Understanding folio layout in Stayflexi


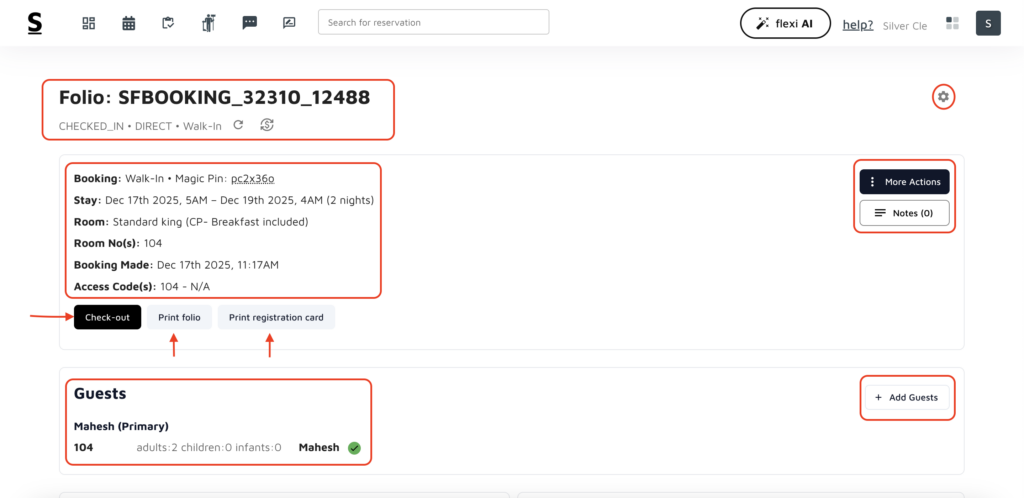
At the top-left (LHS) of the folio page, you will see:
- Booking ID – the unique identifier for the reservation
- Guest status – indicates whether the booking is Confirmed or Checked-in
- Booking segment and sub-segment – helps identify the booking type and source
Next to these details, you will find:
- Refresh icon – refreshes folio data after any changes are made
- Currency conversion icon – allows you to view folio amounts in a different currency
On the top-right (RHS) of the same line:
- Configuration (settings) icon – used to configure folio-related settings and layout
Directly below the Booking ID, you will see a summary box that contains:
- Booking ID
- Stay details (check-in & check-out date/time and number of nights)
- Room name and rate plan
- Room number(s) assigned
- Booking made date and time
- Access code(s) (if applicable)
Within the same booking summary box, you can perform the following actions:
- Check-in / Check-out the guest
- Print Folio for billing or records
- Print Registration Card for guest documentation
On the right-hand side (RHS) of this box, you’ll also find:
- More Actions – for additional booking-level operations
- Notes – to add internal notes related to the booking
Below the booking information box, there is a Guest Details section that displays:
- Primary guest name
- Number of guests
- Breakdown of adults, children, and infants
In the Guest Details section:
- Click the “+ Add Guests” option on the right-hand side to add additional guests to the booking.

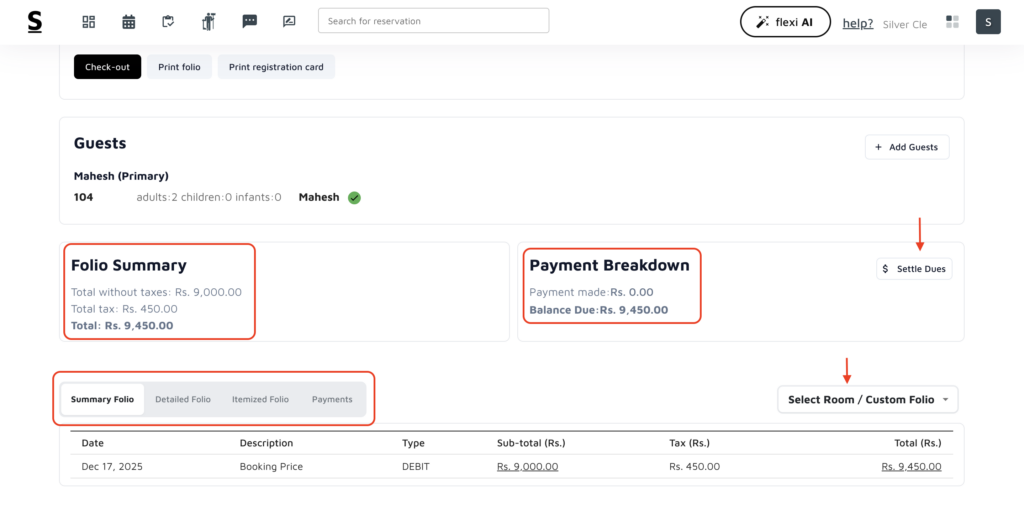
Below the Guest Details section, you will find the Folio Summary box.
This section provides:
- A summarized view of all charges applied to the booking
- A quick overview of the total amount for the stay
It helps front-desk staff quickly understand the guest’s billing at a glance.
Next to the Folio Summary box, you will see the Payment Breakdown section.
This section displays:
- Payments already received
- Outstanding balance
- A clear split of amounts paid vs. pending
This makes it easy to track financial status without scrolling through line items.
On the right-hand side (RHS) of the folio page, you will find the Settle Dues column.
Using this section, you can:
- Settle outstanding balances
- Choose the mode of payment (cash, card, UPI, etc., based on configuration)
- Complete payment directly from the folio page
This allows quick and seamless payment settlement during check-out or mid-stay.
At the end of the folio page, Stayflexi provides four folio view options:
- Summary Folio – a high-level view of charges and totals
- Detailed Folio – includes detailed breakdowns of charges
- Itemized Folio – displays individual line items
- Payments – shows all payment-related transactions
You can click on any of these options to switch views instantly.
On the right-hand side of the folio view section, you’ll find the Room / Custom Folio selector.
This option allows you to:
- Switch between room-level folios
- View or manage custom folios created for the booking
This is especially useful for:
- Multi-room bookings
- Split billing scenarios
- Customized guest invoices


