Stayflexi can give you more direct bookings from Google. Contact your CSM today!
Docly Documentation
Dashboard
Welcome to Stayflexi’s Dashboard, the ultimate tool for modern hotel management! In this video, we showcase how our comprehensive dashboard simplifies and automates hotel operations, boosting efficiency and revenue. From property management to guest services, explore how Stayflexi’s all-in-one platform can transform your hospitality business. Whether you’re managing a boutique hotel or a large chain, discover the power of automation with Stayflexi. Don’t forget to like, subscribe, and click the bell icon for more updates on innovative hospitality solutions!
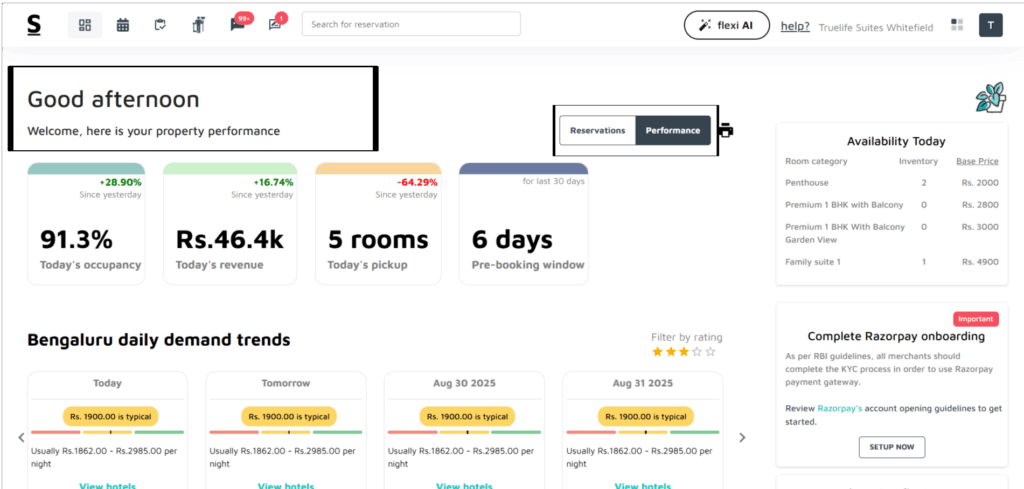
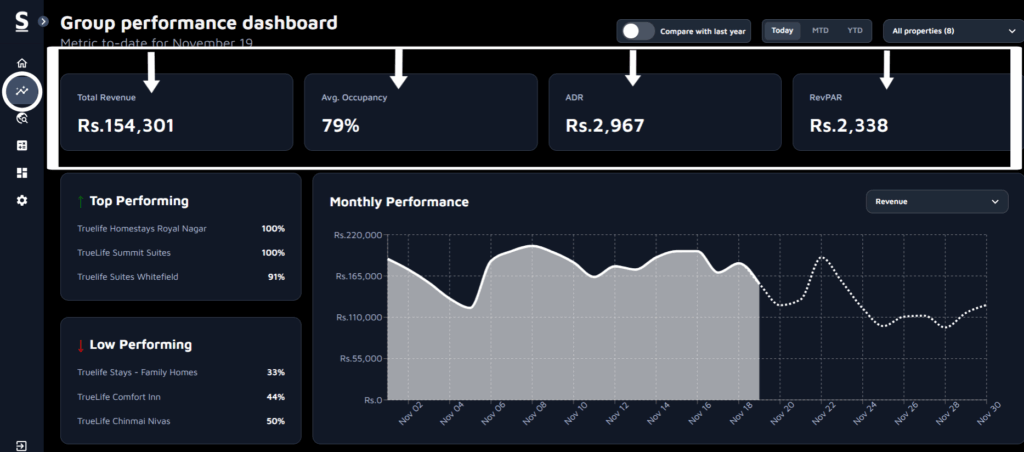
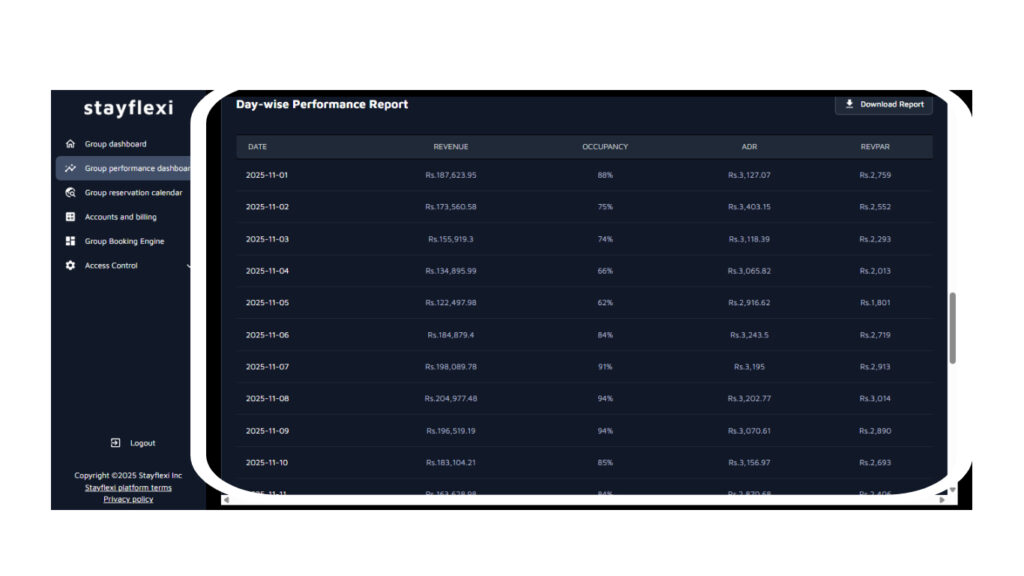
The Performance section is the core of your property operations. It provides a comprehensive snapshot of your hotel’s overall performance in a single view.
The image below illustrates the layout and key metrics displayed on the performance page, giving you a clear understanding of how it looks and functions.
Welcome Message: At the top, you will see a personalized welcome message such as “Good afternoon”, which indicates that the data is updated in real-time.
Navigation Menu: Right next to the greeting, two tabs let you switch between sections like Reservations and Performance.
Print Option: Next to the Performance tab, there is a black icon that represents the print option. By clicking on this icon, you can download the entire performance report in PDF format.
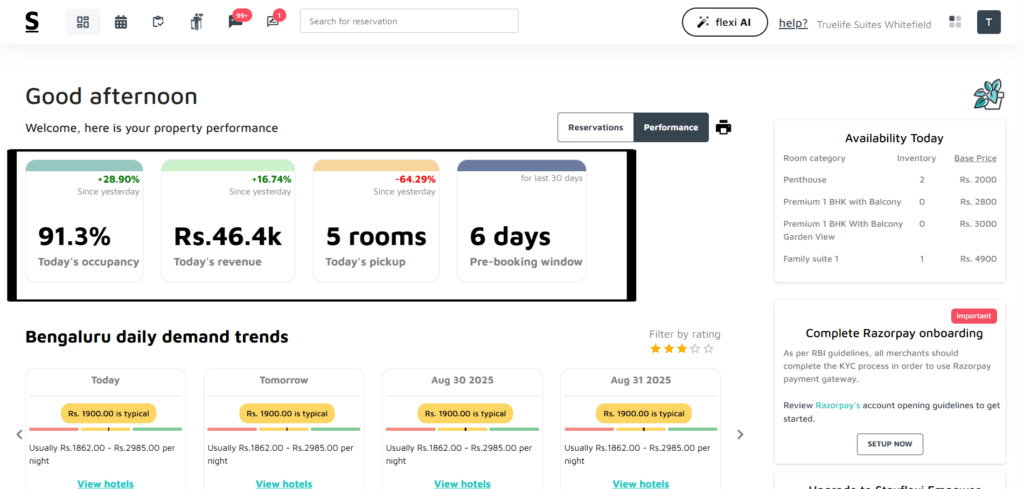
Under the greeting, tabs, and print options, you will find the key metrics of your hotel. Below is a quick summary of the metrics you will come across.
Occupancy Rates: This metric shows the percentage of available rooms that are occupied within a certain period, providing a clear measure of how well your property is being utilized. You’ll also see the percentage for yesterday’s occupancy, giving you a quick comparison to help assess daily growth and trends.
Today’s Revenue: This metric shows the total income generated by the room bookings and other services for current day, offering a snapshot of your property’s financial performance in real-time. It also shows yesterday’s revenue percentage, helping you stay alert to any changes in your property’s financial performance.
Today’s pickup: This metric represents the number of new bookings made today, helping you track the day’s demand and booking activity at a glance. It also shows yesterday’s pickup percentage for a quick comparison, allowing you to evaluate booking trends and performance.
Pre-booking Window: This metric indicates how far in advance guests are booking their stays for your property, helping you identify trends in reservation timing and plan your marketing strategies accordingly. This data reflects the last 30 days.
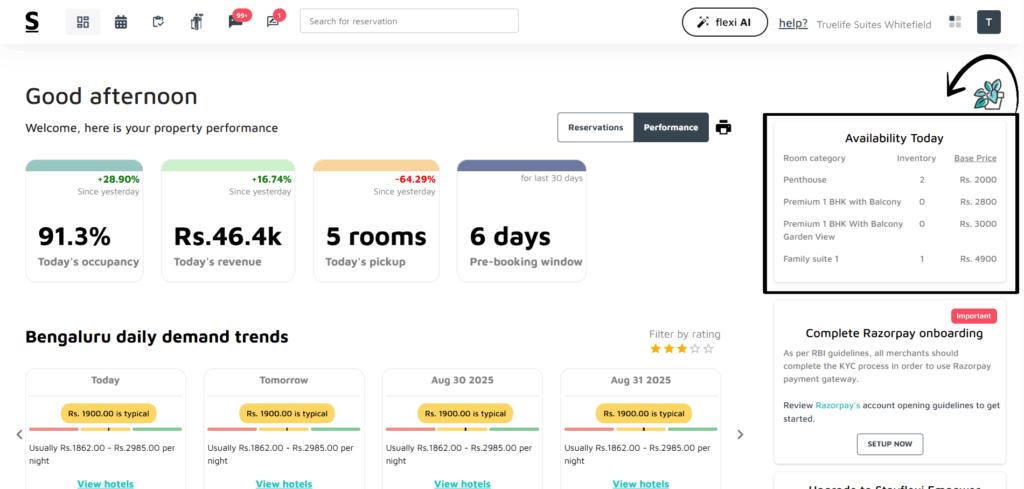
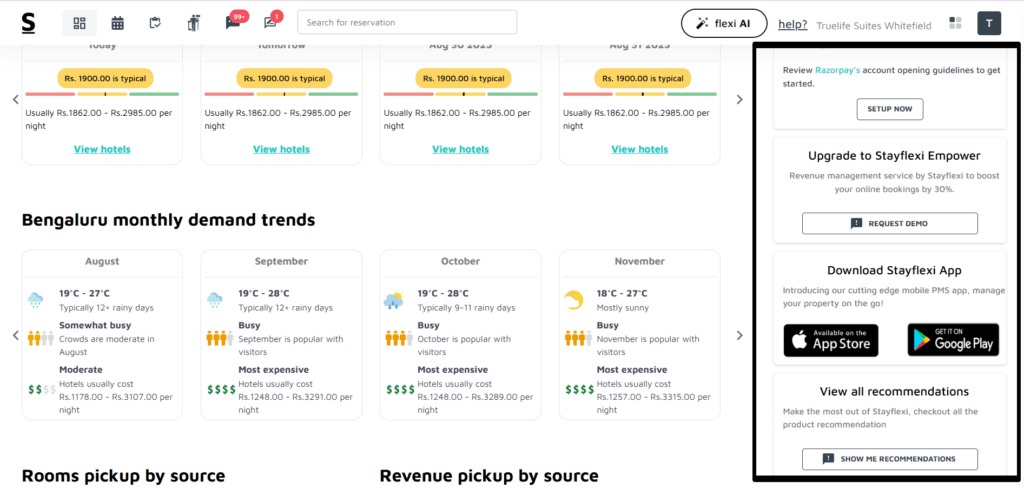
On the right side of the screen, you will find the “Availability Today“. This box provides a quick view of room availability for the current day, including details on room types and base prices. It allows you to quickly respond to guest inquiries regarding room availability.
Usage Tip: Regularly check this box throughout the day to stay updated on room availability.
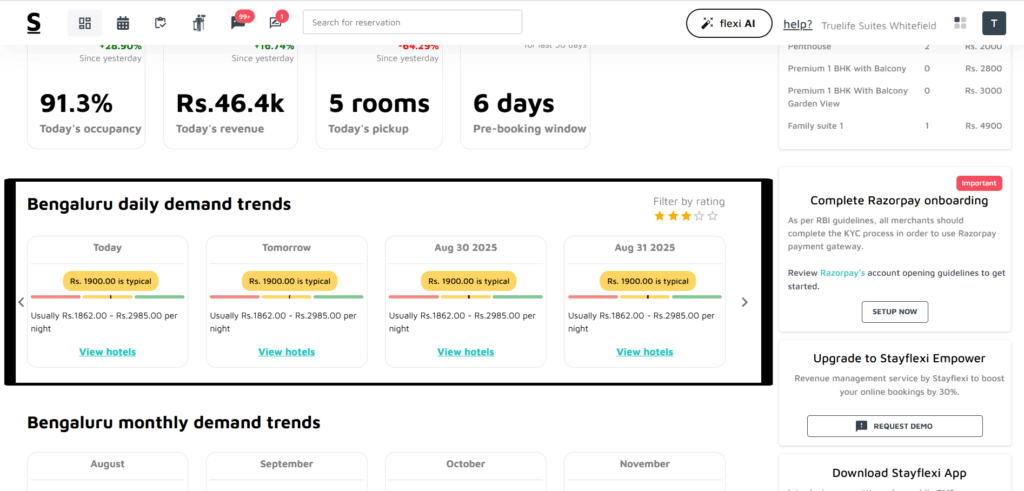
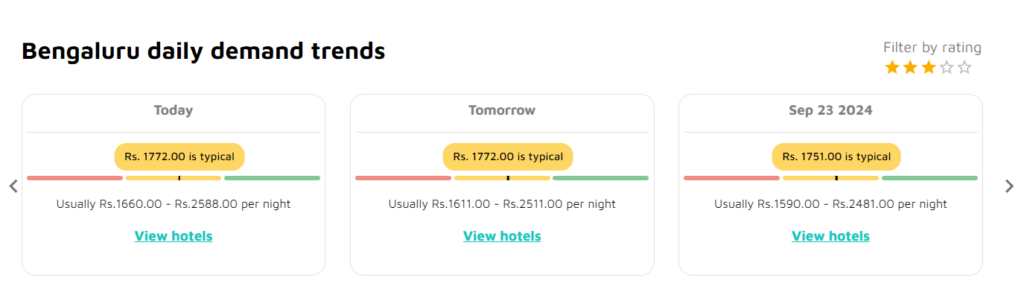
Below the key metrics, you can find the City Daily Demand Trends section, one of the best and unique features of Stayflexi. This feature provides insights into daily booking trends in your city or locality, helping you understand how demand varies from day to day. This feature makes it easy to identify busy and slow days.
Additionally, this feature offers the option to view nearby hotel data. With a simple click, you can see the prices of nearby hotels, allowing you to stay competitive in your pricing strategy.
By analyzing these trends, you can adjust pricing and marketing strategies, ultimately enhancing your property’s occupancy and revenue.
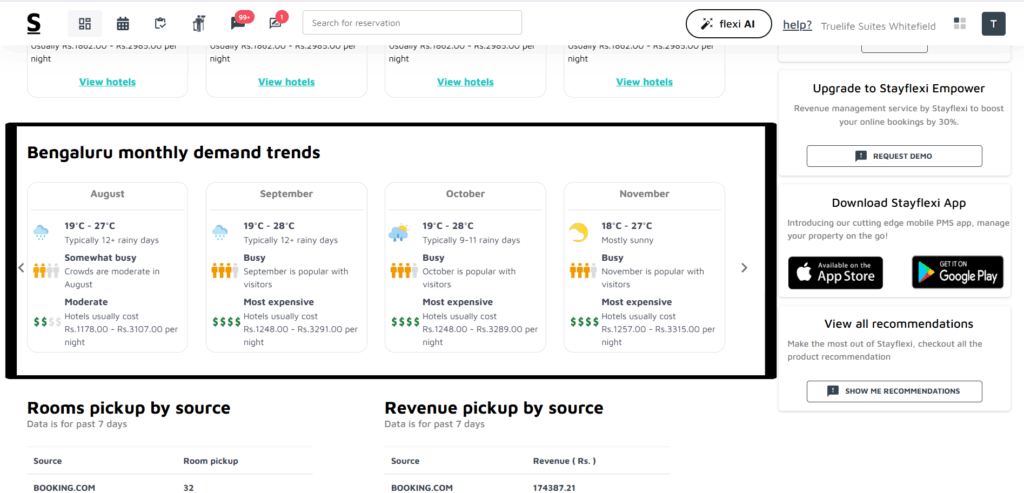
Just below the daily demand trends, the Monthly Demand Trends offer a broader view, highlighting key insights for each month.
Stayflexi’s City Monthly Demand Trends: Your Secret Weapon for Maximizing Bookings!
A tool with a snapshot of Monthly Demand Trends, so you maximize your revenue. Here’s how it works:
Month Overview: You can get a clear, month-by-month breakdown of expected demand and pricing, all in one glance.
Weather Insights: You will know what to expect with weather details, including monthly temperature ranges because knowing the weather helps you understand guest behavior!
Demand Highlights: From peak seasons to off-seasons, Stayflexi gives you all the key insights. Easily identify peak seasons, busy, or moderate periods, allowing you to strategize your marketing and pricing efforts.
Pricing Overview: This shows the average hotel prices for the month using dollar signs [$] to indicate cost.
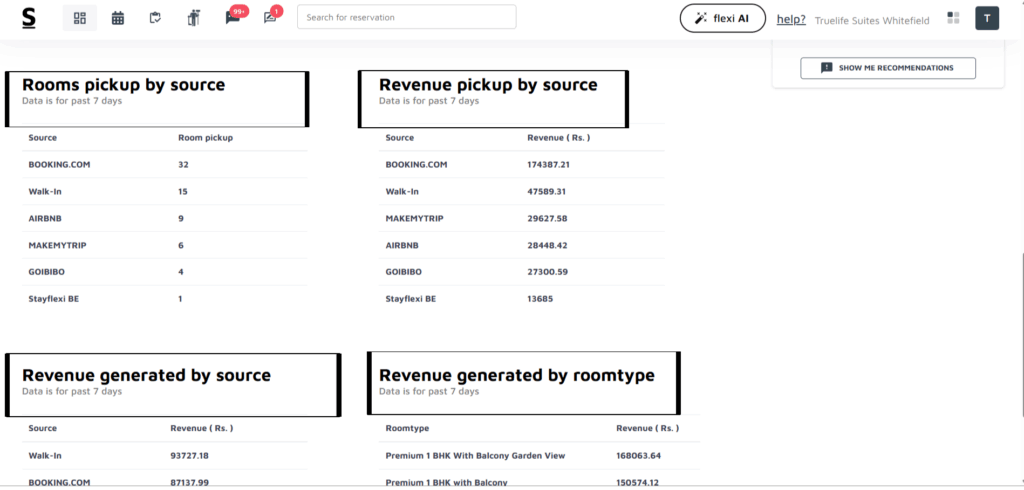
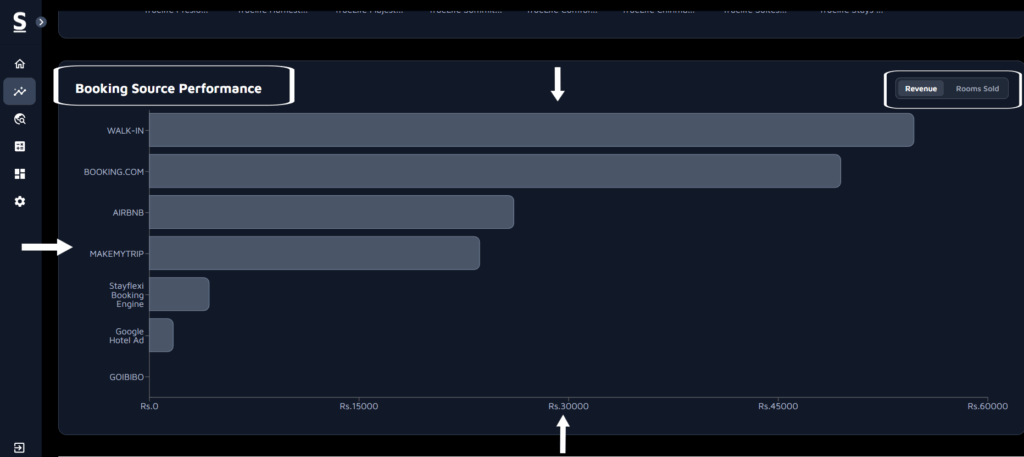
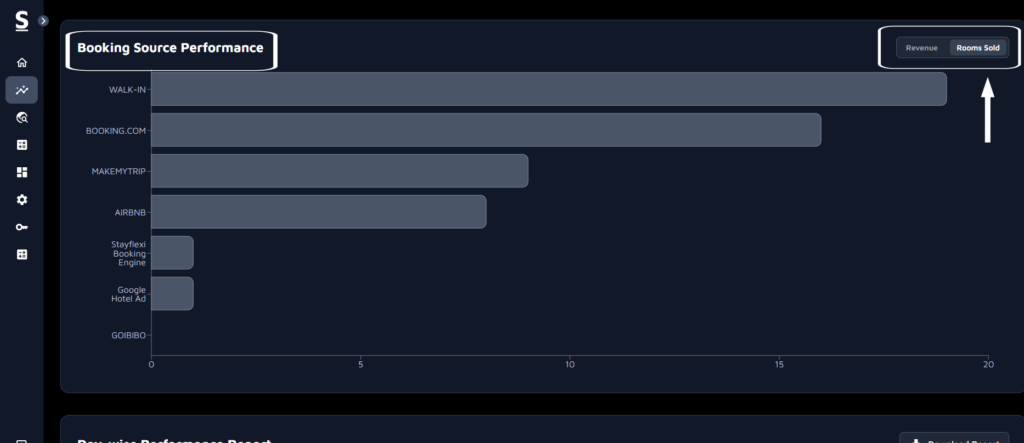
Stayflexi provides a bird’s eye view of essential data related to Room pickups and Revenue generated from various sources. This feature allows you to quickly understand which channels are performing best and where your revenue is coming from.
Below is an explanation of the Pickup and Revenue by Source feature:
Room Pickup by Source: It shows the number of room pickups from various sources over the last 7 days.
Revenue Pickup by Source: It shows the revenue generated from each source over the 7 days.
Revenue Generated by Source and Room Type: These sections provide data on revenue by specific sources and room types.
Recommendations Section: On the right side of the page, you will find a dedicated area for all the recommendations from Stayflexi. This section provides updates and suggestions, helping you optimize your usage of the platform.
What is city demand trends in Stayflexi?
Stayflexi offers a unique feature called City Demand Trends, which provides valuable insights into booking activity across different cities. These trends help property managers understand their local market demand, allowing them to adjust room pricing and availability accordingly.
We have categorized the trends into Daily Demand Trends and Monthly Demand Trends for easier analysis and understanding.
The Daily Demand Trends feature in Stayflexi provides an overview of how room demand fluctuates daily. By selecting a desired date, you can view a graph that shows trends for the entire week, making it easy to identify peak and low-demand days.
Additionally, you can compare your property’s pricing with nearby hotels, seeing at what price they are selling their rooms. This allows you to make data-driven adjustments to your pricing strategy for better competitiveness.
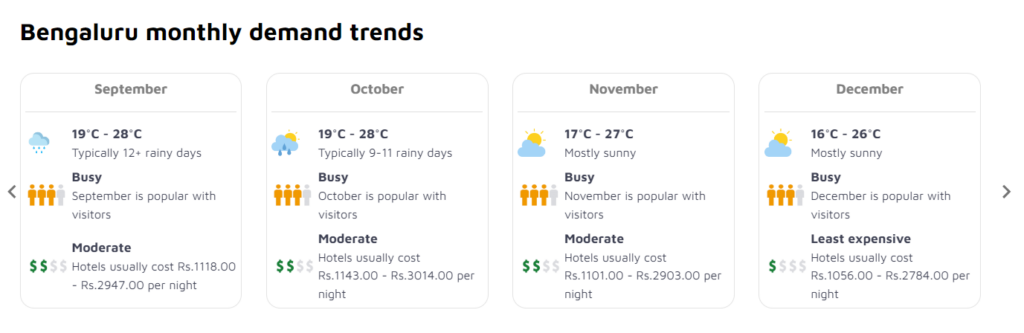
The Monthly Demand Trends feature provides a broader understanding of room demand over a month. You can see which months attract more visitors and which have less traffic. Additionally, it shows weather conditions for each month and indicates price ranges such as whether rates are moderate, least expensive, or expensive.
This feature acts as a predictive tool, enabling you to stay proactive about your property’s performance throughout the year.
Example: As you can see in the above picture, it shows the Bengaluru Monthly Demand Trends.
For October, it’s a busy month with some rainy days, and hotel prices are in the moderate range. Since demand is high, you can increase prices slightly or offer packages to attract more guests.
For December, it’s mostly sunny and still busy, but prices drop to the least expensive range. Offering discounts or special holiday deals can help you attract more guests despite the lower pricing trends.
By analyzing these trends, you can adjust your pricing strategy accordingly, ensuring you’re making the most out of busy months while staying competitive. This allows you to maximize both occupancy and revenue effectively.
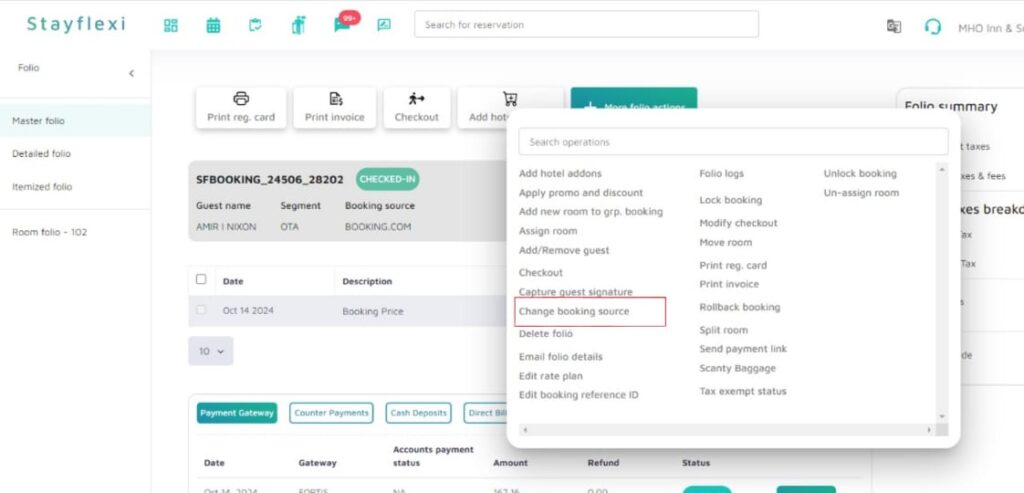
Understanding the reservations section in dashboard.
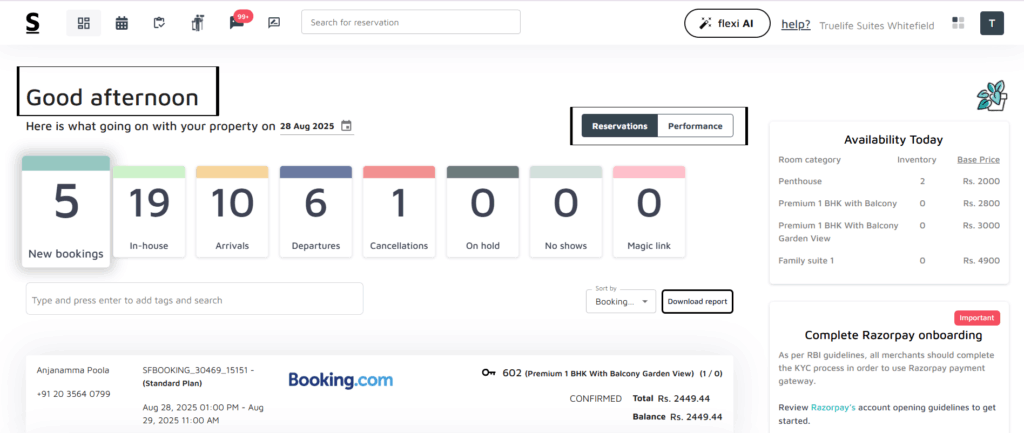
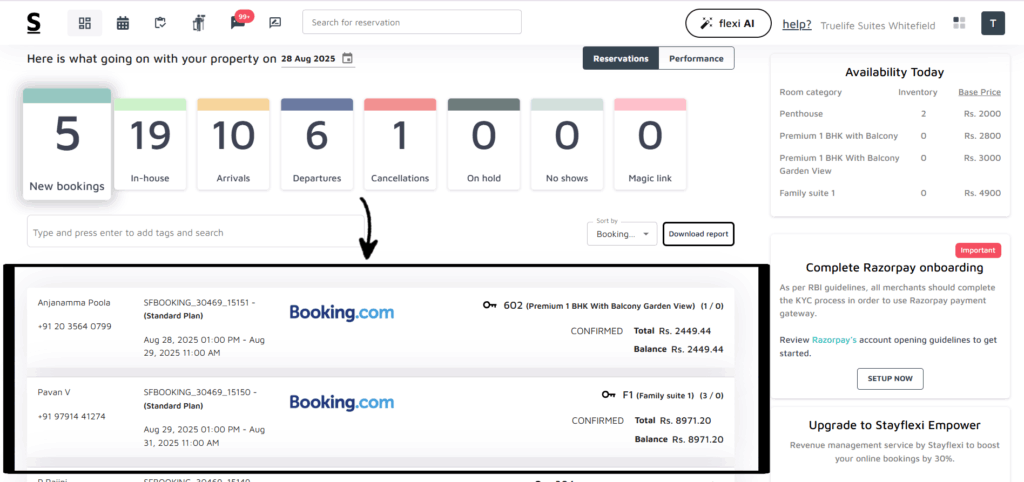
The Reservation Section in Stayflexi offers an all-in-one glance at the status of your property for the day. It is designed to provide key information about your reservations in a single, consolidated view, helping you quickly understand and manage your property’s bookings.
The image below illustrates the Layout of the Reservations page, giving you a clear understanding of how it looks and functions:
Welcome Message: At the top, you will see a personalized welcome message such as “Good afternoon”, which indicates that the data is updated in real-time.
Navigation Menu: Right next to the greeting, two tabs let you switch between sections like Reservations and Performance.
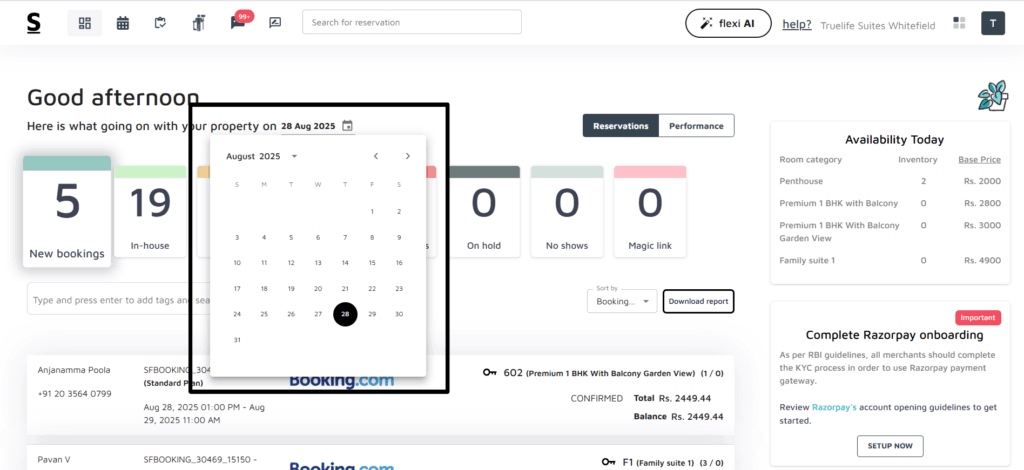
Next to the date, you will find a Calendar icon. Clicking on this icon allows you to toggle between past, present, and future bookings, making it easy to view reservations across different periods. With just one click, you can access the information about your property’s booking history, current occupancy, or upcoming reservations.
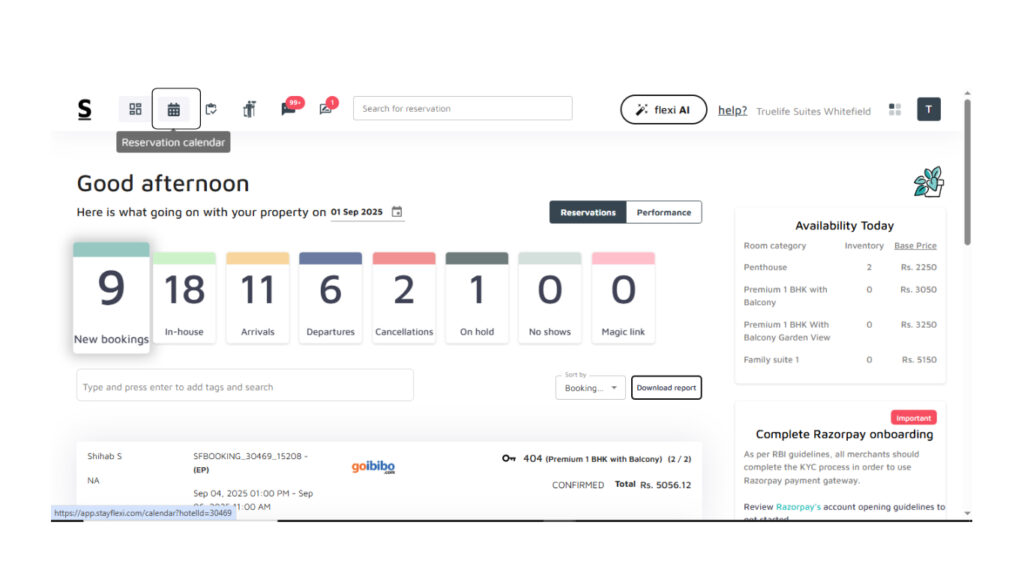
Reservation Overview: This section presents several tiles, each representing a key metric for the day. These tiles allow property managers to gauge the day’s activities quickly. The tiles include:
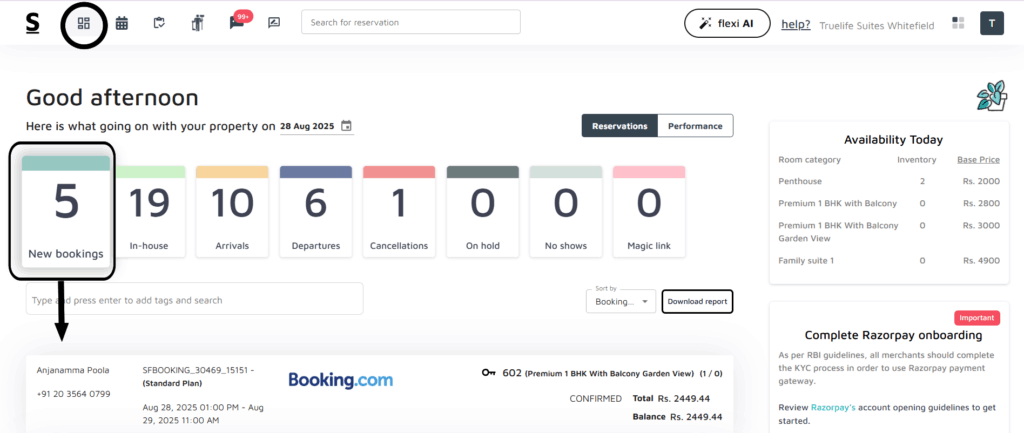
New bookings—These are all the reservations that happened today, in other words, these are room sales that occurred today. Reservations can be of current date or future date.
In-house – All the reservations are in check-in status, and the guests are staying currently on the property.
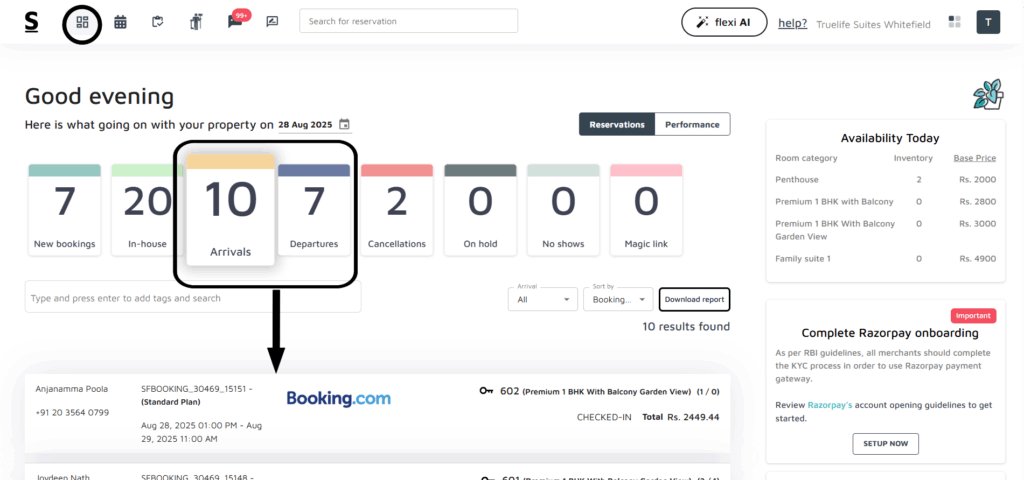
Arrivals – The guests who are scheduled to check in or arrived today.
Departures – The guest who are scheduled to check out today.
Cancellations – The reservations that the guests have canceled.
On hold—Reservations that have not yet been finalized and may require further steps before they are confirmed or canceled.
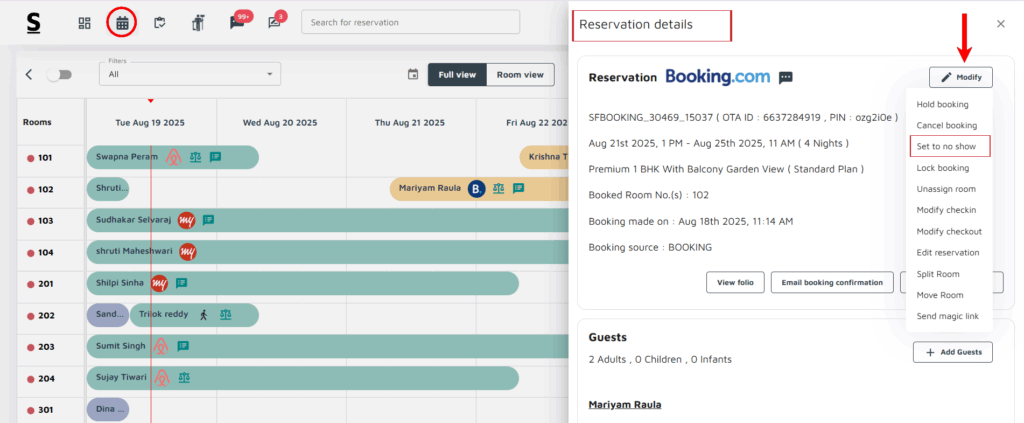
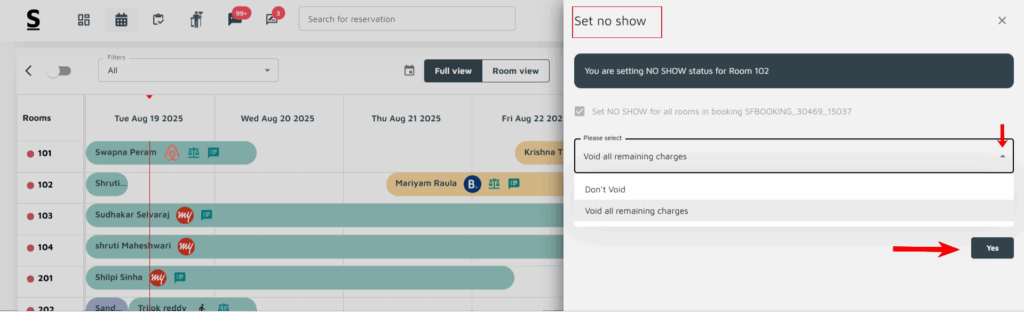
No-show – Indicates reservations where the guest did not arrive on the check-in date and staff had marked them manually No- show.
Magic link – It is a unique feature that sends a URL to the guest via email, whatsapp or SMS allowing them to perform specific actions such as self-check-in,request for early check-in and late check-out as well as access add-ons.
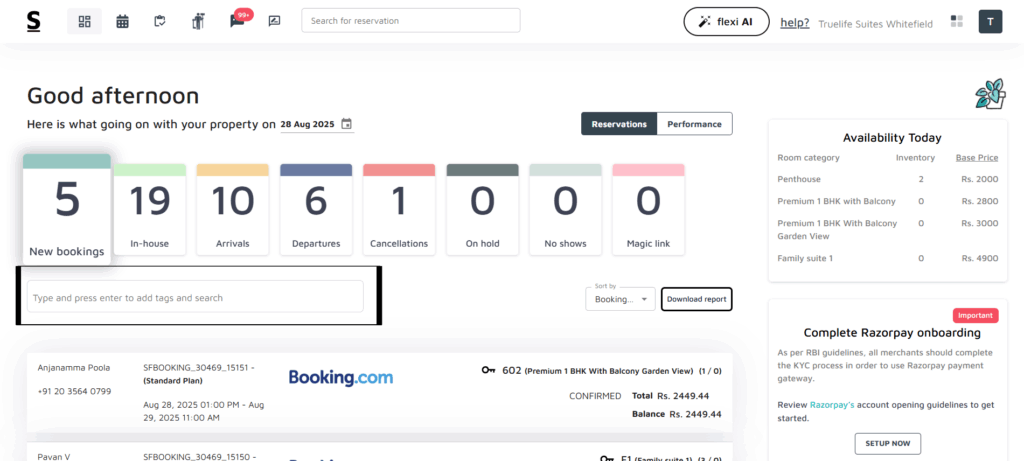
Search Bar: Located directly below the Tiles, the search bar allows you to quickly find specific bookings to organize better and manage reservations. Simply type in a guest name, phone number or stayflexi booking number starting with SFBOOKING_XXXXX_54321 or last 5 digit unique number i.e 54321, to instantly locate the reservation you’re looking for. This search bar makes it effortless to manage a large volume of bookings and find specific booking details at a moment’s notice.
Detailed Booking Information: Below the tiles and search bar, individual bookings details are listed, including:
Guest Name
Booking Source [e.g., OTA channel icon or walk-in symbol]
Room id along with the Room type
Check-in and Check-out dates
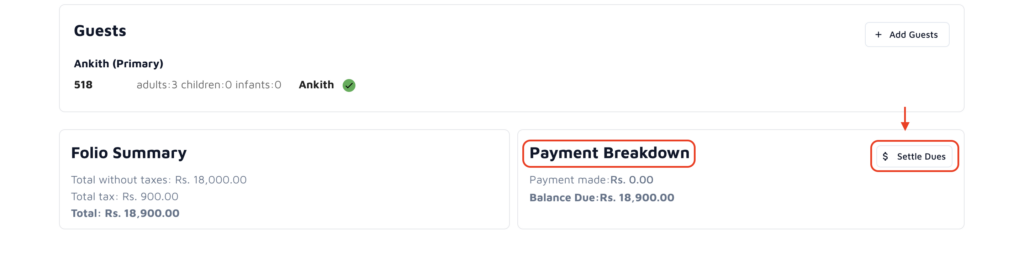
Payment status: Total and balance due.
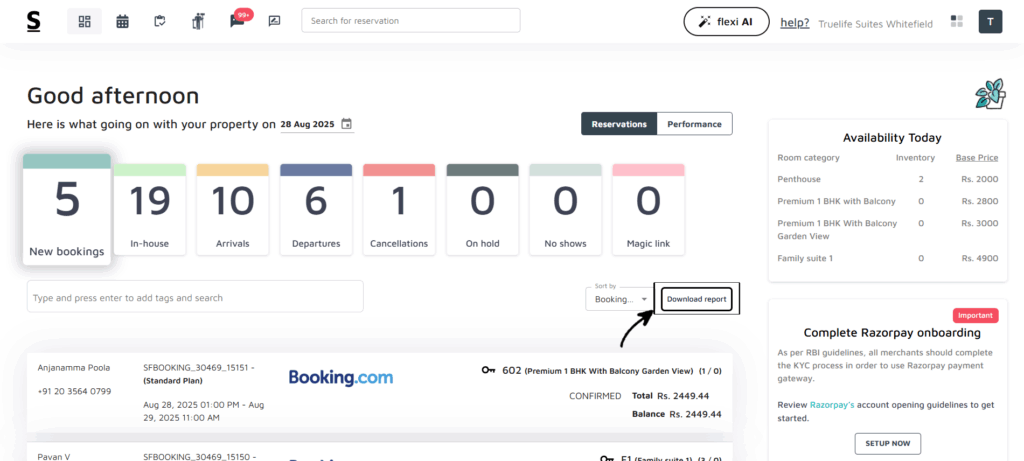
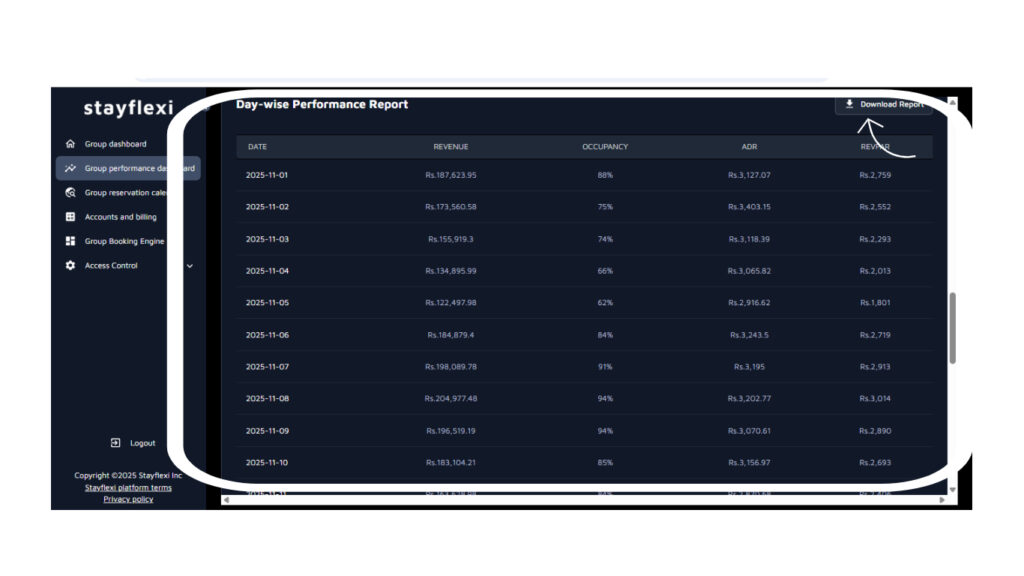
Next to the Search bar, there’s a Download Report button. By clicking on this option, you can download a detailed report of the day’s reservations. This feature allows you to export the data for further analysis or record-keeping.
Sort and Search Feature: Stayflexi allows you to sort the displayed bookings by different criteria, such as guest name, check-in, check-out, etc. Sorting makes it easier to organize your view based on your needs.
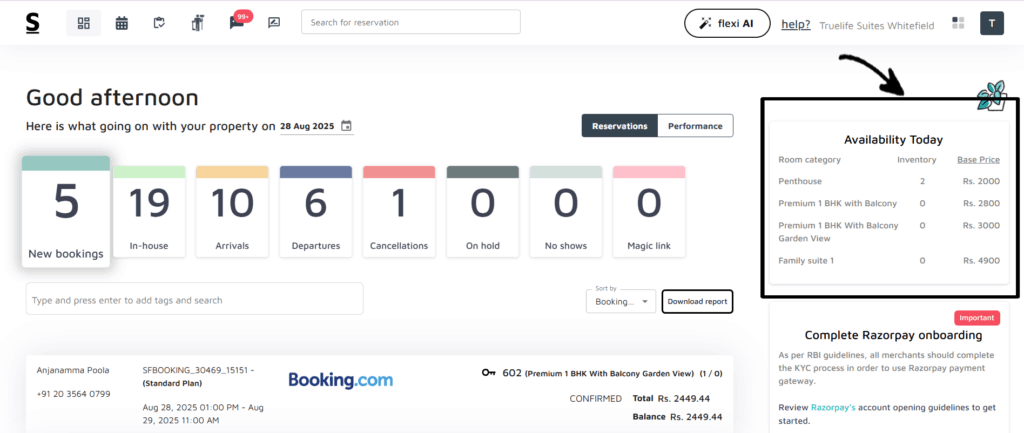
On the right side of the screen, you will find the “Availability Today“. This box provides a quick view of room availability for the current day, including details on room types and base prices. It allows you to quickly respond to guest enquiries regarding room availability and base price.
Usage Tip: Regularly check this box throughout the day to stay updated on room availability.
Recommendations Section: On the right side of the page, you will find a dedicated area for all the recommendations from Stayflexi. This section provides updates and suggestions, helping you optimize your usage of the platform.
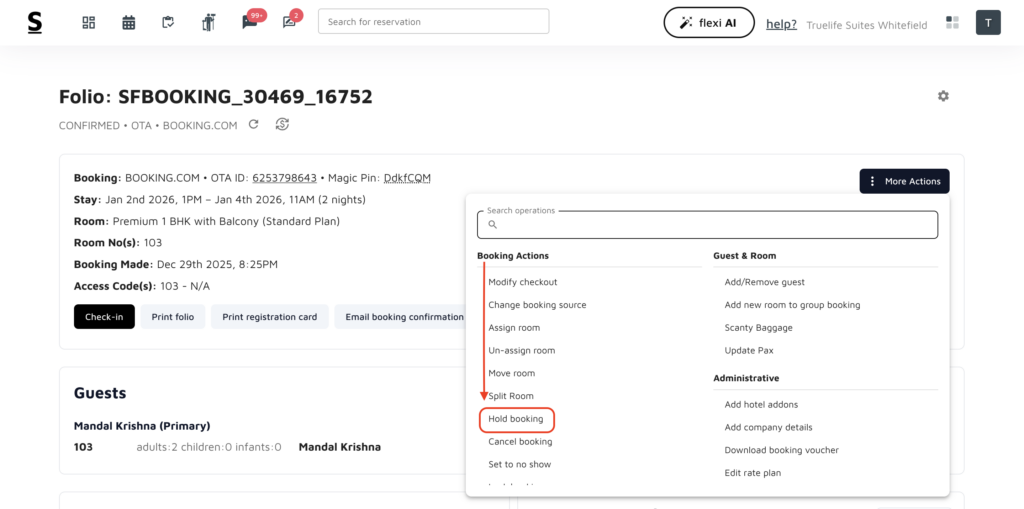
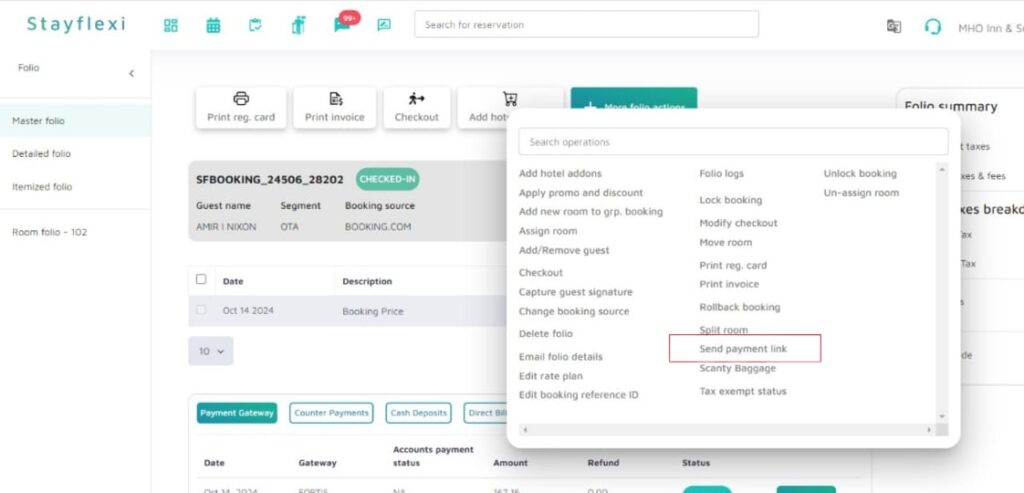
What is send magic link in dashboard?
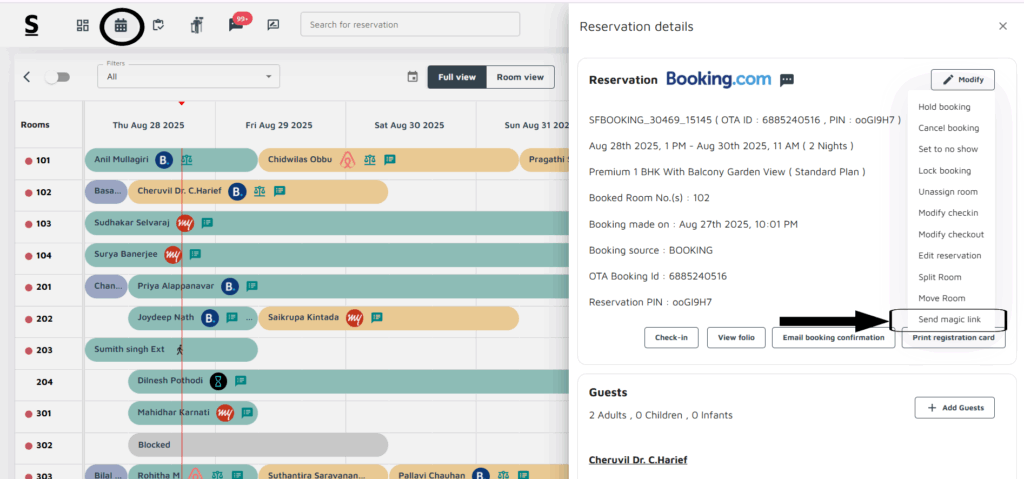
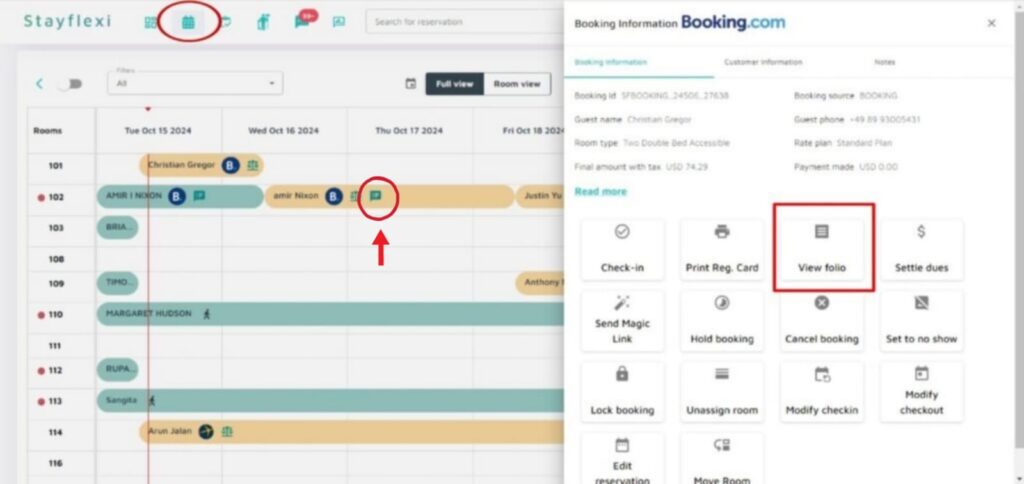
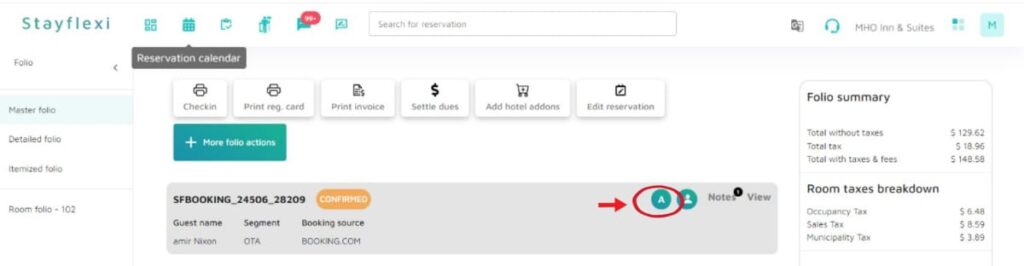
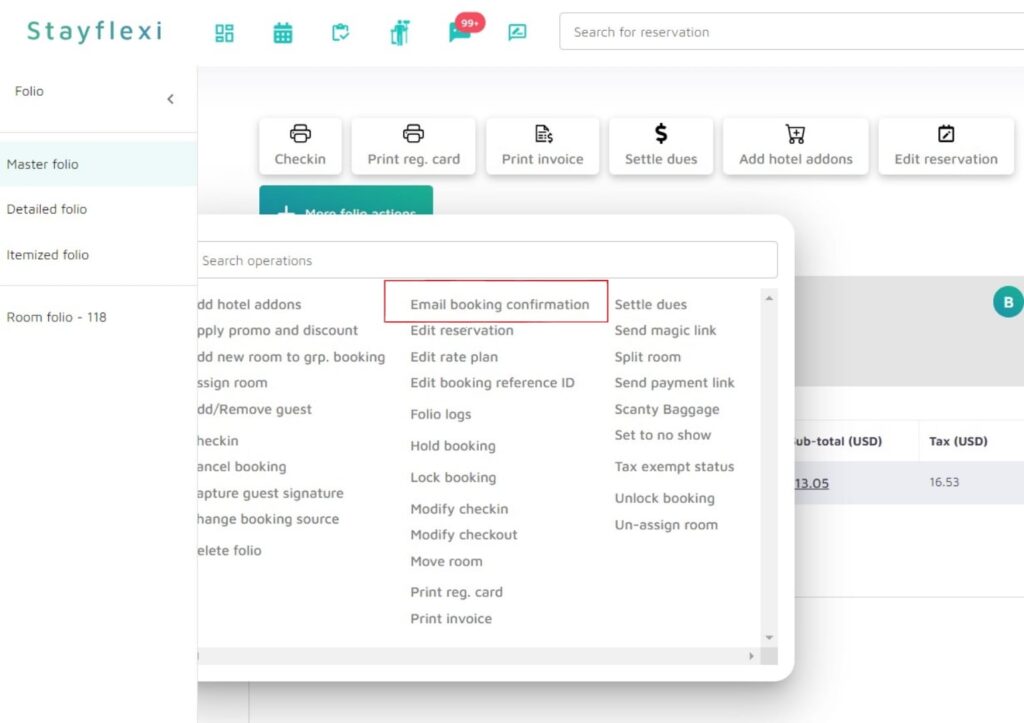
Stayflexi has introduced a new and unique feature, The Magic Link. The image below provides a clear guide on how to locate the Send Magic Link.
The Send Magic Link feature in Stayflexi allows hotel staff to send guests a secure, personalized link that grants them access to their booking details without needing a password. With this link, the guests can easily manage their reservations, check in, or complete payments. This feature enhances convenience and saves time for both hotel staff and guests.
Some key highlights of this feature include :
Convenience: Guests can access their reservation instantly, with just one click.
Security: Each link is unique and exclusively accessible by the authorized recipient.
Efficiency: It simplifies the check in process and various booking-related tasks.
No Password Needed: Guests don’t have to worry about remembering login credentials.
How to Use the “Send Magic Link” Feature
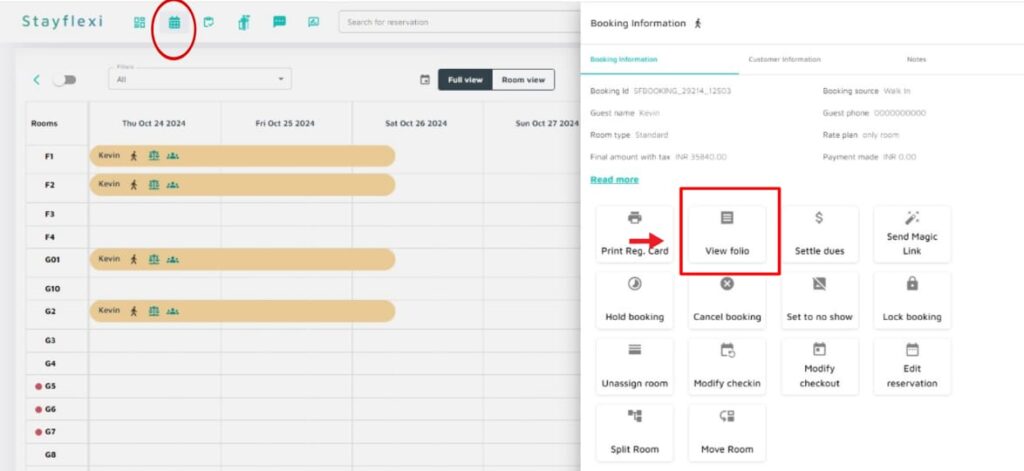
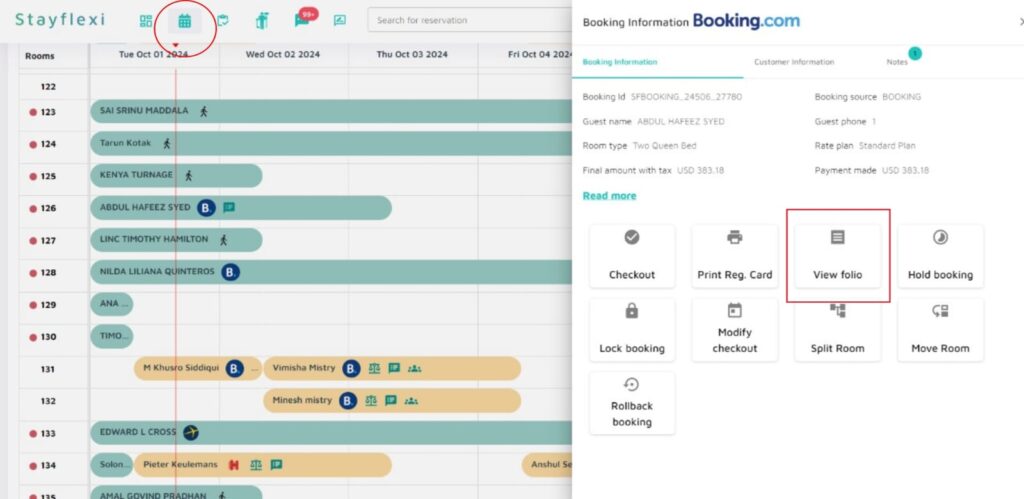
Open the Reservation Calendar: Navigate to the Stayflexi dashboard and open the reservation calendar where you can see the current bookings.
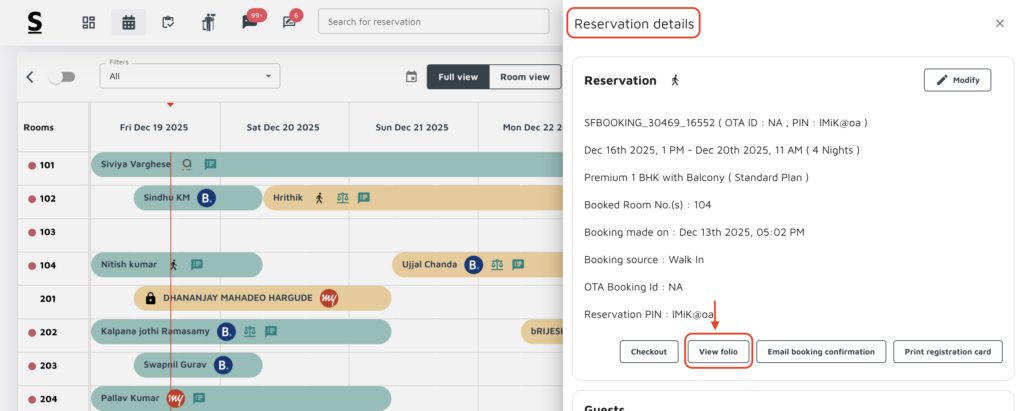
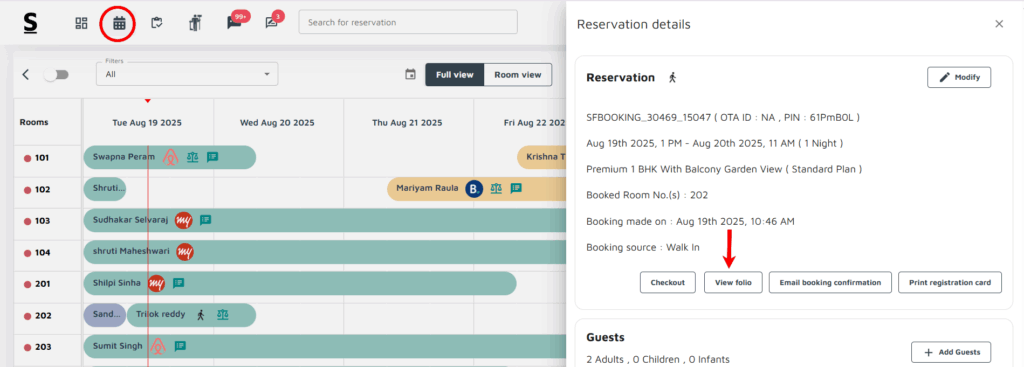
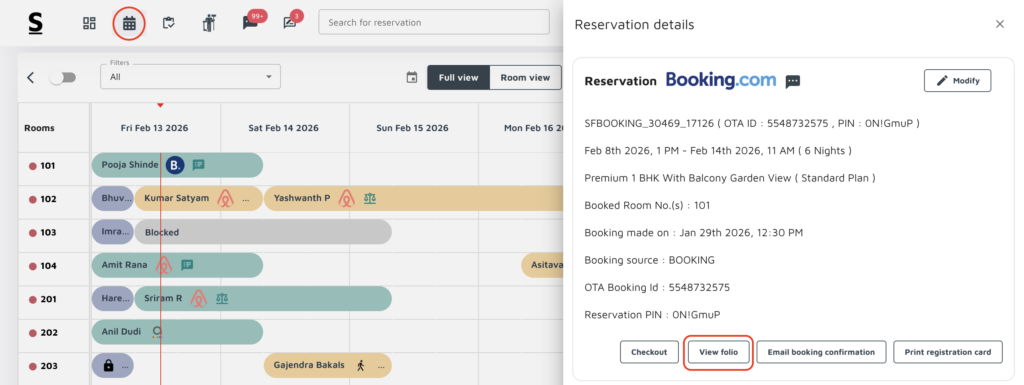
Select a Reservation: Click on the specific booking for which you want to spend the Magic Link. This opens a detailed booking view on the right side of the screen.
Locate the Send Magic Link: In the booking information section, find the “Send Magic Link” button.
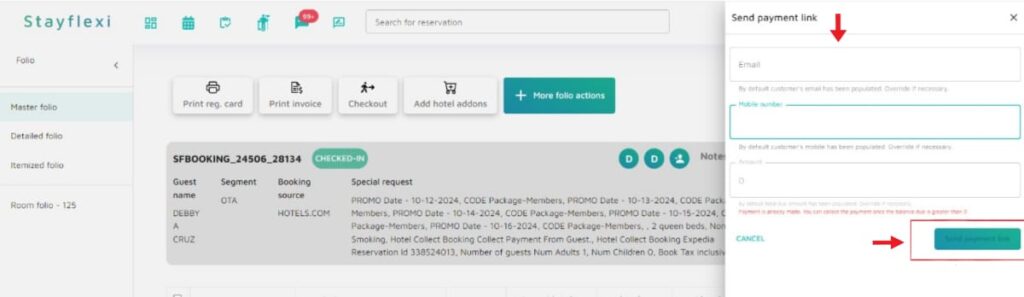
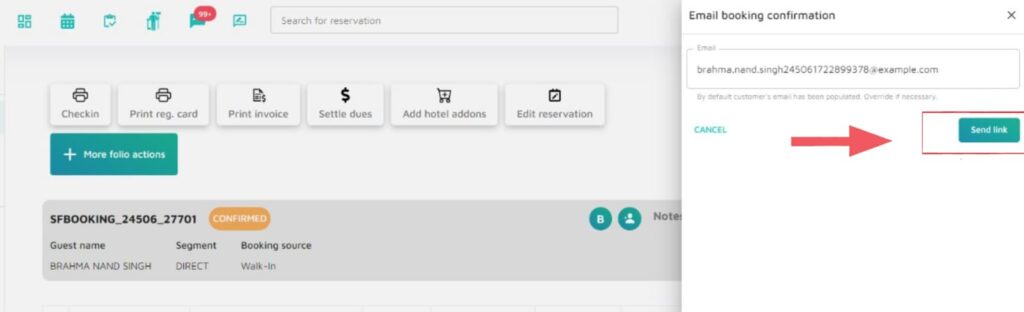
Click on Send Magic Link: Click the “Send Magic Link” button. The system will immediately send a secure link to the guest via their email or phone number registered with the booking.
Guest Received the Magic Link via WhatsApp/email: The guest will receive a link via WhatsApp or email and can click it to view their booking details, check-in status, or payment options without entering login credentials.
Confirmation: After sending the link, you’ll receive a notification on the screen, confirming that the link was successfully sent.
The image below provides a visual representation of the Magic Link for your reference.
How to check new reservations?
To check new reservations in Stayflexi, follow the steps below:
Login: Start by logging into your Stayflexi dashboard using your credentials.
Front Page : You will land on the front page of the dashboard
New Bookings : From the displayed tiles, click on New Bookings.
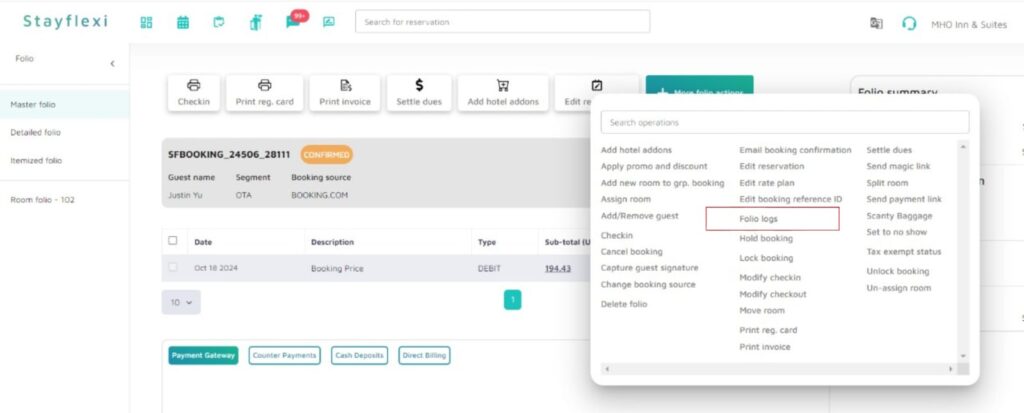
Booking Folio: Under this section, you can find the folio for each new reservation.
Viewing arrivals and departures
Login : Log into your Stayflexi dashboard with your credentials.
Front Page: On the dashboard’s front page, you will see a list of tiles displaying various metrics like New bookings, In-house, Arrivals, Departures, etc.
Arrivals/Departures: click on the Arrivals or Departures tab to view the list of upcoming guest check-ins or expected check-outs.
Booking Details: For each entry, you can click to view more details about the guest and their reservation.
What is pending departure and pending arrival?
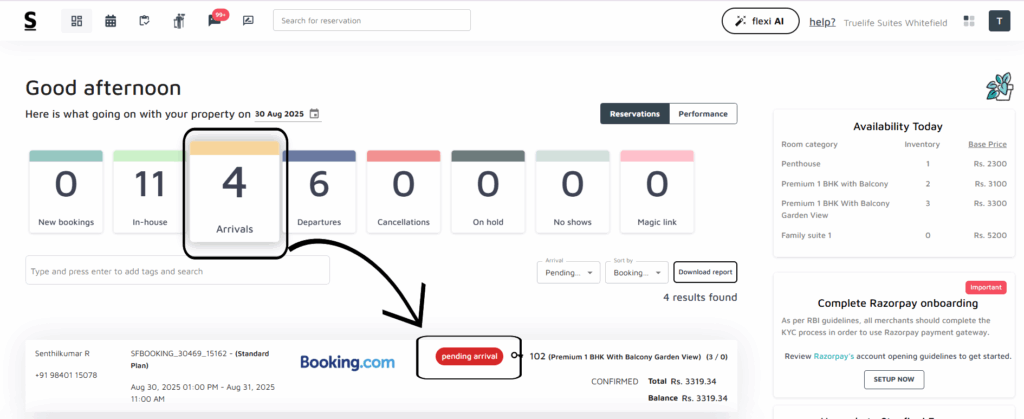
Pending Arrival: This refers to reservations where the guest is expected to arrive but has not yet checked in. These are upcoming bookings that are awaiting the guest’s arrival.
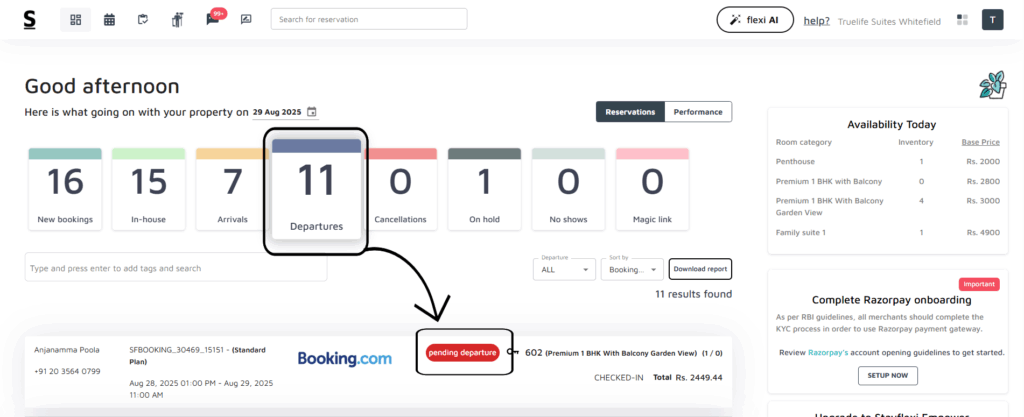
Pending Departures: This refers to reservations where the guest is due to check out but has not yet completed the check-out process. These are active stays that are approaching their scheduled departure date.
Both sections help property managers track the status of reservations and manage arrivals and departures efficiently.
Below are the step-by-step guidelines on how to check pending departures in Stayflexi:
Login : Log into your Stayflexi dashboard with your credentials.
Front Page: On the dashboard’s front page, you will see a list of tiles displaying various metrics like New bookings, In-house, Arrivals, Departures, etc.
Click on the Departure: On the Stayflexi dashboard, locate and click on the “Departures” tile.
View the List of Guests: Below the tile, you will see a list of guests who are scheduled to depart. These are the pending departures.
Below are the step-by-step guidelines on how to check pending Arrivals in Stayflexi:
Login : Log into your Stayflexi dashboard with your credentials.
Front Page: On the dashboard’s front page, you will see a list of tiles displaying various metrics like New bookings, In-house, Arrivals, Departures, etc.
Click on the Arrivals: On the Stayflexi dashboard, locate and click on the “Arrivals” tile.
View the List of Guests: Below the tile, you will see a list of guests who are scheduled to arrive. These are the pending arrivals.
I want to raise a concern or contact my relationship manager via chat, phone, or email. Where can I find the helpline contact information?
Below are the step-by-step guidelines to find the helpline contact information to reach your relationship manager:
Log in: Log in with your credentials, and you’ll be taken to the first page, which is the dashboard.
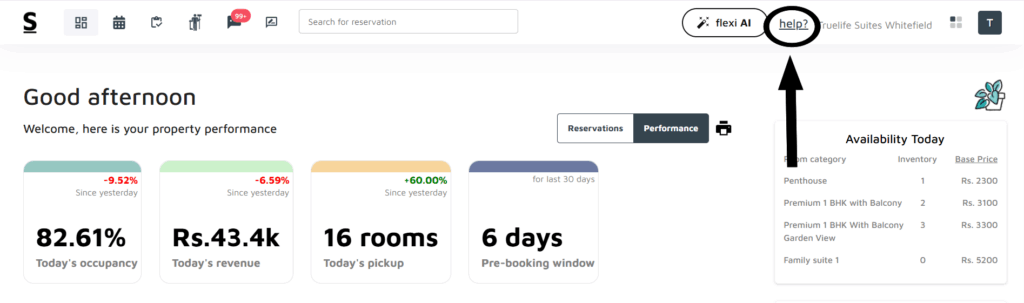
Locate the “help?” option: On the dashboard, located at the top right, find the “help?” option on the right side of the screen. This icon represents the support option.
Click on the Support option: Click on the help? [support] icon.
Support Page Opens: A page will open to the right-hand side.
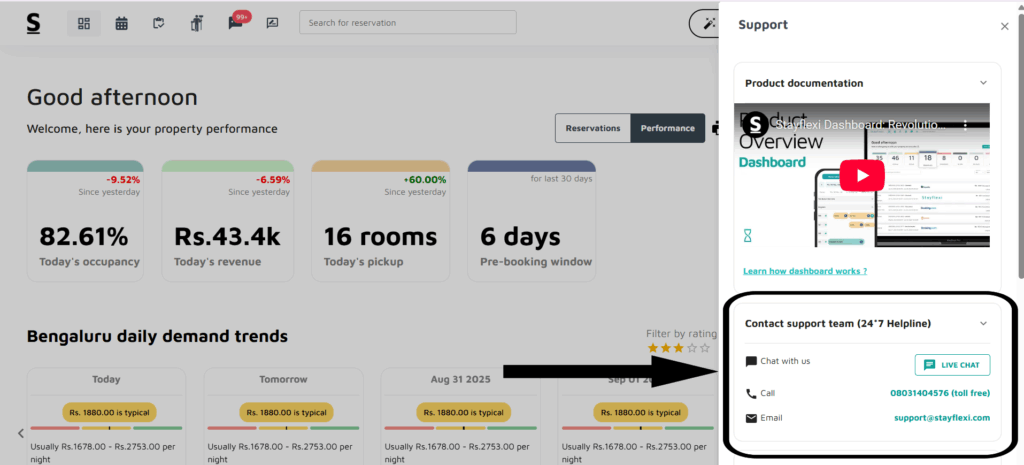
Choose Your Preferred Contact Option :
Live Chat: Start a conversation with the Stayflexi support team directly from the dashboard.
Phone Support: The helpline number for your region will be listed here.
Email Support: You can view the official support email address to send your query.
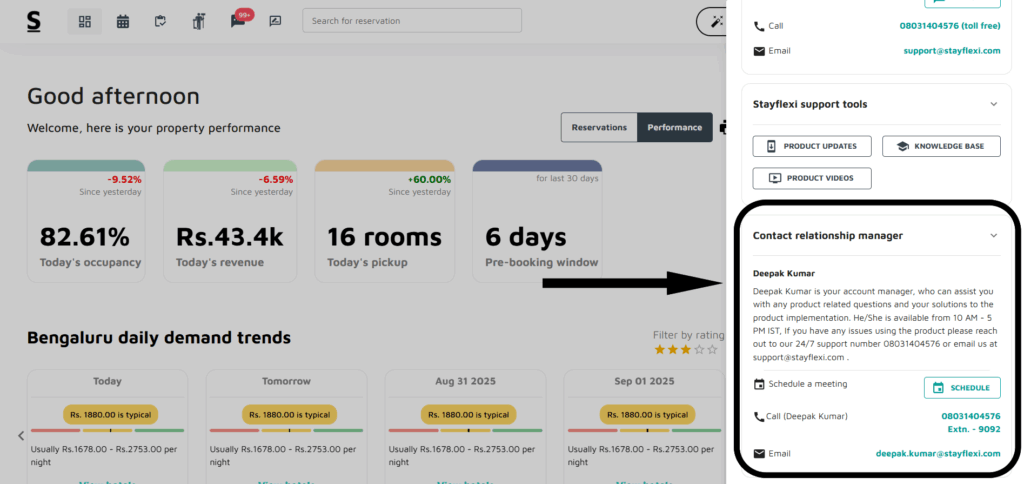
For Relationship Manager Contact
Under the same Help/Support section, you’ll also see the Contact Relationship Manager option with details like name, phone, or email.
How can I view the number of available rooms in each category and the base price from the dashboard?
To view how many rooms are available in each category and what the base price is from the dashboard, follow the below-mentioned steps:
Log in to Stayflexi: Use the provided credentials to log into the Stayflexi dashboard.
View Availability: Once on the opened page, look to the right side of the screen.
Check Availability Today: In this column, you will see the availability for today. Here, you can view:
Room Category Inventory: The number of rooms available in each category.
Base Price: The base price for each room category for the current day.
How it can be useful?
For Example, It’s evening, and a walk-in guest asks for a room. Instead of checking reports, the front desk sees “Available Today: 2 Rooms” on the dashboard and instantly confirms the booking.
Handy because: it saves time, avoids overbooking, and helps staff make quick decisions.
Stayflexi PMS password- How to reset your password
To reset your password in Stayflexi, follow the below steps:
Open the Stayflexi Welcome Page:
Go to the Stayflexi login page.
Enter your Email ID:
In the email field, enter the email ID you use for your Stayflexi login.
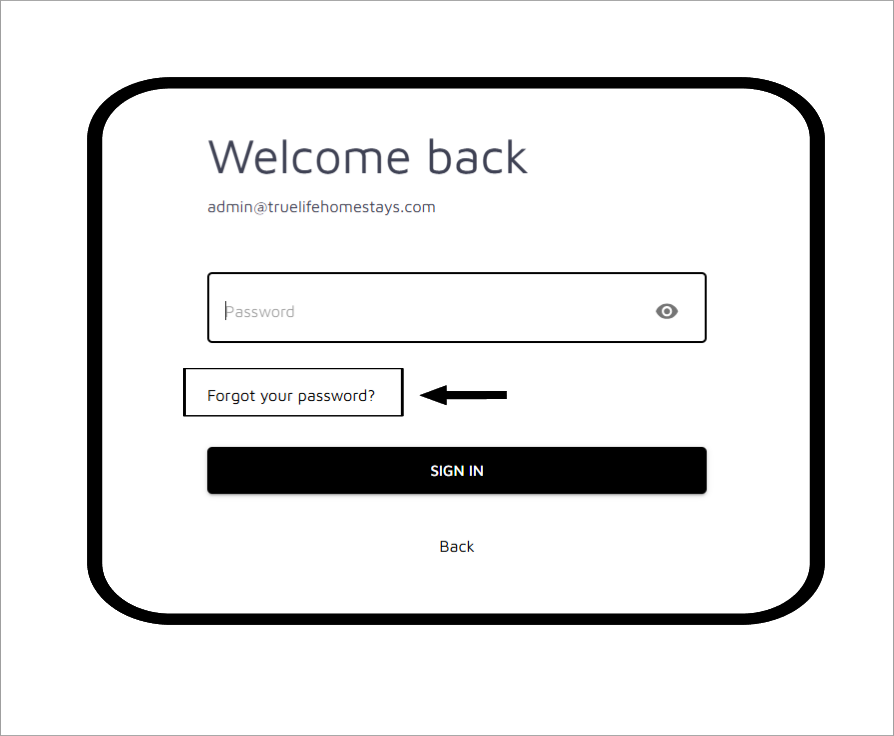
Click on Sign In:
This will take you to a page with the password field.
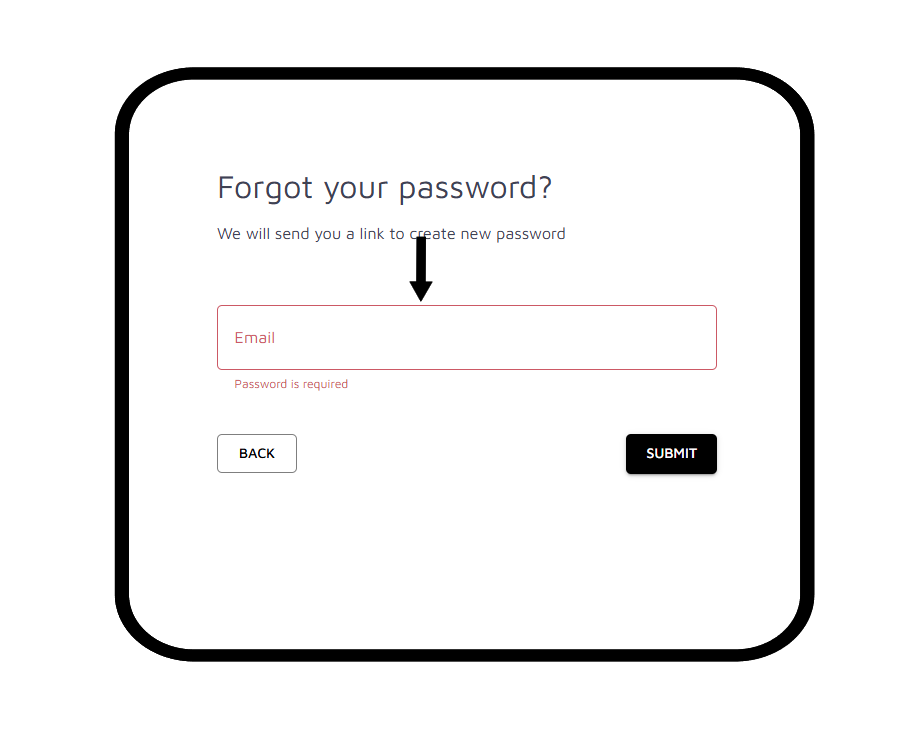
Click on Forgot your Password:
You’ll see a confirmation message saying, “We will send you a link to create a new password”.
Re-enter your Email Id:
Enter the same email id associated with your Stayflexi account.
Click on “Submit”.
This will send a reset link to your email.
Open the Email and Use the Reset Link:
Check your inbox for the reset email. [If you don’t see it, check your Spam or Junk folder.]
Click on the reset link provided in the email.
Create a New Password:
Follow the link to a secure page where you can enter a new password. Choose a new password and confirm the change.
You should be now be able to log in with your new password.
Click on “Submit”:
How to proceed if I can't find the email with reset link?
If you’re a user or sub-user in Stayflexi and can’t find the password reset link, here’s what to do:
Contact the Main Admin:
Only the main admin has access to reset links for users and subusers. Reach out to them, and they can initiate the reset process on your behalf.
Follow Up with Admin:
Once the admin initiate the reset, they’ll provide you with the necessary information to complete the process.
If you don’t see the reset email within a few minutes, check your Spam or Junk folders just in case.
Follow-Up for Additional Assistance:
If you still don’t receive the reset link, or if there’s any issue, ask the main admin to contact Stayflexi support. The support team can help ensure the email is delivered correctly or assist with any technical issues on the account.
Understanding performance section in dashboard
The Performance section is the core of your property operations. It provides a comprehensive snapshot of your hotel’s overall performance in a single view.
The image below illustrates the layout and key metrics displayed on the performance page, giving you a clear understanding of how it looks and functions.
Welcome Message: At the top, you will see a personalized welcome message such as “Good afternoon”, which indicates that the data is updated in real-time.
Navigation Menu: Right next to the greeting, two tabs let you switch between sections like Reservations and Performance.
Print Option: Next to the Performance tab, there is a black icon that represents the print option. By clicking on this icon, you can download the entire performance report in PDF format.
Under the greeting, tabs, and print options, you will find the key metrics of your hotel. Below is a quick summary of the metrics you will come across.
Occupancy Rates: This metric shows the percentage of available rooms that are occupied within a certain period, providing a clear measure of how well your property is being utilized. You’ll also see the percentage for yesterday’s occupancy, giving you a quick comparison to help assess daily growth and trends.
Today’s Revenue: This metric shows the total income generated by the room bookings and other services for current day, offering a snapshot of your property’s financial performance in real-time. It also shows yesterday’s revenue percentage, helping you stay alert to any changes in your property’s financial performance.
Today’s pickup: This metric represents the number of new bookings made today, helping you track the day’s demand and booking activity at a glance. It also shows yesterday’s pickup percentage for a quick comparison, allowing you to evaluate booking trends and performance.
Pre-booking Window: This metric indicates how far in advance guests are booking their stays for your property, helping you identify trends in reservation timing and plan your marketing strategies accordingly. This data reflects the last 30 days.
On the right side of the screen, you will find the “Availability Today“. This box provides a quick view of room availability for the current day, including details on room types and base prices. It allows you to quickly respond to guest inquiries regarding room availability.
Usage Tip: Regularly check this box throughout the day to stay updated on room availability.
Below the key metrics, you can find the City Daily Demand Trends section, one of the best and unique features of Stayflexi. This feature provides insights into daily booking trends in your city or locality, helping you understand how demand varies from day to day. This feature makes it easy to identify busy and slow days.
Additionally, this feature offers the option to view nearby hotel data. With a simple click, you can see the prices of nearby hotels, allowing you to stay competitive in your pricing strategy.
By analyzing these trends, you can adjust pricing and marketing strategies, ultimately enhancing your property’s occupancy and revenue.
Just below the daily demand trends, the Monthly Demand Trends offer a broader view, highlighting key insights for each month.
Stayflexi’s City Monthly Demand Trends: Your Secret Weapon for Maximizing Bookings!
A tool with a snapshot of Monthly Demand Trends, so you maximize your revenue. Here’s how it works:
Month Overview: You can get a clear, month-by-month breakdown of expected demand and pricing, all in one glance.
Weather Insights: You will know what to expect with weather details, including monthly temperature ranges because knowing the weather helps you understand guest behavior!
Demand Highlights: From peak seasons to off-seasons, Stayflexi gives you all the key insights. Easily identify peak seasons, busy, or moderate periods, allowing you to strategize your marketing and pricing efforts.
Pricing Overview: This shows the average hotel prices for the month using dollar signs [$] to indicate cost.
Stayflexi provides a bird’s eye view of essential data related to Room pickups and Revenue generated from various sources. This feature allows you to quickly understand which channels are performing best and where your revenue is coming from.
Below is an explanation of the Pickup and Revenue by Source feature:
Room Pickup by Source: It shows the number of room pickups from various sources over the last 7 days.
Revenue Pickup by Source: It shows the revenue generated from each source over the 7 days.
Revenue Generated by Source and Room Type: These sections provide data on revenue by specific sources and room types.
Recommendations Section: On the right side of the page, you will find a dedicated area for all the recommendations from Stayflexi. This section provides updates and suggestions, helping you optimize your usage of the platform.
Stayflexi Documentation
All-In-One platform with more in-built products and more automation. Giving hotels and guests what they want, stayflexi automates your hotel or vacation rentals and upsells unsold rooms and amenities.
Welcome to Stayflexi’s Dashboard, the ultimate tool for modern hotel management! In this video, we showcase how our comprehensive dashboard simplifies and automates hotel operations, boosting efficiency and revenue. From property management to guest services, explore how Stayflexi’s all-in-one platform can transform your hospitality business. Whether you’re managing a boutique hotel or a large chain, discover the power of automation with Stayflexi. Don’t forget to like, subscribe, and click the bell icon for more updates on innovative hospitality solutions!
Understanding performance section in dashboard
The Performance section is the core of your property operations. It provides a comprehensive snapshot of your hotel’s overall performance in a single view.
The image below illustrates the layout and key metrics displayed on the performance page, giving you a clear understanding of how it looks and functions.
Welcome Message: At the top, you will see a personalized welcome message such as “Good afternoon”, which indicates that the data is updated in real-time.
Navigation Menu: Right next to the greeting, two tabs let you switch between sections like Reservations and Performance.
Print Option: Next to the Performance tab, there is a black icon that represents the print option. By clicking on this icon, you can download the entire performance report in PDF format.
Under the greeting, tabs, and print options, you will find the key metrics of your hotel. Below is a quick summary of the metrics you will come across.
Occupancy Rates: This metric shows the percentage of available rooms that are occupied within a certain period, providing a clear measure of how well your property is being utilized. You’ll also see the percentage for yesterday’s occupancy, giving you a quick comparison to help assess daily growth and trends.
Today’s Revenue: This metric shows the total income generated by the room bookings and other services for current day, offering a snapshot of your property’s financial performance in real-time. It also shows yesterday’s revenue percentage, helping you stay alert to any changes in your property’s financial performance.
Today’s pickup: This metric represents the number of new bookings made today, helping you track the day’s demand and booking activity at a glance. It also shows yesterday’s pickup percentage for a quick comparison, allowing you to evaluate booking trends and performance.
Pre-booking Window: This metric indicates how far in advance guests are booking their stays for your property, helping you identify trends in reservation timing and plan your marketing strategies accordingly. This data reflects the last 30 days.
On the right side of the screen, you will find the “Availability Today“. This box provides a quick view of room availability for the current day, including details on room types and base prices. It allows you to quickly respond to guest inquiries regarding room availability.
Usage Tip: Regularly check this box throughout the day to stay updated on room availability.
Below the key metrics, you can find the City Daily Demand Trends section, one of the best and unique features of Stayflexi. This feature provides insights into daily booking trends in your city or locality, helping you understand how demand varies from day to day. This feature makes it easy to identify busy and slow days.
Additionally, this feature offers the option to view nearby hotel data. With a simple click, you can see the prices of nearby hotels, allowing you to stay competitive in your pricing strategy.
By analyzing these trends, you can adjust pricing and marketing strategies, ultimately enhancing your property’s occupancy and revenue.
Just below the daily demand trends, the Monthly Demand Trends offer a broader view, highlighting key insights for each month.
Stayflexi’s City Monthly Demand Trends: Your Secret Weapon for Maximizing Bookings!
A tool with a snapshot of Monthly Demand Trends, so you maximize your revenue. Here’s how it works:
Month Overview: You can get a clear, month-by-month breakdown of expected demand and pricing, all in one glance.
Weather Insights: You will know what to expect with weather details, including monthly temperature ranges because knowing the weather helps you understand guest behavior!
Demand Highlights: From peak seasons to off-seasons, Stayflexi gives you all the key insights. Easily identify peak seasons, busy, or moderate periods, allowing you to strategize your marketing and pricing efforts.
Pricing Overview: This shows the average hotel prices for the month using dollar signs [$] to indicate cost.
Stayflexi provides a bird’s eye view of essential data related to Room pickups and Revenue generated from various sources. This feature allows you to quickly understand which channels are performing best and where your revenue is coming from.
Below is an explanation of the Pickup and Revenue by Source feature:
Room Pickup by Source: It shows the number of room pickups from various sources over the last 7 days.
Revenue Pickup by Source: It shows the revenue generated from each source over the 7 days.
Revenue Generated by Source and Room Type: These sections provide data on revenue by specific sources and room types.
Recommendations Section: On the right side of the page, you will find a dedicated area for all the recommendations from Stayflexi. This section provides updates and suggestions, helping you optimize your usage of the platform.
What is city demand trends in Stayflexi?
Stayflexi offers a unique feature called City Demand Trends, which provides valuable insights into booking activity across different cities. These trends help property managers understand their local market demand, allowing them to adjust room pricing and availability accordingly.
We have categorized the trends into Daily Demand Trends and Monthly Demand Trends for easier analysis and understanding.
The Daily Demand Trends feature in Stayflexi provides an overview of how room demand fluctuates daily. By selecting a desired date, you can view a graph that shows trends for the entire week, making it easy to identify peak and low-demand days.
Additionally, you can compare your property’s pricing with nearby hotels, seeing at what price they are selling their rooms. This allows you to make data-driven adjustments to your pricing strategy for better competitiveness.
The Monthly Demand Trends feature provides a broader understanding of room demand over a month. You can see which months attract more visitors and which have less traffic. Additionally, it shows weather conditions for each month and indicates price ranges such as whether rates are moderate, least expensive, or expensive.
This feature acts as a predictive tool, enabling you to stay proactive about your property’s performance throughout the year.
Example: As you can see in the above picture, it shows the Bengaluru Monthly Demand Trends.
For October, it’s a busy month with some rainy days, and hotel prices are in the moderate range. Since demand is high, you can increase prices slightly or offer packages to attract more guests.
For December, it’s mostly sunny and still busy, but prices drop to the least expensive range. Offering discounts or special holiday deals can help you attract more guests despite the lower pricing trends.
By analyzing these trends, you can adjust your pricing strategy accordingly, ensuring you’re making the most out of busy months while staying competitive. This allows you to maximize both occupancy and revenue effectively.
Understanding the reservations section in dashboard.
The Reservation Section in Stayflexi offers an all-in-one glance at the status of your property for the day. It is designed to provide key information about your reservations in a single, consolidated view, helping you quickly understand and manage your property’s bookings.
The image below illustrates the Layout of the Reservations page, giving you a clear understanding of how it looks and functions:
Welcome Message: At the top, you will see a personalized welcome message such as “Good afternoon”, which indicates that the data is updated in real-time.
Navigation Menu: Right next to the greeting, two tabs let you switch between sections like Reservations and Performance.
Next to the date, you will find a Calendar icon. Clicking on this icon allows you to toggle between past, present, and future bookings, making it easy to view reservations across different periods. With just one click, you can access the information about your property’s booking history, current occupancy, or upcoming reservations.
Reservation Overview: This section presents several tiles, each representing a key metric for the day. These tiles allow property managers to gauge the day’s activities quickly. The tiles include:
New bookings—These are all the reservations that happened today, in other words, these are room sales that occurred today. Reservations can be of current date or future date.
In-house – All the reservations are in check-in status, and the guests are staying currently on the property.
Arrivals – The guests who are scheduled to check in or arrived today.
Departures – The guest who are scheduled to check out today.
Cancellations – The reservations that the guests have canceled.
On hold—Reservations that have not yet been finalized and may require further steps before they are confirmed or canceled.
No-show – Indicates reservations where the guest did not arrive on the check-in date and staff had marked them manually No- show.
Magic link – It is a unique feature that sends a URL to the guest via email, whatsapp or SMS allowing them to perform specific actions such as self-check-in,request for early check-in and late check-out as well as access add-ons.
Search Bar: Located directly below the Tiles, the search bar allows you to quickly find specific bookings to organize better and manage reservations. Simply type in a guest name, phone number or stayflexi booking number starting with SFBOOKING_XXXXX_54321 or last 5 digit unique number i.e 54321, to instantly locate the reservation you’re looking for. This search bar makes it effortless to manage a large volume of bookings and find specific booking details at a moment’s notice.
Detailed Booking Information: Below the tiles and search bar, individual bookings details are listed, including:
Guest Name
Booking Source [e.g., OTA channel icon or walk-in symbol]
Room id along with the Room type
Check-in and Check-out dates
Payment status: Total and balance due.
Next to the Search bar, there’s a Download Report button. By clicking on this option, you can download a detailed report of the day’s reservations. This feature allows you to export the data for further analysis or record-keeping.
Sort and Search Feature: Stayflexi allows you to sort the displayed bookings by different criteria, such as guest name, check-in, check-out, etc. Sorting makes it easier to organize your view based on your needs.
On the right side of the screen, you will find the “Availability Today“. This box provides a quick view of room availability for the current day, including details on room types and base prices. It allows you to quickly respond to guest enquiries regarding room availability and base price.
Usage Tip: Regularly check this box throughout the day to stay updated on room availability.
Recommendations Section: On the right side of the page, you will find a dedicated area for all the recommendations from Stayflexi. This section provides updates and suggestions, helping you optimize your usage of the platform.
What is send magic link in dashboard?
Stayflexi has introduced a new and unique feature, The Magic Link. The image below provides a clear guide on how to locate the Send Magic Link.
The Send Magic Link feature in Stayflexi allows hotel staff to send guests a secure, personalized link that grants them access to their booking details without needing a password. With this link, the guests can easily manage their reservations, check in, or complete payments. This feature enhances convenience and saves time for both hotel staff and guests.
Some key highlights of this feature include :
Convenience: Guests can access their reservation instantly, with just one click.
Security: Each link is unique and exclusively accessible by the authorized recipient.
Efficiency: It simplifies the check in process and various booking-related tasks.
No Password Needed: Guests don’t have to worry about remembering login credentials.
How to Use the “Send Magic Link” Feature
Open the Reservation Calendar: Navigate to the Stayflexi dashboard and open the reservation calendar where you can see the current bookings.
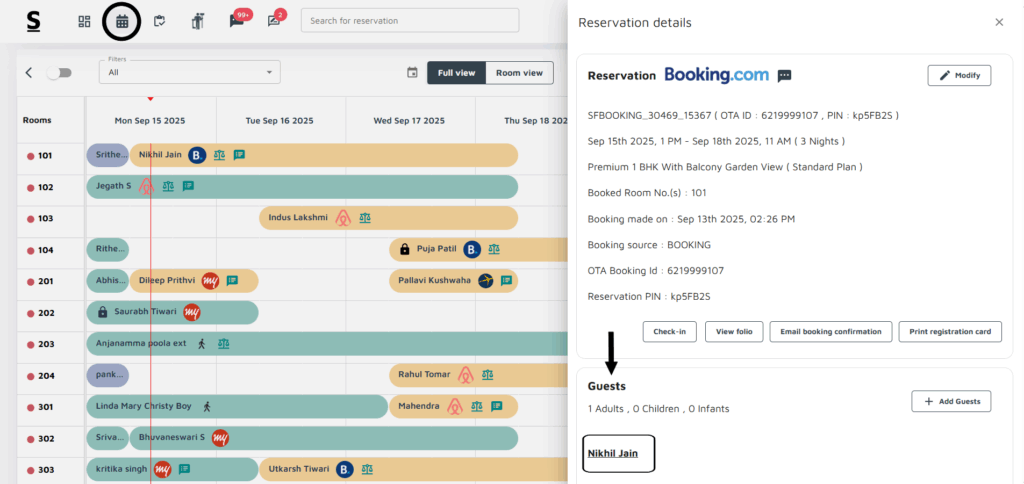
Select a Reservation: Click on the specific booking for which you want to spend the Magic Link. This opens a detailed booking view on the right side of the screen.
Locate the Send Magic Link: In the booking information section, find the “Send Magic Link” button.
Click on Send Magic Link: Click the “Send Magic Link” button. The system will immediately send a secure link to the guest via their email or phone number registered with the booking.
Guest Received the Magic Link via WhatsApp/email: The guest will receive a link via WhatsApp or email and can click it to view their booking details, check-in status, or payment options without entering login credentials.
Confirmation: After sending the link, you’ll receive a notification on the screen, confirming that the link was successfully sent.
The image below provides a visual representation of the Magic Link for your reference.
How to check new reservations?
To check new reservations in Stayflexi, follow the steps below:
Login: Start by logging into your Stayflexi dashboard using your credentials.
Front Page : You will land on the front page of the dashboard
New Bookings : From the displayed tiles, click on New Bookings.
Booking Folio: Under this section, you can find the folio for each new reservation.
Viewing arrivals and departures
Login : Log into your Stayflexi dashboard with your credentials.
Front Page: On the dashboard’s front page, you will see a list of tiles displaying various metrics like New bookings, In-house, Arrivals, Departures, etc.
Arrivals/Departures: click on the Arrivals or Departures tab to view the list of upcoming guest check-ins or expected check-outs.
Booking Details: For each entry, you can click to view more details about the guest and their reservation.
What is pending departure and pending arrival?
Pending Arrival: This refers to reservations where the guest is expected to arrive but has not yet checked in. These are upcoming bookings that are awaiting the guest’s arrival.
Pending Departures: This refers to reservations where the guest is due to check out but has not yet completed the check-out process. These are active stays that are approaching their scheduled departure date.
Both sections help property managers track the status of reservations and manage arrivals and departures efficiently.
Below are the step-by-step guidelines on how to check pending departures in Stayflexi:
Login : Log into your Stayflexi dashboard with your credentials.
Front Page: On the dashboard’s front page, you will see a list of tiles displaying various metrics like New bookings, In-house, Arrivals, Departures, etc.
Click on the Departure: On the Stayflexi dashboard, locate and click on the “Departures” tile.
View the List of Guests: Below the tile, you will see a list of guests who are scheduled to depart. These are the pending departures.
Below are the step-by-step guidelines on how to check pending Arrivals in Stayflexi:
Login : Log into your Stayflexi dashboard with your credentials.
Front Page: On the dashboard’s front page, you will see a list of tiles displaying various metrics like New bookings, In-house, Arrivals, Departures, etc.
Click on the Arrivals: On the Stayflexi dashboard, locate and click on the “Arrivals” tile.
View the List of Guests: Below the tile, you will see a list of guests who are scheduled to arrive. These are the pending arrivals.
I want to raise a concern or contact my relationship manager via chat, phone, or email. Where can I find the helpline contact information?
Below are the step-by-step guidelines to find the helpline contact information to reach your relationship manager:
Log in: Log in with your credentials, and you’ll be taken to the first page, which is the dashboard.
Locate the “help?” option: On the dashboard, located at the top right, find the “help?” option on the right side of the screen. This icon represents the support option.
Click on the Support option: Click on the help? [support] icon.
Support Page Opens: A page will open to the right-hand side.
Choose Your Preferred Contact Option :
Live Chat: Start a conversation with the Stayflexi support team directly from the dashboard.
Phone Support: The helpline number for your region will be listed here.
Email Support: You can view the official support email address to send your query.
For Relationship Manager Contact
Under the same Help/Support section, you’ll also see the Contact Relationship Manager option with details like name, phone, or email.
How can I view the number of available rooms in each category and the base price from the dashboard?
To view how many rooms are available in each category and what the base price is from the dashboard, follow the below-mentioned steps:
Log in to Stayflexi: Use the provided credentials to log into the Stayflexi dashboard.
View Availability: Once on the opened page, look to the right side of the screen.
Check Availability Today: In this column, you will see the availability for today. Here, you can view:
Room Category Inventory: The number of rooms available in each category.
Base Price: The base price for each room category for the current day.
How it can be useful?
For Example, It’s evening, and a walk-in guest asks for a room. Instead of checking reports, the front desk sees “Available Today: 2 Rooms” on the dashboard and instantly confirms the booking.
Handy because: it saves time, avoids overbooking, and helps staff make quick decisions.
Stayflexi PMS password- How to reset your password
To reset your password in Stayflexi, follow the below steps:
Open the Stayflexi Welcome Page:
Go to the Stayflexi login page.
Enter your Email ID:
In the email field, enter the email ID you use for your Stayflexi login.
Click on Sign In:
This will take you to a page with the password field.
Click on Forgot your Password:
You’ll see a confirmation message saying, “We will send you a link to create a new password”.
Re-enter your Email Id:
Enter the same email id associated with your Stayflexi account.
Click on “Submit”.
This will send a reset link to your email.
Open the Email and Use the Reset Link:
Check your inbox for the reset email. [If you don’t see it, check your Spam or Junk folder.]
Click on the reset link provided in the email.
Create a New Password:
Follow the link to a secure page where you can enter a new password. Choose a new password and confirm the change.
You should be now be able to log in with your new password.
Click on “Submit”:
How to proceed if I can't find the email with reset link?
If you’re a user or sub-user in Stayflexi and can’t find the password reset link, here’s what to do:
Contact the Main Admin:
Only the main admin has access to reset links for users and subusers. Reach out to them, and they can initiate the reset process on your behalf.
Follow Up with Admin:
Once the admin initiate the reset, they’ll provide you with the necessary information to complete the process.
If you don’t see the reset email within a few minutes, check your Spam or Junk folders just in case.
Follow-Up for Additional Assistance:
If you still don’t receive the reset link, or if there’s any issue, ask the main admin to contact Stayflexi support. The support team can help ensure the email is delivered correctly or assist with any technical issues on the account.
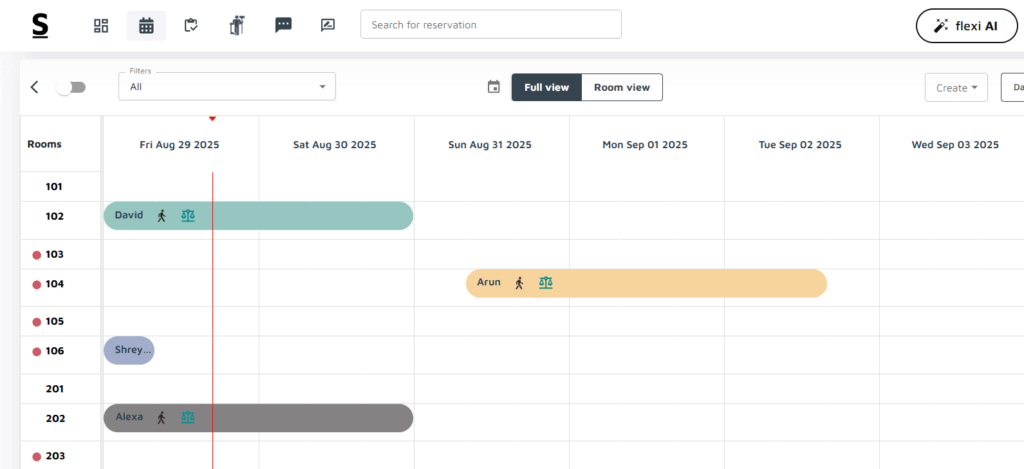
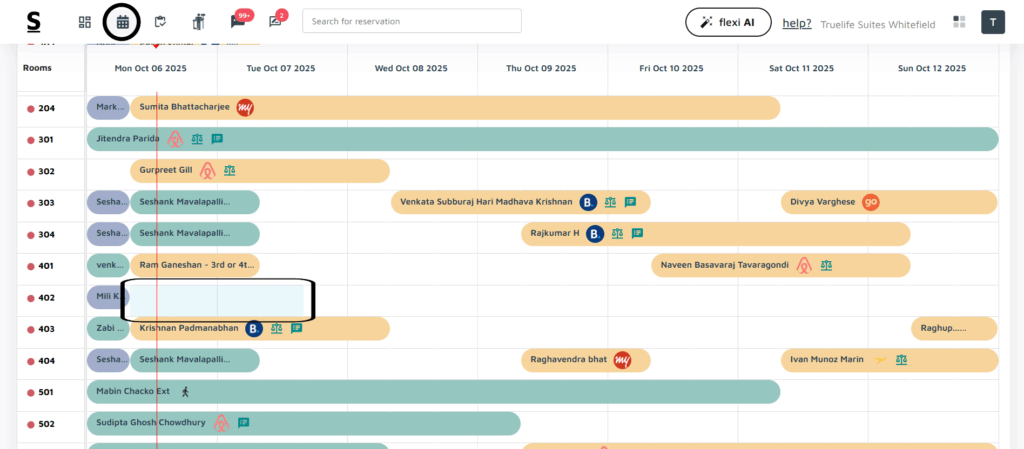
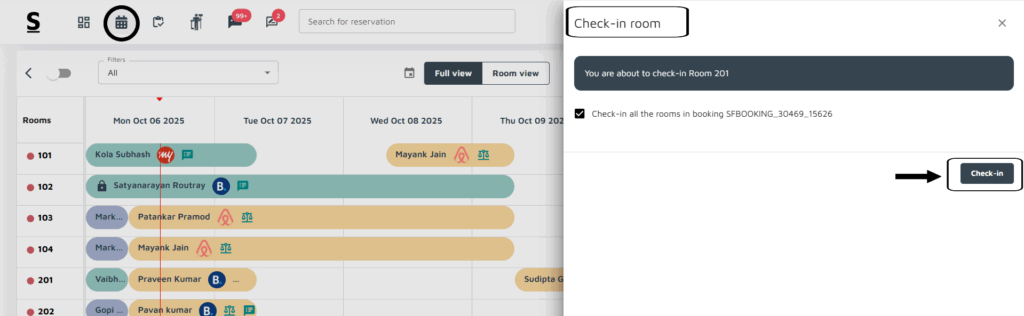
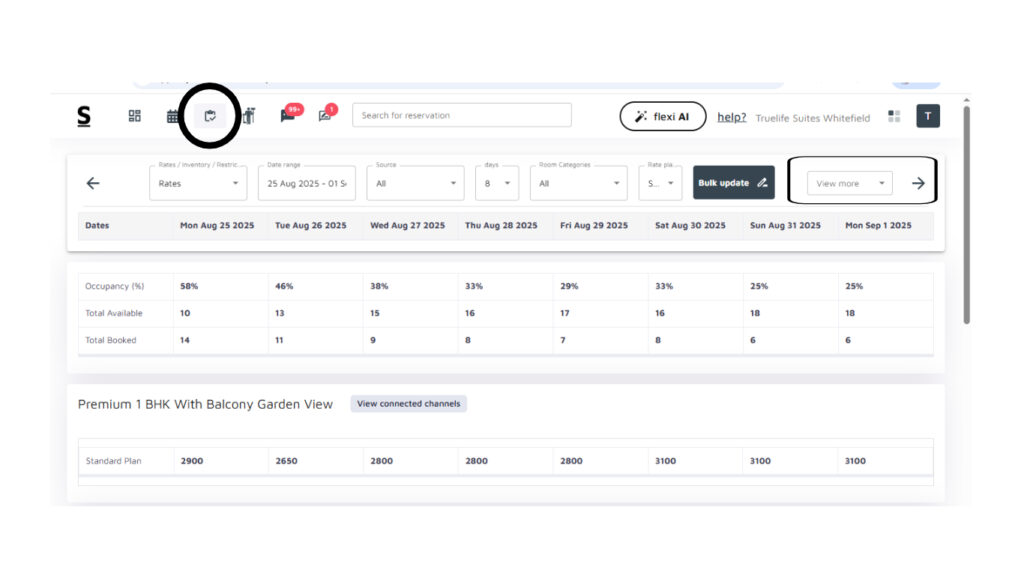
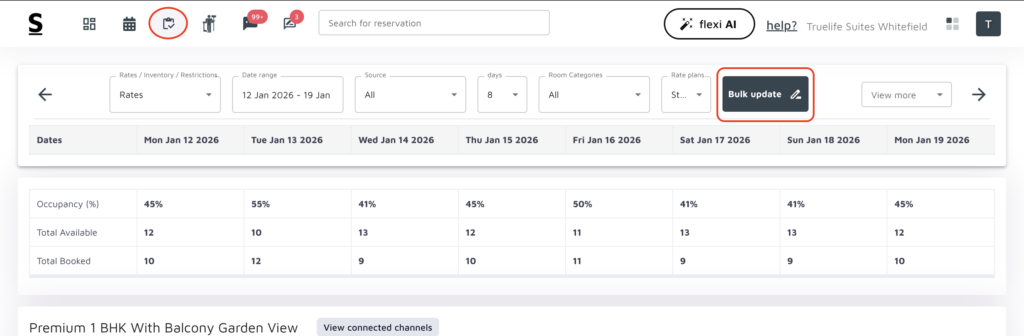
The Stayflexi Reservation Calendar is designed for ease of use, with all key features conveniently located in one place.
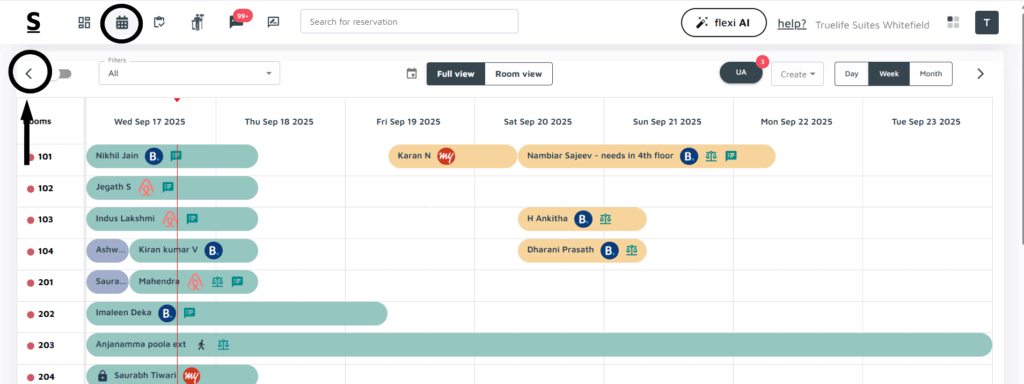
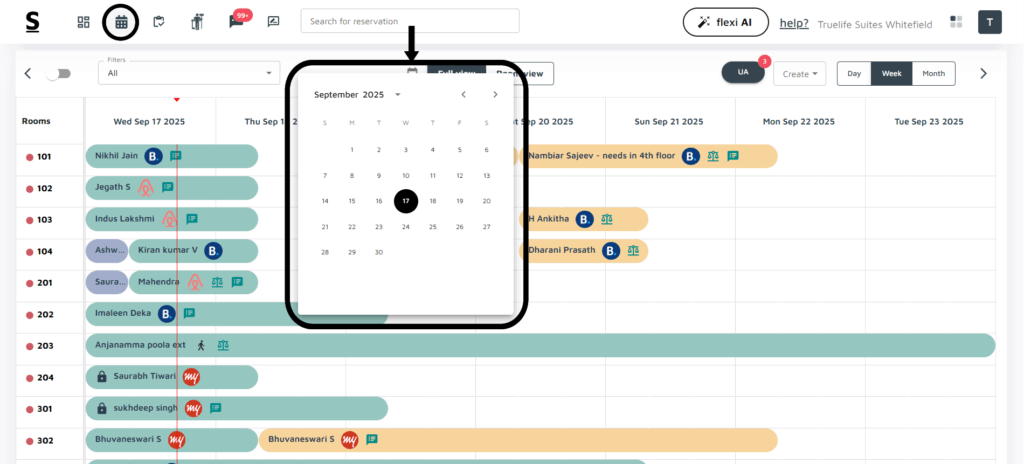
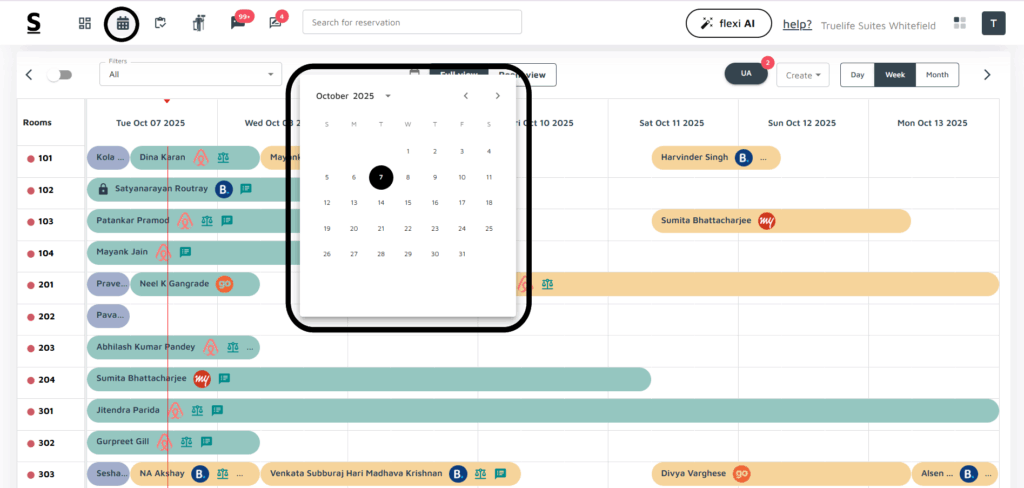
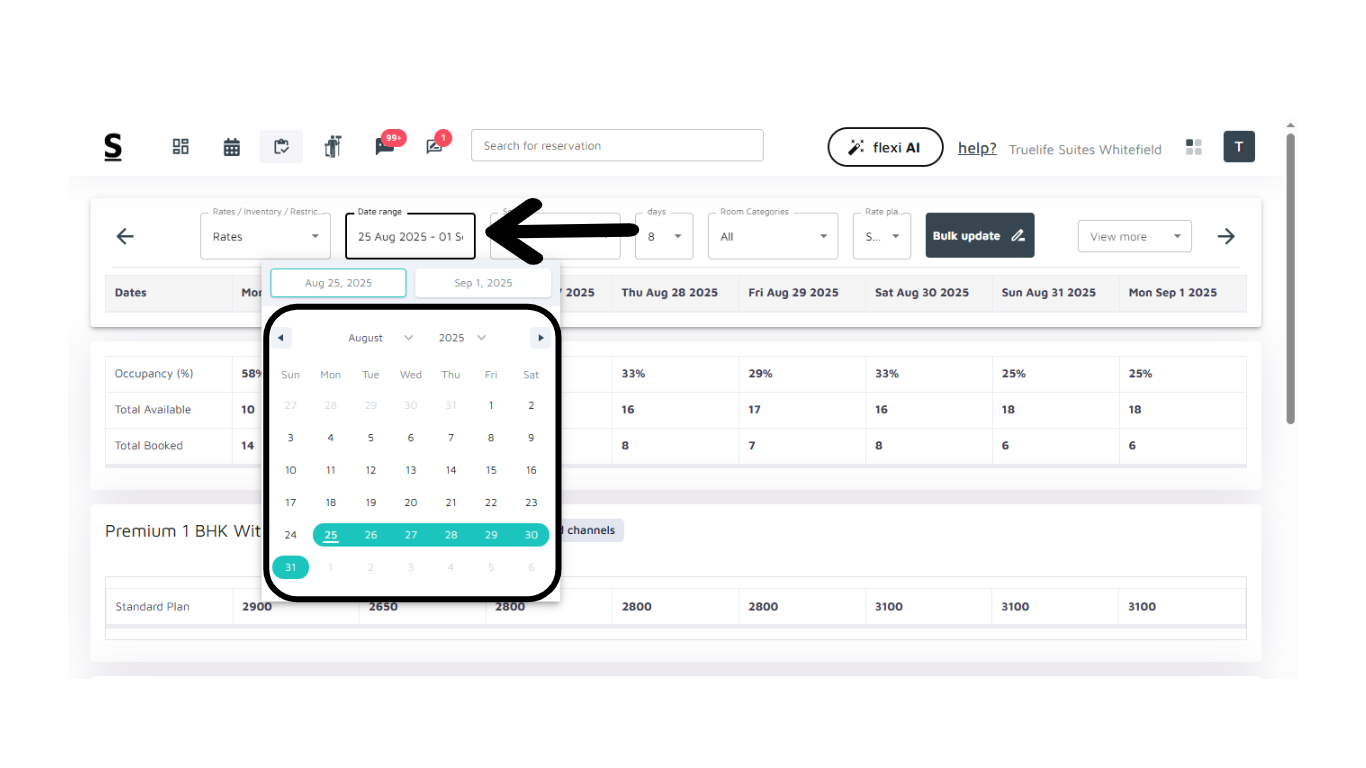
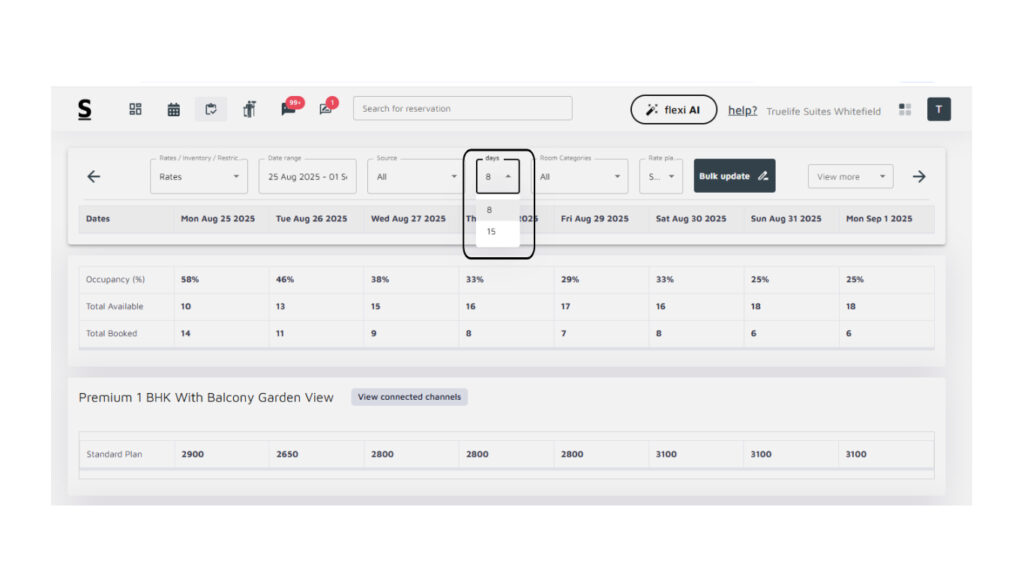
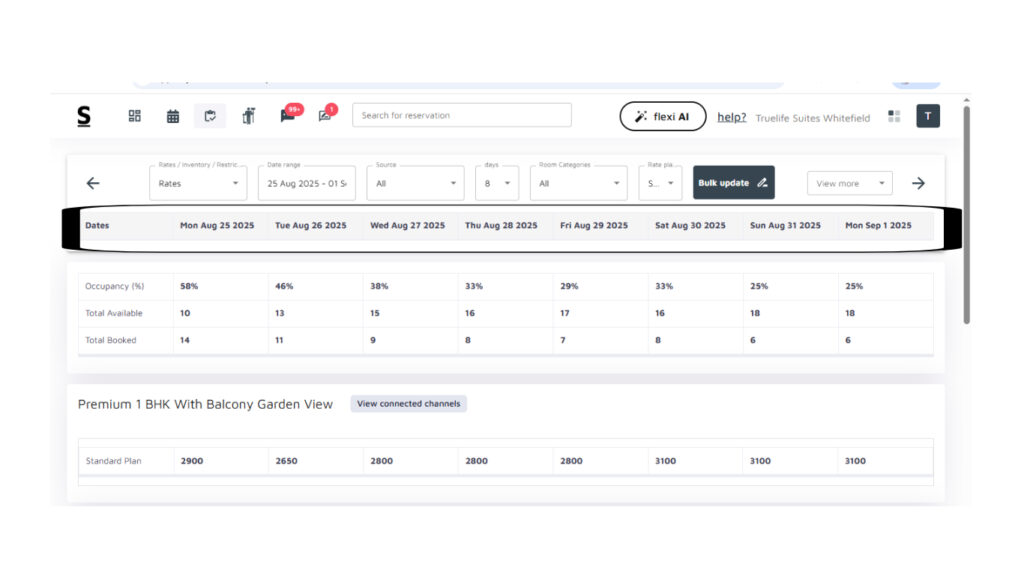
At the top, you’ll find the Date Range Selector. By clicking on the calendar icon, you can quickly view past, present, and future booking data, making it simple to navigate through different periods and manage your reservations efficiently.
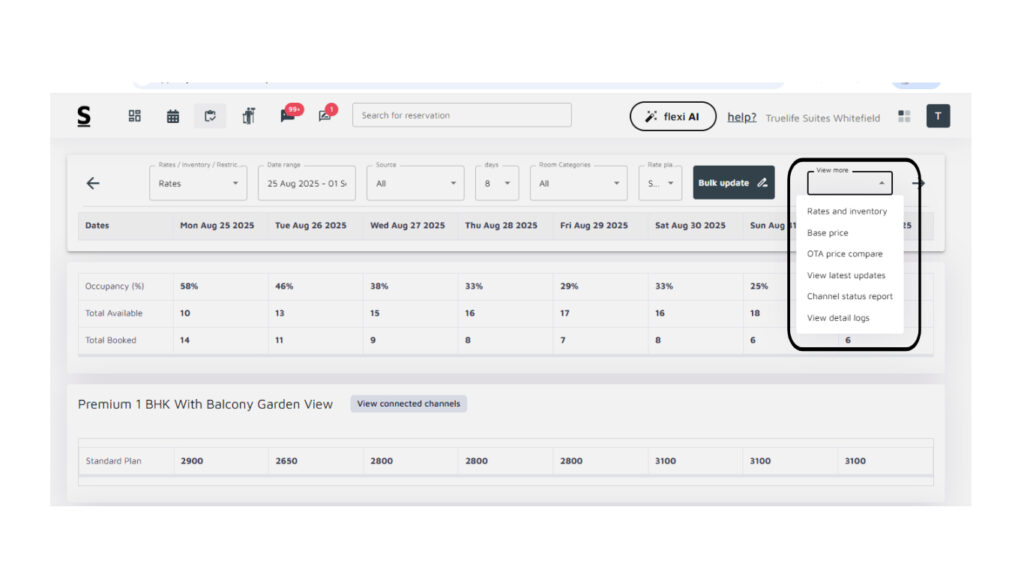
On the right, there’s a View Mode option, allowing you to switch between day, week, or month views for your convenience. By default, the calendar is set to the weekly view for optimal visibility of upcoming reservations.
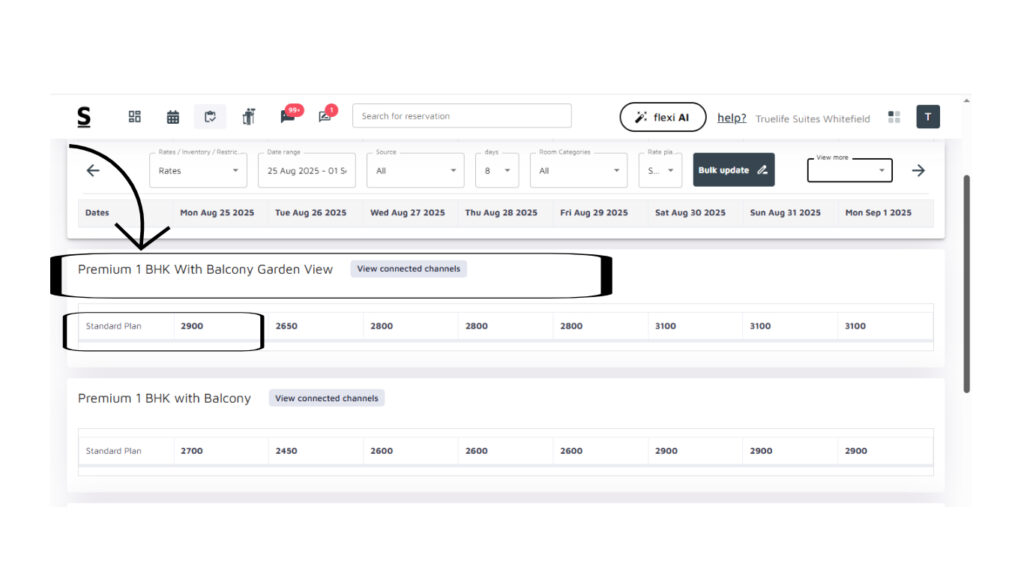
On the left, there’s Room Listings where you’ll see a list of all your rooms, whether you have 5 or 50. Everything is displayed in one place for easy management.
At the top of your room list, you’ll find a toggle. Enabling it will show the Room Type next to each room number.
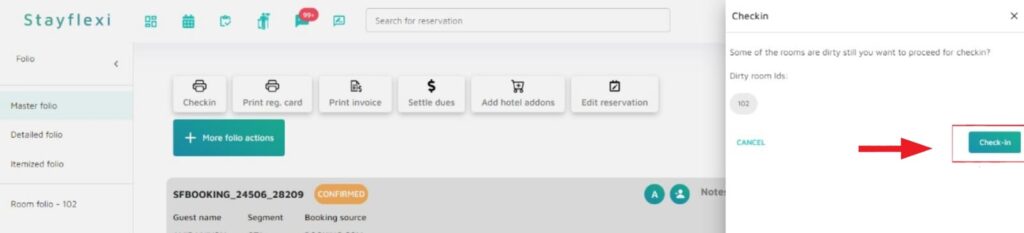
If a room is marked with a red dot in the room number column, it indicates that the room is dirty.
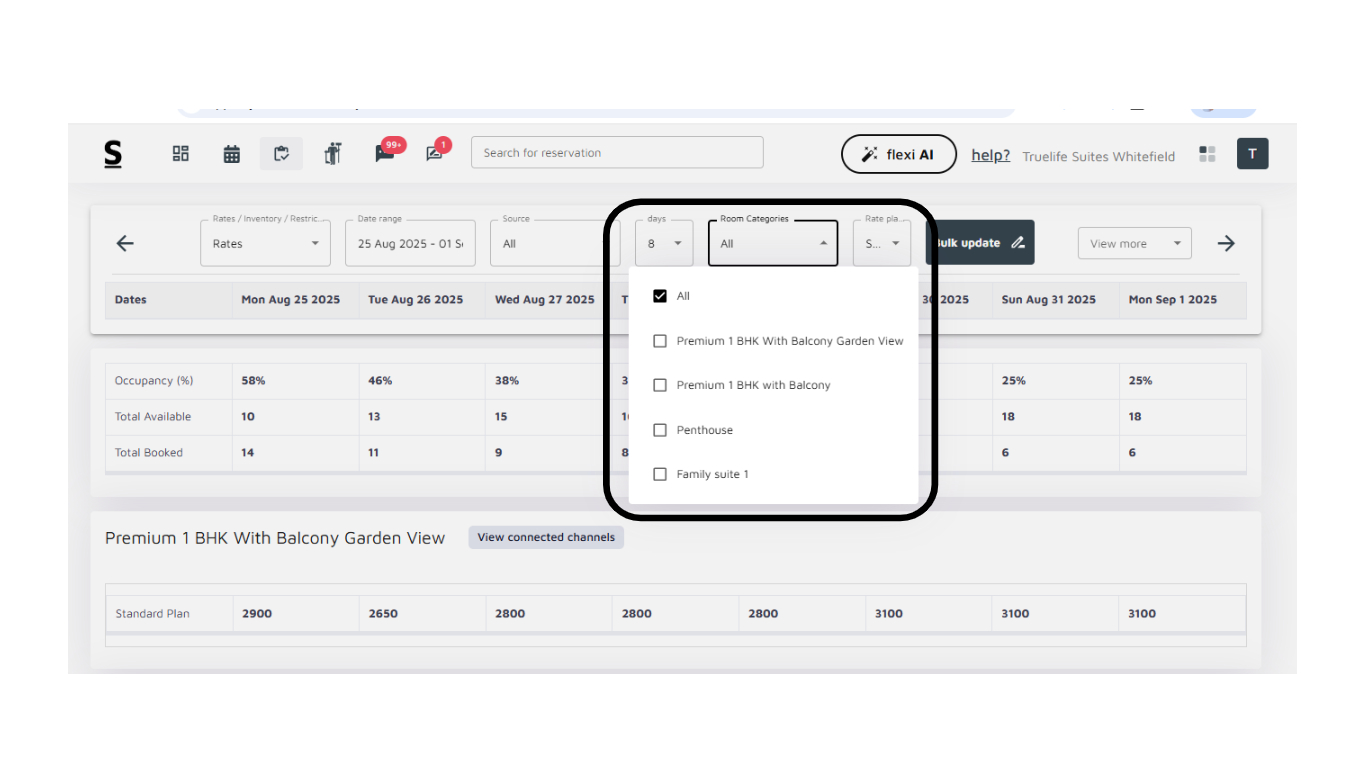
On the left side of the page, you’ll find the Filter option, which gives you multiple choices. For example, if you want to see available rooms under the Deluxe Room Category, you can easily filter and get the desired information with a just a few clicks.
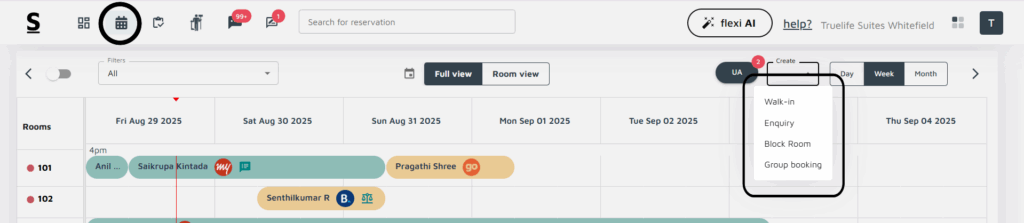
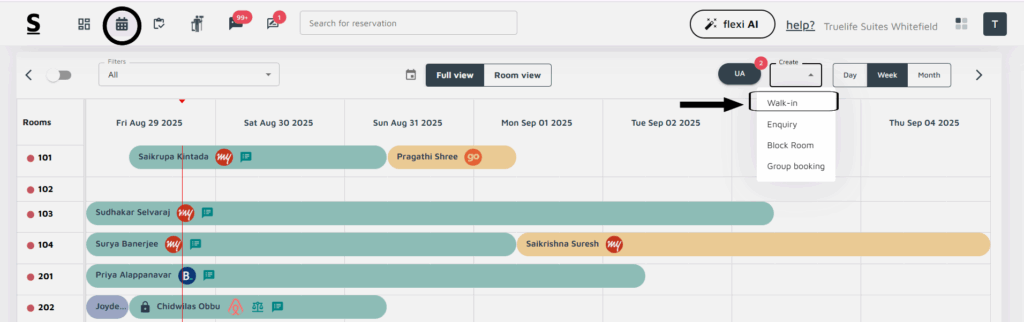
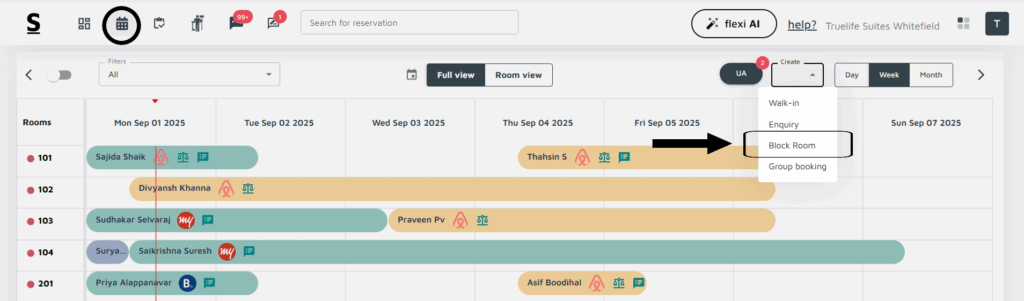
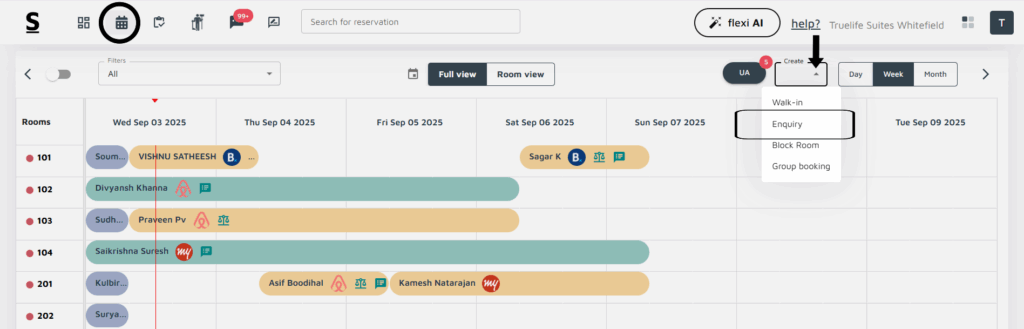
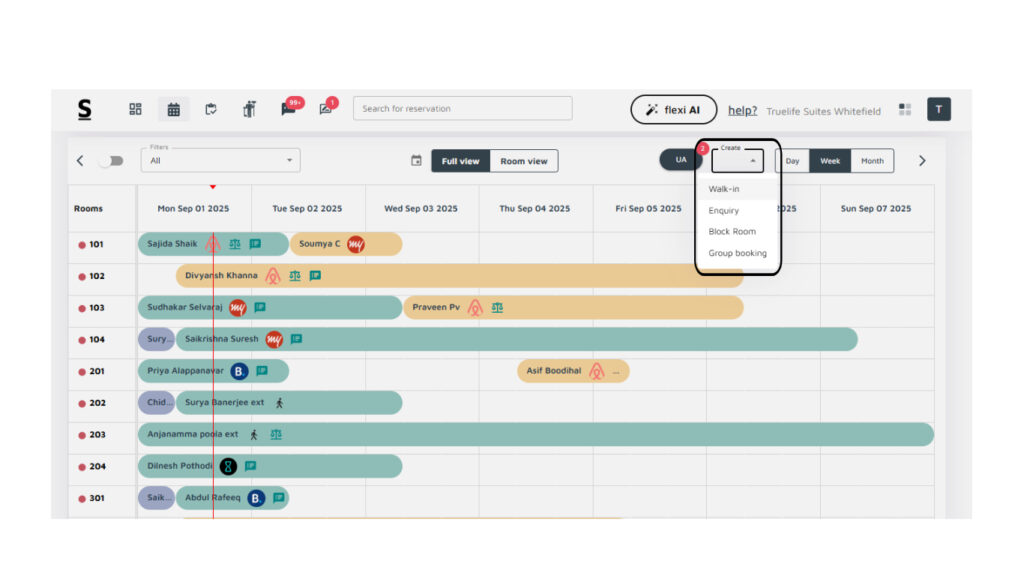
Create Button [Right side of the page]:
On the right-hand of the calendar, you will find a create button. Clicking on it provides four options:
Walk-in: For creating immediate bookings.
Enquiry: For creating guest inquiries that have not yet been confirmed.
Block Room: For blocking rooms due to maintenance or other needs.
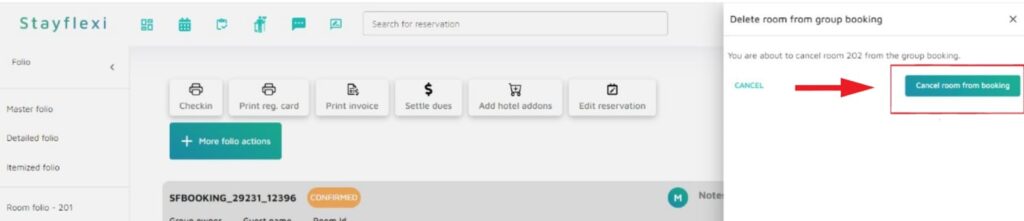
Group Booking: For handling multiple room reservations under a single booking id or group.
Reservation Blocks:
Each reservation is represented as a block [or grid] within the calendar.
The blocks are color-coded based on the status of the reservation, providing a quick visual reference:
Light Yellow: Indicates a Confirmed Reservation.
Green: Represents a reservation that has been Checked In.
Purple: Indicates a Checked-out reservation.
Grey: Represents an Enquiry, signifying that the reservation is not yet confirmed.
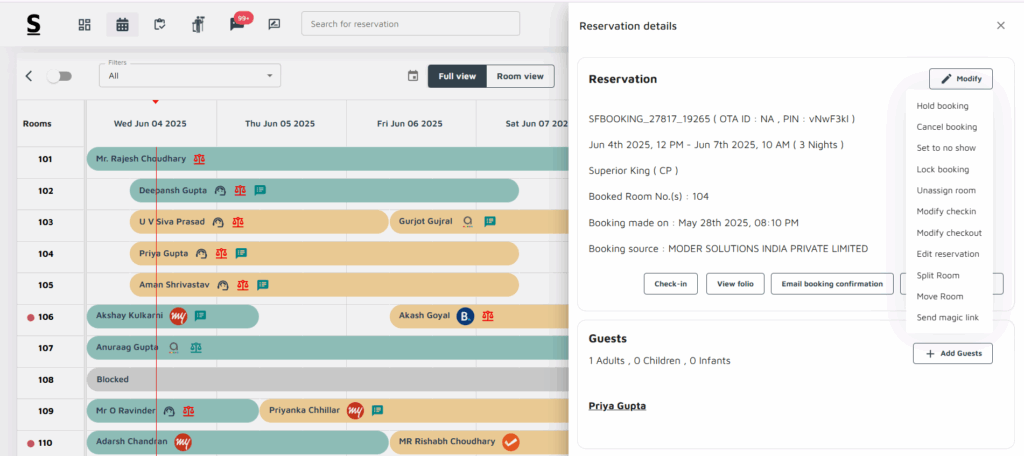
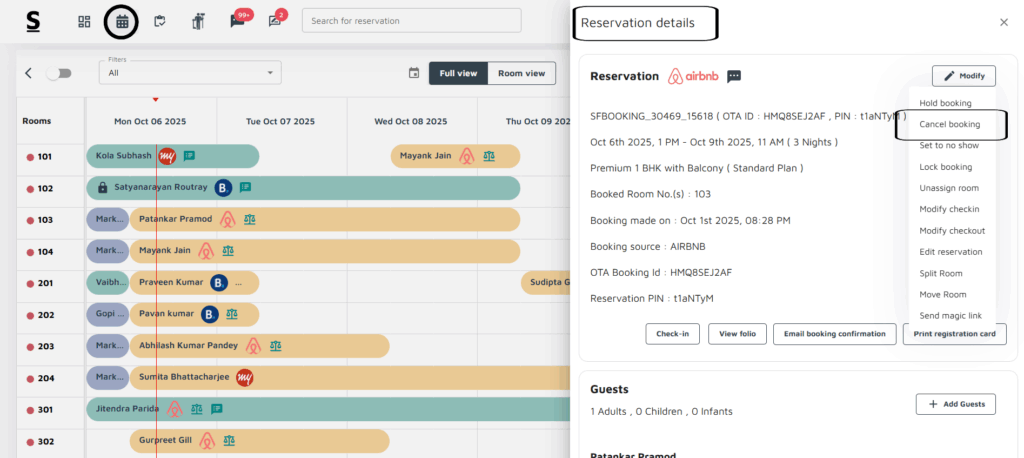
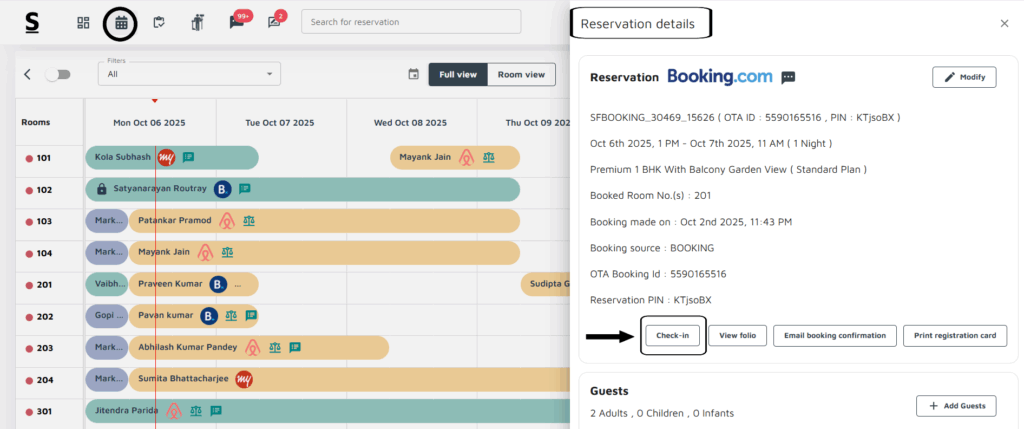
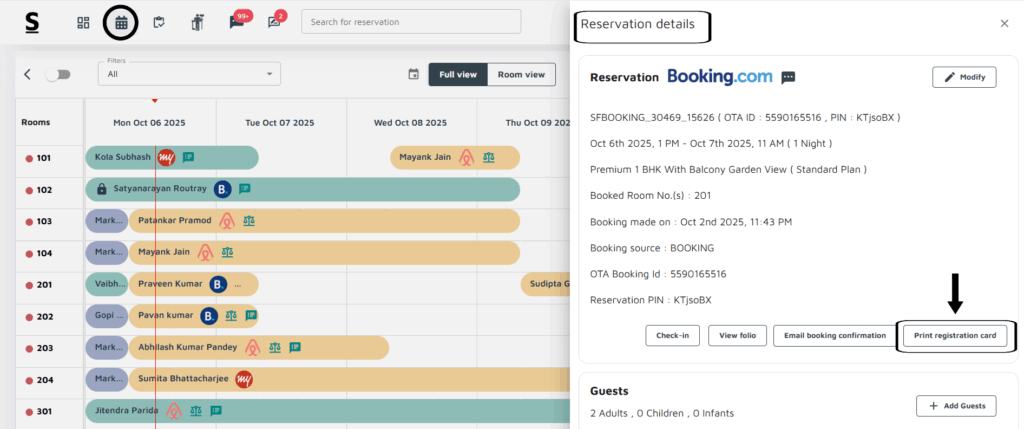
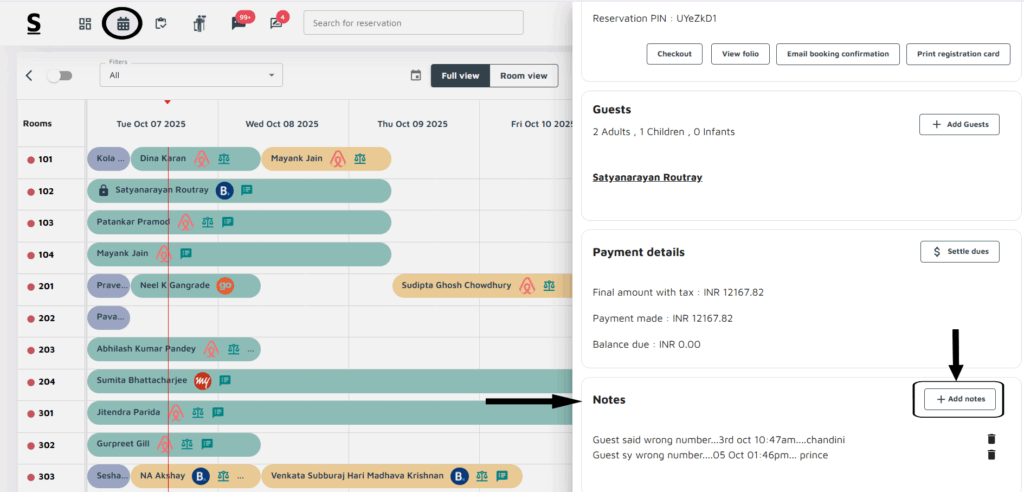
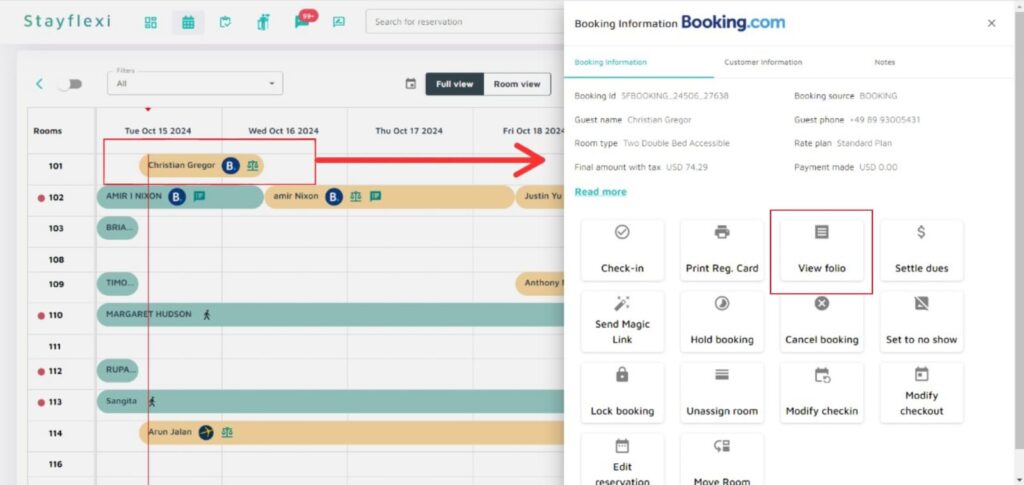
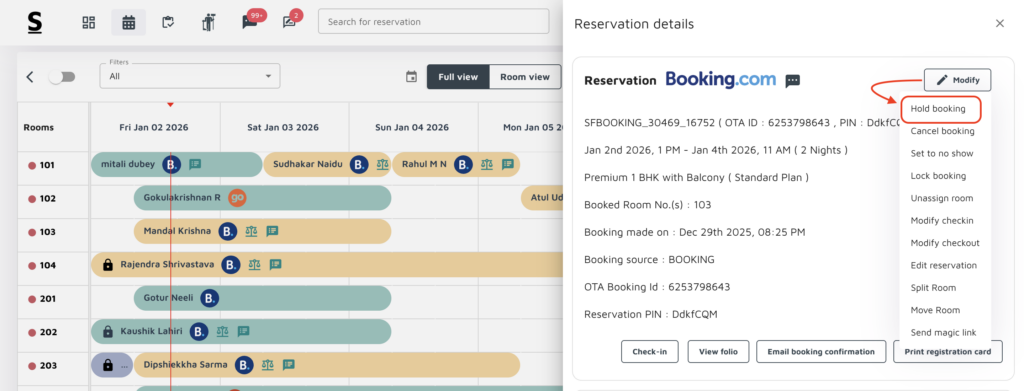
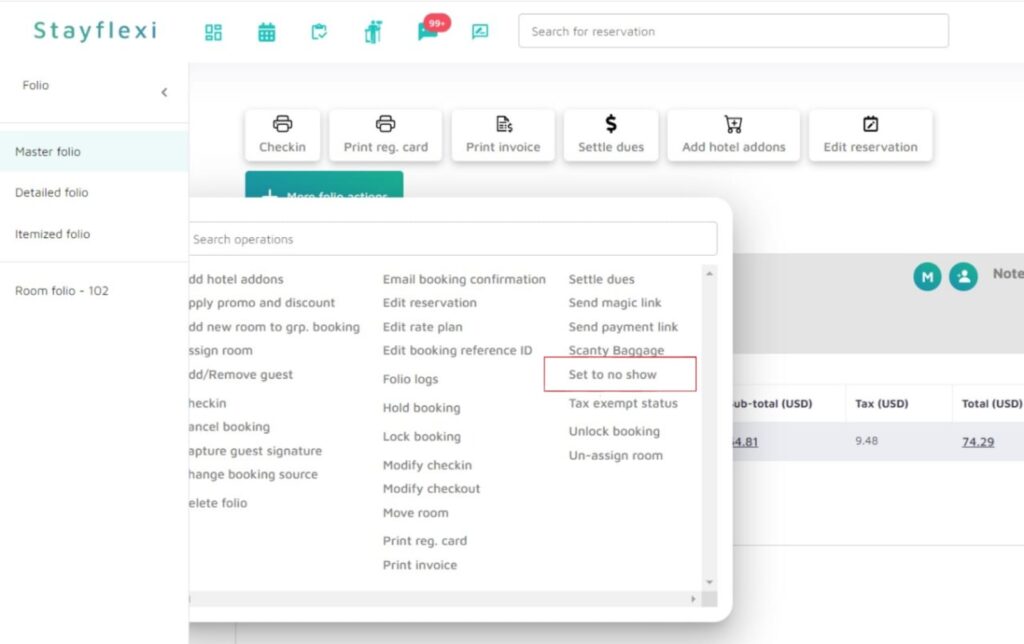
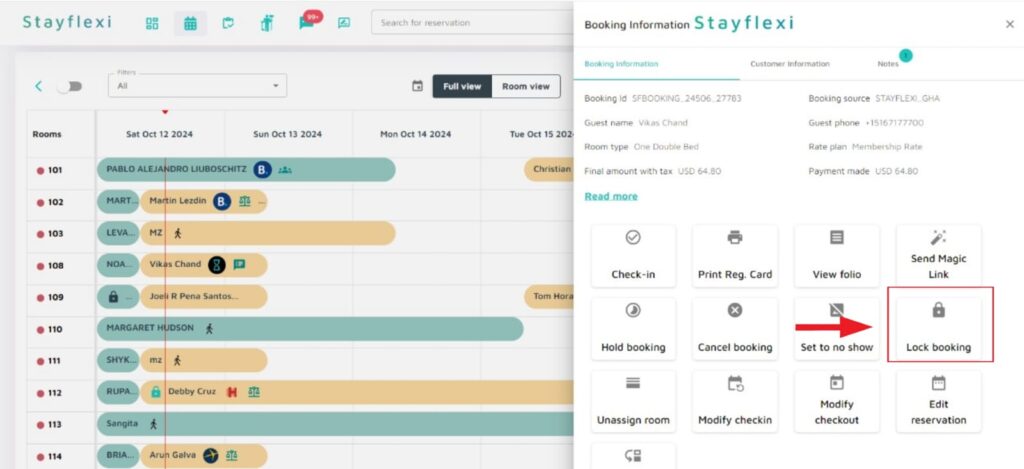
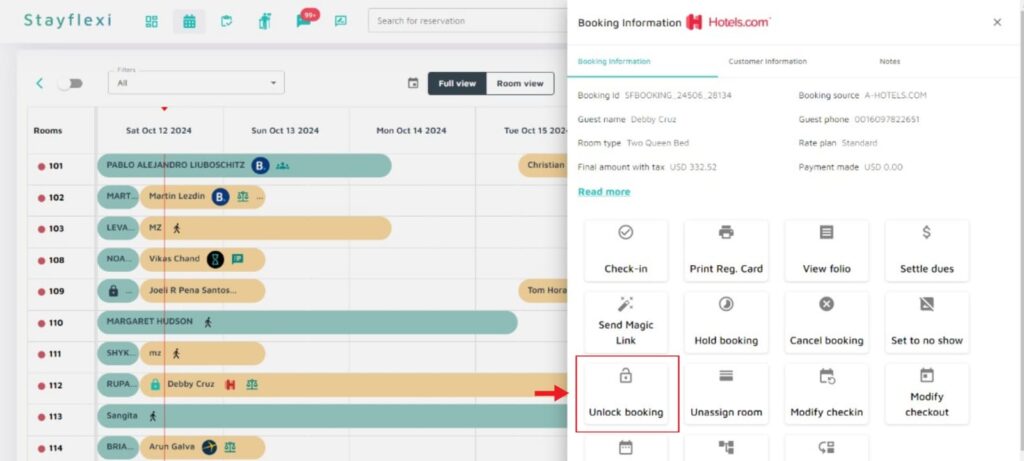
If you click on any reservation, a pop-up will appear on the right side of the screen displaying the Reservation Details.
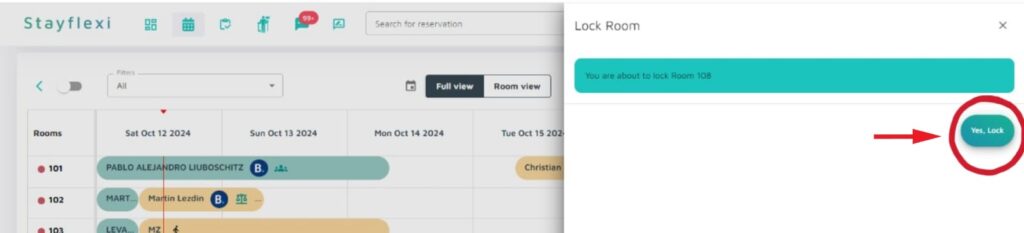
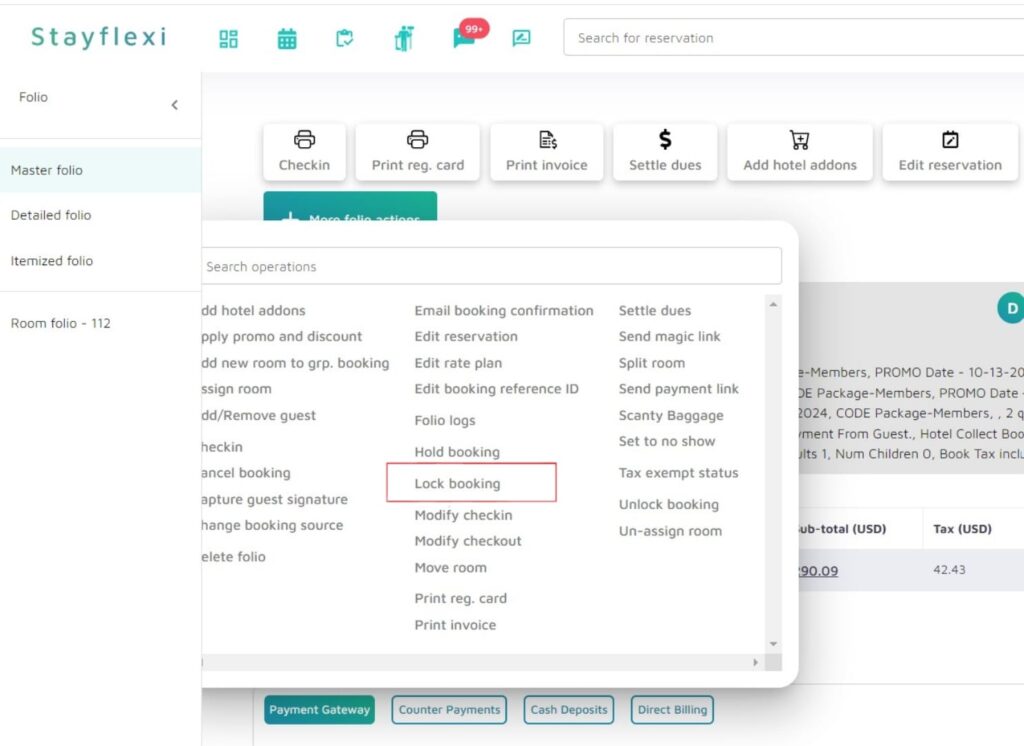
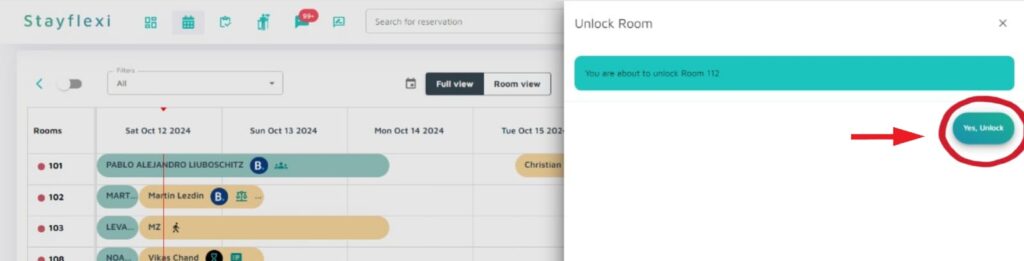
Next to that, you will see multiple actions depending on the reservation you selected, offering quick access to options like Cancel booking, Lock booking, Hold booking, Modify, Check-in/out, and more.
Understanding the filters in reservation calendar
The Stayflexi reservation calendar offers filtering options to help users quickly access the specific room and booking information they need.
Imagine your front desk team receives a call from a guest interested in booking a superior king room for the upcoming weekend. To quickly check the availability of this specific room type [OR] Let’s say it’s a busy day at your property, and the housekeeping team needs to clean rooms that have just been vacated. You want to quickly find which rooms are Dirty and need attention. Don’t worry, Stayflexi is going to make your job much easier with this filter option. Enjoy each step mentioned below!
Below are the step-by-step guidelines for using the filter options:
Login to Stayflexi: Start by logging into your Stayflexi dashboard using your credentials.
Navigate to the Reservations Tab: From the front page of the Stayflexi dashboard, locate the top navigation menu. The second icon is the Reservation Calendar.
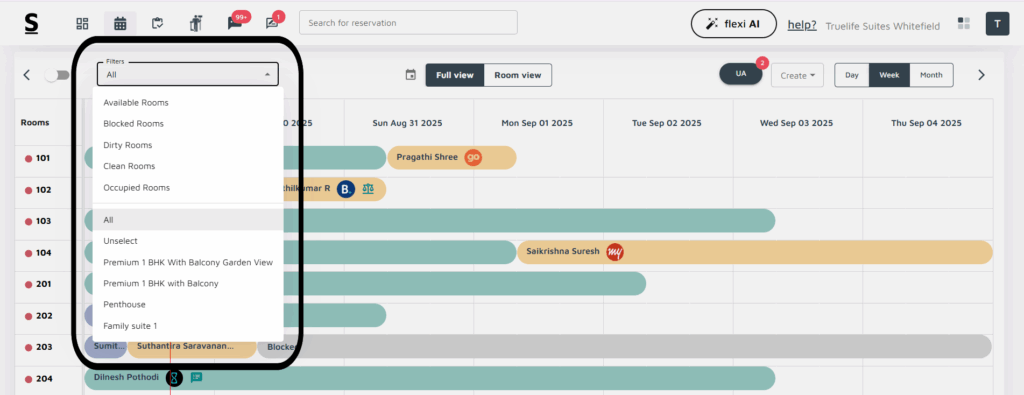
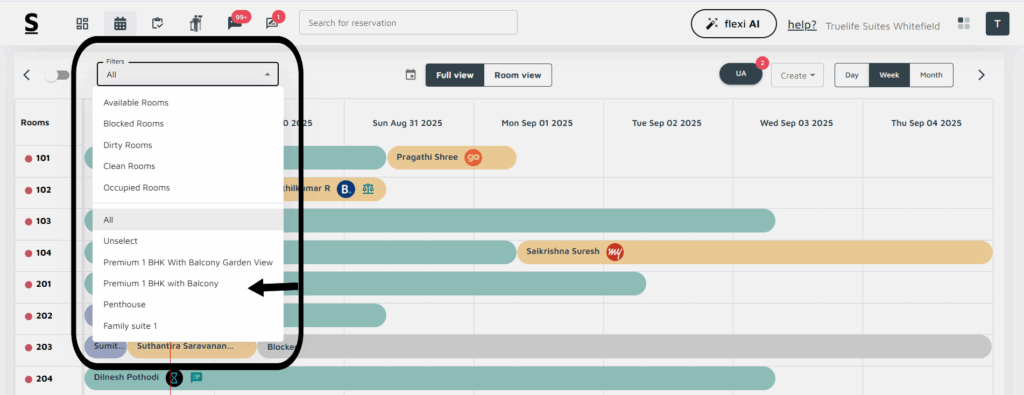
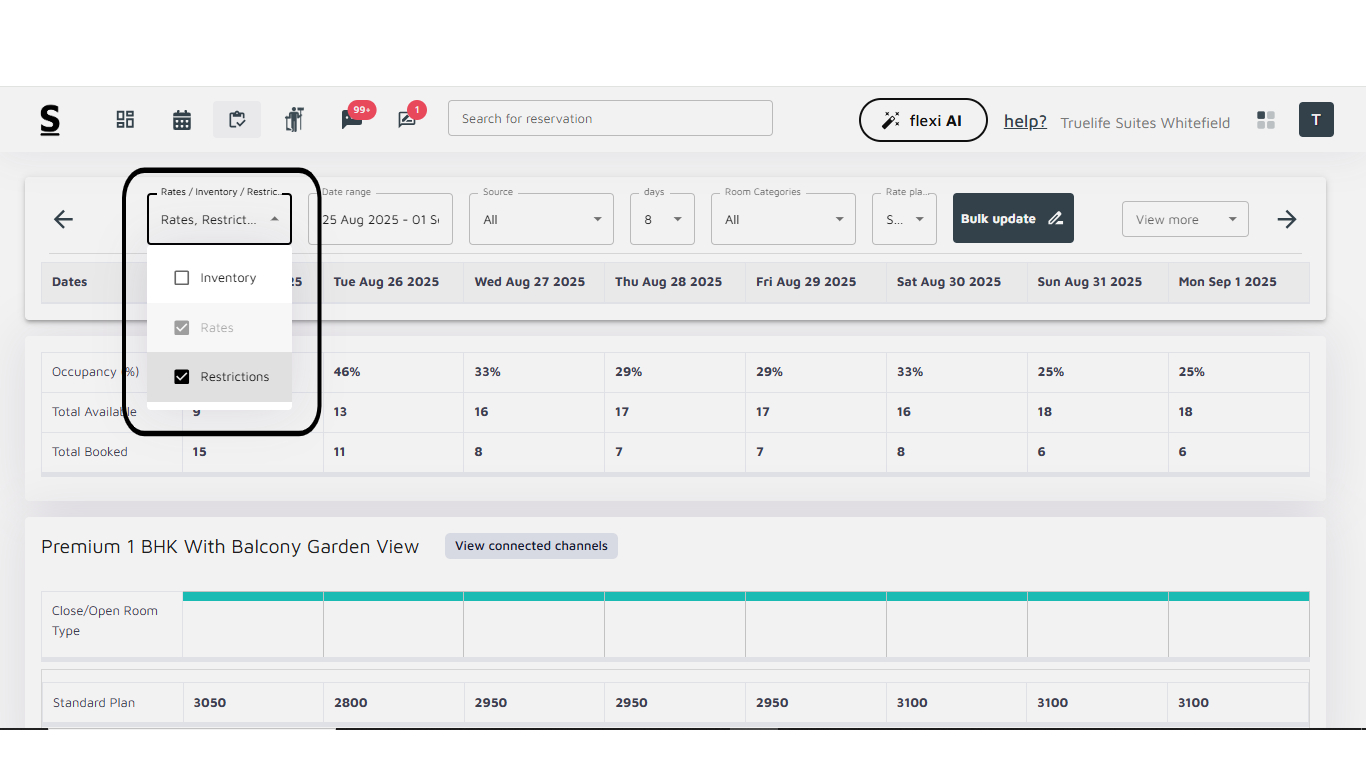
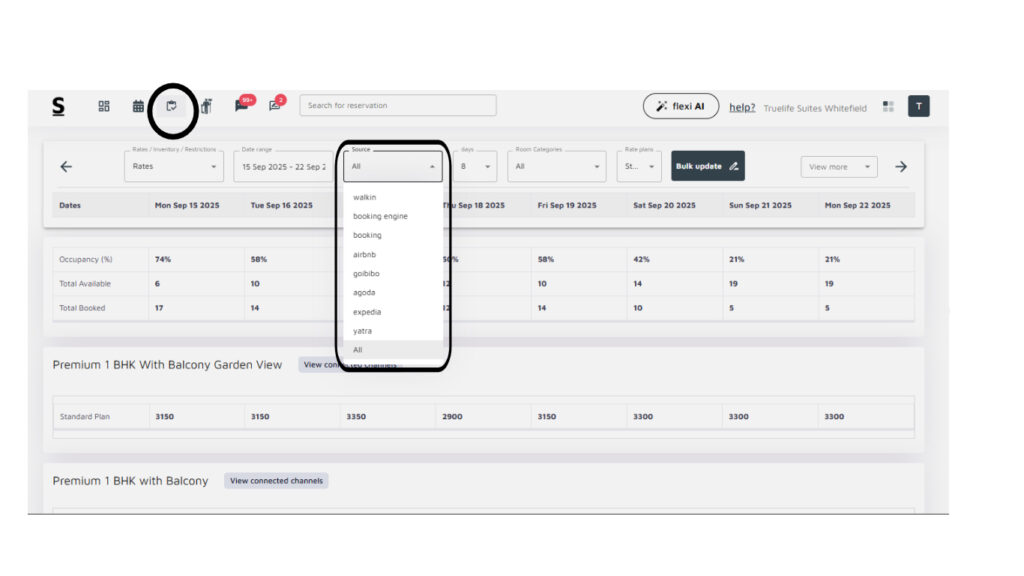
Locate the Filter Option: On the top-left corner [as shown in the image], click the Filter dropdown to reveal a list of available filters.
Available Filters: The following options can be selected from the filter dropdown menu.
Available Rooms: Displays all rooms that are vacant and ready for booking.
Blocked Rooms: Shows the rooms that are temporarily blocked.
Dirty Rooms: Displays rooms that are marked for cleaning.
Clean Rooms: Rooms that are cleaned and ready for new guests.
Occupied Rooms: Shows all rooms currently occupied by guests.
Room Types: You can filter rooms based on their room type such as: Superior King, Super Deluxe, standard etc.
All: Shows all rooms regardless of status or type.
Unselect: Clears all active filters to display all rooms again.
How to view reservations by room type?
Login to Stayflexi: Log into your Stayflexi dashboard with your credentials.
Go to the Reservation Calendar: From the main dashboard, click on Reservation Calendar. Here you can see available rooms and dates.
Locate the Filter Dropdown: At the top-left corner of the calendar, you will see a Filter dropdown. Click on this to open the filter options.
Select a Room Type: From the list of filter options, scroll down to find room types like Superior King, Superior Twin, or any specific room categories that your property has. Click on the room type you wish to filter by.
View Filtered Results: The reservation calendar will automatically refresh to display only the reservations for the selected room type. You will now be able to see all reservations for the chosen room type.
How to create a walk-in reservation?
Stayflexi provides two convenient ways to create Walk-in Reservation:
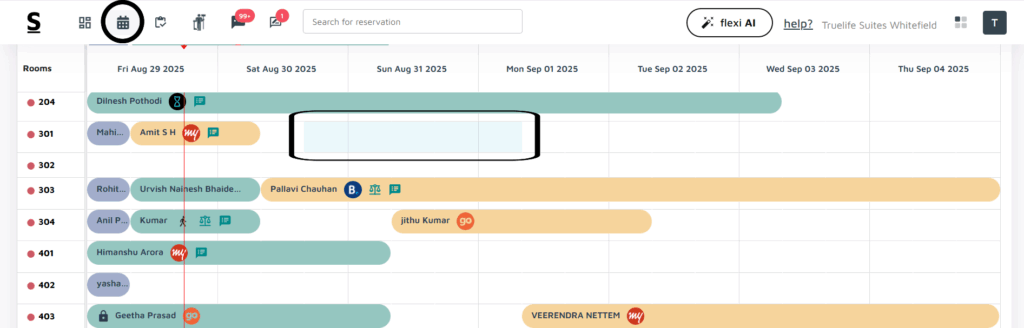
Drag-and-Drop [super friendly]
Walk-in Reservation
Below is the Drag-and-Drop method for checking in a reservation.
Login to your Stayflexi dashboard.
On the left panel, click on the Reservation Calendar [the second icon] to view all your reservations.
Select the desired date from the calendar.
Drag the booking from the Check-in date to the desired check-out date.
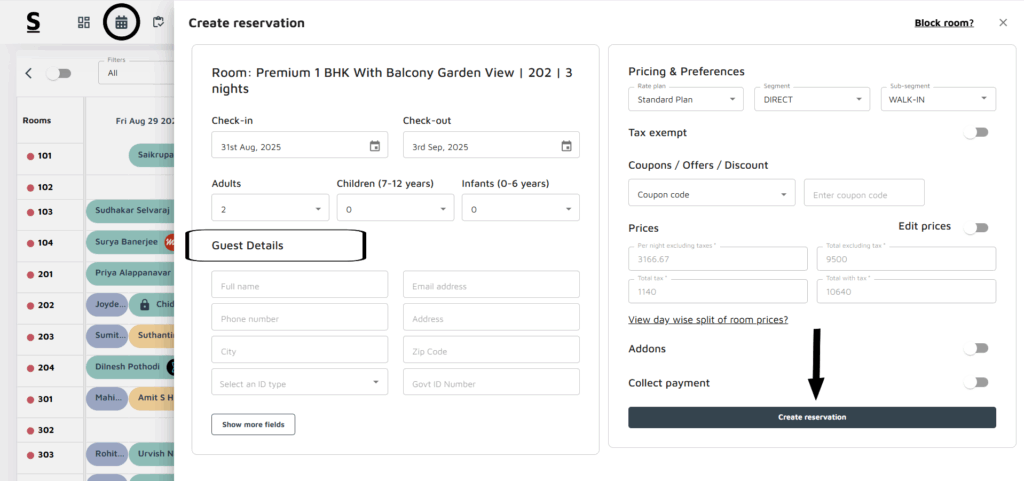
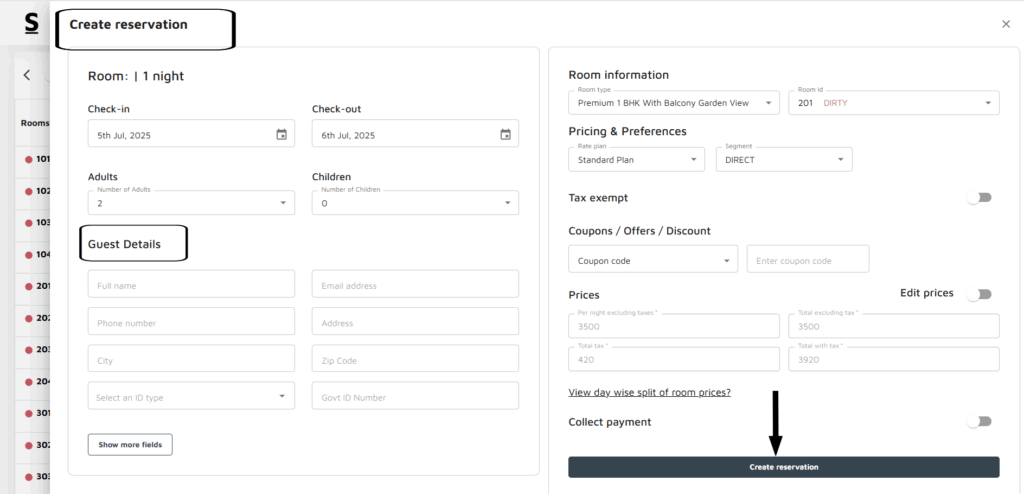
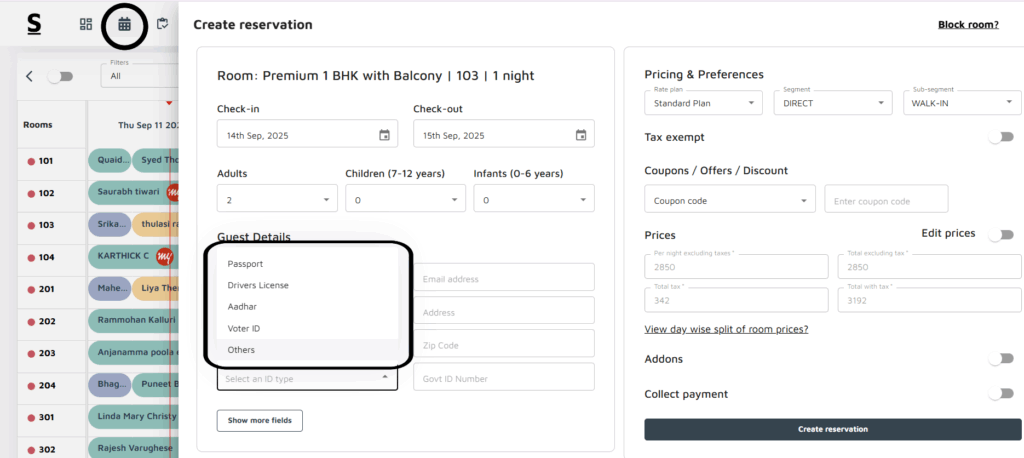
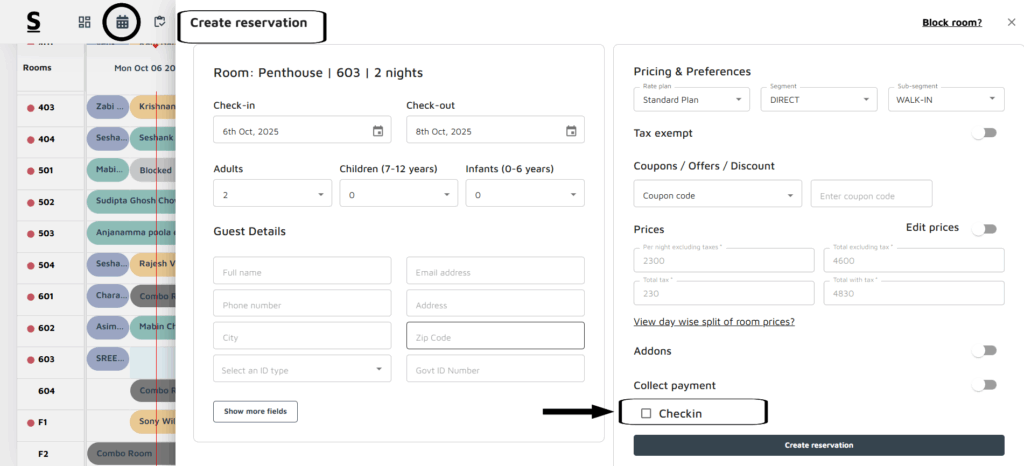
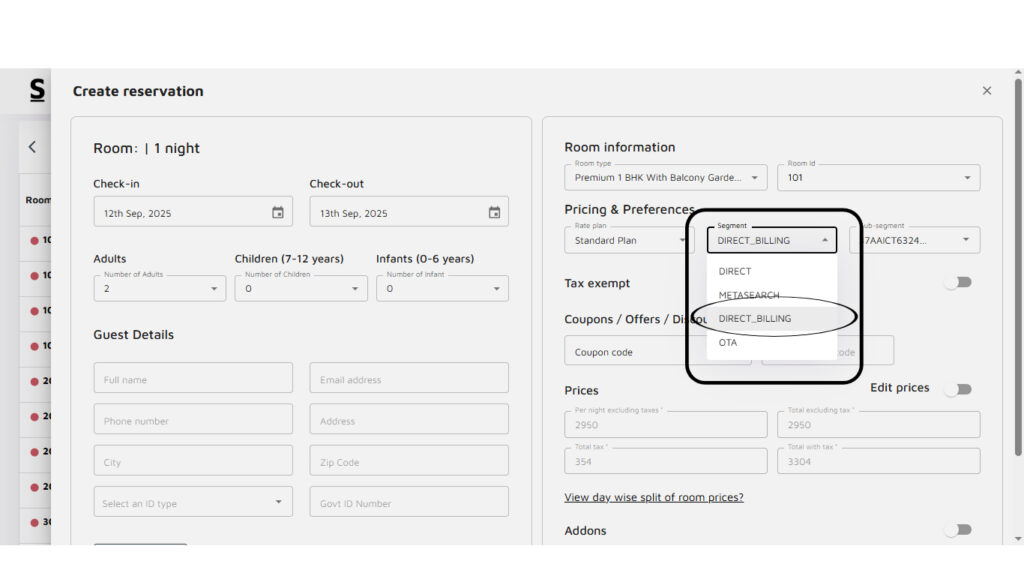
A pop-up window will appear covering the entire screen, where you can complete the guest’s details.
Guest Information Section:
Enter the guest’s Name, Email, and Phone Number.
You can also add any special requests from the guest.
ID Proof: Upload the guest’s ID Proof with Front and Back photos options
Address details: Enter the guest’s address, and select the number of adults and children for the reservation.
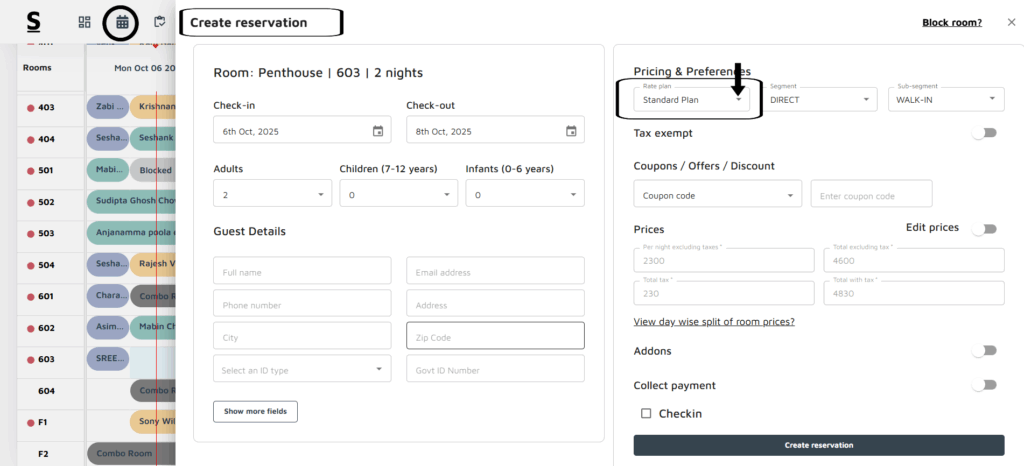
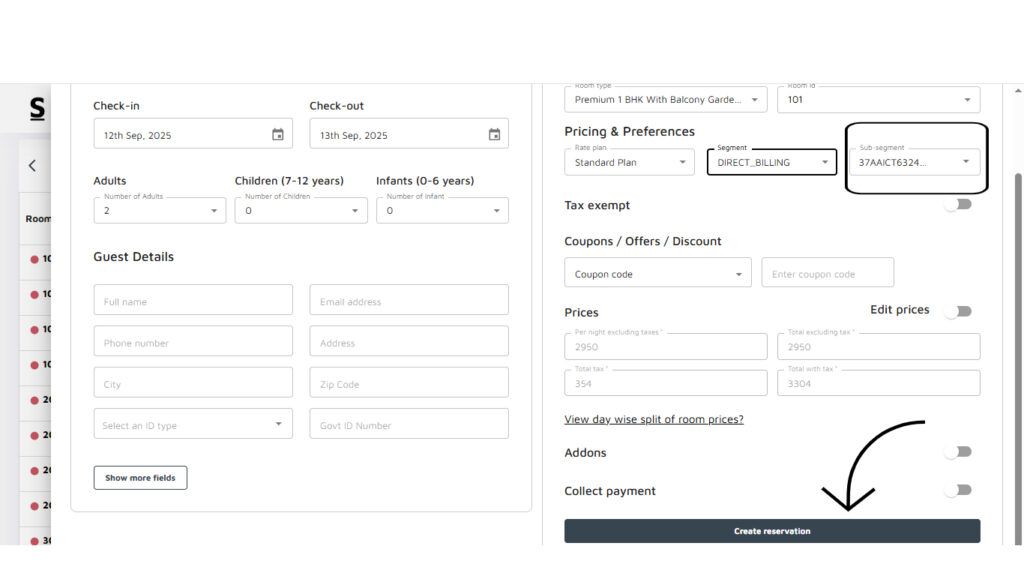
Price and Room Details:
On the right side, the system will automatically update the Room Prices, including Taxes, once the room type is selected.
After reviewing all the details, click the Create Reservation button at the bottom right of the window.
Your Walk-in reservation is now confirmed, and you’ll receive a confirmation message on the screen.
In addition to the drag-and-drop method, Stayflexi also offers the option to create Walk-in reservations for guests who book a room on the spot. Follow the steps below:
Method: 2 – To Create Walk-in Reservation:
Login to your Stayflexi dashboard.
On the left panel, click on the Reservation Calendar [the second icon] to view all your reservations.
On the top-right corner of the calendar, you will see a Create button. Click on it, and a list of 4 options will appear.
From the list, Select Walk-in.
A pop-up window will appear, covering the entire screen. Here, you’ll be prompted to enter all the necessary guest details.
Guest Information Section [Same as Drag and Drop Method]:
Enter the guest’s Name, Email, and Phone Number.
You can also add any special requests from the guest.
ID Proof: Upload the guest’s ID P roof with Front and Back photos options
Address details: Enter the guest’s address, and select the number of adults and children for the reservation.
Price and Room Details:
The system will automatically update room prices, including taxes, based on the selected room type.
After entering all the details, click on Create Reservation at the bottom of the window.
A confirmation message will appear, indicating that your Walk-in reservation has been completed.
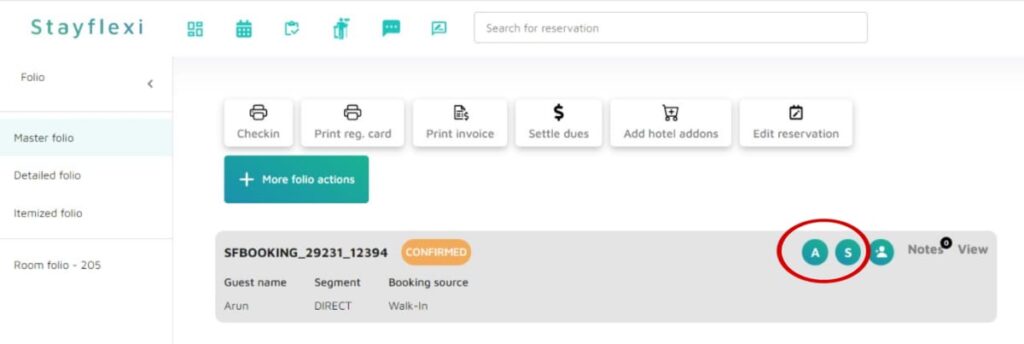
How to create a group reservation?
Follow these steps to create a group reservation in Stayflexi:
Login to your Stayflexi dashboard.
On the left panel, click on the Reservation Calendar [the second icon] to view all your reservations.
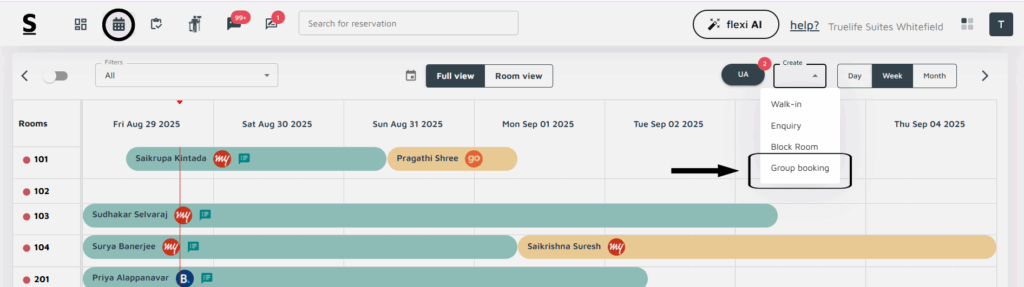
On the top-right corner, click on the Create button. A list of 4 options will appear. Select Group Booking.
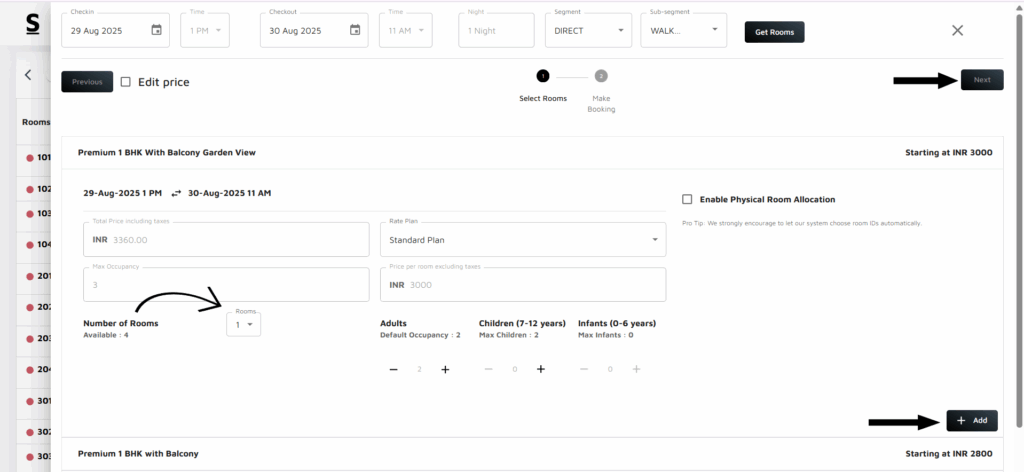
4. A pop-up window will appear. In this window:
Select the Check-in and Check-out dates and times for the group booking.
Specify the number of rooms needed and the occupancy details [number of adults and children for each room].
5. Once the room and occupancy details are filled, click the Add [+] button located at the bottom-right of the page.
After clicking the Add button, the Next button at the top of the window will be enabled. Click on it to proceed.
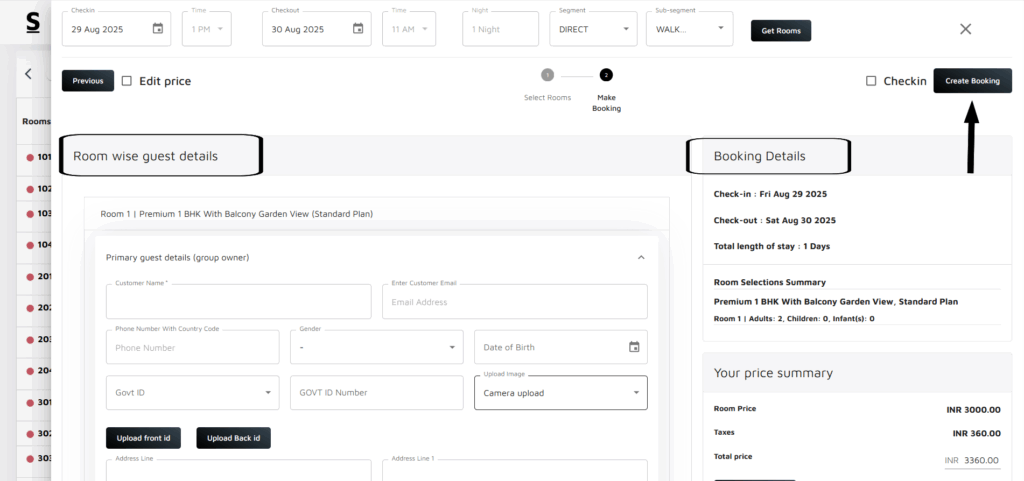
6. Another pop-up will appear for entering guest details, room-wise. The system will automatically pre-fill the check-in, check-out, occupancy, and price summary.
7. Scroll down to find the section for Accompanying Guest Details:
You can either fill in the guest information for each room or select the option to copy the details from the Group Owner. This will auto-fill the respective columns with the same information.
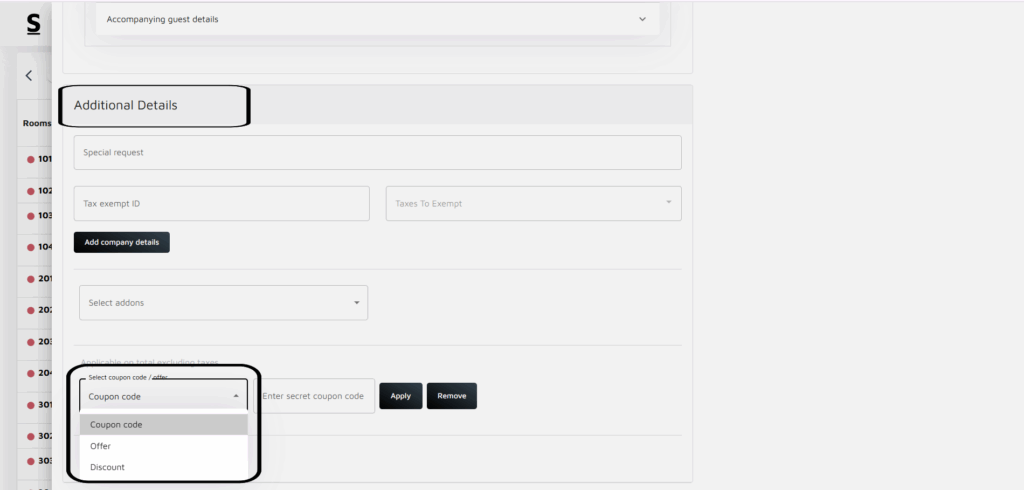
8. There is also an Additional Details section where you can add any special requests from the guest, and confirmation will go to the guest via email.
Example: The guest has requested to decorate the room for a birthday celebration or other special requirements.
9. At the bottom of the page, you will find a section for applying Coupon Codes, Offers, and Discounts. Apply or remove them as needed.
10. Once all details are reviewed and completed, click the Create Reservation button at the top-right corner.
11. You will receive a confirmation message indicating that the group booking has been successfully created.
Note: Once a group booking is created, you can easily identify it on the reservation calendar by the presence of three icons next to the guest’s name.
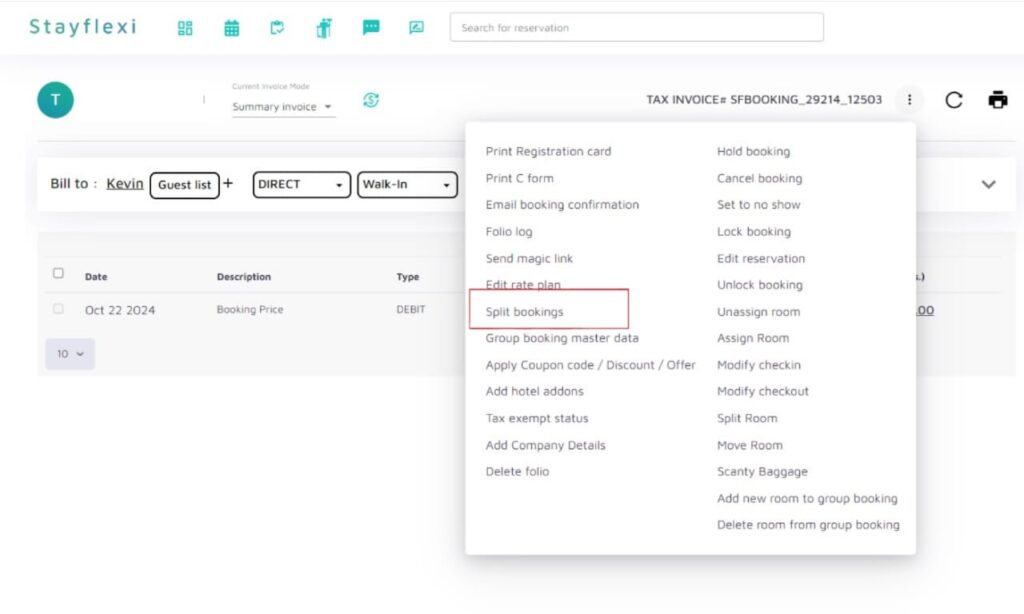
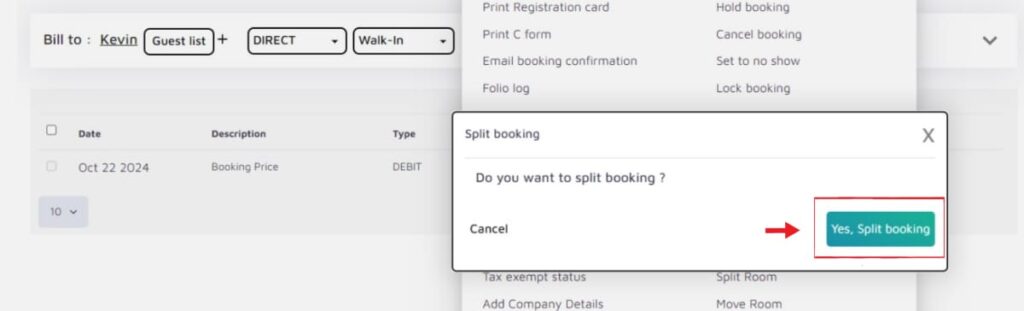
How do I create an enquiry booking and collect payment using a payment link?
Login to Stayflexi: Log into your Stayflexi dashboard with your credentials.
Go to the Reservation Calendar: From the main dashboard, click on Reservation Calendar. Here you can see available rooms and dates.
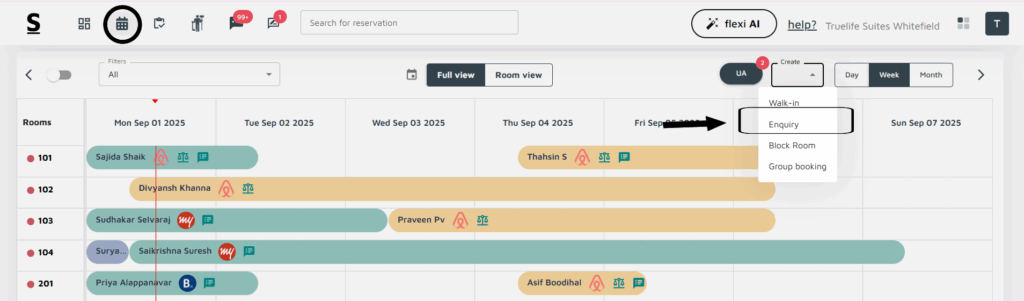
Locate the “Create” column: On the right side of the page, you will see the Create column. This column offers four booking options Walk-in, Enquiry, Block room, and Group booking.
Select Enquiry: click on Enquiry to open a pop-up form.
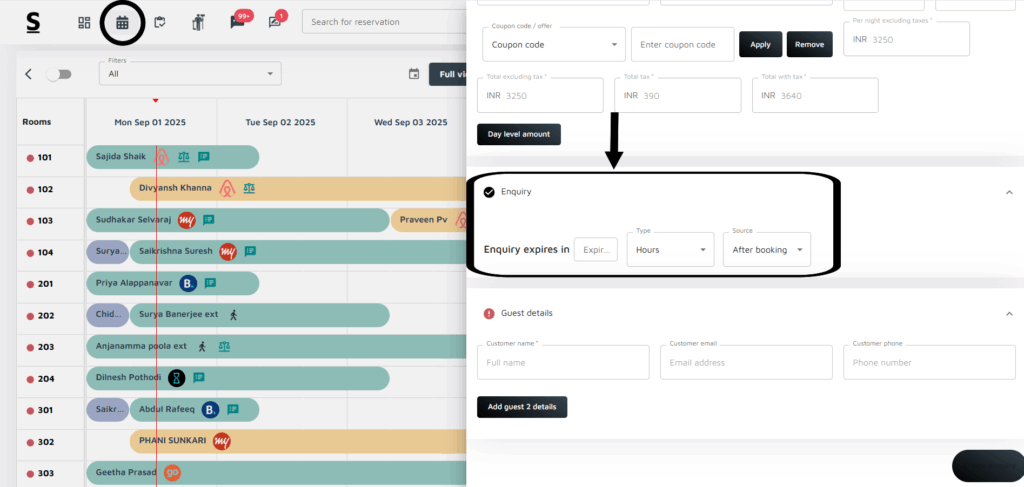
Fill in the Required Details: In the pop-up window, enter the necessary details for the enquiry, including Check-in and Check-out Dates, Guest Names, Room Type, Prices, and more.
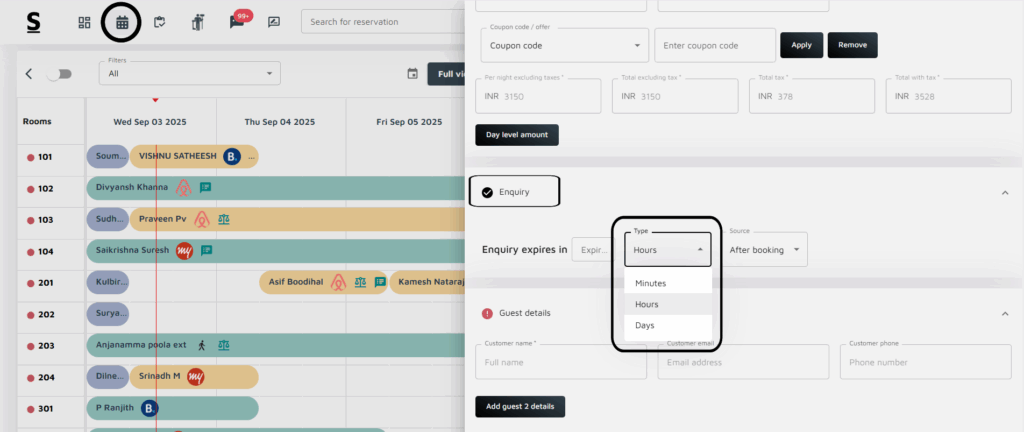
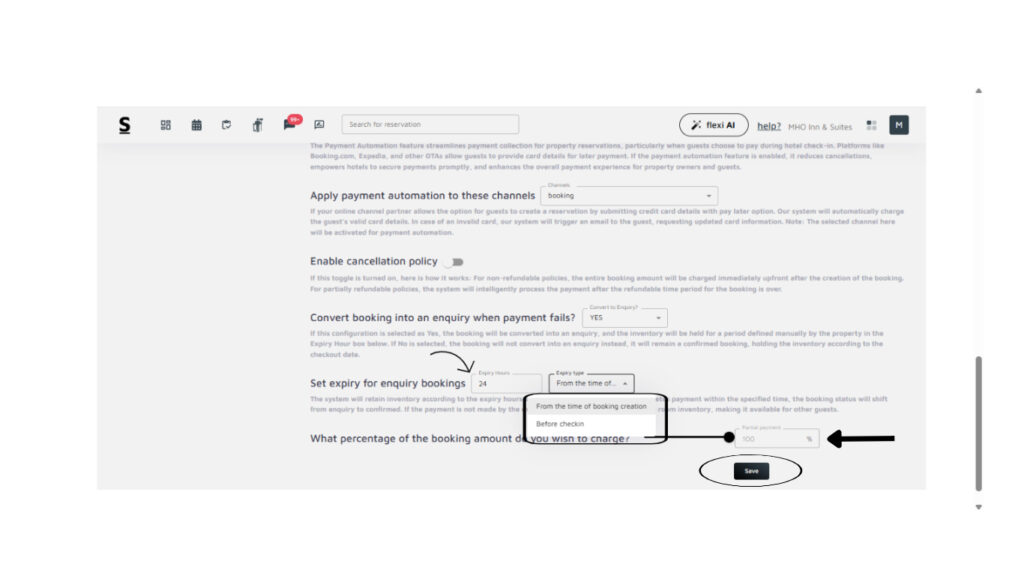
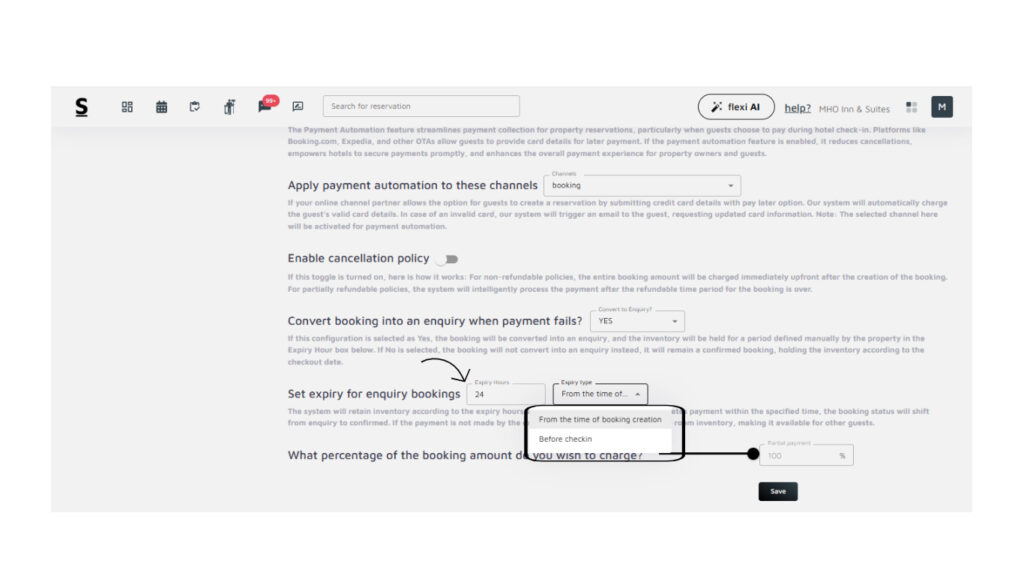
Set Enquiry Expiry Time: You can set an expiry time for the enquiry. This can be in minutes, hours, or days, based on your preference.
Create the Enquiry: Once all details are entered, click Create enquiry at the bottom right corner of the page.
Confirmation Message: You will receive a confirmation message indicating that the enquiry was created successfully, and the guest will receive all the booking details along with a payment link. Once the guest makes the payment through the provided payment link, the enquiry’s booking status will automatically update in the PMS, and the booking will be confirmed.
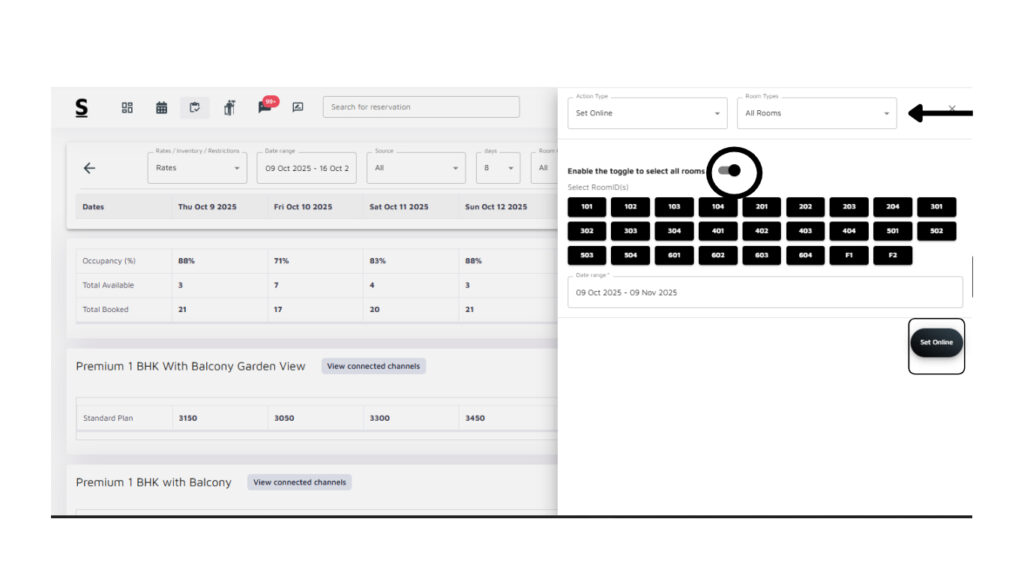
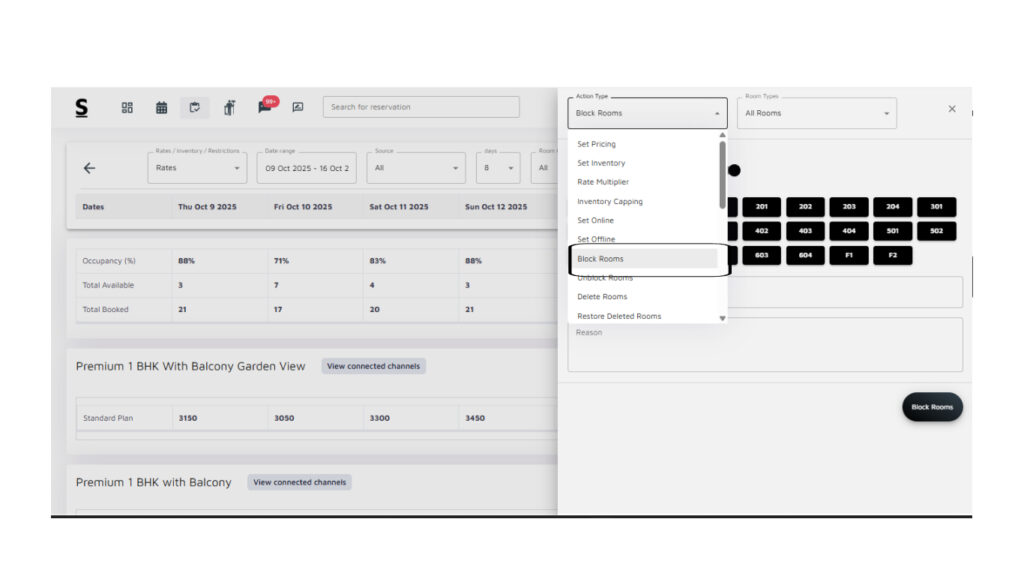
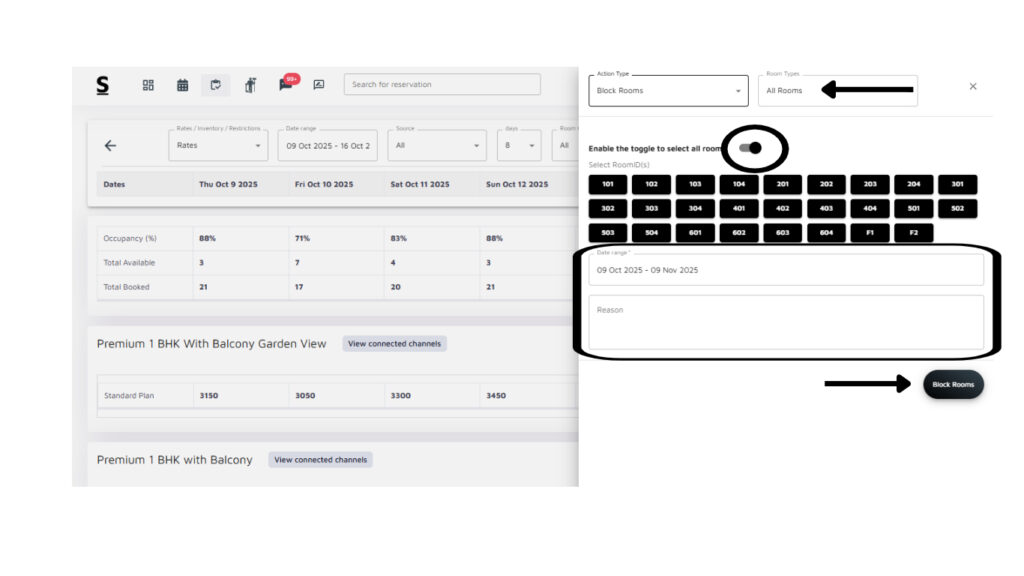
How to block or unblock rooms from reservation calendar?
Below are the step-by-step guidelines to block a room from the reservation calendar:
Login to Stayflexi: Start by logging into your Stayflexi dashboard using your credentials.
Navigate to the Reservation Calendar Tab: From the front page of the Stayflexi dashboard, locate the top navigation menu. The second icon is the Reservation Calendar. Click on the icon to view all your reservations.
Click the Create Column: On the top right corner of the calendar, you will see the Create button. Click on it to view a dropdown menu.
Select “Block Room”: In the dropdown, you will see four options: Walk-in, Enquiry, Block Room, and Group Booking. Click on Block Room.
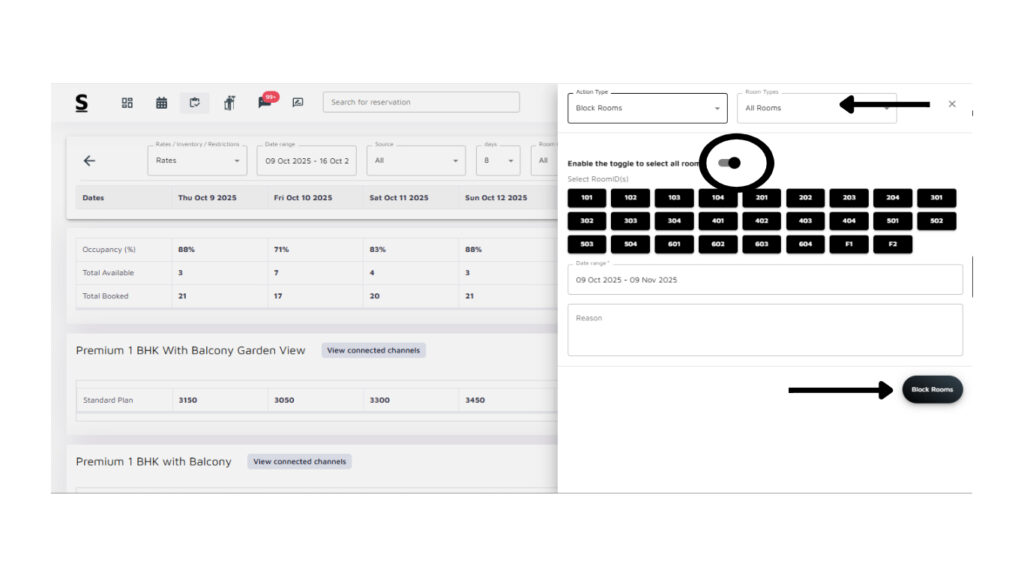
Fill in the Blocking Details: A pop-up window will appear on the right side of the screen. Enter the required details such as Room type, Room ID, and Date Range. There is also an optional field to provide the Reason for Blocking the room.
Confirm Blocking: After entering the details, click the Block Room button at the bottom of the pop-up.
Confirmation Message: You will see a confirmation message indicating that the room has been successfully blocked. To view the block reason, click on the blocked room, and it will display the reason you entered at the time of blocking the room.
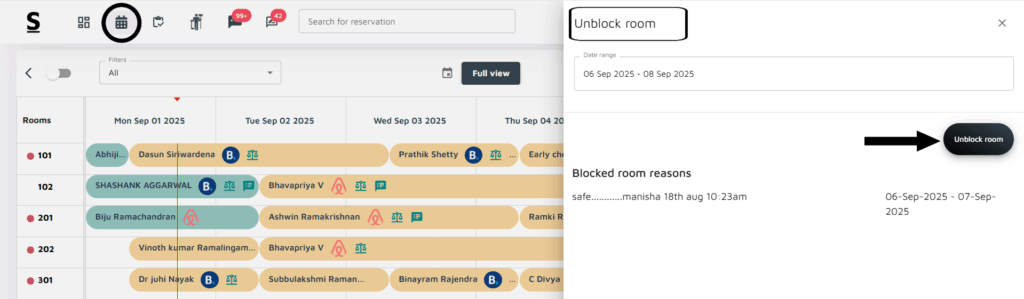
Below are the step-by-step guidelines to Unblock a room from the reservation calendar:
Locate the Blocked Room: In the reservation calendar, the blocked room will be displayed in grey.
Click on the Blocked Rooms: Select the blocked room from the calendar. A pop-up window will appear on the right side of the screen.
Select the Date Range: In the pop-up window, you can adjust the Date Range for the room block if needed.
Unblock the Room: You will see an option to Unblock the room. Click on the Unblock button.
Confirmation Message: After unblocking, you will receive a confirmation message that the room has been successfully unblocked.
How to Modify Check in and Check out date of reservations ?
Below is the step-by-step explanation of the modification of check in and check out date for a reservation in Stayflexi:
Login to Stayflexi: Start by logging into your Stayflexi dashboard using your credentials.
Navigate to the Reservations Tab: From the front page of the Stayflexi dashboard, locate the top navigation menu. The second icon is the Reservation Calendar. Click on the icon to view all your reservations.
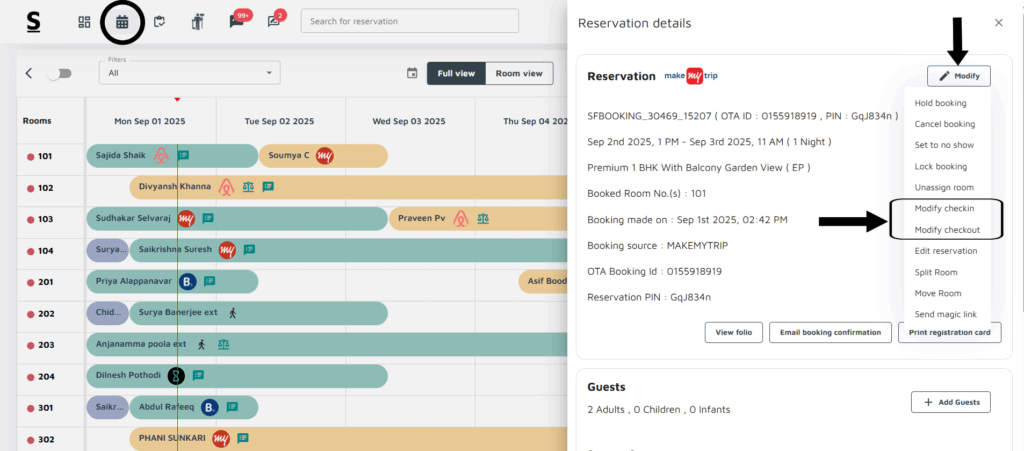
Select the Desired Reservation: Click on the desired reservation, that you wish to modify.
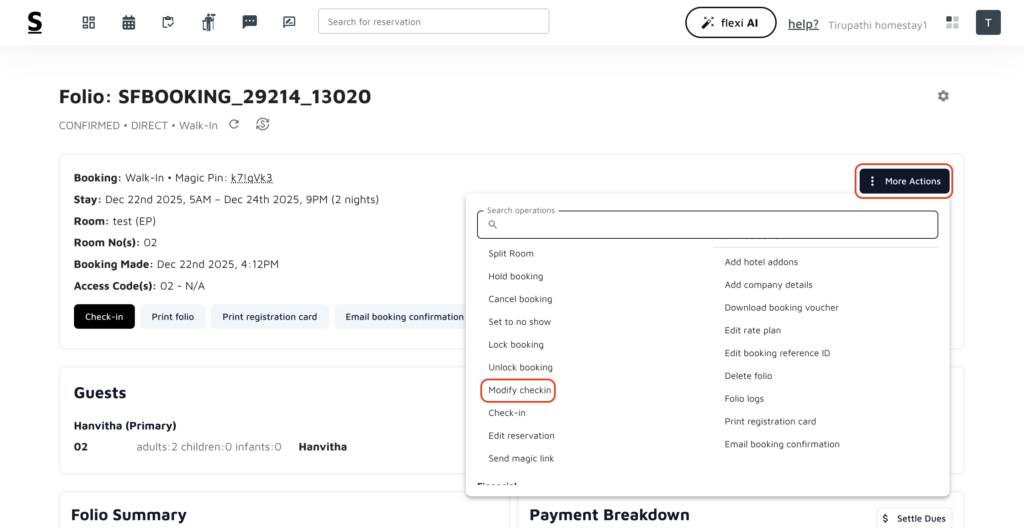
Reservation Information Pop-up: A pop-up will appear on the right side of the screen, providing the key details about the selected reservation. Click on the modify option to view the list of options.
Modification Option: You will see options to modify the check-in and check-out dates in the list, allowing you to adjust the reservation as needed with a calendar icon.
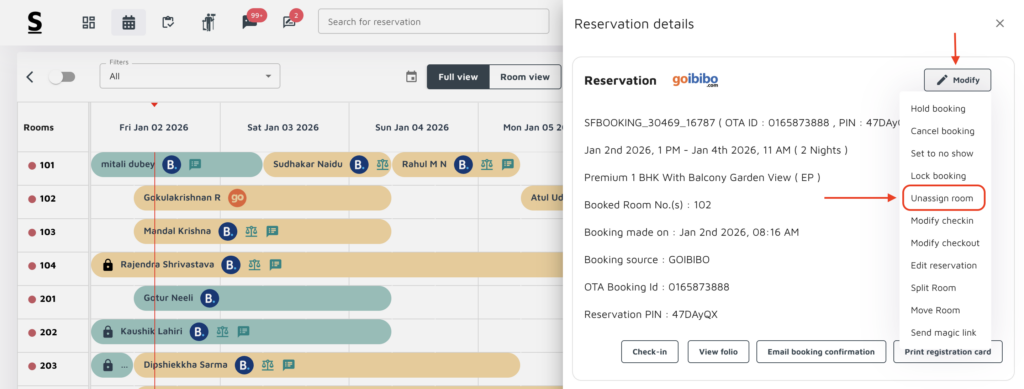
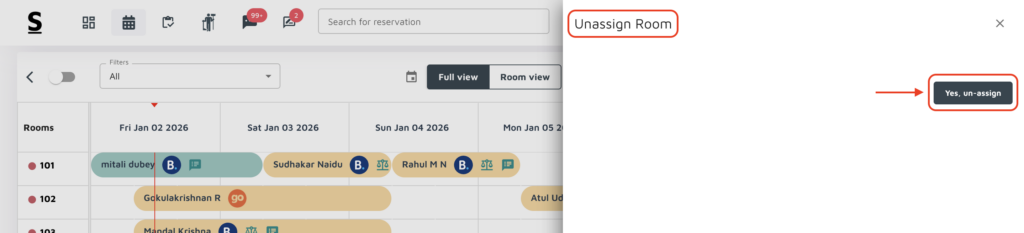
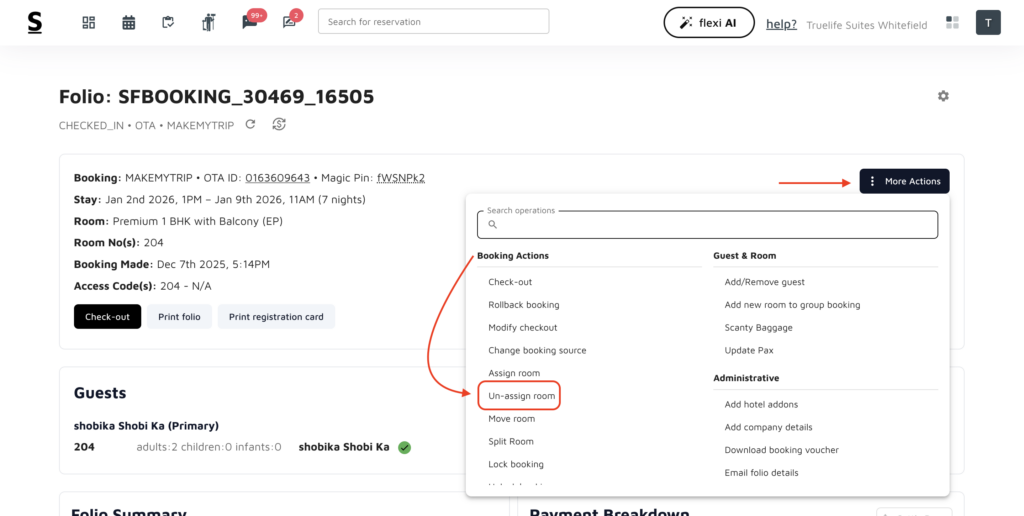
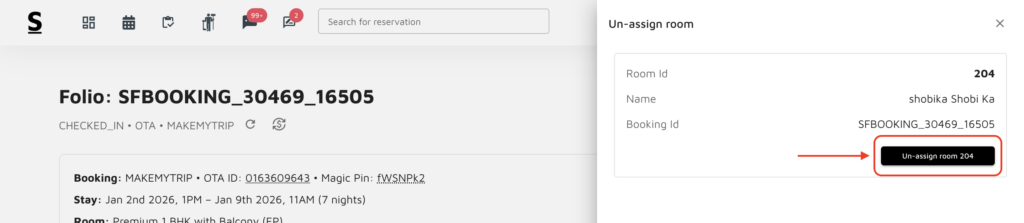
What are unassigned reservations? how to assign room?
Unassigned reservations are bookings that haven’t been allocated to a specific room yet. They appear in the Unassigned Reservations column in the Stayflexi reservation calendar, waiting to be assigned to a room. They could be from guest enquiries, online bookings, or other sources that need manual room assignments.
Follow the steps mentioned below to assign unassigned reservations from the Stayflexi reservation calendar:
Login to Stayflexi: Log into your Stayflexi dashboard using your credentials.
Navigate to the Reservations Tab: From the front page of the Stayflexi dashboard, locate the top navigation menu. The second icon is the Reservation Calendar. Click on the icon to see all your reservations.
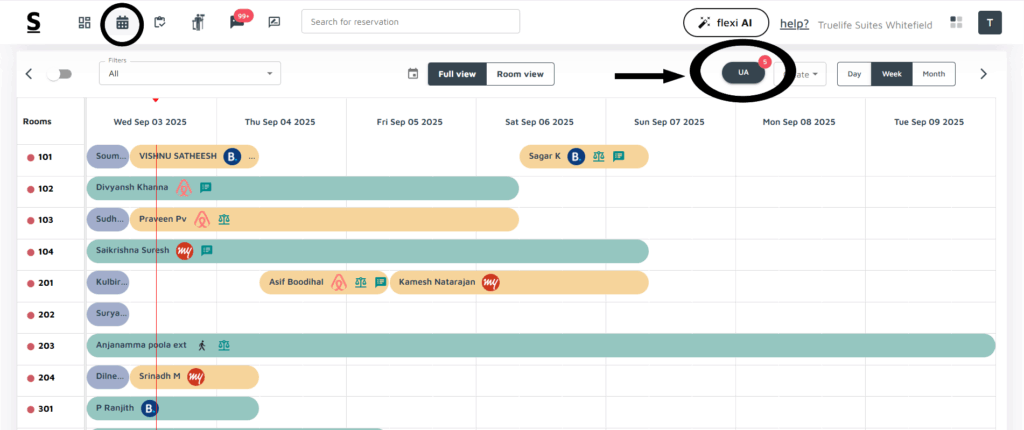
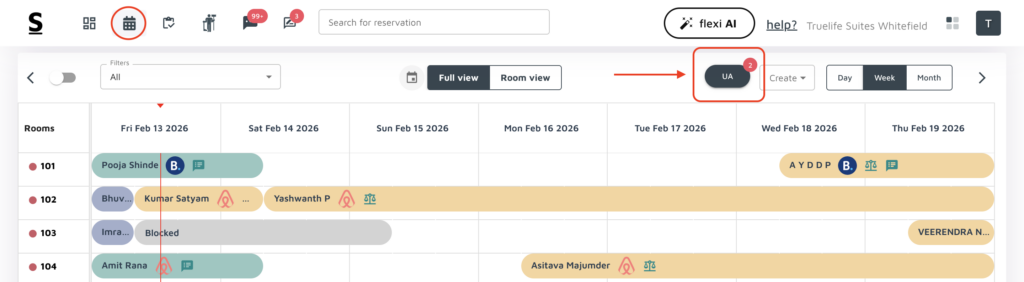
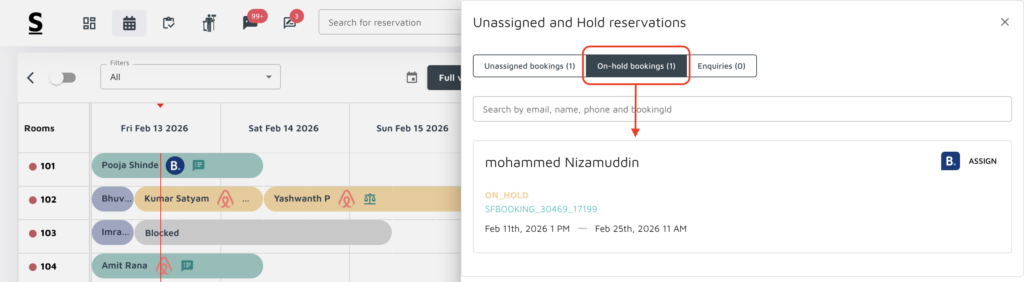
Find the Unassigned Tab: In the top middle of the calendar, next to the Date Range Selector, you’ll see the Unassigned tab. This tab automatically displays all reservations that have not been assigned to rooms.
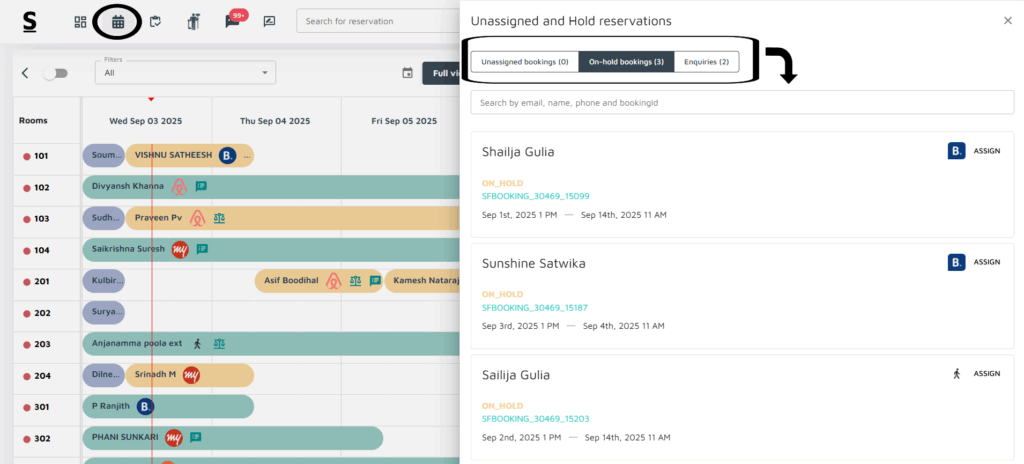
Click to View Details: When you click on the Unassigned tab, a pop-up will appear on the right side of the screen.
The Pop-up is divided into three sections:
Unassigned Reservations: Shows reservations waiting to be assigned.
On Hold Bookings: Displays reservations that are temporarily on hold. These are not confirmed bookings system will not hold inventory.
Enquiries: Lists enquiries made by guests that need further action before becoming confirmed reservations.
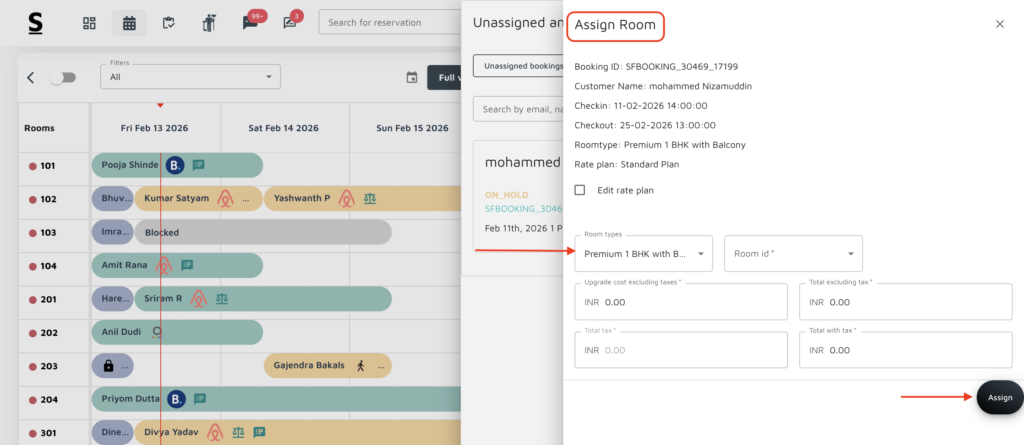
Select a Reason: Click on any reservation under these categories to view details.
View Guest Information: Detailed information about the guest will be displayed after selecting a reservation.
Click the Assign Button: You’ll see an Assign button next to the guest details. Click the Assign button to allocate the reservation to a suitable room.
Confirmation Message: Once the reservation is assigned, a confirmation message will appear, confirming that the booking has been successfully assigned a room.
Can I create a booking enquiry with an automatic expiration if payment is not received, and auto-confirm it upon payment?
Yes, In Stayflexi, you can create a booking enquiry that is based on minutes, hours, or days, and it will automatically expire if the guest doesn’t make the payment within the specified time. Here’s how it works in more detail:
Create Time-Sensitive Booking enquiries:
When you create a booking enquiry, you have the flexibility to set an expiration window that fits your needs. This could be in minutes [for short-term bookings like hourly stays], hours, or even days [for longer enquiries].
The booking enquiry will hold the room or service for the guest during that period. However, it will not be confirmed until payment is received.
The system automatically tracks the time and, if the payment is not made within the set period, the inquiry will expire and the room will be released back into availability. This prevents rooms from being blocked indefinitely without any payment.
Automatic Expiry Without Payment:
If the guest does not complete the payment within the specified time, the enquiry expires automatically, and the booking request is canceled.
This ensures that rooms don’t remain held for too long, improving your occupancy management. You no longer need to manually track unpaid inquiries or release rooms, as the system handles this automatically.
Automatic Confirmation With Payment:
If the guest completes the payment within the expiration window, the system will automatically confirm the booking.
This means there’s no need for manual confirmation or additional follow-up. The enquiry is seamlessly converted into a confirmed reservation, streamlining your operations and saving time for both property staff and guests.
Can I capture and upload a guest’s photo directly from the device camera in the Stayflexi PMS?
YES, Stayflexi allows you to capture and upload a guest’s photo directly from your device’s camera through the software. This feature is especially useful during check-in or when updating guest profiles.
How It Works:
When check-in a guest, you can use the device’s camera [such as a tablet or computer with a webcam] to take their photo instantly.
The photo is then uploaded directly into the guest’s profile or booking record, eliminating the need for manual uploads or external devices.
Benefits:
seamless Process: No need to upload images from external devices, making the process faster and more efficient.
Better Guest Identification: Storing the guest’s photo ensures accurate identification, helping to avoid any mix-ups.
Improved Security: It adds an extra layer of security to your operations by visually verifying the guest’s identity during check-in.
Enhanced Record-Keeping: Photos are stored within the system along with the guest’s information, making them easily accessible for future reference or for the record purpose.
What is the difference between "Move" and "Swap" rooms in the reservation calendar?
In Stayflexi’s reservation calendar, both move and swap room actions allow flexibility in managing guest reservations, but they serve different purposes and operate in distinct ways. Below is the detailed breakdown:
MOVE ROOM:
What It Means: Moving a room involves relocating a reservation from one room to another. This action is typically done when a guest needs to be reassigned to a different room and involves only one reservation at a time.
When to Use It:
When there’s a maintenance issue in the current room, the guest must be placed in a different room.
When a guest requests an upgrade or downgrade to another room.
When you want to free up a particular room for operational reasons [e.g., preparing for a VIP guest or a specific room type request]
How It Works:
The reservation’s details stay the same [like the dates and guest information], but the room assignment changes.
The original room becomes available for new bookings or other uses.
Example:
A guest is booked in Room 105, but due to an upgrade request, you move the reservation to Room 201. The booking is now linked to Room 201, and Room 105 becomes available for another guest.
Benefits:
Efficient Room Management.
Quick Problem-Solving.
No need to Recreate Bookings.
SWAP ROOM:
What It Means: Swapping rooms refers to exchanging room assignments between two different reservations. Instead of just moving one reservation, this involves two reservations that trade places in terms of room assignment.
When to Use It:
When two guests need to exchange rooms for reasons such as preference for specific room types or locations.
To balance room allocations [e.g., if a guest booked a more expensive room but the current room is not available, and another guest’s room can be swapped].
How It Works:
In the reservation calendar, you select the two reservations you want to swap.
Both reservations retain all other details [like guest information, check-in and check-out dates], but their room assignments switch.
Example: Guest A is staying in room 202, and guest B is staying in Room 203. If you swap the rooms, Guest A will now stay in Room 203, and Guest B will move to Room 202.
Benefits:
Efficient Room Adjustments.
Guest Satisfaction.
Save Time and Effort.
Key Differences:
Move Room: Only affects one reservation and relocates it to a new room. It’s a one-way shift.
Swap Rooms: Affects two reservations and switches their room assignments, essentially making a direct trade between two rooms.
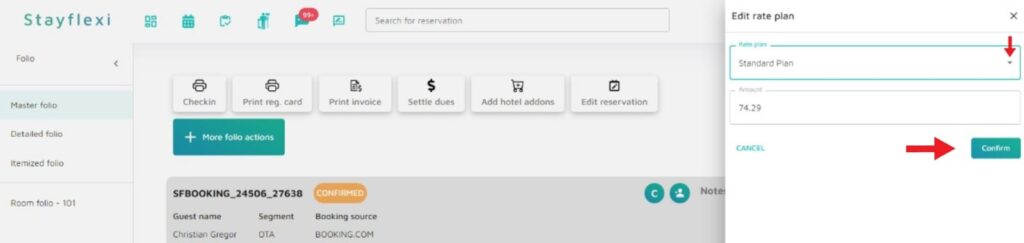
How to upgrade or downgrade a reservation?
Upgrade a Reservation in Stayflexi:
If a guest wants to upgrade their room, they are moving from their current room to a better one, which typically includes more amenities and a higher price.
Example: Upon arrival, a guest originally booked a standard room but decides they want more luxury and requests to move to a deluxe suite with a better view and added amenities. The hotel can easily process this request in Stayflexi by upgrading the reservation and adjusting the rate accordingly.
Downgrade a Reservation in Stayflexi:
If a guest wants to downgrade their room, they wish to move from their current room to one of a lower category, usually at a lower price.
Example: A guest initially booked a deluxe room but decides that the standard room will suffice for their stay, perhaps due to a change in budget or preference. The hotel can easily accommodate this request by downgrading the reservation, and Stayflexi will adjust the room rate to reflect the new booking.
How to Upgrade or Downgrade Reservation in Stayflexi:
Login to Stayflexi: Log into your Stayflexi dashboard using your credentials.
Navigate to the Reservations Tab: From the front page of the Stayflexi dashboard, locate the top navigation menu. The second icon is the Reservation Calendar. Click on the icon to see all your reservations.
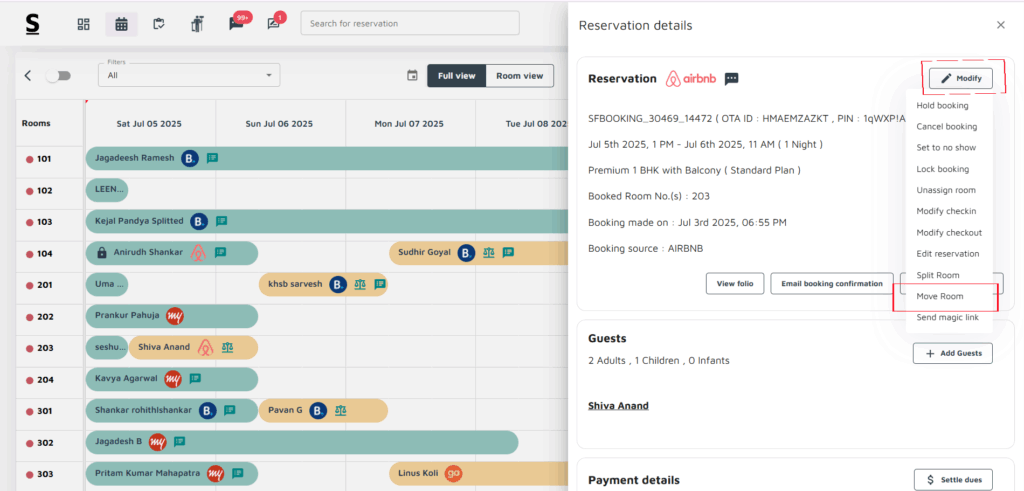
Select the Reservation that you want to Upgrade or Downgrade.
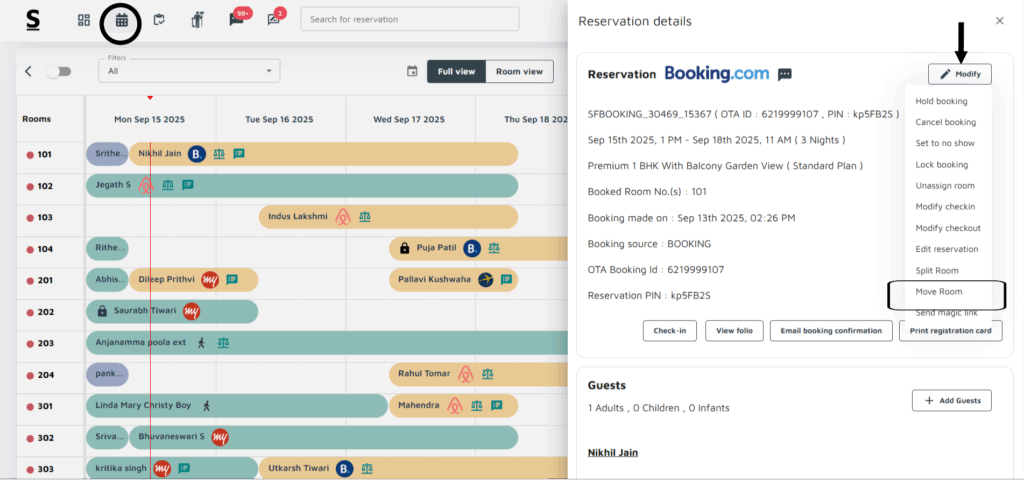
A pop-up window will appear on the right side of the screen showing the Reservation details.
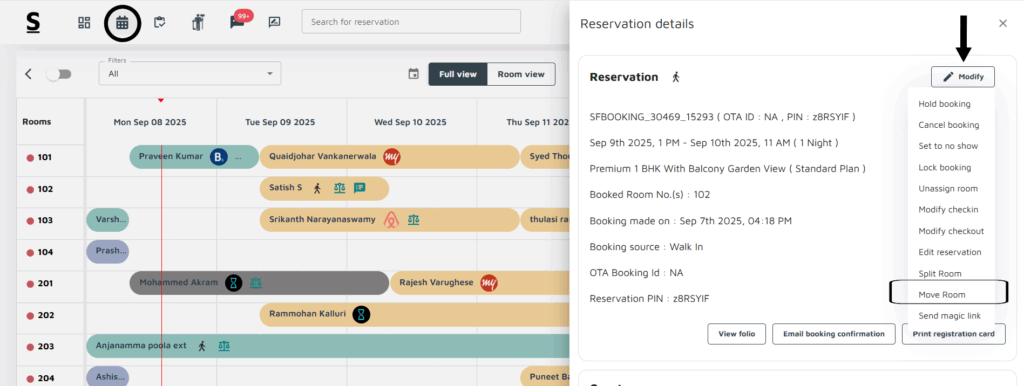
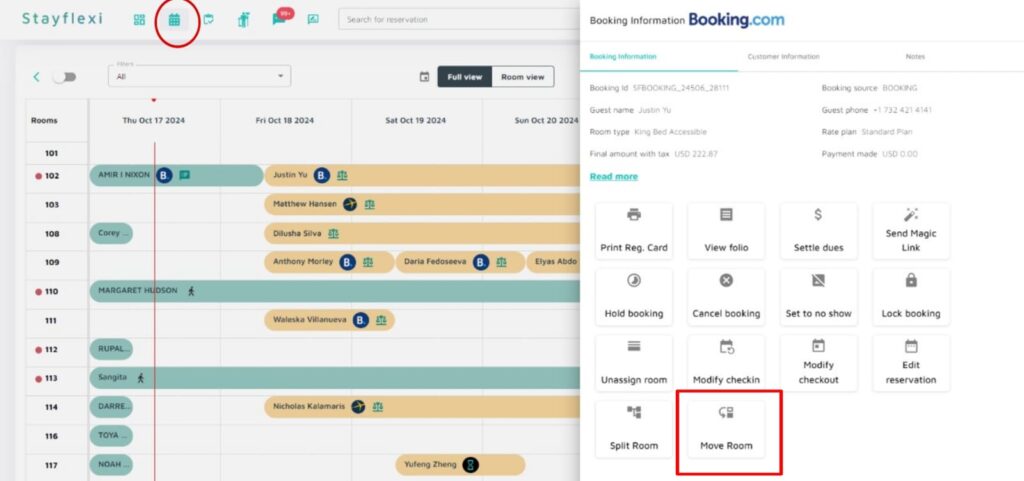
Look for the ‘Modify’ option in the right corner, and click on it to view the list of options.
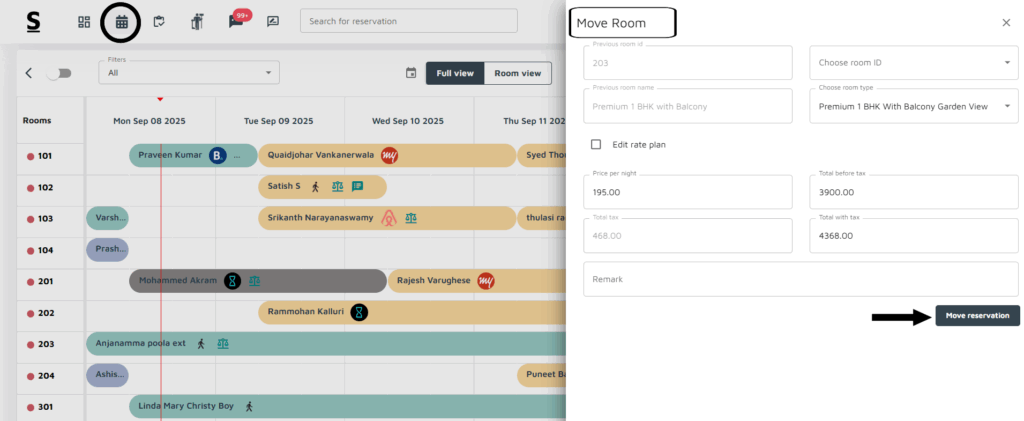
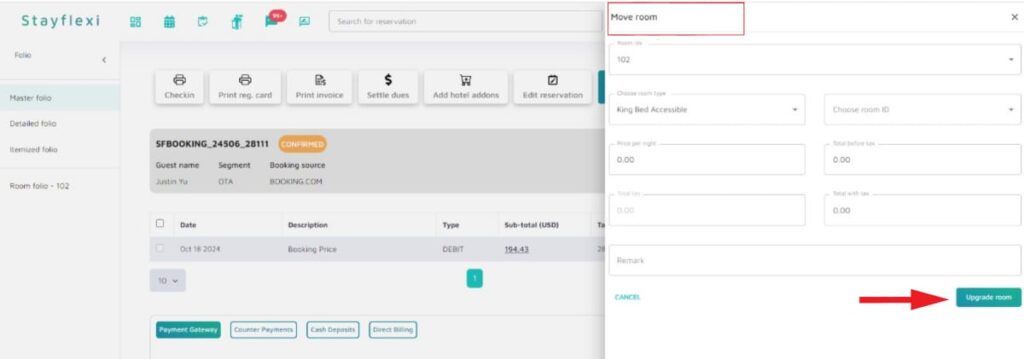
Scroll down to see multiple actions you can perform, and find the Move Room option. Click on it.
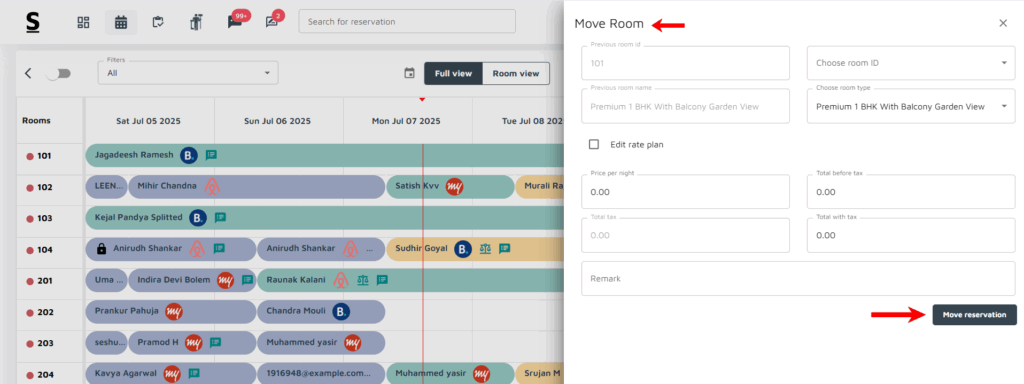
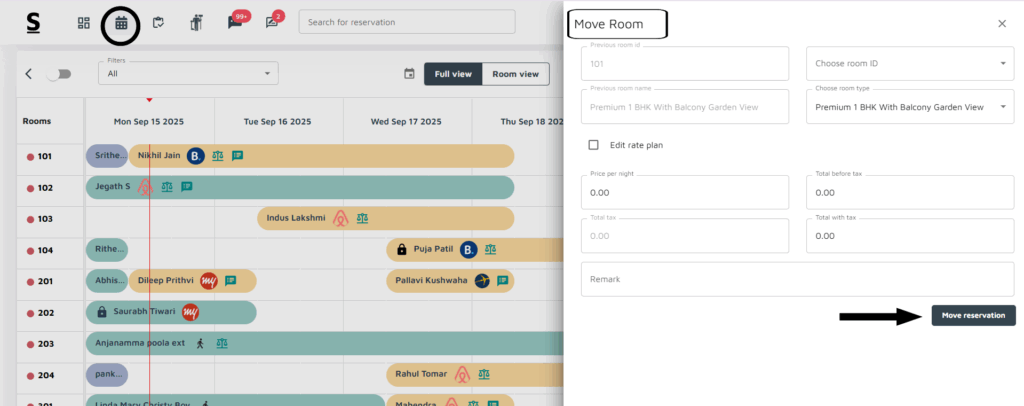
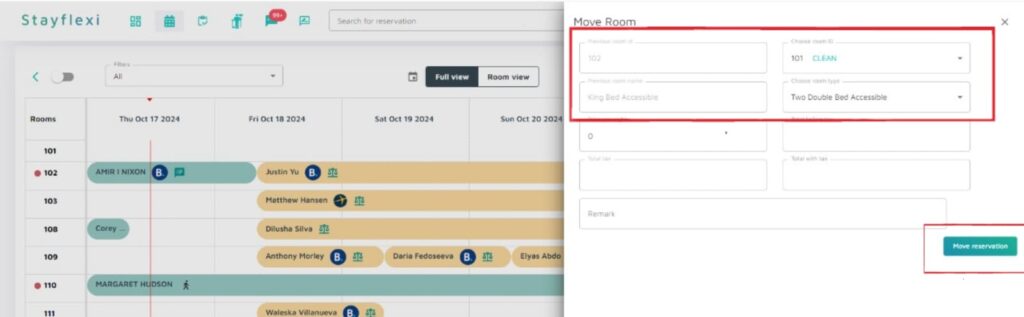
Another pop-up will appear, displaying the room details:
On the left side, you will see the existing room type, room ID, and current price.
On the right side, you will find the new room options for Upgrading or Downgrading.
If you select opt for higher room category [Upgrade], the price will automatically adjust, and the system will show the price difference with a” + ” sign, indicating the additional amount the guest will need to pay.
If the guest opts for a lower room category [Downgrade], the system will show the price difference with a ” – ” sign, indicating the refund or reduced cost.
Once you fill in the required details according to the guest’s preference, click on the Move Reservation button located at the bottom-right corner of the screen.
You have successfully Upgraded or Downgraded the reservation, you will now receive a confirmation message.
When upgrading a reservation from a lower room category to a higher one, should I input the entire charge or only the additional amount?
When upgrading a reservation in Stayflexi, the system is designed to make the process easy and accurate. Once you select a new room type for an upgrade, the system automatically calculates the difference in price between the original room and the upgraded room.
Here’s how it works:
Original Booking: The guest has already booked a room at a specific rate, for example, a Standard Room at $100 per night for 3 nights, totaling $300.
Selecting the Upgrade: When you choose a new room type, such as upgrading to a Deluxe Room at $150 per night, you don’t need to manually calculate the additional cost.
Automatic Price Update: The system instantly calculates the difference between the original rate and the new rate. In this case, it will calculate the $50 difference per night ($150 – $100). For a 3-night stay, the system will automatically add $150 (3 nights x $50) to the original total, generating a new total of $450.
Final Charge: The system updates the reservation total, ensuring that the guest is charged only the additional amount for the upgraded room. This process avoids manual errors and makes sure the correct price is applied.
This automated feature ensures that the property can quickly and accurately process upgrades, while the guest is charged with the correct amount for their stay based on the new room selection.
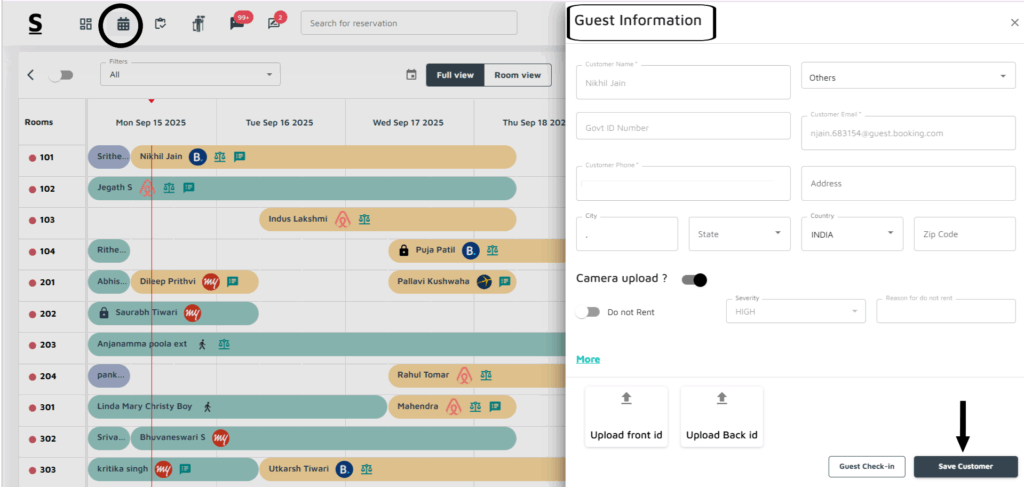
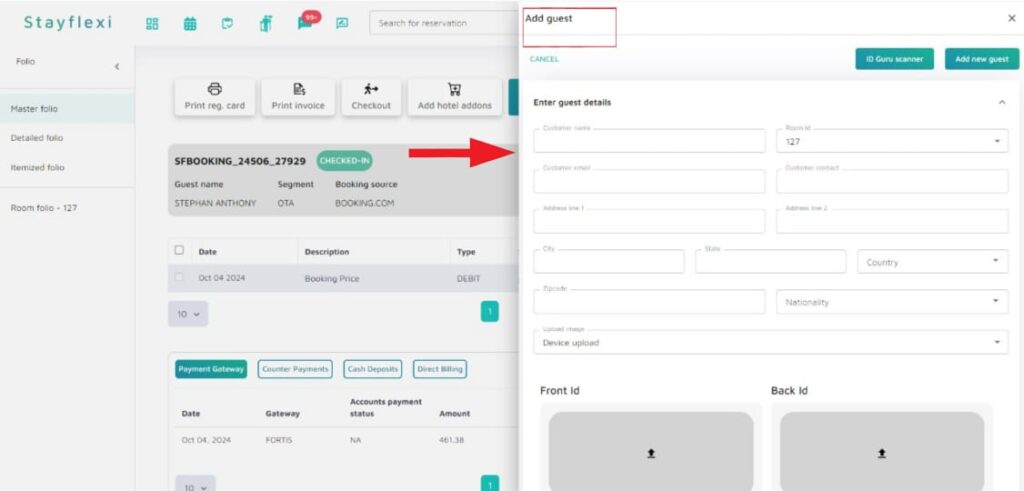
How can I upload guest ID proof in the PMS while creating or editing a reservation?
Below are the guidelines on how to upload guest ID proof in the PMS while creating or editing a reservation.
Login to Stayflexi: Log into your Stayflexi dashboard using your credentials.
Navigate to the Reservations Tab: From the front page of the Stayflexi dashboard, locate the top navigation menu. The second icon is the Reservation Calendar. Click on the icon to see all your reservations.
Select and click on the Reservation that you want to upload guest ID proof in the PMS.
A pop-up window will appear on the right side of the screen showing the Reservation details.
Reservation details: This is the page where you can see the guest information, where their details will be displayed.
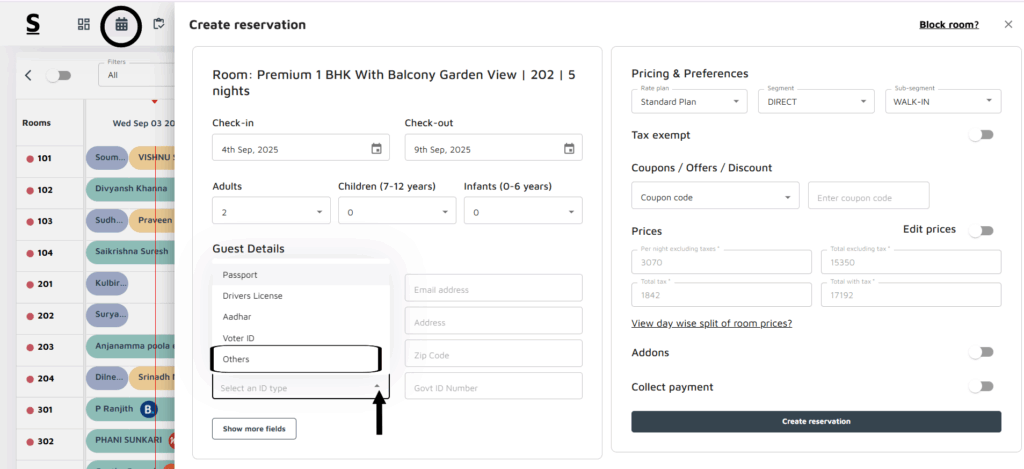
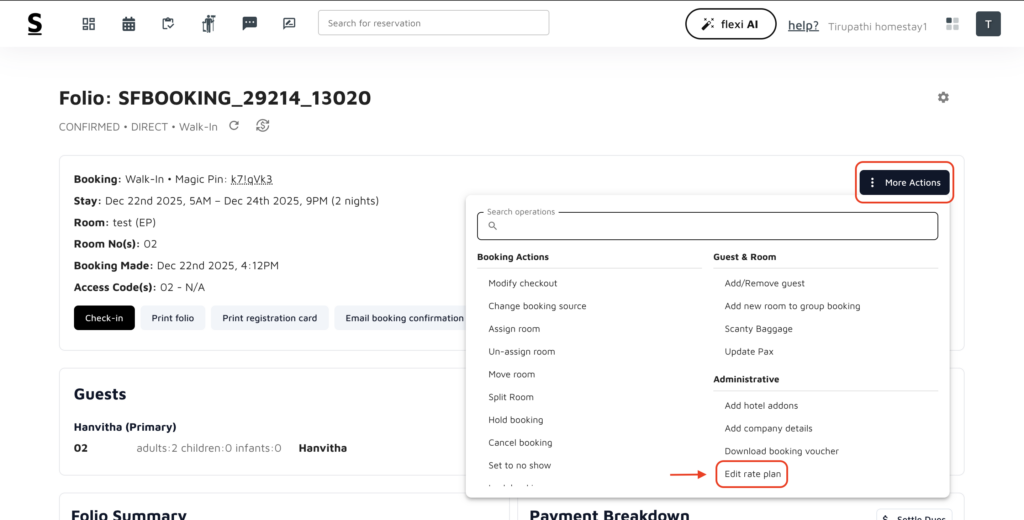
Upload Image Section: At the bottom of the customer information screen, you’ll find list of options. Click on others.
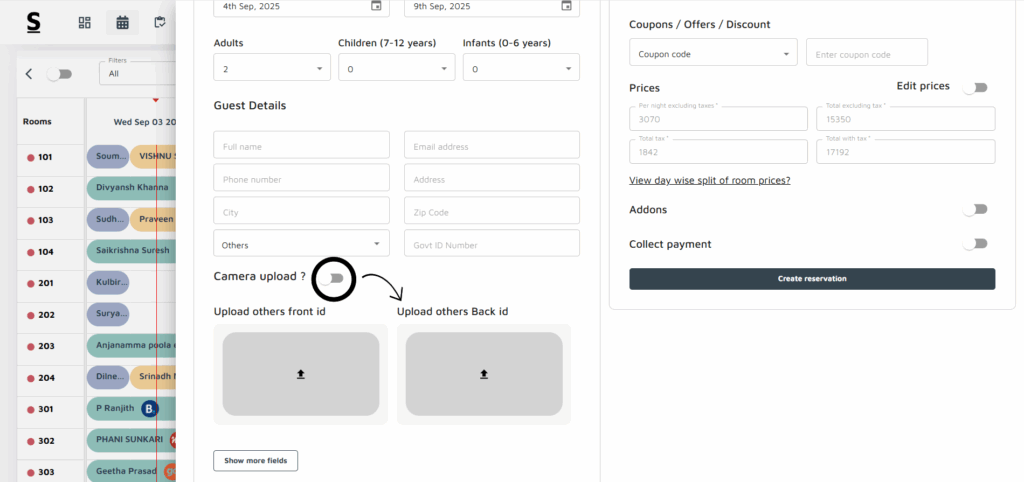
Select Camera or Device Upload: Click on this option, and you’ll see two choices- Camera Upload or Device Upload.
Camera Upload lets you capture an image directly from your camera.
Device Upload allows you to upload images from your device.
Select Device Upload: Choose Device Upload if you have the images saved on your computer or device.
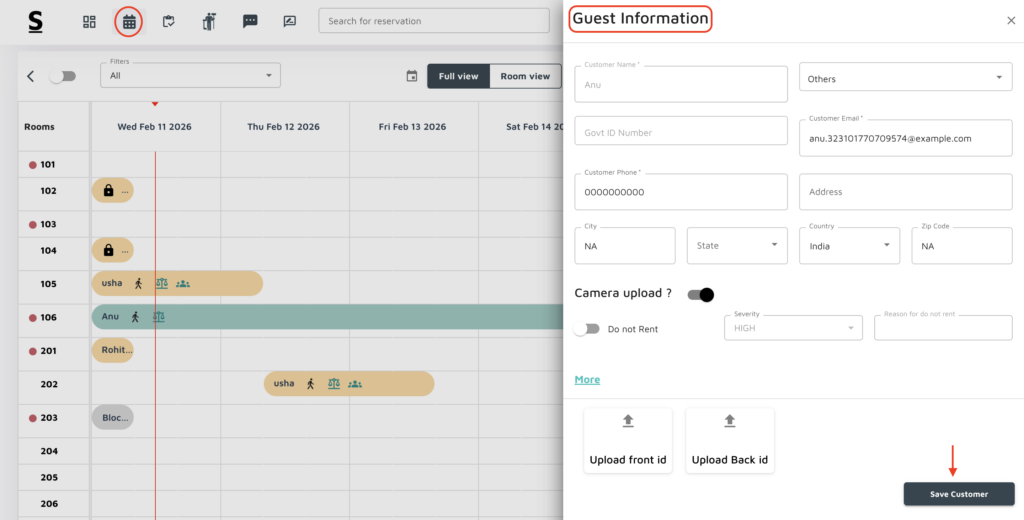
ID Image Upload: You will see two fields: ID Front and ID Back.
Upload the front side of the guest’s ID in the ID front section.
Upload the back side of the ID in the ID Back section.
Use the file selection options to choose images from your device’s gallery or desktop.
Save the Customer Information: After uploading both images, click the Save Customer button to complete the process. This will store the images and update the customer’s information in Stayflexi.
Can I import booking data from another PMS, and what steps are required for that?
YES, you can import booking data from another PMS into Stayflexi. Here’s how you can do it:
To import booking data from another PMS to Stayflexi, follow the below-mentioned guidelines:
Login to Stayflexi: Start by logging into your Stayflexi dashboard using your credentials.
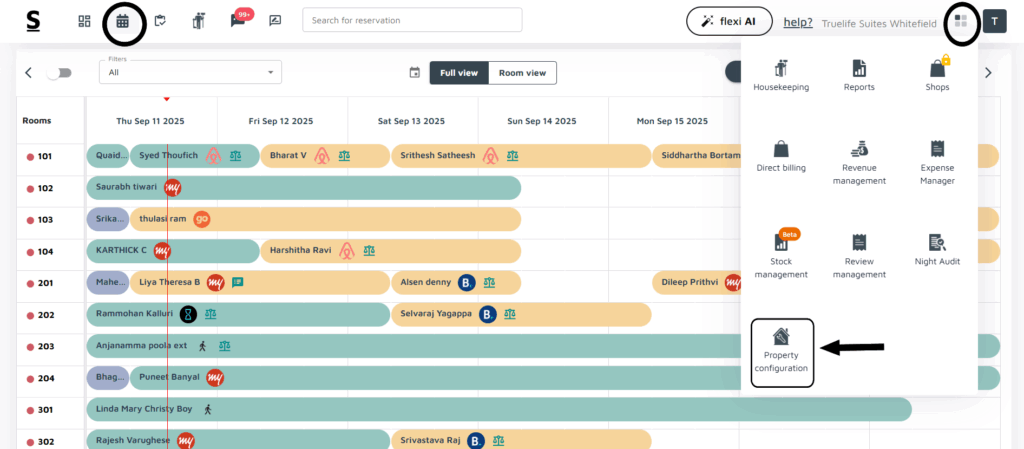
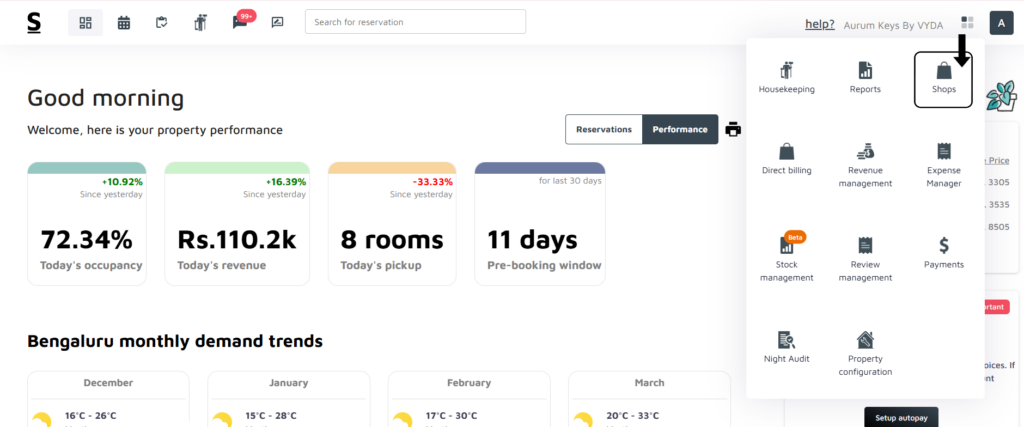
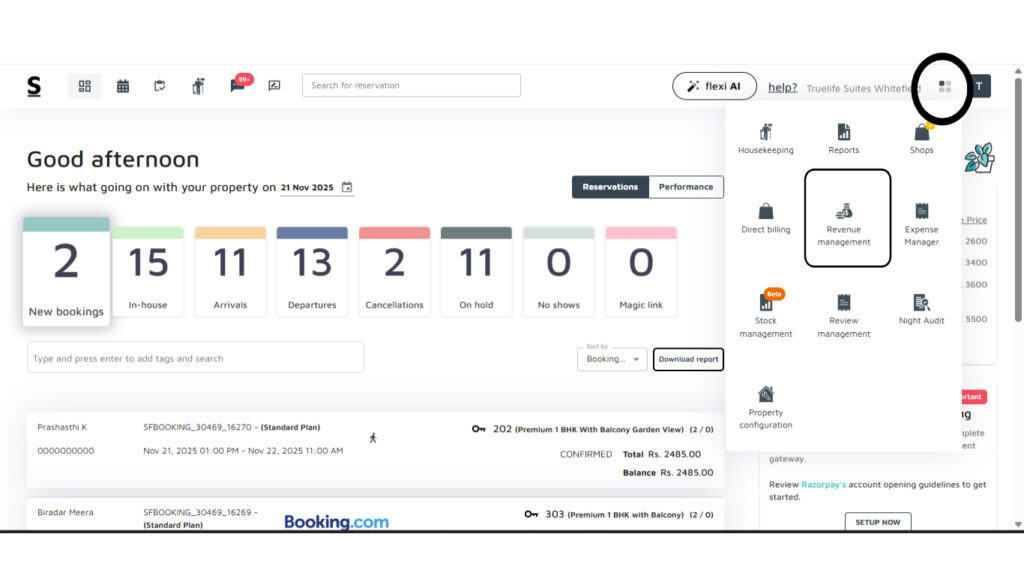
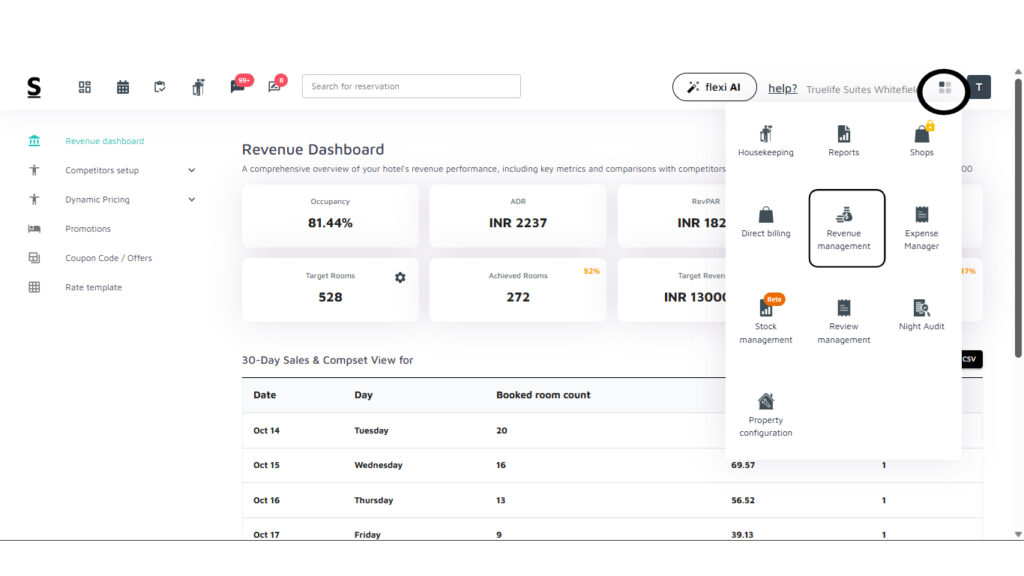
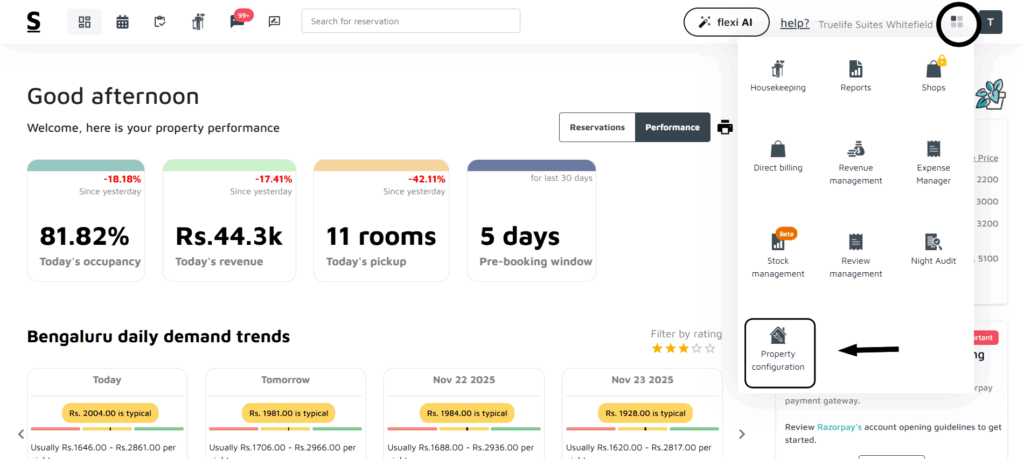
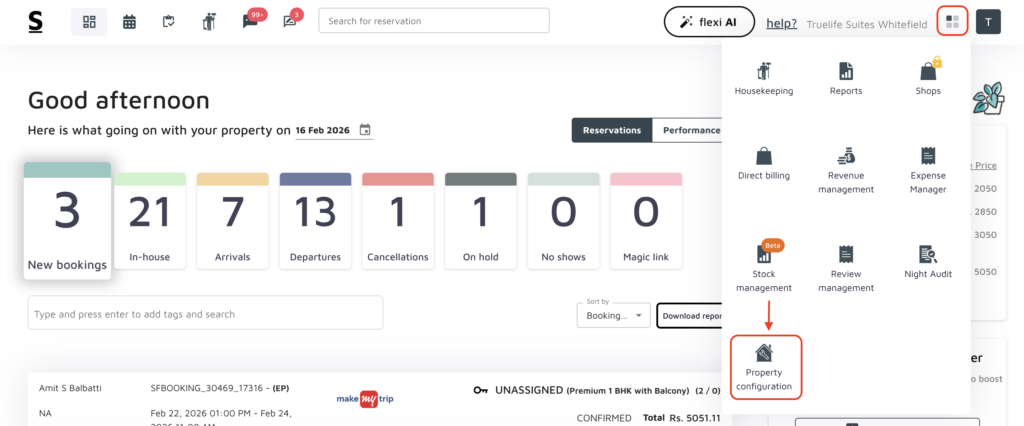
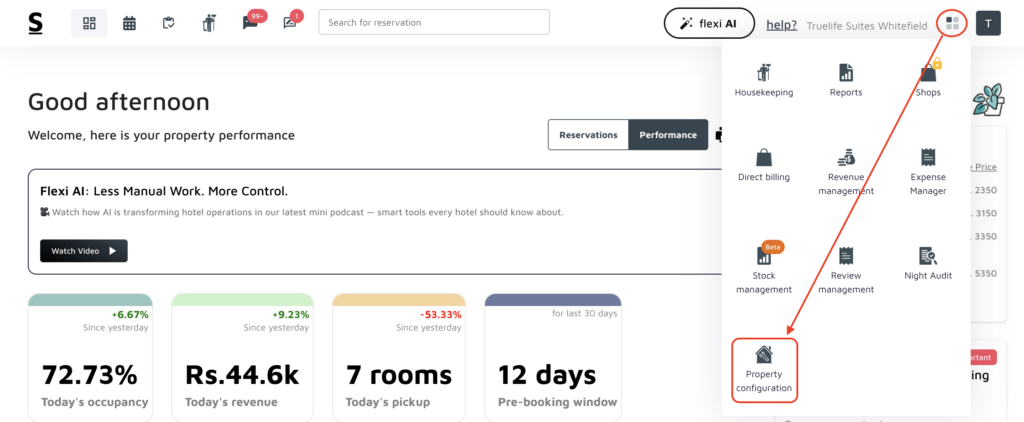
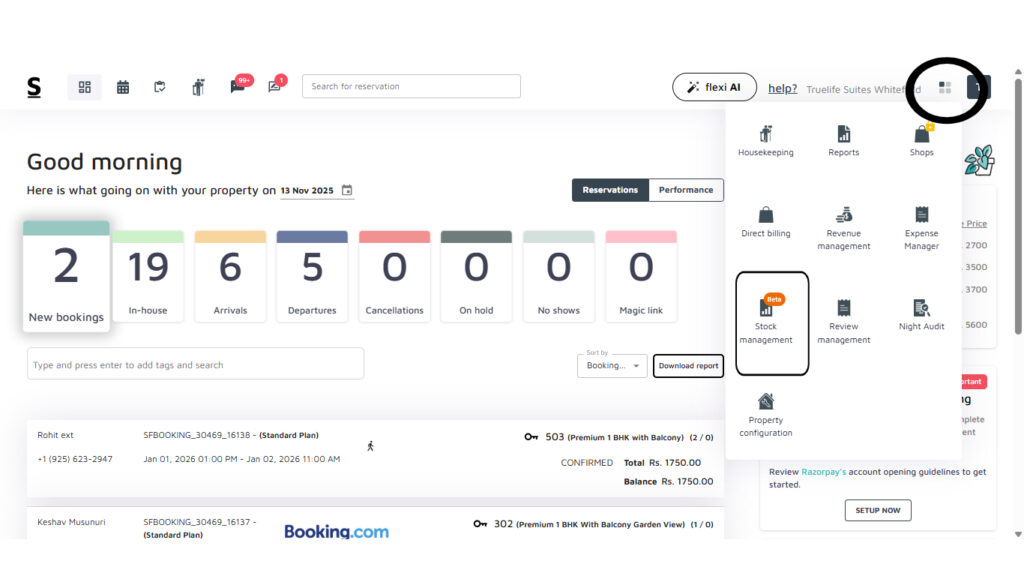
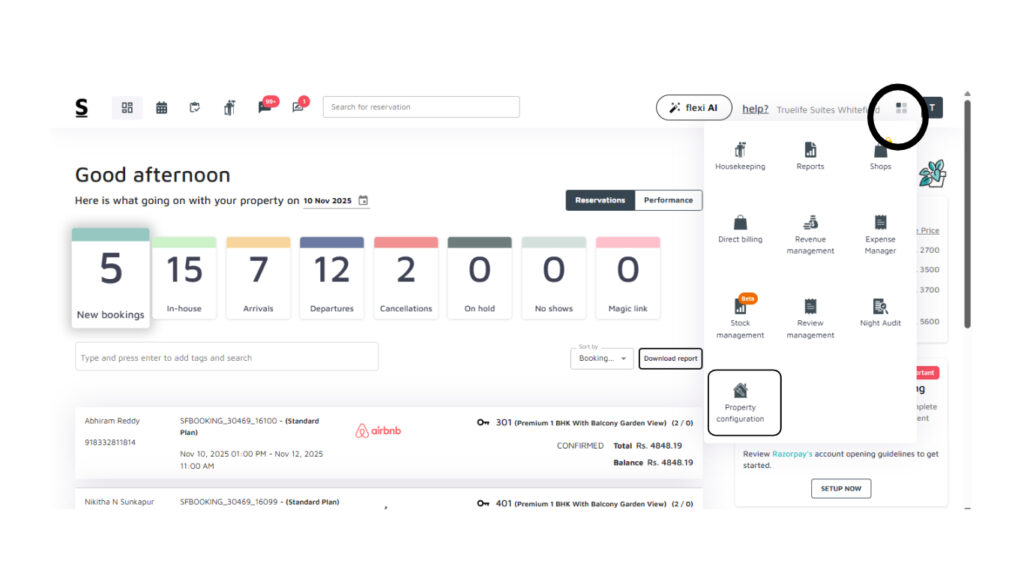
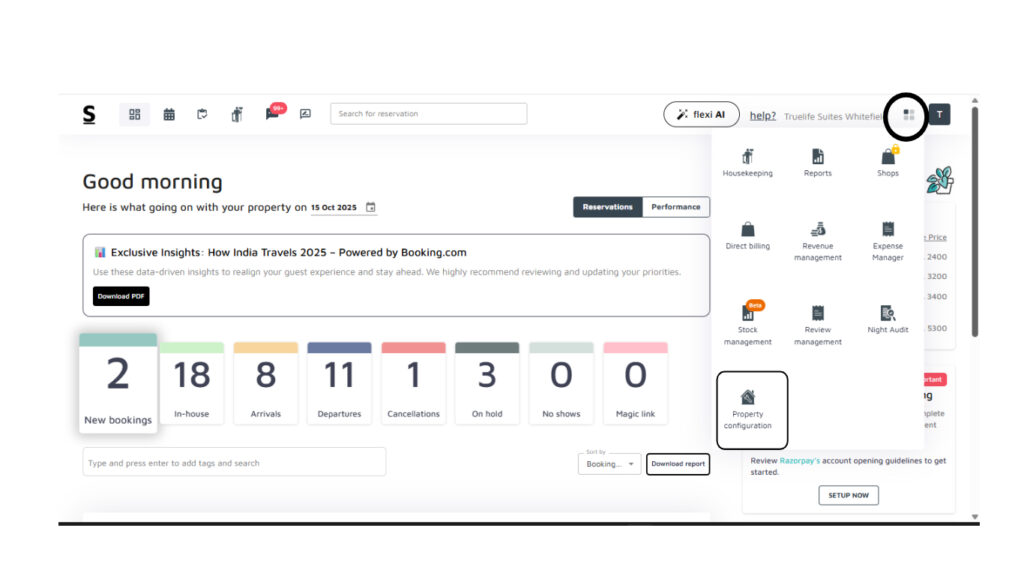
Access More Apps: From the dashboard, click on the 4-dots square icon labeled More Apps, located on the right side of the screen.
Open Property Configuration: Locate and click on Property Configuration from the list of available apps.
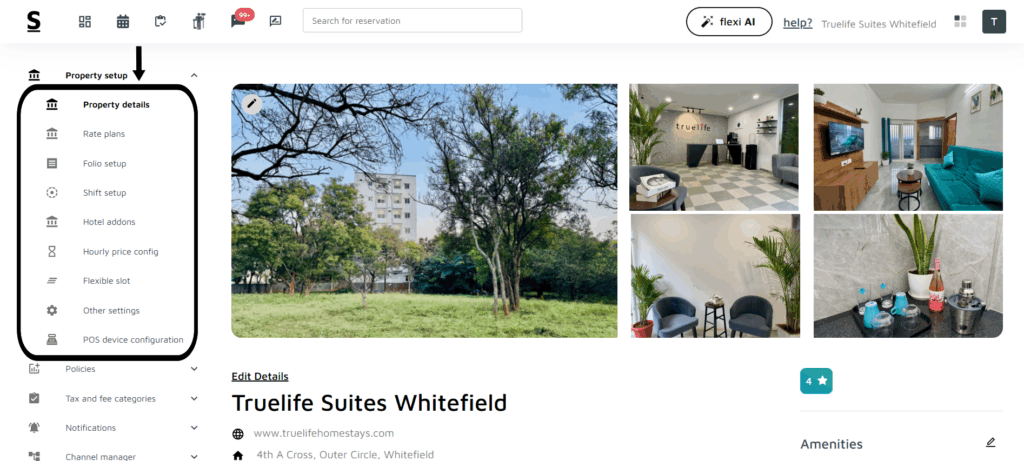
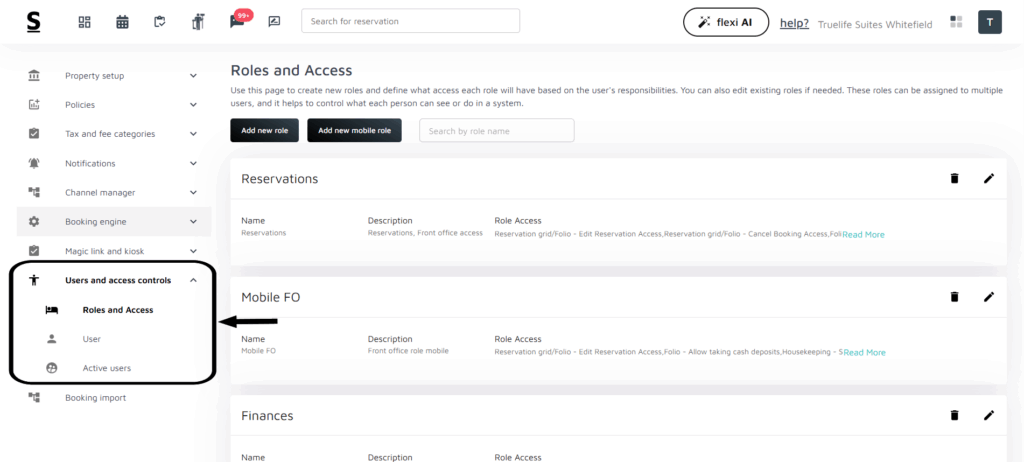
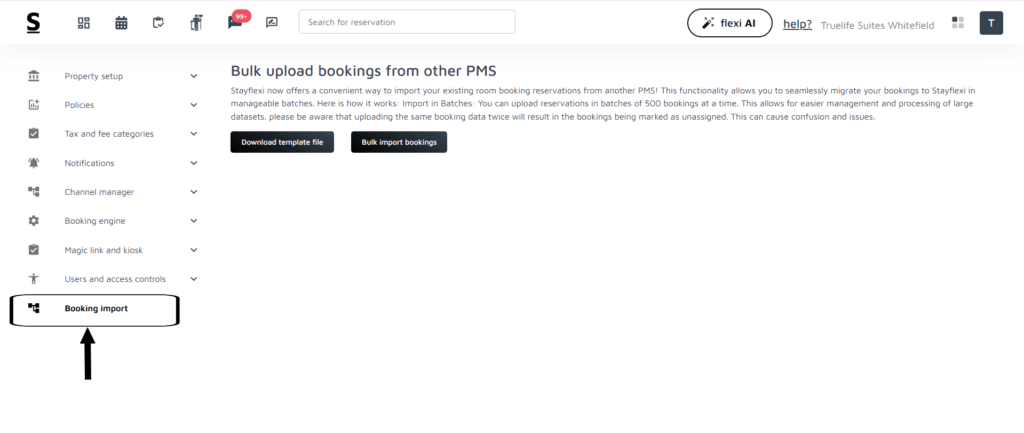
Navigate to Booking Import: A new page will open. On the left side, a list of options will appear, locate and click on Booking Import.
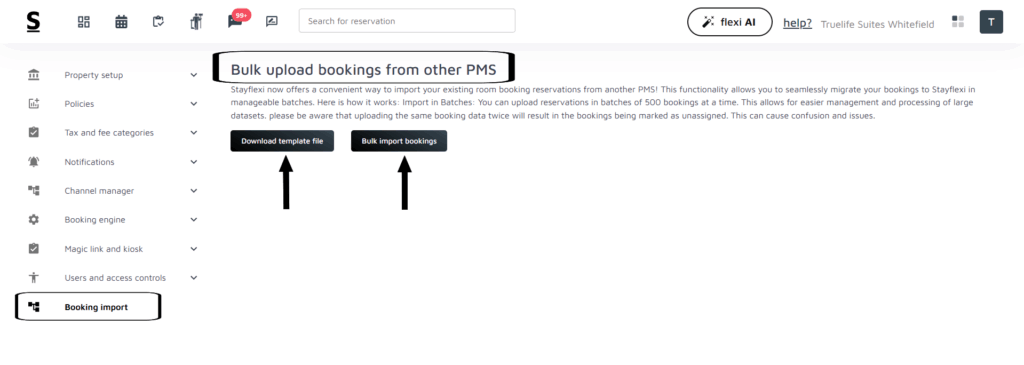
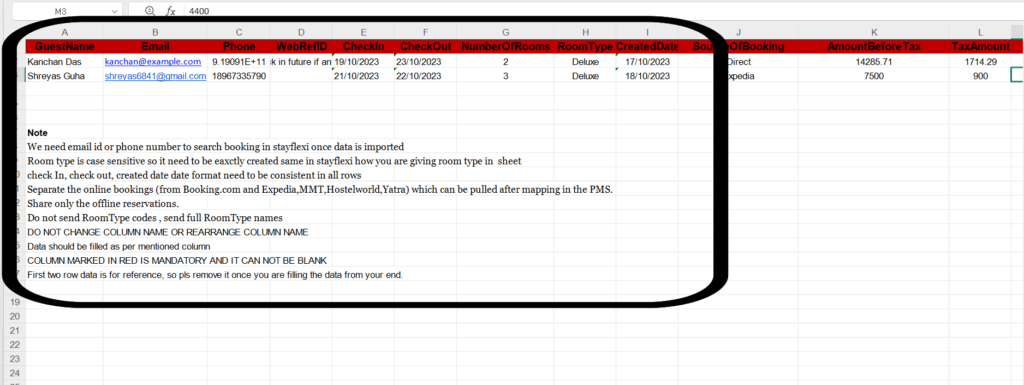
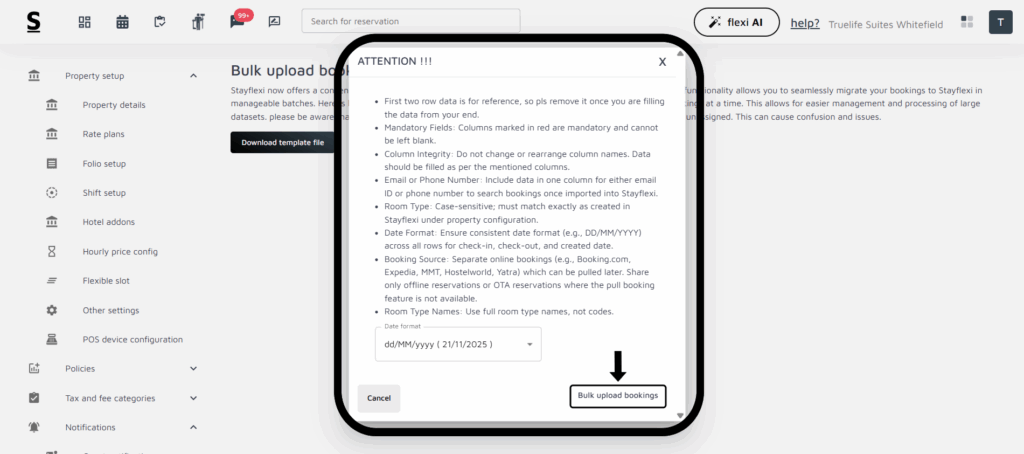
Understand Bulk Upload: A new page will appear titled Bulk Upload Bookings from Other PMS with a description of how to use the feature.
Read through the description carefully.
Download the Template: Click on Download Template File to get the format required for bulk uploads.
Import Bookings: After filling out the template, click on Bulk Import Bookings to migrate your bookings from another PMS.
NOTE: Uploading the same booking data twice will mark the bookings a Unassigned, which may cause confusion or issues. Be cautious to avoid duplicate uploads.
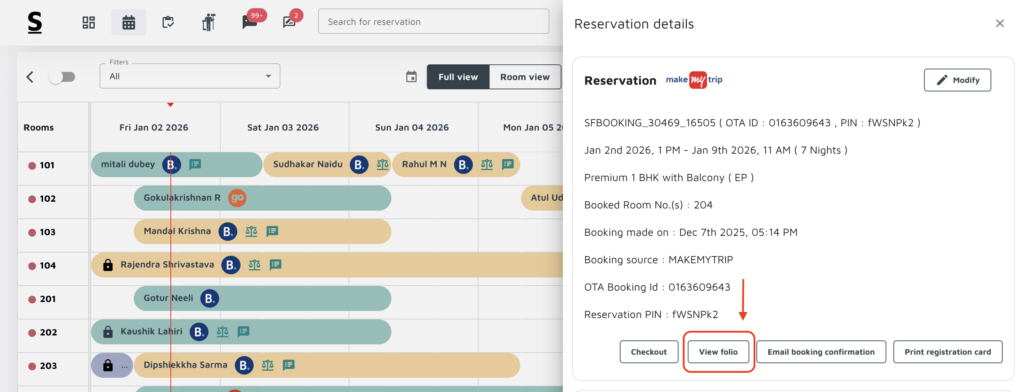
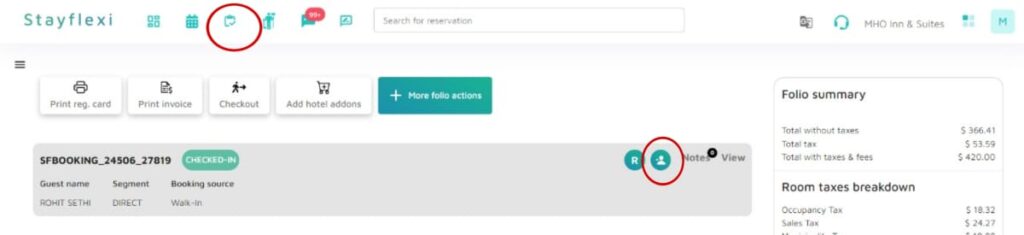
Where can I find the Guest details?
How to View Guest Details
Log in to your Stayflexi account.
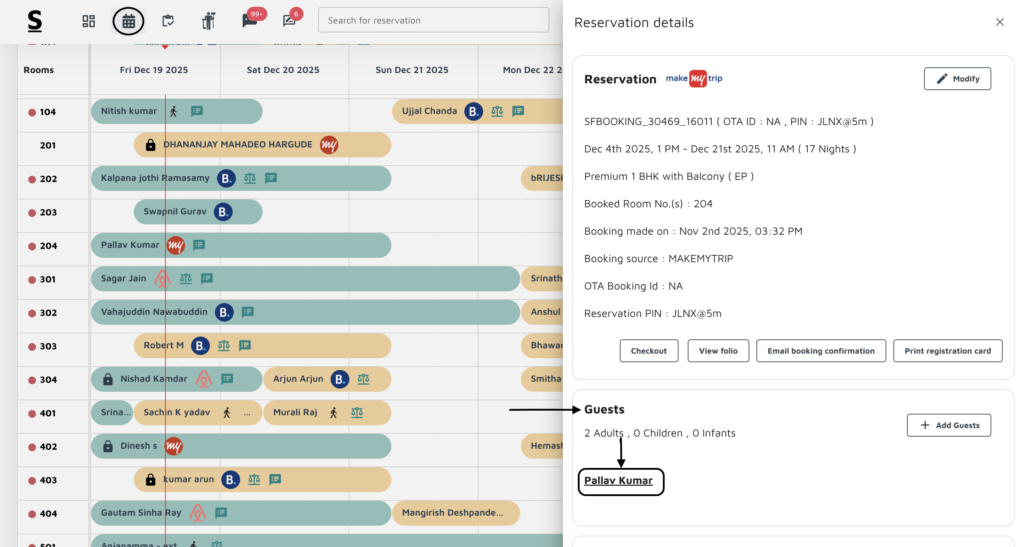
From the left menu, click on the Reservation Calendar (second icon).
Click on any booking from the calendar.
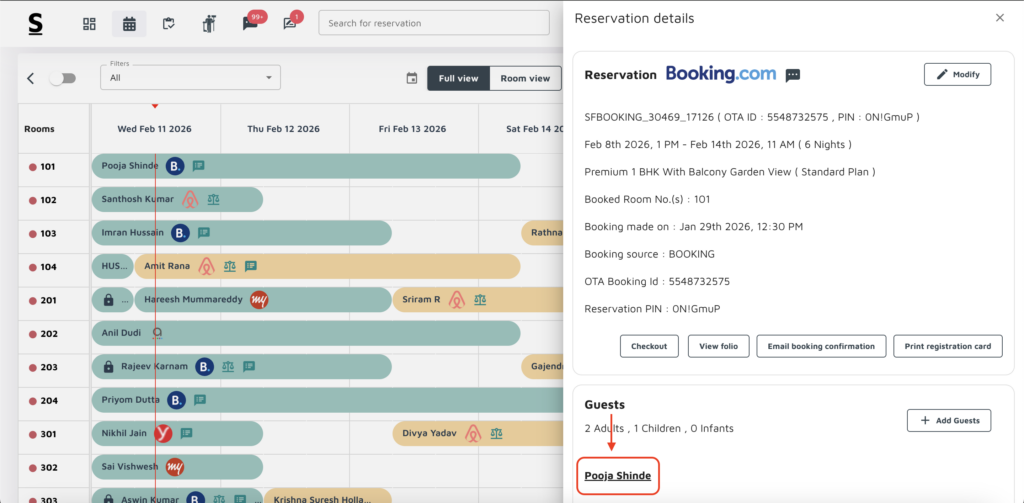
The Reservation details will open on the right-hand side (RHS) of the screen.
In the opened panel:
The first section displays the Reservation Details.
The second section displays the Guest Details.
Click on the guest’s name in the Guest Details section.
This opens the complete guest profile, showing all saved guest information.
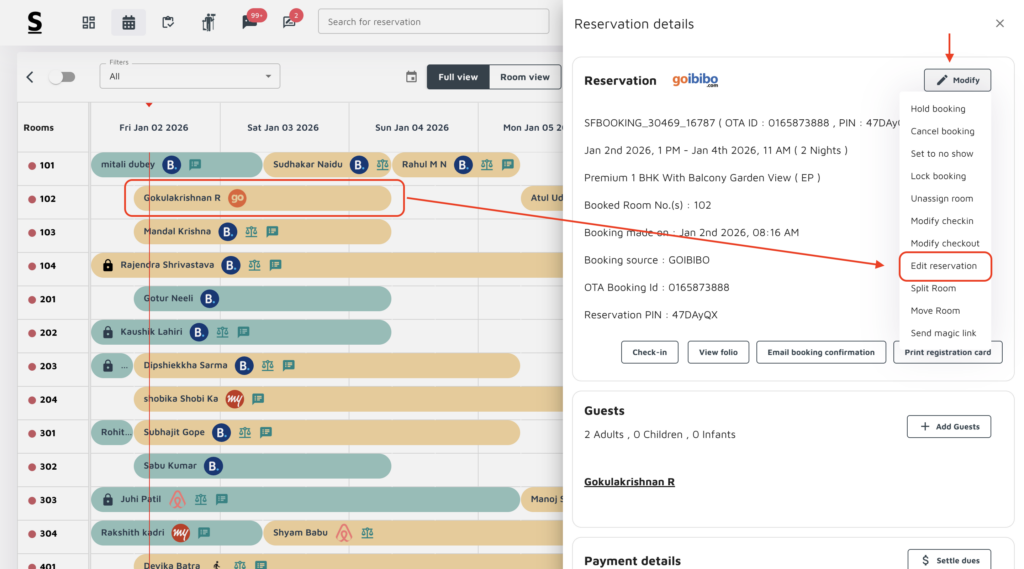
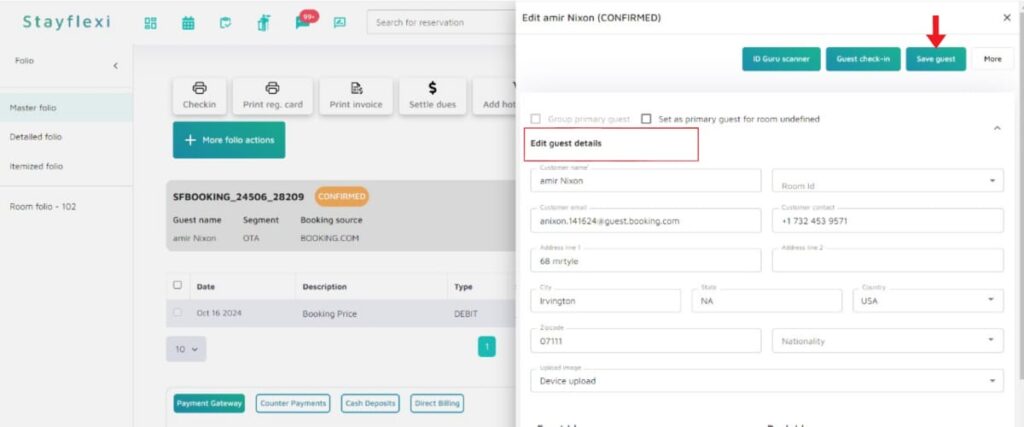
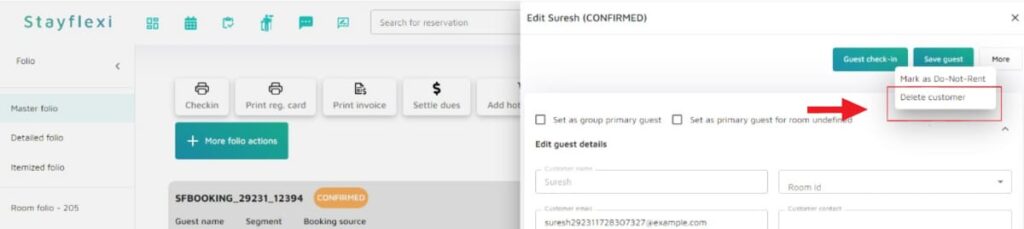
How can I edit guest details in the Stayflexi?
To edit the guest details in the system, follow the below-explained steps:
Login to Stayflexi: Log into your Stayflexi dashboard using your credentials.
Navigate to the Reservations Tab: From the front page of the Stayflexi dashboard, locate the top navigation menu. The second icon is the Reservation Calendar. Click on the icon to see all your reservations.
Select the Reservation: Find and click on the reservation for which you want to edit the details.
View the Reservation Details: A pop-up window displaying the reservation details will appear on the right side of the screen.
From the opened page, click on the guest name. This will open the Edit Reservation option.
Update the guest information with the correct details.
Click Save Customer to save the updated information.
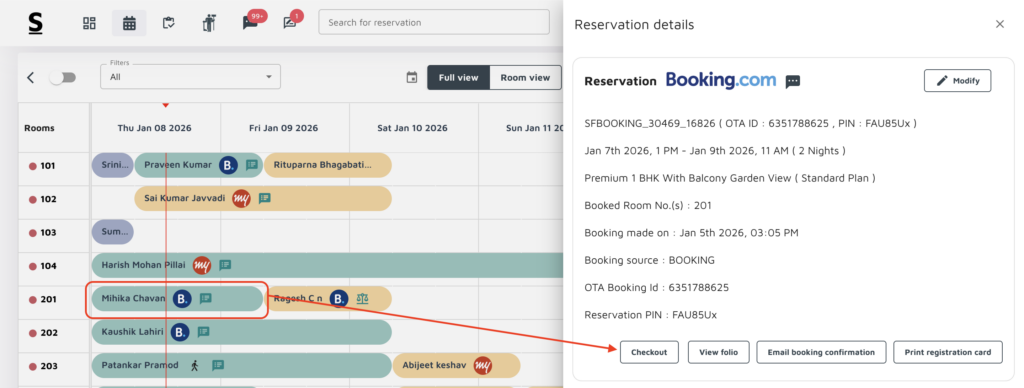
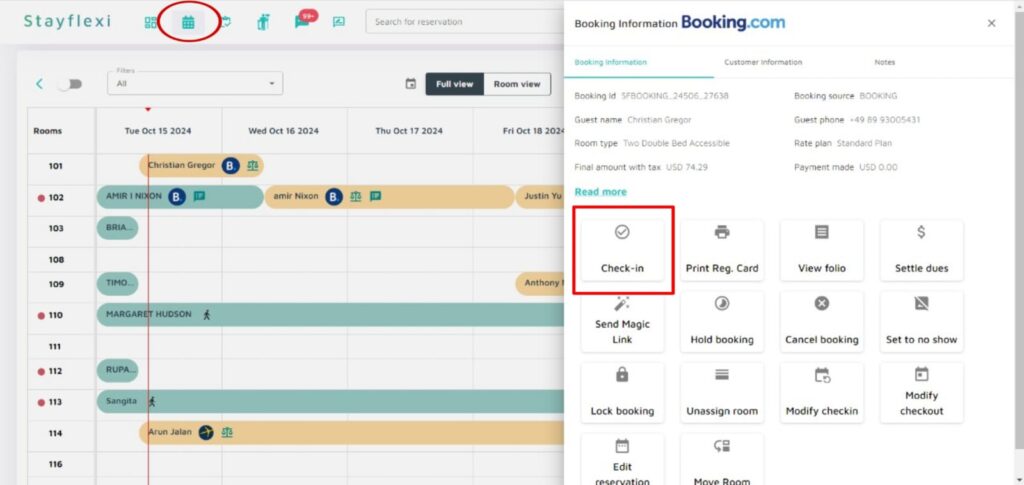
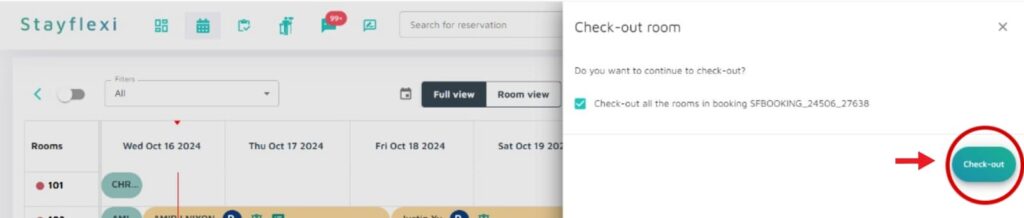
How to check a guest out early ?
Early checkout means the guest is leaving before the original checkout date mentioned in the reservation. The stay duration is reduced, and the system recalculates room charges based on the new checkout date.
Log in to your Stayflexi dashboard.
Navigate to the Reservation Calendar.
Click on the guest’s reservation.
This opens the reservation panel on the right-hand side.
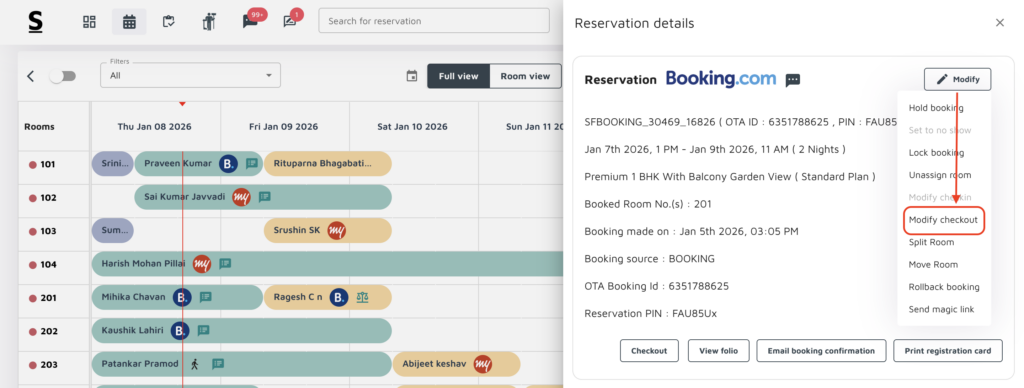
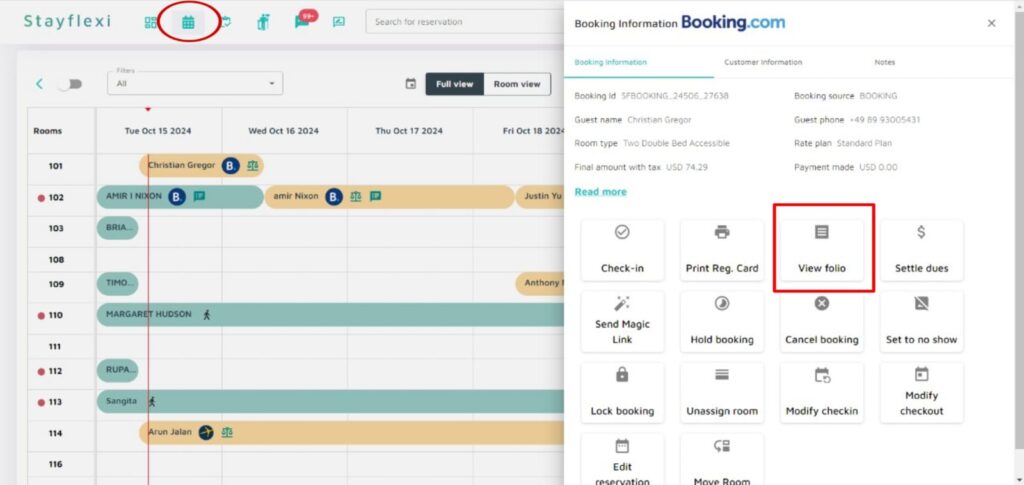
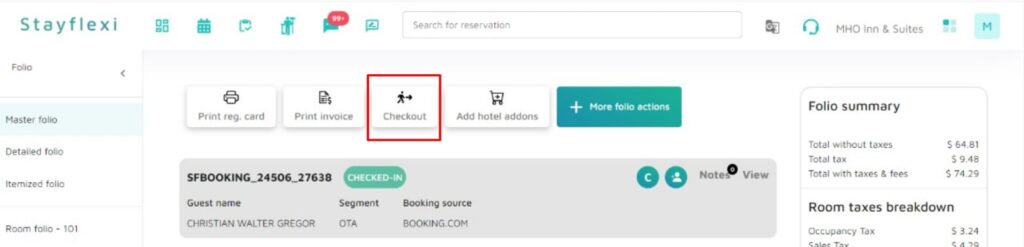
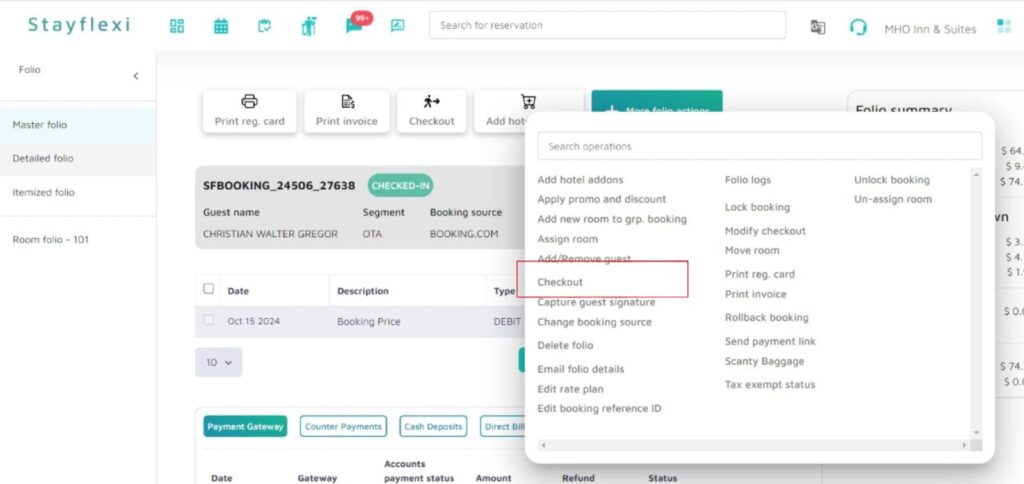
If the guest is already checked in, you will see the Checkout option.
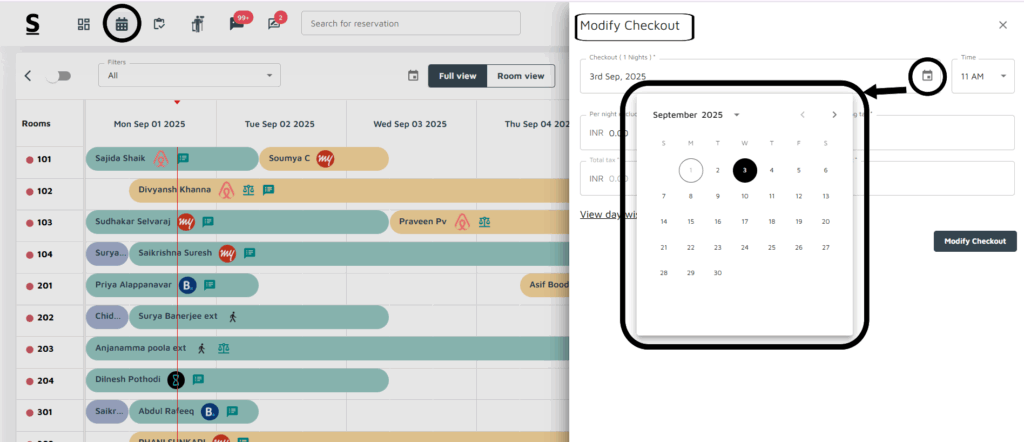
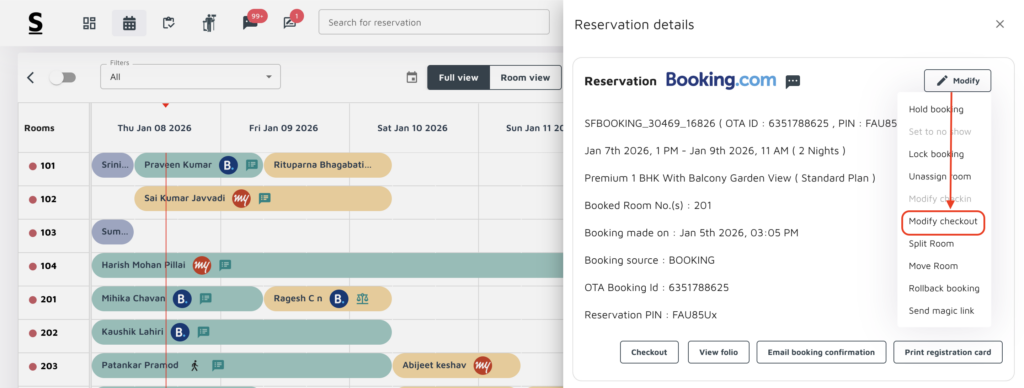
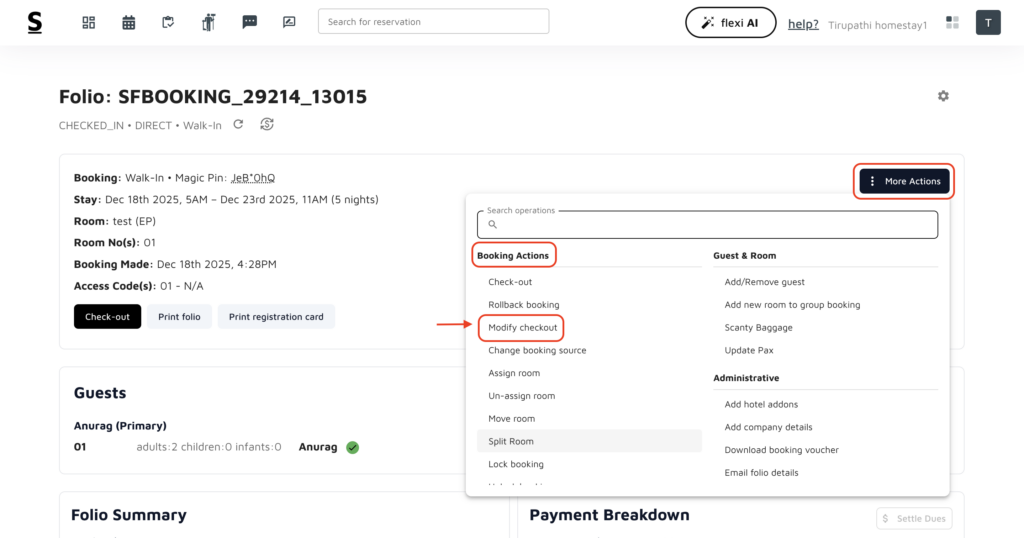
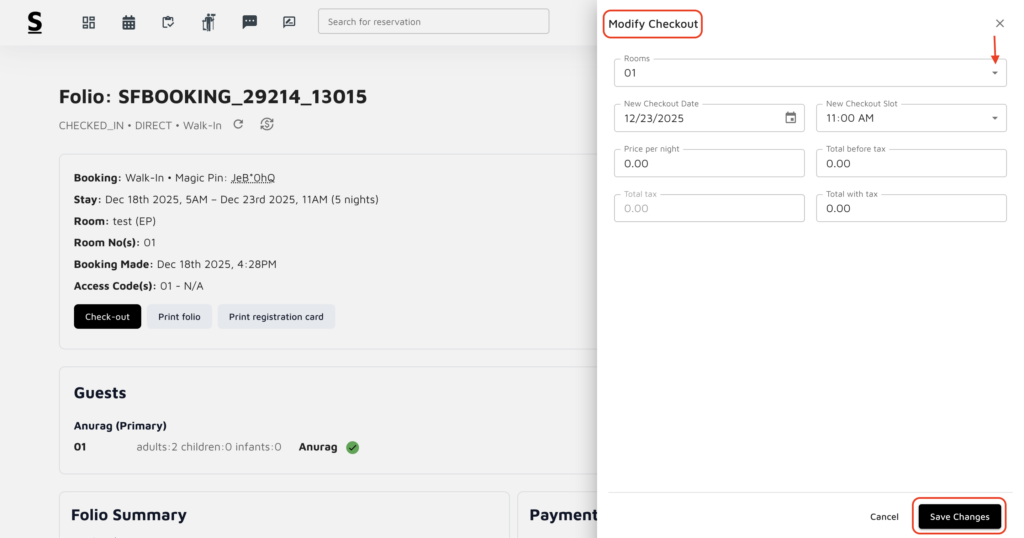
To edit the checkout date, click Modify in the top-right corner of the reservation panel.
From the Modify options, select Modify Checkout.
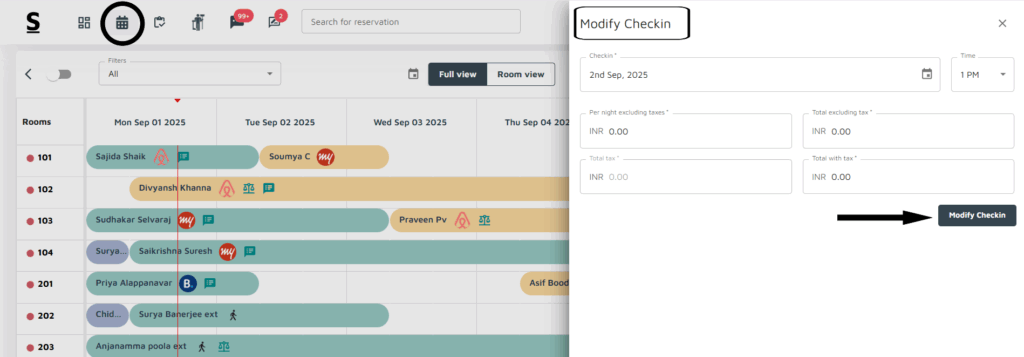
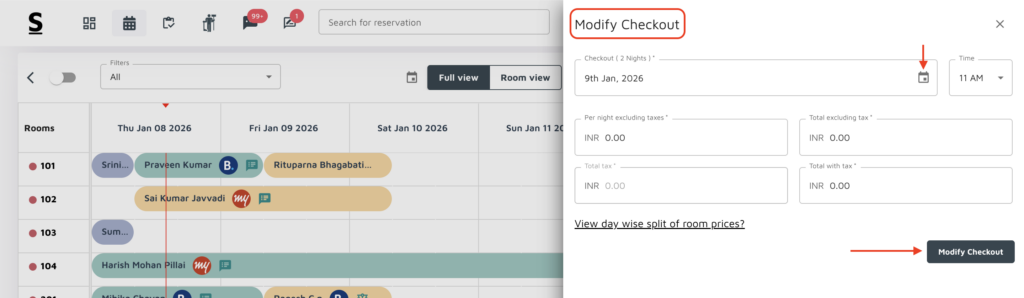
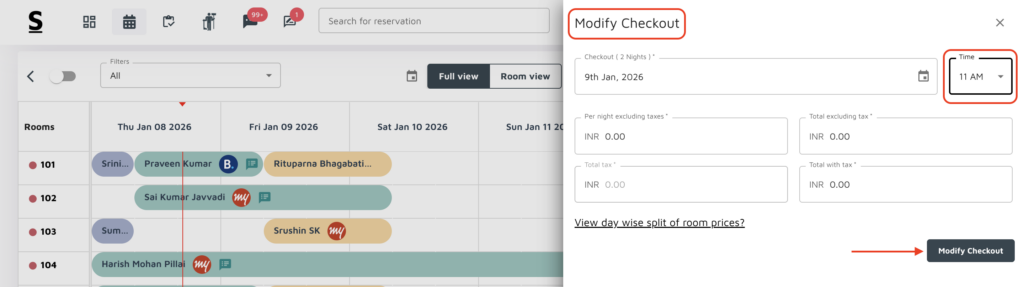
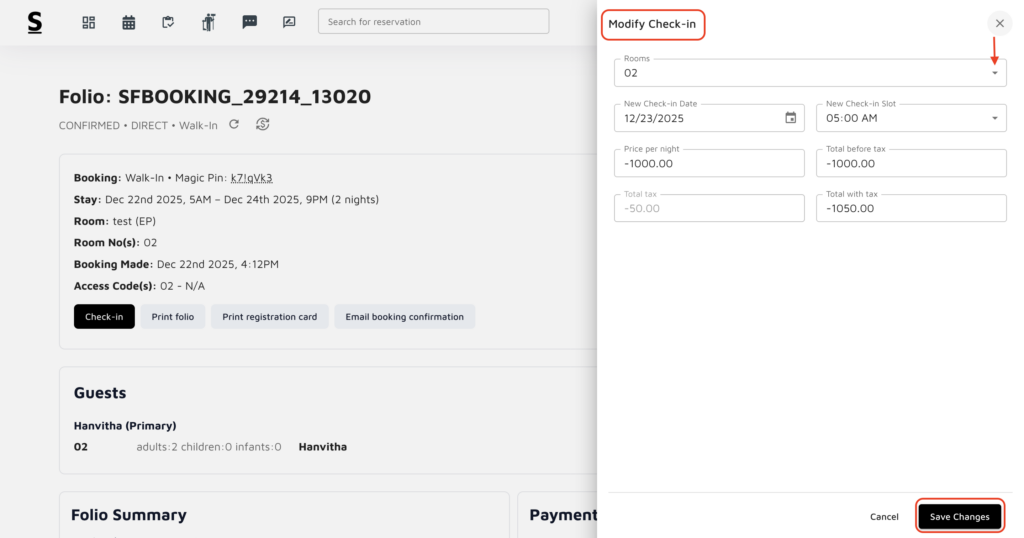
The Modify Checkout screen opens.
Click on the calendar icon to select the new (earlier) checkout date.
The stay dates and charges will update accordingly.
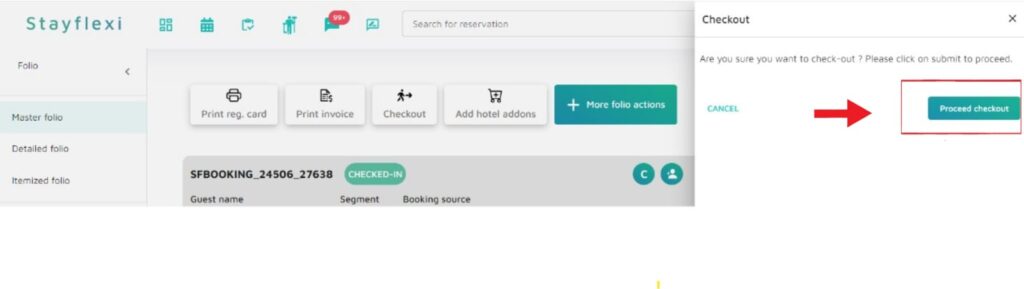
Click Modify Checkout to confirm the changes.
The guest is now checked out early, and the reservation is updated successfully.
Can I edit guest details (name, phone number, ID proof) after check-in?
To edit guest details (name, phone number, ID proof) after check-in, follow the below mentioned steps:
Login to Stayflexi: Log into your Stayflexi dashboard using your credentials.
Navigate to the Reservations Tab: From the front page of the Stayflexi dashboard, locate the top navigation menu. The second icon is the Reservation Calendar. Click on the icon to see all your reservations.
Select the Reservation: Find and click on the reservation for which you want to edit the details.
View the Reservation Details: A pop-up window displaying the reservation details will appear on the right side of the screen.
From the opened page, click on the guest name. This will open the Edit Reservation option.
Update the guest information with the correct details.
Click Save Customer to save the updated information.
How to add Sub Segment ?
How to Modify Checkout time ?
Steps to modify checkout time in Stayflexi:
Log in to your Stayflexi dashboard.
Open the Reservation Calendar.
Click on the guest’s reservation you want to update.
The reservation details panel opens on the right-hand side.
Click on Modify.
From the modify options, select Modify Checkout.
In the Time field, update the checkout time as required.
Review the updated pricing (if applicable).
Click on Modify Checkout to save the changes.
How to move a reservation from one room to another?
Follow the steps mentioned below to Move a reservation from one room to another in Stayflexi:
Login to Stayflexi: Log into your Stayflexi dashboard using your credentials.
Navigate to the Reservations Tab: From the front page of the Stayflexi dashboard, locate the top navigation menu. The second icon is the Reservation Calendar. Click on the icon to see all your reservations.
Select the Reservation: Find and click on the reservation you wish to move by clicking on it.
View the Reservation Details: A pop-up window will appear on the right side of the screen, displaying the guest’s reservations details.
Access Action Options: From the opened page, you will find multiple options for managing the reservation. Locate and click on Move Room.
Fill in the New Room Details: A new page will appear showing two sections:
Previous Room ID [pre-filled with the current room]
Current Room ID [you need to fill this with the new room information].
Below this, you will need to fill in the Room Type, Price, and Tax details.
Note: Based on the room type you select, the system will automatically calculate the difference in amount. For example, if the guest is upgrading from a lower room category to a higher one, the system will prompt you to collect the additional amount.
Add Remarks: There is a column provided for adding remarks about the room change. This is optional but can be useful to understand why move room was done for a given reservation.
Move Reservation: Once all details are entered, click on Move Reservation at the bottom of the page.
Confirmation: A confirmation message will appear, notifying you that the reservation has been successfully moved to the new room.
How do I create a reservation for past dates?
To Create a reservation for past dates, follow the below-mentioned methods:
Navigate to Previous Weeks:
In the reservation Calendar, locate the arrow pointing left in the top-left corner.
Click on it to view the calendar for the previous week. This is useful when you want quick access to earlier dates within a week.
Select Specific Dates:
Alternatively, you can click on the calendar icon located in the middle at the top of the reservation calendar page.
From here, you can select any date across any month to easily make a booking for that specific date.
Follow the below mentioned steps to create a booking for past dates.
Navigate to the Desired Date:
Use the left arrow to access previous weeks or click on the calendar icon to select any specific date across different months.
Drag and Drop a Reservation:
Once on the desired date, click and drag on an available room slot.
A booking window will appear where you can enter guest details, room type, rate, and other relevant information.
Save the Reservation:
After filling in the necessary details, click Save to finalize the booking.
How do I cancel a reservation in the system?
To cancel a reservation in Stayflexi, follow the below-mentioned guidelines:
Login to Stayflexi: Start by logging into your Stayflexi dashboard using your credentials.
Navigate to the Reservations Tab: From the front page of the Stayflexi dashboard, locate the top navigation menu. The second icon is the Reservation Calendar. Click on the icon to view all your reservations.
Select the Desired Reservation: Click on the desired reservation, that you want to cancel.
Reservation Details Page: A page will appear on the right side of the screen displaying Reservation details.
Modify Option: Click on Modify option on top right corner.
Locate Cancel Booking Option: A list of actions will be displayed. Find and click on Cancel Booking.
Choose Cancellation Policy:
A new page will open on the right side.
In the Please Select column, click on the tiny arrow to open the dropdown menu.
Select the applicable Cancellation Policy based on your property’s rules.
Complete the Cancellation: After selecting the policy, click the Yes, Cancel Booking button at the bottom to finalize the action.
Can I mark a same-day booking as checked-in while creating the reservation?
YES, in Stayflexi, you can mark a same-day booking as checked-in while creating the reservation. When you create the booking, there will be an option to directly check in the guest during the reservation process. This allows you to streamline the process for walk-ins or last-minute bookings, ensuring that the reservation is both created and checked in at the same time.
To mark a same-day booking as checked-in while creating the reservation, follow the below-explained step guidelines:
Login to your Stayflexi dashboard.
On the left panel, click on the Reservation Calendar [the second icon] to view all your reservations.
Select the today’s date from the calendar.
Drag the booking from the Check-in date to the desired check-out date.
A pop-up window will appear covering the entire screen, where you can complete the guest’s details.
Enter the guest’s Name, Email, and Phone Number.
You can also add any special requests from the guest.
ID Proof: Upload the guest’s ID Proof with Front and Back photos options
Address details: Enter the guest’s address, and select the number of adults and children for the reservation.
Review Guest Details: After reviewing all the guest details, you will find the Create Reservation button. To the right of this button, there is a Check-in button, which allows you to check in the guest during the reservation process.
Select the Check-in Option: click on the tiny square checkbox next to the Check-in option. By selecting this, the guest will be automatically checked in once the reservation is created.
Click the Create Reservation button at the bottom right of the window.
Your reservation and check-in are completed and you’ll receive a confirmation message on the screen.
I have different rate plans with varying room prices. How do I select a specific rate plan while creating a booking?
To select a specific rate plan while creating a booking, follow the below-mentioned guidelines:
Start the Drag–and-Drop Booking:
In the Reservation Calendar, click and drag on the room and date you want to book.
A new booking page will appear on the screen.
Enter Guest and Price Details:
On the left side, fill in the guest details.
On the right side, you’ll be prompted to set the prices.
Select a Rate Plan:
At the top of the right side, you’ll see the Rate Plan option.
Click on the small arrow to open the dropdown menu.
All rate plans offered by your property will be listed.
Select the rate plan preferred by your guest.
Auto-fill Pricing:
Once a rate plan is selected, the prices for that specific plan will automatically populate the amount columns.
Complete the Booking:
After filling out all the necessary details, click the Create Reservation button at the bottom to finalize the booking.
How to check-in a reservation?
Follow these steps to check-in a confirmed reservation:
Login to your Stayflexi dashboard.
On the left panel, click on the Reservation Calendar [the second icon] to view all your reservations.
Identifying Confirmed Reservations: All confirmed reservations are marked in light yellow. These are confirmed reservations and on arrival dates you can mark check-in.
Click on the specific booking you wish to check-in. A pop-up window will appear on the right side of the screen, displaying reservation details.
Below the booking details, you will see multiple action options as mentioned in the screenshot. Locate the check-in option and click on it.
Another pop-up window will appear to confirm the check-in. Ensure you are checking in the correct guest by verifying the booking ID.
Once verified, click on Check-in to confirm.
You will receive a confirmation message, and the reservation status will change.
The Reservation that was previously colored in light yellow will now turn green, indicating the guest has successfully checked in.
How to print registration card?
Below is the Step to Step guide for printing a registration card in Stayflexi:
Log into Stayflexi: Start by logging into your Stayflexi dashboard using your credentials.
Navigate to the Reservations Tab: From the front page of the Stayflexi dashboard, locate the top navigation menu. The second icon is the Reservation Calendar. Click on the icon to view all your reservations.
Select the Desired Reservation: Click on the specific reservation for the guest whose registration card you want to print.
Open Guest Details: When you click on the desired reservation, a pop-up will appear on the right side of the screen. This pop-up displays the selected reservation details along with multiple options for further actions.
Locate the Print Registration Card: Among the options provided, one of them is a Print Registration Card.
Click the Print Registration Card: Click on this button to initiate the printing process. This action will open a new popup displaying the registration card.
Review the Registration Card: Ensure all the guest details are accurate, including name, date, and any special requests.
Choose your Print Option: From the preview screen, you can choose to print directly by clicking on the print button.
How do I navigate the reservation calendar to view bookings for specific dates?
Follow these steps to navigate through the reservation calendar in Stayflexi:
Login to your Stayflexi dashboard with your credentials.
Click on the Reservation Calendar icon [the second icon on the left panel] to access the calendar, where you will see all your reservations.
In the middle of the page, you will find the Date Range Selector, which allows you to view reservations within a specific time.
Right next to the date range selector, there is a small calendar icon.
By clicking on the calendar icon, a pop-up calendar will appear. You can then select any dates according to your requirements.
You can easily navigate between Past, Present, and Future dates to access the desired reservation details.
How to add booking notes?
Login to Stayflexi: Log into your Stayflexi dashboard using your credentials.
Navigate to the Reservations Tab: From the front page of the Stayflexi dashboard, locate the top navigation menu. The second icon is the Reservation Calendar. Click on the icon to see all your reservations.
Select a Reservation: Click on the Reservation where you want to add Booking Notes.
View the Reservation Details: A pop-up window will appear on the right side of the screen, displaying four sections.
Access the Notes Section: Click on the Notes in the list below to view Booking Notes.
Add a Note: Below the notes section, You’ll see a plus [+] symbol. Click on it to add a new note.
Type your Note: A pop-up window will appear on RHS, allowing you to type the note.
Save the Note: Once you’ve typed the note, click on Save at the bottom of the window.
Confirmation: Your note will be added and saved. You can easily identify that the reservation has a note by the Message Icon appearing next to the reservation in the calendar.
Rates and Inventory
Unlock the full potential of your hotel’s revenue with Stayflexi’s Rates & Inventory management! In this video, we dive into the powerful features of our platform that allow you to seamlessly manage room rates and inventory across multiple channels. Learn how to set dynamic pricing, track inventory in real-time, and avoid overbooking with our intuitive tools. Stayflexi’s Rates & Inventory module is designed to maximize your profitability while minimizing manual tasks. Join us and discover how to take control of your hotel’s pricing strategy and streamline your operations. Remember to like, subscribe, and hit the notification bell for more insights into hospitality management!
Understanding rates & inventory layout
Log in to Stayflexi Dashboard: Use you credentials to log into the Stayflexi dashboard.
Access Rates and Inventory: Click on the third icon, which represents “Rates and Inventory”.
Top Columns Overview: At the top, you’ll see a column labeled “Rates/Inventory/Restrictions”.
Click on this column to reveal the listed options.
Select view: Choose “Rates”, “Inventory”, or “Restrictions” depending on what you want to display.
You can set the page to view only rates, only inventories, only restrictions, or display all at once.
This flexible layout allows you to tailor the view to match your needs, making it easier to manage rates, inventory, and restrictions efficiently.
Next to the Rates/Inventory/Restrictions column, you will find the Date Range Selector.
Click on the Date Range Selector: This will open a calendar view.
Set the Date Range: Select the start and end dates according to your requirements to display the rates and inventory for the chosen period.
This feature allows you to customize the view based on the specific dates you want to manage or review.
Next to the Date Range selector, You’ll see the Source column.
Click on the Source Column: This will display a list of booking sources [Such as OTAs or direct bookings].
Select a Source: Click on any specific source to view the rates and inventory data associated with that particular booking source.
This helps you manage and analyze data for bookings from various sources effectively.
Next to the Source Column, you’ll find the Days Column.
Click on the Days Column: This allows you to set the view for the specified number of days.
Select the Desired Duration: Choose whether you want to display data for 8 days or 15 days in the displayed screen.
This feature enables you to customize the timeframe for which you want to review rates and inventory.
Next to the Days column, You’ll find the Room Categories column.
Click on the Room Categories Column: This allows you to filter the displayed data by room category.
Select the Room Categories: You can choose a specific room category or select all categories to view the data for multiple or all room types.
This feature helps you to focus on specific room categories or view the entire property’s room data at once.
Next to the Room Categories column, you’ll see the Rate Plan column.
Click on the Rate Plan Column: This will display a list of available rate plans for your property.
Select Rate Plans: You can click on any specific rate plan or select all of them according to your requirements.
This functionality allows you to filter and view data based on the selected rate plans, helping you manage pricing strategies effectively.
Next to the Rate Plan column, you’ll find the Bulk Update feature, which is one the most dynamic and versatile tools in Stayflexi.
Click on Bulk Update: This opens a menu with multiple action options, such as:
Set Pricing
Rate Multiplier
Inventory Capping
Block/Unblock Rooms and a lot more.
Select a Feature: Choose any of these features to perform your required actions, whether it’s updating rates, managing inventory, or adjusting room availability.
This feature offers comprehensive solution for bulk changes, making property management more efficient.
Next to the Bulk Update column, you’ll see View more option.
These options help you manage your property’s rates and inventory efficiently and ensure they are in sync across all platforms.
.
Click on the View more option: This will open a list of options, including:
Rates and Inventory: View and manage your property’s rates and inventory.
Base Price: Set and adjust the base price for your rooms.
OTA Price Compare: Compare your rates with those listed on OTAs.
View Latest Updates : Displays the list of modifications to rates and inventory allocations.
Channel Status Report: Provides an overview of the current operational status of all connected distribution channels.
Detailed log: Presents a comprehensive chronological record of all system activities and updates.
These options allow for easy navigation and management of your pricing strategy and market comparison from a single view.
Below all the key options mentioned above, You’ll see a Dates Row.
This Dates Row displays the selected date range, showing the specific days within your chosen timeframe.
It provides a clear overview of how rates, inventory, and other settings apply to each day within the selected range, making it easy to monitor and adjust details for particular dates.
This feature helps you ensure that all rate and inventory updates are aligned with your desired scheduling.
Under the Dates Row, on the left side vertically, you’ll find key occupancy metrics:
Occupancy in 1%: This shows the percentage of rooms occupied for each date in the selected range.
Total Available: Displays the total number of rooms available for booking.
Total Booked: Indicates the total number of rooms already booked.
These metrics give you a quick overview of your property’s occupancy status, helping you manage availability and maximize occupancy efficiently.
Under the Occupancy Metrics, you’ll find a list of Room Categories with their associated Rate Plans:
Room Categories and Rate Plans: This section displays the various room types available at your property, along with the corresponding rate plans for each.
Data for Respective Dates: Next to each room category and rate plan, you’ll see the specific rates, inventory levels, and other relevant data for the selected dates.
This layout provides a clear and organised way to view and manage pricing, room availability, and rate plans across different dates.
Where can I view the sync status of my OTA channels?
Log in to your Stayflexi account using your credentials.
Go to the Dashboard.
Click on Rates and Inventory.
Select the View More option.
Under View More, choose Channel Status Report.
You’ll see a list of all connected OTA channels with their current sync status.
Where can I view my OTA channels report and compare prices across all connected OTAs?
Log in to your Stayflexi account using your credentials.
Go to the Dashboard.
Click on Rates and Inventory.
Select the View More option.
Under View More, click on OTA Price Compare.
You can now view all your connected OTA channels and compare their live prices.
How do I reassign an existing room number to a different room category?
This feature allows you to reassign one or more existing room numbers from their current room category to another room category using the Bulk Update option in Rates & Inventory.
Steps to Reassign Room Type:
Log in to your Stayflexi dashboard.
Navigate to Rates & Inventory.
Click on Bulk Update.
In the Action Type dropdown, select Reassign Room Type.
In the Room Types column (next to Action Type), select the current room type from which the rooms need to be moved.
Select the Room IDs (room numbers) you want to reassign.
From the New Room Type column below, choose the room category you want to move the selected rooms into.
Click on Reassign Rooms to apply the changes.
Once completed, the selected room numbers will be successfully reassigned to the new room category.
How can I check the latest updates or history of changes made to my rates and inventory?
Follow these steps to check the latest updates or history changes made to rates and inventory
Log in to your Stayflexi account using your credentials.
Navigate to the Dashboard.
Click on Rates and Inventory.
Select the View More option.
Under View More, click on View Latest Updates.
Here, you can view all the recent changes, update history, and check the success status for each update.
How can I view detailed logs of rate and inventory changes across OTA channels?
There are two ways to view detailed rate and inventory logs in stayflexi.
Method 1
Log in to your stayflexi account using your credentials.
From the main menu, navigate to the Dashboard.
Click on Rates and Inventory.
Select the View More option.
Under the View More section, click on View Detailed Logs.
You can now:
View detailed reports of rate and inventory updates.
Filter the data by date or channel.
Export the data if required.
Method 2
Navigate to the View More section.
Click on Channel Status Report.
At the top left corner, locate and click on Detailed Logs.
This will take you to the Report Status Panel, where you can view detailed rate and inventory update reports, filter by date or channel, and export data if needed.
Can OTA bookings be canceled directly from Stayflexi?
OTA bookings CANNOT be cancelled directly from Stayflexi.
To cancel an OTA booking, you need to complete the process through the respective OTA’s extranet (like Booking.com, Expedia, or Airbnb), as direct cancellations from Stayflexi are not supported.
This ensures the cancellation is officially processed within the OTA system, maintaining accurate records and communication with the guest. Start by identifying the booking details in Stayflexi, then log in to the OTA extranet, locate the reservation, and cancel it there.
The cancellation status will then sync back to Stayflexi, keeping your records consistent and up-to-date across all platforms.
How can I change rates for a specific day?
To change rates for a specific day in Stayflexi, follow these steps:
Log in to the StayFlexi Dashboard.
From the left panel, click on the third icon from the top (Rates & Inventory).
On the right side of the screen, locate the black “Bulk Update” button and click on it.
From the listed options, select Set Pricing.
On the Set Pricing page, go to the right-hand side and locate the Date Range column.
A calendar will appear. Select the specific date you want to update (e.g., 25th)
Click Apply to confirm your date selection.
Next, select the Room Type and Rate Plan for which you want to update the price.
Enter the desired price for the selected date.
(Optional) If required, you can add another Room Type and set pricing for it.
Once done, click Set Pricing
The pricing for the selected date and room type will be successfully updated across your connected channels.
Can you manually sync rates and inventory from Stayflexi?
YES, you can manually sync rates and inventory from Stayflexi. The platform provides an option to manually update or sync this information with connected OTAs [Online Travel Agencies].
To sync rates and inventory from Stayflexi, follow the below mentioned steps:
Log in to the StayFlexi dashboard with your credentials.
Click on the “Rates and Inventory” icon at the top of the dashboard (third icon from the left).
On the right side of the screen, select Bulk Update.
Under Action Type, choose Bulk Sync.
Under Sync Type, select whether you want to sync Rates or Inventory as per your requirements
Next, configure your sync by:
Selecting the Room Type
Selecting the Rate Plan
Choosing the Channels you want to sync with
Selecting the Date Range
Once all selections are made, click on Save.
A confirmation message will show that the rates have been successfully synced across all selected OTAs.
Where can I view close rate plan restrictions applied to specific OTAs?
To view Closed Rate Plan Restrictions for Specific OTAs in Stayflexi, follow the below-mentioned steps:
Log in to the Stayflexi Dashboard with your credentials.
Click on the ” Rates & Inventory ” icon at the dashboard’s top [third icon from the left].
Enable Restrictions View:
On the opened page, locate the column options on the left side.
Tick the Restrictions box under Sort and View Rates, Inventory, and Restrictions.
This will display all the restrictions applied across OTAs, including Stayflexi.
Filter by Source:
Next to the Date Range Selector, click on the Source column. To know on which source or channel restriction is applied you need to select a specific source.
Use the filter to select the specific OTA or source you wish to view.
Review Restrictions:
Once you scroll down, you will see the rate plan restrictions that are applied. The following options are displayed:
Close/Open Rate Plan
Close/Open on Arrival
Close/Open on Departure
This allows you to easily identify close rate plan restrictions for individual OTAs or sources.
Can I update rates and inventory on OTAs once the channel manager is connected?
To update rates and inventory for connected OTAs in Stayflexi, follow the below-mentioned steps:
Log in to the Stayflexi Dashboard with your credentials.
Click on the ” Rates & Inventory ” icon at the dashboard’s top [third icon from the left].
Click on the Rates/Inventory/Restrictions column on the left side of the screen (the first column).
Select the Rates and Inventory checkboxes.
A list of your connected OTAs will appear on the screen, reflecting current rates and inventory details.
The data displayed is editable, simply update the prices or inventory levels as needed.
Once updated, Stayflexi will automatically sync these changes with your connected OTAs, ensuring that your latest rates and inventory are reflected across all platforms.
Is it possible to change the category of a specific room number or reassign it to a new room type?
YES, you can change the category of a specific room number or reassign it to a new room type in Stayflexi: Here’s how to it:
Below are the step-by-step guidelines for changing the category of a specific room number or reassign it to a new room type in Stayflexi:
Log into the Stayflexi Dashboard.
Click on the third icon from the top, which is Rates and Inventory.
Locate the green “Bulk Update” on the right side of the screen and click on it.
From the listed options, Locate and click onReassign Room Type.
A page will open on the right side of the screen. On this page, click on the Room Types column at the top to access a drop-down menu.
In the drop-down menu, choose the room type that corresponds to the room ID you want to change.
Choose the room number ID.
Below the selected room number, click on New Room Types. A drop-down menu will appear where you can select the new room type.
After selecting the room type and room number, click on theReassign Rooms button at the bottom to complete the process.
How to change prices or inventory for specific channel / OTA?
To change prices for a specific channel/OTA in Stayflexi, follow the below steps:
Log into the Stayflexi Dashboard.
Click on the third icon from the top, which is Rates and Inventory.
Locate the green “Bulk Update” on the right side of the screen and click on it.
Set Pricing: Locate and click on the “Set Pricing” option.
A page will open on the RHS.
Select the OTA/ Channel: To set the price for a specific channel, select the arrow at the top right corner of the page to choose the OTA or Channel.
You can select multiple channels or just one.
Select Days: In the “Days” column, choose the specific days you want to apply the price changes.
Set Date Range: Choose the date range for which you want the price changes to take effect.
Select Room Types: Under “Room Types”, click on “Add Room Type” to select the rooms for which you want to update the pricing.
You can add multiple room types one by one.
Click on Set Pricing: Once all the selections are made, click the green “Set Pricing” button at the bottom of the page.
Review and Confirm: A confirmation page will appear where you can recheck the data you have updated.
If everything is correct, click “Confirm” to apply the changes.
Receive Confirmation: You will get a confirmation message indicating that the pricing has been successfully updated.
To change inventory for a specific channel/OTA in Stayflexi, follow the below steps:
Log into the Stayflexi Dashboard.
Click on the third icon from the top, which is Rates and Inventory.
Locate the green “Bulk Update” on the right side of the screen and click on it.
Locate Inventory Capping and click on it.
Popup Window: A popup will appear on the right-hand side of the screen.
Select Room Types: Choose the Room Types you want to apply the cap on.
Specify days: select the days for which you want to apply the inventory cap.
Set Date Range: Select the date range during which the cap will be in effect.
Source of Booking: Select the source of Booking for which the inventory cap applies, and select the arrow at the top-right corner of the page to choose the OTA or channel.
Select Cap Value: Enter the Cap Value you want to set.
Choose Type: Specify whether the cap is in Count [number of rooms] or Percentage.
Applying Capping: Click on the Apply Capping button to complete the process.
Confirmation Message: A confirmation message will appear, indicating that the inventory capping has been successfully applied.
How do I restrict a specific rate plan on OTAs?
To restrict a specific rate plan on OTAs, follow the below-mentioned steps:
Log into the Stayflexi Dashboard.
Click on the third icon from the top, which is Rates and Inventory.
Navigate to Bulk Update: Click on the “Bulk Update” option in the dashboard.
Select Close/Open Rate Plan:
From the list of actions, locate and click on Close/Open Rate Plan.
A new page will appear on the right side of the screen.
Set the Restrictions:
Select the desired days and date range for the restriction.
Choose the Source [OTAs] where you want to apply the restriction.
Select the Direct Billing Accounts if applicable.
Toggle Room Type and Rate Plan Selection:
You’ll see a toggle option:
Enable the toggle to apply the restriction to all room types and rate plans.
Disable the toggle if you want to select individual room types and rate plans.
Select Room Type and Rate Plan:
Below the toggle, select the Room Type.
Once the room type is selected, the Rate Plan column will become editable.
Choose whether to Close or Open the rate plan for that room type.
Close [restricting the rate plan] or Open [making it available to all OTAs].
Save the Changes:
After filling in all necessary details, click the Save button at the bottom to complete the action.
How can I set a cut-off time for a specific OTA?
Follow the below steps to set a cut-off time for a specific OTA:
Log into the Stayflexi Dashboard.
Click on the third icon from the top, which is Rates and Inventory.
Locate the green “Bulk Update” on the right side of the screen and click on it.
Locate Min/Max Advanced Booking Offset: From the listed options, find and click on Min/Max Advanced Booking Offset.
A page will open on the right side of the screen.
Select Days: Choose the days for which you want to apply the booking offset.
Select Date Range: Specify the date range for the cut-off time.
Select the OTA/Source: From the source list, select the specific OTA for which you want to set the restrictions.
Enable/Disable Toggle: You’ll see a toggle option. If you enable it, the restrictions will apply to all room types and rate plans. If you disable it, you can set restrictions individually.
Select Room Types: Choose the room types for which you want to set the cut-off time.
Set Min/Max Hours: In the respective columns, input the minimum and maximum hours:
Min Hours: Set this when you want to prevent bookings within a certain number of hours before check-in.
Max Hours: Set this when you want to restrict bookings after a certain number of hours from the current time.
The Set cutoff Option is only accessible after all mandatory fields have been completed.
How do I restrict a particular room category on OTAs?
To restrict a particular room category on OTAs, follow the below-mentioned steps:
Log into the Stayflexi Dashboard.
Click on the third icon from the top, which is Rates and Inventory.
Navigate to Bulk Update: Click on the “Bulk Update” option in the dashboard.
Select Close/Open Rate Plan:
From the list of actions, locate and click on Close/Open Room Type.
A new page will appear on the right side of the screen.
Set the Restrictions:
Select the desired days and date range for the restriction.
Choose the Source [OTAs] where you want to apply the restriction.
Select the Direct Billing Accounts if applicable.
Toggle Room Type and Rate Plan Selection:
You’ll see a toggle option:
Enable the toggle to apply the restriction to all room types and rate plans.
Disable the toggle if you want to select individual room types and rate plans.
Select Room Type and Rate Plan:
Below the toggle, select the Room Type.
Once the room type is selected, the Rate Plan column will become editable.
Choose whether to Close or Open the room type.
Close [restricting the room type] or Open [making it available to all OTAs].
Save the Changes:
After filling in all necessary details, click the Save button at the bottom to complete the action.
What is bulk update?
Bulk Update in Stayflexi is a feature designed to simplify the management of multiple rooms, rates, and settings across all OTAs [Online Travel Agencies] and direct booking channels. Instead of manually adjusting rates, inventory, or room availability one by one, Bulk Update allows you to make these changes in a single action for multiple rooms or rate plans, ensuring consistency across all platforms.
What Makes Bulk Update Unique in Stayflexi:
All-in-one Management: Bulk Update covers a wide range of actions, such as setting rates, updating inventory, applying rate multipliers, etc, all from a single interface.
Instant Synchronization: Any changes you make using Bulk Update are automatically synced across all your OTAs and direct booking channels, ensuring consistent pricing and availability without the need for manual entry on each platform.
Easy to Use: Stayflexi’s Bulk Update lets users quickly perform complex actions with just a few clicks, simplifying the management process for even the largest properties with multiple room types and rate plans.
Error Reduction: By allowing bulk actions, Stayflexi reduces the chance of inconsistencies or mistakes when managing inventory and rates, as everything is updated uniformly across channels.
Here’s a simple and easy-to-understand example of using Bulk Update in Stayflexi:
Scenario: Your hotel has 10 rooms under maintenance, and you want to block these rooms from being booked across all OTAs for the next two weeks.
Without Bulk Update: You would need to go into each OTA or channel and manually block these rooms one by one for the specific dates, which could be time-consuming and prone to error.
With Bulk Update: Using the Bulk Update feature, you can quickly select the room types that are under maintenance, choose the Block Rooms option, and set the dates for the next two weeks. With just a few clicks, these rooms will be blocked from being on all OTAs or channels.
Similarly, Bulk Update allows you to perform various other actions easily, such as: Deleting rooms, Setting Inventory, setting rooms online or offline, etc.
Below are the step-by-step guidelines on how to operate Bulk Update:
Log into the Stayflexi Dashboard.
Click on the third icon from the top, which is Rates and Inventory.
Locate the green “Bulk Update” on the right side of the screen and click on it.
A menu will appear with the following actions:
Set Pricing: Allows you to update the room rates across various OTAs or channels for a specific date range. You can adjust pricing for individual room types or rate plans.
Set Inventory: This lets you adjust the number of available room types over a defined date range. This ensures that the correct room availability is synced across all cahnnels.
Rate Multiplier: This feature allows you to apply a percentage increase or decrease to the existing rates for specific room types or rate plans. For example, you could increase the rate by 10% for a peak season.
Inventory Capping: This enables you to set limits on the number of rooms that can be sold through OTAs or specific channels, ensuring you retain control over the direct sales on your website.
Set Online/ Set Offline: This allows you to make certain room types or rate plans available [set online] or Unavailable [Set offline] for booking across your connected OTAs or channels.
Block Rooms/ Unblock Rooms: Provides the option to temporarily block rooms, making them unavailable for booking, or unblock previously blocked rooms, making them available again.
Delete Rooms/ Restore Deleted Rooms: This lets you permanently remove rooms from your inventory, or restore rooms that have been deleted, bringing them back into your active inventory.
Close/ Open Rate Plan and Room Type: This action allows you to close [make unavailable] or open [make available] specific rate plans or room types for booking on OTAs or direct channels.
Min/Max Length of Stay: Sets the minimum or maximum number of nights a guest must book for a particular room type or rate plan. For Instance: You might require a minimum stay of 2 nights during weekends.
Set Sold Out: Marks certain room types as fully booked [sold out] across your channels, even if there are still rooms available, to control availability manually.
Min/Max Advanced Booking Offset: Allows you to specify how far in advance or how close to check-in a guest can book. For example, you may require bookings to be made at least 2 days in advance or set a maximum window of 6 months.
How to sync rates across all OTAs or Channels?
Below are the step-by-step guidelines on how to sync rates across all OTAs or Channels:
Log in to the Stayflexi Dashboard with your credentials.
Click on the ” Rates & Inventory ” icon at the dashboard’s top [third icon from the left].
On the right side of the screen, click on the Bulk Update to open more options.
Select “Bulk sync.”
In the Bulk Sync window, you will see the following fields:
Room Type
Rate Plan
Channels/ OTAs
Date Range
Fill in the required details for each field as per your needs.
Once completed, click the “Save” button.
A confirmation message will show that the rates have been successfully synced across all selected OTAs.
Close / open room type and rate plan.
In Stayflexi, Closing or Opening room types and rate plans refer to controlling the availability of specific rooms and pricing options for bookings.
Close Room Type: When a room type is closed, it becomes unavailable for booking. Even if rooms of that type exist, they won’t appear as options for guests to book.
Close Rate Plan: Closing a rate plan means that the pricing or promotional offer attached to that rate plan is no longer available for booking. Guests won’t see or be able to select that specific rate plan.
Open Room Type: When a room type is opened, it becomes available again for bookings. Guests will see the room types as an option when making reservations.
Open Rate Plan: means making a specific pricing structure or offer available for bookings again, allowing guests to see and book rooms at those rates.
Below are the guidelines on how to use the feature Close/Open Room Type and Rate Plan:
Log into the Stayflexi Dashboard.
Click on the third icon from the top, which is Rates and Inventory.
Locate the green “Bulk Update” on the right side of the screen and click on it.
Locate Close/Open Room Type and Rate Plan in the bulk update settings.
A popup window will open with various options.
Select Days and Date Range: Choose the specific days and date range for which you want to apply the action [close/open room types or rate plans].
Choose Booking Source: Select the source or channel of booking for which you want to apply the restriction [e.g., OTA, direct bookings].
Select Direct Billing Accounts [if applicable]: You can apply the restrictions to specific direct billing accounts.
Enable/Disable the Toggle: There will be a toggle option:
Enable it to apply the action to all room types and rate plans.
Disable it if you want to select individual room types or rate plans.
Click Save: Once you’ve selected, click the Save button to complete the action.
Confirmation Message: You will receive a confirmation message indicating that the action has been successfully applied.
How to check OTA specific rates?
Below are the step-by-step guidelines on how to check OTA specific rates:
Log in to the Stayflexi Dashboard with your credentials.
Click on the ” Rates & Inventory ” icon at the dashboard’s top [third icon from the left].
In the middle of the screen, you will see the Source column, which displays all the sources of bookings [OTAs and direct channels].
Click on any specific source [e.g., Booking.com, Expedia] to view the rates associated with that OTA or channel.
How do I increase or decrease prices for a specific OTA?
Below are the step by step guidelines on how to increase or decrease prices for a specific OTA in Stayflexi:
Log into the Stayflexi Dashboard.
Click on the third icon from the top, which is Rates and Inventory.
Locate the green “Bulk Update” on the right side of the screen and click on it.
Locate and click on “Set Pricing” from the listed options.
On the next page, go to the right-hand-side and select the source to adjust the prices for the specific OTA.
Choose the days and set the date range for which the price adjustments apply.
Select the appropriate room types from the list.
When you select a room type, the pricing details for each rate plan will appear. Adjust the prices per person as needed.
If needed, click on “Add Room Type” to include additional room types for price setting.
Click on “Set Pricing” at the bottom, that will be enabled after filling all the required information.
Review and Confirm: A confirmation page will appear where you can recheck the data you have updated.
Receive Confirmation: You will get a confirmation message indicating that the pricing has been successfully updated.
How do I apply minimum and maximum length of stay restrictions?
In Stayflexi, Minimum/Maximum Length of Stay refers to the restrictions you can set on a booking to control how long guests must or can stay at your property. For Example:
If you set a 2-night minimum, guests cannot book for just 1 night.
If you set a 7-night maximum, guests cannot book for more than 7 consecutive nights.
Below are the step-by-step guidelines for Applying Minimum/Maximum Length of Stay Restrictions:
Log in to the Stayflexi Dashboard with your credentials.
Click on the ” Rates & Inventory ” icon at the dashboard’s top [third icon from the left].
Access the Bulk Update: On the right-hand side of the screen, click the Bulk Update button.
Select Min/Max Length of Stay: A list of bulk actions will appear. Select either Minimum Length of Stay or Maximum Length of Stay depending on your requirement.
Configure the Restriction Details:
A popup will appear where you can configure the restriction
Select the specific days and date range for the restriction.
Choose the source [e.g., OTA channels or Direct Bookings].
Apply to All Room Types and Rate Plans [Optional]: If you want to apply the restriction across all room types and rate plans, toggle the Apply for all room types and rate plans option.
Select Specific Room Types: If you do not want to apply the restriction to all rooms, choose the specific room types that you want the restriction to apply to.
Enter the Minimum or Maximum Length of Stay: Set the Minimum or Maximum length of stay you want to apply.
Confirm the Action:
Click the Min/Max Length of Stay button at the bottom of the popup to apply the restriction.
A confirmation message will appear to confirm that the restrictions have been successfully applied.
How to find rate parities reported by OTAs?
Below are the step-by-step guidelines on how to find rate parities by OTAs in Stayflexi:
Log into the Stayflexi Dashboard.
Click on the third icon from the top, which is Rates and Inventory.
On the right-hand side, locate the View more options.
From the listed options, find and click on “OTA Price Compare”.
You will now see the rate parities reported by different OTAs.
Note: In some Scenarios, OTAs may show varying prices due to promotions or discounts. If the rates differ from Stayflexi, adjust them in the respective OTA extranet to ensure price parity across platforms.
What is inventory capping, and how does it work ?
Inventory Capping in Stayflexi refers to the practice of setting limits on the number of rooms available for booking within a specified timeframe. This feature allows property managers to control how many rooms can be sold at a given timeon given source, helping them manage demand, optimize pricing, and avoid overbooking.
Benefits:
Avoid Overbooking: Reduces the risk of having guests show up with no available rooms.
Manage Demand: Adjusts room availability based on expected occupancy.
Maximize Revenue: Helps in strategic pricing and availability management.
Flexibility: Easy to adjust limits in response to changes in demand or booking patterns.
Example of Use:
If a property wants to allocate a specific number of rooms to online channels, they can use inventory capping. For example, if a property has 20 rooms in a category and wants to make only 5 rooms available to online channels, they can set the cap value to 5, select the desired channels, and specify the date range.
How to use the feature Inventory Capping in Stayflexi:
Log into the Stayflexi Dashboard.
Click on the third icon from the top, which is Rates and Inventory.
Locate the green “Bulk Update” on the right side of the screen and click on it.
Locate Inventory Capping and click on it.
Popup Window: A popup will appear on the right-hand side of the screen.
Select Room Types: Choose the Room Types you want to apply the cap on.
Specify days: select the days for which you want to apply the inventory cap.
Set Date Range: Select the date range during which the cap will be in effect.
Source of Booking: Select the source of Booking for which the inventory cap applies.
Select Cap Value: Enter the Cap Value you want to set.
Choose Type: Specify whether the cap is in Count [number of rooms] or Percentage.
Applying Capping: Click on the Apply Capping button to complete the process.
Confirmation Message: A confirmation message will appear, indicating that the inventory capping has been successfully applied.
How can I adjust the inventory for a specific day?
Below are the step by step guidelines on how to adjust the inventory for a specific day:
Log into the Stayflexi Dashboard.
Click on the third icon from the top, which is Rates and Inventory.
Locate the green “Bulk Update” on the right side of the screen and click on it.
Locate and click on “Set Inventory” from the listed options.
On the next page, go to the Days column and select the specific day for which you want adjust the inventory.
Select the date range to apply the changes.
Choose the appropriate room type from the list.
Enter the desired room count for that day.
If needed, click on the “Add Room Type” button to add inventory for additional room types.
Finally, click on “Set Inventory” to complete the adjustment.
How do I set rooms to offline status?
The main purpose of setting rooms’ Offline Status in Stayflexi is to keep certain rooms unavailable for online bookings while still allowing them to be manually booked for offline purposes.
Here’s a step-by-step guide on how to find the feature Setting a Room Offline:
Log into the Stayflexi Dashboard.
Click on the third icon from the top, which is Rates and Inventory.
Locate the “Bulk Update” option on the top right side of the screen and click on it.
Locate Set Offline: In the list of actions that appears, find and select set Offline option.
Select Room Types: Choose the Room Types and then you can select room numbers you want to set offline from the options provided.
Toggle Selection:
There is a toggle option available:
Enable the toggle to select all rooms at once and make it offline.
Disable it to set rooms offline on a room-by-room basis.
Select the Date Range: Don’t forget to specify the “Date Range” during which the rooms will be offline.
Set Offline: After making your selections, click on the Set Offline button located below.
Confirmation Message: You will receive a confirmation message indicating that the selected rooms have been successfully Set Offline.
Can I copy rates from one online channel and apply them to another channel or travel portal?
To copy rates from one online channel and apply them to another channel or travel portal, follow the below-mentioned steps:
Log into the Stayflexi Dashboard.
Click on the third icon from the top, which is Rates and Inventory.
Locate the green “Bulk Update” on the right side of the screen and click on it.
From the listed options, Locate and click on “Update Rates from OTA”.
A page will open on the RHS of the screen.
In the respective column, select the Source [OTA] from which you want to update the rates.
Select the specific days for which you want to update the rates from OTA.
Choose the date range for which the rates should be updated.
Depending upon your need, select either Previous Year or Next Year to apply the rates accordingly.
The previous year or next year options allow you to apply rate updates based on historical or future data. Here’s a brief overview:
Previous Year: This option lets you copy and apply rates from the same period in the previous year. It’s useful for maintaining consistency in pricing strategies based on past performance.
Next Year: This option allows you to set or adjust rates for the upcoming year. It’s beneficial for planning ahead and ensuring your rates are competitive and aligned with your revenue management strategy.
Once all selections are made, proceed with updating the rates to complete the action.
How can I check if the rates updated in Stayflexi have synced with the OTAs?
There are two ways to verify the rates updated in Stayflexi after syncing with OTAs:
Using view latest updates
To check if the rates updated in Stayflexi have synced with the OTAs, follow these steps:
Log in to the Stayflexi Dashboard with your credentials.
Click on the ” Rates & Inventory ” icon at the dashboard’s top [third icon from the left].
On the right side of the screen, click on View more options to open more options.
Select Logs: From the list of options, click on View latest Updates.
Check the Sync Status: On the opened page, review the status. If it shows “Success”, the updated rates have been successfully synced with the OTAs.
If it does not show “Success” the rates have not been synced, and further action may be needed.
This process ensures that your rates are aligned across Stayflexi and the OTAs.
2. Using View Detailed Logs
In Rates & Inventory, select View Detail Logs
Review the on-screen notice: this log reports only OTA (channel) rate and inventory updates.
From the calendar control, choose the date for which you want the report.
Click Export Report to generate and download the log.
A list of reports for the selected date will be displayed. Review the update records and check their Status.
How to set sold out entire property ?
Below are the step-by-step guidelines on how to Set Sold Out:
Log in to the Stayflexi Dashboard with your credentials.
Click on the ” Rates & Inventory ” icon at the dashboard’s top [third icon from the left].
Click on the “Bulk Update” button located on the right side of the screen.
From the list of actions, select “Set Sold Out.”
A pop-up will appear on the right side of the screen. Select the Specific days you want to mark as sold out.
Choose the date range during which you want to set rooms as sold out.
Click the “Set Sold Out” button to complete the action.
You will receive a Confirmation message and the entire property will be marked as sold out.
How do I set rooms to online status?
The main purpose of setting a room to Online Status in Stayflexi is to make it available for bookings across online channels, such as OTAs [Online Travel Agencies] and the property’s website.
Here’s a step-by-step guide on how to find the feature Setting a Room Online status:
Log into the Stayflexi Dashboard.
Click on the third icon from the top, which is Rates and Inventory.
Locate the “Bulk Update” option on the top right side of the screen and click on it.
Locate Set Online: In the list of actions that appears, find and select set Online option.
Select Room Types: Choose the Room Types and then you can select room numbers you want to set online from the options provided.
Toggle Selection:
There is a toggle option available:
Enable the toggle to select all rooms at once and make it online.
Disable it to set rooms online on a room-by-room basis.
Select the Date Range: Don’t forget to specify the “Date Range” during which the rooms will be online.
Set Online: After making your selections, click on the Set Online button located below.
Confirmation Message: You will receive a confirmation message indicating that the selected rooms have been successfully Set Online.
Blocking and unblocking the rooms.
In Stayflexi, managing room availability is quick and effortless with the Block/Unblock feature. Whether you need to temporarily remove rooms from inventory for maintenance, or permanently block them due to long unavailability, Stayflexi allows you to do so in just a few clicks.
EXAMPLE: Consider a hotel undergoing renovations on one of its floors. The manager needs to keep the rooms on that floor unavailable for an extended period while the work is completed. Using Stayflexi’s block/unblock feature, the manager can permanently block those rooms, ensuring they don’t appear in the booking system.
Once the renovations are done, the manager can simply unblock the rooms with a few clicks, instantly making them available for reservations. This streamlined process helps the hotel avoid any booking mishaps while keeping inventory up to date.
Below are the step-by-step guidelines on blocking and unblocking the rooms:
Log in to the Stayflexi Dashboard with your credentials.
Click on the ” Rates & Inventory ” icon at the dashboard’s top [third icon from the left].
On the opened page, click on Bulk Update. A popup will appear displaying multiple actions you can perform.
Select Block/Unblock Rooms: From the list of actions, choose Block/Unblock Rooms based on your requirements.
Choose Room Types: You will see a page displaying rooms on the right side. Under Room Types, select the rooms you wish to block or unblock.
Select All or Individual Rooms: You will find a toggle below the room types
Enable the toggle to Select all rooms for the action.
Disable it to select rooms individually.
Set Date Range: Below the room selection, choose the date range during which you want the rooms to be blocked or unblocked.
Add a Reason [Optional]: There’s an optional field where you can type the reason for blocking the rooms, if necessary.
Complete the Action: Click on Block/Unblock Rooms to execute the action.
Confirmation: A confirmation message will appear, indicating the completed process.
Note: Once rooms are blocked, they will also appear in the “Out of Order” reports under the Housekeeping tab, ensuring the housekeeping team is aware of the status.
What happens when a room is set offline?
When a room is set to Offline Status in Stayflexi, it becomes unavailable for booking online platforms like OTAs and the property’s official website. However, the room remains available for offline bookings, such as walk-ins or direct reservations made by phone or at the front desk. The inventory is not blocked on online channels like OTAs, but the property purposefully keeps it offline for various reasons, such as maintenance or keeping a few rooms aside for VIP guests.
EXAMPLE: A property may set a room to offline status during a local festival. They anticipate that many guests will walk in without prior bookings, so they reserve some rooms exclusively for offline bookings, ensuring they can accommodate last-minute guests.
What happens when a room is set online?
When a room is Set Online in Stayflexi, it becomes available for booking across all connected channels, including the property’s own website and OTAs [Online Travel Agencies]. This is commonly done after the room has been offline due to maintenance, cleaning, or other operational reasons. The room’s availability is instantly updated across all platforms, making it open for new reservations.
EXAMPLE: Let’s say Kevin, a property manager, had previously set Room 301 offline for a week due to to plumbing repairs. After the repairs are completed and the room is ready for guests, Kevin logs into Stayflexi and sets Room 301 back Online. Immediately, the room becomes available for booking across all connected OTAs like Booking.com and Airbnb.
Later that day, a guest visiting the property’s official website sees Room 301 available for their desired dates and makes a booking. Since Stayflexi automatically syncs inventory across all platforms, the room is also available on all OTA platforms.
By setting the room online, Kevin ensures that the guests have access to the most up-to-date availability, all while avoiding any manual work to update each booking channel individually.
What is the difference between setting room offline and blocking a room?
Setting a Room Offline in Stayflexi: This action temporarily removes a room from online availability, making it unavailable for booking through any online channels. The room can only be booked for walk-in guests. The room will not be shown as available on the online booking platform, and no online reservations can be made for that room until inventory is set back online.
Blocking a Room: Blocking a room in Stayflexi allows a property manager to block a particular room number for a specific guest. This action prevents the room from being booked by other guests during the specified period.
Blocking a room can happen for property management needs also, If renovations, maintenance, or any other changes are needed, property managers can block the room to prevent bookings during that duration.
When a room is blocked, it remains visible on the reservation calendar but is labeled as a blocked room in grey color. This visual indication helps front desk staff quickly identify which rooms are unavailable for new bookings.
Here’s a step-by-step guide on how to find the feature Setting a Room Offline:
Log into the Stayflexi Dashboard.
Click on the third icon from the top, which is Rates and Inventory.
Locate the “Bulk Update” option on the top right side of the screen and click on it.
Locate Set Offline: In the list of actions that appears, find and select set Offline option.
Select Room Types: Choose the Room Types and then you can select room numbers you want to set offline from the options provided.
Toggle Selection:
There is a toggle option available:
Enable the toggle to select all rooms at once and make it offline.
Disable it to set rooms offline on a room-by-room basis.
Select the Date Range: Don’t forget to specify the “Date Range” during which the rooms will be offline.
Set Offline: After making your selections, click on the Set Offline button located below.
Confirmation Message: You will receive a confirmation message indicating that the selected rooms have been successfully Set Offline.
Here’s a step-by-step guide on how to find the feature Block Room:
Log into the Stayflexi Dashboard.
Click on the third icon from the top, which is Rates and Inventory.
Locate the “Bulk Update” option on the top right side of the screen and click on it.
Locate Block Room: In the list of actions, find and select Block Rooms.
Popup Window: A popup will appear on the right-hand side of the screen.
Select Room Types: Choose the Room Types you want to block.
Select Room ID Grids: You can individually select the room ID grids for the rooms you wish to block.
Toggle Selection:
Enable the toggle to block all rooms at once.
Disable the toggle to block rooms individually.
Select Date Range: Don’t forget to specify the “Date Range” during which the rooms will be blocked.
Provide a Reason: There is an optional Reason box where you can type the reason for blocking the room.
Block Room: After making your selections, click on the Block Room button located below.
Confirmation Message: A confirmation message will appear, indicating that the selected rooms have been successfully blocked.
How can I update prices for all or multiple room categories at once for both offline and online travel portals using the software?
Below are the step-by-step guidelines on how to set pricing in Stayflexi:
Log into the Stayflexi Dashboard.
Click on the third icon from the top, which is Rates and Inventory.
Locate the green “Bulk Update” on the right side of the screen and click on it.
From the list of actions, Locate and click on Set Pricing to adjust rates.
A pop-up will appear on the right-hand with options:
Select the Source of booking e.g., OTA, Direct, etc.. for which you want to set the rates. You can choose one, multiple, or all sources at once.
Choose the Days for which you want to adjust the rates, similar to the source selection.
Select the Date Range during which the price changes will apply.
Choose the Room Type and rate Plan you wish to adjust.
Set the Price per Person under the room type and rate plan.
Add the Child and Infant prices, if applicable.
Click on ‘Add Room Type’ on the left side of the pop-up page and repeat the process for each new room type.
After setting all prices, click on ‘Set Pricing’.
You will see a summary of the changes:
Review the updated data and pricing details.
Click on ‘Confirm’ to complete the action.
A confirmation message will appear, indicating that the rates have been successfully updated.
How can I change a room number or room ID within the software?
Below are the step-by-step guidelines on how to change room numbers in Stayflexi:
Log into the Stayflexi Dashboard.
Click on the third icon from the top, which is Rates and Inventory.
Locate the “Bulk Update” option on the right side of the screen and click on it.
Locate Edit Room IDs: In the list of actions, find and select Edit Room IDs.
Popup Window: A page will appear on the right-hand side of the screen.
Select Room Types: Choose the Room Types you want to edit.
Edit Room IDs: Below the room type selection, you will see the current room IDs. Enter your desired new room IDs in the corresponding fields.
Confirm Edit: After entering the new room IDs, click on the Edit Room IDs button below to complete the action.
Confirmation Message: You will receive a confirmation message indicating that the room numbers have been successfully changed.
How to change prices for multiple date ranges and across multiple room types?
To change prices for Multiple Date Ranges and across Multiple Room Types, follow the below steps:
Log into the Stayflexi Dashboard.
Click on the third icon from the top, which is Rates and Inventory.
Locate the green “Bulk Update” on the right side of the screen and click on it.
Set Pricing: Locate and click on the “Set Pricing” option.
A page will open on the RHS.
Select the OTA/ Channel: To set the price for a specific channel, select the arrow at the top right corner of the page to choose the OTA or Channel.
You can select multiple channels or just one.
Select Days: In the “Days” column, choose the specific days you want to apply the price changes.
Set Date Range: Choose the date range for which you want the price changes to take effect.
Click on the date range field to open the calendar.
Choose the start and end dates for the specified range.
Select Room Types: select the arrow at the top right corner of the page in the Select Room Types column. Under “Room Types”, click on “Add Room Type” to select the rooms for which you want to update the pricing.
Note:- You can add multiple room types one by one and accordingly you can update prices in 1 go.
Click on Set Pricing: Once all the selections are made, click the green “Set Pricing” button at the bottom of the page.
Review and Confirm: A confirmation page will appear where you can recheck the data you have updated.
If everything is correct, click “Confirm” to apply the changes.
Receive Confirmation: You will get a confirmation message indicating that the pricing has been successfully updated.
How to check what room types and rate plans connected to what channels/OTAs?
Below are the step-by-step guidelines on how to check what Room Types and Rate plans are connected to what channels:
Log in to the Stayflexi Dashboard with your credentials.
Click on the ” Rates & Inventory ” icon at the dashboard’s top [third icon from the left].
You will see Room Types and Rate Plans listed individually on the page.
Next to each Room Type, there is an option labeled “View Connected Channels”. Click on this option.
A pop-up will appear, displaying the OTAs and channels connected to that specific Room Type and Rate Plan.
How to delete rooms ?
Below are the guidelines on how to Delete rooms:
Log into the Stayflexi Dashboard.
Click on the third icon from the top, which is Rates and Inventory.
Locate the “Bulk Update” option on the right side of the screen and click on it.
Locate Delete Rooms: In the list of actions, find and select Delete Rooms option.
Popup Window: A popup will appear on the right-hand side of the screen.
Select Room Type: Choose the Room Types from which you want to delete.
Select Room IDs: Select the specific Room IDs, which are displayed in grid form.
Delete Rooms: After making your selections, click on the Delete Rooms button below.
Confirmation Message: You will receive a confirmation message indicating that the selected rooms have been successfully deleted.
Follow the same steps as mentioned above for deleting rooms. Choose the Room IDs you want to Restore. After making your selections, click on the Restore Rooms button located below. You will receive a confirmation message indicating that the selected rooms have been successfully restored.
Housekeeping
Experience the future of hotel cleanliness with Stayflexi’s Housekeeping management! In this video, we highlight how our innovative platform streamlines housekeeping operations, ensuring your rooms are spotless and guest-ready. Discover features like real-time task updates, automated scheduling, and seamless communication between staff. Stayflexi’s Housekeeping module enhances efficiency, reduces manual errors, and improves guest satisfaction. Join us to see how you can elevate your hotel’s cleanliness standards and operational efficiency. Don’t forget to like, subscribe, and hit the notification bell for more insights on transforming your hotel management!
Understanding the housekeeping layout.
Overview:
The layout is designed to provide a comprehensive view of the housekeeping status of the rooms on the property. It shows a grid of rooms, and their current status, and allows for various actions related to cleaning and staff assignment. The main dashboard displays key housekeeping statistics, while the bottom section lists the individual rooms with detailed information.
On the top menu, click the Housekeeping icon (4th icon from the left) to open the Housekeeping dashboard. This page displays all rooms along with their current housekeeping and booking statuses.
Housekeeping Status Tiles (Top Section)
At the top of the page, you’ll find status summary tiles, giving a quick overview of the property’s room conditions:
Clean: Number of rooms that are clean and ready for new guests.
Clean Occupied: Clean rooms that currently have checked-in guests.
Dirty: Rooms marked as dirty and need cleaning.
Dirty Stayover: Occupied rooms that require cleaning during the guest’s stay.
Dirty Checkout: Rooms where guests have checked out and the room needs to be serviced.
Out of Order: Rooms unavailable due to repairs or maintenance.
Total Clean: Sum of all rooms marked clean (occupied or vacant).
Total Dirty: Sum of all dirty rooms (stayover + checkout).
All Rooms: Displays the total number of rooms in the property.
Filters and Controls (Below the Tiles)
Search Bar: Quickly search for a specific Room No., Guest Name, or Room Type.
Dropdown (Room Count): Lets you adjust how many room records are displayed per page.
Pick Your Date: Use the calendar icon to view the housekeeping data for a specific date.
Actions Dropdown: Provides key housekeeping operations such as:
Mark Clean – Update selected room(s) to clean status.
Mark Dirty – Mark selected room(s) as dirty.
Assign Staff – Allocate rooms to housekeeping staff for cleaning.
Mark Out of Order – Mark selected rooms as unavailable for maintenance.
Mark Available – Bring out-of-order rooms back to available status.
Add Staff Remark – Add specific notes or updates related to room or staff activity.
Export Report Dropdown: Download detailed housekeeping activity reports in PDF, CSV, or Excel formats for easy tracking and management.
Room List (Main Table Section)
Each row in the table represents an individual room with details such as:
Room No.: The room number assigned within the property.
Status: Shows the current housekeeping condition (e.g., Dirty – Stayover, Dirty – Checkout, Clean).
Guest Name: Displays the guest currently staying or who recently checked out.
Booking Status: Indicates whether the room is Checked-In or Checked-Out.
Check-In / Check-Out: Displays the respective check-in and check-out dates and times.
Staff Name: Shows the staff member responsible for cleaning or maintaining the room.
You can select multiple rooms using the checkboxes for performing batch actions like marking them clean or assigning staff.
Additional Features
Column Settings (Right Side): You can customize visible columns in the table for a personalized view.
Total Rows Count (Bottom): Displays the total number of rooms currently visible in the list.
Accessing Configuration Options
On the right-hand side of the Housekeeping page, click on the ⚙️ Configuration icon to open additional housekeeping settings.
This section provides two important options:
Room Assignment
Out-of-Order Report
The overall Housekeeping Layout provides a clear and structured way for hotel management and staff to:
Monitor daily cleaning progress,
Assign and track staff duties,
Quickly take bulk actions on rooms, and
Generate instant reports for recordkeeping and analysis.
Is there a simple and efficient way to mark all dirty room as clean with just one click from the housekeeping interface? How user-friendly is this process?
Yes, there is a simple and efficient way to mark all dirty rooms as clean directly from the Housekeeping interface, and it’s designed to be very user-friendly.
Here’s how it works:
By following these steps, you can easily mark rooms as clean from the housekeeping interface.
Go to the Housekeeping Page: Click on the Housekeeping icon (4th icon from the left on the top menu).
Select All Dirty Rooms:
Select the dirty tile from the housekeeping dashboard.
Use the checkbox beside the column header to Select All rooms at once.
This automatically highlights every room listed on the page (including all dirty rooms).
Click on the “Actions” Dropdown: From the dropdown options, choose “Mark Clean.”
Instant Update:
All selected dirty rooms will instantly change their status to Clean.
The dashboard counters (Clean, Dirty, Total Clean, etc.) refresh automatically.
Where can I find a comprehensive view of all rooms and their current statuses (dirty, clean, out of order, dirty occupied)?
You can view a comprehensive list of all rooms and their current housekeeping statuses right from the Housekeeping Dashboard itself.
Here’s how it works:
Comprehensive View of All Room Statuses :
Go to the Housekeeping Page: Click on the Housekeeping icon (4th icon from the left on the top menu).
Dashboard Overview:
The top section of the page displays status summary cards showing:
Clean – Rooms ready for occupancy.
Clean Occupied – Clean but currently occupied rooms.
Dirty – Rooms that need cleaning.
Dirty Stayover – Occupied rooms that require daily cleaning.
Dirty Checkout – Rooms vacated by guests and pending cleaning.
Out of Order – Rooms blocked due to maintenance.
Total Clean / Total Dirty / All Rooms – Overall counts for quick tracking.
Room List (Detailed Table View): Below the summary cards, the main table gives a detailed breakdown of each room, including:
Room Number
Current Status (Clean, Dirty, Out of Order, etc.)
Guest Name
Booking Status (Checked-In / Checked-Out)
Check-In & Check-Out Dates
Assigned Staff Name
How do I assign housekeeping staff to specific rooms for cleaning?
Below are the step-by-step guidelines to assign Housekeeping staff to rooms from the Stayflexi Housekeeping:
Method 1: From the Housekeeping Dashboard
Open the Housekeeping Page: Click on the Housekeeping icon (4th icon from the left on the top menu).
Select Room(s):
Use the checkbox beside the room(s) you want to assign.
You can select one or multiple rooms at a time.
Click on the “Actions” Dropdown:
From the dropdown options, choose “Assign Staff for Cleaning.”
Assign Staff:
A small pop-up will appear showing the list of available housekeeping staff.
Select the staff member you want to assign and click Save.
Confirmation:
The Staff Name and Email will now appear beside each assigned room in the table.
The room status and staff remark (if added) will be visible instantly.
Method 2: From the Configurationto Room Assignment Page :
If you want to set permanent staff assignments so that a particular staff is automatically assigned every time that room becomes dirty:
Click on the Configuration icon on the right-hand side of the Housekeeping page.
Select “Room Assignment.”
Choose a Room Number and Assign Staff permanently.
Click Save.
From now on, whenever that room becomes dirty, it will auto-assign to the same staff member.
NOTE: To add a staff member’s name or email in the Room Assignment section, you must first add them under Property Configuration → Users & Access Control. Once the user is created there, their details will automatically reflect in the staff list for Room Assignment.
How to bulk mark rooms dirty / clean?
You can update the housekeeping status of multiple rooms at once using the bulk action feature available on the Housekeeping dashboard. This helps save time and ensures all room statuses are updated instantly.
Below are the step-by-step guidelines to bulk mark rooms as dirty/clean from the Stayflexi Housekeeping:
Open the Housekeeping Page:
Click on the Housekeeping icon (4th icon from the top menu) to access the housekeeping dashboard.
Select Rooms:
Use the checkbox beside each room to select multiple rooms.
To select all rooms at once, click the Select All checkbox at the top of the list.
Click on the “Actions” Dropdown:
At the top of the page, you’ll find the Actions dropdown menu.
Choose “Mark Clean” to mark all selected rooms as clean.
Choose “Mark Dirty” to mark all selected rooms as dirty.
Instant Update:
The selected rooms will immediately update their status.
The status cards (Clean, Dirty, Total Clean, etc.) will automatically refresh to reflect the changes.
Is there a system to add specific remarks or instructions for staff on individual rooms, ensuring they have all the necessary information?
Yes, the Housekeeping module includes a remarks feature that allows you to add specific notes or instructions for staff on individual rooms — ensuring they have all the details they need before cleaning or inspection.
Below are the step-by-step guidelines to add remarks or instructions for staff on individual rooms from the Stayflexi Housekeeping:
Log in to Your Stayflexi Dashboard:
Use your username and password to log in.
Go to Housekeeping:
On the top menu, click the Housekeeping icon (4th icon from the left) to view a list of rooms and their current status.
Select the Rooms:
To select individual rooms, click the checkbox next to each room .
To select all rooms at once, click the checkbox in the header row.
Open the Actions Menu:
Once rooms are selected, click on the Actions dropdown menu at the top of the Housekeeping Dashboard.
A list of bulk action options will appear.
Choose the Action:
Choose the option “Assign a room to supervisor and add a remark.”
Assign Staff:
In the pop-up window that appears, select the staff member from the dropdown by entering their email address. This will assign the selected rooms to that specific staff member.
Add Remarks:
Supervisor Remark:
Enter any important notes or instructions that the supervisor needs to be aware of for the selected rooms in the Supervisor Remark text box.
Staff Remark:
Add specific instructions or comments for the housekeeping staff, such as tasks to be completed or special requirements for the room in the Staff Remark text box.
Save the Remark:
After reviewing the details, click the “Save” button.
This will ensure that the assigned staff members receive the rooms and the remarks you added.
How can I quickly identify and access information about all out-of-order rooms?
You can easily view and manage all Out-of-Order rooms directly from the Housekeeping module. The system provides both a quick visual overview and a detailed report for better tracking and maintenance management.
Below is the Step-by-step guide to identifying and accessing information about all out-of-order rooms in Stayflexi Housekeeping:
Method 1: From the Housekeeping Dashboard:
Open the Housekeeping Page:
Click on the Housekeeping icon (4th icon from the top menu).
Check the Status Summary Cards:
At the top of the page, you’ll see a status card labeled “Out of Order.”
This card instantly shows the total number of rooms currently marked as Out of Order.
View Out-of-Order Rooms in the Table:
Scroll down to the room list (main table).
Under the Status column, look for rooms marked as “Out of Order.”
You can also use the search bar and type “Out of Order” to filter and view only those rooms.
Method 2: From the Configuration → Out-of-Order Report:
On the right-hand side of the Housekeeping page, click on the Configuration icon.
Select “Out-of-Order Report.”
This opens a detailed log of all rooms that are currently out of order, including:
Room Number
Reason for being Out of Order (e.g., AC repair, renovation, maintenance)
Status (Active / Resolved)
Action Log (who marked it and when)
Remarks or Notes (if added during blocking)
You can also export this report in PDF, Excel, or CSV format for tracking and record-keeping.
What is the difference between dirty stayover and dirty?
Both Dirty Stayover and Dirty indicate rooms that require cleaning — but they differ based on whether the room is occupied or vacant.
Dirty Stayover:
Refers to a room that is currently occupied by a guest, but still needs cleaning or servicing.
This usually happens when a guest is staying for multiple nights and requests or is scheduled for daily housekeeping service.
The guest’s belongings remain in the room while cleaning is done.
Example: A guest is staying for 3 nights. After the first night, the room is cleaned while the guest continues the stay — that day, the room status is Dirty Stayover until cleaned.
Dirty (or Dirty Checkout):
Refers to a room that has been vacated by the guest and now needs full cleaning and resetting before the next check-in.
The room is unoccupied and ready for deep cleaning, linen change, and inspection.
Example: A guest checks out at 11 AM, and the room now needs cleaning before the next arrival — that room shows as Dirty (Checkout) or simply Dirty.
How can I export housekeeping data?
Below are the step-by-step guidelines to export the housekeeping charter from Stayflexi Housekeeping:
Log in to Your Stayflexi Dashboard:
Use your username and password to log in.
Go to Housekeeping:
On the top menu, click the Housekeeping icon (4th icon from the left) to view a list of rooms and their current status.
Open the Export Options:
Click on the Export Reportdropdown menu at the top of the Housekeeping Dashboard.
Choose the Export Format:
You will see three options to export the housekeeping data.
Export as CSV
Export as PDF
Export as Excel
For Example:
Select Export asPDF to export the report in PDF format.
Download and View the Report:
Once you select Export asPDF, the file will automatically download to your system.
Open the PDF to view the housekeeping charter in a document format with all the details.
Conversations
Streamline your guest communications with Stayflexi’s Conversations feature. Effortlessly manage all guest interactions from a single platform, as our system integrates chats from leading OTAs like Expedia, Booking.com, and Airbnb. No more juggling multiple extranet logins—respond to enquiries, confirm reservations, and address guest concerns in real time, all within the Stayflexi dashboard. Whether it’s a quick question or a detailed request, Stayflexi ensures seamless communication, helping you enhance guest satisfaction and boost efficiency. Simplify your workflow and deliver exceptional service, every time.
what is the conversation feature in Stayflexi and how can it help a property
The Conversations feature in Stayflexi is specifically designed to streamline communication with guests by linking chats from multiple channels Expedia, Booking.com, and Airbnb directly into theStayflexi platform. This centralization simplifies guest communication management by allowing staff to handle all queries from these major OTAs without the need to access each OTA’s extranet.
Benefits of the Conversations Feature in Stayflexi:
Single Platform for OTA chats:
With Expedia, Booking.com, and Airbnb chats integrated into Stayflexi, the property staff can manage all guest communication in one place. This reduces the time and effort needed to log into each OTA extranet to respond to guests.
Efficient Guest Communication:
Since all messages from these platforms are collected in Stayflexi, staff can respond to guest inquiries in real-time, helping to resolve issues faster and providing a better guest experience.
Consistent and Seamless Replies:
Responses sent through Stayflexi are automatically synced with the OTA platform, ensuring smooth and timely communication without switching between systems.
Improved Productivity:
By centralizing OTA chats, staff can focus on providing better service without worrying about missed messages or delayed responses due to logging in multiple extranets.
How It works:
Staff can access the Conversations tab from the Stayflexi Dashboard .
Here, they will see all messages from guests who booked through Expedia, Booking.com, or Airbnb.
They can reply to guests directly from Stayflexi, and the messages will be automatically sent to the correct platform.
Can I reply online travel portal / channel guest messages from Stayflexi and what are the steps to do so ?
YES, you can reply to guest messages or query through Stayflexi, and managing responses is streamlined through the platform’s Conversations feature. Here’s how it works and how responses are managed:
Direct Guest Replies:
When you send messages to guests via Stayflexi, whether it’s through integrated OTAs like Booking.com, Expedia, or Airbnb, guests can respond to these messages directly from their OTA account.
Their replies appear instantly in the Stayflexi under the Conversations section, where staff can view and respond to them without logging into individual OTA platforms extranet.
Managing Guest Responses:
Centralized Dashboard: All incoming guest messages, whether pre-arrival during the stay or post-checkout, are displayed in a single, centralized dashboard within Stayflexi. This allows property staff to manage all communication from one place.
Real-Time Notifications: When a guest replies, the system sends real-time notifications, ensuring that staff are alerted promptly and can respond to enquiries or issues as soon as they arise.
Responding to Multiple Guests: For properties managing multiple guests, the Conversations feature organizes messages by guest or booking, helping staff handle responses efficiently and without confusion.
Enhancing Guest Experience:
Timely Responses: Since all messages are centralized and tracked, property staff can respond quickly, providing guests with prompt answers to their questions or requests. This enhances guest satisfaction and reduces response times.
Improved Staff Efficiency: By managing all guest communication in one place, property staff save time and avoid the hassle of logging into different OTA platforms to respond to messages. This boosts operational efficiency while maintaining consistent communication with guests.
Can a property communicate on real time basis with OTA guest with the help of conversations
YES, with Stayflexi’s Conversations feature, a property can communicate with OTA [Online Travel Agency] guests in real time. This feature integrates directly with major OTAs like Booking.com, Expedia, and Airbnb, allowing property staff to respond to guest enquiries, messages, and requests without logging into each OTA extranet.
How It Helps:
Real-Time Communication:
Messages sent by guests through the OTA are instantly received in Stayflexi’s Conversations feature, enabling staff to reply in real-time. This ensures quick responses, improving guest satisfaction.
Staff can respond directly from within Stayflexi, and the message is immediately sent to the guest via the corresponding OTA. This real-time messaging ensures that guests get prompt replies, whether they have questions about their booking, special requests, or other concerns.
Automated Updates and Notifications:
With real-time notifications, staff are alerted as soon as a new message arrives, ensuring timely responses. They can see all the necessary information in one interface, such as the guest’s name, booking details, and the source of the message.
Operational Efficiency:
Since all communication channels are integrated into Stayflexi, staff can focus on responding promptly without logging into multiple OTA systems.
It also helps with consistency and accuracy in communication, ensuring that all guest interactions are documented in one place for better tracking and follow-up.
Can I track the history of messages sent to guests through Stayflexi?
YES, Stayflexi enables you to track the entire history of messages sent to guests using its Conversations feature: Here is how it works:
Comprehensive Message Logging:
Every message you send to guests, whether it’s through OTA platforms like Booking.com, Expedia, or Airbnb or directly from Stayflexi, is automatically This creates a detailed log of all communications for each guest.
The communication log includes all types of messages, such as booking confirmations, payment requests, pre-arrival details, and in-stay or post-stay conversations.
Accessing the Message History:
You can easily access the entire message history by navigating to the guest’s reservation within Stayflexi. Each conversation is saved and organized, allowing you to view previous messages and responses in one continuous thread.
This gives you a clear view of all interactions with the guest, including when the messages were sent and what content was shared.
Why Message History Tracking is Helpful:
Consistency: Having a complete communication record ensures you can continue conversations with guests without losing context. You can refer back to earlier messages if there are questions or follow-ups.
Problem Solving: If any issues or disputes arise, the message history provides clear evidence of past communications, helping resolve situations quickly.
Better Team Coordination: Since all staff members can see the conversation history, it’s easier for multiple team members to manage guest communication without duplication or missed details.
Improved Guest Experience: Guests receive timely and informed responses because the staff can quickly refer back to previous communications, making interactions smoother and more efficient.
How does Stayflexi enable communication with guests before, during, and after their stay?
Stayflexi offers a comprehensive communication solution that allows properties to engage with guests before, during, and after their stay. This ensures guests have a seamless experience at every touchpoint, improving service and satisfaction. Here’s how Stayflexi enables communication throughout the guest journey:
Before the Stay:
Pre-Arrival Communication:
Stayflexi allows properties to send automated pre-arrival emails or messages to guests, providing them with important details about their booking, check-in times, and property policies. If a guest sends any inquiry message on Airbnb to property that messages also come to Stayflexi and from Stayflexi you can reply to the guest.
Real-Time Messaging via OTAs:
For guests who book through OTAs such as Booking.com, Expedia, or Airbnb, the Stayflexi Conversations feature connects directly to these platforms. This integration lets property staff Conversations feature connect directly to these platforms. This integration lets property staff respond to any pre-stay questions, such as requests for airport transfers, early check-in, any enquiry or clarification of booking details, all from one central platform.
During the Stay:
Instant Messaging and Real-Time Support:
During a guest’s stay, Stayflexi enables properties to communicate directly with guests for requests or enquiries. Guests can reach out for extra amenities, housekeeping, or room service, and property staff can reply in real time.
Special Requests Management:
Whether it’s a request for a room change, extended stay, or any other specific needs, Stayflexi allows staff to handle and communicate these changes seamlessly. All communication is logged in the platform for easy tracking.
On-Demand Services:
Guests can use the Stayflexi platform to request additional services or upgrades during their stay, such as spa bookings, and late check-outs, enhancing their overall experience.
After the Stay:
Post-Checkout Messages:
After the guest checks out, Stayflexi can automatically send a thank you email, ensuring the guest feels appreciated. This post-stay communication can include helpful details like an invitation to review the property or a summary of their charges.
Feedback Collection:
Properties can send requests for feedback or encourage guests to leave reviews, helping the property gather insights to improve services and boost online visibility. Stayflexi’s platform helps manage guest feedback efficiently.
Review management
Enhance your property’s reputation with Stayflexi’s Review Management feature. Effortlessly manage guest reviews from top platforms like Booking.com, Expedia, and Airbnb, all within the Stayflexi dashboard. Consolidate feedback and respond to reviews in real time, ensuring a seamless and efficient review management process. Stayflexi helps you stay on top of guest feedback, allowing you to address concerns quickly and showcase your commitment to excellent service. Strengthen your online presence and build lasting guest relationships with ease.
Overview of Review Management
Review Management is the process of monitoring, analyzing, and responding to guest feedback left on various online booking platforms, such as Booking.com, Airbnb, and Expedia. For property managers, it’s an essential way to gain insights into guest experiences, address feedback, and enhance the property’s reputation. Stayflexi’s AI-powered review management simplifies this process by consolidating reviews from multiple channels into a single interface. This centralization allows you to view and respond to feedback more efficiently, ultimately helping improve guest satisfaction and increase bookings.
Step-by-Step Guide to Using Stayflexi’s Review Management:
Image 1:
Image 2:
Image 3:
Image 4:
Accessing the Review Management:
Log in to the Stayflexi dashboard and navigate to the Review Management section. This is where you can access and manage guest reviews from different booking platforms, all in one place.
Viewing Reviews Across Multiple Channels
In the left sidebar, you’ll see a list of integrated booking platforms (such as Booking.com, Airbnb, and Expedia).
Select a specific platform to view all guest reviews from that channel.
This consolidation saves you time by providing a single location to manage reviews, rather than logging into each platform separately.
Detailed Rating Breakdown
Each review provides a rating breakdown across different categories, such as Location, Comfort, Cleanliness, Facilities, Value for Money, and Staff.
For instance, if a guest rates their experience, you’ll see individual scores for each aspect (e.g., Location rated at 8, Cleanliness at 7.5).
This breakdown helps you quickly pinpoint specific areas for improvement or highlight positive aspects to maintain, offering actionable insights to enhance the guest experience.
Generating AI-Powered Responses to Reviews
To respond to a guest review, click the Reply button. A popup will appear, allowing you to type your reply directly or use the AI-generated response option, Generate reply with FlexiAI.
FlexiGPT’s AI will draft a professional, relevant response based on the review content. For example, if the review mentions cleanliness concerns, the AI can generate a response acknowledging the feedback and assuring the guest of improvements.
This feature helps ensure that your responses are prompt, thoughtful, and address guest concerns effectively.
Customizing and Sending Your Response
Once the AI has generated a response, you have the option to edit the reply before posting, allowing you to add personal touches or specific details.
After finalizing your response, click the Send button to publish it directly to the guest review on the respective platform.
Benefits of Using Stayflexi’s Review Management:
Centralized Management: Access reviews from multiple channels in one place, saving time and effort.
Actionable Insights: The rating breakdown provides clear visibility into areas of success and improvement.
Prompt, Professional Responses: AI-generated replies help you respond quickly and effectively to guest feedback.
Enhanced Guest Satisfaction: By addressing reviews promptly and thoughtfully, you can improve guest satisfaction and build a positive property reputation.
Stayflexi’s Review management makes managing reviews simple and efficient. It helps property managers respond quickly to guest feedback, use insights to improve the property, and enhance the guest experience overall.
What is Stayflexi’s AI-powered review management, and how can it help my property?
Stayflexi’s AI-powered review management tool is designed to help property managers monitor, analyze, and respond to guest reviews efficiently. Here’s how it works and the benefits it can bring to your property:
Image 1:
Image 2:
Review Management Across Multiple Channels (as shown in Image 1):
The tool gathers guest reviews from multiple booking channels, such as Booking.com, Airbnb, and Expedia, into a single interface.
You can switch between these channels easily, where each platform (Booking.com, Airbnb, Expedia) is accessible on the left sidebar.
This feature saves time by allowing you to view all reviews in one place instead of logging into each platform separately.
Detailed Rating Breakdown (as shown in Images 1 and 2):
Stayflexi’s review management displays a breakdown of guest ratings for different aspects of their stay, including Location, Comfort, Cleanliness, Facilities, Value for Money, and Staff.
Each aspect is rated on a scale (e.g., out of 10), with sliders visually representing guest satisfaction levels. For instance, in the screenshot, the guest rated Staff at 7.5 and other categories at 5.
This breakdown helps you quickly understand which areas are performing well and which may need improvement, allowing you to make data-driven decisions to enhance guest experience.
AI-Generated Responses for Reviews(as shown in Image 2 and 3):
With the Reply button provided within each review, the AI can generate an appropriate response based on the content of the guest’s review.
The AI takes into account the feedback, positive or negative, and crafts a suitable response to address the guest’s comments. For instance, if a guest mentions a negative experience with cleanliness, the AI might respond with an apology and a reassurance that the property will work to resolve the issue.
For example, refer to Image 3: So after clicking on the Reply button, a popup will appear where you can type a reply to the review yourself or can click on the Generate reply with FlexiGPT button, where the FlexiGPT will automatically generate the response or reply for that particular guest’s review.
Then, you can click on the Send button to send the reply to the guest.
This automated response feature saves time and ensures that responses are prompt, professional, and appropriately address the guest’s feedback, which helps improve guest satisfaction and reputation management.
Improving Property Reputation and Guest Satisfaction:
By addressing feedback proactively and using AI to ensure prompt responses, your property can enhance its online reputation. Better ratings and responsive communication can lead to more bookings, as potential guests are influenced by recent reviews.
Identifying and acting on common issues, like the “bad smell” example, allows you to make necessary improvements, enhancing the overall guest experience.
How It Benefits Your Property:
Centralized Review Management: View and manage reviews from multiple channels in one place.
Actionable Insights: Get clear visibility into ratings and guest feedback for targeted improvements.
AI-Generated Responses: Respond to reviews automatically, ensuring a prompt, professional reply.
Enhanced Guest Experience: Use feedback to continuously improve and provide a better guest experience, boosting your reputation and bookings.
Stayflexi’s AI-powered review management tool is an invaluable resource for properties looking to stay on top of guest feedback, resolve issues proactively, and build a positive reputation across booking platforms with the help of automated, AI-generated responses.
Can I respond directly to guest reviews posted on online travel portals through Stayflexi?
Yes, you can respond directly to guest reviews posted on online travel portals through Stayflexi’s AI powered review management.
Stayflexi’s review management centralizes reviews from multiple booking platforms (like Booking.com, Airbnb, and Expedia), allowing you to manage and respond to reviews all from one interface. Here’s how it works:
Image 1:
Image 2:
Image 3:
Log in to Your Stayflexi Dashboard:
Use your username and password to log in.
Go to Review management (as shown in Image 1):
Click on the Review Management section to see guest reviews from multiple channels in one place(6th from the left on the top menu).
Choose the Platform
In the sidebar, select a specific booking platform (like Booking.com, Airbnb, and Expedia) to view its reviews without needing to log in separately to this OTA extranet.
Check the Rating Breakdown:
Each review includes a breakdown of ratings for different aspects of the stay, helping you understand guest feedback.
Reply to the Review
Click the Reply button on any review.
You can type a response yourself or use the “Generate reply with Flexi AI” option to have AI draft a response for you.
Customize and Send
You can modify the AI-generated reply or send it as it is, posting your response directly to the original booking platform.
This setup helps you save time, manage feedback efficiently, and ensures timely, professional responses, enhancing your property’s online reputation and guest satisfaction.
Shops/POS
Streamline your property’s retail and sales operations with Stayflexi’s Shops/POS feature. Easily manage all point-of-sale transactions, track inventory, and generate detailed sales reports from a single platform. Whether you’re operating a shop, restaurant, or spa, Stayflexi’s POS system simplifies billing and enhances operational efficiency. Designed for ease of use, the Shops/POS feature integrates seamlessly with your existing Stayflexi system, providing real-time updates and accurate records. Improve your workflow, reduce manual errors, and offer a smooth experience for both your staff and guests.
How do I set up the shop to start taking orders?
Image 1:
Image 2:
Image 3:
Image 4:
Image 5:
Image 6:
Image 7:
Image 8:
Image 9:
Image 10:
Image 11:
Image 12:
Image 13:
Image 14:
Image 15:
Image 16:
Below is the step-by-step guide to setting up the shop to start taking orders:
Log in to Your Stayflexi Dashboard:
Enter your username and password to log in.
Access Shops/POS:
After logging in, click the “More Apps” icon (represented by four boxes or blocks) in the top right corner.
From the dropdown menu, select Shops(as shown in Image 1).
Shops or outlets page will appear.
Set up the shop:
On the shops page, at the top of the page, you will be able to see the Add Shop option (as shown in Image 2).
Once clicked, it will navigate you to the page where you can create or set up the shop for your property.
Fill in the below details (as shown in Image 3):
Outlet name: Name of your shop or outlet
Outlet address: Fill in the address details where your shop is located.
Outlet Phone: Provide the shop phone number
Outlet email: Provide the shop email ID
Outlet Description: Provide a brief description of your shop
Click on the Next button at the bottom of the page (as shown in Image 3).
Some more details related to creating a shop will appear.
Fill in the below details (as shown in Image 4):
Shop Tax Section:
There is a dropdown labeled “Shop tax” where you can select the applicable tax rate. This is likely required for the shop’s transactions.
If no tax rate is selected, it will display as “Select tax [0%].” You need to select the appropriate tax percentage for your shop.
Service Charge:
Below the tax field, there is an option to choose the type of service charge. The dropdown allows selecting the type, such as “Percentage” or “Fixed”.
In the next field, labeled “Service charge,” you can input the actual service charge value. This determines how much service charge will be applied on top of the base price.
Self-Service Section:
You can enable or disable the “Self-service” option through a dropdown, which includes the following option:
Enable self-service
Disable self-service
Tax Identificationnumber:
Here the Tax identification number is required. This likely indicates that you need to provide additional tax details or a tax ID before proceeding.
Outlet Type:
Users can select the type of outlet (such as F&B, Food & Beverage) from the “Outlet type” dropdown. This helps categorize the type of business or service offered at the shop.
Add Images and Back Buttons:
There are two buttons at the bottom: one to go Back to the previous page and another to Add Images, which allows you to upload images for the shop or menu.
Click on the Add Images option after filling in all the details on this page to go to the next page (as shown in Image 4).
In the Add Images page, you can click on the Click here to upload the images option. (Note: Adding Images is not mandatory, but to enhance your experience at least add one image).
Create Shop:
Create the shop by clicking on the Create Shop option at the bottom of the page (as shown in Image 5).
Your shop or outlet is successfully created and will be visible on the Shops page (as shown in Image 6).
Shop configuration:
To start taking the order, you need to configure the following :
Firstly, click on the shop to navigate to the Dashboard of the shop (as shown in Image 7).
On the left-hand side of the page, you can see the following options:
Dashboard
Place orders
View orders
Reports
Configuration
Click on the Configuration dropdown option (as shown in Image 8).
The configuration option is where you can configure the following for your shop or outlet:
Outlet: Configure and edit your outlet information, like description, default shop tax, order details, tax identification number, etc (as shown in Image 8).
Menu items: Add or Bulk upload menu items you need to configure for your shop (as shown in Image 9).
Categories: Add food categories to configure for your shop (as shown in Image 10).
Discounts: Add discounts based on food categories or menu items (as shown in Image 11).
Table/Area: Configure tables by clicking on the Add new table option (as shown in Image 12).
Table name: Give names for the tables.
Note: You can enter multiple table no. , as well as the table range
Table range – A10:A20 (by this you can add many tables at once by using “:”.
Multiple tables – 1,2,3
Avoid whitespaces to get the desired result.
Table description: Give table description in the table description section
Seating Area
No. of persons: Add how many people can sit at that particular table.
Click on the Save button to add tables.
Staff: To add staff details like staff email ID, staff name, and description (as shown in Image 13).
After setting up all the details you can easily start placing orders by going to the place orders option.
Understanding the “Place Order” Page (as shown in Image 14):
On the Place Order page, you will find:
Tables Section: Displays all available, running, and printed tables.
Occupied Rooms Section: Displays all occupied or checked-in rooms.
Placing an Order for a Specific Table:
Under the Tables Section, you will see a list of available tables.
Click on the table number or table ID for the table where you want to place an order (as shown in Image 14).
Once selected, a list of food categories (e.g., Veg, Non-Veg) whatever you have created from the configuration.
Select your desired category and add menu items to the order (as shown in Image 15).
Save and Confirm the Order:
After adding the menu items, click on the Save Order button to save and confirm your order (as shown in Image 16).
If you want to print KOT then configure KOT with the Stayflexi system and click on KOT & Print (as shown in Image 16).
Settling the Payment: If you’re ready to settle the bill for the order, click on the Settle Order button to complete the payment (as shown in Image 16).
By following these steps you can easily set up the shop and start taking orders.
How do I bulk upload POS menu items? What should I check before uploading?
Log in to Your Stayflexi Dashboard:
Enter your username and password to log in.
Access Shops/POS:
After logging in, click the “More Apps” icon (represented by four boxes or blocks) in the top right corner.
From the dropdown menu, select Shops.
A page showing all available shops or outlets will appear.
Choose the shop or outlet by clicking on the shop or outlet name.
Navigate to the “Configuration” Page:
Once you select a shop or outlet, you will be taken to its Dashboard.
On the left-hand side of the page, you will see various options, including:
Dashboard
Place Orders
View Orders
Reports
Configuration
Click on Configuration dropdown to proceed.
Go to Menu items:
On the Configuration dropdown, you will see a list of options including:
Outlet
Menu items
Categories
Discounts
Table/Area
Staff
Click on the Menu items option.
A list of all the menu items will appear along with the details.
Bulk upload POS menu items:
At the top of the Menu items page, an option called Bulk upload items will be visible.
You can click on this option and upload the Excel sheet from your system to the POS menu items.
But before uploading the menu items, you need to check the format in which you need to upload the menu items.
Just below the Bulk upload items option, the Download bulk upload template file option will be visible.
Click on this option to download the template to bulk upload the items and upload the items according to the bulk upload template.
When you click on the Download bulk upload template file option, a pop-up with a warning message will be displayed.
Read the instructions carefully and click on the Download template file button.
The template file will be downloaded to your system.
Open the template file and check on which format you need to upload the menu items.
If the template instructions are not followed you will not be able to bulk upload the menu items to POS.
After following the template, you can click on the Bulk upload items button to upload the menu items.
By following these steps you can easily bulk-upload menu items.
When settling a POS bill, if remarks (like “payment collected via net banking”) are added, where can I view these remarks in the reports?
Below are the step-by-step guidelines for placing an order for a specific table from Shops/POS:
Log in to Your Stayflexi Dashboard:
Enter your username and password to log in.
Access Shops/POS:
After logging in, click the “More Apps” icon (represented by four boxes or blocks) in the top right corner.
From the dropdown menu, select Shops.
A page showing all available shops or outlets will appear.
Choose the shop or outlet where you want to place an order by clicking on its name.
Navigate to the “Place Order” Page:
Once you select a shop or outlet, you will be taken to its Dashboard.
On the left-hand side of the page, you will see various options, including:
Dashboard
Place Orders
View Orders
Reports
Configuration
Click on Place Orders to proceed.
Understanding the “Place Order” Page:
On the Place Order page, you will find:
Tables Section: Displays all available, running, and printed tables.
Occupied Rooms Section: Displays all occupied or checked-in rooms.
Placing an Order for a Specific Table:
Under the Tables Section, you will see a list of available tables.
Click on the table number or table ID for the table where you want to place an order.
Once selected, a list of food categories (e.g., Veg, Non-Veg) whatever you have created from the configuration.
Select your desired category and add menu items to the order.
Save and Confirm the Order:
After adding the menu items, click on the Save Order button to save and confirm your order.
If you want to print KOT then configure KOT with the Stayflexi system and click on KOT & Print.
Settling the Payment: If you’re ready to settle the bill for the order, click on the Settle Order button to complete the payment.
Settle and Save:
Click on the Settle order button.
A pop-up to settle and save the amount with all other details will appear, like:
Payment type:
Cash
Offline card
Wallet
Other
Click on Other.
Write the remark like “payment collected via net banking” in the remark section.
Now, Click on Settle and Save.
Go to the Reports page in POS:
Click on the Reports option.
You will see various options on the reports page.
Click on the order-wise sales summary report.
Scroll right to the last column of the order-wise sales summary report.
You will find the Remarks column, this is where you can view the remarks if you have added any after settling the order.
How can I configure a service charge, and can it be automatically added to each order?
Image 1:
Image 2:
Image 3:
Image 4:
Image 5:
Image 6:
Image 7:
The service charge can be manually applied to each order. After placing an order in the Place Orders section, you will need to manually select the Apply Service Charge option under the Taxes section for each order.
Below are the step-by-step guidelines on how to configure service charges from Shops/POS:
Log in to Your Stayflexi Dashboard:
Enter your username and password to log in.
Access Shops/POS:
After logging in, click the “More Apps” icon (represented by four boxes or blocks) in the top right corner.
From the dropdown menu, select Shops.
A page showing all available shops or outlets will appear (as shown in Image 1).
Choose the shop or outlet by clicking on the shop or outlet name (as shown in Image 2).
Navigate to the “Configuration” Page:
Once you select a shop or outlet, you will be taken to its Dashboard.
On the left-hand side of the page, you will see various options, including:
Dashboard
Place Orders
View Orders
Reports
Configuration
Click on Configuration dropdown to proceed (as shown in Image 3).
Go to Outlet:
On the Configuration dropdown, you will see a list of options including:
Outlet
Menu items
Categories
Discounts
Table/Area
Staff
Click on the Outlet option (as shown in Image 3).
On the Outlet details block, click Edit to manage your outlet’s information, such as name, address, and email (as shown in Image 3).
Configure a service charge (as shown in Image 4):
Add service charge:
In the Outlet edit page, find the Service Charge option just below the Tax Identification Number textbox.
Select the service charge type from the dropdown:
Percentage
Fixed
Enter the service charge value in the textbox next to the dropdown.
Click Save to store the changes.
Go to the Place Orders page (as shown in Image 5):
Click on the Place Orders option.
On the Place Order page, you will find:
Tables Section: Displays all available, running, and printed tables.
Occupied Rooms Section: Displays all occupied or checked-in rooms.
Create an order:
Under the Tables Section, you will see a list of available tables.
Click on the table number or table ID for the table where you want to place an order (as shown in Image 5).
Once selected, a list of food categories (e.g., Veg, Non-Veg) whatever you have created from the configuration.
Select your desired category and add menu items to the order.
Apply service charge:
Below the Taxes section, you’ll find the Apply Service Charge option (as shown in Image 6).
Manually apply the service charge by clicking on it.
After applying the service charge if you wish to remove the service charge, do the following:
To remove the service charge, select the Remove option below the Service Charge section (as shown in Image 7).
Save and Confirm the Order:
After adding the menu items and applying the service charge, click on the Save Order button to save and confirm your order.
If you want to print KOT then configure KOT with the Stayflexi system and click on KOT & Print.
Settling the Payment: If you’re ready to settle the bill for the order, click on the Settle Order button to complete the payment.
By following these organized steps, you can easily apply service charges to the particular order through the Shops/POS!!
How do I place an order for a specific table?
Below are the step-by-step guidelines for placing an order for a specific table from Shops/POS:
Log in to Your Stayflexi Dashboard:
Enter your username and password to log in.
Access Shops/POS:
After logging in, click the “More Apps” icon (represented by four boxes or blocks) in the top right corner.
From the dropdown menu, select Shops.
A page showing all available shops or outlets will appear.
Choose the shop or outlet where you want to place an order by clicking on its name.
Navigate to the “Place Order” Page:
Once you select a shop or outlet, you will be taken to its Dashboard.
On the left-hand side of the page, you will see various options, including:
Dashboard
Place Orders
View Orders
Reports
Configuration
Click on Place Orders to proceed.
Understanding the “Place Order” Page:
On the Place Order page, you will find:
Tables Section: Displays all available, running, and printed tables.
Occupied Rooms Section: Displays all occupied or checked-in rooms.
Placing an Order for a Specific Table:
Under the Tables Section, you will see a list of available tables.
Click on the table number or table ID for the table where you want to place an order.
Once selected, a list of food categories (e.g., Veg, Non-Veg) whatever you have created from the configuration.
Select your desired category and add menu items to the order.
Save and Confirm the Order:
After adding the menu items, click on the Save Order button to save and confirm your order.
If you want to print KOT then configure KOT with the Stayflexi system and click on KOT & Print.
Settling the Payment: If you’re ready to settle the bill for the order, click on the Settle Order button to complete the payment .
By following these organized steps, you can easily place an order for a specific table through the Shops/POS!!
How do I place an order for a guest staying in a specific room?
Below are the step-by-step guidelines to place an order for guest staying in a specific room from Shops/POS:
Step-by-Step Guide to Place an Order for a Specific Room in Stayflexi:
Log in to Your Stayflexi Dashboard:
Enter your username and password to log in.
Access Shops/POS:
After logging in, click the “More Apps” icon (represented by four boxes or blocks) in the top right corner.
From the dropdown menu, select Shops.
A page showing all available shops or outlets will appear.
Choose the shop or outlet where you want to place an order by clicking on its name.
Navigate to the “Place Order” Page:
Once you select a shop or outlet, you will be taken to its Dashboard.
On the left-hand side of the page, you will see various options, including:
Dashboard
Place Orders
View Orders
Reports
Configuration
Click on Place Orders to proceed.
Understanding the “Place Order” Page:
On the Place Order page, you will find:
Tables Section: Displays all available, running, and printed tables.
Occupied Rooms Section: Displays all occupied or checked-in rooms.
Placing an Order for a Specific Room:
Under the Occupied Rooms section, you will see a list of available rooms (occupied or checked-in rooms).
Click on the room number or roomID for the room where you want to place an order.
A pop-up displaying the guest or customer details for the room will appear, giving you the option to either Proceed or Cancel.
Once you click on Proceed, a list of food categories (e.g., Veg, Non-Veg) will appear.
Select your desired category and add menu items to the order.
Save and Confirm the Order:
After adding the menu items, click on the Save Order button to save and confirm your order.
By following these steps, you can easily place an order for a specific room through the Shops/POS!!
How can I track orders coming from QR code in shops?
Below are the step-by-step guidelines to track orders coming from QR code from Shops/POS:
Log in to Your Stayflexi Dashboard:
Enter your username and password to log in.
Access Shops/POS:
After logging in, click the “More Apps” icon (represented by four boxes or blocks) in the top right corner.
From the dropdown menu, select Shops.
A page showing all available shops or outlets will appear.
Choose the shop or outlet by clicking on the shop or outlet name.
Navigate to the “View Orders” Page:
Once you select a shop or outlet, you will be taken to its Dashboard.
On the left-hand side of the page, you will see various options, including:
Dashboard
Place Orders
View Orders
Reports
Configuration
Click on View Orders to proceed.
Identifying QR Code Orders:
On the View Orders page, you will see a table listing all the orders.
There will be a column labeled QR Code.
If the status in the QR Code column is NO, it means the order was not placed using a QR code.
If the status is YES, the order was placed through a QR code.
These steps help you quickly log in, navigate through the shops, and identify whether an order was placed via a QR code.
How can I transfer a bill from one table to another in shop / POS?
Below are the step-by-step guidelines to transfer bills from one table to another from Shops/POS:
Log in to Your Stayflexi Dashboard:
Enter your username and password to log in.
Access Shops/POS:
After logging in, click the “More Apps” icon (represented by four boxes or blocks) in the top right corner.
From the dropdown menu, select Shops.
A page showing all available shops or outlets will appear.
Choose the shop or outlet where you want to place an order by clicking on its name.
Navigate to the “Place Order” Page:
Once you select a shop or outlet, you will be taken to its Dashboard.
On the left-hand side of the page, you will see various options, including:
Dashboard
Place Orders
View Orders
Reports
Configuration
Click on Place Orders to proceed.
Understanding the “Place Order” Page:
On the Place Order page, you will find:
Tables Section: Displays all available, running, and printed tables.
Occupied Rooms Section: Displays all occupied or checked-in rooms.
Place an order from the Table:
Under the Tables Section, you will see a list of available tables.
Click on the table number or table ID for the table where you want to place an order.
Once selected, a list of food categories (e.g., Veg, Non-Veg) will appear.
Select your desired category and add menu items to the order.
Save and Confirm the Order:
After adding the menu items and customer information, click on the Save Order button to save and confirm your order.
Navigating to the View Order Page:
After confirming your order, click on the shop name located at the top left corner of the screen.
This will take you back to the page where you can place orders.
To view your orders, click on the “View Orders” option on the left side just below the Place Orders option.
Moving a Bill to Another Table:
On the “View Orders” page, select the order whose bill you wish to move.
Find and click on the “Move Bill” button.
A pop-up will appear, displaying all available tables.
Select the table number or ID to which you want to move the bill.
Finally, click the “Confirm Move Table” button.
The guest bill will now be successfully moved to the selected table.
How do I apply a discount to an entire food category or a specific item?
Below are the step-by-step guidelines to apply the discount to an entire food category or a specific item from Shops/POS:
Log in to Your Stayflexi Dashboard:
Enter your username and password to log in.
Access Shops/POS:
After logging in, click the “More Apps” icon (represented by four boxes or blocks) in the top right corner.
From the dropdown menu, select Shops.
A page showing all available shops or outlets will appear.
Choose the shop or outlet by clicking on the shop or outlet name.
Navigate to the “Configuration” Page:
Once you select a shop or outlet, you will be taken to its Dashboard.
On the left-hand side of the page, you will see various options, including:
Dashboard
Place Orders
View Orders
Reports
Configuration
Click on the Configuration dropdown to proceed.
Go to Discount:
On the Configuration dropdown, you will see a list of options including:
Outlet
Menu items
Categories
Discounts
Table/Area
Staff
Click on the Discounts option.
Create a Discount:
To create a new discount, click the Add Discount button.
Fill in the following details:
Discount Name: Enter a name for the discount.
Discount Type: Choose between:
Percentage: Discount will be applied as a percentage of the item or category price.
Fixed: A fixed amount will be discounted.
Discount Value: Enter the value or percentage of the discount.
Discount Applied On: Select where the discount should apply:
Category: Choose categories (e.g., Veg, Non-Veg) from the dropdown to apply the discount to all items in these categories.
Item: Choose specific items (e.g., Veg Biryani, Chicken Biryani) from the dropdown to apply the discount to those items only.
Once all the details are filled in, save your discount settings. The discount option will then be available for the specific item, allowing you to select the desired discount when placing an order if needed.
Can I print a KOT or an A4-sized bill for the guest?
Yes, you can print a KOT or an A4-sized bill for the guest.
Below are the step-by-step guidelines to print KOT or an A4-sized bill for the guest from Shops/POS:
Log in to Your Stayflexi Dashboard:
Enter your username and password to log in.
Access Shops/POS:
After logging in, click the “More Apps” icon (represented by four boxes or blocks) in the top right corner.
From the dropdown menu, select Shops.
A page showing all available shops or outlets will appear.
Choose the shop or outlet where you want to place an order by clicking on its name.
Navigate to the “Place Order” Page:
Once you select a shop or outlet, you will be taken to its Dashboard.
On the left-hand side of the page, you will see various options, including:
Dashboard
Place Orders
View Orders
Reports
Configuration
Click on Place Orders to proceed.
Understanding the “Place Order” Page:
On the Place Order page, you will find:
Tables Section: Displays all available, running, and printed tables.
Occupied Rooms Section: Displays all occupied or checked-in rooms.
Place an order from the Table:
Under the Tables Section, you will see a list of available tables.
Click on the table number or table ID for the table where you want to place an order.
Once selected, a list of food categories (e.g., Veg, Non-Veg) will appear.
Select your desired category and add menu items to the order.
Save and Confirm the Order:
After adding the menu items and customer information, click on the Save Order button to save and confirm your order.
Enter Customer Information:
To add customer details, click on the customer information icon at the top. Enter the required information and save it.
Note: If you’re placing an order from a table, customer information is mandatory to print the A4 bill.
Print KOT:
After saving the order, click the KOT & Print button next to the Save Order button. This will print the Kitchen Order Ticket (KOT), and you’ll see the KOT ID displayed above the ordered or menu items.
If you need to add more items later, save the order again and print a new KOT. The newly added items will have a different KOT ID.
Print Bill (A4 or KOT Bill):
To print the bill, click on the Print Bill button located next to the KOT & Print button. A pop-up will appear with two options:
A4 Bill
KOT Bill View
Choose the type of bill you’d like to print, and it will include all the order details.
Does the shop support KOT (Kitchen Order Tickets), and how does it work?
Yes, shops/POS support KOT(Kitchen Order Tickets).
Below are the step-by-step guidelines to show how KOT works from Shops/POS:
Log in to Your Stayflexi Dashboard:
Enter your username and password to log in.
Access Shops/POS:
After logging in, click the “More Apps” icon (represented by four boxes or blocks) in the top right corner.
From the dropdown menu, select Shops.
A page showing all available shops or outlets will appear.
Choose the shop or outlet where you want to place an order by clicking on its name.
Navigate to the “Place Order” Page:
Once you select a shop or outlet, you will be taken to its Dashboard.
On the left-hand side of the page, you will see various options, including:
Dashboard
Place Orders
View Orders
Reports
Configuration
Click on Place Orders to proceed.
Understanding the “Place Order” Page:
On the Place Order page, you will find:
Tables Section: Displays all available, running, and printed tables.
Occupied Rooms Section: Displays all occupied or checked-in rooms.
Place an order from the Table:
Under the Tables Section, you will see a list of available tables.
Click on the table number or table ID for the table where you want to place an order.
Once selected, a list of food categories (e.g., Veg, Non-Veg) will appear, basically whatever you have configured under categories and menu items.
Select your desired category and add menu items to the order.
Save and Confirm the Order:
After adding the items, click Save Order to confirm the order.
Note: The KOT & Print button will only be clickable after saving the order.
Print KOT:
Once the order is saved, click the KOT & Print button next to the Save Order button.
The Kitchen Order Ticket (KOT) will be printed, and you’ll see the KOT ID above the ordered items.
If you need to add more items later, you can do so, save the order again, and print a new KOT. The newly added items will have a different KOT ID.
That’s how the KOT process works in the Shops/POS module!
Can I partially settle a POS bill? What steps are required to do so?
Yes, you can partially settle the POS bill.
Below are the step-by-step guidelines to partially settle POS bills from Shops/POS:
Log in to Your Stayflexi Dashboard:
Enter your username and password to log in.
Access Shops/POS:
After logging in, click the “More Apps” icon (represented by four boxes or blocks) in the top right corner.
From the dropdown menu, select Shops.
A page showing all available shops or outlets will appear.
Choose the shop or outlet where you want to place an order by clicking on its name.
Navigate to the “Place Order” Page:
Once you select a shop or outlet, you will be taken to its Dashboard.
On the left-hand side of the page, you will see various options, including:
Dashboard
Place Orders
View Orders
Reports
Configuration
Click on Place Orders to proceed.
Understanding the “Place Order” Page:
On the Place Order page, you will find:
Tables Section: Displays all available, running, and printed tables.
Occupied Rooms Section: Displays all occupied or checked-in rooms.
Place an order from the Table:
Under the Tables Section, you will see a list of available tables.
Click on the table number or table ID for the table where you want to place an order.
Once selected, a list of food categories (e.g., Veg, Non-Veg) will appear.
Select your desired category and add menu items to the order.
Save and Confirm the Order:
After adding the menu items and customer information, click on the Save Order button to save and confirm your order.
Enter Customer Information:
To add customer details, click on the customer information icon at the top. Enter the required information and save it.
Note: If you’re placing an order from the table, customer information is mandatory for partial bill payment.
Partial bill payment:
Click on the Settle order button.
A pop-up to settle and save the amount with all other details will appear, like:
Payment type:
Cash
Offline card
Wallet
Other
Calculate amount textbox
Remarks
Settlement amount textbox
Click on the Settlement amount textbox and edit the actual amount with the amount you want to settle the order.
Now, Settle and Save the amount.
Navigate to the View Orders page and check the status of the order.
The order status will be displayed as DUE as the order is partially settled.
If you want to settle the remaining bill in the future, click on the settle dues option under the view orders page and collect the remaining payment.
By following these steps, you can partially settle the POS bill for a particular order.
How do I mark an item as out of stock in the shop?
Below are the step-by-step guidelines to mark an item out of stock from Shops/POS:
Log in to Your Stayflexi Dashboard:
Enter your username and password to log in.
Access Shops/POS:
After logging in, click the “More Apps” icon (represented by four boxes or blocks) in the top right corner.
From the dropdown menu, select Shops.
A page showing all available shops or outlets will appear.
Choose the shop or outlet by clicking on the shop or outlet name.
Navigate to the “Configuration” Page:
Once you select a shop or outlet, you will be taken to its Dashboard.
On the left-hand side of the page, you will see various options, including:
Dashboard
Place Orders
View Orders
Reports
Configuration
Click on Configuration dropdown to proceed.
Go to Menu items:
On the Configuration dropdown, you will see a list of options including:
Outlet
Menu items
Categories
Discounts
Table/Area
Staff
Click on the Menu items option.
A list of all the menu items will appear along with the details.
Mark menu items out of stock:
To mark menu items out of stock, do the following:
There is a Yes or No dropdown under the In Stock column for each menu item.
Just click on the dropdown, select NO,and click it.
The item is now marked as out of stock.
You can verify this by selecting the In-stock items option in the top right of the page.
It takes you to the Out Of Stock items page.
This displays all the out-of-stock items.
By following these steps you can mark all the items as out of stock.
If an order is settled, where can I find the payment method used?
Below are the step-by-step guidelines to check the payment method used from Shops/POS:
Log in to Your Stayflexi Dashboard:
Enter your username and password to log in.
Access Shops/POS:
After logging in, click the “More Apps” icon (represented by four boxes or blocks) in the top right corner.
From the dropdown menu, select Shops.
A page showing all available shops or outlets will appear.
Choose the shop or outlet by clicking on the shop or outlet name.
Navigate to the “View Orders” Page:
Once you select a shop or outlet, you will be taken to its Dashboard.
On the left-hand side of the page, you will see various options, including:
Dashboard
Place Orders
View Orders
Reports
Configuration
Click on View Orders to proceed.
View payment method :
After selecting View Orders, a page with all the order details with table ID, room ID, order source, Settled amount, etc will be displayed.
Click on the row where the order is Settled.
After clicking, different options will appear.
Click on the Detailed Payment View option.
Payment type with the payment amount will be displayed.
By following these steps, you can view the payment method used to settle a particular order.
What types of reports are available in the shop?
Log in to Your Stayflexi Dashboard:
Enter your username and password to log in.
Access Shops/POS:
After logging in, click the “More Apps” icon (represented by four boxes or blocks) in the top right corner.
From the dropdown menu, select Shops.
A page showing all available shops or outlets will appear.
Choose the shop or outlet by clicking on the shop or outlet name.
Navigate to the “Reports” Page:
Once you select a shop or outlet, you will be taken to its Dashboard.
On the left-hand side of the page, you will see various options, including:
Dashboard
Place Orders
View Orders
Reports
Configuration
Click on Reports to proceed.
Below are the types of reports available in the Shops/POS:
Outlet Day-Wise Sales Summary
Purpose: Provides a consolidated sales summary of all transactions made at your outlet, broken down by date wise.
Usage: Useful for tracking daily revenue and performance over a period.
Outlet Day-Wise Balance Summary
Purpose: Displays a day-wise balance summary for your outlet, likely showing remaining financial balances.
Usage: Helps in reviewing financial consistency and ensuring no discrepancies.
Hourly Item Sales Summary Report
Purpose: Presents item sales data broken down by the hour.
Usage: Allows users to identify peak sales hours and optimize staffing and inventory.
Item-Wise Category Summary Report
Purpose: Provides a summary of sales based on individual items.
Usage: Assists in understanding the performance of different product categories and managing stock accordingly.
Order-Wise Sales Summary
Purpose: Summarizes sales based on individual orders, providing insights into order trends.
Usage: Useful for analyzing how many orders were placed, average order value, and item preferences.
KOT Modification
Purpose: Shows a summary of all modifications made to Kitchen Order Tickets (KOT).
Usage: Important for tracking any changes made to orders in the kitchen and ensuring order accuracy.
KOT Report
Purpose: Displays a summary of all Kitchen Order Tickets (KOT) punched for the shop.
Usage: Useful for tracking kitchen workload and ensuring all orders have been processed.
Day-Wise Item Sales Summary Report
Purpose: It provides a day-wise breakdown of items punched into the system for the shop.
Usage: Useful for tracking daily item-level sales performance and managing inventory.
Reports
Unlock powerful insights into your property’s operations with Stayflexi’s Reports feature. Access a variety of detailed, customizable reports, including occupancy, financials, guest demographics, and booking patterns. These reports are designed to help you monitor your property’s performance, spot trends, and make informed, strategic decisions. With real-time data at your fingertips, Stayflexi Reports allow you to evaluate key metrics and streamline your decision-making process, ensuring better control over your property performance.
Overview Of reports and what are important reports to refer in Stayflexi ?
What are Stayflexi Reports?
The Reports feature in Stayflexi provides property managers with essential insights into their property’s operations. It offers a range of detailed reports on revenue, tax filing, occupancy, booking sources, sales performance, and guest demographics. These reports allow users to monitor trends, optimize room pricing, adjust marketing strategies, and improve overall property performance. By analyzing these data points, property managers can make informed decisions that enhance profitability and guest experience, supporting both day-to-day management and long-term strategic planning.
Why Use Stayflexi Reports?
Reports are essential for understanding various aspects of your property’s operations, such as:
Tracking Revenue: Track financial performance, analyze income sources, and identify high-performing channels.
Optimize Occupancy: Adjust room availability based on occupancy trends and prevent under utilisation.
Manage Sales Performance: Monitor bookings, cancellations, and modifications to better understand guest behavior.
Enhance Marketing Strategies: Evaluate booking sources to focus on effective distribution channels.
Set Competitive Pricing: Utilize average daily rate[ADR] and revenue per available room [RevPar] insights to develop profitable pricing.
Using these reports enables data-driven decisions, leading to increased occupancy, revenue, and guest satisfaction.
How to Access and Use Stayflexi Reports?
Accessing Reports:
Log in to your Stayflexi dashboard using your credentials.
From the dashboard, click on the 4-dots square icon labeled “More Apps”, located on the right side of the screen.
From the listed apps, locate and click on the Reports.
In Stayflexi, when you access the Reports feature, a new page opens where you can view a comprehensive list of reports, each providing valuable insights into property performance.
The Key Reports to focus on include:
Flash Manager Report: This report provides a quick, high-level overview of essential metrics, offering insights that help in daily decision-making, which include:
Revenue Report: Details revenue generated from various sources, helping track income flow.
Tax Revenue Report: Shows total tax collected on revenues, aiding in tax management.
Taxes Report: Breaks down specific tax categories and amounts, useful for accounting.
Payments Summary Report: Summarizes all payments received, giving a quick snapshot of cash flow.
Payments Detailed Report: Offers a more granular view of each transaction, ideal for payment tracking.
Expense Report: Lists all expenses, helping manage property costs effectively.
Inventory Report: Tracks available room Inventory, ensuring room availability and allocation.
House Report: Summarizes room statuses, occupancy, and other essential house operations.
Room Revenue Report: Focused on revenue generated per room, this report is critical for understanding how room sales contribute to overall income.
Night Audit Report: Summarizes daily transactions, occupancy, and revenue, ensuring all records are accurate and balanced at the end of each day.
The Flash Manager Report, Room Revenue Report, and Night Audit Report in Stayflexi collectively offer a property’s performance. Together, they cover almost every crucial aspect of property management, including revenue tracking, occupancy levels, tax breakdowns, payments, expenses, inventory, and room status.
Is there a way to generate a report for POS transactions (restaurant, spa, etc.) within the property?
YES, here’s a step-by-step guide on how to generate reports for transactions across various property outlets like restaurants, spas, etc., in Stayflexi:
Log in to your Stayflexi dashboard using your credentials.
From the dashboard, click on the 4-dots square icon labeled “More Apps”, located on the right side of the screen.
From the listed apps, locate and click on the Reports.
On the left side of the dashboard, you will see a list of different reports.
From the list of available reports, click on All Outlets Itemwise Category Summary Report.
View the Report:
The report will open on your screen, displaying transaction details.
Data is organized with headers horizontally, such as:
Outlet Name
Item Category
Item Name
Quantity Sold
Total Sales
Below each column, you’ll find the corresponding data categorized by outlet.
Filter by Date Range:
Use the Date Range Selector to choose the desired time period:
For current date transactions, select today’s date.
For previous date transactions, adjust the date range accordingly.
Analyze and Export:
Review the report on-screen or export it for further analysis, depending on your needs.
This process ensures you can quickly access detailed sales and transaction data for each outlet within your property.
How can I generate an expense report to track operational costs?
To generate an expense report to track operational costs of your property in Stayflexi, follow the below-mentioned steps:
Log in to your Stayflexi dashboard using your credentials.
From the dashboard, click on the 4-dots square icon labeled “More Apps”, located on the right side of the screen.
From the listed apps, locate and click on the Reports.
On the left side of the dashboard, you will see a list of different reports.
From the list of displayed reports, locate and select the Expense Manager Report.
View the Report Details:
The report will open, showing your property’s expenses.
Data is structured as follows:
Horizontal Headers include:
Type of Expense (e.g., maintenance, utilities)
ID (unique identifier for each expense)
Reason/Entity Name (why or who the expense was for)
Description (details of the expense)
Vertical Columns list the corresponding data under each header.
Analyze the Data:
Scroll through the report to review detailed expense entries.
Use this report to track and manage your property’s expenditures.
This report provides a clear overview of your expenses, helping you monitor and control costs efficiently.
How can I generate a report of all the charged virtual cards from Expedia or Booking.com?
To generate a report of all the charged virtual cards from Expedia or Booking.com, Follow the below-mentioned guidelines.
Log in to your Stayflexi dashboard using your credentials.
From the dashboard, click on the 4-dots square icon labeled “More Apps”, located on the right side of the screen.
From the listed apps, locate and click on the Reports.
On the left side of the dashboard, you will see a list of different reports.
Click on Payment Reports: Go to the Reports section and select Payment Reports.
Click on the Payment Gateway Report option.
Select the desired date range in the open report to view the relevant data.
Review the columns provided in the report, such as the Gateway and Booking Source columns.
Use the filter option in the Booking Source column to display data specific to a selected OTA, like Expedia or Booking.com. [Refer to the provided image to clearly understand the filtering process.]
How can I generate a tax report to track the taxes collected from bookings?
To generate a tax report to track the taxes collected from bookings, follow the below-mentioned steps:
Log in to your Stayflexi dashboard using your credentials.
From the dashboard, click on the 4-dots square icon labeled “More Apps”, located on the right side of the screen.
From the listed apps, locate and click on the Reports.
On the left side of the dashboard, you will see a list of different reports.
Access Property Reports: At the top of the Reports section, you’ll see Property Reports. The reports under this section will already be displayed on the screen.
Click on Room Bookings Report :
Click on “Room Bookings Reports” from the displayed reports.
View the Report:
A report will open displaying the booking information.
View the Tax:
Scroll to the far right of the report to view the tax charged for each booking.
This report provides a clear breakdown of taxes associated with each booking.
How can I generate a booking source report to track where my reservations are coming from (e.g., OTA, direct bookings)?
To generate a booking source report to track where your reservations are coming from, follow the below-explained steps:
Log in to your Stayflexi dashboard using your credentials.
From the dashboard, click on the 4-dots square icon labeled “More Apps”, located on the right side of the screen.
From the listed apps, locate and click on the Reports.
On the left side of the dashboard, you will see a list of different reports.
Access Property Reports: At the top of the Reports section, you’ll see Property Reports. The reports under this section will already be displayed on the screen.
Click on the Room Bookings Report from the list of displayed reports on the screen.
A report will open, Locate the ‘Booking Source’ column heading, displayed horizontally. You can apply filter for a specific OTA booking source.
Below this heading, you’ll find the information on the source of each booking.
Can I view a report of all reservations made during a specific period?
To view a report of all reservations made during a specific period, follow the below mentioned steps:
Log in to your Stayflexi dashboard using your credentials.
From the dashboard, click on the 4-dots square icon labeled “More Apps”, located on the right side of the screen.
From the listed apps, locate and click on the Reports.
On the left side of the dashboard, you will see a list of different reports.
Access Property Reports: At the top of the Reports section, you’ll see Property Reports. The reports under this section will already be displayed on the screen.
Open the Master Report:
Click on Master Report to open the detailed booking report.
Select the Date Range:
In the reports section, locate the Date Range Selector to set the dates.
Choose Your Dates:
Click on any specific dates for which you want to view all reservations made during that period.
Apply the Date Range:
Once you’ve selected the desired dates, click the “Apply” button to confirm your date range.
This will display a report showing all reservations made within the specified period.
Is there a way to generate a report for discounts or promotions applied to bookings?
To generate a report for discounts or promotions applied to bookings, follow the below-mentioned guidelines:
Log in to your Stayflexi dashboard using your credentials.
From the dashboard, click on the 4-dots square icon labeled “More Apps”, located on the right side of the screen.
From the listed apps, locate and click on the Reports.
On the left side of the dashboard, you will see a list of different reports.
Access Property Reports: At the top of the Reports section, you’ll see Property Reports. The reports under this section will already be displayed on the screen.
Open the Master Report:
Click on Master Report to open the detailed booking report.
Add the Coupons/Discounts Column:
By default, the report does not show applied coupon codes or discounts.
To add this information, go to the columns list on the right side of the report.
Scroll through the options, find “Applied Coupons/Discounts,” and check the box next to it.
View the Updated Report:
The selected column will now appear in your report, displaying any coupon codes or discounts applied to each booking.
This way, you can easily see details about any promotional offers associated with each reservation.
How can I generate a report of room revenue by room type or category?
To generate a report of room revenue by room type or category, follow the below-mentioned steps:
Log in to your Stayflexi dashboard using your credentials.
From the dashboard, click on the 4-dots square icon labeled “More Apps”, located on the right side of the screen.
From the listed apps, locate and click on the Reports.
On the left side of the dashboard, you will see a list of different reports.
Access Property Reports: At the top of the Reports section, you’ll see Property Reports. The reports under this section will already be displayed on the screen.
Open Room Bookings Report:
Click on “Room Bookings Report” in your Stayflexi dashboard.
Customize Columns:
On the right side of the report, click on the column options listed vertically.
Find “Room Category” in the options and check the box next to it.
Adjust Column Placement:
The “Room Category” column will now appear in your report.
You can move it by dragging it to place it next to any other column of your choice.
This customization allows you to organize and view the report in a way that best suits your needs.
How can I download a guest history report?
To download a guest history report in Stayflexi, follow the below-mentioned guidelines:
Log in to your Stayflexi dashboard using your credentials.
From the dashboard, click on the 4-dots square icon labeled “More Apps”, located on the right side of the screen.
From the listed apps, locate and click on the Reports.
On the left side of the dashboard, you will see a list of different reports.
Access the Customer Report:
Go to the dashboard and click on the Customers Report section.
From the page that opens, click on Customers Report again from the two options presented.
View Guest Details:
A detailed report will open, displaying guest details in horizontal rows and vertical columns.
Set the Date Range:
At the top of the report, locate the Date Range Selector and click on it to open a calendar.
The calendar allows you to select date ranges by weekly, monthly, or yearly intervals, as well as options for days up to today and days starting today.
Choose the date range that suits your needs and click on the Apply button within the calendar.
Use Filters for Easy Navigation:
Next to the Date Range Selector, find the Filters option. Click on it to open a dropdown with filter choices.
Apply any necessary filters to refine the report and make it easier to navigate.
Export the Report:
To the right of the Filters column, click on the Export Report dropdown menu.
Select your preferred format (PDF, CSV, or Excel) to export the report.
By following these steps, you can download a guest history report.
How do I analyze my property's monthly or yearly room booking performance report compared to the previous year?
To analyze your property’s monthly or yearly performance report compared to the previous year, follow the below-mentioned guidelines:
Log in to your Stayflexi dashboard using your credentials.
From the dashboard, click on the 4-dots square icon labeled “More Apps”, located on the right side of the screen.
From the listed apps, locate and click on the Reports.
On the left side of the dashboard, you will see a list of different reports.
Go to Flash Manager Report:
In your dashboard, click on the Flash Manager Report section. This report gives you an overview of property performance metrics.
Set the Date Range:
At the top of the page, locate the Date Range Selector to choose the period [monthly or yearly] you want to analyze.
Enable Comparison Mode:
Next to the date range selector, the report will display comparative data, allowing you to see key metrics from the current period alongside those from the previous year [e.g., this month vs. the same month last year, or this year vs. last year].
Analyze the Report:
In comparison mode, all key performance indicators [KPIs] will show side-by-side comparisons, helping you analyze growth, trends, and any notable changes in performance over time.
This setup provides a clear view of your property’s performance against the previous, making it easier to assess improvements or areas that need attention.
Is there a report to track cancellations and no-shows?
To track cancellations in Stayflexi, follow the below-mentioned steps:
Log in to your Stayflexi dashboard using your credentials.
From the dashboard, click on the 4-dots square icon labeled “More Apps”, located on the right side of the screen.
From the listed apps, locate and click on the Reports.
On the left side of the dashboard, you will see a list of different reports.
Access Property Reports: At the top of the Reports section, you’ll see Property Reports. The reports under this section will already be displayed on the screen.
Open the Master Report:
Click on Master Report to open the detailed booking report.
Locate the Booking Status Column:
In the report, find the Booking Status column displayed horizontally. This column shows the status of each booking, such as confirmed, checked out, and cancelled.
Filter for Cancelled Bookings:
Click on the Filter option beneath the Booking Status column.
A popup will appear, allowing you to select specific statuses.
Choose Cancelled to display only the bookings with a cancelled status.
Following these steps will filter the report to show only cancelled bookings, making it easy to track cancellations.
To track no shows in Stayflexi, follow the below-mentioned steps:
Log in to your Stayflexi dashboard using your credentials.
From the dashboard, click on the 4-dots square icon labeled “More Apps”, located on the right side of the screen.
From the listed apps, locate and click on the Reports.
On the left side of the dashboard, you will see a list of different reports.
Open the Front Desk Report:
On the dashboard, click on Front Desk Report to access a range of front desk-related reports.
Select the No-Show Report:
From the reports displayed, locate and click on No-Show Report.
View No-Show Details:
The No-Show Report page will open, showing information about guests who did not show up at your property. This report includes guest details and reservation specifics.
This process allows you to easily view and trackall no-show bookings for better management and follow-up.
How do I view an overdue payments or pending balance report?
To view an overdue payments or pending balance report, follow the below-mentioned steps in Stayflexi:
Log in to your Stayflexi dashboard using your credentials.
From the dashboard, click on the 4-dots square icon labeled “More Apps”, located on the right side of the screen.
From the listed apps, locate and click on the Reports.
On the left side of the dashboard, you will see a list of different reports.
Access Property Reports: At the top of the Reports section, you’ll see Property Reports. The reports under this section will already be displayed on the screen.
Open the Room Revenue Reports:
Click on the Room Revenue Report section. This report provides detailed information about guest transactions and room revenue, both with and without taxes.
Navigate to the Pending Balance Column:
Once the report opens, scroll or use the arrow keys to move to the extreme right of the report sheet.
Check the Balance Amount:
Look for the Balance Amount column on the fair right. This column reflects any pending balances for guests, showing any overdue payments or remaining amounts.
This process allows you to quickly identify and review any outstanding payments directly within the report.
How can I view logs of any changes made to room pricing, inventory, or a specific reservation ID in the system?
Below are the step-by-step guidelines to view logs of any changes made to room pricing, inventory, or a specific reservation ID in the system in Stayflexi:
Accessing Reports:
Log in to your Stayflexi dashboard using your credentials.
From the dashboard, click on the 4-dots square icon labeled “More Apps”, located on the right side of the screen.
From the listed apps, locate and click on the Reports.
On the left side of the dashboard, you will see a list of different reports.
“Log Reports” section :
On the main dashboard, find and click on the log reports option. This section keeps a record of all changes in the system.
View User Log Report:
Once on the Log Reports page, you’ll see a detailed user log report appear on your screen.
Open the Report:
Click on the report to open it and view the information.
Explore the Columns:
The report displays various columns across the screen, such as change type, date, user name, and specific details of the modification. These columns allow you to filter and search for specific changes based on your requirements.
Filter Information:
To find the exact log details you need, filter by date, user, or other criteria based on the columns available.
This process will help you access logs on any modifications to room pricing, inventory, or reservations as needed.
How do I schedule a daily revenue report for my property?
To generate a daily revenue report for your property, Follow the below-mentioned steps:
Log in to your Stayflexi dashboard using your credentials.
From the dashboard, click on the 4-dots square icon labeled “More Apps”, located on the right side of the screen.
From the listed apps, locate and click on the Reports.
Once the reports page opens, look to the right side and click on Schedule Reports.
On Schedule Reports page, click on Add New Report Schedule to start configuring your report.
Configure the Report:
A report configuration page will appear on the right.
Fill in the details, including the Name of the Report Schedule [e.g.,”Daily Revenue Report”].
Select Report Type as Revenue Report.
Set Schedule Frequency by clicking on the dropdown. Choose Daily from the default options.
Click the Save button at the bottom to complete the setup.
You have successfully scheduled a Daily Revenue Report in Stayflexi. The system will automatically generate the report daily based on your configuration.
How can I view the occupancy report for a specific date?
To view the occupancy report for a specific date range, Follow the below-mentioned guidelines:
Log in to your Stayflexi dashboard using your credentials.
From the dashboard, click on the 4-dots square icon labeled “More Apps”, located on the right side of the screen.
From the listed apps, locate and click on the Reports.
On the left side of the dashboard, you will see a list of different reports.
From the list, locate and click on Channel Manager Reports.
Three reports will open. Click on Occupancy Report to proceed.
In the center of the page, find the date selection area. Click on the calendar icon to open the dropdown calendar.
From the dropdown calendar, select the specific date for which you want to view the occupancy report.
You will now receive the Occupancy Report for that particular date, providing insights into the room utilization and occupancy levels.
How do I generate a report to track the booking sources by OTA channel manager, such a Booking.com, Expedia, etc.?
To track where your reservations are coming from (e.g., OTA, direct bookings), follow the below-mentioned steps:
Log in to your Stayflexi dashboard using your credentials.
From the dashboard, click on the 4-dots square icon labeled “More Apps”, located on the right side of the screen.
From the listed apps, locate and click on the Reports.
On the left side of the dashboard, you will see a list of different reports.
From the list, locate and click on Channel Manager Reports.
Three reports appear on the screen, click on CM Bookings Report.
The report will open on the same page, displaying a list of bookings received from various channels.
Within the report, find the Booking Source column.
Here you’ll see the source of each booking, showing where each guest reservation originated.
How do I check a detailed room status report (occupied, available, out of service)?
To create a detailed room status report (occupied, available, out of service), follow the below-mentioned steps:
Log in to your Stayflexi dashboard using your credentials.
From the dashboard, click on the 4-dots square icon labeled “More Apps”, located on the right side of the screen.
From the listed apps, locate and click on the Reports.
On the left side of the dashboard, you will see a list of different reports.
Access Property Reports: At the top of the Reports section, you’ll see Property Reports. The reports under this section will already be displayed on the screen.
Select Room Inventory Report: Locate and click on Room Inventory Report.
View Report Details: A new page will open, displaying a table at the top with columns like Blocked Rooms, Net Rooms, Available Rooms, etc.
Explore More Columns: To see additional columns, click on the small arrow icon on the right side to scroll forward.
Review the Inventory Report: Below the columns, you’ll find detailed data for your room inventory, showing a breakdown of each room’s status.
How do I check a report of payments made through different methods (e.g., cash, card, bank transfer)?
To create a report for payments made via different methods (cash, card, online, etc.), follow the below-mentioned steps:
Log in to your Stayflexi dashboard using your credentials.
From the dashboard, click on the 4-dots square icon labeled “More Apps”, located on the right side of the screen.
From the listed apps, locate and click on the Reports.
On the left side of the dashboard, you will see a list of different reports.
Click on Payment Reports: Go to the Reports section and select Payment Reports.
Select Counter Report by Payment Type: From the list of available reports, locate and click on Counter Report by Payment Type.
View the Report: A new page will open, displaying the report. At the top, you’ll see columns with names indicating different payment categories.
Check Payment Type Data: Under each column, you’ll find data showing the amounts received by various payment types, such as credit card, cash, bank transfer, etc.
Direct Billing
Simplify your billing process with Stayflexi’s Direct Billing feature. This tool allows you to efficiently manage invoices and payments for corporate clients, travel agents, or any other partners requiring direct billing. Generate detailed invoices, track payment statuses, and manage credit limits all from one centralized platform. Stayflexi’s Direct Billing streamlines financial operations, reducing manual effort and ensuring accurate records. Provide your partners with a seamless billing experience while maintaining full control over your property’s financial workflows.
How do I create a ''Direct Billing'' account in Stayflexi?
Image 1:
Image 2:
Image 3:
Below is the step-by-step guide to creating a direct billing account in Stayflexi:
Log in to Your Stayflexi Dashboard:
Use your username and password to log in.
Go to Direct Billing:
After logging in, click the icon with four boxes (more apps) in the top right corner(as shown in Image 1).
A dropdown menu will appear.
Select “Direct Billing” from the list (as shown in Image 1).
Click on ‘Add New’:
In the Direct Billing section, click the ‘Add new’ button, which will open a form on the right-hand side of the screen(as shown in Image 2).
Fill in Basic Information (as shown in Image 2):
Account Name: Enter the name of the company or travel agent.
Account Number: Enter the corresponding account number.
Account Type: Select the appropriate account type from the dropdown.
The Account type dropdown includes the following types:
Corporate
Travel Agent
House Account
Select the type based on the account you are creating.
Tax ID: Enter the Tax ID.
Account Email: Provide a valid email address for the account so that travel agents should receive email.
Account Phone: Enter the contact phone number, starting with the country code (e.g., +1 for USA).
Enter Address Details(as shown in Image 2):
Address Line 1: Enter the main address for the account.
Address Line 2: Fill in additional address details (optional).
City: Provide the city where the business is located.
State: Enter the state or region.
Country: Select the country from the dropdown list.
Postal Code: Enter the postal code for the address.
Configure IGST Status (Optional only for Indian Property):
If applicable, toggle the IGST status switch for integrated tax setup(as shown in Image 2).
Save the Information(as shown in Image 2):
After filling in all required details, click the ‘Save’ button at the bottom of the form to create the Direct Billing account.
Once saved, the new Direct Billing account will appear in the list, where you can manage or edit the information as needed (as shown in Image 3).
This process allows you to create and manage accounts for direct billing in Stayflexi, making it easy to handle payments directly with travel agents or corporate companies.
How do I view all bookings for a specific Direct Billing account?
Log in to Your Stayflexi Dashboard:
Use your username and password to log in.
Go to Direct Billing:
After logging in, click the icon with four boxes (more apps) in the top right corner(as shown in Image 1).
A dropdown menu will appear.
Select “Direct Billing” from the list (as shown in Image 1).
View Bookings:
Click on the View booking option on the Direct billing account you want to view the bookings(as shown in Image 2).
A page with all the bookings made on this particular direct billing account will be displayed (as shown in Image 3).
You can settle the balance amount from here by clicking on the Settle Dues option (as shown in Image 3).
If you want to display only the Unsettled bookings, enable the Unsettled-only switch to display the Unsettled bookings list (as shown in Image 3).
By following the steps you will be easily able to view all bookings for a specific Direct billing account.
How can I see only unsettled folios or reservations for a given Direct Billing account?
Log in to Your Stayflexi Dashboard:
Use your username and password to log in.
Go to Direct Billing:
After logging in, click the icon with four boxes (more apps) in the top right corner.
A dropdown menu will appear.
Select “Direct Billing” from the list.
View Bookings:
Click on the View booking option on the Direct billing account you want to view the bookings(as shown in Image 2).
A page with all the bookings made on this particular direct billing account will be displayed (as shown in Image 3).
If you want to display only the Unsettled folios or bookings, enable the Unsettled-only switch to display the Unsettled bookings/reservations list.
By following these steps you can easily see the unsettled folio or reservations for a given Direct Billing account.
How do I settle a folio after receiving payment from a Direct Billing account?
Below is the step-by-step guide to settling a folio after receiving payment from a Direct billing account:
Log in to Your Stayflexi Dashboard:
Use your username and password to log in.
Go to Direct Billing:
After logging in, click the icon with four boxes (more apps) in the top right corner.
A dropdown menu will appear.
Select “Direct Billing” from the list.
View Bookings:
Click on the View booking option on the Direct billing account you want to view the bookings
A page with all the bookings made on this particular direct billing account will be displayed
If you want to display only the Unsettled folios or bookings, enable the Unsettled-only switch to display the Unsettled bookings/reservations list.
Setlle Dues:
Click on the checkbox next to the booking or reservation you want to settle the booking.
You can settle the balance amount by clicking on the Settle Dues option
A list of payment methods will be displayed select the payment method you want to make the payment.
A pop-up with the amount details and a Bulk settle button will appear.
Click on the Bulk settle option to settle the dues.
How can I edit or update a Direct Billing account?
Log in to Your Stayflexi Dashboard:
Use your username and password to log in.
Go to Direct Billing:
After logging in, click the icon with four boxes (more apps) in the top right corner
A dropdown menu will appear.
Select “Direct Billing” from the list
Edit/Update Direct Billing account:
Click on the edit icon beside the View Bookings button for the particular direct billing account you want to edit or update the details.
A page to edit or update the details of the particular direct billing account will be displayed
Save the details:
After editing or updating the direct billing account details, click on the Save button to save the updated information
How do I download a report of all bookings under a Direct Billing account?
Log in to Your Stayflexi Dashboard:
Use your username and password to log in.
Go to Direct Billing:
After logging in, click the icon with four boxes (more apps) in the top right corner.
A dropdown menu will appear.
Select “Direct Billing” from the list.
View Bookings:
Click on the View booking option on the Direct billing account you want to download the report.
A page with all the bookings made on this particular direct billing account will be displayed.
Click on the Export report drop down at the top next to the settle dues option.
The Export report drop down contains.
Export as CSV
Export as PDF
Export as Excel
You can download the report of the bookings in any of the formats you wish by clicking on the above-mentioned options.
How do I view the pending balance for a Direct Billing account?
Image 1:
Image 2:
Image 3:
Below is the step-by-step guide to viewing all the pending balances for a specific Direct billing account:
Log in to Your Stayflexi Dashboard:
Use your username and password to log in.
Go to Direct Billing:
After logging in, click the icon with four boxes (more apps) in the top right corner.
Select “Direct Billing” from the list.
View Bookings:
Click on the View Booking option on the Direct billing account you want to view the pending balance.
A page with all the bookings made on this particular direct billing account will be displayed.
By scrolling right, at the end of the table, you can see the Direct Billing Balance Due and Folio Balance Due columns where you can view all the pending balances for a Direct Billing account.
By following these steps you can easily view all the pending balances for a specific direct billing account.
How can I make a walk-in booking under a Direct Billing account?
Log in to Your Stayflexi Dashboard:
Use your username and password to log in.
Go to Reservation calendar:
After logging in, click the Reservation Calendar icon second icon from the left.
Create a Walk-in booking:
Select the Create drop down on the right.
Click on the Walk-in option.
Fill in the customer details.
Click on the Segment drop down on the right-hand side of the page.
Select the DIRECT_BILLING option.
Click on the Sub-segment drop down
Select the Direct billing account under which you want to create the walk-in booking.
Click on the Create Reservation button to successfully create a walk-in booking.
By following these steps you can make a walk-in booking under a Direct Billing account.
Revenue Management
Optimize your property’s profitability with Stayflexi’s Revenue Management feature. Leverage advanced tools to adjust pricing dynamically, track demand patterns, and forecast future trends. Stayflexi enables you to implement data-driven pricing strategies that maximize revenue while maintaining optimal occupancy levels. With real-time analytics and automated rate adjustments, Stayflexi’s Revenue Management helps you stay competitive in a constantly changing market. Take the guesswork out of pricing and ensure your property reaches its full revenue potential.
How do all Revenue Management features work and how do I set them up?
Below is a complete guide explaining all key features inside Revenue Management along with step-by-step instructions to help you configure each tool easily. This includes: Competitor Setup, Demand-Based Pricing, Rule-Based Pricing, Time-Based Pricing, Promotions, Coupon Code Offers, and Rate Templates.
1. Competitor Setup
Competitor Setup allows you to add or edit competitor hotels so the system can compare your pricing with similar properties in your market. This helps improve your demand-based and rule-based pricing accuracy.
Steps to Set It Up:
Log in to Your Stayflexi Dashboard:
Use your username and password.
Open Revenue Management:
Click the four-boxes (More Apps) icon.
Select Revenue Management.
Open Competitor Setup:
Click Competitor Setup on the left sidebar.
Add a Competitor:
Click Add Competitor.
Search the competitor on Google.
Copy the competitor’s Google hotel profile link and paste it here.
Click Save.
Edit your google profile and Remove Competitors:
click on edit your google profile and do the changes
Select the competitor and click on Remove
2. Demand-Based Pricing
Demand-Based Pricing uses AI to adjust your room prices based on market demand and your property’s star category. It automatically increases or decreases your prices depending on whether demand is low, moderate, high, or occupancy-based.
1. Open Revenue Management Log in to your account → go to More Apps → select Revenue Management.
2. Open Dynamic Pricing In the left menu, click Dynamic Pricing, then choose Demand-Based Pricing.
3. Add a New Configuration Click Add New Configuration to begin.
Important Note:Before configuring demand-based pricing, make sure your room types and rate plans are properly set up. If they are not linked correctly, it may lead to rate mismatches. For example, the system may remind you to sync the base price of your Premium 1BHK with Balcony Garden View with the market demand before continuing.
4. Choose the Star Category and also enable the demand based configuration toggle Select the hotel’s star rating (e.g., 3-star, 4-star, etc.).
5. Select the Demand Type Pick the demand level you want to target:
Low Demand
Moderate Demand
High Demand
Occupancy-Based Demand
6. Set the Price Behavior Choose whether the price should Increase or Decrease when this demand condition is met.
7. Enter the Adjustment Value Add the amount or percentage you want to adjust (e.g., +₹200, -₹150, +10%, etc.).
8. Save Your Configuration Click Save to activate your demand-based pricing rule.
3. Rule-Based Pricing
Rule-Based Pricing lets you create your own custom pricing rules based on occupancy levels. You can increase or decrease the price depending on how full the hotel is and apply these rules to specific room categories.
Select any rule to modify it, switch it off, or delete it permanently.
4. Time-Based Pricing (Time Slot Configuration)
Time-Based Pricing allows you to schedule when dynamic pricing should run. Instead of applying rules continuously, Stayflexi will only update prices during specific times you choose (example: every morning at 9 AM).
Steps to Configure It:
Open Time Slot Configuration:
Revenue Management → Dynamic Pricing → Time Slot Configuration.
Enable Time-Based Pricing:
Toggle ON the Time Slot mode.
Add a Time Slot:
Click Add Time Slot.
Enter a time (example: 09:00 AM)
Save the Time Slot:
Click Save.
Edit or Remove Slots:
Click a slot to update or delete it.
5. Promotions
Promotions allow you to create special offers such as discounts or seasonal deals that automatically apply to selected dates and room types.
Steps to Create a Promotion:
Log in to Your Stayflexi Dashboard:
Use your username and password to log in.
Go to Revenue Management:
After logging in, click the four boxes icon (more apps) in the top right corner.
A dropdown menu will appear.
Select “Revenue Management” from the list.
Go to Promotions:
On the left sidebar, click on “Promotions” (the 4th option) to view the promotions page.
Add a New Promotion:
Click the “Add new promotion” button to start creating a new promotion.
Set Stay Duration Criteria
In the section “How long do guests need to stay to get this promotion?”, enter the following:
Minimum number of nights required for guests to stay to qualify for the promotion.
Maximum number of nights guests can stay to qualify.
Set Room Booking Criteria
In the section “How many rooms do guests need to book to get this promotion?”, input:
Minimum number of rooms guests need to book.
Maximum number of rooms guests can book.
Set the Discount Percentage
In the section “How much of a discount do you want to give?”, enter the desired discount percentage.
Choose the Rate Plan
From the dropdown in the “Which Rate?” section, select the rate plan that the discount applies to (e.g., EP).
Set the Date Range for Discounted Stays:
Specify the date range for when guests can use the promotion
Select Days of the Week for Discount Availability:
Choose the days of the week that the discounted rate will be available. You can select all days or specific days as needed.
Make Promotion Available Online
Decide whether to make the promotion available online
Turn On the Toggle: Promotion will be available on the Stayflexi direct booking engine.
Turn Off the Toggle: Promotion will not be available for the Stayflexi booking engine.
Enter Promotion Name
Provide a descriptive name for your promotion to help identify it easily
Save the Promotion
Once you have entered all the details, review them carefully.
Click the “Save” button to finalise and activate your promotion.
6. Coupon Code Offers
Coupon codes allow you to give guests special codes that apply a fixed or percentage discount during booking.
Log in to Your Stayflexi Dashboard:
Use your username and password to log in.
Go to Revenue Management:
After logging in, click the four boxes icon (more apps) in the top right corner
A dropdown menu will appear.
Select “Revenue Management” from the list
Go to Coupon/Offers:
On the left sidebar, click on “Coupon Code / Offers” (the 5th option) to view the Coupon Code/ Offers page.
Add a Coupon/Offers:
Click the “Add Coupon Code / Offers” button to start creating a new Coupon Code / Offers
Enter Coupon Code / Offer Name:
Provide a descriptive name for your coupon code/offer to help identify it easily
Describe Coupon Code / Offer:
Provide a brief description of your coupon code/ offer for better understanding
Choose the type
From the dropdown in the “Choose type of your coupon code/offer” section, either of the following types:
OFFER
COUPON CODE
Set Room Booking Criteria
In the section “How many rooms do guests need to book to get this coupon code or offer?”, input:
Minimum number of rooms guests need to book.
Maximum number of rooms guests can book.
Set Stay Duration Criteria
In the section “How long do guests need to stay to get this coupon code or offer?”, enter the following:
Minimum number of nights required for guests to stay to qualify for the coupon code/ offer.
Maximum number of nights guests can stay to qualify.
Set the Discount
In the section “How much of a discount do you want to give?”, enter the desired discount and select the type of discount (Percentage or Flat ) from the dropdown.
Set the Date Range for Discounted Stays
In the “When can guests check in using the discounted rate?” section, specify the date range for when guests can use the Coupon code/offer.
Select Days of the Week for Discount Availability:
Choose the days of the week that the discounted rate will be available. You can select all days or specific days as needed
Valid Booking Period:
In the section “When can bookings be shown?”, select the date range during which the coupon code/offer is valid for bookings
Coupon Code/Offer Usage Limit:
In the section “How many times can the coupon code/offer be used? (leave blank for no limit)”:
The coupon code or offer can be used as many times as you want unless a limit is set.
Save the Coupon code/ offer:
Once you have entered all the details, review them carefully.
Click the “Save” button to finalize and activate your Coupon code/ offer.
7. Rate Templates
Rate Templates let you store pre-set pricing for seasons like high season, low season, weekends, festivals, or events. You can apply these templates to any date range with one click, saving time and ensuring pricing consistency.
How to Set Them Up?
Set Up a Rate Template:
Log in to the Stayflexi Dashboard.
Click the four boxes icon (more apps) in the top right corner.
A dropdown will appear.
Select “Revenue Management” from the list.
Click on “Rate Template” (second option on the left sidebar).
Click “Add New Template.”
Fill in the required fields (template name, color, and description).
Define the start and end dates for the season by using the template calendar button in the top right corner of the Rate template page (refer to the above Images).
Steps to Create and Apply a Template:
How do I add or remove competitors in the Competitor Setup section?
Below are the step-by-step guidelines on adding and managing competitors from the Competitor Setup section in Revenue Management:
Log in to Your Stayflexi Dashboard:
Use your username and password to log in.
Go to Revenue Management:
Click the four-boxes (More Apps) icon at the top right corner.
A dropdown menu will appear.
Select “Revenue Management” from the list.
Open Competitor Setup:
On the left sidebar, click “Competitor Setup” or “Competitor List”.
Add a Competitor:
Click “Add Competitor”.
Open Google and search for the competitor property.
Copy the hotel’s Google profile link.
Paste the link into the input field.
Click Save to add the competitor.
Remove a Competitor:
Click Remove
Confirm the action.
Your competitor data is now updated:
These competitors will be used for market comparison inside the Revenue Dashboard and demand-based pricing logic.
How do I configure Demand-Based Pricing?
Below are the step-by-step guidelines on setting up Demand-Based Pricing.
Log in to Your Stayflexi Dashboard:
Enter your username and password.
Open Revenue Management:
Click the four-boxes (More Apps) icon.
Select “Revenue Management.”
Go to Dynamic Pricing:
Click the Dynamic Pricing dropdown on the left sidebar.
Select “Demand-Based Pricing.”
Start a New Configuration:
Click “Add New Configuration.”
Important Note:Before configuring demand-based pricing, make sure your room types and rate plans are properly set up. If they are not linked correctly, it may lead to rate mismatches. For example, the system may remind you to sync the base price of your Premium 1BHK with Balcony Garden View with the market demand before continuing.
Choose Your Property’s Star Category:
Select the appropriate star category (e.g., 3-star, 4-star).
This helps the system compare your property with similar market competitors.
Select the Demand Type:
Choose one of the following:
Low Demand
Moderate Demand
High Demand
Occupancy-Based Demand
Set the Pricing Action:
Choose whether the price should Increase or Decrease when this demand level is detected.
Enter the Price Adjustment Value:
Add the amount or percentage by which the price should change.
Example: Increase by ₹200 or decrease by 10%.
Save the Configuration:
Click Save to activate the demand-based pricing rule.
The system will now automatically adjust rates based on market demand.
How do I create Rule-Based Pricing rules?
Below are the step-by-step guidelines on creating Rule-Based Pricing rules in Dynamic Pricing:
Log in to the Stayflexi Dashboard:
Use your login credentials.
Open Revenue Management:
Click the four-boxes icon.
Select “Revenue Management.”
Go to Dynamic Pricing:
Click the Dynamic Pricing dropdown on the left.
Select “Rule-Based Pricing.”
Add a New Rule:
Click “Add Rule” or “Add Dynamic Pricing Rule.”
Define the Occupancy Range:
Enter the occupancy percentage range where this rule should apply.
Example:
0%–50% → Decrease price
51%–70% → Increase price
71%–100% → Increase price more
Choose the Price Adjustment Type:
Set whether the change is a percentage or a fixed amount.
Enter the value accordingly.
Select Room Categories:
Choose whether this rule should apply to all rooms or specific room categories.
Set the Active Date Range:
Choose the calendar dates during which this rule should remain active.
Save the Rule:
Click Save to finalize the rule.
You will now see it listed in the Rule-Based Pricing table.
What is Time-Based Pricing and how do I set Time Slots?
Below are the step-by-step guidelines on what Time-Based Pricing means and how to configure Time Slot Pricing in Revenue Management:
Time-Based Pricing allows you to schedule when your dynamic pricing rules should run. Instead of adjusting prices continuously in real-time, the system will only update prices during the specific time slots you choose. This gives you more control, prevents frequent price fluctuations, and helps you manage pricing updates at predictable times (e.g., every morning at 9 AM).
Open Revenue Management:
Log in to your Stayflexi dashboard.
Click the four-boxes (More Apps) icon and select Revenue Management.
Open Dynamic Pricing:
Click Dynamic Pricing in the left sidebar.
Select Time Slot Configuration.
Enable Time Slot Mode:
Turn ON the toggle for Time-Based Pricing.
This switches dynamic pricing from real-time updates to scheduled time-based updates.
Add a Time Slot:
Click “Add Time Slot.”
Enter the exact time you want the pricing rules to run (e.g., 09:00 AM or 2:00 PM).
Save the Time Slot:
Click Save to activate the time slot.
From now on, pricing rules will only be applied at these scheduled times.
Remove or Edit Time Slots:
Click an existing time slot to edit its time.
To delete, click the delete option.
Save changes to update your time-based pricing schedule.
How do I manage (edit, run the rule immediately, disable or delete) dynamic pricing rules?
Below are the step-by-step guidelines on managing existing rules:
Open Rule-Based Pricing Go to Revenue Management → Dynamic Pricing → Rule-Based Pricing.
Select the Rule Click on the rule you want to manage from the list.
Edit the Rule
On the right-hand side, click the pencil (edit) icon.
In the Edit Rule screen, you can update the rule definition, occupancy ranges, adjustment values, turn on/off room-type-based occupancy, select room types, or change the date range.
Save your changes.
Run the Rule Immediately If you want the updated rule to apply right away, click Run Rule Now.
Disable the Rule To stop the rule from applying temporarily, click Disable Rule. (The rule will remain saved and can be enabled later.)
Permanently Delete or Remove the Rule
Click the calendar icon on the right.
Select Permanently Disable Rule if you want to remove it from use completely.
(You will also see an option to Permanently Enable Rule if needed.)
How do Rate Templates work and how do I create one?
Rate Templates allow you to store predefined pricing structures for different seasons, events, or special periods. Instead of manually updating each date on the calendar, you can create templates (such as High Season, Low Season, Weekend Rates, Festival Rates) and apply them instantly to any date range with just one click. This ensures pricing is consistent, faster to update, and reduces errors across your property.
Below are the step-by-step guidelines on what Rate Templates are and how to create and apply them:
Go to Revenue Management:
Log in to your Stayflexi dashboard.
Click the four-boxes (More Apps) icon.
Select Revenue Management.
Open Rate Templates:
Click Rate Templates from the left menu.
Add a New Template:
Click “Add Template.”
Enter a template name (examples: Winter Rates, High Season Rates, Festival Rates).
Enter Room Pricing:
For each room type, enter the base rate or seasonal rate that should be saved in this template.
Add weekday/weekend variations if applicable.
Save the Template:
Click Save.
Your template will now appear in the Rate Templates list.
Apply the Template to Dates:
Click Apply Template or open the calendar tool.
Select the start date and end date you want to apply the template to.
Choose the template you created from the dropdown list.
Click Apply.
Rates Will Instantly Update:
All selected dates will automatically update to the pricing defined in the template.
Your property’s rate strategy becomes consistent and easier to manage.
Can dynamic pricing be set to run at a specific time, regardless of occupancy changes?
Yes, dynamic pricing can be set to run at a specific time regardless of occupancy changes in Stayflexi.
When you enable Time Slot Configuration, you can pick certain times during the day for your pricing rules to take effect. Once this mode is on, the system will only adjust prices based on occupancy at those chosen times, not continuously throughout the day. This makes it easier to manage pricing.
For example, if you set a time for 10:00 AM, the system will check the occupancy and apply the pricing rules at that exact time. This way, you have clear control over when your prices change.
Here’s a simpler guide to setting dynamic pricing at specific times using Time Slot Configuration in Stayflexi:
Log in to Your Stayflexi Dashboard:
Use your username and password to log in.
Go to Revenue Management:
After logging in, click the four boxes icon (more apps) in the top right corner.
A dropdown menu will appear.
Select “Revenue Management” from the list.
Go to Dynamic Pricing:
Click the “Dynamic Pricing” dropdown icon (3rd option on the left sidebar).
Open Time-based pricing
On the left side, under Dynamic Pricing, you will see options like:
Demand-based pricing
Rule-based pricing
Time-based pricing
Click on Time-based pricing.
Turn onTime Slot Mode:
You will see a switch asking, “Do you want to enable a time slot?”
Turn this switch on
Set a Time for Dynamic Pricing
Under the switch, you will see a field to choose a time (e.g., 10:00 AM).
Pick the time you want the dynamic pricing rules to apply.
Click Add to set the time for more time slots.
Save Your Settings
After adding the time, click Save.
The time will now be listed on the screen.
Confirm or Adjust:
Check if the time slot appears correctly.
If you need to change or remove it, click the Delete button next to the time
Once this is set up, dynamic pricing will run at the time you choose, based on occupancy at that moment, instead of adjusting in real-time. This helps you control when pricing changes happen.
Can the occupancy percentages in dynamic pricing overlap across different rules?
In Stayflexi, occupancy percentages for dynamic pricing rules cannot overlap.
Each rule must have its own unique occupancy percentage range. For example, if one rule covers 50% to 80% occupancy, you cannot create another rule that overlaps with any part of that range, such as 60% to 90%. The ranges need to be distinct so the system knows exactly which rule to apply.
If you attempt to create overlapping rules, Stayflexi will alert you and ask you to change the ranges to ensure they don’t overlap, avoiding any confusion when applying the correct rule.
Here’s a step-by-step guide to check if occupancy percentages overlap between different dynamic pricing rules in Stayflexi:
Log in to Your Stayflexi Dashboard:
Use your username and password to log in.
Go to Revenue Management:
After logging in, click the four boxes icon (more apps) in the top right corner.
A dropdown menu will appear.
Select “Revenue Management” from the list
Go to Dynamic Pricing
Click the “Dynamic Pricing” dropdown icon (3rd option on the left sidebar).
Select the “Rule-based pricing” option from the dropdown.
Create an Overlapping Rule:
Let’s say you already have a rule called “Rule 1” that applies to occupancy percentages between 50% and 80% (as shown in Image 2).
Now, try to create another rule “Rule 2” by clicking the Add new dynamic pricing rule button, with an occupancy range of 60% and 90%.
Receive the Error:
The system will prevent you from saving “Rule 2” because its occupancy range overlaps with “Rule 1”.
An error message will pop up, stating: “Invalid rule specified, occupancy range is overlapping. Please enable if the previous rule is disabled.”
By following these steps, you can ensure that your dynamic pricing rules do not have overlapping occupancy percentages.
Can dynamic pricing be applied to only one specific room category?
Yes, in Stayflexi, you can apply dynamic pricing to just one specific room category. This allows you to adjust prices for that room type based on occupancy, without affecting the prices of other room categories.
Below are the step-by-step guidelines on dynamic pricing being applied to only one specific room category from Revenue Management:
Log in to Your Stayflexi Dashboard:
Use your username and password to log in.
Go to Revenue Management:
After logging in, click the four boxes icon (more apps) in the top right corner.
A dropdown menu will appear.
Select “Revenue Management” from the list.
Go to Dynamic Pricing:
Click the “Dynamic Pricing” dropdown icon (3rd option on the left sidebar).
Select the “Rule-based pricing” option from the dropdown.
Create or Edit a Pricing Rule:
To apply a rule to a specific room category, you can:
Create a new rule by clicking the Add new dynamic pricing rule button.
Or edit an existing rule by selecting it from the list of rules on the rule-based pricing page.
Enable Room Type-Based Occupancy:
In the rule setup window, you will see an option to EnableRoom Type-Based Occupancy.
Turn this option ON. This will let you apply the pricing rule to specific room categories instead of the entire property.
Select the Room Category (as shown in Image 3):
After enabling room-type-based occupancy, you will see a dropdown menu “Room types” under the “Select room types?” section.
Click on the dropdown and select the room category you want (e.g., Deluxe Room, Suite, etc.).
You can choose one or more categories, but to apply the rule to a single room category, just select that one.
Define the Pricing Rule:
Now, set the conditions for your dynamic pricing:
Occupancy Percentage Range: Enter the range of occupancy for when the rule should apply (e.g. if occupancy is between 90% and 100%).
Price Adjustment: Choose how much you want to increase or decrease the price when occupancy falls within that range (you can set it as a percentage or a fixed amount).
Rule Name:
Name the Dynamic Pricing rule (e.g., Rule 2).
Save the Rule:
Once you have set everything up, click on the “Add Event” button to apply the rule.
The dynamic pricing rule will now apply only to the room category you selected.
Can dynamic pricing and rate templates function simultaneously?
Yes, you can use both rate templates and dynamic pricing at the same time in Stayflexi. Rate templates let you set seasonal prices, while dynamic pricing adjusts rates based on real-time occupancy levels. When you set up seasonal prices, dynamic pricing will still work, making sure your rates reflect market conditions. Here’s a simple guide on how to use them together:
What Are Rate Templates?
What They Do: Rate templates allow you to set specific prices for certain times of the year, like during busy seasons or holidays. You can schedule these rates in advance.
Why Use Them: They help you plan by setting fixed prices for high-demand periods like summer or festival seasons and it can be used multiple times.
What is Dynamic Pricing?
What It Does: Dynamic pricing automatically adjusts your room rates based on demand and how full your hotel is.
Why Use It: It helps you maximize revenue by adjusting rates in real time based on current demand.
Dynamic pricing adjusts the rates based on the overall occupancy of the entire property. However, if you want to set dynamic pricing for a specific room type, you can do that by enabling the ‘Enable room type-based occupancy’ option when creating the pricing rule.
How Do They Work Together?
Work Simultaneously: When you set a seasonal rate using a rate template (like for a holiday), dynamic pricing still works. The seasonal rate will be your base price.
Adjust Automatically: If demand changes during that season (for example, if your hotel starts filling up), dynamic pricing will increase or decrease the rate based on occupancy.
How to Set Them Up?
Set Up a Rate Template:
Log in to the Stayflexi Dashboard.
Click the four boxes icon (more apps) in the top right corner.
A dropdown will appear.
Select “Revenue Management” from the list.
Click on “Rate Template” (second option on the left sidebar).
Click “Add New Template.”
Fill in the required fields (template name, color, and description).
Define the start and end dates for the season by using the template calendar button in the top right corner of the Rate template page (refer to the above Images).
Configure Dynamic Pricing (refer to the above Images):
Go to “Dynamic Pricing” (third option on the left sidebar under Revenue Management).
Select “Rule-based Pricing.”
Set rules for price changes (for example, “If occupancy is above 80%, increase rates by 10%”) by clicking “Add New Dynamic Pricing Rule.”
Why Use Both?
Maximize Earnings: Rate templates give you a plan for high-demand times, while dynamic pricing helps you adjust based on real-time changes. This way, you can always charge the best rates.
Stay Competitive: Using both strategies ensures your prices stay competitive no matter the season or occupancy level.
By following these steps, you can easily set up rate templates and dynamic pricing in Stayflexi, ensuring your rates are always optimized to help you earn more while staying flexible with market changes.
How do I create predefined Coupon Code/ offers in the system?
Below are the step-by-step guidelines to create predefined Coupon Code/offers in the system from Revenue Management:
Log in to Your Stayflexi Dashboard:
Use your username and password to log in.
Go to Revenue Management:
After logging in, click the four boxes icon (more apps) in the top right corner
A dropdown menu will appear.
Select “Revenue Management” from the list
Go to Coupon/Offers:
On the left sidebar, click on “Coupon Code / Offers” (the 5th option) to view the Coupon Code/ Offers page.
Add a Coupon/Offers:
Click the “Add Coupon Code / Offers” button to start creating a new Coupon Code / Offers
Enter Coupon Code / Offer Name:
Provide a descriptive name for your coupon code/offer to help identify it easily
Describe Coupon Code / Offer:
Provide a brief description of your coupon code/ offer for better understanding
Choose the type
From the dropdown in the “Choose type of your coupon code/offer” section, either of the following types:
OFFER
COUPON CODE
Set Room Booking Criteria
In the section “How many rooms do guests need to book to get this coupon code or offer?”, input:
Minimum number of rooms guests need to book.
Maximum number of rooms guests can book.
Set Stay Duration Criteria
In the section “How long do guests need to stay to get this coupon code or offer?”, enter the following:
Minimum number of nights required for guests to stay to qualify for the coupon code/ offer.
Maximum number of nights guests can stay to qualify.
Set the Discount
In the section “How much of a discount do you want to give?”, enter the desired discount and select the type of discount (Percentage or Flat ) from the dropdown.
Set the Date Range for Discounted Stays
In the “When can guests check in using the discounted rate?” section, specify the date range for when guests can use the Coupon code/offer.
Select Days of the Week for Discount Availability:
Choose the days of the week that the discounted rate will be available. You can select all days or specific days as needed
Valid Booking Period:
In the section “When can bookings be shown?”, select the date range during which the coupon code/offer is valid for bookings
Coupon Code/Offer Usage Limit:
In the section “How many times can the coupon code/offer be used? (leave blank for no limit)”:
The coupon code or offer can be used as many times as you want unless a limit is set.
Save the Coupon code/ offer:
Once you have entered all the details, review them carefully.
Click the “Save” button to finalize and activate your Coupon code/ offer.
How do I create predefined promotions in the system?
Below are the step-by-step guidelines to create predefined promotions in the system from Revenue Management:
Log in to Your Stayflexi Dashboard:
Use your username and password to log in.
Go to Revenue Management:
After logging in, click the four boxes icon (more apps) in the top right corner.
A dropdown menu will appear.
Select “Revenue Management” from the list.
Go to Promotions:
On the left sidebar, click on “Promotions” (the 4th option) to view the promotions page.
Add a New Promotion:
Click the “Add new promotion” button to start creating a new promotion.
Set Stay Duration Criteria
In the section “How long do guests need to stay to get this promotion?”, enter the following:
Minimum number of nights required for guests to stay to qualify for the promotion.
Maximum number of nights guests can stay to qualify.
Set Room Booking Criteria
In the section “How many rooms do guests need to book to get this promotion?”, input:
Minimum number of rooms guests need to book.
Maximum number of rooms guests can book.
Set the Discount Percentage
In the section “How much of a discount do you want to give?”, enter the desired discount percentage.
Choose the Rate Plan
From the dropdown in the “Which Rate?” section, select the rate plan that the discount applies to (e.g., EP).
Set the Date Range for Discounted Stays:
Specify the date range for when guests can use the promotion
Select Days of the Week for Discount Availability:
Choose the days of the week that the discounted rate will be available. You can select all days or specific days as needed.
Make Promotion Available Online
Decide whether to make the promotion available online
Turn On the Toggle: Promotion will be available on the Stayflexi direct booking engine.
Turn Off the Toggle: Promotion will not be available for the Stayflexi booking engine.
Enter Promotion Name
Provide a descriptive name for your promotion to help identify it easily
Save the Promotion
Once you have entered all the details, review them carefully.
Click the “Save” button to finalise and activate your promotion.
Will the rates automatically revert to the base price if the dynamic pricing rule is disabled or deleted after it has been applied?
No, the rates will not automatically revert to the base price if the dynamic pricing rule is disabled or deleted after it has been applied.
Disabling the rule stops it from affecting future bookings, but any bookings made while the rule was active will keep the modified rates.
Deleting the rule permanently removes it, but again, it only affects future bookings. Existing bookings will retain the rates applied during the rule’s active period.
To return the rates to their original base price, you must change them manually.
Understanding Dynamic Pricing Rules:
Dynamic pricing rules in Stayflexi help you change room prices automatically based on things like demand, special promotions, or seasonal changes. When these rules are active, they change the prices for all relevant bookings automatically.
Applying a Dynamic Pricing Rule:
When you activate a dynamic pricing rule, it instantly applies to all bookings during the time the rule is active.
The system will show the modified prices for all reservations made while the rule is in place.
Disabling or Deleting a Dynamic Pricing Rule:
Disabling the Rule:
If you disable the dynamic pricing rule, it stops changing prices for future bookings.
However, any bookings made while the rule was active will still keep the modified rates. These rates will not automatically go back to the base price.
Deleting the Rule:
Deleting the rule removes it from your settings entirely.
This only impacts future bookings, meaning no new bookings will use the deleted rule.
Existing bookings will still have the prices that were set when the rule was active.
Impact on Existing Bookings:
Any bookings made while the dynamic pricing rule was active will keep the modified rates.
These rates will not go back to the original base price automatically, even after disabling or deleting the rule.
To reset these prices to the base rate, you need to manually adjust them.
How to Manually Update Prices:
To adjust the prices back to the base price (or set a new price), follow these steps:
Go to the Rates and Inventory Page
In the Stayflexi dashboard, click on the Rates and Inventory icon (it’s the 3rd icon from the left in the top menu).
Select Rates and Inventory:
In the Rates and Inventory page, select the checkbox for Rates and Inventory from the drop down menu in the top left corner
Use Bulk Update:
Click on the Bulk update button
Set Pricing Option:
From the dropdown options, select Set pricing
Choose Room Types:
Select the room types where you want to adjust the prices
Choose the Rate plans:
Select the rate plans where you want to adjust the prices
Manually Enter the Base Price:
Enter the base price (or a new price) for those room types in the provided field
Save Your Changes:
Click the Set Pricing button to save and apply your new pricing
By following these steps, you can ensure that prices for existing bookings are manually updated to the base price or any price you prefer, even if the dynamic pricing rule is disabled or deleted.
Expense manager
Keep your property’s finances in check with Stayflexi’s Expense Manager feature. This tool enables you to record, categorize, and monitor all operational expenses in real time. From utility bills to maintenance costs, Stayflexi provides a clear, organized view of your spending. With detailed reporting and analytics, you can track trends, manage budgets, and make informed financial decisions. Stayflexi’s Expense Manager simplifies expense tracking, helping you maintain profitability and control over your property’s financial health.
What is the Cash Tracker in Stayflexi?
The Cash Tracker in Stayflexi is a built-in tool that helps properties monitor, record, and reconcile all cash transactions in real-time. It gives a clear snapshot of how much cash is currently on hand, where it came from, and how it’s being used — making daily cash flow management simple and transparent.
Key Functions of Cash Tracker:
Tracks All Cash Inflows :
Cash received from guest folios (payments during check-in, check-out, or in-stay purchases)
Cash top-ups added for operational needs
Any other incoming cash sources.
Monitors All Cash Outflows:
Expenses paid in cash (e.g., supplies, repairs, petty cash)
Cash withdrawals for various purposes
Employee payouts and vendor payments
Real-Time Cash Balance :
Instantly calculates and displays the current available cash on the property based on inflow and outflow records.
Shift & Day-Wise Tracking :
Allows tracking of cash collections and withdrawals per shift or day, making handovers and audits easier.
Why it’s Useful? :
Eliminates manual ledger entries for cash
Provides transparent cash movement history linked to employees and categories
Reduces errors and discrepancies during reconciliation
Ensures accountability by tracking who collected or spent the cash and for what reason
Example Use Case :
If the front desk collects ₹5,000 in cash from guests and the housekeeping team spends ₹1,000 for supplies, the Cash Tracker will show:
₹5,000 as inflow (guest payments)
₹1,000 as outflow (housekeeping expense)
₹4,000 as the remaining cash balance for the day
What types of transactions can be recorded in the Cash Tracker?
The Cash Tracker in Stayflexi is a centralized tool that allows properties to log, monitor, and reconcile all cash transactions in real-time. It helps ensure transparency, accountability, and accuracy in managing the property’s cash flow.
Types of Transactions in Cash Tracker:
Cash Top-Ups – Manual cash additions to the register :
These are cash amounts manually added to the cash register to ensure enough funds are available for operational needs.
Example: The property manager adds ₹10,000 to the register at the start of the month for housekeeping purchases and petty cash needs.
Flow:
Manager initiates a Cash Top-Up entry in Cash Tracker.
Selects “Monthly Operational Cash” as the reason (predefined in Top-Up categories).
Enters amount and date, then saves.
Cash balance increases immediately by ₹10,000 in the tracker.
2. Cash Collections – Automatically logged when guest dues are settled in cash
This transaction type is system-generated whenever a guest payment is made in cash via their folio.
Example: A guest settles their bill of ₹5,000 in cash at checkout.
Flow:
Front desk records payment in the Guest Folio.
Selects Cash as payment mode.
System automatically logs this transaction in the Cash Tracker as a Cash Collection.
Available cash balance increases by ₹5,000 without manual entry.
3. Cash Withdrawals – Expenses, cash payouts, or owner withdrawals
Cash removed from the register for operational expenses, staff payments, or withdrawals by the owner.
Example: The property needs ₹2,000 to pay a local plumber for urgent repairs.
Flow:
Staff member logs in to Cash Tracker.
Selects Cash Withdrawal and chooses the category “Maintenance & Repairs” (predefined in Withdrawal categories).
Enters amount, date, and purpose.
Cash balance decreases by ₹2,000 immediately.
How is Cash Collected from Guest Folios Tracked?
When a guest settles dues in cash (e.g., room payments, add-ons), the amount is automatically added to the Cash Tracker in the Expenses manager as an inflow entry, ensuring the cash register reflects real-time updates. If you wish not to track, you can uncheck the ‘transfer cash to cash top-up’ in settle dues.
Flow:
The front desk or cashier opens the Guest Folio in Stayflexi.
Selects Cash as the payment method while settling the balance.
By default, the system records the payment instantly as a Cash Collection in the Cash Tracker.
The available cash balance updates in real-time.
Optional: If you don’t want this cash to be added to the Cash Tracker, simply deselect the checkbox (which is automatically selected by default).
Example:
A guest has a pending bill of ₹6,863.
The front desk receives the amount in cash and updates the folio.
Stayflexi auto-logs the ₹6,863 under Cash Collections in the Cash Tracker with the guest’s folio reference and payment date.
If the checkbox is deselected before saving, the transaction will not appear in the Cash Tracker.
Benefits:
Eliminates manual logging errors.
Creates a transparent audit trail.
Keeps cash balance updated instantly.
Allows flexibility to exclude specific cash collections from the Cash Tracker when needed.
Can I Add Cash to the Tracker Manually?
Yes. You can manually add cash to the Cash Tracker using the Cash Top-Up feature. This is useful for recording manual additions such as morning cash floats, emergency funds, or any non-guest cash injections into the register.
Flow:
Go to the Cash Tracker section in Stayflexi.
Click Add Top-Up from the left-hand menu.
Pick the Date for the cash addition.
In the Reason/Entity column, select a predefined top-up category (e.g., Morning Cash Load, Emergency Top-Up).
Enter the Amount and any Description for future reference.
Click Save to update the cash balance instantly.
Example:
At the start of the day, the cashier adds ₹5,000 to the cash drawer as a morning float.
They log into the Cash Tracker → Add Top-Up → select “Morning Cash Load” → enter ₹5,000 → Save.
The system immediately reflects this addition in the available cash balance.
What if the owner or manager takes cash out for personal or business purposes?
If the property owner, manager, or any authorized person withdraws cash for personal use or business-related expenses, you can log this in the Cash Tracker under Cash Withdrawals. This ensures the transaction is properly documented and the cash balance stays accurate.
Flow:
Go to the Cash Tracker section in Stayflexi.
Click Add Withdrawal from the left-hand menu.
Pick the Date of the withdrawal.
In the Reason/Entity column, select a predefined withdrawal category (e.g., Owner Withdrawal, Vendor Payment, Staff Wages).
Enter the Amount withdrawn and add a Description if necessary.
Click Save to record the transaction and update the available cash balance.
Example:
The owner takes ₹10,000 from the property’s cash for urgent equipment repair.
The cashier logs into the Cash Tracker → Add Withdrawal → select “Owner Withdrawal” → enter ₹10,000 → Save.
The system reduces the cash balance immediately and keeps a record for auditing.
What is the Expense Manager feature in Stayflexi, and how does it benefit to a property?
The Expense Manager in Stayflexi is a built-in tool that allows hotel staff to record, track, and manage all property-level operational expenses in one place. It provides visibility into where money is being spent, helping owners and managers maintain better financial control.
Why is it useful for your property?
Managing expenses manually or across disconnected spreadsheets often leads to data gaps, miscommunication, or overspending. The Expense Manager solves this by:
Providing real-time visibility into all property-level expenses.
Helping owners and managers track where money is going — by category, department, or user.
Ensuring accountability, as each expense is logged with user details and time stamps.
Offering easy reporting for audits, internal reviews, or tax purposes.
Improving financial planning by enabling data-driven decisions based on actual expense trends.
What types of expenses can I record in the Expense Manager?
You can log any operational expense, such as:
Housekeeping supplies
Maintenance costs
Staff salaries or wages
Vendor payments
Utility bills
Marketing costs
Miscellaneous purchases (stationery, fuel, etc.
Where can I access the Expense Manager in the Stayflexi dashboard?
Follow the steps below to access the Expense Manager from your Stayflexi dashboard:
Log in to your Stayflexi dashboard using your property credentials.
On the top right corner of the dashboard, click on the “More Apps” icon.
From the dropdown menu, select “Expense Manager.”
You will now be redirected to the Expense Manager interface, where you can start adding or managing your property’s expenses.
Understanding the Expense Manager Dashboard
Once you access the Expense Manager, you’ll be welcomed with a summary dashboard that gives you a quick overview of your financial activity:
Info Box Section (Top Panel): This section displays key financial figures at a glance:
Total Expenses
Cash Withdrawals
Cash Top-ups
Overall Cash Balance
Top Expense Categories (Middle Panel): Right next to the info boxes, you’ll find a list of the top categories where most of your expenses are being recorded. This helps you quickly identify high-spending areas.
Day-wise Expense Trend Graph (Right Panel): A visual day-wise trend graph shows how your expenses fluctuate over time. This allows you to monitor daily spending patterns, spot unusual spikes, and track how different departments impact cash flow.
Configuration Section (Bottom Panel): Below the summary panels, you’ll find an option to configure your Expense Manager settings.
Summary
The Expense Manager in Stayflexi is an essential module for any property aiming to maintain financial discipline, improve expense accountability, and reduce manual errors. It’s more than just a tracker — it’s a smart financial tool built to support daily operations, internal audits, and long-term budgeting.
Where can I see report for Expense Manager?
You can see the reports for Expense Manager by navigating to the Expense Reports section in the Reports.
Below is the step-by-step guide to see the Expense Manager reports:
Logging into Your Stayflexi Dashboard:
Enter your username and password to log in.
Navigate to Reports:
Once logged in, click on the More Apps icon (represented by four blocks) in the top right corner.
From the dropdown menu, select Reports.
On the left-hand menu, select Expense Reports.
Go to Expense Manager Reports:
After selecting the Expense Reports option, the Expense Manager Reports option will be displayed.
Click on the Expense Manager reports block.
This will navigate you to the page where you can see all the Expense Manager reports, including:
The date the expense was created
Type of expense( Expense, withdrawal, or top-up)
Issued to details.
Reason – entity name
Description
Amount.
By following these steps you can see all the Expense Manager report details.
How do I set up the Expense Manager in Stayflexi?
The Expense Manager in Stayflexi is designed to help properties track and manage all financial transactions such as daily expenses, cash withdrawals, and top-ups — all in one place. This guide walks you through how to set it up, configure it, and use it effectively for complete financial control.
1. ACESSING THE EXPENSE MANAGER:
To get started:
Log in to your Stayflexi dashboard using your property credentials.
Click on the “More Apps” icon (grid with four blocks) at the top right corner.
From the dropdown, select “Expense Manager.”
You’ll be redirected to the Expense Manager dashboard.
2. UNDERSTANDING THE EXPENSE MANAGER DASHBOARD:
Upon entry, you’ll see a summarized financial overview:
Info Boxes (Top Panel):
Total Expenses
Cash Withdrawals
Cash Top-Ups
Overall Cash Balance
Top Expense Categories (Middle Panel):
Displays your most frequently used expense types.
Day-wise Trend Graph (Right Panel):
Visualizes daily spending trends to help monitor expense flow.
Configuration Panel (Bottom Section):
Here, you can set up categories, payment modes, and user access settings to customize the Expense Manager for your property’s needs.
3. SETTING UP THE EXPENSE MANAGER:
A. Configure Expense Categories:
From the left-hand column, select “Expenses.”
On the right-hand side, click the Configuration icon.
Under Expense Categories, click Add New and enter names like:
Toiletries
Housekeeping Essentials
Repairs & Maintenance
Marketing
Click Save after each entry.
Repeat as needed to cover all types of expenses.
B. Set Up Withdrawal Categories:
From the left-hand column, switch to “Withdrawals.”
Click on the Configuration icon.
Click “Create Withdrawal Category”, and enter types like:
Daily Wages
Vendor Payments
Staff Advances
Click Save to store the category.
C. Configure Top-Up Categories:
On the left-hand side, switch to “Top-Up.”
Go to the Configuration panel.
Click Add Top-Up Type, and define options like:
Morning Cash Load
Emergency Top-Up
Night Shift Float
Click Save.
D. Configure Employee Access:
To track who’s responsible for logging financial actions:
In the Configuration menu, select “Configure Employee.”
Click “Create Employee” and add team members involved in financial entries.
Assign roles and permissions for:
Logging expenses
Creating withdrawals or top-ups
Approving entries (if needed)
This ensures complete accountability and audit readiness.
4. RECORDING FINANCIAL TRANSACTIONS:
A. Add and Track Expenses:
Click “Add Expense” from the left-hand menu (+ icon).
Choose an Expense Category (e.g., Housekeeping, Repairs).
Enter the amount, date, description, and upload any receipt.
Click Save to log the expense.
B. Log Cash Withdrawals:
Select “Add Withdrawal” from the left menu.
Choose a Withdrawal Category (e.g., Vendor Payment).
Fill in the amount, date, and add a note if needed.
Click Save.
C. Log Cash Top-Ups:
Click “Add Top-Up” from the left-hand side.
Select a Top-Up Category (e.g., Morning Cash Load).
Enter the amount and add any notes.
Click Save to record the top-up.
EXAMPLE USE CASES :
Housekeeping Purchase:
₹1,250 spent on cleaning supplies via UPI.
Logged under Housekeeping with a receipt attached.
Overall Summary:
With the Expense Manager set up and in use:
Your team can log all financial activities in real-time.
Owners and managers get complete visibility into daily cash flow.
Each entry is attributed to the right staff member, ensuring accountability.
Reports and graphs help analyze trends and control spending.
How can I add daily expenses in Expense Manager?
Log in to Stayflexi
Start by logging into your Stayflexi account with your credentials.
Once logged in, click on the More Apps icon (represented by four blocks) in the top right corner.
From the dropdown menu, select Expense Manager.
Add Daily Expenses:
To record any daily expenses, follow these simple steps:
Choose an Expense Category:
Click “Add Expense” from the left-hand menu (+ icon).
Select the date of the expense. It will default to today’s date, but you can modify it if needed.
Click on the dropdown arrow in this column to view and select from your predefined expense categories (e.g., Housekeeping, Repairs, Supplies).
Choose the employee or vendor to whom the amount was issued.
This list is based on entries from the “Configure Employee” section.
Type the exact amount spent in this field.
Add a brief description of the expense for future reference (e.g., “Purchased cleaning liquid for Room 101”).
If this expense should also be recorded under Withdrawals, tick the checkbox to link it.
Click the “Save” button to record the daily expense entry.
The expense will now be logged in the system and reflected in your dashboard, reports, and day-wise trends.
What is the 'Top-up' feature in the Expense Manager, and how is it used?
The Top-up feature in Stayflexi’s Expense Manager allows property owners and managers to load cash into their cash drawer at the beginning of the day or at any other time when additional cash is required for daily operations, such as covering expenses or withdrawals. This feature ensures that there is always enough cash available to manage operations smoothly.
Why use the Top-Up Feature?
To track when and how much cash is being added to the property’s available funds.
To maintain an accurate cash balance in the system.
To ensure accountability when physical cash is handed over to specific employees or departments.
Here’s how to use it step by step:
Log in to Stayflexi:
Start by logging into your Stayflexi account with your credentials.
Once logged in, click on the More Apps icon (represented by four blocks) in the top right corner.
From the dropdown menu, select Expense Manager.
Fill-Out Top-Up Details:
Pick the Date: Choose the date on which the top-up is made. It defaults to today, but you can change it as needed.
Reason / Entity Column:This dropdown is used to select the predefined Top-Up categories (e.g., “Morning Cash Load”, “Emergency Fund”) that were configured earlier under the Top-Up Configuration section.
Issued To: Select the employee who received the top-up. This list is based on the employees added under Configure Employee.
Enter Amount: Add the total amount of cash added.
Add Description: Optionally, include a short note for reference (e.g., “Cash float provided for front desk”).
Save the Top-Up:Click Save to log the entry. The system will update your overall cash balance accordingly.
Where Does It Reflect?
The added amount will be reflected in the cash balance on your dashboard.
It will also appear in the Top-Up summary reports, helping you track how often and how much cash is loaded.
Tip: Regularly reconciling top-ups against expenses and withdrawals helps ensure accurate cash flow tracking and reduces discrepancies.
Payments
Simplify your payment management with Stayflexi’s Payments feature. Effortlessly process payments from bookings, deposits, and additional services through a secure and integrated platform. Accept a wide range of payment methods, including credit cards, debit cards, and online wallets, giving your guests flexibility and ease. Stayflexi’s Payments feature ensures smooth transactions with automatic invoicing, payment tracking, and detailed reports. With everything in one place, you can streamline your financial processes and provide a hassle-free experience for both staff and guests.
What is Payment Automation and how does it work in Stayflexi?
Payment automation in Stayflexi helps hotels handle payments smoothly and automatically. This feature ensures that guests’ payments are collected on time, making the booking process more efficient for property owners.
Log in to Your Stayflexi Dashboard:
Enter your username and password to log in.
Go to Payments:
After logging in, click the “More Apps” icon (represented by four boxes or blocks) in the top right corner.
From the dropdown menu, select Payments
Click on the Payment Configuration option
Enable Payment Automation
What it does: When this feature is turned on, Stayflexi automates the payment collection process for all reservations. This is particularly useful for properties that allow guests to pay during check-in or via online platforms like Booking.com, Expedia, or other OTAs (Online Travel Agencies).
How it works:
The system automatically processes payments when guests make a reservation if payment automation is enabled.
If the payment fails, the system can notify the guest to update their card details.
This automation reduces cancellations and ensures that hotels receive payments promptly.
Why you should enable it: It saves you time and effort in manually managing payments and reduces the chances of cancellations due to payment failures.
How to enable: Simply toggle the switch to the “on” position to activate payment automation for your property.
Apply Payment Automation to These Channels
What it does: This setting allows you to apply payment automation to specific booking channels, such as Booking.com, Expedia, and other OTAs.
How it works:
When guests book through these channels, the system will automatically charge their card details if they have selected the “pay later” option.
If the guest’s card is invalid, the system will send an email requesting updated payment information. The room inventory will be held until the payment is successfully processed.
How to set it up: Use the dropdown menu to select the channels you want to apply payment automation.
Enable Cancellation Policy
What it does: This feature automatically applies your hotel’s cancellation policy to the booking. If enabled, it charges the guest based on the rules of your cancellation policy, such as charging upfront for non-refundable bookings or after the cancellation window for partially refundable bookings.
How it works:
For non-refundable policies, the full booking amount is charged immediately after the booking is made.
For partially refundable policies, the system will automatically handle the payment after the refundable time period for the booking is over.
Why you should enable it: Automating the cancellation policy helps avoid manual intervention and ensures guests are charged according to the booking rules.
How to enable: Toggle the switch to enable or disable the cancellation policy automation.
Convert Booking into an Enquiry when Payment Fails
What it does: This option allows you to convert a booking into an Enquiry booking if the guest’s payment fails. This holds the booking temporarily, without canceling it outright, giving the guest time to resolve their payment issues.
How it works:
If the payment doesn’t go through, the booking is changed to an Enquiry, and the room inventory is reserved for a set period.
During this time, the guest can update their payment details, and the booking will be confirmed once payment is successful.
If the guest fails to complete the payment within the expiry time, the Enquiry is canceled, and the room is released for other guests.
Why you should use it: This feature gives the guest a second chance to complete the payment and ensures that rooms aren’t lost too quickly due to temporary payment failures.
How to enable: Select “YES” to convert failed payment bookings into Enquiries, or “NO” if you want the booking to remain in confirmed status or be canceled right away.
Set Expiry for Enquiry Bookings:
What it does: This setting lets you decide how long a booking will remain in an Enquiry state before it expires. During this time, the room is held for the guest, and the payment can still be completed.
How it works:
You can set the Expiry Hours to specify how long the booking will stay as an Enquiry.
There are two Expiry Types:
From the time of booking creation: The expiry countdown starts as soon as the booking is made.
Before check-in: The expiry countdown is based on the check-in date and time.
Why you should use it: It gives flexibility on how long to hold a room for guests who haven’t completed their payments. Setting this appropriately ensures you can free up rooms for other bookings if the payment isn’t completed in time.
How to set it up: Enter the number of hours for the expiry and select whether the timer starts from the time of booking or before check-in.
Partial Payment Setting.
What it does: This feature allows you to charge a percentage of the booking amount upfront instead of the full amount.
How it works:
You can set a specific percentage (e.g., 50%, 100%) of the total booking amount to be collected at the time of booking.
For example, if you set the percentage to 50%, guests will be charged half the total amount when they book, and the remaining amount can be charged later (e.g., at check-in).
Why you should use it: This can help secure bookings with a smaller payment upfront, giving guests more flexibility while still confirming the reservation.
How to set it up: Use the slider to choose the percentage of the booking amount you wish to charge when the booking is made.
Payment automation in Stayflexi helps properties manage payments more efficiently by automating processes like payment collection, applying cancellation policies, and handling failed payments. Each of these settings provides flexibility in how payments are handled, ensuring that hotel owners can streamline operations while providing guests with a smooth booking experience.
What is the Payment Automation Dashboard and what can I monitor there?
The Payment Automation Dashboard in Stayflexi is designed to give hotel owners and managers a clear and detailed overview of their payment activities. This dashboard allows you to monitor various aspects of payments, including automated payments, manual payments, and payments by type (like cash, card, etc.). By using this dashboard, you can track how payments are processed daily, understand the volume by payment methods, and see important details related to failed or successful payments.
What Can You Monitor on the Dashboard?
Total Payments (Automated vs. Manual)
Top section: You can see the total volume of payments processed, divided between automated and manual payments. This helps you understand the extent to which payment automation is being used and how much manual intervention is needed.
Payments by Day
Top middle section: A graph shows the volume of payments for each day of the month, giving you insights into daily payment trends. This can help you spot patterns, such as when guests tend to make more payments (e.g., weekends vs. weekdays).
Payment by Type
Top right graph: This section breaks down payments by different methods—cash, card, bank transfers, and online payments. You can easily see which payment methods are most popular among guests.
Manual vs. Automated Payments
Middle section: This chart distinguishes between payments that are handled automatically (through booking engines or payment processors) and those handled manually. It shows the total revenue from each method.
Gateway Payments by Day
Bottom right graph: This shows payments that went through various gateways (such as Stripe, Razorpay, etc.) over specific days. It helps you track gateway performance and identify any issues related to specific payment providers.
Table for payments, refunds, transfers, and reversals (Detailed View)
Bottom section: This table shows a detailed list of individual transactions, including date, amount booking ID, guest name, payment type, gateway name, payment gateway ID, and source of payment.
Step-by-Step Explanation:
Log in to Your Stayflexi Dashboard:
Enter your username and password to log in.
Go to Dashboard:
After logging in, click the “More Apps” icon (represented by four boxes or blocks) in the top right corner.
From the dropdown menu, select Payments(as shown in Image 1).
You will see the Dashboard option with various graphs and data tables.
Review Total Payments (as shown in Image 2):
At the top of the dashboard, you’ll see the total payments processed today. This includes both automated and manual payments, so you can quickly gauge how much revenue has been collected.
Check Payments by Day(as shown in Image 3):
Look at the “Payments by Day” graph to understand payment trends over the month. The taller bars indicate days with higher payment volumes.
This helps you predict busier times or peak days for payments.
Analyze Payments by Type(as shown in Image 3):
The “Payments by Type” graph gives you a breakdown of the payment methods used (cash, card, etc.). This is useful for understanding guest preferences and ensuring your payment methods are adequately supported.
Compare Automated vs. Manual Payments(as shown in Image 4):
Check the graph that compares manual and automated payments. If you notice that manual payments are higher, you might want to adjust your settings to enable more automation.
View Gateway Payments by Day(as shown in Image 4):
The “Gateway Payments by Day” chart tracks the payments processed through payment gateways like Stripe and Razorpay. This shows which payment providers are being used most often and allows you to monitor gateway-specific trends.
Monitor Individual Transactions(as shown in Images 5 and 6):
At the bottom, you will see a table with details of each payment, refunds, transfers, and reversal. Use this table to:
Confirm amounts.
Check the booking IDs
Payment gateway IDs etc.
The Payment Automation Dashboard gives you a clear and comprehensive overview of how payments are being processed for your hotel. By monitoring this dashboard, you can ensure smooth operations, identify any issues quickly, and make informed decisions to improve your payment processes.
How do I configure Payment Automation in Stayflexi?
Below is the step-by-step guide to configuring payment automation in Staflexi:
Login to Stayflexi Dashboard:
Start by logging into your Stayflexi account using your credentials.
Go to Payment Configuration:
After logging in, click the “More Apps” icon (represented by four boxes or blocks) in the top right corner.
From the dropdown menu, select Payments
On the Payment page, click the Payment Configuration option
Enable Payment Automation
Toggle the switch next to the Enable Payment Automation section to activate this feature.
What it does: This enables automatic payment collection from guests at the time of booking or during check-in, depending on the OTA (Online Travel Agent) or the type of payment selected.
Benefit: Streamlines the payment process and reduces the chances of failed payments going unnoticed.
Choose Channels for Payment Automation
In the Apply Payment Automation to These Channels section, select the OTAs (e.g., Booking.com, Expedia) where you want payment automation enabled.
Use the dropdown menu to choose one or multiple channels.
What it does: Ensures that for the selected channels, the system automatically attempts to charge the guest’s credit card at the time of booking or check-in.
Benefit: You can control which channels are enabled for automated payment, providing flexibility in handling different OTA payment rules.
Enable or Disable the Cancellation Policy
Toggle the switch next to Enable Cancellation Policy.
What it does: When this feature is enabled, the system automatically charges the guest for non-refundable bookings right after the booking is confirmed. For partially refundable bookings, payments are processed after the refundable period expires.
Benefit: Automates cancellation charges, ensuring properties comply with their cancellation policies without manual involvement.
Configure Failed Payment Handling:
In the section labelled Convert Booking into an Enquiry When Payment Fails, you can decide what happens when a guest’s payment fails.
Select “YES”: If you want the booking to be converted into an enquiry, which will hold the room inventory for a certain period (defined by expiry hours) while waiting for the guest to make a successful payment.
Select “NO”: If you want the booking to remain confirmed even if the payment fails, keep the room inventory locked for the guest.
What it does: Helps you manage failed payments by either downgrading the booking to an enquiry (with time limits) or keeping it confirmed, giving flexibility to your booking management process.
Benefit: Avoids the risk of overbooking and allows you to retain control over room inventory in case of payment failures.
Set Expiry Time for Enquiry Bookings (Optional):
If you’ve opted to convert failed payments into enquiries, you’ll need to set the expiry time for the enquiry.
In the Expiry Hours field, specify how long (in hours) you want to hold the booking as an enquiry before releasing the inventory.
In the Expiry Type dropdown, choose the reference point (e.g., from the time of enquiry) for calculating expiry.
What it does: Ensures that room inventory isn’t held indefinitely, releasing it if the guest does not make the payment within the set time.
Benefit: Ensures rooms are available to other potential guests if payments aren’t completed within a reasonable time frame.
Save Your Settings(as shown in Image 4):
After configuring all the options, make sure to Save the settings to apply the changes to your property’s payment automation system.
Benefit: Your property will now automatically handle payments and cancellation policies based on the rules you’ve set, helping you manage bookings and payments more efficiently.
What happens if the payment fails due to an invalid guest card?
If a guest’s payment fails due to an invalid credit card, Stayflexi offers automated processes to handle the situation. Follow this step-by-step breakdown of what happens next and how the system manages the failed payment.
System Tries to Process Payment(refer the above given Image):
When a guest makes a booking, Stayflexi’s payment automation system attempts to charge the credit card provided by the guest during the booking process (either at the time of booking or during check-in depending on the channel and configuration).
Payment Failure:
If the guest’s credit card details are invalid or the payment is declined, the system automatically detects the failure.
Email Notification to Guest (refer the above given Image):
The system sends an automated email to the guest informing them that their payment could not be processed.
The email will contain a request for updated card information, urging the guest to provide new, valid payment details.
Benefit: This ensures that the guest is promptly informed and allowed to resolve the issue without delay.
Booking Converted to Enquiry (refer the above given Image):
If you have enabled the Convert Booking into an Enquiry When Payment Fails option, the booking will be converted into an enquiry status.
What does this mean?: An enquiry status means that the room is held in the system, but the booking is not confirmed until the payment is completed.
The room inventory will be reserved for a specific period (defined by expiry hours) to give the guest time to resolve their payment issue.
Example: If you have set the enquiry expiry to 24 hours, the guest has 24 hours to update their card information before the room is released for other bookings.
Expiry Hours for Enquiry Bookings(refer the above given Image):
You can configure the expiry hours for the enquiry under the Set Expiry for Enquiry Bookings section.
After the defined expiry time (e.g., 24 hours), if the guest does not provide updated payment information, the room will be automatically released back into inventory, making it available for other guests to book.
Benefit: This ensures that rooms aren’t blocked indefinitely by bookings with failed payments, allowing the property to maximize room availability.
Booking Remains Confirmed (refer the above given Image):
If the Convert Booking into Enquiry option is disabled, the booking will remain confirmed even if the payment fails.
The system will continue to hold the room for the guest, but the payment will still need to be resolved before check-in.
Benefit: This gives flexibility in managing bookings for important guests, and keeping their reservations confirmed while they work on resolving payment issues.
By the above options, if a guest’s payment fails due to an invalid credit card in Stayflexi, the system will:
Automatically send an email to the guest requesting updated card details.
Convert the booking into an enquiry (if configured), holding the room for a specific period.
Allow you to set an expiry time for enquiry bookings, releasing the room if no payment is made within the time frame.
Keep the booking confirmed (if you choose not to convert it to an enquiry), allowing the guest time to resolve the payment issue.
This automation ensures that failed payments are handled efficiently while protecting your property’s inventory from being blocked by unconfirmed bookings.
How is the guest’s card charged? Is it based on the cancellation policy set in Stayflexi?
Yes, the guest’s card is charged based on the cancellation policy that you have configured in Stayflexi. The system automates the payment process, taking into account the specific terms of your cancellation policy, which determines how and when the guest is charged. Below is a step-by-step explanation of how the guest’s card is charged and how the cancellation policy influences this process.
Set Up Cancellation Policy:
In Stayflexi, you can set up different cancellation policies (e.g., non-refundable, partially refundable) for your property through Property configuration.
Non-refundable policy: The entire booking amount will be charged upfront after the booking is confirmed.
Partially refundable policy: The system will process the payment based on the refundable time period you have set.
Example:
Non-refundable: Guests are charged immediately and cannot get a refund if they cancel.
Refundable up to 48 hours before check-in: Guests are charged after the refundable period expires (48 hours before check-in).
Guest Makes a Booking:
When the guest makes a booking through your property, Stayflexi’s system attempts to charge the guest’s card according to the payment automation settings and the specific cancellation policy applied to the booking.
Charging the Guest’s Card Based on Cancellation Policy
Depending on the cancellation policy configured:
For Non-Refundable Policies:
The system will automatically charge the full amount immediately after booking confirmation.
Since the booking is non-refundable, the guest won’t be able to cancel for a refund.
This helps ensure that you secure payment for the room regardless of any cancellation requests from the guest.
For Partially or Fully Refundable Policies:
If you have set a refundable window (e.g., cancel within 48 hours before check-in), the system does not charge the guest’s card immediately.
Instead, the card will be charged after the refundable window expires.
For example, if the guest cancels within the allowable window, they won’t be charged, but if they cancel after the window, the card will be charged as per the policy.
Example:
If the cancellation policy allows free cancellation up to 48 hours before check-in, the system will automatically charge the guest’s card 48 hours before the check-in time.
If the guest cancels before that time, no charge is made.
Handling Failed Charges:
In cases where the guest’s card is invalid or the payment fails, Stayflexi’s automated email system will notify the guest and request updated card information.
If the payment cannot be processed, the booking can be converted to an Enquiry booking (based on your configuration), and the room inventory will be held for a specific period until the issue is resolved.
After Cancellation Window Expires:
If the guest’s booking falls under a refundable policy and the cancellation window expires without cancellation, the system will automatically charge the guest’s card according to the policy.
If you enable Payment Automation, this entire process happens automatically without manual intervention.
Tracking Charges:
All charges (whether automated or manual) can be tracked and reviewed in Stayflexi’s dashboard, allowing property managers to monitor payments for each booking.
Does Stayflexi offer the option to charge a booking partially or in full?
Yes, Stayflexi allows properties to charge a booking either partially or in full, depending on how you configure the payment and cancellation policies. The system offers flexibility to property owners, enabling automated payment handling based on your preferences. Below is a step-by-step explanation of how you can configure partial or full charges for a booking in Stayflexi.
Log in to Your Stayflexi Dashboard:
Enter your username and password to log in.
Go to Payments
After logging in, click the “More Apps” icon (represented by four boxes or blocks) in the top right corner.
From the dropdown menu, select Payments
Click on the Payment Configuration option.
Navigate to Payment Automation Configuration:
In the Payment Configuration page, you should see the following options Enable Payment Automation, Apply Payment Automation to These Channels, and Enable Cancellation Policy.
Enable Payment Automation
Toggle the switch to Enable Payment Automation.
This ensures that the system will handle payments automatically without manual intervention.
Once enabled, the system will automatically charge guests based on the rules you define, whether partially or fully.
Choose the Payment Automation Channels:
In the Apply Payment Automation to These Channels section, you can select which online channels will apply these automation rules (e.g., Booking.com, Expedia).
If the channel supports partial payment, you can apply the settings to that channel, ensuring seamless payment processing for bookings coming from different platforms.
Configure Partial or Full Charges:
Full Charge Setup (For Non-Refundable Bookings)
If you want to charge the guest the full amount immediately:
Ensure that your Cancellation Policy is set to non-refundable (this usually indicates the booking is fully charged at the time of booking).
You can configure this under the Enable Cancellation Policy toggle. Turn it on, and set the full charge as the default for non-refundable bookings.
Once the booking is confirmed, the guest’s card will be charged for the entire amount, guaranteeing full payment upfront.
Partial Charge Setup (For Refundable Bookings):
If you want to charge only a portion of the booking amount upfront:
Set the Cancellation Policy to allow for refundable bookings.
In the Payment Settings, configure the system to charge a partial deposit. This could be a percentage of the total (e.g., 20% upfront).
Under the payment rules, set the remaining balance to be charged closer to the check-in date.
Set Triggers for Payments:
You can configure specific triggers for payments:
Full charge at the time of booking for non-refundable reservations.Partial charge (e.g., a deposit) when the booking is made, and set the system to collect the remaining amount before check-in or when the refundable window closes.
Monitor and Track Payments:
In the dashboard, you can track the status of payments, whether they were charged partially or in full.
If the guest’s card fails or if a partial payment is pending, Stayflexi will display this information, allowing you to follow up if necessary.
Handling Failed Payments:
If a payment fails (e.g., invalid card details), Stayflexi will automatically notify the guest and prompt them to update their card information.
Depending on your policy, the booking can be converted to an Enquiry, and the room will be held for a set number of hours until the guest resolves the payment issue.
Save Your Configuration:
After setting all payment policies (whether full or partial), make sure to save your settings.
The system will then automatically apply these rules to all future bookings that meet the criteria.
Property Configuration
Easily customize your property’s setup with Stayflexi’s Property Configuration feature. From room configurations to pricing and policies, this feature gives you full control over how your property operates. Adjust settings, manage amenities, and define special rules to match your specific needs, all from one centralized platform. Stayflexi’s Property Configuration simplifies the setup process, ensuring your property’s details are accurate and aligned with your operational goals, with complete control at your fingertips.
Overview of Property Configuration
In Stayflexi, Property Configuration is a module that enables hotel administrators to set up and manage various operational and customizable aspects of their property within the Stayflexi system.
To access and manage your Property Configuration settings:
Log in to Stayflexi Start by logging into your Stayflexi dashboard with your admin credentials.
Go to More Apps On the right-hand side (RHS) of your dashboard, click on “More Apps.”
Open Property Configuration From the list of available modules that appears, select “Property Configuration.” This will take you to the section where you can manage key setup elements such as rooms, rates, channels, taxes, fees, policies, meal plans, and more.
On the LHS, you will see several categories. Each category contains multiple configuration options — simply click the dropdown arrow to expand and view all available settings.
1. Property Setup
Under Property Setup, you can manage all essential configurations related to your property. This includes:
Property Details – Update general information such as name, address, contact details, and branding.
Rate Plans – Create or edit rate plans, meal plans, and associated pricing.
Folio Setup – Configure how charges, payments, and folios are structured.
Shift Setup – Manage shift timings for your staff or front desk operations.
Hotel Add-ons – Add or modify extra services such as breakfast, pickup/drop, amenities, etc.
Hourly Price Configuration – Set pricing for hourly stays (if applicable).
Flexible Slot Settings – Configure flexible check-in/check-out slots used for day-use or short stays.
Other Settings – Manage additional property-level preferences and operational rules.
POS Device Configuration – Set up your POS devices for billing and room posting.
2. Policies
Under the Policies category, you can configure all rules related to cancellations, modifications, and overall hotel guidelines. This includes:
Cancellation Policies Define how cancellations are handled, including charges, deadlines, and refund rules.
Amendment Policies Set rules for booking modifications such as date changes, room changes, or guest information updates.
Hotel Policies (Terms & Conditions) Add or update the general hotel rules, guest guidelines, check-in/check-out terms, smoking policies, pet policies, and other terms & conditions.
3. Tax and Fee Categories
In this section, you can configure all tax- and fee-related settings applicable to your property or group of properties:
Tax Categories Set up standard tax configurations, including GST, service tax, occupancy tax, or any government-mandated tax.
Group Tax Categories Create and manage tax templates that can be applied across multiple properties within your group.
Custom Tax Categories Add any additional or property-specific taxes that do not fall under standard categories.
Fee Categories Configure various fee types such as service fees, cleaning fees, resort fees, or any other predefined charges.
Group Fee Categories Create fee structures that can be applied at the group level for consistent configuration across all properties.
4. Notifications
Under the Notifications category, you can configure automated communication settings for both guests and hotel staff:
Guest Notifications Set up emails, SMS, or WhatsApp messages sent to guests — including booking confirmations, pre-arrival messages, check-in/out notifications, invoices, and more.
Hotelier Notifications Configure alerts and updates for your internal team, such as new bookings, cancellations, modifications, payment alerts, or housekeeping updates.
Guest Review Manage and customize automated review requests sent to guests after their stay, helping you collect valuable feedback and improve service quality.
5. Channel Manager
The Channel Manager section allows you to connect and manage all your online distribution channels seamlessly:
Channel Mapping Map your room types, rates, and inventory with OTAs (such as Booking.com, Expedia, Airbnb, Agoda, etc.) to ensure real-time sync across all platforms.
Rentals United If you use Rentals United as your distribution hub, you can configure and manage the integration here for automated channel updates.
Custom Booking Sources Create and manage additional booking sources such as corporate accounts, travel agents, direct offline bookings, or any custom-defined channel.
6. Booking Engine
The Booking Engine section allows you to customize and manage how your property or group appears and functions on your direct booking website.
Hotel Configuration Set up property-specific booking engine settings, including room visibility, images, amenities, policies, booking restrictions, promotions, and payment options.
Group Configuration Manage booking engine settings at the group level — allowing you to configure branding, group-wide policies, promotions, and centralized setup for all properties under the group.
7. Magic Link & Kiosk
This section allows you to configure your contactless check-in experience and streamline guest arrival processes.
Configuration Manage overall Magic Link and Kiosk settings, including check-in flow, required guest details, ID upload settings, payment requirements, and customized guest instructions.
Common Area Lock Codes Add or manage lock codes for shared spaces such as entrances, lounges, gyms, or co-living areas. These can be automatically shared with guests through the Magic Link.
Room-Wise Check-In Instructions Set specific instructions for each room — such as door lock codes, access guidelines, special directions, or any room-specific arrival notes. These appear in the guest’s Magic Link at check-in time.
8. Users & Access Controls
This section helps you manage who can access the system and what level of permissions they have.
Roles and Access Create and configure different user roles (e.g., Front Desk, Housekeeping, Manager). Define permissions for each role to control what they can view, edit, or manage within the system.
Users Add new users such as staff, managers, or admins. Assign roles, set login credentials, and manage their access settings.
Active Users View all currently active users in the system. Monitor login activity, track user sessions, and manage access when needed.
9. Booking Import
The Booking Import section allows you to seamlessly upload and sync past or existing reservations into Stayflexi.
How can I show actual check-in and check-out times on invoices?
Below is the step-by-step guide to show actual check-in and check-out times on invoices:
Log in to Your Stayflexi Dashboard:
Enter your username and password to log in.
Go to Property configuration:
After logging in, click the “More Apps” icon (represented by four boxes or blocks) in the top right corner.
From the dropdown menu, select Property Configuration.
On the left-hand side of the Property Configuration page, you will see various options.
Click on the Property setup dropdown icon :
A list of different options will be displayed in the dropdown, including:
Property details
Folio setup
Shift setup
Hotel addons
Hourly price config
Flexible slot
Other settings
Click on the Folio setup option
The Folio configuration page will be displayed.
Setting up actual check-in and check-out times on invoices:
In the Folio setup page, scroll to the below option:
Show Actual Check-in and Checkout:
Enable the toggle.
Once enabled, the system will automatically include the guest’s real check-in and check-out times on all generated invoices and folios.
By this, you can show the actual check-in and check-out times on the invoices.
How do I configure room dependency pricing?
Below is the step-by-step guide to configuring room dependency pricing in Property Configuration:
Logging into Your Stayflexi Dashboard
Enter your username and password to access your Stayflexi dashboard.
Accessing Property Configuration
After logging in, click on the More Apps icon (shown as four blocks) located in the top-right corner.
From the dropdown, select Property Configuration.
Navigating to Property Setup
On the left side of the Property Configuration page, you’ll see a menu with various options.
Click on the Property Setup dropdown to reveal additional options, including:
Property Details
Folio Setup
Shift Setup
Hotel Addons
Hourly Price Config
Flexible Slot
Other Settings
Select Property Details
Setting Up Room Dependency Pricing
On the Property Details page, locate the Manage Room Types section, where all room types are listed.
For each room type, click the three-dot menu to view options such as:
Edit Amenities
Edit Room
Select Edit Room to access the room’s details.
A section to edit room details will appear. Scroll down to the Derived Pricing – Room Category section:
Choose a Parent Room from the dropdown to set the base room for dependency pricing.
In the Dependency dropdown, select Yes to enable pricing dependence on the selected parent room.
In the Direction dropdown, specify whether to increase (+) or decrease (-) the price based on the parent room.
Enter a Value for the price adjustment.
Choose the Type of adjustment [percentage (%) or INR].
Click Save to apply your changes.
By this, you can configure the room dependency pricing.
Where can I configure all notifications sent to guests?
Below are the step-by-step guidelines to configure notifications sent to guests from Property Configuration:
Logging into Your Stayflexi Dashboard:
Enter your username and password to log in.
Go to Property Configuration:
Once logged in, click on the More Apps icon (represented by four blocks) in the top right corner.
From the dropdown menu, select Property Configuration.
Got to Notifications:
You’ll see various options on the left side of the Property Configuration page.
Click on the Notifications dropdown to reveal more options, including:
Guest notifications
Hotelier notifications.
Guest review
Click on the Guest notifications option.
Guest notifications:
In the Guest notifications page, you can control email and WhatsApp notifications sent to guests.
Email notifications:
It includes the following options and the Enable disable switch next to each option:
Notification when a booking is made
Notification when a booking check-in happens
Notification when a booking checkout happens
Notification when a booking cancellation happens
Notification when a booking modification happens
Notification when an online payment for a booking happens
Notification when a payment for a booking happens via a generated payment link
Notification when a Flex Collect payment fails
Notification when a Self Service check-in happens
Notification when a Self Service checkout happens
Notification when a Self Service early check-in/late checkout happens
Notification when a POS order is finished
Notification when a self-service POS order is created
Notification when an OTA booking is made
Direct Notification to Customers on check-in/Checkout for OTA Booking.
You can enable or disable any options by clicking ON an OFF switch next to each option.
WhatsApp notifications:
It includes the following options and the Enable disable switch next to each option:
Booking Confirmation
Self Checkin Notification
Early Checkin Notification
Late Checkout Notification.
You can enable or disable any options by clicking ON an OFF switch next to each option.
Save the configuration:
By clicking on the Save option, you can save the changes you have configured.
How to Create Users ?
To Create Users, follow the below mentioned steps:
Log in to your Stayflexi account using your credentials.
Click on the Four Grid (Apps) icon on the top right-hand side.
Select Property Configuration from the menu.
On the left-hand side panel, click on Access & Control.
From the dropdown options, select Users (second option).
On the Users page, click Add New User.
Enter the required details of the new user (name, email, contact information, etc.).
Assign the appropriate Roles & Access permissions.
Click Save to confirm.
Can I bulk upload bookings from another PMS into Stayflexi? What are the requirements?
Yes, You can bulk upload bookings from another PMS into Stayflexi by following the below-given steps:
Log into Your Stayflexi Dashboard:
Enter your username and password to sign in.
Navigate to Property Configuration:
Once logged in, click on the “More Apps” icon (four small blocks) in the top-right corner.
Select “Property Configuration” from the dropdown menu.
Go to Booking Imports:
In the left-hand menu, click on “Booking imports.”
This will take you to the page for uploading bookings in bulk.
Download and Fill Out the Template:
Click on the “Download template” button to get the file needed for bulk uploading.
Open the template and add all booking details in the format provided.
Upload Your Booking Data:
Once you’ve filled out the template, go back to the booking imports page.
Click on “Bulk import bookings” and follow the instructions that appear in the pop-up window.
Set the date format as needed, then click “Bulk upload booking.”
Finally, upload your completed file.
Your bookings will now be imported into Stayflexi!
This functionality allows you to seamlessly migrate your bookings to Stayflexi in manageable batches. Here is how it works: Import in Batches: You can upload reservations in batches of 500 bookings at a time. This allows for easier management and processing of large datasets. please be aware that uploading the same booking data twice will result in the bookings being marked as unassigned. This can cause confusion and issues.
What are custom booking sources, how can I create them, and how are they useful?
Custom booking sources allow property managers to define and track specific booking channels that aren’t part of the standard, integrated sources. For example, instead of only capturing bookings from well-known Online Travel Agencies (OTAs) or direct website bookings, custom booking sources let you track referrals from unique sources like local agencies, social media campaigns, corporate partnerships, or other specific sources.
Logging into Your Stayflexi Dashboard:
Enter your username and password to log in.
Go to Property Configuration:
Once logged in, click on the More Apps icon (represented by four blocks) in the top right corner.
From the dropdown menu, select Property Configuration.
Go to the Custom Booking sources:
Navigate to the “Channel Manager” section in the left-hand menu.
Select “Custom booking sources”.
Add a New Source:
On the Custom Booking Sources page, click on Add New Source. This will open a pop-up form for adding a new source.
Enter Source Details:
Segment: Select the category or segment that best represents your source, such as OTA if it’s an Online Travel Agency.
Sub-source: Select or type the name of the specific source within the chosen segment. This could be the name of a referral agency, a corporate client, or another unique channel.
Save the New Booking Source :
Click Save to add this source to your list of custom booking sources.
If you change your mind, you can click Cancel to exit without saving.
How Custom Booking Sources Are Useful:
Track and analyze revenue more accurately by understanding where your bookings are coming from. Once custom booking sources are created, you can select them when creating a reservation in Stayflexi PMS.
By following these steps, you can define and organize new booking sources that will make your revenue analysis more detailed and meaningful.
Uploading Room/Hotel Images: How can a property upload images of rooms and hotel facilities for the website?
Below are the step-by-step guidelines to upload images of rooms and hotel facilities for the website from Property Configuration:
Log in to Your Stayflexi Dashboard:
Enter your username and password to log in.
Go to Property configuration:
After logging in, click the “More Apps” icon (represented by four boxes or blocks) in the top right corner.
From the dropdown menu, select Property Configuration.
On the left-hand side of the Property Configuration page, you will see various options.
Click on the Property setup dropdown icon:
A list of different options will be displayed in the dropdown, including:
Property details
Folio setup
Shift setup
Hotel addons
Hourly price config
Flexible slot
Other settings
Click on the Property details option.
A page with all the details of the property and the details of room categories will be displayed.
Upload Hotel Images:
Once the Property Details page is displayed, you can see the Images at the beginning of the page.
Click the Edit icon on the first Image.
A pop-up will appear to upload the hotel image.
Select the Click or Drop here option.
Select the Images from your system and add them here or you can just drag and drop the Images.
Click on the Save option to save the Hotel Images.
You can also remove the Images by clicking on the cross option on the Image.
Upload Room Images:
On the Property Details page, find the Manage Room Types section, where all room types are listed.
On room type, click the edit icon on the left-hand side of the room type.
A pop-up will appear to upload Room-type images.
Select the Click or Drop here option.
Select the Images from your system and add them here or you can just drag and drop the Images.
Click on the Save option to save the Room Images.
You can also remove the Images by clicking on the cross option on the Image.
How to change the Room Type name ?
Steps to change the room name:
Log in to your Stayflexi dashboard.
Click on More Apps (represented by the four-block icon) and select Property Configuration.
Navigate to Property setup.
Scroll down to the Manage room type section.
On the required room type, click on the three dots (⋮) to view more options.
Click on Edit room.
In the first column, update the Room Name as required.
Click Save to apply the changes.
How do I update hotel details like website URL, address, description, logo, or phone number?
Below are the step-by-step guidelines to update hotel details like website URL, address, description, logo, or phone number from Property Configuration:
Log in to Your Stayflexi Dashboard:
Enter your username and password to log in.
Go to Property configuration:
After logging in, click the “More Apps” icon (represented by four boxes or blocks) in the top right corner.
From the dropdown menu, select Property Configuration.
On the left-hand side of the Property Configuration page, you will see various options.
Click on the Property setup dropdown icon :
A list of different options will be displayed in the dropdown, including:
Property details
Folio setup
Shift setup
Hotel addons
Hourly price config
Flexible slot
Other settings
Click on the Property details option.
A page with all the details of the property and the details of room categories will be displayed.
Update or Edit Hotel Details:
In the Property details page, click on the Edit details option just above the property name.
All the Hotel details are displayed in the Edit Hotel Details section.
In this section, you can edit or update the details of the property/hotel, including:
Property Name
Property Official Website (for updating website URL)
Address
Property Description
Logo
Phone number
Total room count
By clicking on any of the textboxes, you can edit or update the Property details and click on the Save button to save the changes made.
Setting Room Occupancy: How do I define maximum occupancy, including adults, children, and infants, along with age limits for rooms?
Below are the step-by-step guidelines for setting room occupancy:
Logging into Your Stayflexi Dashboard:
Enter your username and password to log in.
Go to Property Configuration:
Once logged in, click on the More Apps icon (represented by four blocks) in the top right corner.
From the dropdown menu, select Property Configuration.
Navigating Property Setup:
On the left side of the Property Configuration page, you’ll see various options.
Click on the Property Setup dropdown to reveal more options, including:
Property Details
Folio Setup
Shift Setup
Hotel Addons
Hourly Price Config
Flexible Slot
Other Settings
Click on the Property Setup option.
Setting up room occupancy:
On the Property Details page, find the Manage Room Types section, where all room types are listed.
On room type, click the three-dot menu on the room type to display the following options:
Edit Amenities
Edit Room
Select Edit Room to see room details.
A section to edit room details appears, where you can see various options:
To set room occupancy for maximum occupancy, including adults, children, and infants, along with age limits, do the following:
To set max room occupancy: Click on the Room max occupancy field.
For adults: Click on the Max adults field.
For children: Click on Max children(7-12 years) field
For infant: Click on the Max infant (0-6 years) field
For minimum and maximum child age: Click on the Min child age and Max child age field
For minimum and maximum infant age: Click on the Min child age and Max infant age field
After setting up everything, click on the Save button to save all the defined occupancy.
By following these steps you can define room occupancy.
What is folio configuration, and what can I do with it?
Folio Configuration is the settings area in your PMS where you control how guest folios, invoices, registration cards, and related financial documents are displayed, formatted, and generated. It lets you customize the layout, content, numbering, and rules used across all billing documents in your property.
Folio Configuration is organized into the following sections: 1. Display & Content 2. PDF & Print Settings 3. Registration Card 4. Other Settings 5. Custom Folio Sequencing
To access and manage your Property Configuration settings:
Log in to Stayflexi Start by logging into your Stayflexi dashboard with your admin credentials.
Go to More Apps On the right-hand side (RHS) of your dashboard, click on “More Apps.”
Open Property Configuration From the list of available modules that appears, select “Property Configuration.” This will take you to the section where you can manage key setup elements such as rooms, rates, channels, taxes, fees, policies, meal plans, and more.
Display Content Settings (Folio Configuration)
Below are all the options available under Display Content and what each one does:
Show Cancellation Policy in Folio (Toggle) Enable this to display the property’s cancellation policy on guest invoices and folios.
Show Signature (Toggle) Enables a section on the folio for guest or staff signatures, useful for check-in confirmations or billing approval.
Folio Log (Toggle) Shows a chronological log of folio activities such as added charges, edits, payments, and adjustments.
Folio Terms and Conditions (Toggle) Displays your property’s terms & conditions on the folio for guest acknowledgment.
Folio Display Phone Number (Field) Enter the phone number you want displayed on the folio (property contact number).
Folio Display Email (Field) Enter the email address that should appear on the folio for guest communication or support.
Booking Folio Header (Field) Customize the header text displayed on top of the folio (e.g., “Tax Invoice,” “Guest Folio,” “Billing Summary”).
Hide Stayflexi Booking ID (Toggle) Enable this if you don’t want the Stayflexi-generated booking ID to appear on the folio.
Hide Room Booking Charges on Registration Card for OTA Bookings (Toggle) Hides nightly room rates on the registration card when the reservation comes from OTAs like Booking.com, Agoda, etc.
Show Terms on Guest Emails (Toggle) When enabled, the system includes your terms and conditions in all automated guest emails.
Show Actual Check-in and Checkout (Toggle) Displays the guest’s actual check-in and check-out timestamps on generated invoices and folios.
PDF & Print Settings (Folio Configuration)
Below are the available options under PDF & Print Settings and what each one controls:
Choose the Logo Size Select the size of the property logo that appears on the folio/invoice PDF.
Choose the Invoice PDF Font Size Set the default font size for text on all invoice PDFs. (Helps ensure the document is easy to read and fits properly on a page.)
Choose the Margin Top Adjust the top margin of the invoice PDF. (Useful when printing on pre-formatted paper or aligning content under the logo.)
Invoice Date Rule Choose how the invoice date should be generated—such as booking date, check-out date, or actual invoice creation date. (Ensures consistency with your accounting or audit processes.)
Folio PDF Layout Select the layout/template for the folio PDF.
Registration Card Settings
Show Room Tariff on Registration Card (Toggle) Displays the nightly room rate on the registration card.
Enable to show the tariff to guests at check-in.
Disable if you prefer not to reveal pricing (especially for OTA bookings).
Registration Card Preference (Dropdown / Setting) Choose the preferred format or template for registration cards.
Show Registration Card Number (Toggle) Displays a unique registration card number on the document. (Helpful for record keeping, audits, or internal tracking.)
Show Cancellation Policy on Registration Card (Toggle) Includes the property’s cancellation policy directly on the registration card. (Ensures guests acknowledge policy terms during check-in.)
Show Terms & Conditions on Registration Card (Toggle) Adds your terms & conditions section to the registration card. (Useful for legal compliance and guest consent.)
Choose the Registration Card PDF Font Size (Field / Selector) Set the preferred font size for the PDF version of the registration card. (Helps improve readability or fit more content on a single page.)
Other Settings
Show HSN Code (Toggle) When enabled, the HSN/SAC code will be displayed on the invoice/folio for applicable taxable items.
High Balance Alert Configuration Set the threshold amount at which the system should trigger a high-balance alert for a reservation. (Helps front-office staff monitor outstanding balances and avoid checkout delays.)
Folio Footer Configuration Add or customize the footer text that appears at the bottom of all folios and invoices. (Commonly used for disclaimers, bank details, thank-you notes, or legal statements.)
Custom Folio Sequencing Configure how folio numbers are generated — set custom prefixes, formats, or numbering rules. (Useful for aligning invoice numbering with accounting standards or property-specific workflows.)
Custom Folio Sequencing
Booking Folio Prefix Enter a custom prefix that will appear before every folio number.
Booking Folio Sequence Start Set the starting number for the folio sequence. (Example: starting from 1, 1000, or any preferred number.)
Booking Folio Suffix Add a suffix that will appear at the end of each folio number. (Example: -A, -STAY, -NY.)
Generate Custom ID for Cancelled and No-Show Bookings (Toggle) Enable this to assign a separate custom folio ID format for bookings that are cancelled or marked as no-show.
After making any changes in the Folio Configuration section, click the Save button on the right-hand side to ensure all updates are applied and stored.
How do I set up property tax, custom tax, and fee categories?
Tax categories: A Tax category can be used to calculate and apply tax in a variety of places. For example, defining tax for a room type, tax for an item being added to an invoice or tax for products in a shop.
Custom tax categories: A Custom tax property is used to define and configure specific tax rules for their property.
Fee categories: A Fee category can be used to calculate and apply fees in a variety of places. For example, defining fee for a room type, fee for an item being added to an invoice, or fee for products in a shop.
Below are the step-by-step guidelines for amenities both at the property and room level from Property configuration:
Logging into Your Stayflexi Dashboard:
Enter your username and password to log in.
Go to Property Configuration:
Once logged in, click on the More Apps icon (represented by four blocks) in the top right corner.
From the dropdown menu, select Property Configuration.
Navigating Tax and fee categories:
On the left side of the Property Configuration page, you’ll see various options.
Click on the Tax and fee categories dropdown to reveal more options, including:
Tax categories
Group tax categories
Custom tax categories
Fee categories
Group fee categories
Create Tax category:
Click on the Tax Categoriesoption from the Tax and Fee Categories dropdown.
Click on the Add New Tax Category button at the top of the Tax Categories page.
Tax category section will appear:
Enter the Tax name and Tax percentage.
Click on the Save button to save the Tax category.
Create Custom tax category:
Click on the Custom Tax Categories option from the Tax and Fee Categoriesdropdown.
Click on the Add New Custom tax button at the top of the Custom tax Categories page
Create custom taxes based on various factors such as:
Tax Name: The name of the custom tax (e.g., service tax).
Tax Value: The percentage or fixed amount for the tax.
Room Type: The types of rooms or accommodations the tax applies to.
Per Person/Per Night: Option to apply the tax on a per-person or per-night basis.
OTA, Booking Engine, Walk-in: The ability to specify whether the tax applies to bookings from Online Travel Agencies (OTAs), the booking engine, or walk-in customers.
Click on the Save button to save the Custom tax category.
Create Fee category :
Click on the Fee Categories option from the Tax and Fee Categories dropdown.
Click on the Add New Fee Category button at the top of the Fee Categories page.
The fee category section will appear:
Enter:
Fee category name
Fee value
Value type dropdown which consists of:
ABSOLUTE
PERCENT
Fee type dropdown which consists of:
Per Booking
Per Room
Per Room Night
You can select the checkbox next to Apply for walk-ins section if required.
Click the Save button to save the Fee category.
Managing Property and Room Amenities: How do I control amenities at both the property and room level?
Below are the step-by-step guidelines to amenities both at the property and room level from Property Configuration:
Logging into Your Stayflexi Dashboard:
Enter your username and password to log in.
Go to Property Configuration:
Once logged in, click on the More Apps icon (represented by four blocks) in the top right corner.
From the dropdown menu, select Property Configuration.
Navigating Property Setup:
On the left side of the Property Configuration page, you’ll see various options.
Click on the Property Setup dropdown to reveal more options, including:
Property Details
Folio Setup
Shift Setup
Hotel Addons
Hourly Price Config
Flexible Slot
Other Settings
Viewing and Editing Property Details:
Select Property Details (the first option on the left).
A page will open showing all your property information, including room categories.
Managing Property Amenities:
On the Property Details page, look to the right side for the Amenities section.
Click the icon next to Amenities.
A list of all available property-level amenities will appear.
You can:
Add or remove amenities.
Mark amenities as free or paid by using the buttons next to each amenity.
Managing Room Amenities:
On the Property Details page, find the Manage Room Types section, where all room types are listed.
On room type, click the three-dot menu on the room type to display the following options:
Edit Amenities
Edit Room
Select Edit Amenities to see all room-level amenities.
You can:
Add or remove amenities.
Make amenities free or paid by clicking the buttons next to each one.
This guide helps you quickly and easily manage both property-level and room-level amenities.
What is a fee category, and how can I use it?
A fee category in Stayflexi is used to define and apply various fees for room types and items being added to invoices. It allows you to set up different types of fees, such as room type, that will be automatically applied during the booking process.
Below is the Step-by-step guide on the Fee category in Property configuration:
Logging into Your Stayflexi Dashboard:
Enter your username and password to log in.
Go to Property Configuration:
Once logged in, click on the More Apps icon (represented by four blocks) in the top right corner.
From the dropdown menu, select Property Configuration.
Access the Fee Category Page:
Click on the “Tax and Fee Categories” section.
Click on “Fee Categories” to add the fee categories.
Add a New Fee Category:
Click on the “Add New Fee Category” button.
A new form will pop up on the right side.
Provide a Fee Category Name:
In the “Fee category name?” field, enter a descriptive name for the fee. For example, you might call it a “Room Booking Fee” or “Entertainment Fee”.
This will appear in invoices automatically when creating a room reservation.
Set the Fee Value :
Under “Fee value?“, enter the amount for the fee.
Choose the Value Type from the dropdown:
Absolute: A fixed fee, like Rs.150 per booking.
Percentage: A percentage of the total amount, like 10% of the total amount.
Choose the Fee Type from the dropdown:
Per Booking: Applied for each booking.
Per Room: Applied for each room in a booking.
Per Room night: The fee will be applied for each room night. This means if a guest stays in one room for three nights, the fee will be applied three times (once per room night).
Save the Fee Category:
Once you’ve filled in all the necessary details, click the “Save” button.
The fee category will now be available and can be applied across the property for various services.
Creating Hotel Add-on Services: Where do I add extra services offered by my hotel?
Below are the step-by-step guidelines to create hotel add-ons from Property Configuration:
Logging into Your Stayflexi Dashboard:
Enter your username and password to log in.
Go to Property Configuration:
Once logged in, click on the More Apps icon (represented by four blocks) in the top right corner.
From the dropdown menu, select Property Configuration.
Navigating Property Setup:
On the left side of the Property Configuration page, you’ll see various options.
Click on the Property Setup dropdown to reveal more options, including:
Property Details
Folio Setup
Shift Setup
Hotel Addons
Hourly Price Config
Flexible Slot
Other Settings
Click on the Hotel Addons option.
Add Hotel Addons:
To create Hotel addons, click on the Add new hotel addon button on the top of the Hotel Addons page.
A section to fill in the required details to create a Hotel addon will appear.
Fill in the following to create the hotel addon:
Addon name
Addon description
Addon applicable at room types:
Click on the dropdown to select room types
You can select multiple rooms from the dropdown(For example: Suite, Deluxe rooms)
Tax category:
Select tax categories from the dropdown(.eg., Food tax or Alcohol tax, etc)
Addon value:
In the Addon value field, enter the price for the extra service your property offers.
For example, if airport pick-up costs Rs.150, enter 150.
Date Range: Select the date range you want to apply the addon to.
Do you want to apply per night?
Click the Yes or No switch.
Do you want to apply at the booking level?
Click the Yes or No switch.
Save to create the Addon:
Click on the Save button to create the Hotel Addon.
By following these steps you can easily create the hotel add-ons.
What is User and Access Control, and what is its purpose?
User and Access Control is a feature within the Stayflexi platform designed to manage the permissions and roles of users. The goal is to regulate what actions each user can perform and what parts of the system they can access based on their assigned roles.
Below is a step-by-step explanation of how this system works for end users:
Accessing User and Access Control:
Log into your Stayflexi account with your credentials.
Once logged in, click on the More Apps icon (represented by four blocks) in the top right corner.
From the dropdown menu, select Property Configuration.
Under Property configuration, the are various options.
Click on Users and Access Controls to reveal the following key sections:
Roles and Access
User
Active Users
Roles and Access: This section lets you manage roles, which define specific permissions for users in the system. Here’s how it works:
Viewing Roles:
When you click on Roles and Access, you will see a list of predefined roles with a description and the access permissions granted to that role.
Creating a New Role:
You can add a new role by clicking Add a new role for general users or Add a new mobile role for mobile-specific roles.
In the role creation window, you can define the role name, and description, and specify which features or areas of the system the role should have access to (e.g., housekeeping reports, room management, etc.).
Editing Roles:
Existing roles can be modified by clicking the edit icon (pencil) next to the role name.
You can adjust permissions or make changes to reflect new responsibilities for that role.
Users :
This section allows you to manage users who have access to the Stayflexi platform. You can view, add, and edit user access details.
Add new user:
Click on the Add new user button.
A page will be displayed.
This page lets you create a new user in a system and assign multiple roles based on their responsibilities. You can adjust the user’s access level or revoke access at any time.
Enter the email ID and password of the user you want to create.
Enable the toggle net to the role which you want to assign to the user.
Click on the Save button to create the User.
You can also edit the user role, reset the password, and force logout the user respectively.
Active Users:
This section shows users who are currently active and logged into the software in real time.
It includes:
Search Bar: You can search for specific users who are actively logged in by entering their email ID.
Active Users List: Currently, the list of active users is empty, suggesting that no users are currently logged in.
Log Out All Users: This button allows you to log out all active users at once. This might be useful during maintenance or to ensure security by enforcing re-logins.
Purpose of User and Access Control:
Security: Limits access to sensitive information based on user roles, ensuring that only authorized personnel can view or modify critical data.
Operational Efficiency: By providing tailored access to different areas of the platform, employees can quickly and efficiently perform tasks relevant to their jobs.
Accountability: Role-based permissions help track which users are responsible for certain actions, providing a clear audit trail in case of errors or issues.
What are different type of policies I can configure in Stayflexi
In Stayflexi, you can configure various types of hotel policies, which include:
Cancellation Policies: Rules for handling booking cancellations and associated refunds.
Amendment Policies: Guidelines for making changes or amendments to existing bookings.
Hotel Policies (Terms and Conditions): General hotel rules like check-in/out times, usage of facilities, guest behavior, etc.
Below is the step-by-step guide to configure policies:
Logging into Your Stayflexi Dashboard:
Enter your username and password to log in.
Go to Property Configuration:
After logging in, click the “More Apps” icon in the top right corner (represented by four boxes or blocks).
From the dropdown menu, select Property Configuration.
On the left-hand side of the Property Configuration page, you’ll see various options.
Got to Policies:
Click on the Policies option.
Under Policies, you will see options like Cancellation Policies, Amendment Policies, and Hotel Policies (Terms and Conditions).
Cancellation policies:
Under the Cancellation policy, click on the Add new policy button.
You can create a cancellation/refund policy in this by filling in the below details:
Policy name: Give a name for the policy.
Policy description: Describe the policy.
Note: If the Add policy rule is created and the above checkbox beside the description section is not selected then this rule will reflect everywhere i.e. Booking Engine, Email, Room folio.
Enable toggle to apply the rule for all channels(optional).
Save the policy by clicking on the Save button.
You can also edit or disable the policies.
Amendment policies:
Select Amendment policies.
Here, you can create or edit amendment policies that govern how amendments to bookings will be charged.
Add a New Policy
Click on the Add New Policy button to create a new amendment policy.
Days Range
In this section, you set the days before the check-in date when amendments will not be allowed. You define the following:
Amendment not permitted within X and Y days prior to arrival date.
Enter the number of days (e.g., “10 and 5”) to specify the range within which amendments to bookings are not allowed.
Amendment Charges
You can set different charges for amendments, depending on how many times the booking is amended:
For first amendment: Specify the percentage (e.g., “0%”) of the booking amount that will be charged for the first amendment.
For the second amendment: Set a charge for the second amendment by entering a percentage (e.g., “5%”) of the booking amount.
For subsequent amendments: Set a percentage (e.g., “10%”) for any amendments beyond the second one.
Note: Modification can be allowed for the dates-This means users may modify the booking dates, and charges will be applied according to the set amendment policy.
Saving the Policy:
Once you’ve filled in all the necessary details (days range and amendment charges), click the Save button to save the policy.
This allows users to control how booking changes will be handled, including when they can be made and the cost for each amendment.
Hotel policies(terms and conditions):
Click on the Hotel policies(terms and conditions) option.
On this page, you can provide hotel rules like usage of facilities, guest behavior, etc.
Click on the Add new T&C button.
Here you can add the Hotel policy or Terms and conditions.
Click on the Save option.
Setting Minimum Room Price: How can I set a minimum price for a room category to avoid lower price updates?
Yes. You can set a minimum price for a room category by using Stayflexi’s Property configuration settings.
Below are the step-by-step guidelines for setting up minimum room price:
Logging into Your Stayflexi Dashboard:
Enter your username and password to log in.
Go to Property Configuration:
Once logged in, click on the More Apps icon (represented by four blocks) in the top right corner.
From the dropdown menu, select Property Configuration.
Navigating Property Setup:
On the left side of the Property Configuration page, you’ll see various options.
Click on the Property Setup dropdown to reveal more options, including:
Property Details
Folio Setup
Shift Setup
Hotel Addons
Hourly Price Config
Flexible Slot
Other Settings
Click on the Property Details option.
Setting up room occupancy:
On the Property Details page, find the Manage Room Types section, where all room types are listed.
On room type, click the three-dot menu on the room type to display the following options:
Edit Amenities
Edit Room
Select Edit Room to see room details.
A section to edit room details appears, where you can see various options.
To set minimum room price:
Click on the Minimum Room Price field.
After setting up the minimum room price, click on the Save button to save the minimum room price.
By following these steps you can set the Minimum room price.
How can I send automatic emails to guests after checkout to collect reviews?
Below are the steps to send automatic emails to guests after checkout to collect the reviews:
Logging into Your Stayflexi Dashboard:
Enter your username and password to log in.
Go to Property Configuration:
Once logged in, click on the More Apps icon (represented by four blocks) in the top right corner.
From the dropdown menu, select Property Configuration.
Got to Notification
On the left side of the Property Configuration page, you’ll see various options.
Click on the Notifications dropdown to reveal more options, including:
Guest notifications
Hotelier notifications.
Guest review
Click on the Guest review option.
This is where you can control review request emails.
Enable Guest Review Feedback:
On the “Guest Review” page, you will see an option for “Guest Review Feedback.”
Toggle the switch next to this option to enable it. Once enabled, the system will send an automated email to guests after they check out.
Set the Mode to Automatic :
There are two modes:
AUTOMATIC
MANUAL
Ensure that the Mode is set to “AUTOMATIC”. This ensures that the email will be sent automatically without any manual intervention after the guest checks out.
Enter Your Google Review/Feedback URL :
In the input field labeled “Paste your Google review/docs URL”, paste the URL for your property’s Google Review page.
You can obtain this URL by navigating to your property’s listing on Google, copying the review link, and pasting it into this field.
Alternatively, you can use a Google Docs form if you’d like to gather reviews through a custom form instead of Google Reviews.
Save and Confirm:
Once you’ve pasted the URL and enabled the review feedback toggle, ensure all changes are saved by clicking on the Update option.
The system will now send an email with the provided review link to guests after their checkout.
What are hotelier notifications, and how do they help?
Hotelier notifications are communication features of Stayflexi that allow hotel operators to receive important updates and reports related to their property. These notifications can be sent via email or messaging platforms like WhatsApp to keep the hotelier informed about key operations, such as daily reports, property updates, rate alerts, and more.
Below is a Step-by-Step Guide for End Users:
Logging into Your Stayflexi Dashboard:
Enter your username and password to log in.
Go to Property Configuration:
Once logged in, click on the More Apps icon (represented by four blocks) in the top right corner.
From the dropdown menu, select Property Configuration.
Go to the Notifications:
Navigate to the “Notifications” section in the left-hand menu.
Select “Hotelier notifications” to configure notifications sent to the hotel.
Configure Email Notifications:
Night Audit Report:
In the “Emails” section, locate the “Night audit report” field.
Enter one or more email addresses (separated by commas) to receive daily night audit reports. These reports provide a summary of property performance and operations for the day.
Make sure not to include any spaces before or after the commas when entering multiple email addresses.
Set Up WhatsApp Notifications:
WhatsApp Daily Report:
In the “Whatsapp” section, you can enable WhatsApp notifications to receive daily reports about the property.
Toggle the switch to activate WhatsApp notifications for reports and alerts.
Property Report via WhatsApp:
Enter your WhatsApp number(s) in the “Configure your WhatsApp numbers to receive the property report” field. Multiple numbers can be entered, separated by commas.
Rate Shopper Price Alerts via WhatsApp:
In the second WhatsApp configuration field, enter the numbers to receive price alerts for competitive properties or rate changes. This ensures that hoteliers can react quickly to market shifts.
After entering the required information, click “Save” to apply the changes.
Saving Changes:
Once you’ve set up your email and WhatsApp notifications, make sure to click the “Save” button at the bottom of the page. This will save your configuration and activate the notifications according to the inputted details.
Benefits for Hoteliers:
Timely Updates: Receive critical reports such as the night audit summary and property performance via email and WhatsApp.
Quick Response: Stay updated with rate shopper price alerts to react quickly to market conditions.
Customization: Control where and how notifications are sent by entering multiple recipients and contact numbers, ensuring key personnel are informed.
This guide will help you ensure that notifications are properly set up so you can stay on top of essential hotel operations.
What is shift setup, and how is it beneficial for my property?
Below is the step-by-step guide for Shift setup:
Logging into Your Stayflexi Dashboard:
Enter your username and password to log in.
Go to Property Configuration:
Once logged in, click on the More Apps icon (represented by four blocks) in the top right corner.
From the dropdown menu, select Property Configuration.
Go to Shift setup:
From the Property configuration, click on the Property setup option from the dropdown and navigate to Shift Setup.
Click on Shift Setup to open the shift setup page.
Add a New Shift:
At the top of the shift setup page, you’ll see a button labeled Add New Shift.
Click this button to create a new shift for your staff.
Enter Shift Name:
In the Shift Name? field, enter a name for the shift (e.g., Morning Shift, Evening Shift, etc.). This helps identify the shift later.
Set Start Time:
Under the Start Time? section set the shift’s start time.
Use the dropdown menus to select the start hour and start minute. For example, selecting 00 for both will set the shift to start at midnight.
Set End Time :
Similarly, under the End Time? section set the time when the shift ends.
Choose the end hour and end minute. For instance, selecting 23 for hours and 59 for minutes will set the shift to end at 11:59 PM.
Set Shift Status :
In the Status? dropdown, choose whether the shift is ENABLED or DISABLED.
If the shift is enabled, it will be active and available in the system.
Assign Staff Members :
In the Staff Names? field, enter the email addresses of staff members assigned to this shift.
You can list multiple staff members in the dropdown and can add multiple staff by clicking on the staff email ID.
Save the Shift Configuration :
After filling out the required fields (shift name, times, status, staff names), ensure all details are correct.
Click the Save to finalize and save the shift configuration.
Benefits of Shift setup for properties:
The Shift setup feature helps property managers easily manage staff shifts by defining working hours and assigning staff to those shifts. Staff outside his shift hour won’t be able to login into stayflexi PMS and access any information from PMS.
It ensures a clear schedule for operational efficiency and data privacy.
Single Slot vs. 3 Slots: What are single slot and 3 slots, and which option should I select for my property?
In the Stayflexi system, “Single Slot” and “3 Slots” refer to the way time blocks are allocated for bookings. The main difference lies in the flexibility and duration of the booking periods available.
Logging into Your Stayflexi Dashboard:
Enter your username and password to log in.
Go to Property Configuration:
Once logged in, click on the More Apps icon (represented by four blocks) in the top right corner.
From the dropdown menu, select Property Configuration.
Navigating Property Setup:
On the left side of the Property Configuration page, you’ll see various options.
Click on the Property Setup dropdown to reveal more options, including:
Property Details
Folio Setup
Shift Setup
Hotel Addons
Hourly Price Config
Flexible Slot
Other Settings
Click on the Flexible Slot option.
Go to the Edit slot mode option where you can set the slots to either Single slot or the Three slots.
Single Slot:
Definition: A “Single Slot” refers to fix check-in and check-out time a property can be booked. For example, if you select a single slot for a property, it might represent a booking window such as 12 PM check-in time to 11 AM check-out time (24 hours), which guests can book as one uninterrupted time block.
Usage: This option is commonly used for properties that want to offer straightforward, full-day, or fixed-period bookings without breaking the day into smaller chunks.
Best For:
Properties that offer standard check-in and check-out times (e.g., hotels, hostels).
Three Slots:
Definition: The “Three Slots” option divides the day into three distinct time slots, allowing the property to be booked multiple times throughout the day. For example, the day may be split into:
Morning slot: 8 AM to 4 PM
Evening slot: 4 PM to 12 AM
Night slot: 12 AM to 8 AM
Usage: This gives the property more flexibility to accommodate multiple guests during different parts of the day. It allows for more frequent bookings by splitting the availability into smaller blocks.
Best For:
Properties that offer short-stay or day-use options (e.g., hourly hotels, lounges, co-working spaces).
Maximizing revenue by booking the same property multiple times in a day.
Which Option to Select?
Single Slot: Choose this if your property typically handles longer stays or if you prefer simpler management with one guest per day.
Three Slots: Choose this if you want to maximize occupancy and revenue by accommodating multiple bookings per day. This is great for day use, hourly stays, or situations where flexibility is key.
Consider how often your property is booked and the type of guests you cater to when making the decision.
How can I set hourly rates for my property?
Below is the step-by-step guide to set hourly rates from Property configuration:
Logging into Your Stayflexi Dashboard:
Enter your username and password to log in.
Go to Property Configuration:
Once logged in, click on the More Apps icon (represented by four blocks) in the top right corner.
From the dropdown menu, select Property Configuration.
Navigate to Property setup:
On the left side of the Property Configuration page, you’ll see various options.
Click on the Property Setup dropdown to reveal more options, including:
Property Details
Folio Setup
Shift Setup
Hotel Addons
Hourly Price Config
Flexible Slot
Other Settings
Click on the Hourly Price Config option.
Configure Hourly Booking
Click on the Configure option on the right side of the page.
A new window will appear titled Configure hourly booking.
Enter the Date range during which the hourly rates will apply by selecting the start and end dates using the calendar picker.
In the example, the date range is from 17 Oct 2024 to 24 Oct 2024.
Set Room Types and Rate Plans.
Choose the Room types from the dropdown (you can select multiple Room types from the dropdown). This will apply hourly rates to the specific rooms.
Select a Rate plan from the dropdown (you can select multiple Rate plans from the dropdown). This will apply hourly rates to that specific rate plan.
Define Your Hourly Pricing.
In the Set your price section, specify the hourly Price.
Enter the rate value (for example, 30$) in the price input field.
Select whether this price is a Percent or a Flat value from the dropdown.
Define how long this rate is applicable by selecting the number of hours.
For example, this could be for “6 hours”.
Advanced Settings (Optional)
If you need advanced settings for managing multiple rates or different room types, click on the Click here button next to “If you need advanced settings for all your rates.”
This will open additional configurations, allowing you to fine-tune the pricing.
Save Your Settings
After setting up your hourly pricing, click on the Save button at the bottom.
The hourly rates will now be applied based on the configuration you’ve set.
Following these steps will ensure that your property’s hourly rates are properly configured and visible to customers booking for specific hours.
Night Audit
Simplify your end-of-day processes with Stayflexi’s Night Audit feature. This powerful tool automates daily reconciliations, including revenue tracking, payment verification, and occupancy reports. It ensures your financial data is accurate and up to date, reducing manual effort and errors. Stayflexi’s Night Audit gives you a comprehensive overview of your property’s daily performance, helping you close the day efficiently and start the next one with confidence. Perfect for properties of all sizes, it’s the seamless solution for managing your nightly operations.
Overview of Night Audit
The Night Audit is a key daily process in property management that ensures all transactions are accurately recorded and the property is ready for the next day. In Stayflexi, this process is streamlined to help properties efficiently manage their financials and operations at the end of each day.
Purpose of the Night Audit:
Check Financial Records:
Verifies all payments, room charges, and services used during the day.
Update Guest Accounts:
Makes sure that all charges and payments for each guest are correct.
Prepare for the Next Day:
Adjusts room availability and other details to ensure smooth operations.
Key Tasks in Stayflexi:
Review Transactions:
Automatically reviews all daily transactions, like room bookings and service charges.
Guest Account Review:
Ensures all guest folios are accurate, showing the correct room rates, services used, and payments received.
Report Generation:
Generates key reports such as revenue summaries, occupancy rates, and transaction summaries for the day.
How the Process Works:
End-of-Day Closure:
The night audit begins when the front desk is closed, ensuring all daily activities are finalized in the system.
System Updates:
Stayflexi’s system automatically updates financial records and generates daily reports or you can manually do Night Audit.
Final Adjustments:
Any errors or discrepancies found are corrected to ensure accurate records.
Importance of the Night Audit:
Financial Accuracy:
The audit helps ensure financial records are correct, which is important for budgeting and forecasting.
Operational Readiness:
By updating room inventory and reconciling accounts, the audit prepares the property for the next day, ensuring a smooth operation.
Performance Insights:
The audit provides valuable reports that offer insights into trends, helping management make strategic decisions.
Can I access Night Audit reports of previous days using Stayflexi?
YES, you can access night audit reports of previous days in Stayflexi.
Below is the explanation of how to access night audit reports from previous days using Stayflexi:
Go to the Night Audit Section:
From the Stayflexi dashboard, select the Night Audit option.
Access the Date Range Selector :
On the Night Audit page, find the Data Range field at the top of the page. Click on this field to open a calendar view.
Select the Desired Date:
In the Calendar, navigate to the date range you’re interested in.
Select a Single date for a specific past day’s report, or choose a date range if you want to see reports over multiple days.
View the Night Audit Data:
Once you’ve selected the date, the system will automatically display the night audit data for that period.
By following these steps, you can efficiently retrieve and review night audit reports from any previous date.
Can Stayflexi automate the Night Audit for my property?
YES, Stayflexi can automate the Night Audit process for your property, making it easier to manage daily operations without manual intervention. Here how it works:
To automate the Night Audit for your property in Stayflexi, follow the below-mentioned steps:
Login to Stayflexi: Start by logging into your Stayflexi dashboard using your credentials.
Access More Apps: From the dashboard, click on the 4-dots square icon labeled “More Apps”, located on the right side of the screen.
Locate Night Audit: From the listed apps, locate and click on the “Night Audit” option.
Open Night Audit Page: A new page will open that displays the night audit settings.
Find Configuration Options: On the right side of the screen, you’ll see two options:
Night Audit History
Night Audit Configuration – “Click on it”.
Open Configuration Page: The configuration page will appear, where you can manage night audit settings.
Select Auto Mode: Look for the third setting from the top labeled “What mode you prefer”. Click the small arrow next to it to open the dropdown options.
Choose Auto: From the dropdown, select the “Auto” option.
Save Settings: Once you’ve selected “Auto”, the system will now automatically run the night audit.
With the above steps, you’ve successfully configured Stayflexi to automatically perform the night audit each day without manual intervention.
How does Stayflexi handle the Night Audit process?
To know how Stayflexi handle the Night Audit process, go through the below mentioned steps to understand better:
Login to Stayflexi: Start by logging into your Stayflexi dashboard using your credentials.
Access More Apps: From the dashboard, click on the 4-dots square icon labeled “More Apps”, located on the right side of the screen.
Locate Night Audit: From the listed apps, locate and click on the “Night Audit” option.
Open Night Audit Page: A new page will open that displays the night audit settings.
Find Configuration Options: On the right side of the screen, you’ll see two options:
Night Audit History
Night Audit Configuration – “Click on it”.
Open Configuration Page: The configuration page will appear, where you can manage night audit settings.
Understanding the Night Audit Process: On this page, you can review how the night audit works and the options available to ensure it runs smoothly . Before proceeding, you need to configure the settings properly.
Enable Night Audit: Start by enabling the night audit feature. Click on the toggle to activate it, as indicated in the visual guide.
Select Audit Mode: Choose your preferred mode for running the night audit- either Auto or Manual. This option determines whether the system will automatically conduct the audit or if you’ll initiate it manually.
Set the Audit Time: Specify the time you want the night audit to run. Click on the tiny arrow next to the time setting to view default time slots. Select any time that fits your property’s schedule, We advise you to select a time when property operation end for the given day ideally it can be 12 to 1 am at night.
Manage Cancellations, No Shows, and Pending Departures: Each of these sections has specific principles that guide how they are handled during the night audit.
Cancellations: You will see options to enable or disable toggles for cancellations. Read the descriptions below each option to understand their implications and choose accordingly.
No Shows: Similarly, manage no show settings by enabling or disabling the appropriate toggles based on your policy.
Pending Departures: Adjust the settings for pending departures in the same manner, ensuring you align with your operational procedures.
Set Up Notifications: Finally, in the notifications section, enter multiple email addresses to receive the night audit report. This ensures that relevant staff members stay informed about the audit outcomes.
By configuring these settings, you allow Stayflexi to handle the night audit process smoothly and efficiently.
What happens if a reservation or payment is missing during the Night Audit?
If a reservation or payment is missing during the night audit in Stayflexi, the system will identify the issue, prompting the property staff to take corrective actions. Here’s what happens:
Missing Data Alert: The system will flag any discrepancies, such as missing reservations or payments. This alert will show up in the night audit report, making it clear where the issue lies.
Manual Investigation: The property staff will need to investigate the missing reservation or payment. This may involve checking guest folios, payment records, or third-party OTA integrations to identify why the data is missing.
Corrective Actions: Once the issue is identified, the staff can take corrective measures, such as entering the missing reservation or processing the payment manually. If the payment is delayed from an OTA, they may need to wait for the funds to be transferred or confirmed.
Reconciliation: After resolving the issue, the night audit can be re-run to ensure that all financial and reservation data is accurately reconciled for the day.
In the Night Audit history of Stayflexi, if you see a “Pending” status, it means the audit process has not been completed successfully. By clicking on the “Pending” status, a page will appear, covering half of your screen. This page will list the specific reasons why the audit was unsuccessful, providing you with details to address the issues and successfully complete the audit.
What reports does Stayflexi generate during the Night Audit?
During the Night Audit in Stayflexi, various reports are generated based on your property’s configuration. These typically include:
Audit Reports
Room Revenue Reports
Payments Reports
Front Desk Reports
Daily Intelligence Reports, etc.
You can receive all the reports as a single attachment or access them individually, depending on how they are configured.
In the Audit email, you’ll mainly see:
Today’s Performance, including total payments
Monthly Performance, summarizing total payments for the month.
The picture beside is a reference to help you understand the report that is sent to your email. This is how the main context would look, followed by the attachments mentioned below.
Click on the “View Report”, as highlighted in the picture, to access all the reports in a single view.
The above picture shows the result of clicking on the “View Report” button in the email. If you click on it, you will be redirected to the Stayflexi platform, where you can view all the reports in a single snapshot.
The mail will include an attachment containing all the individual reports for detailed reference, just as shown in the picture below.
Stock Management
Efficiently manage your property’s inventory with Stayflexi’s Stock Management feature. Track and control your stock levels in real time, whether it’s for housekeeping supplies, maintenance materials, or guest amenities. Stayflexi makes it easy to monitor stock usage, set reorder alerts, and ensure you never run out of essentials. With detailed reporting and automatic updates, Stayflexi’s Stock Management feature helps you stay organized, reduce waste, and optimize your supply chain, ensuring your property runs smoothly and efficiently at all times.
Overview of Stock Management
Stayflexi’s Stock Management system helps properties track and manage their inventory, orders, and suppliers. It offers tools to monitor stock levels in real time, create purchase orders, and receive alerts for low stock. This system helps reduce waste, improve efficiency, and keep operations running smoothly, particularly in the hospitality industry.
Stock management consists of the following option:
Dashboard:
The Dashboard consists of the following options:
Consumption Report: Shows real-time data on the usage of raw materials.
Current Stock Report: Provides an overview of stock levels for each item.
Purchase Order Report: Lists pending and recent purchase orders.
Wastage Report: Displays wastage data to help control costs and minimize losses.
Notifications Column: Centralized alerts for stock status.
Reports:
The Reports consist of the following reports:
Warehouse Cumulative Report: Provides an overall summary of warehouse stock and activities.
Purchase Order Received Report: Displays details of purchase orders received by the warehouse.
Closing Stock for Warehouse Report: Shows the closing stock levels for the warehouse at the end of a specified period.
Warehouse Consumption Report: Tracks the consumption of stock in the warehouse.
Food Costing Report: Analyzes the cost breakdown of food-related inventory.
Purchase:
This page displays your orders from a specific supplier, along with order dates and payment status.
You can track orders using a request number and view items yet to be received. Once received, orders are removed.
Consumption:
Closing stock:
The Closing Stock feature in Stayflexi enables properties to track and record end-of-day inventory levels for raw materials, ensuring accurate stock management across various categories and outlets. Users can select a date, outlet type, and raw material category, then input specific quantities and units for each item in stock.
Raw material wastage:
The Raw Material Wastage option in stock management is a feature that helps businesses track and manage the loss or spoilage of raw materials. In any inventory system, wastage can occur due to various reasons such as spoilage, expiration, handling errors, or production processes.
Overall, this feature aids in minimizing waste, optimizing stock levels, and ultimately lowering operational costs by providing clear insights into how raw materials are used and where losses occur.
Configuration:
The Configuration includes:
Vendors: Stores information about suppliers, making it easier to order materials from trusted vendors.
Raw materials – Centralised: This centralised warehouse serves as the central hub for all raw materials, from which they are distributed to the appropriate outlets.
Item recipes: By creating recipes with precise ingredient quantities, businesses can streamline operations, minimise wastage, and enhance overall efficiency.
Outlet configuration: To ensure easy configuration with a specific shop and effective tracking of raw material data, it is recommended that the outlet be named the same as the shop.
How do I configure an outlet in stock management and map it with a restaurant? Why is mapping stock management outlets important with restaurant outlets?
Below is the step-by-step guide to configure an outlet in stock management and map with a restaurant:
Log in to Your Stayflexi Dashboard:
Enter your username and password to log in.
Go to Stock management:
After logging in, click the “More Apps” icon (represented by four boxes or blocks) in the top right corner.
From the drop down menu, select Stock management
Go to Configuration:
Click on the three horizontal lines in the top right corner of the Stock management
Click on the Configuration drop down
Go to Outlet configuration:
In the Configuration dropdown, you can see the following options:
Vendors
Raw materials – Centralized
Item recipes
Outlet configuration
Click on the Outlet Configuration option
Add the Outlet:
On the Outlet configuration page, click on the Add outlet configuration button
A page to add the outlet configuration appears.
Type the name of the shop outlet you want to add in the Shop outlet name field[Note: It is recommended to use the same name for the outlet as that of the shop
Click on the Type drop down, which includes the following options
SINGLE
MULTIPLE
Select the particular type of outlet either Single or multiple.
Enter the closing stock time from the Closing stock time drop down
Now click on the Confirm button to add the Outlet configuration
Map the outlet with the restaurant/shop:
To map the outlet you created with the restaurant/shops of your property, click on the Item recipes option from the Configuration dropdown
The recipe management page appears.
Click on the Add new recipe button
All the shops or restaurants in your property will be displayed from the Shop name drop down
You can select the shop you want to map with the outlet you created in the Stock management configuration.
Click on the Outlet dropdown where all the outlets you added from the outlet configuration in the stock management will be displayed (as shown in Image 9).
You can select whichever outlet you want to map with the shop or restaurant.
Select the raw material and then click on the Confirm button to add the recipe and also to successfully map the restaurant or shop to the outlet in the Stock management
Mapping stock management outlets with restaurant outlets ensures smooth operations by accurately tracking inventory, reducing waste, and making sure the right stock is available at the right place. It helps manage resources efficiently, keeps recipes consistent, and provides clear reports for better decision-making. This process simplifies multi-outlet management and ensures everything runs seamlessly.
What kinds of reports are available in stock management?
The following reports are available in Stock Management:
Warehouse Cumulative Report
Purchase Order Received Report
Closing Stock for Warehouse Report
Warehouse Consumption Report
Food Costing Report
Follow the below-given steps to understand the reports that are available in Stayflexi’s stock management:
Log in to Stayflexi:
Access your Stayflexi account using your credentials.
Go to Stock management:
After logging in, click the “More Apps” icon (represented by four boxes or blocks) in the top right corner.
From the dropdown menu, select Stock Management (as shown in Image 1).
Navigate to the Reports Section
On the left-hand side menu, click on the Reports tab under Stock Management.
View Available Reports
Once you are in the Reports section, you will see a list of report cards. Each card represents a different type of report.
Understand Each Report’s Purpose
The available reports are:
Warehouse Cumulative Report: Provides an overall summary of warehouse stock and activities.
Purchase Order Received Report: Displays details of purchase orders received by the warehouse.
Closing Stock for Warehouse Report: Shows the closing stock levels for the warehouse at the end of a specified period.
Warehouse Consumption Report: Tracks the consumption of stock in the warehouse.
Food Costing Report: Analyzes the cost breakdown of food-related inventory.
Access a Report
Click the View button on the corresponding report card to open and view the detailed data for that report.
How do I place a purchase order to a vendor and receive it in Stayflexi once the vendor delivers it?
Below is the step-by-step guide to placing a purchase order with a vendor and receiving it in Stayflexi’s Stock management once the vendor delivers it:
Log in to Your Stayflexi Dashboard:
Enter your username and password to log in.
Go to Stock management:
After logging in, click the “More Apps” icon (represented by four boxes or blocks) in the top right corner.
From the dropdown menu, select Stock management
Go to Configurationto add the vendor details:
Click on the three horizontal lines in the top right corner of the Stock management
First, you need to configure the vendor details by clicking on the Add new vendor button in the Vendors option under Configuration to purchase an order with a vendor
Purchase an order from the Vendor:
Click on the Purchase option in the left-sidebar on the Stock Management page
Click the Add Purchase Order button on the right of the Purchase Order list page
Add items for purchase from your chosen vendor, then confirm your selection by following the below-given
Supplier Dropdown:
Purpose: Select the vendor or supplier from whom the materials are being purchased.
Action: Click the dropdown arrow, then choose the supplier’s name.
Delivery Charge Included in Invoice (FLAT):
Purpose: Enter the fixed delivery charge amount that will be included in the invoice.
Action: Input the flat amount (e.g., “0” if no delivery charges apply).
Payment Type:
Purpose: Select whether the order will be paid immediately (“PAID”) or later (“UNPAID”).
Action: Click the dropdown arrow and choose the appropriate option.
Item Details Section:
Raw Material Name
Purpose: Choose the raw material or item to be ordered.
Action: Use the dropdown to select an item.
Quantity
Purpose: Specify the number of units of the selected item.
Action: Input the desired quantity (e.g., “0” if no items are currently being ordered).
Unit
Purpose: The unit of measurement for the item (e.g., kilograms, liters, or pieces). This may be pre-defined.
Price Per Unit
Purpose: Enter the cost per unit of the item.
Action: Input the price (e.g., “0” for no cost yet).
Tax Percentage
Purpose: Enter the applicable tax percentage for the item.
Action: Input the percentage (e.g., “0”).
Tax Amount
Purpose: This field auto-calculates the tax amount based on the tax percentage and unit price.
Action: No manual input is required here.
Total
Purpose: Displays the total cost of the item, including quantity, unit price, and taxes.
Action: Automatically calculated.
Description
Purpose: Optionally provide additional notes or details about the item.
Action: Input a short description, if needed.
Add Purchase Order
Purpose: Add another item to the order if you are purchasing multiple goods.
Action: Click this button to open a new row for adding a new item.
Cancel
Purpose: Discard the current purchase order and return to the previous screen.
Action: Click the Cancel link.
Confirm
Purpose: Finalize the purchase order.
Action: Click the Confirm button to save and submit the purchase order.
This page displays your orders from a specific supplier, order dates and payment status. You can track orders using a request number and view items that have not been received. Once received, orders are removed.
To obtain raw materials, visit Configuration Raw Material Centralized and select Receive Raw Material Vendor.
Receive the Purchase order (as shown in Images 7 and 8):
Click on the Configuration dropdown and click on the Raw Material – Centralized option.
In the Centralized Raw Material List page, click on the Receive Raw Material – Vendor button on the right side of the page.
To receive the raw materials from the vendor, do the following:
Select Supplier:
Click on the dropdown under Supplier and choose the vendor.
Choose Date:
Confirm the delivery date range. This may already be pre-filled.
Select Raw Material:
Click on the dropdown under Raw Material and pick the item.
Check Unit:
Verify the unit.
Enter Quantity:
Type the quantity received.
Confirm or Cancel:
Click Confirm to save the details or Cancel to discard and exit.
By following the above steps you can purchase an order from the vendor and receive it in Stayflexi’s Stock management.
Can I track daily wastage due to any reason? How do I do that in Stayflexi?
Yes, you can track daily wastage in Stayflexi.
Below is the step-by-step guide to track the daily wastage:
Steps to Track Daily Wastage in Stayflexi:
Log in to Stayflexi:
Access your Stayflexi account using your credentials.
Go to Stock management:
After logging in, click the “More Apps” icon (represented by four boxes or blocks) in the top right corner.
From the dropdown menu, select Stock Management
Navigate to the ‘Raw Material Wastage’ Section
From the left-hand menu, go to Consumption.
Under the Consumption menu, click on Raw Material Wastage.
View the Wastage List:
The Wastage List screen will appear, as shown in the screenshot. Here, you can view details like:
Wastage Date
Raw Material Category
Raw Material
Quantity
Unit
Average Purchase Price
Total
Description
Filter by Date or Outlet Type:
Use the Date field to select the specific day you want to track.
Use the Outlet Type dropdown to filter by a specific outlet if applicable.
Add Wastage details:
Click the Add Wastage button on the top-right corner of the screen
Fill the following details
Select Outlet Type:
In the dropdown field labeled “Raw Material Wastage For”, select the outlet type where the wastage occurred (e.g., Centralised Outlet).
Enter Raw Material Details:
Use the fields to provide details about the wastage:
Raw Material Name: Choose the raw material from the dropdown.
Raw Material Category: Select the category of the raw material (e.g., Food, Beverages, etc.).
Quantity: Specify the amount of raw material wasted.
Raw Material Unit: Choose the unit of measurement (e.g., Kg, L, etc.).
Note: The In-hand stock is shown below the quantity field, helping you track available stock.
Add Cost Details:
Average Purchase Price: Enter the average cost of purchasing the raw material.
Total Amount: This field might auto-calculate based on quantity and purchase price. Otherwise, input the total cost manually.
Provide a Description:
In the Description field, specify the reason for the wastage (e.g., expired stock, spillage, or over-preparation). This helps in tracking patterns and minimizing future losses.
Add Additional Wastage (Optional):
If you have multiple items to report, click the Add Wastage button and fill in the details for the next item.
Save the Wastage Record:
Once all details are added, click Confirm to save the wastage record.
What is recipe management, and why is it important?
What is Recipe Management?
Recipe management is the process of defining, organising, and maintaining recipes for food or beverage preparation in a structured manner. It ensures the efficient use of raw materials, reduces wastage, and improves overall cost and operational management. This functionality is essential for properties to maintain consistency in product quality and optimise resources.
Why is Recipe Management Important?
Accuracy in Resource Planning: By specifying the required raw materials and quantities for each recipe, businesses can plan inventory effectively.
Minimized Wastage: Accurate recipes prevent over- or under-utilization of raw materials.
Cost Efficiency: Standardized recipes help in determining precise costs for preparation, enabling proper pricing and profitability.
Consistency: Recipes ensure that products are prepared with the same quality and taste across outlets or branches.
Improved Reporting and Tracking: Linking recipes to raw material usage provides insights into consumption trends and helps identify areas for improvement.
Step-by-Step Guide for Using Recipe Management:
Log in to Your Stayflexi Dashboard:
Enter your username and password to log in.
Go to Stock management:
After logging in, click the “More Apps” icon (represented by four boxes or blocks) in the top right corner.
From the dropdown menu, select Stock management
Go to Configuration:
Click on the three horizontal lines in the top right corner of the Stock management.
Click on the Configuration dropdown
Go to Item recipes:
In the Configuration dropdown, you can see the following options:
Vendors
Raw materials – Centralized
Item recipes
Outlet configuration
Click on the Item Recipes option to open the recipe management page
Add a New Recipe:
Click the “Add New Recipe” button to create a new recipe
All the shops or restaurants in your property will be displayed from the Shop name dropdown
You can select the shop you want to map with the outlet you created in the Stock management configuration.
Click on the Outlet dropdown where all the outlets you added from the outlet configuration in the stock management will be displayed
You can select whichever outlet you want to map with the shop or restaurant.
Select the raw material and then click on the Confirm button to add the recipe and also to successfully map the restaurant or shop to the outlet in the Stock management
Edit or Delete Recipes
The newly created recipe will appear in the list under the Recipe Management dashboard.
Click on the edit option to edit that particular recipe’s details, such as updating raw materials or quantities.
If you want to delete that particular recipe, you can click on the delete option beside the edit option to delete the recipe.
By following the above-given steps, you can understand the recipe management in Stayflexi’s Stock management.
Does Stayflexi provide a dashboard in stock management to view all important data?
Yes, Stayflexi provides a dashboard in the stock management module to view and monitor all important data. The dashboard displays various reports such as consumption, current stock, wastage, and purchase orders, giving a clear overview of inventory performance and usage.
Step-by-Step guide for Stock management Dashboard:
Log in to Your Stayflexi Dashboard:
Enter your username and password to log in.
Go to Stock management:
After logging in, click the “More Apps” icon (represented by four boxes or blocks) in the top right corner.
From the dropdown menu, select Stock Management
Navigate to the Dashboard
Consumption Report:
Located at the top of the dashboard, this section shows the consumption data of raw materials categorized by time periods: Today, Yesterday, Last 7 Days, and Last 30 Days.
Example: The consumption for items like Onion, Tomato, Rice, and Chicken is displayed in kilograms (KG).
Current Stock Report:
This section displays the current quantity of stock for each item available in the inventory.
Data includes Item Name, Category, Unit, and Quantity.
Example: The stock shows 81 KG of Onion, 1 KG of Tomato, 1000 KG of Rice, and 1000 KG of Chicken.
Wastage Report:
This report highlights wastage data over various time periods (e.g., Today, Yesterday, Last 7 Days, Last 30 Days).
The user can filter by Raw Material Wise or other available categories.
Purchase Order Report
Located on the right side, it lists purchase orders with a date range filter.
Displays information like Request Number, Total Amount, and Date.
Notifications Section
Provides notifications or important messages for low stock levels etc related to the selected date range.
Folio
Welcome to Stayflexi’s Folio management feature! In this video, we explore how our advanced folio system simplifies billing and improves the guest experience. Learn how to manage guest charges, payments, and invoices effortlessly, all in one place. Stayflexi’s Folio module ensures accurate and transparent billing, enhancing both operational efficiency and guest satisfaction. Watch now to discover how you can streamline your hotel’s financial operations and provide a seamless experience for your guests. Don’t forget to like, subscribe, and click the bell icon for more updates on innovative hospitality solutions!
Overview Part 2: In this video, we demonstrate how our Folio feature consolidates all charges, payments, and adjustments into a single, easy-to-manage document. Learn how to efficiently handle guest invoices, track expenses, and ensure accurate billing with Stayflexi’s intuitive platform. Perfect for enhancing transparency and reducing manual errors, our Folio module streamlines financial management for your hotel. Watch now to discover how you can simplify your billing processes and improve guest satisfaction! Don’t forget to like, subscribe, and hit the notification bell for more updates on innovative hospitality solutions!
Understanding folio layout in Stayflexi
At the top-left (LHS) of the folio page, you will see:
Booking ID – the unique identifier for the reservation
Guest status – indicates whether the booking is Confirmed or Checked-in
Booking segment and sub-segment – helps identify the booking type and source
Next to these details, you will find:
Refresh icon – refreshes folio data after any changes are made
Currency conversion icon – allows you to view folio amounts in a different currency
On the top-right (RHS) of the same line:
Configuration (settings) icon – used to configure folio-related settings and layout
Directly below the Booking ID, you will see a summary box that contains:
Booking ID
Stay details (check-in & check-out date/time and number of nights)
Room name and rate plan
Room number(s) assigned
Booking made date and time
Access code(s) (if applicable)
Within the same booking summary box, you can perform the following actions:
Check-in / Check-out the guest
Print Folio for billing or records
Print Registration Card for guest documentation
On the right-hand side (RHS) of this box, you’ll also find:
More Actions – for additional booking-level operations
Notes – to add internal notes related to the booking
Below the booking information box, there is a Guest Details section that displays:
Primary guest name
Number of guests
Breakdown of adults, children, and infants
In the Guest Details section:
Click the “+ Add Guests” option on the right-hand side to add additional guests to the booking.
Below the Guest Details section, you will find the Folio Summary box.
This section provides:
A summarized view of all charges applied to the booking
A quick overview of the total amount for the stay
It helps front-desk staff quickly understand the guest’s billing at a glance.
Next to the Folio Summary box, you will see the Payment Breakdown section.
This section displays:
Payments already received
Outstanding balance
A clear split of amounts paid vs. pending
This makes it easy to track financial status without scrolling through line items.
On the right-hand side (RHS) of the folio page, you will find the Settle Dues column.
Using this section, you can:
Settle outstanding balances
Choose the mode of payment (cash, card, UPI, etc., based on configuration)
Complete payment directly from the folio page
This allows quick and seamless payment settlement during check-out or mid-stay.
At the end of the folio page, Stayflexi provides four folio view options:
Summary Folio – a high-level view of charges and totals
Detailed Folio – includes detailed breakdowns of charges
Itemized Folio – displays individual line items
Payments – shows all payment-related transactions
You can click on any of these options to switch views instantly.
On the right-hand side of the folio view section, you’ll find the Room / Custom Folio selector.
This option allows you to:
Switch between room-level folios
View or manage custom folios created for the booking
This is especially useful for:
Multi-room bookings
Split billing scenarios
Customized guest invoices
Difference between Summary, Detailed, and itemized folio versions
Stayflexi provides three distinct folio types – Summary, Detailed, and Itemized to enhance the management of guest accounts. Each folio type is designed to meet specific needs, allowing property staff to navigate billing with ease.
Login to Stayflexi: Log into your Stayflexi dashboard using your credentials.
Navigate to the Reservations Tab: From the front page of the Stayflexi dashboard, locate the top navigation menu. The second icon is the Reservation Calendar. Click on the icon to see all your reservations.
Select the Reservation: Choose the reservation for which you want to see the folio by clicking on it
View Reservation Details: A pop-up window will appear on the right side of the screen, showing the reservation details.
Find the Folio Option: Scroll down to the section with multiple actions. Look for the option labeled View Folio and click on it.
Stayflexi offers three types of folios, each designed for different operational and guest communication needs. You can switch between these from the bottom of the Folio page.
Summary Folio
The Summary Folio shows a consolidated view of the guest’s total charges, without displaying individual transaction lines. It highlights only the key figures such as total room charges, additional charges, taxes, payments, and balance due.
This folio format is best suited for quick reviews and guest-facing billing.
Hoteliers typically use the Summary Folio in the following situations:
During check-out, when the guest wants to quickly know the final payable amount
While sharing or printing a simple bill for guests who do not need detailed charge breakdowns
At the front desk during peak hours, to save time and close billing faster
For corporate or short stays, where only the total amount matters
Detailed Folio
The Detailed Folio shows a clear breakdown of charges by category, such as room charges, add-ons, and taxes, without going into every individual transaction.
Hoteliers typically use the Detailed Folio in these situations:
When a guest asks for a clear explanation of charges but not line-by-line details
For corporate, long-stay, or GST-related bookings where charge clarity is required
While handling billing queries or disputes, to explain how the total amount is formed
For internal audits or management review of booking charges
The Detailed Folio balances clarity and simplicity by explaining charges without overwhelming detail.
Itemized Folio
The Itemized Folio displays a line-by-line record of every transaction posted to the booking, including dates, descriptions, taxes, and totals.
Hoteliers typically use the Itemized Folio in these situations:
When guests request a complete transaction-level bill
For accounting, reconciliation, or financial audits
To review or verify manual postings, adjustments, or add-on charges
While resolving detailed billing disputes or discrepancies
The Itemized Folio offers maximum transparency and is best suited for detailed financial review.
How to print folio to pdf
To print folio to pdf, follow the below-mentioned steps :
Log in to Stayflexi using your dashboard credentials.
From the top navigation menu, click on the Reservation Calendar (second icon) to view all reservations.
Select the required reservation from the calendar. The reservation details panel opens on the right-hand side.
Click on View Folio to open the folio page.
On the folio page, review the booking details shown in the first section and click on Print Folio.
The Print Invoice panel opens on the right-hand side:
Use the dropdown to select the required folio type (Summary, Detailed, or Itemized).
Choose whether to Bill to Guest or Bill to Company.
Click on Generate & Print.
You will be redirected to the print preview page. From the Destination dropdown, select Save as PDF.
Click Save to download the folio as a PDF file.
Done — the folio is now saved and ready to share or store.
How do I mark a booking as a no-show, and can I do this for all OTAs?
To mark a booking as a no-show, follow the below-mentioned steps:
Login to Stayflexi: Log into your Stayflexi dashboard using your credentials.
Navigate to the Reservations Tab: From the front page of the Stayflexi dashboard, locate the top navigation menu. The second icon is the Reservation Calendar. Click on the icon to see all your reservations.
Select the Reservation: Choose the reservation for which you wish to mark as a no-show.
View Reservation Details: A pop-up window will appear on the right side of the screen, showing the reservation details.
Locate and Click on ‘Modify’ on the RHS.
click on “Set to no show” from the displayed list of actions.
You will be redirected to a Set to No-Show page. Here, select the cancellation policy appropriate for your property.
Click on the Set button after selecting the policy to finalize the no-shows status.
Once these steps are completed, the booking will be marked as a no-show in Stayflexi.
Can I do this for all OTAs?
Stayflexi marks “No Show” only for Booking.com bookings because of a direct integration through the Booking.com API. This integration is crucial since Booking.com charges a commission based on completed bookings. If a “No Show” is not properly marked, Booking.com will still apply a commission charge, even if the guest didn’t actually check in.
All Booking.com bookings with Stayflexi are set up as “pay at hotel,” meaning guests pay directly upon arrival. By marking “No Show” in Stayflexi, the system can automatically update the status on Booking.com’s side, preventing unnecessary commission charges for guests who didn’t show up.
For other OTAs, Stayflexi doesn’t support a “No Show” update.
How to capture guest signature with my payment terminal
To Delete a card from a booking in Stayflexi, follow the below steps:
1) Go to folio
2) Click on 3 dots just beside the booking ID
3) Click on Capture guest signature
4) This will light up the payment terminal and the guest can signature. This signature will be digitally recorded into the folio
How to add GST number to folio
To add GST number to folio in Stayflexi, follow the below-mentioned steps:
Login to Stayflexi: Log into your Stayflexi dashboard using your credentials.
Navigate to the Reservations Tab: From the front page of the Stayflexi dashboard, locate the top navigation menu. The second icon is the Reservation Calendar. Click on the icon to see all your reservations.
Select the Reservation: Choose the reservation you want to add GST number to folio.
View Reservation Details: A pop-up window will appear on the right side of the screen.
Click on the “View Folio” option from the reservation calendar.
On the folio page, find the invoice related to the booking.
Click on the tiny drop-down arrow next to the invoice to expand it.
A list containing guest details will appear.
Add or Edit GST Number
Locate the GST Number field and click on it.
Enter a new GST number or edit the existing one.
Save Changes
Click Update to save the changes successfully.
The GST number will now be updated for the booking.
Can I change the payment mode after settlement?
Follow these steps to update the payment mode for a reservation after settlement.
Log in to your Stayflexi account.
Open the reservation for which you want to change the payment mode.
From the reservation details panel (on the right-hand side), click “View Folio.”
Scroll down to the bottom of the folio page.
Under Folio View Mode, select “Payments.”
In the Payments section, locate the payment entry you want to modify.
On the extreme right-hand side of that payment row, click “Actions.”
Choose the option to Change Payment Mode.
Select the desired payment method from the available options.
Click Confirm to save the changes. The payment mode will now be updated successfully.
Where can we get the invoice with per night breakup?
To get the invoice with per night breakup in Stayflexi, follow the below-mentioned steps:
Login to Stayflexi: Log into your Stayflexi dashboard using your credentials.
Navigate to the Reservations Tab: From the front page of the Stayflexi dashboard, locate the top navigation menu. The second icon is the Reservation Calendar. Click on the icon to see all your reservations.
Select the Reservation: Choose the reservation you want to see the view folio history or log.
View Reservation Details: A pop-up window will appear on the right side of the screen.
Click on the “View Folio” option from the reservation calendar.
By default, the folio opens in Summary Folio Mode, displaying the entire invoice summary.
Select Folio Type:
By default, the Summary Folio is selected. You’ll find options to choose from three types of folios:
Summary Folio
Detailed Folio
Itemized Folio
View Detailed Folio:
Click on Detailed Folio to switch views.
The invoice will now display a per-night breakdown, showing charges and details for each night of the reservation.
This view allows you to analyze the charges more granularly, helping with detailed billing.
I am unable to charge or authorize the guest credit card or the virtual card provided by the OTA. What can or should I do next?
If and when the card charge or authorization fails, you will see a clear error message on the same popup and the folio log. This happens because your payment gateway has declined the charge. You can use the displayed information to follow up with your payment gateway provider
How to edit booking source in the folio
To edit booking source in the folio in Stayflexi, follow the below steps:
Login to Stayflexi: Log into your Stayflexi dashboard using your credentials.
Navigate to the Reservations Tab: From the front page of the Stayflexi dashboard, locate the top navigation menu. The second icon is the Reservation Calendar. Click on the icon to see all your reservations.
Select the Reservation: Choose the reservation you want to edit booking source in the folio.
View Reservation Details: A pop-up window will appear on the right side of the screen.
Click on the “View Folio” option from the reservation calendar.
Open More Actions:
From the folio page, click onMore Actions.
Change Booking Source
Select Change Booking Source from the drop-down menu.
A side panel will appear on the right with two options.
Select New Source and Segment
Use the drop-down menu to click on the tiny arrows next to the options.
Choose the new Source and Segment.
Click Save Changes to finalize the changes.
Your booking source has now been updated.
How to settle dues in folio?
Login to Stayflexi: Log into your Stayflexi dashboard using your credentials.
Navigate to the Reservations Tab: From the front page of the Stayflexi dashboard, locate the top navigation menu. The second icon is the Reservation Calendar. Click on the icon to see all your reservations.
Select the Reservation: Choose the reservation for which you want to see the folio by clicking on it
View Reservation Details: A pop-up window will appear on the right side of the screen, showing the Reservation details.
Find the Folio Option: In the reservation section, Look for the option labeled View Folio and click on it.
How to Settle Dues in the Folio?
Open the required Folio from the reservation.
On the right-hand side (RHS) of the folio page, locate the Payment Breakdown section.
Click on Settle Dues.
A list of available payment modes will be displayed.
Select the preferred mode of payment.
Confirm the action to settle the outstanding dues.
How to modify check in or check out date and time for a given booking.
Click on More Actions in the folio page.
Under Booking Actions, select Check-in.
Note: If the reservation is already checked in, you will see the Check-out option instead.
Click on Check-in / Check-out.
The Modify Check-in / Check-out panel will open on the right-hand side.
Select the Room, New Check-in/out Date, and Check-in Slot.
The pricing will be automatically updated based on the selected dates.
Review the updated details and click Save Changes.
Your booking has now been successfully modified.
How to edit folio amount?
Below are the step-by-step guidelines on how to edit the Folio Amount in Stayflexi:
Login to Stayflexi: Log into your Stayflexi dashboard using your credentials.
Navigate to the Reservations Tab: From the front page of the Stayflexi dashboard, locate the top navigation menu. The second icon is the Reservation Calendar. Click on the icon to see all your reservations.
Select the Reservation: Choose the reservation you want to edit the amount in the folio.
View Reservation Details: A pop-up window will appear on the right side of the screen, showing the reservation details.
Find the Folio Option: Look for the option labeled View Folio and click on it.
How to Edit the Folio Amount in Stayflexi:
Click the Folio button to access the billing information.
Check Subtotal and Total:
The Subtotal displays the charges before taxes are applied.
The Total shows the charges with taxes included.
Modify Prices:
Identify the charge you want to change.
Click on the price, to modify the price.
Instant Update:
Any changes you make will automatically reflect in the folio.
The updated price will adjust both the subtotal and total accordingly.
Finalize and Save: After editing, review the changes and click Save to apply the updates to the folio.
How can we modify the Booking price after the reservation is created?
In Stayflexi, you can modify the booking price after the reservation is confirmed. It ensures that you can easily update the price after confirmation.
Through the Reservation Calendar:
Login to Stayflexi: Log into your Stayflexi dashboard using your credentials.
Navigate to the Reservations Tab: From the front page of the Stayflexi dashboard, locate the top navigation menu. The second icon is the Reservation Calendar. Click on the icon to see all your reservations.
Select the Reservation: Choose the reservation for which you want to modify the booking price.
View Reservation Details: A pop-up window will appear on the right side of the screen.
Locate the Modify option on the right-hand side, click on it to view a list of actions.
Locate and click on “Edit Reservation”.
On the next page, modify the desired price in the appropriate field.
Click on the “Edit Reservation” button below to complete the action.
A confirmation message will appear on the screen.
How to edit the rate plan on the folio
To Edit a Rate Plan in Stayflexi, Follow the below-mentioned steps:
Login to Stayflexi: Log into your Stayflexi dashboard using your credentials.
Navigate to the Reservations Tab: From the front page of the Stayflexi dashboard, locate the top navigation menu. The second icon is the Reservation Calendar. Click on the icon to see all your reservations.
Select the Reservation: Choose the reservation you want to edit the rate plan on the folio.
View Reservation Details: A pop-up window will appear on the right side of the screen.
Click on the “View Folio” option from the reservation calendar.
From the opened page, click on “More Actions”.
From the opened More Actions menu, go to the Administrative category.
Click on Edit Rate Plan.
This opens the Edit Rate Plan panel on the right-hand side.
From the Rate Plan dropdown, select the rate plan you want to change.
Below this, you will see the Amount field.
Note: Once a rate plan is selected, the system automatically generates and updates the corresponding price in the amount field.
Review the updated amount.
Click Save Changes to apply the updated rate plan.
How to provide discounts on a Flat / Percentage basis for the existing reservations?
To Provide discounts on a flat or percentage basis for existing reservations in Stayflexi:
Login to Stayflexi: Log into your Stayflexi dashboard using your credentials.
Navigate to the Reservations Tab: From the front page of the Stayflexi dashboard, locate the top navigation menu. The second icon is the Reservation Calendar. Click on the icon to see all your reservations.
Select the Reservation: Choose the reservation for which you want to modify the booking price.
View Reservation Details: A pop-up window will appear on the right side of the screen.
Click on the “View Folio” option from the reservation calendar.
In the“View Folio” page, click on “More Actions”.
From the More Folio Actions menu, scroll to the Financial category.
Click on Apply Promo / Discount.
This opens the discount panel on the right-hand side.
In the Action Type dropdown, choose Apply Manual Discount.
Other available options include Apply Coupon Code and Apply Offer.
Under Type, select either:
Flat (fixed amount), or Percent (percentage-based discount).
Enter the discount amount.
Click Validate to preview the applied discount amount in INR.
Once verified, click Apply to Folio at the bottom to add the discount to the folio.
How to release a booking from Hold Bookings in Stayflexi?
If a booking is placed on hold, releasing it and assigning it to a room is simple. Here’s how you can do it from the reservation calendar:
Below are the step-by-step guidelines on how to release a booking from Hold Bookings:
Access the Reservation Calendar: Log in to the dashboard and navigate to the Reservation Calendar.
Locate Unassigned and On-Hold Bookings: On the right-hand side of the screen, click on the UA [unassigned] section. This will display any Unassigned bookings, On-Hold bookings, and inquiries.
Select On-Hold Bookings: From the list, click on the On-Hold Bookings section to view details of guests with bookings on hold.
Assign the Booking: Select the booking you want to release from hold, then click on Assign.
Fill in Room Details: A pop-up window will appear where you can fill in the room details you’d like to assign. Complete all required fields and click Assign.
Confirm the Assignment: The guest’s name will now reflect on the reservation calendar grid in the selected room.
You will receive confirmation that the booking has been successfully released from hold and assigned to a room.
Where can we modify the Rate plan after the reservation is confirmed?
To Modify the Rate Plan after a reservation is confirmed in Stayflexi, follow the below mentioned steps:
Login to Stayflexi: Log into your Stayflexi dashboard using your credentials.
Navigate to the Reservations Tab: From the front page of the Stayflexi dashboard, locate the top navigation menu. The second icon is the Reservation Calendar. Click on the icon to see all your reservations.
Select the Reservation: Choose the reservation for which you want to modify the booking price.
View Reservation Details: A pop-up window will appear on the right side of the screen.
Click on the “View Folio” option from the reservation calendar.
In the “View Folio” page, click on “More Folio Actions”.
From the listed options, locate and click on “Edit Rate Plan”.
A page will open on the right-hand side of the screen.
In the Rate Plan column, click the tiny arrow to view all available rate plans for your property.
Choose the desired rate plan and edit it.
Click the “Confirm” button to complete the action.
You will receive a confirmation message.
How to unassign a booking from a room number from the reservation calendar or room folio ?
In Stayflexi, you can unassign a booking from a room number using two methods. Below is the explanation of two methods:
Through the Reservation Calendar:
Go to the Reservation Calendar: Navigate to the reservation calendar in Stayflexi.
Select the Reservation Calendar: Click on the reservation you want to unassign from a room.
Access Room Options: In the opened window on the right-hand side, you will see multiple options.
Unassign the Room: Locate and click on “Unassign Room”.
Confirm the Action: A confirmation page will appear to the right.
Complete the Action: Click “Yes, Unassign” to finalize the process
Through Folio:
Login to Stayflexi: Log into your Stayflexi dashboard using your credentials.
Navigate to the Reservations Tab: From the front page of the Stayflexi dashboard, locate the top navigation menu. The second icon is the Reservation Calendar. Click on the icon to see all your reservations.
Select the Reservation: Choose the reservation you want to Unassign from a room.
View Reservation Details: A pop-up window will appear on the right side of the screen.
Click on the “View Folio” option from the reservation calendar.
From the opened page, click on “More Folio Actions”.
Locate and click on Unassign room
A pop-up will appear on the Right Hand Side as a confirmation.
Complete the action by clicking Unassign Room below.
How to release a booking inventory by putting booking on hold from folio or reservation calendar
In Stayflexi, you can put a booking on hold using two methods: through the reservation calendar or the folio.
Below is a step-by-step explanation of both methods:
Through Reservation Calendar:
Step 1: Navigate to the Reservation Calendar.
Step 2: Click on the Reservation you want to put on hold.
Step 3: A page will open on the right-hand side.
Step 4: From the opened page, click on Modify and select “Hold Booking”.
Step 5: A confirmation page will open
Step 6: Click “Yes, hold booking.”
You will receive a confirmation message that the action has been successfully completed.
Through Folio:
Step 1: Click on the Reservation you want to put on hold.
Step 2: A page will open on the right-hand side.
Step 3: Locate and click on “View Folio” from the listed actions.
Step 4: On the folio page, click on “More Folio Actions”.
Step 5: Locate Hold Booking from the multiple listed actions.
Step 6: Click on “Hold Booking” to proceed further.
Step 7: A confirmation page will open on the right side of the screen.
Step 8: Click “Confirm” to complete the action.
You will receive a confirmation message that the booking has been successfully placed on hold.
Can I delete a particular reservation from system
YES, you can delete a particular reservation in Stayflexi by following the below steps:
Login to Stayflexi: Log into your Stayflexi dashboard using your credentials.
Navigate to the Reservations Tab: From the front page of the Stayflexi dashboard, locate the top navigation menu. The second icon is the Reservation Calendar. Click on the icon to see all your reservations.
Select the Reservation: Choose the reservation for which you want to see the folio by clicking on it
View Reservation Details: A pop-up window will appear on the right side of the screen.
Find the Folio Option: Scroll down to the section with multiple actions. Look for the option labeled View Folio and click on it.
Click on More Folio Actions.
The options are categorized — under the Administrative category, select Delete Folio.
Click Delete Folio to proceed.
Once deleted:
The reservation will be removed from the Reservation Calendar.
It will no longer appear in active booking views.
Note: Deleted reservations are not permanently erased. You can find the reservation and its details in the Folio Report under the Archived state. The booking can be reverted at any time if required — only if the user has been granted the necessary permission under Roles and Access.
How to move a booking to a different room number or room category
In Stayflexi, You can move a booking to a different room number or room category using two methods:
Below is the explanation of moving a booking to a different room or room category through the reservation calendar:
Login to Stayflexi: Log into your Stayflexi dashboard using your credentials.
Navigate to the Reservations Tab: From the front page of the Stayflexi dashboard, locate the top navigation menu. The second icon is the Reservation Calendar. Click on the icon to see all your reservations.
Select the Reservation: Choose the confirmed reservation you want to move a booking to a different room number or category.
Click on Move Room: From the list of available actions, locate and click the Move Room button next to the reservation.
Open the Move Reservation Page: A page will open to the Right Hand Side.
Select Room and Category: Choose the new room number and room category based on the guest’s requirement.
Automatic Amount Update: The amount will automatically update in the relevant columns based on the new room.
Add a Remark: In the remarks column, provide the reason for moving the booking to another room.
Complete the Action: Click on “Move Reservation” at the bottom to finalize the move.
Through View Folio:
Login to Stayflexi: Log into your Stayflexi dashboard using your credentials.
Navigate to the Reservations Tab: From the front page of the Stayflexi dashboard, locate the top navigation menu. The second icon is the Reservation Calendar. Click on the icon to see all your reservations.
Select the Reservation: Choose the confirmed reservation you want to move a booking to a different room number or category.
View Reservation Details: A pop-up window will appear on the right side of the screen, showing the booking and customer information.
Find the Folio Option: Scroll down to the section with multiple actions. Look for the option labeled View Folio and click on it.
Click on More Folio Actions: On the folio page, click the More Folio Actions button to view additional options.
Locate and click on Move Room: From the listed options, click on move room.
Open the Move Reservation Page: A page will open to the RHS.
Select Room and Category: Choose the new room number and room category based on the guest’s requirement.
Automatic Amount Update: The amount will automatically update in the relevant columns based on the new room.
Add a Remark: In the remarks column, provide the reason for moving the booking to another room.
Complete the Action: Click on “Upgrade room” at the bottom to finalize the move.
How to split a group booking ?
A split booking in Stayflexi allows you to break down a group reservation into individual bookings by separating a group room booking into individual rooms. This feature is especially useful when a group booking for multiple rooms needs to be split into separate reservations for each room. It offers flexibility by allowing each room to have its own folio, billing, and details after the split, while still retaining the original booking information. Once the booking is split, the group reservation ID will change to individual reservation IDs, and the room prices will be adjusted accordingly.
To Split a group booking in Stayflexi, follow the below steps:
Login to Stayflexi: Log into your Stayflexi dashboard using your credentials.
Navigate to the Reservations Tab: From the front page of the Stayflexi dashboard, locate the top navigation menu. The second icon is the Reservation Calendar. Click on the icon to see all your reservations.
Select the Group Booking: Click on the group booking that you want to split.
Navigate to the Folio: Open the folio of the selected booking.
Access More Folio Actions: Click on “More Folio Actions”.
Locate and Click on Split Bookings: From the list of actions, find and select “Split Bookings”.
Confirm the Action: A pop-up will appear asking for confirmation. Click “Yes, Split Booking”.
The group booking will now be split into individual bookings, and you will no longer see the group booking icon next to the reservations.
How to add company details to a folio in Stayflexi and apply them during billing?
Below are the step-by-step guidelines on how to find the Folio of a Reservation in Stayflexi:
Login to Stayflexi: Log into your Stayflexi dashboard using your credentials.
Navigate to the Reservations Tab: From the front page of the Stayflexi dashboard, locate the top navigation menu. The second icon is the Reservation Calendar. Click on the icon to see all your reservations.
Select the Reservation: Choose the reservation you want to add the company details.
View Reservation Details: A pop-up window will appear on the right side of the screen, showing the booking and customer information.
Find the Folio Option: Scroll down to the section with multiple actions. Look for the option labeled View Folio and click on it.
How to Add Company Details to a Folio:
Locate More Folio Actions: On the folio page, find the section called More Folio Actions.
Select Add Company: Click on the option to Add Company Details.
Fill in Company Details: A popup will appear where you need to fill in all the relevant company information.
Click Add Details: Once all the details are filled in, click the green Add Details button at the bottom to save the company information.
Confirmation Message: You will receive a confirmation message that the company details have been successfully added.
Billing with Company Details:
Booking Segment and Source:
During billing, go to the folio. Next to the guest name, click on the Booking Segment column.
Select Direct Billing to link the company to the folio.
In the Booking Source column, select the appropriate company details.
Proceed with Billing:
The bill will be processed with selected company details.
Sending Folio PDF: You can send the Folio PDF to:
The Guest
The Company.
Click on the print icon in black color at the top right-hand side to see the options for sending the folio.
How to set a booking to no show
In Stayflexi, you can set a booking no-show using two methods: through the reservation calendar or the folio.
Below are the explanations and guidelines for both methods:
Through the Reservation Calendar:
Step 1: Go to Reservation Calendar.
Step 2: Click on the reservation you want to set a no show.
Step 3: A page will open on the right side with multiple actions.
Step 4: Locate and click on “Set to no show”.
Step 5: A page will open on the right side for selecting the no-show option.
Step 6: Select your options, such as:
Apply Cancellation policy.
Don’t void.
Charge one night and void remaining.
Void all remaining charges.
Step 7: Click “Yes” to complete the action.
You will receive a confirmation message that the booking has been successfully Set to no show.
Through Folio:
Step 1: Click on the reservation you want to set to no-show.
Step 2: A page will open on the right side.
Step 3: Select “View Folio” from the available actions.
Step 4: On the Folio page, click on “More Folio Actions.”
Step 5: Locate and click on the” Set to no show option”.
Step 6: Select the void charge options according to your preference.
Step 7: Click on “Set to no show” to complete the action.
You will receive a confirmation message indicating that the booking has been successfully Set to no show.
How to view folio history or folio log ?
Below is the explanation of how to view folio history or log in Stayflexi:
Login to Stayflexi: Log into your Stayflexi dashboard using your credentials.
Navigate to the Reservations Tab: From the front page of the Stayflexi dashboard, locate the top navigation menu. The second icon is the Reservation Calendar. Click on the icon to see all your reservations.
Select the Reservation: Choose the reservation you want to see the view folio history or log.
View Reservation Details: A pop-up window will appear on the right side of the screen.
Click on the “View Folio” option from the reservation calendar.
From the opened page, click on “More Folio Actions”.
From the listed options, locate and click on “Folio Logs”.
A new page will open displaying the folio logs for the selected reservation.
You can see detailed information such as the log time, the user who made the action, and the logged action itself.
How to lock a booking a specific room so that system does not move it automatically
In Stayflexi, you can lock a booking to a specific room to prevent the system from moving it automatically. This can be done in two ways: through the reservation calendar or the folio. Below are the instructions for both methods.
Through Reservation Calendar:
Step 1: Log in to the Stayflexi dashboard using your credentials.
Step 2: Click on the Second icon on top to open the reservation calendar.
Step 3: Select the reservation you want to lock to a specific room.
Step 4: A page will appear on the right-hand side with multiple actions.
Step 5: Locate and click on “Lock Booking”.
Step 6: A confirmation page will open.
Step 7: Click “Yes, lock” to complete the action.
You will receive a confirmation message that the room has been successfully locked to the booking.
Through Folio:
Step 1: Log in to the Stayflexi dashboard using your credentials.
Step 2: Click on the Second icon on top to open the reservation calendar.
Step 3: Select the reservation you want to lock to a specific room.
Step 4: A page will appear on the right-hand side with multiple actions.
Step 5: Locate and click on “View Folio”.
Step 6: On the folio page, click on “More Folio Actions” in green.
Step 7: On the folio page, click on “Lock Booking”.
Step 8: A confirmation page will open on the right side.
Step 9: Click “Yes, lock room” to complete the action.
You will receive confirmation that the booking has been successfully locked to the specific room.
How to unlock a booking a specific room so that system can move it automatically
In Stayflexi, you can unlock a booking to a specific room to prevent the system from moving it automatically. This can be done in two ways: through the reservation calendar or the folio. Below are the instructions for both methods.
Through Reservation Calendar:
Step 1: Log in to the Stayflexi dashboard using your credentials.
Step 2: Click on the Second icon on top to open the reservation calendar.
Step 3: Select the reservation you want to unlock for a specific room.
Step 4: A page will appear on the right-hand side with multiple actions.
Step 5: Locate and click on “Unlock Booking”.
Step 6: A confirmation page will open.
Step 7: Click “Yes, unlock” to complete the action.
You will receive a confirmation message that the room has been successfully unlocked for the booking.
Through Folio:
Step 1: Log in to the Stayflexi dashboard using your credentials.
Step 2: Click on the Second icon on top to open the reservation calendar.
Step 3: Select the reservation you want to unlock for a specific room.
Step 4: A page will appear on the right-hand side with multiple actions.
Step 5: Locate and click on “View Folio”.
Step 6: On the folio page, click on “More Folio Actions” in green.
Step 7: On the folio page, click on “Unlock Booking”.
Step 8: A confirmation page will open on the right side.
Step 9: Click “Yes, unlock room” to complete the action.
You will receive confirmation that the booking has been successfully unlocked to the specific room.
How to add a new room to a group booking or remove a room from group booking
To add a new room to a group booking in Stayflexi, follow the below steps:
Login to Stayflexi: Log into your Stayflexi dashboard using your credentials.
Navigate to the Reservations Tab: From the front page of the Stayflexi dashboard, locate the top navigation menu. The second icon is the Reservation Calendar. Click on the icon to see all your reservations.
Select the Group Booking: Click on the group booking for which you want to add a new room.
Navigate to the Folio: Open the folio of the selected booking.
Access More Folio Actions: Click on “More Folio Actions”.
Locate and click on “Add New Room to Group Booking”.
A page will open on the right side. Fill in the guest details and room information you want to add.
The room price will automatically be generated based on the room’s rate.
Click on the “Add” button below to complete the action.
To delete a room from a group booking in Stayflexi, follow the below steps:
Login to Stayflexi: Log into your Stayflexi dashboard using your credentials.
Navigate to the Reservations Tab: From the front page of the Stayflexi dashboard, locate the top navigation menu. The second icon is the Reservation Calendar. Click on the icon to see all your reservations.
Select the Group Booking: Click on the group booking for which you want to add a new room.
Navigate to the Folio: Open the folio of the selected booking.
Access More Folio Actions: Click on “More Folio Actions”.
Locate and click on “Delete room from group booking”.
A page will open in the middle of the screen.
Click on the tiny arrow [as shown in the picture] to view the room ID list.
Select the room you want to delete.
Click on Cancel Booking to complete the action.
How to add Addons or any chargeable service in room folio ?
Login to Stayflexi: Log into your Stayflexi dashboard using your credentials.
Navigate to the Reservations Tab: From the front page of the Stayflexi dashboard, locate the top navigation menu. The second icon is the Reservation Calendar. Click on the icon to see all your reservations.
Select the Reservation: Choose the reservation for which you want to see the folio by clicking on it
View Reservation Details: A pop-up window will appear on the right side of the screen, showing the booking and customer information.
Find the Folio Option: Scroll down to the section with multiple actions. Look for the option labeled View Folio and click on it.
How to add Addons or any chargeable service in the room folio?
At the top of the page, locate the Add Hotel Addons button.
Click on it to proceed further.
On the right side, the add hotel addons page will open.
select the Room ID for which you want to add addons.
Click on Addons: When you click on Addons, you will see two options:
Predefined Addons: A list of preset services [e.g., breakfast, spa, parking] with fixed pricing.
Custom Addons: An option where the property can manually add any service or item not predefined, allowing you to input the description and price as needed.
Below that, you will see a list of details like date, payment mode, etc.
Fill in the mandatory column for the folio item name that you are adding.
Once completed, scroll down and click on the Add New Hotel Addon button below to finalize and save the addon.
How to add notes to a given booking ?
To Add Notes to a Booking in Stayflexi, follow the below-mentioned steps:
Login to Stayflexi: Log into your Stayflexi dashboard using your credentials.
Navigate to the Reservations Tab: From the front page of the Stayflexi dashboard, locate the top navigation menu. The second icon is the Reservation Calendar. Click on the icon to see all your reservations.
Select the Reservation: Choose the reservation you want to add the notes.
View Reservation Details: A pop-up window will appear on the right side of the screen.
Click on the “View Folio” option from the reservation calendar.
On the folio page, locate the Notes icon next to the guest alphabet and guest add icon [as shown in the image below].
Click on the Notes.
A panel will open on the right-hand side, displaying two sections:
Customer Notes
Booking Notes
Select the appropriate section where you want to add your notes.
After entering the notes, click the Add button to save.
Once you add notes to a reservation, the message icon in the reservation calendar will update and reflect that notes have been added to the particular reservation.
Refer to the first image above to view the notes icon, circled in the reservation, which indicates that notes have been added to that specific reservation.
How to take different type of payments for a given booking
To take different types of payments for a booking in Stayflexi, follow the below-mentioned steps:Through the Reservation Calendar
Login to Stayflexi: Log into your Stayflexi dashboard using your credentials.
Navigate to the Reservations Tab: From the front page of the Stayflexi dashboard, locate the top navigation menu. The second icon is the Reservation Calendar. Click on the icon to see all your reservations.
Select the Reservation: Choose the reservation you want to take different types of payments.
View Reservation Details: A pop-up window will appear on the right side of the screen.
From the available options, click on Settle Dues.
A list of payment methods will appear.
Choose the guest’s preferred payment method.
A pop-up will appear in the middle of the screen.
Fill in the required payment details and click the submit button to complete the action.
Through View Folio:
Login to Stayflexi: Log into your Stayflexi dashboard using your credentials.
Navigate to the Reservations Tab: From the front page of the Stayflexi dashboard, locate the top navigation menu. The second icon is the Reservation Calendar. Click on the icon to see all your reservations.
Select the Reservation: Choose the reservation for which you want to see the folio by clicking on it
View Reservation Details: A pop-up window will appear on the right side of the screen, showing the booking and customer information.
Find the Folio Option: Scroll down to the section with multiple actions. Look for the option labeled View Folio and click on it.
At the top of the page, locate the Settle Dues button.
Click on it to view the available options.
On the right side, select the Room ID for which you want to settle the dues.
Below that, you will see a list of payment methods available.
Choose the payment method the guest prefer to pay.
Fill in the required payment details.
Click the Record button to complete the action.
Through More Folio Actions:
Login to Stayflexi: Log into your Stayflexi dashboard using your credentials.
Navigate to the Reservations Tab: From the front page of the Stayflexi dashboard, locate the top navigation menu. The second icon is the Reservation Calendar. Click on the icon to see all your reservations.
Select the Reservation: Choose the reservation for which you want to see the folio by clicking on it
View Reservation Details: A pop-up window will appear on the right side of the screen, showing the booking and customer information.
Find the Folio Option: Scroll down to the section with multiple actions. Look for the option labeled View Folio and click on it.
Click on More Folio Actions: From the listed options, locate and click on settle dues.
Click the Record button to complete the action.
How to take cash deposit for a given booking
The Cash Deposit feature in Stayflexi allows you to accept and record cash payments made by guests as deposits during their stay. This feature is handy for tracking advance payments or security deposits that guests may need to provide at check-in or before using certain services.
Here’s how it works:
The property can add a cash deposit against a guest’s booking.
The amount is recorded in the system, ensuring both the guest and the property can track the deposit.
The deposit can later be used to settle any dues or refund if necessary.
To take a cash deposit for a given booking in Stayflexi, follow the below-mentioned steps:Through the Reservation Calendar
Login to Stayflexi: Log into your Stayflexi dashboard using your credentials.
Navigate to the Reservations Tab: From the front page of the Stayflexi dashboard, locate the top navigation menu. The second icon is the Reservation Calendar. Click on the icon to see all your reservations.
Select the Reservation: Choose the reservation you want to take a cash deposit.
View Reservation Details: A pop-up window will appear on the right side of the screen.
From the available options, click on Settle Dues.
A list of payment methods will appear.
Choose Cash deposit.
A pop-up will appear in the middle of the screen.
Fill in the required payment details and additionally, you have a description column, where you can input specific notes or details about the transaction.
Click the submit button to complete the action.
Through View Folio:
Login to Stayflexi: Log into your Stayflexi dashboard using your credentials.
Navigate to the Reservations Tab: From the front page of the Stayflexi dashboard, locate the top navigation menu. The second icon is the Reservation Calendar. Click on the icon to see all your reservations.
Select the Reservation: Choose the reservation for which you want to take a cash deposit.
View Reservation Details: A pop-up window will appear on the right side of the screen, showing the booking and customer information.
Find the Folio Option: Scroll down to the section with multiple actions. Look for the option labeled View Folio and click on it.
At the top of the page, locate the Settle Dues button.
Click on it to view the available options.
On the right side, select the Room ID for which you want to take cash deposit.
Below that, you will see a list of payment methods available.
Choose Cash deposit.
A pop-up will appear in the middle of the screen.
Fill in the required payment details and additionally, you have a description column, where you can input specific notes or details about the transaction.
Click the submit button to complete the action.
How to refund a payment to guest from Stayflexi PMS ?
hi
To Refund a Payment in Stayflexi, follow the below steps:
Log in to your Stayflexi account.
Open the reservation for which you want to process the refund.
From the reservation details panel (on the right-hand side), click “View Folio.”
Scroll down to the bottom of the folio page.
Under Folio View Mode, select “Payments.”
On the extreme right side of the relevant payment entry, click “Actions.”
From the available options, select “Refund.”
In the pop-up window, enter the reason for the refund.
Click Refund to complete the refund process.
How to send a payment link to the guest from Stayflexi PMS?
To Send a Payment link to the guest in Stayflexi, follow the below steps:
Login to Stayflexi: Log into your Stayflexi dashboard using your credentials.
Navigate to the Reservations Tab: From the front page of the Stayflexi dashboard, locate the top navigation menu. The second icon is the Reservation Calendar. Click on the icon to see all your reservations.
Select the Reservation: Choose the reservation for which you want to send the payment link to.
View Reservation Details: A pop-up window will appear on the right side of the screen.
Click on the “View Folio” option from the reservation calendar.
From the opened page, click on “More Folio Actions”.
Locate and click on “Send Payment Link.”
In the opened page, fill in the guest’s email, mobile number, and the amount.
By default, the guest details entered at the time of reservation will already be reflected in these columns.
Click on “Send Payment Link” to complete the action, Guest will receive the payment link.
A confirmed message will appear on the screen.
How to delete a saved card from given booking
To Delete a card from a booking in Stayflexi, follow the below steps:
Login to Stayflexi: Log into your Stayflexi dashboard using your credentials.
Navigate to the Reservations Tab: From the front page of the Stayflexi dashboard, locate the top navigation menu. The second icon is the Reservation Calendar. Click on the icon to see all your reservations.
Select the Reservation: Choose the reservation for which you want to add a card.
View Reservation Details: A pop-up window will appear on the right side of the screen.
Click on the Settle Dues to see the listed options.
Click on the card number to bring up the card with options.
A pop-up will appear, showing the card details with options.
Click on the “Delete Card” button to remove the card from the booking.
You have successfully deleted the card now.
How to add guest card details to a particular booking and charge it?
To add a card to a particular booking and charge it in Stayflexi, follow the below steps:
Login to Stayflexi: Log into your Stayflexi dashboard using your credentials.
Navigate to the Reservations Tab: From the front page of the Stayflexi dashboard, locate the top navigation menu. The second icon is the Reservation Calendar. Click on the icon to see all your reservations.
Select the Reservation: Choose the reservation for which you want to add a card.
View Reservation Details: A pop-up window will appear on the right side of the screen.
Click on the Settle Dues to see the listed options.
Locate and click on “Add Card”.
A pop-up will appear on the screen. Fill in the card details.
Click on “Add card” to complete the process.
Again, click on “Settle Dues” to see the added card.
Click on the card number to bring up the card with options.
Enter the amount you want to charge and click on “Charge” to complete the action
Once the card is charged amount will reflect under the payment made section in the room folio.
How to Change the booking segment or source ?
To change the Booking Segment or Source in Stayflexi, follow the below mentioned steps:
Login to Stayflexi: Log into your Stayflexi dashboard using your credentials.
Navigate to the Reservations Tab: From the front page of the Stayflexi dashboard, locate the top navigation menu. The second icon is the Reservation Calendar. Click on the icon to see all your reservations.
Select the Reservation: Choose the reservation for which you want to change the booking segment and source.
View Reservation Details: A pop-up window will appear on the right side of the screen.
Click on the “View Folio” option from the reservation calendar.
From the opened page, click on “More Folio Actions”.
Locate and click on “Change Booking Source”.
A page will open on the right-hand side.
Click on the tiny arrows in the two columns to view and change the booking segment and source.
Click on “Add Segment” below to complete the action.
How to edit the guest details in the folio
To edit the guest details in the folio, follow the below mentioned steps:
Login to Stayflexi: Log into your Stayflexi dashboard using your credentials.
Navigate to the Reservations Tab: From the front page of the Stayflexi dashboard, locate the top navigation menu. The second icon is the Reservation Calendar. Click on the icon to see all your reservations.
Select the Reservation: Choose the reservation for which you want to modify the booking price.
View Reservation Details: A pop-up window will appear on the right side of the screen.
Click on the “View Folio” option from the reservation calendar.
On the opened page, click on the alphabet icon with the guest’s name initial in the booking ID column.
A page will open on the right side.
Edit the guest details by filling the boxes one by one.
Click on “Save Guest” after making the changes to complete the action.
How to check-in a booking
In Stayflexi, you can check in a booking using three methods:
Through the Reservation Calendar:
Below are the step by step guidelines for check-in a booking in Stayflexi:
Login to Stayflexi: Log into your Stayflexi dashboard using your credentials.
Navigate to the Reservations Tab: From the front page of the Stayflexi dashboard, locate the top navigation menu. The second icon is the Reservation Calendar. Click on the icon to see all your reservations.
Select the Reservation: Choose the confirmed reservation you want to check-in.
Click on Check-In: From the list of available actions, locate and click the Check-In button next to the reservation.
Confirmation Page: A panel will open on the right-hand side, confirming that you are checking in the guest with the displayed reservation ID.
Complete Check-In: To finalize the process, scroll down and click on the Check-In button at the bottom of the confirmation panel. This will complete the action and check the guest in.
Once you check in the guest by clicking the Check-In button, the reservation color will change from orange to green. This color change serves as a visual indicator for easy understanding, signifying that the guest has successfully checked in.
A confirmation message will appear on the screen.
Through View Folio:
Login to Stayflexi: Log into your Stayflexi dashboard using your credentials.
Navigate to the Reservations Tab: From the front page of the Stayflexi dashboard, locate the top navigation menu. The second icon is the Reservation Calendar. Click on the icon to see all your reservations.
Select the Reservation: Choose the confirmed reservation you want to check-in.
View Reservation Details: A pop-up window will appear on the right side of the screen, showing the booking and customer information.
Find the Folio Option: Scroll down to the section with multiple actions. Look for the option labeled View Folio and click on it.
Locate the Check-In box: On the folio page, at the top, you’ll see the “Check-In” box [as shown in the above image].
Click on the Check-In Box: Click on the box to begin the check-in process.
Confirmation Page: A confirmation panel will open on the right-hand side, showing the booking ID.
Complete Check-In: Proceed by clicking the Check-In button on the panel to finalize and complete the action
Once you check in the guest by clicking the Check-In button, the reservation color will change from orange to green. This color change serves as a visual indicator for easy understanding, signifying that the guest has successfully checked in.
A confirmation message will appear on the screen.
Through More Folio Actions:
Login to Stayflexi: Log into your Stayflexi dashboard using your credentials.
Navigate to the Reservations Tab: From the front page of the Stayflexi dashboard, locate the top navigation menu. The second icon is the Reservation Calendar. Click on the icon to see all your reservations.
Select the Reservation: Choose the confirmed reservation you want to check-in.
View Reservation Details: A pop-up window will appear on the right side of the screen, showing the booking and customer information.
Find the Folio Option: Scroll down to the section with multiple actions. Look for the option labeled View Folio and click on it.
Click on More Folio Actions: On the folio page, click the More Folio Actions button to view additional options.
Locate the Check-In Option: From the listed options, locate and click on the Check-In option.
Confirmation Page: A confirmation panel will open on the right-hand side, showing the booking ID.
Complete Check-In: Proceed by clicking the Check-In button on the panel to finalize and complete the action
Once you check in the guest by clicking the Check-In button, the reservation color will change from orange to green. This color change serves as a visual indicator for easy understanding, signifying that the guest has successfully checked in.
A confirmation message will appear on the screen.
How to checkout a booking
In Stayflexi, you can check-out a booking using three methods:
Through the Reservation Calendar:
Below are the step by step guidelines for check-out a booking in Stayflexi:
Login to Stayflexi: Log into your Stayflexi dashboard using your credentials.
Navigate to the Reservations Tab: From the front page of the Stayflexi dashboard, locate the top navigation menu. The second icon is the Reservation Calendar. Click on the icon to see all your reservations.
Select the Reservation: Choose the confirmed reservation you want to check-out.
Click on Check-out: From the list of available actions, locate and click the check-out button next to the reservation.
Confirmation Page: A panel will open on the right-hand side, confirming that you are checking out the guest with the displayed reservation ID.
Complete Check-out: To finalize the process, scroll down and click on the Check-out button at the bottom of the confirmation panel. This will complete the action and check the guest out.
Once you check out the guest by clicking the Check-out button, the reservation color will change from green to violet. This color change serves as a visual indicator for easy understanding, signifying that the guest has successfully checked out.
A confirmation message will appear on the screen.
Through View Folio:
Login to Stayflexi: Log into your Stayflexi dashboard using your credentials.
Navigate to the Reservations Tab: From the front page of the Stayflexi dashboard, locate the top navigation menu. The second icon is the Reservation Calendar. Click on the icon to see all your reservations.
Select the Reservation: Choose the confirmed reservation you want to check-out.
View Reservation Details: A pop-up window will appear on the right side of the screen, showing the booking and customer information.
Find the Folio Option: Scroll down to the section with multiple actions. Look for the option labeled View Folio and click on it.
Locate the Check-out box: On the folio page, at the top, you’ll see the “Check-out” box [as shown in the above image].
Click on the Check-out Box: Click on the box to begin the check-out process.
Confirmation Page: A confirmation panel will open on the right-hand side, showing the booking ID.
Complete Check-out: Proceed by clicking the Check-Out button on the panel to finalize and complete the action
Once you check out the guest by clicking the Check-out button, the reservation color will change from green to violet. This color change serves as a visual indicator for easy understanding, signifying that the guest has successfully checked out.
A confirmation message will appear on the screen.
Through More Folio Actions:
Login to Stayflexi: Log into your Stayflexi dashboard using your credentials.
Navigate to the Reservations Tab: From the front page of the Stayflexi dashboard, locate the top navigation menu. The second icon is the Reservation Calendar. Click on the icon to see all your reservations.
Select the Reservation: Choose the confirmed reservation you want to check-in.
View Reservation Details: A pop-up window will appear on the right side of the screen, showing the booking and customer information.
Find the Folio Option: Scroll down to the section with multiple actions. Look for the option labeled View Folio and click on it.
Click on More Folio Actions: On the folio page, click the More Folio Actions button to view additional options.
Locate the Check-Out Option: From the listed options, locate and click on the Check-Out option.
Confirmation Page: A confirmation panel will open on the right-hand side, showing the booking ID.
Complete Check-Out: Proceed by clicking the Check-out button on the panel to finalize and complete the action
Once you check out the guest by clicking the Check-out button, the reservation color will change from green to violet. This color change serves as a visual indicator for easy understanding, signifying that the guest has successfully checked out.
A confirmation message will appear on the screen.
How to cancel a booking
In Stayflexi, you can cancel a booking using two methods: through the reservation calendar or via the folio.
Below are the explanations and guidelines for both methods:
Through the Reservation Calendar:
Step 1: Go to Reservation Calendar.
Step 2: Click on the reservation you want to cancel.
Step 3: A page will open on the right side with multiple actions.
Step 4: Locate and click on “Cancel Booking”.
Step 5: A page will open on the right side for cancellation options.
Step 6: Select your options, such as:
Apply Cancellation policy:- It will cancel the booking and apply the amount as per cancellation policy configured.
Don’t void.
Charge one night and void remaining:- It will charge one night prices only and void remaining night prices.
Void all remaining charges:- It will make the room amount zero for the given booking id.
Step 7: Click “Yes, Cancel booking”.
You will receive a confirmation message that the booking has been successfully canceled.
Through Folio:
Step 1: Click on the reservation you want to cancel.
Step 2: A page will open on the right side.
Step 3: Select “View Folio” from the available actions.
Step 4: On the Folio page, click on “More Folio Actions.”
Step 5: Locate and click on “Cancel Booking”.
Step 6: Select the void charge options according to your preference.
Step 7: Click “Confirm Cancel” to complete the action.
You will receive a confirmation message indicating that the booking has been successfully canceled.
Note: To cancel an online travel portal or channel booking, Kindly reach out to the respective online travel portal or channel.
How to email guest folio and confirmation voucher?
To email a guest folio in Stayflexi, you can quickly send a detailed breakdown of the guest’s charges, payments, and any adjustments directly to their email.
Below are the step-by-step guidelines for emailing a guest folio in Stayflexi:
Login to Stayflexi: Log into your Stayflexi dashboard using your credentials.
Navigate to the Reservations Tab: From the front page of the Stayflexi dashboard, locate the top navigation menu. The second icon is the Reservation Calendar. Click on the icon to see all your reservations.
Select the Reservation: Choose the reservation for which you want to send the folio by clicking on it
View Reservation Details: A pop-up window will appear on the right side of the screen, showing the booking and customer information.
Find the Folio Option: Scroll down to the section with multiple actions. Look for the option labeled View Folio and click on it.
Access More Folio Options: This will open the folio page. On this page, click on the More Folio Options button.
Select Email Folio: A pop-up will appear with various options. Find and click on Email Folio.
Review Guest Email: A new pop-up will appear on the right side of the screen, automatically filled with guest’s email address.
Send the Folio: Click on Send to email the folio to the guest.
Confirmation: You will now receive a confirmation message indicating the folio has been successfully sent.
how to send a Confirmation voucher?
To email a confirmation voucher in Stayflexi, you can send guests an official document confirming their reservation details, including dates, room type, and any associated charges.
Here are the step-by-step guidelines for sending a confirmation voucher:
Login to Stayflexi: Log into your Stayflexi dashboard using your credentials.
Navigate to the Reservations Tab: From the front page of the Stayflexi dashboard, locate the top navigation menu. The second icon is the Reservation Calendar. Click on the icon to see all your reservations.
Select the Reservation: Choose the reservation for which you want to send the folio by clicking on it
View Reservation Details: A pop-up window will appear on the right side of the screen, showing the booking and customer information.
Find the Folio Option: Scroll down to the section with multiple actions. Look for the option labeled View Folio and click on it.
Access More Folio Options: This will open the folio page. On this page, click on the More Folio Options button.
Email Confirmation: From the options that pop up, select Email Booking Confirmation.
Confirm Email: Another pop-up will appear to the right, where the guest’s email address will automatically be displayed, You can also edit it in case you want to send it to the different email id.
Send the Email: Click on the Send button below the email field to send the confirmation voucher.
Confirmation Message: You will receive a confirmation message indicating that the email has been successfully sent to the guest.
How to exempt taxes from a particular reservation?
Login to Stayflexi: Log into your Stayflexi dashboard using your credentials.
Navigate to the Reservations Tab: From the front page of the Stayflexi dashboard, locate the top navigation menu. The second icon is the Reservation Calendar. Click on the icon to see all your reservations.
Select the Reservation: Choose the reservation for which you want to see the folio by clicking on it
View Reservation Details: A pop-up window will appear on the right side of the screen, showing the booking and customer information.
Find the Folio Option: Scroll down to the section with multiple actions. Look for the option labeled View Folio and click on it.
How to Apply for Tax Exemption?
Click on More Folio Actions: At the top of the folio, click the green More Folio Actions button.
A popup window will appear with multiple actions listed.
Locate and click on Tax-Exempt Status: Select this option from the list.
Another popup will appear on the right side.
Enable the toggle to check for tax exemption , or uncheck it to revoke the exemption.
Enter the Tax Exemption ID and specify the types of taxes to exempt.
Click the Tax Exempt button to complete the action successfully.
What is Scanty Baggage Feature?
The Scanty Baggage feature in Stayflexi marks reservations where guests arrive with minimal or no luggage. This is typically an indicator for the hotel staff to be cautious, as it may signify a higher risk of the guest leaving without paying. When a guest is flagged as “Scanty Baggage”, it helps the hotel staff take necessary precautions, such as requesting advance payment or ensuring payment guarantees before allowing further services.
How to find Folio:
Login to Stayflexi: Log into your Stayflexi dashboard using your credentials.
Navigate to the Reservations Tab: From the front page of the Stayflexi dashboard, locate the top navigation menu. The second icon is the Reservation Calendar. Click on the icon to see all your reservations.
Select the Reservation: Choose the reservation for which you want to see the folio by clicking on it
View Reservation Details: A pop-up window will appear on the right side of the screen, showing the booking and customer information.
Find the Folio Option: Scroll down to the section with multiple actions. Look for the option labeled View Folio and click on it.
How to find and mark Scanty Baggage in Stayflexi:
Click on “More Folio Actions”.
Locate “Scanty Baggage” and click on it.
A pop-up window will appear on the right-hand side.
The default option will be “Yes/No”. Select “Yes” to mark the reservation as having Scanty Baggage.
Click the “Confirm” button below.
After confirming, you will see a red luggage icon in the middle of the folio page, next to the booking ID and status of the reservation, indicating that the reservation has been marked as having Scanty Baggage.
Adding or removing guests from a reservation
Login to Stayflexi: Log into your Stayflexi dashboard using your credentials.
Navigate to the Reservations Tab: From the front page of the Stayflexi dashboard, locate the top navigation menu. The second icon is the Reservation Calendar. Click on the icon to see all your reservations.
Select the Reservation: Choose the reservation for which you want to see the folio by clicking on it
View Reservation Details: A pop-up window will appear on the right side of the screen, showing the booking and customer information.
Find the Folio Option: Scroll down to the section with multiple actions. Look for the option labeled View Folio and click on it.
How to Add a Guestin Folio:
Click on the icon to the right side next to the alphabet icon.
A guest details form will appear. Fill in all the required details.
Click on the green “Add Guest” button.
Once added, you will see two initials representing the guest’s name
You have successfully added the guest.
How to Remove a Guest in Folio:
Click on the guest’s alphabet icon corresponding to the guest you want to remove.
You will be taken to the guest information page.
Click on “More” option.
Select “Delete customer” to remove them from the folio.
You have successfully removed the guest.
How to add / remove room on existing reservation?
Login to Stayflexi: Log into your Stayflexi dashboard using your credentials.
Navigate to the Reservations Tab: From the front page of the Stayflexi dashboard, locate the top navigation menu. The second icon is the Reservation Calendar. Click on the icon to see all your reservations.
Select the Reservation: Choose the reservation for which you want to see the folio by clicking on it
View Reservation Details: A pop-up window will appear on the right side of the screen, showing the booking and customer information.
Find the Folio Option: Scroll down to the section with multiple actions. Look for the option labeled View Folio and click on it.
How to Add a Room to an Existing Reservation:
Click on “Add New Room to Group Booking” in the “More Folio Actions” menu.
A new page will open on the right side of the screen displaying room and guest details.
Fill in the necessary details, then click the “Save” button to complete the action.
The added room number will reflect on the left-hand side, along with the existing room number.
You have successfully added a room to the existing reservation.
How to Remove a Room from an Existing Reservation:
Click on the room folio for the room you want to remove.
Select “More Folio Actions.”
Find Delete Room from Group Booking, or search for it using the search bar.
A confirmation page will appear on the right side. Click Remove Room from Booking to complete the action.
You have successfully removed the room from the booking.
Booking Engine
Boost your property’s direct bookings with Stayflexi’s Booking Engine feature. This powerful tool integrates seamlessly into your website, allowing guests to easily check availability, view rates, and make secure bookings in just a few clicks. With a user-friendly interface and mobile optimization, your guests can book anytime, anywhere.
Stayflexi’s Booking Engine also provides real-time updates on room availability and pricing, ensuring your property stays competitive. Reduce reliance on third-party platforms and increase your revenue by capturing more direct bookings, all while offering a smooth and hassle-free booking experience for your guests.
Stayflexi Booking Engine - Everything you need to know
Stayflexi’s Booking Engine makes it easy to reserve your stay online. Follow these simple steps to book your room smoothly:
Open the Booking Page
Go to the hotel website where Stayflexi is set up.
Click on the booking section on the main page to start.
Choose Your Dates
Pick your check-in and check-out dates on the calendar.
Flexible options let you choose convenient arrival and departure times.
Select Your Room
Browse the available rooms with photos and details.
The system shows rooms that match your selected dates.
Enter Guest Info
Fill in your name and contact details.
Double-check for accuracy to ensure a smooth check-in process.
Review Your Booking
Review your booking summary to confirm dates, room type, extras, and the total price.
If you have any promo codes, enter them now.
Make Payment
Choose a payment method (credit card, Apple Pay, etc.).
Enter your details safely. Stayflexi supports quick, secure payment.
Receive Confirmation
After payment, a confirmation email will be sent to you.
This includes a booking reference and check-in instructions.
Step-by-step guide for booking engine configuration
Logging into Your Stayflexi Dashboard:
Enter your username and password to log in.
Go to Property Configuration:
Once logged in, click on the More Apps icon (represented by four blocks) in the top right corner.
From the drop down menu, select Property Configuration
Go to Booking engine:
You’ll see various options on the left side of the Property Configuration page.
Click on the Booking engine option
This will navigate you to the booking engine settings or configuration page.
Booking Engine URL
This field holds the URL of the booking engine page that guests will be directed to when making a reservation. Ensure it has the correct hotel ID included in the URL.
Header Colour
This option allows you to choose the color for the header of the booking engine page. Select a color that matches your brand identity.
Main Body Colour
Sets the main background colour for the body section of the booking engine page. Pick a colour that complements the header and maintains readability.
Room Type and Summary Cart Colour
Controls the color for the sections displaying room types and the booking summary cart. This can help highlight these areas for better user navigation.
Lowest Price Colour
Sets the color for the lowest price displayed on the booking engine, making it more prominent to attract attention to special rates or discounts.
Font Colour
Specifies the text color used across the booking engine page. Ensure this color contrasts well with the background for readability.
Phone Number
Enter the contact number that guests can use for inquiries. This should be a direct line to the hotel’s reservations or customer support team.
Email
The email address provided here will be visible to guests, offering an alternative contact method for support or booking assistance.
Add Your Website Link to Booking Engine Logo
Toggle this option to add a clickable link to your website on the booking engine’s logo, providing guests a way to navigate back to your main site from the booking engine.
Run Booking Engine in Stayflexi’s Unique 3-Slot Mode
Stayflexi’s 3-slot mode organizes booking times into distinct slots (e.g., morning, afternoon, evening). Toggle this feature based on your property’s needs.
Rate Check Widget
Enables or disables the rate check widget, a tool that helps guests quickly view rates and availability across dates.
Can Users Make Booking Without Addons?
This option allows users to book a room without adding optional services or amenities (add-ons). If set to “No,” guests must select at least one add-on.
Do You Want to Allow Partial Payment?
Enables guests to make a partial payment at the time of booking instead of paying in full. The percentage slider lets you set the minimum partial payment amount.
Manually Approve Bookings for a Given Time Before Check-In?
This setting allows you to require manual approval for bookings made within a specific time frame before check-in. The hours field specifies how close to check-in this applies (set to 0 hrs here, meaning no time restriction).
Allow Booking Engine Widget to Add Rooms by Default?
When enabled, the booking engine widget automatically adds a default room for guests, simplifying the booking process for users.
Save Button
Click “Save” after configuring the settings to apply the changes to your booking engine.
These are the settings for the Booking engine.
Stayflexi Booking Engine configurations which you should know.
Logging into Your Stayflexi Dashboard:
Enter your username and password to log in.
Go to Property Configuration:
Once logged in, click on the More Apps icon (represented by four blocks) in the top right corner.
From the drop down menu, select Property Configuration
Got to Booking engine:
You’ll see various options on the left side of the Property Configuration page.
Click on the Booking engine option
This will navigate you to the booking engine settings or configuration page.
Booking Engine URL
This field holds the URL of the booking engine page that guests will be directed to when making a reservation. Ensure it has the correct hotel ID included in the URL.
Header Color
This option allows you to choose the color for the header of the booking engine page. Select a color that matches your brand identity.
Main Body Color
Sets the main background color for the body section of the booking engine page. Pick a color that complements the header and maintains readability.
Room Type and Summary Cart Color
Controls the color for the sections displaying room types and the booking summary cart. This can help highlight these areas for better user navigation.
Lowest Price Color
Sets the color for the lowest price displayed on the booking engine, making it more prominent to attract attention to special rates or discounts.
Font Color
Specifies the text color used across the booking engine page. Ensure this color contrasts well with the background for readability.
Phone Number
Enter the contact number that guests can use for inquiries. This should be a direct line to the hotel’s reservations or customer support team.
Email
The email address provided here will be visible to guests, offering an alternative contact method for support or booking assistance.
Add Your Website Link to Booking Engine Logo
Toggle this option to add a clickable link to your website on the booking engine’s logo, providing guests a way to navigate back to your main site from the booking engine.
Run Booking Engine in Stayflexi’s Unique 3-Slot Mode
Stayflexi’s 3-slot mode organizes booking times into distinct slots (e.g., morning, afternoon, evening). Toggle this feature based on your property’s needs.
Rate Check Widget
Enables or disables the rate check widget, a tool that helps guests quickly view rates and availability across dates.
Can Users Make Booking Without Addons?
This option allows users to book a room without adding optional services or amenities (add-ons). If set to “No,” guests must select at least one add-on.
Do You Want to Allow Partial Payment?
Enables guests to make a partial payment at the time of booking instead of paying in full. The percentage slider lets you set the minimum partial payment amount.
Manually Approve Bookings for a Given Time Before Check-In?
This setting allows you to require manual approval for bookings made within a specific time frame before check-in. The hours field specifies how close to check-in this applies (set to 0 hrs here, meaning no time restriction).
Allow Booking Engine Widget to Add Rooms by Default?
When enabled, the booking engine widget automatically adds a default room for guests, simplifying the booking process for users.
Save Button
Click “Save” after configuring the settings to apply the changes to your booking engine.
These are the settings for the Booking engine.
Stayflexi Booking Engine - How to Sell specific Rooms with Rate Plans on Booking Engine
To sell specific rooms with Rate Plans on the Booking Engine, you need to configure the rate plan in the PMS.
Below is the step-by-step guide to configure or create a Rate Plan in Stayflexi’s Revenue Management:
Log in to Your Stayflexi Dashboard:
Use your username and password to log in.
Go to Revenue Management:
After logging in, click the four boxes icon (more apps) in the top right corner.
A dropdown menu will appear.
Select “Revenue Management” from the list
Create a Rate plan
Go to the “Rate plans” section on the left menu.
Click “Add new rate plan” to open the rate plan creation form.
Filling in Rate Plan Details
What’s the name of your rate category?
This is where you enter the name of your rate plan.
This name will be used internally to identify the rate plan.
What’s the plan Display Name of your rate category?
This is the name that will be displayed to customers.
Make sure the name is clear and descriptive for customers.
Set your rates
Select Rate: Choose an existing base rate plan from the dropdown
Percentage or Amount Adjustment: Select whether the adjustment to the base rate should be in % (percentage) or $ (fixed amount).
Value: Enter the adjustment amount (e.g., “20” if you’re offering a 20% discount).
Dependency: Choose if this rate plan is dependent on another rate plan.
Hard Dependency Toggle: Set this to “Yes” if this rate plan should only be available when its base rate plan is available.
Dependency Dropdown: Select “YES” if you want this rate plan to be strictly tied to the base rate.
Selecting Additional Policies and Settings
Select a Policy: Choose a cancellation policy or other policy that applies to this rate plan (e.g., “Cancellation Policy”).
This ensures the selected policy rules apply to reservations made under this rate plan.
Configuring Visibility and Payment Options
Show this rate plan on front desk kiosk?
No/Yes Toggle: Choose whether this rate plan should appear on the front desk kiosk.
No: The rate plan will not be visible on the kiosk, meaning staff won’t see it for walk-in or front desk bookings.
Yes: The rate plan will be visible at the kiosk, allowing it to be used for on-the-spot bookings.
Allow pay at property?
No/Yes Toggle: Decide if customers are allowed to pay directly at the property or if only online payments are accepted.
No: Only online payments will be allowed; customers must pay in advance.
Yes: Guests can choose to pay when they arrive at the property.
Hide this rate plan on the booking engine?
No/Yes Toggle: Determine if this rate plan should be hidden from the online booking engine.
No: The rate plan will be shown and available on the booking engine.
Yes: The rate plan will be hidden, meaning it won’t appear to guests booking online.
Is this rate plan for OTA mapping only?
No/Yes Toggle: Specify if this rate plan is exclusively for OTA (Online Travel Agency) mapping and should not be visible elsewhere.
No: The rate plan will be available across different channels, including the booking engine and front desk kiosk.
Yes: The rate plan will only be used for OTA mapping. It won’t show up on the Stayflexi booking engine or for front desk reservations.
Assigning Room Types and Adding Description
Which room types?
Select the specific room types to which this rate plan applies. Only the selected rooms will offer this rate to guests.
Describe the rate category in a few words?
Enter a brief description of the rate plan to help staff and customers understand what this rate plan includes or why it might be beneficial (e.g., “20% discount for stays of 3 nights or more”).
Saving the Rate Plan(as shown in Image 2):
Once all details and settings have been configured, click “Save” at the bottom of the form to create the rate plan.
According to the above configuration, the Rate plan will either be visible on the Booking engine or will be hidden at the time of booking creation for the guests.
Below is the step-by-step guide on how to sell specific rooms with rate plans in the Stayflexi Booking Engine :
Access the Booking Engine
Go to the Stayflexi booking engine for the hotel or property you’re interested in.
You may find this link on the hotel’s website or by searching directly for the property on Stayflexi.
Select Dates and Room Preferences
Choose your Check-In and Check-Out dates.
Specify the number of rooms, adults, and children to filter the available rooms accordingly.
Browse Available Room Types
Scroll to the “Choose your room(s)” section. Each room type, such as “Suite” or “Deluxe Room,” is listed here.
Click on a room type to view additional details like maximum occupancy, bed configuration, and amenities (e.g., soundproofing, hardwood floors, private bathrooms).
Select a Rate Plan
Each room type has multiple rate plans, such as Standard Plan, AP (American Plan), MAP (Modified American Plan), and CP (Continental Plan).
Review the rate plan options and prices. Each rate plan may come with specific inclusions, like meals or cancellation policies.
Choose Quantity
Use the quantity selector next to the desired rate plan (the +/- buttons) to choose the number of rooms you want to book under that plan.
Click Add to confirm your selection. The selected room and rate plan will appear in your booking summary on the right.
Review Your Booking Summary
On the right side of the screen, you’ll see a summary of your booking. This includes:
Room type and rate plan (e.g., Suite – Standard Plan).
The number of adults and children.
Room price and any applicable taxes.
Proceed to Book
Once you’re satisfied with your selections, click on Continue to Book.
This will take you to the next steps, where you’ll enter guest information and payment details.
Complete the Payment
Enter your details and follow the prompts to complete the payment.
After payment, you’ll receive a booking confirmation with all the details of your reservation.
Coupon code option on stayflexi Booking Engine and how it is useful
The “Coupon code” option on the Stayflexi booking engine allows users to apply discount codes or promotional offers to reduce the booking cost. This option is useful for guests who have received a coupon from the hotel or as part of a promotional campaign. By entering the code and clicking “Apply,” guests can see the updated price with the discount reflected in the total.
Creating a Coupon Code in Stayflexi PMS
Before guests can use a coupon code on the booking engine, you must set it up in the Stayflexi Dashboard.
Log in to Your Stayflexi Dashboard:
Use your username and password to log in.
Go to Revenue Management:
After logging in, click the four boxes icon (more apps) in the top right corner
A dropdown menu will appear.
Select “Revenue Management” from the list
Go to Coupon/Offers:
On the left sidebar, click on “Coupon Code / Offers” (the 5th option) to view the Coupon Code/ Offers page. (as shown in Image 2).
Add a Coupon/Offers:
Click the “Add Coupon Code / Offers” button to start creating a new Coupon Code / Offers
Enter Coupon Code / Offer Name:
Provide a descriptive name for your coupon code/offer to help identify it easily
Describe Coupon Code / Offer:
Provide a brief description of your coupon code/ offer for better understanding
Choose the type
From the dropdown in the “Choose type of your coupon code/offer” section, either of the following types:
OFFER
COUPON CODE
Set Room Booking Criteria
In the section “How many rooms do guests need to book to get this coupon code or offer?”, input:
Minimum number of rooms guests need to book.
Maximum number of rooms guests can book.
Set Stay Duration Criteria
In the section “How long do guests need to stay to get this coupon code or offer?”, enter the following:
Minimum number of nights required for guests to stay to qualify for the coupon code/ offer.
Maximum number of nights guests can stay to qualify.
Set the Discount (as shown in Image 4):
In the section “How much of a discount do you want to give?”, enter the desired discount and select the type of discount (Percentage or Flat ) from the dropdown.
Set the Date Range for Discounted Stays
In the “When can guests check in using the discounted rate?” section, specify the date range for when guests can use the Coupon code/offer.
Select Days of the Week for Discount Availability:
Choose the days of the week that the discounted rate will be available. You can select all days or specific days as needed
Valid Booking Period:
In the section “When can bookings be shown?”, select the date range during which the coupon code/offer is valid for bookings
Coupon Code/Offer Usage Limit:
In the section “How many times can the coupon code/offer be used? (leave blank for no limit)”:
The coupon code or offer can be used as many times as you want unless a limit is set
Save the Coupon code/ offer:
Once you have entered all the details, review them carefully.
Click the “Save” button to finalize and activate your Coupon code/ offer
Using the Coupon Code on the Stayflexi Booking Engine
Now that the coupon code is set up, guests can apply it during the booking process.
Select Room and Start Booking
On the Stayflexi booking engine, guests should select a room and click Continue to Book.
Locate the Coupon Code Field
In the booking details section, they’ll see a field labeled Coupon Code with an Apply button.
Enter and Apply the Coupon Code
Guests can enter their coupon code carefully (avoiding extra spaces).
They then click Apply to activate the discount.
View the Discounted Total
If the coupon code is valid, the total booking amount will update to reflect the discount.
Complete the Booking
After reviewing the discounted price, guests can fill in their booking details, and click Pay Now to complete the reservation at the discounted rate.
Enjoy the Savings!
Guests save on their booking, enjoying a more affordable stay thanks to the coupon code.
Following these steps, you can efficiently set up and manage Coupon codes/offers, enhancing guest experience and boosting bookings.
Magic link
Simplify guest access with Stayflexi’s Magic Link feature. This innovative tool allows guests to quickly and securely log in to their reservations or accounts with just a single click. No passwords or complicated steps—guests receive a personalized link via email or SMS, making the process seamless and convenient. Whether for checking in, viewing bookings, or accessing special offers, Stayflexi’s Magic Link enhances the guest experience by providing quick, secure, and hassle-free access, all while reducing administrative workload for your staff.
What is the Magic Link feature in Stayflexi, and how can it benefit my property?
The Magic Link is a feature in Stayflexi which are used by hotels and properties to streamline the guest experience by providing a unique, secure URL that grants guests access to various self-service options along with all the booking details and a way to connect with properties directly. The link can be sent to guests via email, whatsapp and messaging allowing them to complete tasks like:
Self-check-in: Guests can check in using a self-service link without assistance from the front desk.
Early check-in/late check-out: Guests can request to check in early or check out late if the hotel offers these options.
Room upgrades: Guests can view available room upgrades and choose to upgrade before arrival.
Purchase add-ons: Guests can buy extra services like meals, spa treatments, tours or any add on services offered by properties.
Payment options: Guests can pay for services either in advance or upon arrival, depending on the hotel’s configuration.
The Magic Link eliminates the need for guests to interact with the front desk directly for these services, providing convenience and flexibility. It simplifies the process of managing bookings and enhancing guest experience through an easy-to-use, web-based interface. The property benefits from a more efficient check-in/check-out process, reduced staff workload, and opportunities to upsell services or rooms.
Here is a step-by-step guide for Magic link:
Log in to Your Stayflexi Dashboard:
Enter your username and password to log in.
Go to Property configuration:
After logging in, click the “More Apps” icon (represented by four boxes or blocks) in the top right corner.
From the dropdown menu, select Property Configuration.
On the left-hand side of the Property Configuration page, you will see various options.
Click on the Magic link and kiosk dropdown, you will see some more options.
Click on the Configuration option.
This takes you to the Self-service configuration page.
Front Desk Kiosk URL
Purpose: This URL is generated for the hotel’s self-service platform, allowing guests to access services such as check-in, check-out, and other options without needing to interact with hotel staff directly.
Action: Guests can visit this link to use self-service features when check-in in at the property.
Front desk QR codePurpose:
This QR code is generated for the hotel’s self-service platform, providing guests with quick and easy access to essential services such as check-in, check-out, and other available options directly from their mobile devices.
Action: Guests can scan this QR code upon arrival at the property to access self-service features instantly, enabling a smooth and contactless check-in or check-out experience without needing to interact with hotel staff.
Do you want to allow guests to self-check in?
Purpose: This option, when enabled, allows guests to check in using the self-service link without assistance from the front desk.
Action: Toggle this switch to “Yes” to let guests check themselves in before their arrival.
Do you want to allow guests to perform early check-in?
Purpose: This allows guests to check in earlier than the standard check-in time, providing more flexibility.
Action: Toggle this to “Yes” to offer early check-in as an option, subject to hotel availability.
Do you want to allow guests to perform late check-out?
Purpose: This option allows guests to check out later than the regular check-out time.
Action: Enable this option if you wish to offer late check-out services.
Do you want to allow guests to purchase add-ons?
Purpose: Enables guests to buy additional services or products, such as breakfast, spa services, or room upgrades, through the self-service platform.
Action: Switch this to “Yes” to allow guests to purchase available add-ons.
Do you want to allow guests to pay at the hotel for add-ons?
Purpose: If add-ons are enabled, this option determines whether guests must pay at the time of booking (PAY NOW) or the hotel (PAY AT HOTEL).
Action: Select either “PAY NOW” or “PAY AT HOTEL” depending on how you want guests to complete payments for the add-ons.
Do you want guests to auto-upgrade their rooms?
Purpose: This feature allows guests to automatically upgrade their room if a better room is available, usually at an additional charge. It helps properties in up selling rooms automatically and generate extra revenue.
Action: Enable this if you want to give guests the option to upgrade their rooms through the self-service platform.
Do you want to send the self-service link email to guests and the hotel?
Purpose: When this option is enabled, the system sends the self-service link via email to both the guest and the property.
This makes the check-in process easier for the guest and helps the hotel manage the guest’s arrival.
Action: Toggle this to “Yes” to enable the automatic sending of the self-service link via email.
Please specify check-in instructions for the guest
Purpose: In this field, the property can provide detailed instructions for the check-in process that will be visible on the front desk kiosk and sent to the guest. These instructions guide the guest through self-check-in, ensuring they understand how to proceed.
Action: Write specific check-in instructions, such as ID verification procedures or directions to the hotel, in the provided text box.
Final Step:
Save Configuration: Once you have set your desired options, click the “Save” button at the bottom right to apply these configurations.
This ensures that the self-service settings are updated for your guests.
How do I configure or control the settings for the Magic Link?
Below is the Step-by-step guide to control or configure settings for Magic Link:
Log in to Your Stayflexi Dashboard
Enter your username and password to log in.
Go to Property configuration:
After logging in, click the “More Apps” icon (represented by four boxes or blocks) in the top right corner.
From the drop down menu, select Property Configuration.
On the left-hand side of the Property Configuration page, you will see various options.
Got to Magic link and kiosk:
Click on the Magic link and kiosk drop down, you will see some more options.
Click on the Configuration option.
This takes you to the Self-service configuration page.
Front Desk Kiosk URL
Purpose: This URL is generated for the hotel’s self-service platform, allowing guests to access services such as check-in, check-out, and other options without needing to interact with hotel staff directly.
Action: Guests can visit this link to use self-service features when checking in at the property.
Do you want to allow guests to self-check in?
Purpose: This option, when enabled, allows guests to check in using the self-service link without assistance from the front desk.
Action: Toggle this switch to “Yes” to let guests check themselves in before their arrival.
Once you toggle this switch to “Yes”, you get an option below it asking “What percentage of the balance due should be charged as the self-check-in cost?”.
Configure the percentage amount of the booking’s balance due that is payable during self-check-ins. If set to 0, guests will be able to self-check in without payment.
Do you want to allow guests to perform early check-in?
Purpose: This allows guests to check in earlier than the standard check-in time, providing more flexibility.
Action: Toggle this to “Yes” to offer early check-in as an option, subject to hotel availability.
Once you toggle this switch to “Yes”, you get an option below it asking “How many hours before the check-in can the guest opt for early check-in?”.
Configure the availability window to allow the guest to perform early check-in within the hours set before the actual check-in(as shown in Image 3).
Do you want to allow guests to perform late check-out?
Purpose: This option allows guests to check out later than the regular check-out time.
Action: Enable this option if you wish to offer late check-out services.
Once you toggle this switch to “Yes”, you get an option below it asking “How many hours before the check-out can the guest opt for late check-out?”.
Configure the availability window to allow the guest to perform late checkout within the hours set before the actual checkout(as shown in Image 3).
Do you want to allow guests to purchase add-ons?
Purpose: Enables guests to buy additional services or products, such as breakfast, spa services, or room upgrades, through the self-service platform.
Action: Switch this to “Yes” to allow guests to purchase available add-ons.
Do you want to allow guests to pay at the hotel for add-ons?
Purpose: If add-ons are enabled, this option determines whether guests must pay the POS orders at the time of booking (PAY NOW) or the hotel (PAY AT HOTEL).
Action: Select either “PAY NOW” or “PAY AT HOTEL” depending on how you want guests to complete payments for the add-ons.
Do you want guests to auto-upgrade their rooms?
Purpose: This feature allows guests to automatically upgrade their room if a better room is available, usually at an additional charge.
Action: Enable this if you want to give guests the option to upgrade their rooms through the self-service platform.
Once you toggle this switch to “Yes”, you get an option below it asking “Do you want to allow guests to upgrade their room after check-in?”.
If enabled, it will allow the users to auto-upgrade their room from the self-service URL after check-in(as shown in Image 3).
Do you want to send the self-service link email to guests and the hotel?
Purpose: When this option is enabled, the system sends the self-service link via email to both the guest and the hotel.
This makes the check-in process easier for the guest and helps the hotel manage the guest’s arrival.
Action: Toggle this to “Yes” to enable the automatic sending of the self-service link via email.
Please specify check-in instructions for the guest
Purpose: In this field, the hotel can provide detailed instructions for the check-in process that will be visible on the front desk kiosk and sent to the guest. These instructions guide the guest through self-check-in, ensuring they understand how to proceed.
Action: Write specific check-in instructions, such as ID verification procedures or directions to the hotel, in the provided text box.
Save the configuration:
Save Configuration: Once you have set your desired options, click the “Save” button at the bottom right to apply these configurations.
This ensures that the self-service settings are updated for your guests.
If a guest selects a service through the Magic Link, where can I view it in Stayflexi?
If a guest selects a service through the Magic Link in Stayflexi, you can view it in Stayflexi’s Dashboard. Here’s a step-by-step guide on how you can view the Magic link bookings
Log in to Your Stayflexi Dashboard
Enter your username and password to log in.
Go to the Magic link in the Dashboard
In the Dashboard, click on the Reservations option.
You can see the following tiles/blocks:
New bookings
In-house
Arrivals
Departures
Cancellations
On hold
No shows
Magic link
Click on the Magic link tile.
All the bookings made through the Magic link will be displayed.
You view the folio, send a magic link and approve the booking by clicking on the options on the booking.
Following these steps, you can view the bookings or services the guest selects through the Magic link in Stayflexi.
How do I configure shop items or services to appear on the Magic Link?
Below is the step-by-step guide to configuring shop items or services to appear on the Magic Link:
Log in to Your Stayflexi Dashboard:
Enter your username and password to log in.
Go to Property configuration:
After logging in, click the “More Apps” icon (represented by four boxes or blocks) in the top right corner.
From the drop down menu, select Property Configuration
On the left-hand side of the Property Configuration page, you will see various options.
Got to Magic link and kiosk:
Click on the Magic link and kiosk drop down, you will see some more options.
Click on the Configuration option.
This takes you to the Self-service configuration page.
Configure shop items or services:
To set up shop items or services to appear on the Magic link, do the following:
Do you want to allow guests to purchase add-ons?
Purpose: Enables guests to buy additional services or products, such as breakfast, spa services, or room upgrades, through the self-service platform.
Action: Switch this to “Yes” to allow guests to purchase available add-ons.
Do you want to allow guests to pay at the hotel for add-ons?
Purpose: If add-ons are enabled, this option determines whether guests must pay the POS orders at the time of booking (PAY NOW) or the hotel (PAY AT HOTEL).
Action: Select either “PAY NOW” or “PAY AT HOTEL” depending on how you want guests to complete payments for the add-ons.
Click on the Save button to set up the shop items or service successfully.
Also, you can enable or disable particular POS/Shops menu items to be displayed on the magic link sent to guests by following the below-given steps:
Log in to Your Stayflexi Dashboard
Enter your username and password to log in.
Access Shops/POS:
After logging in, click the “More Apps” icon (represented by four boxes or blocks) in the top right corner.
From the drop down menu, select Shops
A page showing all available shops or outlets will appear.
Choose the shop or outlet by clicking on the shop or outlet name.
Navigate to the “Configuration” Page:
Once you select a shop or outlet, you will be taken to its Dashboard.
On the left-hand side of the page, you will see various options, including:
Dashboard
Place Orders
View Orders
Reports
Configuration
Click on Configuration drop down to proceed
Go to Menu items:
On the Configuration dropdown, you will see a list of options including:
Outlet
Menu items
Categories
Discounts
Table/Area
Staff
Click on the Menu items option
A list of all the menu items will appear along with the details.
Enable or disable the menu items:
To enable or disable the menu items to be displayed on magic link sent to guests, do the following
Click on the Edit item option under the Actions column for the menu item,you want to either enable or disable on the Magic link.
A page to edit the details for menu items will appear.
Scroll down to the Self-service section.
There are two options:
Enable
Click on Enable to enable the menu item on the Magic link and provide the self-service discount value in the Self-service discount field below.
Disable
Click on Disable to disable the menu item on the Magic link.
Click on the Save button to save the changes made.
By following these steps you can configure shop items or services to appear on the Magic Link.
Can I set up room-specific self-check-in instructions for guest using the Magic Link?
Yes, you can set up room-specific self-check-in instructions for guests using the magic link by following the steps given below
Log in to Your Stayflexi Dashboard:
Enter your username and password to log in.
Go to Property configuration:
After logging in, click the “More Apps” icon (represented by four boxes or blocks) in the top right corner.
From the drop down menu, select Property Configuration
On the left-hand side of the Property Configuration page, you will see various options.
Got to Magic link and kiosk:
Click on the Magic link and kiosk drop down, you will see some more options
Click on the Room wise check-in instructions option
This takes you to the Room check-in instructions page.
On the Room check-in instructions page, a list of room IDs will be displayed.
For each room ID, the check-in instructions column is available.
Click on the Add some instructions field next to the room ID where you want to specify the self-check-in instructions.
Enter the instructions and click, and the instructions will be successfully set up.
By following these steps room-specific self-check-in instructions for guests using the magic link.
Group Dashboard
Group Performance Dashboard Overview
The Group Performance Dashboard in stayflexi provides a comprehensive and insightful overview of your multi-property portfolio’s performance, all in one place. It enables hoteliers to easily understand key performance metrics, identify top-performing properties, and analyze trends through visual, easy-to-read reports.
To access the Group Performance Dashboard:
Log in to your Stayflexi admin account.
On the left-hand menu, click on Dashboard.
At the top of the dashboard screen, switch to the “Group Performance” tab (visible only for group/chain accounts).
This will open the consolidated multi-property performance view with metrics, charts, and comparisons across all your properties.
Right-Hand Side Controls (RHS):
Compare with Last Year On the top-right corner, you will find a toggle that allows you to compare your current performance with the same period last year. Enable this toggle to instantly view YoY comparisons across all key metrics.
View by Today, MTD, or YTD You can switch the data view between Today, Month-to-Date (MTD), and Year-to-Date (YTD). This helps you quickly analyze performance for different time frames.
Filter by Properties (All Properties Dropdown) Click on the All Properties dropdown to view a full list of your properties. You can select one or multiple properties to filter the dashboard and see results for specific locations or clusters.
When you open the dashboard, you can instantly view performance data for a specific date, including:
Total Revenue
Average Occupancy
Average ADR (Average Daily Rate)
RevPAR (Revenue Per Available Room)
On the LHS, you’ll find sections that highlight your Top Performing and Low Performing properties. These insights help you quickly understand which properties are exceeding expectations and which ones may require attention or operational improvements.
On the right side, the Monthly Performance Graph helps visualize trends by filtering metrics such as Revenue, ADR, RevPAR, or Occupancy
When you scroll down, you’ll see a property-wise performance bar graph that gives you a clear visual comparison across all your properties.
Compare by Today, MTD, or YTD Use the time selector to switch the graph between Today, Month-to-Date, and Year-to-Date performance.
Select Metrics on the RHS On the right-hand side, you can choose which key metric to display:
Revenue
Occupancy
ADR (Average Daily Rate)
RevPAR (Revenue Per Available Room)
Graph Layout
Vertical Axis: Represents the value range (e.g., revenue amount, occupancy %, ADR, etc.)
Horizontal Axis: Shows all your properties side by side for easy comparison.
When you scroll further down, you will find the Booking Source Performance chart, which helps you understand which channels contribute the most to your business.
Switch Between Revenue and Rooms Sold On the top right-hand side, you can toggle between:
Revenue
Rooms Sold This lets you compare how each booking source performs based on the metric you want to analyze.
Chart Layout
Vertical Axis: Displays all your booking sources (e.g., Walk-in, OTA, Booking Engine etc..).
Horizontal Axis: Represents the value—either total revenue or number of rooms sold depending on the selected tab.
Scroll further down to access the Day-Wise Performance Report, which provides a detailed daily breakdown of your property or group performance.
The table includes key metrics such as: Date, Revenue, Occupancy, ADR, and RevPAR.
On the top right-hand side, you also have the option to download this report for offline use or sharing with your team.
The Group Performance Dashboard simplifies performance tracking and empowers your management team to make data-driven decisions that enhance overall profitability across all properties.
What can I view and analyse under the Group Performance Dashboard?
Under the Group Performance Dashboard in stayflexi, you can view and analyse the performance of your properties in detail:
Daily and Monthly Metrics: Instantly see key performance indicators like Revenue, Occupancy, ADR, and RevPAR for the current day or across a selected month.
Top and Low Performing Properties: Identify which properties are leading or lagging through the panel on the left.
Monthly Performance Trends: Use the interactive graph on the right to analyse trends over time, filtering by Revenue, ADR, RevPAR, or Occupancy.
Property-wise Performance: Compare properties with detailed bar graphs showing date-wise or monthly data for Revenue, ADR, RevPAR, and Occupancy.
Booking Source Performance: Review channel-wise performance using horizontal bar charts, filterable by Revenue or Rooms Sold.
Day-wise Performance Report: Access daily summaries of Revenue, ADR, Occupancy, and RevPAR, with the option to download reports for further analysis.
The dashboard provides a comprehensive view of your portfolio, enabling data-driven decisions to optimise performance and profitability.
How can I view performance for a specific property, multiple properties, or all my properties together?
Here are the steps :
Log in to your stayflexi account using your credentials.
From the left-hand menu, click on Group Performance Dashboard.
At the top of the dashboard, locate the property selection dropdown.
To view a specific property, select the property name from the dropdown.
To view multiple properties together, check the boxes next to the properties you want to include.
To view all properties in your group, select the “All Properties” option.
The dashboard will update to display performance metrics – including Revenue, Occupancy, ADR, and RevPAR, for your selected property or properties.
You can now analyse trends using the Monthly Performance Graph, Property-wise Performance, Booking Source Performance, and Day-wise Performance Report for your selected selection.
To save the data, click Download Report to export the performance summary for your chosen properties and date range.
How can I view and compare monthly performance in graph format?
To view monthly performance in the Group Performance Dashboard, follow these steps:
Log in to your stayflexi account.
From the left-hand menu, select Group Performance Dashboard.
Click on the Monthly Data tab to view performance across the month.
On the right-hand side, view the graph showing month-long trends.
Use the filter options above the graph to select the metric you want to analyse – Revenue, ADR, RevPAR, or Occupancy.
The graph will update to display the selected metric, allowing you to easily compare performance trends over the month.
How do I interpret the top performing and low performing properties?
Interpreting the Top Performing and Low Performing Properties Panel
Log in to your stayflexi account.
Navigate to the Group Performance Dashboard.
On the left side, locate the Top Performing and Low Performing Properties panel.
Review which properties are listed under each category, based on recent Revenue and Occupancy metrics.
Use this information to identify strong performers and properties that may require attention or promotional efforts.
Can I filter the booking source performance by number of rooms sold instead of revenue?
Filtering Booking Source Performance by Number of Rooms Sold
Log in to your stayflexi account and open the Group Performance Dashboard.
Scroll down to the Booking Source Performance section.
Find the filter or toggle option above the horizontal bar graph.
Select Number of Rooms Sold instead of the default Revenue.
The graph will update to display booking channel performance based on room sales rather than revenue.
Helpline
For immediate assistance, you can contact our support team:
The Stayflexi Reservation Calendar is designed for ease of use, with all key features conveniently located in one place.
At the top, you’ll find the Date Range Selector. By clicking on the calendar icon, you can quickly view past, present, and future booking data, making it simple to navigate through different periods and manage your reservations efficiently.
On the right, there’s a View Mode option, allowing you to switch between day, week, or month views for your convenience. By default, the calendar is set to the weekly view for optimal visibility of upcoming reservations.
On the left, there’s Room Listings where you’ll see a list of all your rooms, whether you have 5 or 50. Everything is displayed in one place for easy management.
At the top of your room list, you’ll find a toggle. Enabling it will show the Room Type next to each room number.
If a room is marked with a red dot in the room number column, it indicates that the room is dirty.
On the left side of the page, you’ll find the Filter option, which gives you multiple choices. For example, if you want to see available rooms under the Deluxe Room Category, you can easily filter and get the desired information with a just a few clicks.
Create Button [Right side of the page]:
On the right-hand of the calendar, you will find a create button. Clicking on it provides four options:
Walk-in: For creating immediate bookings.
Enquiry: For creating guest inquiries that have not yet been confirmed.
Block Room: For blocking rooms due to maintenance or other needs.
Group Booking: For handling multiple room reservations under a single booking id or group.
Reservation Blocks:
Each reservation is represented as a block [or grid] within the calendar.
The blocks are color-coded based on the status of the reservation, providing a quick visual reference:
Light Yellow: Indicates a Confirmed Reservation.
Green: Represents a reservation that has been Checked In.
Purple: Indicates a Checked-out reservation.
Grey: Represents an Enquiry, signifying that the reservation is not yet confirmed.
If you click on any reservation, a pop-up will appear on the right side of the screen displaying the Reservation Details.
Next to that, you will see multiple actions depending on the reservation you selected, offering quick access to options like Cancel booking, Lock booking, Hold booking, Modify, Check-in/out, and more.
Understanding the filters in reservation calendar
The Stayflexi reservation calendar offers filtering options to help users quickly access the specific room and booking information they need.
Imagine your front desk team receives a call from a guest interested in booking a superior king room for the upcoming weekend. To quickly check the availability of this specific room type [OR] Let’s say it’s a busy day at your property, and the housekeeping team needs to clean rooms that have just been vacated. You want to quickly find which rooms are Dirty and need attention. Don’t worry, Stayflexi is going to make your job much easier with this filter option. Enjoy each step mentioned below!
Below are the step-by-step guidelines for using the filter options:
Login to Stayflexi: Start by logging into your Stayflexi dashboard using your credentials.
Navigate to the Reservations Tab: From the front page of the Stayflexi dashboard, locate the top navigation menu. The second icon is the Reservation Calendar.
Locate the Filter Option: On the top-left corner [as shown in the image], click the Filter dropdown to reveal a list of available filters.
Available Filters: The following options can be selected from the filter dropdown menu.
Available Rooms: Displays all rooms that are vacant and ready for booking.
Blocked Rooms: Shows the rooms that are temporarily blocked.
Dirty Rooms: Displays rooms that are marked for cleaning.
Clean Rooms: Rooms that are cleaned and ready for new guests.
Occupied Rooms: Shows all rooms currently occupied by guests.
Room Types: You can filter rooms based on their room type such as: Superior King, Super Deluxe, standard etc.
All: Shows all rooms regardless of status or type.
Unselect: Clears all active filters to display all rooms again.
How to view reservations by room type?
Login to Stayflexi: Log into your Stayflexi dashboard with your credentials.
Go to the Reservation Calendar: From the main dashboard, click on Reservation Calendar. Here you can see available rooms and dates.
Locate the Filter Dropdown: At the top-left corner of the calendar, you will see a Filter dropdown. Click on this to open the filter options.
Select a Room Type: From the list of filter options, scroll down to find room types like Superior King, Superior Twin, or any specific room categories that your property has. Click on the room type you wish to filter by.
View Filtered Results: The reservation calendar will automatically refresh to display only the reservations for the selected room type. You will now be able to see all reservations for the chosen room type.
How to create a walk-in reservation?
Stayflexi provides two convenient ways to create Walk-in Reservation:
Drag-and-Drop [super friendly]
Walk-in Reservation
Below is the Drag-and-Drop method for checking in a reservation.
Login to your Stayflexi dashboard.
On the left panel, click on the Reservation Calendar [the second icon] to view all your reservations.
Select the desired date from the calendar.
Drag the booking from the Check-in date to the desired check-out date.
A pop-up window will appear covering the entire screen, where you can complete the guest’s details.
Guest Information Section:
Enter the guest’s Name, Email, and Phone Number.
You can also add any special requests from the guest.
ID Proof: Upload the guest’s ID Proof with Front and Back photos options
Address details: Enter the guest’s address, and select the number of adults and children for the reservation.
Price and Room Details:
On the right side, the system will automatically update the Room Prices, including Taxes, once the room type is selected.
After reviewing all the details, click the Create Reservation button at the bottom right of the window.
Your Walk-in reservation is now confirmed, and you’ll receive a confirmation message on the screen.
In addition to the drag-and-drop method, Stayflexi also offers the option to create Walk-in reservations for guests who book a room on the spot. Follow the steps below:
Method: 2 – To Create Walk-in Reservation:
Login to your Stayflexi dashboard.
On the left panel, click on the Reservation Calendar [the second icon] to view all your reservations.
On the top-right corner of the calendar, you will see a Create button. Click on it, and a list of 4 options will appear.
From the list, Select Walk-in.
A pop-up window will appear, covering the entire screen. Here, you’ll be prompted to enter all the necessary guest details.
Guest Information Section [Same as Drag and Drop Method]:
Enter the guest’s Name, Email, and Phone Number.
You can also add any special requests from the guest.
ID Proof: Upload the guest’s ID P roof with Front and Back photos options
Address details: Enter the guest’s address, and select the number of adults and children for the reservation.
Price and Room Details:
The system will automatically update room prices, including taxes, based on the selected room type.
After entering all the details, click on Create Reservation at the bottom of the window.
A confirmation message will appear, indicating that your Walk-in reservation has been completed.
How to create a group reservation?
Follow these steps to create a group reservation in Stayflexi:
Login to your Stayflexi dashboard.
On the left panel, click on the Reservation Calendar [the second icon] to view all your reservations.
On the top-right corner, click on the Create button. A list of 4 options will appear. Select Group Booking.
4. A pop-up window will appear. In this window:
Select the Check-in and Check-out dates and times for the group booking.
Specify the number of rooms needed and the occupancy details [number of adults and children for each room].
5. Once the room and occupancy details are filled, click the Add [+] button located at the bottom-right of the page.
After clicking the Add button, the Next button at the top of the window will be enabled. Click on it to proceed.
6. Another pop-up will appear for entering guest details, room-wise. The system will automatically pre-fill the check-in, check-out, occupancy, and price summary.
7. Scroll down to find the section for Accompanying Guest Details:
You can either fill in the guest information for each room or select the option to copy the details from the Group Owner. This will auto-fill the respective columns with the same information.
8. There is also an Additional Details section where you can add any special requests from the guest, and confirmation will go to the guest via email.
Example: The guest has requested to decorate the room for a birthday celebration or other special requirements.
9. At the bottom of the page, you will find a section for applying Coupon Codes, Offers, and Discounts. Apply or remove them as needed.
10. Once all details are reviewed and completed, click the Create Reservation button at the top-right corner.
11. You will receive a confirmation message indicating that the group booking has been successfully created.
Note: Once a group booking is created, you can easily identify it on the reservation calendar by the presence of three icons next to the guest’s name.
How do I create an enquiry booking and collect payment using a payment link?
Login to Stayflexi: Log into your Stayflexi dashboard with your credentials.
Go to the Reservation Calendar: From the main dashboard, click on Reservation Calendar. Here you can see available rooms and dates.
Locate the “Create” column: On the right side of the page, you will see the Create column. This column offers four booking options Walk-in, Enquiry, Block room, and Group booking.
Select Enquiry: click on Enquiry to open a pop-up form.
Fill in the Required Details: In the pop-up window, enter the necessary details for the enquiry, including Check-in and Check-out Dates, Guest Names, Room Type, Prices, and more.
Set Enquiry Expiry Time: You can set an expiry time for the enquiry. This can be in minutes, hours, or days, based on your preference.
Create the Enquiry: Once all details are entered, click Create enquiry at the bottom right corner of the page.
Confirmation Message: You will receive a confirmation message indicating that the enquiry was created successfully, and the guest will receive all the booking details along with a payment link. Once the guest makes the payment through the provided payment link, the enquiry’s booking status will automatically update in the PMS, and the booking will be confirmed.
How to block or unblock rooms from reservation calendar?
Below are the step-by-step guidelines to block a room from the reservation calendar:
Login to Stayflexi: Start by logging into your Stayflexi dashboard using your credentials.
Navigate to the Reservation Calendar Tab: From the front page of the Stayflexi dashboard, locate the top navigation menu. The second icon is the Reservation Calendar. Click on the icon to view all your reservations.
Click the Create Column: On the top right corner of the calendar, you will see the Create button. Click on it to view a dropdown menu.
Select “Block Room”: In the dropdown, you will see four options: Walk-in, Enquiry, Block Room, and Group Booking. Click on Block Room.
Fill in the Blocking Details: A pop-up window will appear on the right side of the screen. Enter the required details such as Room type, Room ID, and Date Range. There is also an optional field to provide the Reason for Blocking the room.
Confirm Blocking: After entering the details, click the Block Room button at the bottom of the pop-up.
Confirmation Message: You will see a confirmation message indicating that the room has been successfully blocked. To view the block reason, click on the blocked room, and it will display the reason you entered at the time of blocking the room.
Below are the step-by-step guidelines to Unblock a room from the reservation calendar:
Locate the Blocked Room: In the reservation calendar, the blocked room will be displayed in grey.
Click on the Blocked Rooms: Select the blocked room from the calendar. A pop-up window will appear on the right side of the screen.
Select the Date Range: In the pop-up window, you can adjust the Date Range for the room block if needed.
Unblock the Room: You will see an option to Unblock the room. Click on the Unblock button.
Confirmation Message: After unblocking, you will receive a confirmation message that the room has been successfully unblocked.
How to Modify Check in and Check out date of reservations ?
Below is the step-by-step explanation of the modification of check in and check out date for a reservation in Stayflexi:
Login to Stayflexi: Start by logging into your Stayflexi dashboard using your credentials.
Navigate to the Reservations Tab: From the front page of the Stayflexi dashboard, locate the top navigation menu. The second icon is the Reservation Calendar. Click on the icon to view all your reservations.
Select the Desired Reservation: Click on the desired reservation, that you wish to modify.
Reservation Information Pop-up: A pop-up will appear on the right side of the screen, providing the key details about the selected reservation. Click on the modify option to view the list of options.
Modification Option: You will see options to modify the check-in and check-out dates in the list, allowing you to adjust the reservation as needed with a calendar icon.
What are unassigned reservations? how to assign room?
Unassigned reservations are bookings that haven’t been allocated to a specific room yet. They appear in the Unassigned Reservations column in the Stayflexi reservation calendar, waiting to be assigned to a room. They could be from guest enquiries, online bookings, or other sources that need manual room assignments.
Follow the steps mentioned below to assign unassigned reservations from the Stayflexi reservation calendar:
Login to Stayflexi: Log into your Stayflexi dashboard using your credentials.
Navigate to the Reservations Tab: From the front page of the Stayflexi dashboard, locate the top navigation menu. The second icon is the Reservation Calendar. Click on the icon to see all your reservations.
Find the Unassigned Tab: In the top middle of the calendar, next to the Date Range Selector, you’ll see the Unassigned tab. This tab automatically displays all reservations that have not been assigned to rooms.
Click to View Details: When you click on the Unassigned tab, a pop-up will appear on the right side of the screen.
The Pop-up is divided into three sections:
Unassigned Reservations: Shows reservations waiting to be assigned.
On Hold Bookings: Displays reservations that are temporarily on hold. These are not confirmed bookings system will not hold inventory.
Enquiries: Lists enquiries made by guests that need further action before becoming confirmed reservations.
Select a Reason: Click on any reservation under these categories to view details.
View Guest Information: Detailed information about the guest will be displayed after selecting a reservation.
Click the Assign Button: You’ll see an Assign button next to the guest details. Click the Assign button to allocate the reservation to a suitable room.
Confirmation Message: Once the reservation is assigned, a confirmation message will appear, confirming that the booking has been successfully assigned a room.
Can I create a booking enquiry with an automatic expiration if payment is not received, and auto-confirm it upon payment?
Yes, In Stayflexi, you can create a booking enquiry that is based on minutes, hours, or days, and it will automatically expire if the guest doesn’t make the payment within the specified time. Here’s how it works in more detail:
Create Time-Sensitive Booking enquiries:
When you create a booking enquiry, you have the flexibility to set an expiration window that fits your needs. This could be in minutes [for short-term bookings like hourly stays], hours, or even days [for longer enquiries].
The booking enquiry will hold the room or service for the guest during that period. However, it will not be confirmed until payment is received.
The system automatically tracks the time and, if the payment is not made within the set period, the inquiry will expire and the room will be released back into availability. This prevents rooms from being blocked indefinitely without any payment.
Automatic Expiry Without Payment:
If the guest does not complete the payment within the specified time, the enquiry expires automatically, and the booking request is canceled.
This ensures that rooms don’t remain held for too long, improving your occupancy management. You no longer need to manually track unpaid inquiries or release rooms, as the system handles this automatically.
Automatic Confirmation With Payment:
If the guest completes the payment within the expiration window, the system will automatically confirm the booking.
This means there’s no need for manual confirmation or additional follow-up. The enquiry is seamlessly converted into a confirmed reservation, streamlining your operations and saving time for both property staff and guests.
Can I capture and upload a guest’s photo directly from the device camera in the Stayflexi PMS?
YES, Stayflexi allows you to capture and upload a guest’s photo directly from your device’s camera through the software. This feature is especially useful during check-in or when updating guest profiles.
How It Works:
When check-in a guest, you can use the device’s camera [such as a tablet or computer with a webcam] to take their photo instantly.
The photo is then uploaded directly into the guest’s profile or booking record, eliminating the need for manual uploads or external devices.
Benefits:
seamless Process: No need to upload images from external devices, making the process faster and more efficient.
Better Guest Identification: Storing the guest’s photo ensures accurate identification, helping to avoid any mix-ups.
Improved Security: It adds an extra layer of security to your operations by visually verifying the guest’s identity during check-in.
Enhanced Record-Keeping: Photos are stored within the system along with the guest’s information, making them easily accessible for future reference or for the record purpose.
What is the difference between "Move" and "Swap" rooms in the reservation calendar?
In Stayflexi’s reservation calendar, both move and swap room actions allow flexibility in managing guest reservations, but they serve different purposes and operate in distinct ways. Below is the detailed breakdown:
MOVE ROOM:
What It Means: Moving a room involves relocating a reservation from one room to another. This action is typically done when a guest needs to be reassigned to a different room and involves only one reservation at a time.
When to Use It:
When there’s a maintenance issue in the current room, the guest must be placed in a different room.
When a guest requests an upgrade or downgrade to another room.
When you want to free up a particular room for operational reasons [e.g., preparing for a VIP guest or a specific room type request]
How It Works:
The reservation’s details stay the same [like the dates and guest information], but the room assignment changes.
The original room becomes available for new bookings or other uses.
Example:
A guest is booked in Room 105, but due to an upgrade request, you move the reservation to Room 201. The booking is now linked to Room 201, and Room 105 becomes available for another guest.
Benefits:
Efficient Room Management.
Quick Problem-Solving.
No need to Recreate Bookings.
SWAP ROOM:
What It Means: Swapping rooms refers to exchanging room assignments between two different reservations. Instead of just moving one reservation, this involves two reservations that trade places in terms of room assignment.
When to Use It:
When two guests need to exchange rooms for reasons such as preference for specific room types or locations.
To balance room allocations [e.g., if a guest booked a more expensive room but the current room is not available, and another guest’s room can be swapped].
How It Works:
In the reservation calendar, you select the two reservations you want to swap.
Both reservations retain all other details [like guest information, check-in and check-out dates], but their room assignments switch.
Example: Guest A is staying in room 202, and guest B is staying in Room 203. If you swap the rooms, Guest A will now stay in Room 203, and Guest B will move to Room 202.
Benefits:
Efficient Room Adjustments.
Guest Satisfaction.
Save Time and Effort.
Key Differences:
Move Room: Only affects one reservation and relocates it to a new room. It’s a one-way shift.
Swap Rooms: Affects two reservations and switches their room assignments, essentially making a direct trade between two rooms.
How to upgrade or downgrade a reservation?
Upgrade a Reservation in Stayflexi:
If a guest wants to upgrade their room, they are moving from their current room to a better one, which typically includes more amenities and a higher price.
Example: Upon arrival, a guest originally booked a standard room but decides they want more luxury and requests to move to a deluxe suite with a better view and added amenities. The hotel can easily process this request in Stayflexi by upgrading the reservation and adjusting the rate accordingly.
Downgrade a Reservation in Stayflexi:
If a guest wants to downgrade their room, they wish to move from their current room to one of a lower category, usually at a lower price.
Example: A guest initially booked a deluxe room but decides that the standard room will suffice for their stay, perhaps due to a change in budget or preference. The hotel can easily accommodate this request by downgrading the reservation, and Stayflexi will adjust the room rate to reflect the new booking.
How to Upgrade or Downgrade Reservation in Stayflexi:
Login to Stayflexi: Log into your Stayflexi dashboard using your credentials.
Navigate to the Reservations Tab: From the front page of the Stayflexi dashboard, locate the top navigation menu. The second icon is the Reservation Calendar. Click on the icon to see all your reservations.
Select the Reservation that you want to Upgrade or Downgrade.
A pop-up window will appear on the right side of the screen showing the Reservation details.
Look for the ‘Modify’ option in the right corner, and click on it to view the list of options.
Scroll down to see multiple actions you can perform, and find the Move Room option. Click on it.
Another pop-up will appear, displaying the room details:
On the left side, you will see the existing room type, room ID, and current price.
On the right side, you will find the new room options for Upgrading or Downgrading.
If you select opt for higher room category [Upgrade], the price will automatically adjust, and the system will show the price difference with a” + ” sign, indicating the additional amount the guest will need to pay.
If the guest opts for a lower room category [Downgrade], the system will show the price difference with a ” – ” sign, indicating the refund or reduced cost.
Once you fill in the required details according to the guest’s preference, click on the Move Reservation button located at the bottom-right corner of the screen.
You have successfully Upgraded or Downgraded the reservation, you will now receive a confirmation message.
When upgrading a reservation from a lower room category to a higher one, should I input the entire charge or only the additional amount?
When upgrading a reservation in Stayflexi, the system is designed to make the process easy and accurate. Once you select a new room type for an upgrade, the system automatically calculates the difference in price between the original room and the upgraded room.
Here’s how it works:
Original Booking: The guest has already booked a room at a specific rate, for example, a Standard Room at $100 per night for 3 nights, totaling $300.
Selecting the Upgrade: When you choose a new room type, such as upgrading to a Deluxe Room at $150 per night, you don’t need to manually calculate the additional cost.
Automatic Price Update: The system instantly calculates the difference between the original rate and the new rate. In this case, it will calculate the $50 difference per night ($150 – $100). For a 3-night stay, the system will automatically add $150 (3 nights x $50) to the original total, generating a new total of $450.
Final Charge: The system updates the reservation total, ensuring that the guest is charged only the additional amount for the upgraded room. This process avoids manual errors and makes sure the correct price is applied.
This automated feature ensures that the property can quickly and accurately process upgrades, while the guest is charged with the correct amount for their stay based on the new room selection.
How can I upload guest ID proof in the PMS while creating or editing a reservation?
Below are the guidelines on how to upload guest ID proof in the PMS while creating or editing a reservation.
Login to Stayflexi: Log into your Stayflexi dashboard using your credentials.
Navigate to the Reservations Tab: From the front page of the Stayflexi dashboard, locate the top navigation menu. The second icon is the Reservation Calendar. Click on the icon to see all your reservations.
Select and click on the Reservation that you want to upload guest ID proof in the PMS.
A pop-up window will appear on the right side of the screen showing the Reservation details.
Reservation details: This is the page where you can see the guest information, where their details will be displayed.
Upload Image Section: At the bottom of the customer information screen, you’ll find list of options. Click on others.
Select Camera or Device Upload: Click on this option, and you’ll see two choices- Camera Upload or Device Upload.
Camera Upload lets you capture an image directly from your camera.
Device Upload allows you to upload images from your device.
Select Device Upload: Choose Device Upload if you have the images saved on your computer or device.
ID Image Upload: You will see two fields: ID Front and ID Back.
Upload the front side of the guest’s ID in the ID front section.
Upload the back side of the ID in the ID Back section.
Use the file selection options to choose images from your device’s gallery or desktop.
Save the Customer Information: After uploading both images, click the Save Customer button to complete the process. This will store the images and update the customer’s information in Stayflexi.
Can I import booking data from another PMS, and what steps are required for that?
YES, you can import booking data from another PMS into Stayflexi. Here’s how you can do it:
To import booking data from another PMS to Stayflexi, follow the below-mentioned guidelines:
Login to Stayflexi: Start by logging into your Stayflexi dashboard using your credentials.
Access More Apps: From the dashboard, click on the 4-dots square icon labeled More Apps, located on the right side of the screen.
Open Property Configuration: Locate and click on Property Configuration from the list of available apps.
Navigate to Booking Import: A new page will open. On the left side, a list of options will appear, locate and click on Booking Import.
Understand Bulk Upload: A new page will appear titled Bulk Upload Bookings from Other PMS with a description of how to use the feature.
Read through the description carefully.
Download the Template: Click on Download Template File to get the format required for bulk uploads.
Import Bookings: After filling out the template, click on Bulk Import Bookings to migrate your bookings from another PMS.
NOTE: Uploading the same booking data twice will mark the bookings a Unassigned, which may cause confusion or issues. Be cautious to avoid duplicate uploads.
Where can I find the Guest details?
How to View Guest Details
Log in to your Stayflexi account.
From the left menu, click on the Reservation Calendar (second icon).
Click on any booking from the calendar.
The Reservation details will open on the right-hand side (RHS) of the screen.
In the opened panel:
The first section displays the Reservation Details.
The second section displays the Guest Details.
Click on the guest’s name in the Guest Details section.
This opens the complete guest profile, showing all saved guest information.
How can I edit guest details in the Stayflexi?
To edit the guest details in the system, follow the below-explained steps:
Login to Stayflexi: Log into your Stayflexi dashboard using your credentials.
Navigate to the Reservations Tab: From the front page of the Stayflexi dashboard, locate the top navigation menu. The second icon is the Reservation Calendar. Click on the icon to see all your reservations.
Select the Reservation: Find and click on the reservation for which you want to edit the details.
View the Reservation Details: A pop-up window displaying the reservation details will appear on the right side of the screen.
From the opened page, click on the guest name. This will open the Edit Reservation option.
Update the guest information with the correct details.
Click Save Customer to save the updated information.
How to check a guest out early ?
Early checkout means the guest is leaving before the original checkout date mentioned in the reservation. The stay duration is reduced, and the system recalculates room charges based on the new checkout date.
Log in to your Stayflexi dashboard.
Navigate to the Reservation Calendar.
Click on the guest’s reservation.
This opens the reservation panel on the right-hand side.
If the guest is already checked in, you will see the Checkout option.
To edit the checkout date, click Modify in the top-right corner of the reservation panel.
From the Modify options, select Modify Checkout.
The Modify Checkout screen opens.
Click on the calendar icon to select the new (earlier) checkout date.
The stay dates and charges will update accordingly.
Click Modify Checkout to confirm the changes.
The guest is now checked out early, and the reservation is updated successfully.
Can I edit guest details (name, phone number, ID proof) after check-in?
To edit guest details (name, phone number, ID proof) after check-in, follow the below mentioned steps:
Login to Stayflexi: Log into your Stayflexi dashboard using your credentials.
Navigate to the Reservations Tab: From the front page of the Stayflexi dashboard, locate the top navigation menu. The second icon is the Reservation Calendar. Click on the icon to see all your reservations.
Select the Reservation: Find and click on the reservation for which you want to edit the details.
View the Reservation Details: A pop-up window displaying the reservation details will appear on the right side of the screen.
From the opened page, click on the guest name. This will open the Edit Reservation option.
Update the guest information with the correct details.
Click Save Customer to save the updated information.
How to add Sub Segment ?
How to Modify Checkout time ?
Steps to modify checkout time in Stayflexi:
Log in to your Stayflexi dashboard.
Open the Reservation Calendar.
Click on the guest’s reservation you want to update.
The reservation details panel opens on the right-hand side.
Click on Modify.
From the modify options, select Modify Checkout.
In the Time field, update the checkout time as required.
Review the updated pricing (if applicable).
Click on Modify Checkout to save the changes.
How to move a reservation from one room to another?
Follow the steps mentioned below to Move a reservation from one room to another in Stayflexi:
Login to Stayflexi: Log into your Stayflexi dashboard using your credentials.
Navigate to the Reservations Tab: From the front page of the Stayflexi dashboard, locate the top navigation menu. The second icon is the Reservation Calendar. Click on the icon to see all your reservations.
Select the Reservation: Find and click on the reservation you wish to move by clicking on it.
View the Reservation Details: A pop-up window will appear on the right side of the screen, displaying the guest’s reservations details.
Access Action Options: From the opened page, you will find multiple options for managing the reservation. Locate and click on Move Room.
Fill in the New Room Details: A new page will appear showing two sections:
Previous Room ID [pre-filled with the current room]
Current Room ID [you need to fill this with the new room information].
Below this, you will need to fill in the Room Type, Price, and Tax details.
Note: Based on the room type you select, the system will automatically calculate the difference in amount. For example, if the guest is upgrading from a lower room category to a higher one, the system will prompt you to collect the additional amount.
Add Remarks: There is a column provided for adding remarks about the room change. This is optional but can be useful to understand why move room was done for a given reservation.
Move Reservation: Once all details are entered, click on Move Reservation at the bottom of the page.
Confirmation: A confirmation message will appear, notifying you that the reservation has been successfully moved to the new room.
How do I create a reservation for past dates?
To Create a reservation for past dates, follow the below-mentioned methods:
Navigate to Previous Weeks:
In the reservation Calendar, locate the arrow pointing left in the top-left corner.
Click on it to view the calendar for the previous week. This is useful when you want quick access to earlier dates within a week.
Select Specific Dates:
Alternatively, you can click on the calendar icon located in the middle at the top of the reservation calendar page.
From here, you can select any date across any month to easily make a booking for that specific date.
Follow the below mentioned steps to create a booking for past dates.
Navigate to the Desired Date:
Use the left arrow to access previous weeks or click on the calendar icon to select any specific date across different months.
Drag and Drop a Reservation:
Once on the desired date, click and drag on an available room slot.
A booking window will appear where you can enter guest details, room type, rate, and other relevant information.
Save the Reservation:
After filling in the necessary details, click Save to finalize the booking.
How do I cancel a reservation in the system?
To cancel a reservation in Stayflexi, follow the below-mentioned guidelines:
Login to Stayflexi: Start by logging into your Stayflexi dashboard using your credentials.
Navigate to the Reservations Tab: From the front page of the Stayflexi dashboard, locate the top navigation menu. The second icon is the Reservation Calendar. Click on the icon to view all your reservations.
Select the Desired Reservation: Click on the desired reservation, that you want to cancel.
Reservation Details Page: A page will appear on the right side of the screen displaying Reservation details.
Modify Option: Click on Modify option on top right corner.
Locate Cancel Booking Option: A list of actions will be displayed. Find and click on Cancel Booking.
Choose Cancellation Policy:
A new page will open on the right side.
In the Please Select column, click on the tiny arrow to open the dropdown menu.
Select the applicable Cancellation Policy based on your property’s rules.
Complete the Cancellation: After selecting the policy, click the Yes, Cancel Booking button at the bottom to finalize the action.
Can I mark a same-day booking as checked-in while creating the reservation?
YES, in Stayflexi, you can mark a same-day booking as checked-in while creating the reservation. When you create the booking, there will be an option to directly check in the guest during the reservation process. This allows you to streamline the process for walk-ins or last-minute bookings, ensuring that the reservation is both created and checked in at the same time.
To mark a same-day booking as checked-in while creating the reservation, follow the below-explained step guidelines:
Login to your Stayflexi dashboard.
On the left panel, click on the Reservation Calendar [the second icon] to view all your reservations.
Select the today’s date from the calendar.
Drag the booking from the Check-in date to the desired check-out date.
A pop-up window will appear covering the entire screen, where you can complete the guest’s details.
Enter the guest’s Name, Email, and Phone Number.
You can also add any special requests from the guest.
ID Proof: Upload the guest’s ID Proof with Front and Back photos options
Address details: Enter the guest’s address, and select the number of adults and children for the reservation.
Review Guest Details: After reviewing all the guest details, you will find the Create Reservation button. To the right of this button, there is a Check-in button, which allows you to check in the guest during the reservation process.
Select the Check-in Option: click on the tiny square checkbox next to the Check-in option. By selecting this, the guest will be automatically checked in once the reservation is created.
Click the Create Reservation button at the bottom right of the window.
Your reservation and check-in are completed and you’ll receive a confirmation message on the screen.
I have different rate plans with varying room prices. How do I select a specific rate plan while creating a booking?
To select a specific rate plan while creating a booking, follow the below-mentioned guidelines:
Start the Drag–and-Drop Booking:
In the Reservation Calendar, click and drag on the room and date you want to book.
A new booking page will appear on the screen.
Enter Guest and Price Details:
On the left side, fill in the guest details.
On the right side, you’ll be prompted to set the prices.
Select a Rate Plan:
At the top of the right side, you’ll see the Rate Plan option.
Click on the small arrow to open the dropdown menu.
All rate plans offered by your property will be listed.
Select the rate plan preferred by your guest.
Auto-fill Pricing:
Once a rate plan is selected, the prices for that specific plan will automatically populate the amount columns.
Complete the Booking:
After filling out all the necessary details, click the Create Reservation button at the bottom to finalize the booking.
How to check-in a reservation?
Follow these steps to check-in a confirmed reservation:
Login to your Stayflexi dashboard.
On the left panel, click on the Reservation Calendar [the second icon] to view all your reservations.
Identifying Confirmed Reservations: All confirmed reservations are marked in light yellow. These are confirmed reservations and on arrival dates you can mark check-in.
Click on the specific booking you wish to check-in. A pop-up window will appear on the right side of the screen, displaying reservation details.
Below the booking details, you will see multiple action options as mentioned in the screenshot. Locate the check-in option and click on it.
Another pop-up window will appear to confirm the check-in. Ensure you are checking in the correct guest by verifying the booking ID.
Once verified, click on Check-in to confirm.
You will receive a confirmation message, and the reservation status will change.
The Reservation that was previously colored in light yellow will now turn green, indicating the guest has successfully checked in.
How to print registration card?
Below is the Step to Step guide for printing a registration card in Stayflexi:
Log into Stayflexi: Start by logging into your Stayflexi dashboard using your credentials.
Navigate to the Reservations Tab: From the front page of the Stayflexi dashboard, locate the top navigation menu. The second icon is the Reservation Calendar. Click on the icon to view all your reservations.
Select the Desired Reservation: Click on the specific reservation for the guest whose registration card you want to print.
Open Guest Details: When you click on the desired reservation, a pop-up will appear on the right side of the screen. This pop-up displays the selected reservation details along with multiple options for further actions.
Locate the Print Registration Card: Among the options provided, one of them is a Print Registration Card.
Click the Print Registration Card: Click on this button to initiate the printing process. This action will open a new popup displaying the registration card.
Review the Registration Card: Ensure all the guest details are accurate, including name, date, and any special requests.
Choose your Print Option: From the preview screen, you can choose to print directly by clicking on the print button.
How do I navigate the reservation calendar to view bookings for specific dates?
Follow these steps to navigate through the reservation calendar in Stayflexi:
Login to your Stayflexi dashboard with your credentials.
Click on the Reservation Calendar icon [the second icon on the left panel] to access the calendar, where you will see all your reservations.
In the middle of the page, you will find the Date Range Selector, which allows you to view reservations within a specific time.
Right next to the date range selector, there is a small calendar icon.
By clicking on the calendar icon, a pop-up calendar will appear. You can then select any dates according to your requirements.
You can easily navigate between Past, Present, and Future dates to access the desired reservation details.
How to add booking notes?
Login to Stayflexi: Log into your Stayflexi dashboard using your credentials.
Navigate to the Reservations Tab: From the front page of the Stayflexi dashboard, locate the top navigation menu. The second icon is the Reservation Calendar. Click on the icon to see all your reservations.
Select a Reservation: Click on the Reservation where you want to add Booking Notes.
View the Reservation Details: A pop-up window will appear on the right side of the screen, displaying four sections.
Access the Notes Section: Click on the Notes in the list below to view Booking Notes.
Add a Note: Below the notes section, You’ll see a plus [+] symbol. Click on it to add a new note.
Type your Note: A pop-up window will appear on RHS, allowing you to type the note.
Save the Note: Once you’ve typed the note, click on Save at the bottom of the window.
Confirmation: Your note will be added and saved. You can easily identify that the reservation has a note by the Message Icon appearing next to the reservation in the calendar.
What is city demand trends in Stayflexi?
Stayflexi offers a unique feature called City Demand Trends, which provides valuable insights into booking activity across different cities. These trends help property managers understand their local market demand, allowing them to adjust room pricing and availability accordingly.
We have categorized the trends into Daily Demand Trends and Monthly Demand Trends for easier analysis and understanding.
The Daily Demand Trends feature in Stayflexi provides an overview of how room demand fluctuates daily. By selecting a desired date, you can view a graph that shows trends for the entire week, making it easy to identify peak and low-demand days.
Additionally, you can compare your property’s pricing with nearby hotels, seeing at what price they are selling their rooms. This allows you to make data-driven adjustments to your pricing strategy for better competitiveness.
The Monthly Demand Trends feature provides a broader understanding of room demand over a month. You can see which months attract more visitors and which have less traffic. Additionally, it shows weather conditions for each month and indicates price ranges such as whether rates are moderate, least expensive, or expensive.
This feature acts as a predictive tool, enabling you to stay proactive about your property’s performance throughout the year.
Example: As you can see in the above picture, it shows the Bengaluru Monthly Demand Trends.
For October, it’s a busy month with some rainy days, and hotel prices are in the moderate range. Since demand is high, you can increase prices slightly or offer packages to attract more guests.
For December, it’s mostly sunny and still busy, but prices drop to the least expensive range. Offering discounts or special holiday deals can help you attract more guests despite the lower pricing trends.
By analyzing these trends, you can adjust your pricing strategy accordingly, ensuring you’re making the most out of busy months while staying competitive. This allows you to maximize both occupancy and revenue effectively.
Rates and Inventory
Unlock the full potential of your hotel’s revenue with Stayflexi’s Rates & Inventory management! In this video, we dive into the powerful features of our platform that allow you to seamlessly manage room rates and inventory across multiple channels. Learn how to set dynamic pricing, track inventory in real-time, and avoid overbooking with our intuitive tools. Stayflexi’s Rates & Inventory module is designed to maximize your profitability while minimizing manual tasks. Join us and discover how to take control of your hotel’s pricing strategy and streamline your operations. Remember to like, subscribe, and hit the notification bell for more insights into hospitality management!
Log in to Stayflexi Dashboard: Use you credentials to log into the Stayflexi dashboard.
Access Rates and Inventory: Click on the third icon, which represents “Rates and Inventory”.
Top Columns Overview: At the top, you’ll see a column labeled “Rates/Inventory/Restrictions”.
Click on this column to reveal the listed options.
Select view: Choose “Rates”, “Inventory”, or “Restrictions” depending on what you want to display.
You can set the page to view only rates, only inventories, only restrictions, or display all at once.
This flexible layout allows you to tailor the view to match your needs, making it easier to manage rates, inventory, and restrictions efficiently.
Next to the Rates/Inventory/Restrictions column, you will find the Date Range Selector.
Click on the Date Range Selector: This will open a calendar view.
Set the Date Range: Select the start and end dates according to your requirements to display the rates and inventory for the chosen period.
This feature allows you to customize the view based on the specific dates you want to manage or review.
Next to the Date Range selector, You’ll see the Source column.
Click on the Source Column: This will display a list of booking sources [Such as OTAs or direct bookings].
Select a Source: Click on any specific source to view the rates and inventory data associated with that particular booking source.
This helps you manage and analyze data for bookings from various sources effectively.
Next to the Source Column, you’ll find the Days Column.
Click on the Days Column: This allows you to set the view for the specified number of days.
Select the Desired Duration: Choose whether you want to display data for 8 days or 15 days in the displayed screen.
This feature enables you to customize the timeframe for which you want to review rates and inventory.
Next to the Days column, You’ll find the Room Categories column.
Click on the Room Categories Column: This allows you to filter the displayed data by room category.
Select the Room Categories: You can choose a specific room category or select all categories to view the data for multiple or all room types.
This feature helps you to focus on specific room categories or view the entire property’s room data at once.
Next to the Room Categories column, you’ll see the Rate Plan column.
Click on the Rate Plan Column: This will display a list of available rate plans for your property.
Select Rate Plans: You can click on any specific rate plan or select all of them according to your requirements.
This functionality allows you to filter and view data based on the selected rate plans, helping you manage pricing strategies effectively.
Next to the Rate Plan column, you’ll find the Bulk Update feature, which is one the most dynamic and versatile tools in Stayflexi.
Click on Bulk Update: This opens a menu with multiple action options, such as:
Set Pricing
Rate Multiplier
Inventory Capping
Block/Unblock Rooms and a lot more.
Select a Feature: Choose any of these features to perform your required actions, whether it’s updating rates, managing inventory, or adjusting room availability.
This feature offers comprehensive solution for bulk changes, making property management more efficient.
Next to the Bulk Update column, you’ll see View more option.
These options help you manage your property’s rates and inventory efficiently and ensure they are in sync across all platforms.
.
Click on the View more option: This will open a list of options, including:
Rates and Inventory: View and manage your property’s rates and inventory.
Base Price: Set and adjust the base price for your rooms.
OTA Price Compare: Compare your rates with those listed on OTAs.
View Latest Updates : Displays the list of modifications to rates and inventory allocations.
Channel Status Report: Provides an overview of the current operational status of all connected distribution channels.
Detailed log: Presents a comprehensive chronological record of all system activities and updates.
These options allow for easy navigation and management of your pricing strategy and market comparison from a single view.
Below all the key options mentioned above, You’ll see a Dates Row.
This Dates Row displays the selected date range, showing the specific days within your chosen timeframe.
It provides a clear overview of how rates, inventory, and other settings apply to each day within the selected range, making it easy to monitor and adjust details for particular dates.
This feature helps you ensure that all rate and inventory updates are aligned with your desired scheduling.
Under the Dates Row, on the left side vertically, you’ll find key occupancy metrics:
Occupancy in 1%: This shows the percentage of rooms occupied for each date in the selected range.
Total Available: Displays the total number of rooms available for booking.
Total Booked: Indicates the total number of rooms already booked.
These metrics give you a quick overview of your property’s occupancy status, helping you manage availability and maximize occupancy efficiently.
Under the Occupancy Metrics, you’ll find a list of Room Categories with their associated Rate Plans:
Room Categories and Rate Plans: This section displays the various room types available at your property, along with the corresponding rate plans for each.
Data for Respective Dates: Next to each room category and rate plan, you’ll see the specific rates, inventory levels, and other relevant data for the selected dates.
This layout provides a clear and organised way to view and manage pricing, room availability, and rate plans across different dates.
Where can I view the sync status of my OTA channels?
Log in to your Stayflexi account using your credentials.
Go to the Dashboard.
Click on Rates and Inventory.
Select the View More option.
Under View More, choose Channel Status Report.
You’ll see a list of all connected OTA channels with their current sync status.
Where can I view my OTA channels report and compare prices across all connected OTAs?
Log in to your Stayflexi account using your credentials.
Go to the Dashboard.
Click on Rates and Inventory.
Select the View More option.
Under View More, click on OTA Price Compare.
You can now view all your connected OTA channels and compare their live prices.
How do I reassign an existing room number to a different room category?
This feature allows you to reassign one or more existing room numbers from their current room category to another room category using the Bulk Update option in Rates & Inventory.
Steps to Reassign Room Type:
Log in to your Stayflexi dashboard.
Navigate to Rates & Inventory.
Click on Bulk Update.
In the Action Type dropdown, select Reassign Room Type.
In the Room Types column (next to Action Type), select the current room type from which the rooms need to be moved.
Select the Room IDs (room numbers) you want to reassign.
From the New Room Type column below, choose the room category you want to move the selected rooms into.
Click on Reassign Rooms to apply the changes.
Once completed, the selected room numbers will be successfully reassigned to the new room category.
How can I check the latest updates or history of changes made to my rates and inventory?
Follow these steps to check the latest updates or history changes made to rates and inventory
Log in to your Stayflexi account using your credentials.
Navigate to the Dashboard.
Click on Rates and Inventory.
Select the View More option.
Under View More, click on View Latest Updates.
Here, you can view all the recent changes, update history, and check the success status for each update.
How can I view detailed logs of rate and inventory changes across OTA channels?
There are two ways to view detailed rate and inventory logs in stayflexi.
Method 1
Log in to your stayflexi account using your credentials.
From the main menu, navigate to the Dashboard.
Click on Rates and Inventory.
Select the View More option.
Under the View More section, click on View Detailed Logs.
You can now:
View detailed reports of rate and inventory updates.
Filter the data by date or channel.
Export the data if required.
Method 2
Navigate to the View More section.
Click on Channel Status Report.
At the top left corner, locate and click on Detailed Logs.
This will take you to the Report Status Panel, where you can view detailed rate and inventory update reports, filter by date or channel, and export data if needed.
Can OTA bookings be canceled directly from Stayflexi?
OTA bookings CANNOT be cancelled directly from Stayflexi.
To cancel an OTA booking, you need to complete the process through the respective OTA’s extranet (like Booking.com, Expedia, or Airbnb), as direct cancellations from Stayflexi are not supported.
This ensures the cancellation is officially processed within the OTA system, maintaining accurate records and communication with the guest. Start by identifying the booking details in Stayflexi, then log in to the OTA extranet, locate the reservation, and cancel it there.
The cancellation status will then sync back to Stayflexi, keeping your records consistent and up-to-date across all platforms.
How can I change rates for a specific day?
To change rates for a specific day in Stayflexi, follow these steps:
Log in to the StayFlexi Dashboard.
From the left panel, click on the third icon from the top (Rates & Inventory).
On the right side of the screen, locate the black “Bulk Update” button and click on it.
From the listed options, select Set Pricing.
On the Set Pricing page, go to the right-hand side and locate the Date Range column.
A calendar will appear. Select the specific date you want to update (e.g., 25th)
Click Apply to confirm your date selection.
Next, select the Room Type and Rate Plan for which you want to update the price.
Enter the desired price for the selected date.
(Optional) If required, you can add another Room Type and set pricing for it.
Once done, click Set Pricing
The pricing for the selected date and room type will be successfully updated across your connected channels.
Can you manually sync rates and inventory from Stayflexi?
YES, you can manually sync rates and inventory from Stayflexi. The platform provides an option to manually update or sync this information with connected OTAs [Online Travel Agencies].
To sync rates and inventory from Stayflexi, follow the below mentioned steps:
Log in to the StayFlexi dashboard with your credentials.
Click on the “Rates and Inventory” icon at the top of the dashboard (third icon from the left).
On the right side of the screen, select Bulk Update.
Under Action Type, choose Bulk Sync.
Under Sync Type, select whether you want to sync Rates or Inventory as per your requirements
Next, configure your sync by:
Selecting the Room Type
Selecting the Rate Plan
Choosing the Channels you want to sync with
Selecting the Date Range
Once all selections are made, click on Save.
A confirmation message will show that the rates have been successfully synced across all selected OTAs.
Where can I view close rate plan restrictions applied to specific OTAs?
To view Closed Rate Plan Restrictions for Specific OTAs in Stayflexi, follow the below-mentioned steps:
Log in to the Stayflexi Dashboard with your credentials.
Click on the ” Rates & Inventory ” icon at the dashboard’s top [third icon from the left].
Enable Restrictions View:
On the opened page, locate the column options on the left side.
Tick the Restrictions box under Sort and View Rates, Inventory, and Restrictions.
This will display all the restrictions applied across OTAs, including Stayflexi.
Filter by Source:
Next to the Date Range Selector, click on the Source column. To know on which source or channel restriction is applied you need to select a specific source.
Use the filter to select the specific OTA or source you wish to view.
Review Restrictions:
Once you scroll down, you will see the rate plan restrictions that are applied. The following options are displayed:
Close/Open Rate Plan
Close/Open on Arrival
Close/Open on Departure
This allows you to easily identify close rate plan restrictions for individual OTAs or sources.
Can I update rates and inventory on OTAs once the channel manager is connected?
To update rates and inventory for connected OTAs in Stayflexi, follow the below-mentioned steps:
Log in to the Stayflexi Dashboard with your credentials.
Click on the ” Rates & Inventory ” icon at the dashboard’s top [third icon from the left].
Click on the Rates/Inventory/Restrictions column on the left side of the screen (the first column).
Select the Rates and Inventory checkboxes.
A list of your connected OTAs will appear on the screen, reflecting current rates and inventory details.
The data displayed is editable, simply update the prices or inventory levels as needed.
Once updated, Stayflexi will automatically sync these changes with your connected OTAs, ensuring that your latest rates and inventory are reflected across all platforms.
Is it possible to change the category of a specific room number or reassign it to a new room type?
YES, you can change the category of a specific room number or reassign it to a new room type in Stayflexi: Here’s how to it:
Below are the step-by-step guidelines for changing the category of a specific room number or reassign it to a new room type in Stayflexi:
Log into the Stayflexi Dashboard.
Click on the third icon from the top, which is Rates and Inventory.
Locate the green “Bulk Update” on the right side of the screen and click on it.
From the listed options, Locate and click onReassign Room Type.
A page will open on the right side of the screen. On this page, click on the Room Types column at the top to access a drop-down menu.
In the drop-down menu, choose the room type that corresponds to the room ID you want to change.
Choose the room number ID.
Below the selected room number, click on New Room Types. A drop-down menu will appear where you can select the new room type.
After selecting the room type and room number, click on theReassign Rooms button at the bottom to complete the process.
How to change prices or inventory for specific channel / OTA?
To change prices for a specific channel/OTA in Stayflexi, follow the below steps:
Log into the Stayflexi Dashboard.
Click on the third icon from the top, which is Rates and Inventory.
Locate the green “Bulk Update” on the right side of the screen and click on it.
Set Pricing: Locate and click on the “Set Pricing” option.
A page will open on the RHS.
Select the OTA/ Channel: To set the price for a specific channel, select the arrow at the top right corner of the page to choose the OTA or Channel.
You can select multiple channels or just one.
Select Days: In the “Days” column, choose the specific days you want to apply the price changes.
Set Date Range: Choose the date range for which you want the price changes to take effect.
Select Room Types: Under “Room Types”, click on “Add Room Type” to select the rooms for which you want to update the pricing.
You can add multiple room types one by one.
Click on Set Pricing: Once all the selections are made, click the green “Set Pricing” button at the bottom of the page.
Review and Confirm: A confirmation page will appear where you can recheck the data you have updated.
If everything is correct, click “Confirm” to apply the changes.
Receive Confirmation: You will get a confirmation message indicating that the pricing has been successfully updated.
To change inventory for a specific channel/OTA in Stayflexi, follow the below steps:
Log into the Stayflexi Dashboard.
Click on the third icon from the top, which is Rates and Inventory.
Locate the green “Bulk Update” on the right side of the screen and click on it.
Locate Inventory Capping and click on it.
Popup Window: A popup will appear on the right-hand side of the screen.
Select Room Types: Choose the Room Types you want to apply the cap on.
Specify days: select the days for which you want to apply the inventory cap.
Set Date Range: Select the date range during which the cap will be in effect.
Source of Booking: Select the source of Booking for which the inventory cap applies, and select the arrow at the top-right corner of the page to choose the OTA or channel.
Select Cap Value: Enter the Cap Value you want to set.
Choose Type: Specify whether the cap is in Count [number of rooms] or Percentage.
Applying Capping: Click on the Apply Capping button to complete the process.
Confirmation Message: A confirmation message will appear, indicating that the inventory capping has been successfully applied.
How do I restrict a specific rate plan on OTAs?
To restrict a specific rate plan on OTAs, follow the below-mentioned steps:
Log into the Stayflexi Dashboard.
Click on the third icon from the top, which is Rates and Inventory.
Navigate to Bulk Update: Click on the “Bulk Update” option in the dashboard.
Select Close/Open Rate Plan:
From the list of actions, locate and click on Close/Open Rate Plan.
A new page will appear on the right side of the screen.
Set the Restrictions:
Select the desired days and date range for the restriction.
Choose the Source [OTAs] where you want to apply the restriction.
Select the Direct Billing Accounts if applicable.
Toggle Room Type and Rate Plan Selection:
You’ll see a toggle option:
Enable the toggle to apply the restriction to all room types and rate plans.
Disable the toggle if you want to select individual room types and rate plans.
Select Room Type and Rate Plan:
Below the toggle, select the Room Type.
Once the room type is selected, the Rate Plan column will become editable.
Choose whether to Close or Open the rate plan for that room type.
Close [restricting the rate plan] or Open [making it available to all OTAs].
Save the Changes:
After filling in all necessary details, click the Save button at the bottom to complete the action.
How can I set a cut-off time for a specific OTA?
Follow the below steps to set a cut-off time for a specific OTA:
Log into the Stayflexi Dashboard.
Click on the third icon from the top, which is Rates and Inventory.
Locate the green “Bulk Update” on the right side of the screen and click on it.
Locate Min/Max Advanced Booking Offset: From the listed options, find and click on Min/Max Advanced Booking Offset.
A page will open on the right side of the screen.
Select Days: Choose the days for which you want to apply the booking offset.
Select Date Range: Specify the date range for the cut-off time.
Select the OTA/Source: From the source list, select the specific OTA for which you want to set the restrictions.
Enable/Disable Toggle: You’ll see a toggle option. If you enable it, the restrictions will apply to all room types and rate plans. If you disable it, you can set restrictions individually.
Select Room Types: Choose the room types for which you want to set the cut-off time.
Set Min/Max Hours: In the respective columns, input the minimum and maximum hours:
Min Hours: Set this when you want to prevent bookings within a certain number of hours before check-in.
Max Hours: Set this when you want to restrict bookings after a certain number of hours from the current time.
The Set cutoff Option is only accessible after all mandatory fields have been completed.
How do I restrict a particular room category on OTAs?
To restrict a particular room category on OTAs, follow the below-mentioned steps:
Log into the Stayflexi Dashboard.
Click on the third icon from the top, which is Rates and Inventory.
Navigate to Bulk Update: Click on the “Bulk Update” option in the dashboard.
Select Close/Open Rate Plan:
From the list of actions, locate and click on Close/Open Room Type.
A new page will appear on the right side of the screen.
Set the Restrictions:
Select the desired days and date range for the restriction.
Choose the Source [OTAs] where you want to apply the restriction.
Select the Direct Billing Accounts if applicable.
Toggle Room Type and Rate Plan Selection:
You’ll see a toggle option:
Enable the toggle to apply the restriction to all room types and rate plans.
Disable the toggle if you want to select individual room types and rate plans.
Select Room Type and Rate Plan:
Below the toggle, select the Room Type.
Once the room type is selected, the Rate Plan column will become editable.
Choose whether to Close or Open the room type.
Close [restricting the room type] or Open [making it available to all OTAs].
Save the Changes:
After filling in all necessary details, click the Save button at the bottom to complete the action.
What is bulk update?
Bulk Update in Stayflexi is a feature designed to simplify the management of multiple rooms, rates, and settings across all OTAs [Online Travel Agencies] and direct booking channels. Instead of manually adjusting rates, inventory, or room availability one by one, Bulk Update allows you to make these changes in a single action for multiple rooms or rate plans, ensuring consistency across all platforms.
What Makes Bulk Update Unique in Stayflexi:
All-in-one Management: Bulk Update covers a wide range of actions, such as setting rates, updating inventory, applying rate multipliers, etc, all from a single interface.
Instant Synchronization: Any changes you make using Bulk Update are automatically synced across all your OTAs and direct booking channels, ensuring consistent pricing and availability without the need for manual entry on each platform.
Easy to Use: Stayflexi’s Bulk Update lets users quickly perform complex actions with just a few clicks, simplifying the management process for even the largest properties with multiple room types and rate plans.
Error Reduction: By allowing bulk actions, Stayflexi reduces the chance of inconsistencies or mistakes when managing inventory and rates, as everything is updated uniformly across channels.
Here’s a simple and easy-to-understand example of using Bulk Update in Stayflexi:
Scenario: Your hotel has 10 rooms under maintenance, and you want to block these rooms from being booked across all OTAs for the next two weeks.
Without Bulk Update: You would need to go into each OTA or channel and manually block these rooms one by one for the specific dates, which could be time-consuming and prone to error.
With Bulk Update: Using the Bulk Update feature, you can quickly select the room types that are under maintenance, choose the Block Rooms option, and set the dates for the next two weeks. With just a few clicks, these rooms will be blocked from being on all OTAs or channels.
Similarly, Bulk Update allows you to perform various other actions easily, such as: Deleting rooms, Setting Inventory, setting rooms online or offline, etc.
Below are the step-by-step guidelines on how to operate Bulk Update:
Log into the Stayflexi Dashboard.
Click on the third icon from the top, which is Rates and Inventory.
Locate the green “Bulk Update” on the right side of the screen and click on it.
A menu will appear with the following actions:
Set Pricing: Allows you to update the room rates across various OTAs or channels for a specific date range. You can adjust pricing for individual room types or rate plans.
Set Inventory: This lets you adjust the number of available room types over a defined date range. This ensures that the correct room availability is synced across all cahnnels.
Rate Multiplier: This feature allows you to apply a percentage increase or decrease to the existing rates for specific room types or rate plans. For example, you could increase the rate by 10% for a peak season.
Inventory Capping: This enables you to set limits on the number of rooms that can be sold through OTAs or specific channels, ensuring you retain control over the direct sales on your website.
Set Online/ Set Offline: This allows you to make certain room types or rate plans available [set online] or Unavailable [Set offline] for booking across your connected OTAs or channels.
Block Rooms/ Unblock Rooms: Provides the option to temporarily block rooms, making them unavailable for booking, or unblock previously blocked rooms, making them available again.
Delete Rooms/ Restore Deleted Rooms: This lets you permanently remove rooms from your inventory, or restore rooms that have been deleted, bringing them back into your active inventory.
Close/ Open Rate Plan and Room Type: This action allows you to close [make unavailable] or open [make available] specific rate plans or room types for booking on OTAs or direct channels.
Min/Max Length of Stay: Sets the minimum or maximum number of nights a guest must book for a particular room type or rate plan. For Instance: You might require a minimum stay of 2 nights during weekends.
Set Sold Out: Marks certain room types as fully booked [sold out] across your channels, even if there are still rooms available, to control availability manually.
Min/Max Advanced Booking Offset: Allows you to specify how far in advance or how close to check-in a guest can book. For example, you may require bookings to be made at least 2 days in advance or set a maximum window of 6 months.
How to sync rates across all OTAs or Channels?
Below are the step-by-step guidelines on how to sync rates across all OTAs or Channels:
Log in to the Stayflexi Dashboard with your credentials.
Click on the ” Rates & Inventory ” icon at the dashboard’s top [third icon from the left].
On the right side of the screen, click on the Bulk Update to open more options.
Select “Bulk sync.”
In the Bulk Sync window, you will see the following fields:
Room Type
Rate Plan
Channels/ OTAs
Date Range
Fill in the required details for each field as per your needs.
Once completed, click the “Save” button.
A confirmation message will show that the rates have been successfully synced across all selected OTAs.
Close / open room type and rate plan.
In Stayflexi, Closing or Opening room types and rate plans refer to controlling the availability of specific rooms and pricing options for bookings.
Close Room Type: When a room type is closed, it becomes unavailable for booking. Even if rooms of that type exist, they won’t appear as options for guests to book.
Close Rate Plan: Closing a rate plan means that the pricing or promotional offer attached to that rate plan is no longer available for booking. Guests won’t see or be able to select that specific rate plan.
Open Room Type: When a room type is opened, it becomes available again for bookings. Guests will see the room types as an option when making reservations.
Open Rate Plan: means making a specific pricing structure or offer available for bookings again, allowing guests to see and book rooms at those rates.
Below are the guidelines on how to use the feature Close/Open Room Type and Rate Plan:
Log into the Stayflexi Dashboard.
Click on the third icon from the top, which is Rates and Inventory.
Locate the green “Bulk Update” on the right side of the screen and click on it.
Locate Close/Open Room Type and Rate Plan in the bulk update settings.
A popup window will open with various options.
Select Days and Date Range: Choose the specific days and date range for which you want to apply the action [close/open room types or rate plans].
Choose Booking Source: Select the source or channel of booking for which you want to apply the restriction [e.g., OTA, direct bookings].
Select Direct Billing Accounts [if applicable]: You can apply the restrictions to specific direct billing accounts.
Enable/Disable the Toggle: There will be a toggle option:
Enable it to apply the action to all room types and rate plans.
Disable it if you want to select individual room types or rate plans.
Click Save: Once you’ve selected, click the Save button to complete the action.
Confirmation Message: You will receive a confirmation message indicating that the action has been successfully applied.
How to check OTA specific rates?
Below are the step-by-step guidelines on how to check OTA specific rates:
Log in to the Stayflexi Dashboard with your credentials.
Click on the ” Rates & Inventory ” icon at the dashboard’s top [third icon from the left].
In the middle of the screen, you will see the Source column, which displays all the sources of bookings [OTAs and direct channels].
Click on any specific source [e.g., Booking.com, Expedia] to view the rates associated with that OTA or channel.
How do I increase or decrease prices for a specific OTA?
Below are the step by step guidelines on how to increase or decrease prices for a specific OTA in Stayflexi:
Log into the Stayflexi Dashboard.
Click on the third icon from the top, which is Rates and Inventory.
Locate the green “Bulk Update” on the right side of the screen and click on it.
Locate and click on “Set Pricing” from the listed options.
On the next page, go to the right-hand-side and select the source to adjust the prices for the specific OTA.
Choose the days and set the date range for which the price adjustments apply.
Select the appropriate room types from the list.
When you select a room type, the pricing details for each rate plan will appear. Adjust the prices per person as needed.
If needed, click on “Add Room Type” to include additional room types for price setting.
Click on “Set Pricing” at the bottom, that will be enabled after filling all the required information.
Review and Confirm: A confirmation page will appear where you can recheck the data you have updated.
Receive Confirmation: You will get a confirmation message indicating that the pricing has been successfully updated.
How do I apply minimum and maximum length of stay restrictions?
In Stayflexi, Minimum/Maximum Length of Stay refers to the restrictions you can set on a booking to control how long guests must or can stay at your property. For Example:
If you set a 2-night minimum, guests cannot book for just 1 night.
If you set a 7-night maximum, guests cannot book for more than 7 consecutive nights.
Below are the step-by-step guidelines for Applying Minimum/Maximum Length of Stay Restrictions:
Log in to the Stayflexi Dashboard with your credentials.
Click on the ” Rates & Inventory ” icon at the dashboard’s top [third icon from the left].
Access the Bulk Update: On the right-hand side of the screen, click the Bulk Update button.
Select Min/Max Length of Stay: A list of bulk actions will appear. Select either Minimum Length of Stay or Maximum Length of Stay depending on your requirement.
Configure the Restriction Details:
A popup will appear where you can configure the restriction
Select the specific days and date range for the restriction.
Choose the source [e.g., OTA channels or Direct Bookings].
Apply to All Room Types and Rate Plans [Optional]: If you want to apply the restriction across all room types and rate plans, toggle the Apply for all room types and rate plans option.
Select Specific Room Types: If you do not want to apply the restriction to all rooms, choose the specific room types that you want the restriction to apply to.
Enter the Minimum or Maximum Length of Stay: Set the Minimum or Maximum length of stay you want to apply.
Confirm the Action:
Click the Min/Max Length of Stay button at the bottom of the popup to apply the restriction.
A confirmation message will appear to confirm that the restrictions have been successfully applied.
How to find rate parities reported by OTAs?
Below are the step-by-step guidelines on how to find rate parities by OTAs in Stayflexi:
Log into the Stayflexi Dashboard.
Click on the third icon from the top, which is Rates and Inventory.
On the right-hand side, locate the View more options.
From the listed options, find and click on “OTA Price Compare”.
You will now see the rate parities reported by different OTAs.
Note: In some Scenarios, OTAs may show varying prices due to promotions or discounts. If the rates differ from Stayflexi, adjust them in the respective OTA extranet to ensure price parity across platforms.
What is inventory capping, and how does it work ?
Inventory Capping in Stayflexi refers to the practice of setting limits on the number of rooms available for booking within a specified timeframe. This feature allows property managers to control how many rooms can be sold at a given timeon given source, helping them manage demand, optimize pricing, and avoid overbooking.
Benefits:
Avoid Overbooking: Reduces the risk of having guests show up with no available rooms.
Manage Demand: Adjusts room availability based on expected occupancy.
Maximize Revenue: Helps in strategic pricing and availability management.
Flexibility: Easy to adjust limits in response to changes in demand or booking patterns.
Example of Use:
If a property wants to allocate a specific number of rooms to online channels, they can use inventory capping. For example, if a property has 20 rooms in a category and wants to make only 5 rooms available to online channels, they can set the cap value to 5, select the desired channels, and specify the date range.
How to use the feature Inventory Capping in Stayflexi:
Log into the Stayflexi Dashboard.
Click on the third icon from the top, which is Rates and Inventory.
Locate the green “Bulk Update” on the right side of the screen and click on it.
Locate Inventory Capping and click on it.
Popup Window: A popup will appear on the right-hand side of the screen.
Select Room Types: Choose the Room Types you want to apply the cap on.
Specify days: select the days for which you want to apply the inventory cap.
Set Date Range: Select the date range during which the cap will be in effect.
Source of Booking: Select the source of Booking for which the inventory cap applies.
Select Cap Value: Enter the Cap Value you want to set.
Choose Type: Specify whether the cap is in Count [number of rooms] or Percentage.
Applying Capping: Click on the Apply Capping button to complete the process.
Confirmation Message: A confirmation message will appear, indicating that the inventory capping has been successfully applied.
How can I adjust the inventory for a specific day?
Below are the step by step guidelines on how to adjust the inventory for a specific day:
Log into the Stayflexi Dashboard.
Click on the third icon from the top, which is Rates and Inventory.
Locate the green “Bulk Update” on the right side of the screen and click on it.
Locate and click on “Set Inventory” from the listed options.
On the next page, go to the Days column and select the specific day for which you want adjust the inventory.
Select the date range to apply the changes.
Choose the appropriate room type from the list.
Enter the desired room count for that day.
If needed, click on the “Add Room Type” button to add inventory for additional room types.
Finally, click on “Set Inventory” to complete the adjustment.
How do I set rooms to offline status?
The main purpose of setting rooms’ Offline Status in Stayflexi is to keep certain rooms unavailable for online bookings while still allowing them to be manually booked for offline purposes.
Here’s a step-by-step guide on how to find the feature Setting a Room Offline:
Log into the Stayflexi Dashboard.
Click on the third icon from the top, which is Rates and Inventory.
Locate the “Bulk Update” option on the top right side of the screen and click on it.
Locate Set Offline: In the list of actions that appears, find and select set Offline option.
Select Room Types: Choose the Room Types and then you can select room numbers you want to set offline from the options provided.
Toggle Selection:
There is a toggle option available:
Enable the toggle to select all rooms at once and make it offline.
Disable it to set rooms offline on a room-by-room basis.
Select the Date Range: Don’t forget to specify the “Date Range” during which the rooms will be offline.
Set Offline: After making your selections, click on the Set Offline button located below.
Confirmation Message: You will receive a confirmation message indicating that the selected rooms have been successfully Set Offline.
Can I copy rates from one online channel and apply them to another channel or travel portal?
To copy rates from one online channel and apply them to another channel or travel portal, follow the below-mentioned steps:
Log into the Stayflexi Dashboard.
Click on the third icon from the top, which is Rates and Inventory.
Locate the green “Bulk Update” on the right side of the screen and click on it.
From the listed options, Locate and click on “Update Rates from OTA”.
A page will open on the RHS of the screen.
In the respective column, select the Source [OTA] from which you want to update the rates.
Select the specific days for which you want to update the rates from OTA.
Choose the date range for which the rates should be updated.
Depending upon your need, select either Previous Year or Next Year to apply the rates accordingly.
The previous year or next year options allow you to apply rate updates based on historical or future data. Here’s a brief overview:
Previous Year: This option lets you copy and apply rates from the same period in the previous year. It’s useful for maintaining consistency in pricing strategies based on past performance.
Next Year: This option allows you to set or adjust rates for the upcoming year. It’s beneficial for planning ahead and ensuring your rates are competitive and aligned with your revenue management strategy.
Once all selections are made, proceed with updating the rates to complete the action.
How can I check if the rates updated in Stayflexi have synced with the OTAs?
There are two ways to verify the rates updated in Stayflexi after syncing with OTAs:
Using view latest updates
To check if the rates updated in Stayflexi have synced with the OTAs, follow these steps:
Log in to the Stayflexi Dashboard with your credentials.
Click on the ” Rates & Inventory ” icon at the dashboard’s top [third icon from the left].
On the right side of the screen, click on View more options to open more options.
Select Logs: From the list of options, click on View latest Updates.
Check the Sync Status: On the opened page, review the status. If it shows “Success”, the updated rates have been successfully synced with the OTAs.
If it does not show “Success” the rates have not been synced, and further action may be needed.
This process ensures that your rates are aligned across Stayflexi and the OTAs.
2. Using View Detailed Logs
In Rates & Inventory, select View Detail Logs
Review the on-screen notice: this log reports only OTA (channel) rate and inventory updates.
From the calendar control, choose the date for which you want the report.
Click Export Report to generate and download the log.
A list of reports for the selected date will be displayed. Review the update records and check their Status.
How to set sold out entire property ?
Below are the step-by-step guidelines on how to Set Sold Out:
Log in to the Stayflexi Dashboard with your credentials.
Click on the ” Rates & Inventory ” icon at the dashboard’s top [third icon from the left].
Click on the “Bulk Update” button located on the right side of the screen.
From the list of actions, select “Set Sold Out.”
A pop-up will appear on the right side of the screen. Select the Specific days you want to mark as sold out.
Choose the date range during which you want to set rooms as sold out.
Click the “Set Sold Out” button to complete the action.
You will receive a Confirmation message and the entire property will be marked as sold out.
How do I set rooms to online status?
The main purpose of setting a room to Online Status in Stayflexi is to make it available for bookings across online channels, such as OTAs [Online Travel Agencies] and the property’s website.
Here’s a step-by-step guide on how to find the feature Setting a Room Online status:
Log into the Stayflexi Dashboard.
Click on the third icon from the top, which is Rates and Inventory.
Locate the “Bulk Update” option on the top right side of the screen and click on it.
Locate Set Online: In the list of actions that appears, find and select set Online option.
Select Room Types: Choose the Room Types and then you can select room numbers you want to set online from the options provided.
Toggle Selection:
There is a toggle option available:
Enable the toggle to select all rooms at once and make it online.
Disable it to set rooms online on a room-by-room basis.
Select the Date Range: Don’t forget to specify the “Date Range” during which the rooms will be online.
Set Online: After making your selections, click on the Set Online button located below.
Confirmation Message: You will receive a confirmation message indicating that the selected rooms have been successfully Set Online.
Blocking and unblocking the rooms.
In Stayflexi, managing room availability is quick and effortless with the Block/Unblock feature. Whether you need to temporarily remove rooms from inventory for maintenance, or permanently block them due to long unavailability, Stayflexi allows you to do so in just a few clicks.
EXAMPLE: Consider a hotel undergoing renovations on one of its floors. The manager needs to keep the rooms on that floor unavailable for an extended period while the work is completed. Using Stayflexi’s block/unblock feature, the manager can permanently block those rooms, ensuring they don’t appear in the booking system.
Once the renovations are done, the manager can simply unblock the rooms with a few clicks, instantly making them available for reservations. This streamlined process helps the hotel avoid any booking mishaps while keeping inventory up to date.
Below are the step-by-step guidelines on blocking and unblocking the rooms:
Log in to the Stayflexi Dashboard with your credentials.
Click on the ” Rates & Inventory ” icon at the dashboard’s top [third icon from the left].
On the opened page, click on Bulk Update. A popup will appear displaying multiple actions you can perform.
Select Block/Unblock Rooms: From the list of actions, choose Block/Unblock Rooms based on your requirements.
Choose Room Types: You will see a page displaying rooms on the right side. Under Room Types, select the rooms you wish to block or unblock.
Select All or Individual Rooms: You will find a toggle below the room types
Enable the toggle to Select all rooms for the action.
Disable it to select rooms individually.
Set Date Range: Below the room selection, choose the date range during which you want the rooms to be blocked or unblocked.
Add a Reason [Optional]: There’s an optional field where you can type the reason for blocking the rooms, if necessary.
Complete the Action: Click on Block/Unblock Rooms to execute the action.
Confirmation: A confirmation message will appear, indicating the completed process.
Note: Once rooms are blocked, they will also appear in the “Out of Order” reports under the Housekeeping tab, ensuring the housekeeping team is aware of the status.
What happens when a room is set offline?
When a room is set to Offline Status in Stayflexi, it becomes unavailable for booking online platforms like OTAs and the property’s official website. However, the room remains available for offline bookings, such as walk-ins or direct reservations made by phone or at the front desk. The inventory is not blocked on online channels like OTAs, but the property purposefully keeps it offline for various reasons, such as maintenance or keeping a few rooms aside for VIP guests.
EXAMPLE: A property may set a room to offline status during a local festival. They anticipate that many guests will walk in without prior bookings, so they reserve some rooms exclusively for offline bookings, ensuring they can accommodate last-minute guests.
What happens when a room is set online?
When a room is Set Online in Stayflexi, it becomes available for booking across all connected channels, including the property’s own website and OTAs [Online Travel Agencies]. This is commonly done after the room has been offline due to maintenance, cleaning, or other operational reasons. The room’s availability is instantly updated across all platforms, making it open for new reservations.
EXAMPLE: Let’s say Kevin, a property manager, had previously set Room 301 offline for a week due to to plumbing repairs. After the repairs are completed and the room is ready for guests, Kevin logs into Stayflexi and sets Room 301 back Online. Immediately, the room becomes available for booking across all connected OTAs like Booking.com and Airbnb.
Later that day, a guest visiting the property’s official website sees Room 301 available for their desired dates and makes a booking. Since Stayflexi automatically syncs inventory across all platforms, the room is also available on all OTA platforms.
By setting the room online, Kevin ensures that the guests have access to the most up-to-date availability, all while avoiding any manual work to update each booking channel individually.
What is the difference between setting room offline and blocking a room?
Setting a Room Offline in Stayflexi: This action temporarily removes a room from online availability, making it unavailable for booking through any online channels. The room can only be booked for walk-in guests. The room will not be shown as available on the online booking platform, and no online reservations can be made for that room until inventory is set back online.
Blocking a Room: Blocking a room in Stayflexi allows a property manager to block a particular room number for a specific guest. This action prevents the room from being booked by other guests during the specified period.
Blocking a room can happen for property management needs also, If renovations, maintenance, or any other changes are needed, property managers can block the room to prevent bookings during that duration.
When a room is blocked, it remains visible on the reservation calendar but is labeled as a blocked room in grey color. This visual indication helps front desk staff quickly identify which rooms are unavailable for new bookings.
Here’s a step-by-step guide on how to find the feature Setting a Room Offline:
Log into the Stayflexi Dashboard.
Click on the third icon from the top, which is Rates and Inventory.
Locate the “Bulk Update” option on the top right side of the screen and click on it.
Locate Set Offline: In the list of actions that appears, find and select set Offline option.
Select Room Types: Choose the Room Types and then you can select room numbers you want to set offline from the options provided.
Toggle Selection:
There is a toggle option available:
Enable the toggle to select all rooms at once and make it offline.
Disable it to set rooms offline on a room-by-room basis.
Select the Date Range: Don’t forget to specify the “Date Range” during which the rooms will be offline.
Set Offline: After making your selections, click on the Set Offline button located below.
Confirmation Message: You will receive a confirmation message indicating that the selected rooms have been successfully Set Offline.
Here’s a step-by-step guide on how to find the feature Block Room:
Log into the Stayflexi Dashboard.
Click on the third icon from the top, which is Rates and Inventory.
Locate the “Bulk Update” option on the top right side of the screen and click on it.
Locate Block Room: In the list of actions, find and select Block Rooms.
Popup Window: A popup will appear on the right-hand side of the screen.
Select Room Types: Choose the Room Types you want to block.
Select Room ID Grids: You can individually select the room ID grids for the rooms you wish to block.
Toggle Selection:
Enable the toggle to block all rooms at once.
Disable the toggle to block rooms individually.
Select Date Range: Don’t forget to specify the “Date Range” during which the rooms will be blocked.
Provide a Reason: There is an optional Reason box where you can type the reason for blocking the room.
Block Room: After making your selections, click on the Block Room button located below.
Confirmation Message: A confirmation message will appear, indicating that the selected rooms have been successfully blocked.
How can I update prices for all or multiple room categories at once for both offline and online travel portals using the software?
Below are the step-by-step guidelines on how to set pricing in Stayflexi:
Log into the Stayflexi Dashboard.
Click on the third icon from the top, which is Rates and Inventory.
Locate the green “Bulk Update” on the right side of the screen and click on it.
From the list of actions, Locate and click on Set Pricing to adjust rates.
A pop-up will appear on the right-hand with options:
Select the Source of booking e.g., OTA, Direct, etc.. for which you want to set the rates. You can choose one, multiple, or all sources at once.
Choose the Days for which you want to adjust the rates, similar to the source selection.
Select the Date Range during which the price changes will apply.
Choose the Room Type and rate Plan you wish to adjust.
Set the Price per Person under the room type and rate plan.
Add the Child and Infant prices, if applicable.
Click on ‘Add Room Type’ on the left side of the pop-up page and repeat the process for each new room type.
After setting all prices, click on ‘Set Pricing’.
You will see a summary of the changes:
Review the updated data and pricing details.
Click on ‘Confirm’ to complete the action.
A confirmation message will appear, indicating that the rates have been successfully updated.
How can I change a room number or room ID within the software?
Below are the step-by-step guidelines on how to change room numbers in Stayflexi:
Log into the Stayflexi Dashboard.
Click on the third icon from the top, which is Rates and Inventory.
Locate the “Bulk Update” option on the right side of the screen and click on it.
Locate Edit Room IDs: In the list of actions, find and select Edit Room IDs.
Popup Window: A page will appear on the right-hand side of the screen.
Select Room Types: Choose the Room Types you want to edit.
Edit Room IDs: Below the room type selection, you will see the current room IDs. Enter your desired new room IDs in the corresponding fields.
Confirm Edit: After entering the new room IDs, click on the Edit Room IDs button below to complete the action.
Confirmation Message: You will receive a confirmation message indicating that the room numbers have been successfully changed.
How to change prices for multiple date ranges and across multiple room types?
To change prices for Multiple Date Ranges and across Multiple Room Types, follow the below steps:
Log into the Stayflexi Dashboard.
Click on the third icon from the top, which is Rates and Inventory.
Locate the green “Bulk Update” on the right side of the screen and click on it.
Set Pricing: Locate and click on the “Set Pricing” option.
A page will open on the RHS.
Select the OTA/ Channel: To set the price for a specific channel, select the arrow at the top right corner of the page to choose the OTA or Channel.
You can select multiple channels or just one.
Select Days: In the “Days” column, choose the specific days you want to apply the price changes.
Set Date Range: Choose the date range for which you want the price changes to take effect.
Click on the date range field to open the calendar.
Choose the start and end dates for the specified range.
Select Room Types: select the arrow at the top right corner of the page in the Select Room Types column. Under “Room Types”, click on “Add Room Type” to select the rooms for which you want to update the pricing.
Note:- You can add multiple room types one by one and accordingly you can update prices in 1 go.
Click on Set Pricing: Once all the selections are made, click the green “Set Pricing” button at the bottom of the page.
Review and Confirm: A confirmation page will appear where you can recheck the data you have updated.
If everything is correct, click “Confirm” to apply the changes.
Receive Confirmation: You will get a confirmation message indicating that the pricing has been successfully updated.
How to check what room types and rate plans connected to what channels/OTAs?
Below are the step-by-step guidelines on how to check what Room Types and Rate plans are connected to what channels:
Log in to the Stayflexi Dashboard with your credentials.
Click on the ” Rates & Inventory ” icon at the dashboard’s top [third icon from the left].
You will see Room Types and Rate Plans listed individually on the page.
Next to each Room Type, there is an option labeled “View Connected Channels”. Click on this option.
A pop-up will appear, displaying the OTAs and channels connected to that specific Room Type and Rate Plan.
How to delete rooms ?
Below are the guidelines on how to Delete rooms:
Log into the Stayflexi Dashboard.
Click on the third icon from the top, which is Rates and Inventory.
Locate the “Bulk Update” option on the right side of the screen and click on it.
Locate Delete Rooms: In the list of actions, find and select Delete Rooms option.
Popup Window: A popup will appear on the right-hand side of the screen.
Select Room Type: Choose the Room Types from which you want to delete.
Select Room IDs: Select the specific Room IDs, which are displayed in grid form.
Delete Rooms: After making your selections, click on the Delete Rooms button below.
Confirmation Message: You will receive a confirmation message indicating that the selected rooms have been successfully deleted.
Follow the same steps as mentioned above for deleting rooms. Choose the Room IDs you want to Restore. After making your selections, click on the Restore Rooms button located below. You will receive a confirmation message indicating that the selected rooms have been successfully restored.
Understanding the reservations section in dashboard.
The Reservation Section in Stayflexi offers an all-in-one glance at the status of your property for the day. It is designed to provide key information about your reservations in a single, consolidated view, helping you quickly understand and manage your property’s bookings.
The image below illustrates the Layout of the Reservations page, giving you a clear understanding of how it looks and functions:
Welcome Message: At the top, you will see a personalized welcome message such as “Good afternoon”, which indicates that the data is updated in real-time.
Navigation Menu: Right next to the greeting, two tabs let you switch between sections like Reservations and Performance.
Next to the date, you will find a Calendar icon. Clicking on this icon allows you to toggle between past, present, and future bookings, making it easy to view reservations across different periods. With just one click, you can access the information about your property’s booking history, current occupancy, or upcoming reservations.
Reservation Overview: This section presents several tiles, each representing a key metric for the day. These tiles allow property managers to gauge the day’s activities quickly. The tiles include:
New bookings—These are all the reservations that happened today, in other words, these are room sales that occurred today. Reservations can be of current date or future date.
In-house – All the reservations are in check-in status, and the guests are staying currently on the property.
Arrivals – The guests who are scheduled to check in or arrived today.
Departures – The guest who are scheduled to check out today.
Cancellations – The reservations that the guests have canceled.
On hold—Reservations that have not yet been finalized and may require further steps before they are confirmed or canceled.
No-show – Indicates reservations where the guest did not arrive on the check-in date and staff had marked them manually No- show.
Magic link – It is a unique feature that sends a URL to the guest via email, whatsapp or SMS allowing them to perform specific actions such as self-check-in,request for early check-in and late check-out as well as access add-ons.
Search Bar: Located directly below the Tiles, the search bar allows you to quickly find specific bookings to organize better and manage reservations. Simply type in a guest name, phone number or stayflexi booking number starting with SFBOOKING_XXXXX_54321 or last 5 digit unique number i.e 54321, to instantly locate the reservation you’re looking for. This search bar makes it effortless to manage a large volume of bookings and find specific booking details at a moment’s notice.
Detailed Booking Information: Below the tiles and search bar, individual bookings details are listed, including:
Guest Name
Booking Source [e.g., OTA channel icon or walk-in symbol]
Room id along with the Room type
Check-in and Check-out dates
Payment status: Total and balance due.
Next to the Search bar, there’s a Download Report button. By clicking on this option, you can download a detailed report of the day’s reservations. This feature allows you to export the data for further analysis or record-keeping.
Sort and Search Feature: Stayflexi allows you to sort the displayed bookings by different criteria, such as guest name, check-in, check-out, etc. Sorting makes it easier to organize your view based on your needs.
On the right side of the screen, you will find the “Availability Today“. This box provides a quick view of room availability for the current day, including details on room types and base prices. It allows you to quickly respond to guest enquiries regarding room availability and base price.
Usage Tip: Regularly check this box throughout the day to stay updated on room availability.
Recommendations Section: On the right side of the page, you will find a dedicated area for all the recommendations from Stayflexi. This section provides updates and suggestions, helping you optimize your usage of the platform.
Housekeeping
Experience the future of hotel cleanliness with Stayflexi’s Housekeeping management! In this video, we highlight how our innovative platform streamlines housekeeping operations, ensuring your rooms are spotless and guest-ready. Discover features like real-time task updates, automated scheduling, and seamless communication between staff. Stayflexi’s Housekeeping module enhances efficiency, reduces manual errors, and improves guest satisfaction. Join us to see how you can elevate your hotel’s cleanliness standards and operational efficiency. Don’t forget to like, subscribe, and hit the notification bell for more insights on transforming your hotel management!
The layout is designed to provide a comprehensive view of the housekeeping status of the rooms on the property. It shows a grid of rooms, and their current status, and allows for various actions related to cleaning and staff assignment. The main dashboard displays key housekeeping statistics, while the bottom section lists the individual rooms with detailed information.
On the top menu, click the Housekeeping icon (4th icon from the left) to open the Housekeeping dashboard. This page displays all rooms along with their current housekeeping and booking statuses.
Housekeeping Status Tiles (Top Section)
At the top of the page, you’ll find status summary tiles, giving a quick overview of the property’s room conditions:
Clean: Number of rooms that are clean and ready for new guests.
Clean Occupied: Clean rooms that currently have checked-in guests.
Dirty: Rooms marked as dirty and need cleaning.
Dirty Stayover: Occupied rooms that require cleaning during the guest’s stay.
Dirty Checkout: Rooms where guests have checked out and the room needs to be serviced.
Out of Order: Rooms unavailable due to repairs or maintenance.
Total Clean: Sum of all rooms marked clean (occupied or vacant).
Total Dirty: Sum of all dirty rooms (stayover + checkout).
All Rooms: Displays the total number of rooms in the property.
Filters and Controls (Below the Tiles)
Search Bar: Quickly search for a specific Room No., Guest Name, or Room Type.
Dropdown (Room Count): Lets you adjust how many room records are displayed per page.
Pick Your Date: Use the calendar icon to view the housekeeping data for a specific date.
Actions Dropdown: Provides key housekeeping operations such as:
Mark Clean – Update selected room(s) to clean status.
Mark Dirty – Mark selected room(s) as dirty.
Assign Staff – Allocate rooms to housekeeping staff for cleaning.
Mark Out of Order – Mark selected rooms as unavailable for maintenance.
Mark Available – Bring out-of-order rooms back to available status.
Add Staff Remark – Add specific notes or updates related to room or staff activity.
Export Report Dropdown: Download detailed housekeeping activity reports in PDF, CSV, or Excel formats for easy tracking and management.
Room List (Main Table Section)
Each row in the table represents an individual room with details such as:
Room No.: The room number assigned within the property.
Status: Shows the current housekeeping condition (e.g., Dirty – Stayover, Dirty – Checkout, Clean).
Guest Name: Displays the guest currently staying or who recently checked out.
Booking Status: Indicates whether the room is Checked-In or Checked-Out.
Check-In / Check-Out: Displays the respective check-in and check-out dates and times.
Staff Name: Shows the staff member responsible for cleaning or maintaining the room.
You can select multiple rooms using the checkboxes for performing batch actions like marking them clean or assigning staff.
Additional Features
Column Settings (Right Side): You can customize visible columns in the table for a personalized view.
Total Rows Count (Bottom): Displays the total number of rooms currently visible in the list.
Accessing Configuration Options
On the right-hand side of the Housekeeping page, click on the ⚙️ Configuration icon to open additional housekeeping settings.
This section provides two important options:
Room Assignment
Out-of-Order Report
The overall Housekeeping Layout provides a clear and structured way for hotel management and staff to:
Monitor daily cleaning progress,
Assign and track staff duties,
Quickly take bulk actions on rooms, and
Generate instant reports for recordkeeping and analysis.
Is there a simple and efficient way to mark all dirty room as clean with just one click from the housekeeping interface? How user-friendly is this process?
Yes, there is a simple and efficient way to mark all dirty rooms as clean directly from the Housekeeping interface, and it’s designed to be very user-friendly.
Here’s how it works:
By following these steps, you can easily mark rooms as clean from the housekeeping interface.
Go to the Housekeeping Page: Click on the Housekeeping icon (4th icon from the left on the top menu).
Select All Dirty Rooms:
Select the dirty tile from the housekeeping dashboard.
Use the checkbox beside the column header to Select All rooms at once.
This automatically highlights every room listed on the page (including all dirty rooms).
Click on the “Actions” Dropdown: From the dropdown options, choose “Mark Clean.”
Instant Update:
All selected dirty rooms will instantly change their status to Clean.
The dashboard counters (Clean, Dirty, Total Clean, etc.) refresh automatically.
Where can I find a comprehensive view of all rooms and their current statuses (dirty, clean, out of order, dirty occupied)?
You can view a comprehensive list of all rooms and their current housekeeping statuses right from the Housekeeping Dashboard itself.
Here’s how it works:
Comprehensive View of All Room Statuses :
Go to the Housekeeping Page: Click on the Housekeeping icon (4th icon from the left on the top menu).
Dashboard Overview:
The top section of the page displays status summary cards showing:
Clean – Rooms ready for occupancy.
Clean Occupied – Clean but currently occupied rooms.
Dirty – Rooms that need cleaning.
Dirty Stayover – Occupied rooms that require daily cleaning.
Dirty Checkout – Rooms vacated by guests and pending cleaning.
Out of Order – Rooms blocked due to maintenance.
Total Clean / Total Dirty / All Rooms – Overall counts for quick tracking.
Room List (Detailed Table View): Below the summary cards, the main table gives a detailed breakdown of each room, including:
Room Number
Current Status (Clean, Dirty, Out of Order, etc.)
Guest Name
Booking Status (Checked-In / Checked-Out)
Check-In & Check-Out Dates
Assigned Staff Name
How do I assign housekeeping staff to specific rooms for cleaning?
Below are the step-by-step guidelines to assign Housekeeping staff to rooms from the Stayflexi Housekeeping:
Method 1: From the Housekeeping Dashboard
Open the Housekeeping Page: Click on the Housekeeping icon (4th icon from the left on the top menu).
Select Room(s):
Use the checkbox beside the room(s) you want to assign.
You can select one or multiple rooms at a time.
Click on the “Actions” Dropdown:
From the dropdown options, choose “Assign Staff for Cleaning.”
Assign Staff:
A small pop-up will appear showing the list of available housekeeping staff.
Select the staff member you want to assign and click Save.
Confirmation:
The Staff Name and Email will now appear beside each assigned room in the table.
The room status and staff remark (if added) will be visible instantly.
Method 2: From the Configurationto Room Assignment Page :
If you want to set permanent staff assignments so that a particular staff is automatically assigned every time that room becomes dirty:
Click on the Configuration icon on the right-hand side of the Housekeeping page.
Select “Room Assignment.”
Choose a Room Number and Assign Staff permanently.
Click Save.
From now on, whenever that room becomes dirty, it will auto-assign to the same staff member.
NOTE: To add a staff member’s name or email in the Room Assignment section, you must first add them under Property Configuration → Users & Access Control. Once the user is created there, their details will automatically reflect in the staff list for Room Assignment.
How to bulk mark rooms dirty / clean?
You can update the housekeeping status of multiple rooms at once using the bulk action feature available on the Housekeeping dashboard. This helps save time and ensures all room statuses are updated instantly.
Below are the step-by-step guidelines to bulk mark rooms as dirty/clean from the Stayflexi Housekeeping:
Open the Housekeeping Page:
Click on the Housekeeping icon (4th icon from the top menu) to access the housekeeping dashboard.
Select Rooms:
Use the checkbox beside each room to select multiple rooms.
To select all rooms at once, click the Select All checkbox at the top of the list.
Click on the “Actions” Dropdown:
At the top of the page, you’ll find the Actions dropdown menu.
Choose “Mark Clean” to mark all selected rooms as clean.
Choose “Mark Dirty” to mark all selected rooms as dirty.
Instant Update:
The selected rooms will immediately update their status.
The status cards (Clean, Dirty, Total Clean, etc.) will automatically refresh to reflect the changes.
Is there a system to add specific remarks or instructions for staff on individual rooms, ensuring they have all the necessary information?
Yes, the Housekeeping module includes a remarks feature that allows you to add specific notes or instructions for staff on individual rooms — ensuring they have all the details they need before cleaning or inspection.
Below are the step-by-step guidelines to add remarks or instructions for staff on individual rooms from the Stayflexi Housekeeping:
Log in to Your Stayflexi Dashboard:
Use your username and password to log in.
Go to Housekeeping:
On the top menu, click the Housekeeping icon (4th icon from the left) to view a list of rooms and their current status.
Select the Rooms:
To select individual rooms, click the checkbox next to each room .
To select all rooms at once, click the checkbox in the header row.
Open the Actions Menu:
Once rooms are selected, click on the Actions dropdown menu at the top of the Housekeeping Dashboard.
A list of bulk action options will appear.
Choose the Action:
Choose the option “Assign a room to supervisor and add a remark.”
Assign Staff:
In the pop-up window that appears, select the staff member from the dropdown by entering their email address. This will assign the selected rooms to that specific staff member.
Add Remarks:
Supervisor Remark:
Enter any important notes or instructions that the supervisor needs to be aware of for the selected rooms in the Supervisor Remark text box.
Staff Remark:
Add specific instructions or comments for the housekeeping staff, such as tasks to be completed or special requirements for the room in the Staff Remark text box.
Save the Remark:
After reviewing the details, click the “Save” button.
This will ensure that the assigned staff members receive the rooms and the remarks you added.
How can I quickly identify and access information about all out-of-order rooms?
You can easily view and manage all Out-of-Order rooms directly from the Housekeeping module. The system provides both a quick visual overview and a detailed report for better tracking and maintenance management.
Below is the Step-by-step guide to identifying and accessing information about all out-of-order rooms in Stayflexi Housekeeping:
Method 1: From the Housekeeping Dashboard:
Open the Housekeeping Page:
Click on the Housekeeping icon (4th icon from the top menu).
Check the Status Summary Cards:
At the top of the page, you’ll see a status card labeled “Out of Order.”
This card instantly shows the total number of rooms currently marked as Out of Order.
View Out-of-Order Rooms in the Table:
Scroll down to the room list (main table).
Under the Status column, look for rooms marked as “Out of Order.”
You can also use the search bar and type “Out of Order” to filter and view only those rooms.
Method 2: From the Configuration → Out-of-Order Report:
On the right-hand side of the Housekeeping page, click on the Configuration icon.
Select “Out-of-Order Report.”
This opens a detailed log of all rooms that are currently out of order, including:
Room Number
Reason for being Out of Order (e.g., AC repair, renovation, maintenance)
Status (Active / Resolved)
Action Log (who marked it and when)
Remarks or Notes (if added during blocking)
You can also export this report in PDF, Excel, or CSV format for tracking and record-keeping.
What is the difference between dirty stayover and dirty?
Both Dirty Stayover and Dirty indicate rooms that require cleaning — but they differ based on whether the room is occupied or vacant.
Dirty Stayover:
Refers to a room that is currently occupied by a guest, but still needs cleaning or servicing.
This usually happens when a guest is staying for multiple nights and requests or is scheduled for daily housekeeping service.
The guest’s belongings remain in the room while cleaning is done.
Example: A guest is staying for 3 nights. After the first night, the room is cleaned while the guest continues the stay — that day, the room status is Dirty Stayover until cleaned.
Dirty (or Dirty Checkout):
Refers to a room that has been vacated by the guest and now needs full cleaning and resetting before the next check-in.
The room is unoccupied and ready for deep cleaning, linen change, and inspection.
Example: A guest checks out at 11 AM, and the room now needs cleaning before the next arrival — that room shows as Dirty (Checkout) or simply Dirty.
How can I export housekeeping data?
Below are the step-by-step guidelines to export the housekeeping charter from Stayflexi Housekeeping:
Log in to Your Stayflexi Dashboard:
Use your username and password to log in.
Go to Housekeeping:
On the top menu, click the Housekeeping icon (4th icon from the left) to view a list of rooms and their current status.
Open the Export Options:
Click on the Export Reportdropdown menu at the top of the Housekeeping Dashboard.
Choose the Export Format:
You will see three options to export the housekeeping data.
Export as CSV
Export as PDF
Export as Excel
For Example:
Select Export asPDF to export the report in PDF format.
Download and View the Report:
Once you select Export asPDF, the file will automatically download to your system.
Open the PDF to view the housekeeping charter in a document format with all the details.
What is send magic link in dashboard?
Stayflexi has introduced a new and unique feature, The Magic Link. The image below provides a clear guide on how to locate the Send Magic Link.
The Send Magic Link feature in Stayflexi allows hotel staff to send guests a secure, personalized link that grants them access to their booking details without needing a password. With this link, the guests can easily manage their reservations, check in, or complete payments. This feature enhances convenience and saves time for both hotel staff and guests.
Some key highlights of this feature include :
Convenience: Guests can access their reservation instantly, with just one click.
Security: Each link is unique and exclusively accessible by the authorized recipient.
Efficiency: It simplifies the check in process and various booking-related tasks.
No Password Needed: Guests don’t have to worry about remembering login credentials.
How to Use the “Send Magic Link” Feature
Open the Reservation Calendar: Navigate to the Stayflexi dashboard and open the reservation calendar where you can see the current bookings.
Select a Reservation: Click on the specific booking for which you want to spend the Magic Link. This opens a detailed booking view on the right side of the screen.
Locate the Send Magic Link: In the booking information section, find the “Send Magic Link” button.
Click on Send Magic Link: Click the “Send Magic Link” button. The system will immediately send a secure link to the guest via their email or phone number registered with the booking.
Guest Received the Magic Link via WhatsApp/email: The guest will receive a link via WhatsApp or email and can click it to view their booking details, check-in status, or payment options without entering login credentials.
Confirmation: After sending the link, you’ll receive a notification on the screen, confirming that the link was successfully sent.
The image below provides a visual representation of the Magic Link for your reference.
How to check new reservations?
To check new reservations in Stayflexi, follow the steps below:
Login: Start by logging into your Stayflexi dashboard using your credentials.
Front Page : You will land on the front page of the dashboard
New Bookings : From the displayed tiles, click on New Bookings.
Booking Folio: Under this section, you can find the folio for each new reservation.
Conversations
Streamline your guest communications with Stayflexi’s Conversations feature. Effortlessly manage all guest interactions from a single platform, as our system integrates chats from leading OTAs like Expedia, Booking.com, and Airbnb. No more juggling multiple extranet logins—respond to enquiries, confirm reservations, and address guest concerns in real time, all within the Stayflexi dashboard. Whether it’s a quick question or a detailed request, Stayflexi ensures seamless communication, helping you enhance guest satisfaction and boost efficiency. Simplify your workflow and deliver exceptional service, every time.
what is the conversation feature in Stayflexi and how can it help a property
The Conversations feature in Stayflexi is specifically designed to streamline communication with guests by linking chats from multiple channels Expedia, Booking.com, and Airbnb directly into theStayflexi platform. This centralization simplifies guest communication management by allowing staff to handle all queries from these major OTAs without the need to access each OTA’s extranet.
Benefits of the Conversations Feature in Stayflexi:
Single Platform for OTA chats:
With Expedia, Booking.com, and Airbnb chats integrated into Stayflexi, the property staff can manage all guest communication in one place. This reduces the time and effort needed to log into each OTA extranet to respond to guests.
Efficient Guest Communication:
Since all messages from these platforms are collected in Stayflexi, staff can respond to guest inquiries in real-time, helping to resolve issues faster and providing a better guest experience.
Consistent and Seamless Replies:
Responses sent through Stayflexi are automatically synced with the OTA platform, ensuring smooth and timely communication without switching between systems.
Improved Productivity:
By centralizing OTA chats, staff can focus on providing better service without worrying about missed messages or delayed responses due to logging in multiple extranets.
How It works:
Staff can access the Conversations tab from the Stayflexi Dashboard .
Here, they will see all messages from guests who booked through Expedia, Booking.com, or Airbnb.
They can reply to guests directly from Stayflexi, and the messages will be automatically sent to the correct platform.
Can I reply online travel portal / channel guest messages from Stayflexi and what are the steps to do so ?
YES, you can reply to guest messages or query through Stayflexi, and managing responses is streamlined through the platform’s Conversations feature. Here’s how it works and how responses are managed:
Direct Guest Replies:
When you send messages to guests via Stayflexi, whether it’s through integrated OTAs like Booking.com, Expedia, or Airbnb, guests can respond to these messages directly from their OTA account.
Their replies appear instantly in the Stayflexi under the Conversations section, where staff can view and respond to them without logging into individual OTA platforms extranet.
Managing Guest Responses:
Centralized Dashboard: All incoming guest messages, whether pre-arrival during the stay or post-checkout, are displayed in a single, centralized dashboard within Stayflexi. This allows property staff to manage all communication from one place.
Real-Time Notifications: When a guest replies, the system sends real-time notifications, ensuring that staff are alerted promptly and can respond to enquiries or issues as soon as they arise.
Responding to Multiple Guests: For properties managing multiple guests, the Conversations feature organizes messages by guest or booking, helping staff handle responses efficiently and without confusion.
Enhancing Guest Experience:
Timely Responses: Since all messages are centralized and tracked, property staff can respond quickly, providing guests with prompt answers to their questions or requests. This enhances guest satisfaction and reduces response times.
Improved Staff Efficiency: By managing all guest communication in one place, property staff save time and avoid the hassle of logging into different OTA platforms to respond to messages. This boosts operational efficiency while maintaining consistent communication with guests.
Can a property communicate on real time basis with OTA guest with the help of conversations
YES, with Stayflexi’s Conversations feature, a property can communicate with OTA [Online Travel Agency] guests in real time. This feature integrates directly with major OTAs like Booking.com, Expedia, and Airbnb, allowing property staff to respond to guest enquiries, messages, and requests without logging into each OTA extranet.
How It Helps:
Real-Time Communication:
Messages sent by guests through the OTA are instantly received in Stayflexi’s Conversations feature, enabling staff to reply in real-time. This ensures quick responses, improving guest satisfaction.
Staff can respond directly from within Stayflexi, and the message is immediately sent to the guest via the corresponding OTA. This real-time messaging ensures that guests get prompt replies, whether they have questions about their booking, special requests, or other concerns.
Automated Updates and Notifications:
With real-time notifications, staff are alerted as soon as a new message arrives, ensuring timely responses. They can see all the necessary information in one interface, such as the guest’s name, booking details, and the source of the message.
Operational Efficiency:
Since all communication channels are integrated into Stayflexi, staff can focus on responding promptly without logging into multiple OTA systems.
It also helps with consistency and accuracy in communication, ensuring that all guest interactions are documented in one place for better tracking and follow-up.
Can I track the history of messages sent to guests through Stayflexi?
YES, Stayflexi enables you to track the entire history of messages sent to guests using its Conversations feature: Here is how it works:
Comprehensive Message Logging:
Every message you send to guests, whether it’s through OTA platforms like Booking.com, Expedia, or Airbnb or directly from Stayflexi, is automatically This creates a detailed log of all communications for each guest.
The communication log includes all types of messages, such as booking confirmations, payment requests, pre-arrival details, and in-stay or post-stay conversations.
Accessing the Message History:
You can easily access the entire message history by navigating to the guest’s reservation within Stayflexi. Each conversation is saved and organized, allowing you to view previous messages and responses in one continuous thread.
This gives you a clear view of all interactions with the guest, including when the messages were sent and what content was shared.
Why Message History Tracking is Helpful:
Consistency: Having a complete communication record ensures you can continue conversations with guests without losing context. You can refer back to earlier messages if there are questions or follow-ups.
Problem Solving: If any issues or disputes arise, the message history provides clear evidence of past communications, helping resolve situations quickly.
Better Team Coordination: Since all staff members can see the conversation history, it’s easier for multiple team members to manage guest communication without duplication or missed details.
Improved Guest Experience: Guests receive timely and informed responses because the staff can quickly refer back to previous communications, making interactions smoother and more efficient.
How does Stayflexi enable communication with guests before, during, and after their stay?
Stayflexi offers a comprehensive communication solution that allows properties to engage with guests before, during, and after their stay. This ensures guests have a seamless experience at every touchpoint, improving service and satisfaction. Here’s how Stayflexi enables communication throughout the guest journey:
Before the Stay:
Pre-Arrival Communication:
Stayflexi allows properties to send automated pre-arrival emails or messages to guests, providing them with important details about their booking, check-in times, and property policies. If a guest sends any inquiry message on Airbnb to property that messages also come to Stayflexi and from Stayflexi you can reply to the guest.
Real-Time Messaging via OTAs:
For guests who book through OTAs such as Booking.com, Expedia, or Airbnb, the Stayflexi Conversations feature connects directly to these platforms. This integration lets property staff Conversations feature connect directly to these platforms. This integration lets property staff respond to any pre-stay questions, such as requests for airport transfers, early check-in, any enquiry or clarification of booking details, all from one central platform.
During the Stay:
Instant Messaging and Real-Time Support:
During a guest’s stay, Stayflexi enables properties to communicate directly with guests for requests or enquiries. Guests can reach out for extra amenities, housekeeping, or room service, and property staff can reply in real time.
Special Requests Management:
Whether it’s a request for a room change, extended stay, or any other specific needs, Stayflexi allows staff to handle and communicate these changes seamlessly. All communication is logged in the platform for easy tracking.
On-Demand Services:
Guests can use the Stayflexi platform to request additional services or upgrades during their stay, such as spa bookings, and late check-outs, enhancing their overall experience.
After the Stay:
Post-Checkout Messages:
After the guest checks out, Stayflexi can automatically send a thank you email, ensuring the guest feels appreciated. This post-stay communication can include helpful details like an invitation to review the property or a summary of their charges.
Feedback Collection:
Properties can send requests for feedback or encourage guests to leave reviews, helping the property gather insights to improve services and boost online visibility. Stayflexi’s platform helps manage guest feedback efficiently.
Viewing arrivals and departures
Login : Log into your Stayflexi dashboard with your credentials.
Front Page: On the dashboard’s front page, you will see a list of tiles displaying various metrics like New bookings, In-house, Arrivals, Departures, etc.
Arrivals/Departures: click on the Arrivals or Departures tab to view the list of upcoming guest check-ins or expected check-outs.
Booking Details: For each entry, you can click to view more details about the guest and their reservation.
Review management
Enhance your property’s reputation with Stayflexi’s Review Management feature. Effortlessly manage guest reviews from top platforms like Booking.com, Expedia, and Airbnb, all within the Stayflexi dashboard. Consolidate feedback and respond to reviews in real time, ensuring a seamless and efficient review management process. Stayflexi helps you stay on top of guest feedback, allowing you to address concerns quickly and showcase your commitment to excellent service. Strengthen your online presence and build lasting guest relationships with ease.
Review Management is the process of monitoring, analyzing, and responding to guest feedback left on various online booking platforms, such as Booking.com, Airbnb, and Expedia. For property managers, it’s an essential way to gain insights into guest experiences, address feedback, and enhance the property’s reputation. Stayflexi’s AI-powered review management simplifies this process by consolidating reviews from multiple channels into a single interface. This centralization allows you to view and respond to feedback more efficiently, ultimately helping improve guest satisfaction and increase bookings.
Step-by-Step Guide to Using Stayflexi’s Review Management:
Image 1:
Image 2:
Image 3:
Image 4:
Accessing the Review Management:
Log in to the Stayflexi dashboard and navigate to the Review Management section. This is where you can access and manage guest reviews from different booking platforms, all in one place.
Viewing Reviews Across Multiple Channels
In the left sidebar, you’ll see a list of integrated booking platforms (such as Booking.com, Airbnb, and Expedia).
Select a specific platform to view all guest reviews from that channel.
This consolidation saves you time by providing a single location to manage reviews, rather than logging into each platform separately.
Detailed Rating Breakdown
Each review provides a rating breakdown across different categories, such as Location, Comfort, Cleanliness, Facilities, Value for Money, and Staff.
For instance, if a guest rates their experience, you’ll see individual scores for each aspect (e.g., Location rated at 8, Cleanliness at 7.5).
This breakdown helps you quickly pinpoint specific areas for improvement or highlight positive aspects to maintain, offering actionable insights to enhance the guest experience.
Generating AI-Powered Responses to Reviews
To respond to a guest review, click the Reply button. A popup will appear, allowing you to type your reply directly or use the AI-generated response option, Generate reply with FlexiAI.
FlexiGPT’s AI will draft a professional, relevant response based on the review content. For example, if the review mentions cleanliness concerns, the AI can generate a response acknowledging the feedback and assuring the guest of improvements.
This feature helps ensure that your responses are prompt, thoughtful, and address guest concerns effectively.
Customizing and Sending Your Response
Once the AI has generated a response, you have the option to edit the reply before posting, allowing you to add personal touches or specific details.
After finalizing your response, click the Send button to publish it directly to the guest review on the respective platform.
Benefits of Using Stayflexi’s Review Management:
Centralized Management: Access reviews from multiple channels in one place, saving time and effort.
Actionable Insights: The rating breakdown provides clear visibility into areas of success and improvement.
Prompt, Professional Responses: AI-generated replies help you respond quickly and effectively to guest feedback.
Enhanced Guest Satisfaction: By addressing reviews promptly and thoughtfully, you can improve guest satisfaction and build a positive property reputation.
Stayflexi’s Review management makes managing reviews simple and efficient. It helps property managers respond quickly to guest feedback, use insights to improve the property, and enhance the guest experience overall.
What is Stayflexi’s AI-powered review management, and how can it help my property?
Stayflexi’s AI-powered review management tool is designed to help property managers monitor, analyze, and respond to guest reviews efficiently. Here’s how it works and the benefits it can bring to your property:
Image 1:
Image 2:
Review Management Across Multiple Channels (as shown in Image 1):
The tool gathers guest reviews from multiple booking channels, such as Booking.com, Airbnb, and Expedia, into a single interface.
You can switch between these channels easily, where each platform (Booking.com, Airbnb, Expedia) is accessible on the left sidebar.
This feature saves time by allowing you to view all reviews in one place instead of logging into each platform separately.
Detailed Rating Breakdown (as shown in Images 1 and 2):
Stayflexi’s review management displays a breakdown of guest ratings for different aspects of their stay, including Location, Comfort, Cleanliness, Facilities, Value for Money, and Staff.
Each aspect is rated on a scale (e.g., out of 10), with sliders visually representing guest satisfaction levels. For instance, in the screenshot, the guest rated Staff at 7.5 and other categories at 5.
This breakdown helps you quickly understand which areas are performing well and which may need improvement, allowing you to make data-driven decisions to enhance guest experience.
AI-Generated Responses for Reviews(as shown in Image 2 and 3):
With the Reply button provided within each review, the AI can generate an appropriate response based on the content of the guest’s review.
The AI takes into account the feedback, positive or negative, and crafts a suitable response to address the guest’s comments. For instance, if a guest mentions a negative experience with cleanliness, the AI might respond with an apology and a reassurance that the property will work to resolve the issue.
For example, refer to Image 3: So after clicking on the Reply button, a popup will appear where you can type a reply to the review yourself or can click on the Generate reply with FlexiGPT button, where the FlexiGPT will automatically generate the response or reply for that particular guest’s review.
Then, you can click on the Send button to send the reply to the guest.
This automated response feature saves time and ensures that responses are prompt, professional, and appropriately address the guest’s feedback, which helps improve guest satisfaction and reputation management.
Improving Property Reputation and Guest Satisfaction:
By addressing feedback proactively and using AI to ensure prompt responses, your property can enhance its online reputation. Better ratings and responsive communication can lead to more bookings, as potential guests are influenced by recent reviews.
Identifying and acting on common issues, like the “bad smell” example, allows you to make necessary improvements, enhancing the overall guest experience.
How It Benefits Your Property:
Centralized Review Management: View and manage reviews from multiple channels in one place.
Actionable Insights: Get clear visibility into ratings and guest feedback for targeted improvements.
AI-Generated Responses: Respond to reviews automatically, ensuring a prompt, professional reply.
Enhanced Guest Experience: Use feedback to continuously improve and provide a better guest experience, boosting your reputation and bookings.
Stayflexi’s AI-powered review management tool is an invaluable resource for properties looking to stay on top of guest feedback, resolve issues proactively, and build a positive reputation across booking platforms with the help of automated, AI-generated responses.
Can I respond directly to guest reviews posted on online travel portals through Stayflexi?
Yes, you can respond directly to guest reviews posted on online travel portals through Stayflexi’s AI powered review management.
Stayflexi’s review management centralizes reviews from multiple booking platforms (like Booking.com, Airbnb, and Expedia), allowing you to manage and respond to reviews all from one interface. Here’s how it works:
Image 1:
Image 2:
Image 3:
Log in to Your Stayflexi Dashboard:
Use your username and password to log in.
Go to Review management (as shown in Image 1):
Click on the Review Management section to see guest reviews from multiple channels in one place(6th from the left on the top menu).
Choose the Platform
In the sidebar, select a specific booking platform (like Booking.com, Airbnb, and Expedia) to view its reviews without needing to log in separately to this OTA extranet.
Check the Rating Breakdown:
Each review includes a breakdown of ratings for different aspects of the stay, helping you understand guest feedback.
Reply to the Review
Click the Reply button on any review.
You can type a response yourself or use the “Generate reply with Flexi AI” option to have AI draft a response for you.
Customize and Send
You can modify the AI-generated reply or send it as it is, posting your response directly to the original booking platform.
This setup helps you save time, manage feedback efficiently, and ensures timely, professional responses, enhancing your property’s online reputation and guest satisfaction.
Shops/POS
Streamline your property’s retail and sales operations with Stayflexi’s Shops/POS feature. Easily manage all point-of-sale transactions, track inventory, and generate detailed sales reports from a single platform. Whether you’re operating a shop, restaurant, or spa, Stayflexi’s POS system simplifies billing and enhances operational efficiency. Designed for ease of use, the Shops/POS feature integrates seamlessly with your existing Stayflexi system, providing real-time updates and accurate records. Improve your workflow, reduce manual errors, and offer a smooth experience for both your staff and guests.
Below is the step-by-step guide to setting up the shop to start taking orders:
Log in to Your Stayflexi Dashboard:
Enter your username and password to log in.
Access Shops/POS:
After logging in, click the “More Apps” icon (represented by four boxes or blocks) in the top right corner.
From the dropdown menu, select Shops(as shown in Image 1).
Shops or outlets page will appear.
Set up the shop:
On the shops page, at the top of the page, you will be able to see the Add Shop option (as shown in Image 2).
Once clicked, it will navigate you to the page where you can create or set up the shop for your property.
Fill in the below details (as shown in Image 3):
Outlet name: Name of your shop or outlet
Outlet address: Fill in the address details where your shop is located.
Outlet Phone: Provide the shop phone number
Outlet email: Provide the shop email ID
Outlet Description: Provide a brief description of your shop
Click on the Next button at the bottom of the page (as shown in Image 3).
Some more details related to creating a shop will appear.
Fill in the below details (as shown in Image 4):
Shop Tax Section:
There is a dropdown labeled “Shop tax” where you can select the applicable tax rate. This is likely required for the shop’s transactions.
If no tax rate is selected, it will display as “Select tax [0%].” You need to select the appropriate tax percentage for your shop.
Service Charge:
Below the tax field, there is an option to choose the type of service charge. The dropdown allows selecting the type, such as “Percentage” or “Fixed”.
In the next field, labeled “Service charge,” you can input the actual service charge value. This determines how much service charge will be applied on top of the base price.
Self-Service Section:
You can enable or disable the “Self-service” option through a dropdown, which includes the following option:
Enable self-service
Disable self-service
Tax Identificationnumber:
Here the Tax identification number is required. This likely indicates that you need to provide additional tax details or a tax ID before proceeding.
Outlet Type:
Users can select the type of outlet (such as F&B, Food & Beverage) from the “Outlet type” dropdown. This helps categorize the type of business or service offered at the shop.
Add Images and Back Buttons:
There are two buttons at the bottom: one to go Back to the previous page and another to Add Images, which allows you to upload images for the shop or menu.
Click on the Add Images option after filling in all the details on this page to go to the next page (as shown in Image 4).
In the Add Images page, you can click on the Click here to upload the images option. (Note: Adding Images is not mandatory, but to enhance your experience at least add one image).
Create Shop:
Create the shop by clicking on the Create Shop option at the bottom of the page (as shown in Image 5).
Your shop or outlet is successfully created and will be visible on the Shops page (as shown in Image 6).
Shop configuration:
To start taking the order, you need to configure the following :
Firstly, click on the shop to navigate to the Dashboard of the shop (as shown in Image 7).
On the left-hand side of the page, you can see the following options:
Dashboard
Place orders
View orders
Reports
Configuration
Click on the Configuration dropdown option (as shown in Image 8).
The configuration option is where you can configure the following for your shop or outlet:
Outlet: Configure and edit your outlet information, like description, default shop tax, order details, tax identification number, etc (as shown in Image 8).
Menu items: Add or Bulk upload menu items you need to configure for your shop (as shown in Image 9).
Categories: Add food categories to configure for your shop (as shown in Image 10).
Discounts: Add discounts based on food categories or menu items (as shown in Image 11).
Table/Area: Configure tables by clicking on the Add new table option (as shown in Image 12).
Table name: Give names for the tables.
Note: You can enter multiple table no. , as well as the table range
Table range – A10:A20 (by this you can add many tables at once by using “:”.
Multiple tables – 1,2,3
Avoid whitespaces to get the desired result.
Table description: Give table description in the table description section
Seating Area
No. of persons: Add how many people can sit at that particular table.
Click on the Save button to add tables.
Staff: To add staff details like staff email ID, staff name, and description (as shown in Image 13).
After setting up all the details you can easily start placing orders by going to the place orders option.
Understanding the “Place Order” Page (as shown in Image 14):
On the Place Order page, you will find:
Tables Section: Displays all available, running, and printed tables.
Occupied Rooms Section: Displays all occupied or checked-in rooms.
Placing an Order for a Specific Table:
Under the Tables Section, you will see a list of available tables.
Click on the table number or table ID for the table where you want to place an order (as shown in Image 14).
Once selected, a list of food categories (e.g., Veg, Non-Veg) whatever you have created from the configuration.
Select your desired category and add menu items to the order (as shown in Image 15).
Save and Confirm the Order:
After adding the menu items, click on the Save Order button to save and confirm your order (as shown in Image 16).
If you want to print KOT then configure KOT with the Stayflexi system and click on KOT & Print (as shown in Image 16).
Settling the Payment: If you’re ready to settle the bill for the order, click on the Settle Order button to complete the payment (as shown in Image 16).
By following these steps you can easily set up the shop and start taking orders.
How do I bulk upload POS menu items? What should I check before uploading?
Log in to Your Stayflexi Dashboard:
Enter your username and password to log in.
Access Shops/POS:
After logging in, click the “More Apps” icon (represented by four boxes or blocks) in the top right corner.
From the dropdown menu, select Shops.
A page showing all available shops or outlets will appear.
Choose the shop or outlet by clicking on the shop or outlet name.
Navigate to the “Configuration” Page:
Once you select a shop or outlet, you will be taken to its Dashboard.
On the left-hand side of the page, you will see various options, including:
Dashboard
Place Orders
View Orders
Reports
Configuration
Click on Configuration dropdown to proceed.
Go to Menu items:
On the Configuration dropdown, you will see a list of options including:
Outlet
Menu items
Categories
Discounts
Table/Area
Staff
Click on the Menu items option.
A list of all the menu items will appear along with the details.
Bulk upload POS menu items:
At the top of the Menu items page, an option called Bulk upload items will be visible.
You can click on this option and upload the Excel sheet from your system to the POS menu items.
But before uploading the menu items, you need to check the format in which you need to upload the menu items.
Just below the Bulk upload items option, the Download bulk upload template file option will be visible.
Click on this option to download the template to bulk upload the items and upload the items according to the bulk upload template.
When you click on the Download bulk upload template file option, a pop-up with a warning message will be displayed.
Read the instructions carefully and click on the Download template file button.
The template file will be downloaded to your system.
Open the template file and check on which format you need to upload the menu items.
If the template instructions are not followed you will not be able to bulk upload the menu items to POS.
After following the template, you can click on the Bulk upload items button to upload the menu items.
By following these steps you can easily bulk-upload menu items.
When settling a POS bill, if remarks (like “payment collected via net banking”) are added, where can I view these remarks in the reports?
Below are the step-by-step guidelines for placing an order for a specific table from Shops/POS:
Log in to Your Stayflexi Dashboard:
Enter your username and password to log in.
Access Shops/POS:
After logging in, click the “More Apps” icon (represented by four boxes or blocks) in the top right corner.
From the dropdown menu, select Shops.
A page showing all available shops or outlets will appear.
Choose the shop or outlet where you want to place an order by clicking on its name.
Navigate to the “Place Order” Page:
Once you select a shop or outlet, you will be taken to its Dashboard.
On the left-hand side of the page, you will see various options, including:
Dashboard
Place Orders
View Orders
Reports
Configuration
Click on Place Orders to proceed.
Understanding the “Place Order” Page:
On the Place Order page, you will find:
Tables Section: Displays all available, running, and printed tables.
Occupied Rooms Section: Displays all occupied or checked-in rooms.
Placing an Order for a Specific Table:
Under the Tables Section, you will see a list of available tables.
Click on the table number or table ID for the table where you want to place an order.
Once selected, a list of food categories (e.g., Veg, Non-Veg) whatever you have created from the configuration.
Select your desired category and add menu items to the order.
Save and Confirm the Order:
After adding the menu items, click on the Save Order button to save and confirm your order.
If you want to print KOT then configure KOT with the Stayflexi system and click on KOT & Print.
Settling the Payment: If you’re ready to settle the bill for the order, click on the Settle Order button to complete the payment.
Settle and Save:
Click on the Settle order button.
A pop-up to settle and save the amount with all other details will appear, like:
Payment type:
Cash
Offline card
Wallet
Other
Click on Other.
Write the remark like “payment collected via net banking” in the remark section.
Now, Click on Settle and Save.
Go to the Reports page in POS:
Click on the Reports option.
You will see various options on the reports page.
Click on the order-wise sales summary report.
Scroll right to the last column of the order-wise sales summary report.
You will find the Remarks column, this is where you can view the remarks if you have added any after settling the order.
How can I configure a service charge, and can it be automatically added to each order?
Image 1:
Image 2:
Image 3:
Image 4:
Image 5:
Image 6:
Image 7:
The service charge can be manually applied to each order. After placing an order in the Place Orders section, you will need to manually select the Apply Service Charge option under the Taxes section for each order.
Below are the step-by-step guidelines on how to configure service charges from Shops/POS:
Log in to Your Stayflexi Dashboard:
Enter your username and password to log in.
Access Shops/POS:
After logging in, click the “More Apps” icon (represented by four boxes or blocks) in the top right corner.
From the dropdown menu, select Shops.
A page showing all available shops or outlets will appear (as shown in Image 1).
Choose the shop or outlet by clicking on the shop or outlet name (as shown in Image 2).
Navigate to the “Configuration” Page:
Once you select a shop or outlet, you will be taken to its Dashboard.
On the left-hand side of the page, you will see various options, including:
Dashboard
Place Orders
View Orders
Reports
Configuration
Click on Configuration dropdown to proceed (as shown in Image 3).
Go to Outlet:
On the Configuration dropdown, you will see a list of options including:
Outlet
Menu items
Categories
Discounts
Table/Area
Staff
Click on the Outlet option (as shown in Image 3).
On the Outlet details block, click Edit to manage your outlet’s information, such as name, address, and email (as shown in Image 3).
Configure a service charge (as shown in Image 4):
Add service charge:
In the Outlet edit page, find the Service Charge option just below the Tax Identification Number textbox.
Select the service charge type from the dropdown:
Percentage
Fixed
Enter the service charge value in the textbox next to the dropdown.
Click Save to store the changes.
Go to the Place Orders page (as shown in Image 5):
Click on the Place Orders option.
On the Place Order page, you will find:
Tables Section: Displays all available, running, and printed tables.
Occupied Rooms Section: Displays all occupied or checked-in rooms.
Create an order:
Under the Tables Section, you will see a list of available tables.
Click on the table number or table ID for the table where you want to place an order (as shown in Image 5).
Once selected, a list of food categories (e.g., Veg, Non-Veg) whatever you have created from the configuration.
Select your desired category and add menu items to the order.
Apply service charge:
Below the Taxes section, you’ll find the Apply Service Charge option (as shown in Image 6).
Manually apply the service charge by clicking on it.
After applying the service charge if you wish to remove the service charge, do the following:
To remove the service charge, select the Remove option below the Service Charge section (as shown in Image 7).
Save and Confirm the Order:
After adding the menu items and applying the service charge, click on the Save Order button to save and confirm your order.
If you want to print KOT then configure KOT with the Stayflexi system and click on KOT & Print.
Settling the Payment: If you’re ready to settle the bill for the order, click on the Settle Order button to complete the payment.
By following these organized steps, you can easily apply service charges to the particular order through the Shops/POS!!
How do I place an order for a specific table?
Below are the step-by-step guidelines for placing an order for a specific table from Shops/POS:
Log in to Your Stayflexi Dashboard:
Enter your username and password to log in.
Access Shops/POS:
After logging in, click the “More Apps” icon (represented by four boxes or blocks) in the top right corner.
From the dropdown menu, select Shops.
A page showing all available shops or outlets will appear.
Choose the shop or outlet where you want to place an order by clicking on its name.
Navigate to the “Place Order” Page:
Once you select a shop or outlet, you will be taken to its Dashboard.
On the left-hand side of the page, you will see various options, including:
Dashboard
Place Orders
View Orders
Reports
Configuration
Click on Place Orders to proceed.
Understanding the “Place Order” Page:
On the Place Order page, you will find:
Tables Section: Displays all available, running, and printed tables.
Occupied Rooms Section: Displays all occupied or checked-in rooms.
Placing an Order for a Specific Table:
Under the Tables Section, you will see a list of available tables.
Click on the table number or table ID for the table where you want to place an order.
Once selected, a list of food categories (e.g., Veg, Non-Veg) whatever you have created from the configuration.
Select your desired category and add menu items to the order.
Save and Confirm the Order:
After adding the menu items, click on the Save Order button to save and confirm your order.
If you want to print KOT then configure KOT with the Stayflexi system and click on KOT & Print.
Settling the Payment: If you’re ready to settle the bill for the order, click on the Settle Order button to complete the payment .
By following these organized steps, you can easily place an order for a specific table through the Shops/POS!!
How do I place an order for a guest staying in a specific room?
Below are the step-by-step guidelines to place an order for guest staying in a specific room from Shops/POS:
Step-by-Step Guide to Place an Order for a Specific Room in Stayflexi:
Log in to Your Stayflexi Dashboard:
Enter your username and password to log in.
Access Shops/POS:
After logging in, click the “More Apps” icon (represented by four boxes or blocks) in the top right corner.
From the dropdown menu, select Shops.
A page showing all available shops or outlets will appear.
Choose the shop or outlet where you want to place an order by clicking on its name.
Navigate to the “Place Order” Page:
Once you select a shop or outlet, you will be taken to its Dashboard.
On the left-hand side of the page, you will see various options, including:
Dashboard
Place Orders
View Orders
Reports
Configuration
Click on Place Orders to proceed.
Understanding the “Place Order” Page:
On the Place Order page, you will find:
Tables Section: Displays all available, running, and printed tables.
Occupied Rooms Section: Displays all occupied or checked-in rooms.
Placing an Order for a Specific Room:
Under the Occupied Rooms section, you will see a list of available rooms (occupied or checked-in rooms).
Click on the room number or roomID for the room where you want to place an order.
A pop-up displaying the guest or customer details for the room will appear, giving you the option to either Proceed or Cancel.
Once you click on Proceed, a list of food categories (e.g., Veg, Non-Veg) will appear.
Select your desired category and add menu items to the order.
Save and Confirm the Order:
After adding the menu items, click on the Save Order button to save and confirm your order.
By following these steps, you can easily place an order for a specific room through the Shops/POS!!
How can I track orders coming from QR code in shops?
Below are the step-by-step guidelines to track orders coming from QR code from Shops/POS:
Log in to Your Stayflexi Dashboard:
Enter your username and password to log in.
Access Shops/POS:
After logging in, click the “More Apps” icon (represented by four boxes or blocks) in the top right corner.
From the dropdown menu, select Shops.
A page showing all available shops or outlets will appear.
Choose the shop or outlet by clicking on the shop or outlet name.
Navigate to the “View Orders” Page:
Once you select a shop or outlet, you will be taken to its Dashboard.
On the left-hand side of the page, you will see various options, including:
Dashboard
Place Orders
View Orders
Reports
Configuration
Click on View Orders to proceed.
Identifying QR Code Orders:
On the View Orders page, you will see a table listing all the orders.
There will be a column labeled QR Code.
If the status in the QR Code column is NO, it means the order was not placed using a QR code.
If the status is YES, the order was placed through a QR code.
These steps help you quickly log in, navigate through the shops, and identify whether an order was placed via a QR code.
How can I transfer a bill from one table to another in shop / POS?
Below are the step-by-step guidelines to transfer bills from one table to another from Shops/POS:
Log in to Your Stayflexi Dashboard:
Enter your username and password to log in.
Access Shops/POS:
After logging in, click the “More Apps” icon (represented by four boxes or blocks) in the top right corner.
From the dropdown menu, select Shops.
A page showing all available shops or outlets will appear.
Choose the shop or outlet where you want to place an order by clicking on its name.
Navigate to the “Place Order” Page:
Once you select a shop or outlet, you will be taken to its Dashboard.
On the left-hand side of the page, you will see various options, including:
Dashboard
Place Orders
View Orders
Reports
Configuration
Click on Place Orders to proceed.
Understanding the “Place Order” Page:
On the Place Order page, you will find:
Tables Section: Displays all available, running, and printed tables.
Occupied Rooms Section: Displays all occupied or checked-in rooms.
Place an order from the Table:
Under the Tables Section, you will see a list of available tables.
Click on the table number or table ID for the table where you want to place an order.
Once selected, a list of food categories (e.g., Veg, Non-Veg) will appear.
Select your desired category and add menu items to the order.
Save and Confirm the Order:
After adding the menu items and customer information, click on the Save Order button to save and confirm your order.
Navigating to the View Order Page:
After confirming your order, click on the shop name located at the top left corner of the screen.
This will take you back to the page where you can place orders.
To view your orders, click on the “View Orders” option on the left side just below the Place Orders option.
Moving a Bill to Another Table:
On the “View Orders” page, select the order whose bill you wish to move.
Find and click on the “Move Bill” button.
A pop-up will appear, displaying all available tables.
Select the table number or ID to which you want to move the bill.
Finally, click the “Confirm Move Table” button.
The guest bill will now be successfully moved to the selected table.
How do I apply a discount to an entire food category or a specific item?
Below are the step-by-step guidelines to apply the discount to an entire food category or a specific item from Shops/POS:
Log in to Your Stayflexi Dashboard:
Enter your username and password to log in.
Access Shops/POS:
After logging in, click the “More Apps” icon (represented by four boxes or blocks) in the top right corner.
From the dropdown menu, select Shops.
A page showing all available shops or outlets will appear.
Choose the shop or outlet by clicking on the shop or outlet name.
Navigate to the “Configuration” Page:
Once you select a shop or outlet, you will be taken to its Dashboard.
On the left-hand side of the page, you will see various options, including:
Dashboard
Place Orders
View Orders
Reports
Configuration
Click on the Configuration dropdown to proceed.
Go to Discount:
On the Configuration dropdown, you will see a list of options including:
Outlet
Menu items
Categories
Discounts
Table/Area
Staff
Click on the Discounts option.
Create a Discount:
To create a new discount, click the Add Discount button.
Fill in the following details:
Discount Name: Enter a name for the discount.
Discount Type: Choose between:
Percentage: Discount will be applied as a percentage of the item or category price.
Fixed: A fixed amount will be discounted.
Discount Value: Enter the value or percentage of the discount.
Discount Applied On: Select where the discount should apply:
Category: Choose categories (e.g., Veg, Non-Veg) from the dropdown to apply the discount to all items in these categories.
Item: Choose specific items (e.g., Veg Biryani, Chicken Biryani) from the dropdown to apply the discount to those items only.
Once all the details are filled in, save your discount settings. The discount option will then be available for the specific item, allowing you to select the desired discount when placing an order if needed.
Can I print a KOT or an A4-sized bill for the guest?
Yes, you can print a KOT or an A4-sized bill for the guest.
Below are the step-by-step guidelines to print KOT or an A4-sized bill for the guest from Shops/POS:
Log in to Your Stayflexi Dashboard:
Enter your username and password to log in.
Access Shops/POS:
After logging in, click the “More Apps” icon (represented by four boxes or blocks) in the top right corner.
From the dropdown menu, select Shops.
A page showing all available shops or outlets will appear.
Choose the shop or outlet where you want to place an order by clicking on its name.
Navigate to the “Place Order” Page:
Once you select a shop or outlet, you will be taken to its Dashboard.
On the left-hand side of the page, you will see various options, including:
Dashboard
Place Orders
View Orders
Reports
Configuration
Click on Place Orders to proceed.
Understanding the “Place Order” Page:
On the Place Order page, you will find:
Tables Section: Displays all available, running, and printed tables.
Occupied Rooms Section: Displays all occupied or checked-in rooms.
Place an order from the Table:
Under the Tables Section, you will see a list of available tables.
Click on the table number or table ID for the table where you want to place an order.
Once selected, a list of food categories (e.g., Veg, Non-Veg) will appear.
Select your desired category and add menu items to the order.
Save and Confirm the Order:
After adding the menu items and customer information, click on the Save Order button to save and confirm your order.
Enter Customer Information:
To add customer details, click on the customer information icon at the top. Enter the required information and save it.
Note: If you’re placing an order from a table, customer information is mandatory to print the A4 bill.
Print KOT:
After saving the order, click the KOT & Print button next to the Save Order button. This will print the Kitchen Order Ticket (KOT), and you’ll see the KOT ID displayed above the ordered or menu items.
If you need to add more items later, save the order again and print a new KOT. The newly added items will have a different KOT ID.
Print Bill (A4 or KOT Bill):
To print the bill, click on the Print Bill button located next to the KOT & Print button. A pop-up will appear with two options:
A4 Bill
KOT Bill View
Choose the type of bill you’d like to print, and it will include all the order details.
Does the shop support KOT (Kitchen Order Tickets), and how does it work?
Yes, shops/POS support KOT(Kitchen Order Tickets).
Below are the step-by-step guidelines to show how KOT works from Shops/POS:
Log in to Your Stayflexi Dashboard:
Enter your username and password to log in.
Access Shops/POS:
After logging in, click the “More Apps” icon (represented by four boxes or blocks) in the top right corner.
From the dropdown menu, select Shops.
A page showing all available shops or outlets will appear.
Choose the shop or outlet where you want to place an order by clicking on its name.
Navigate to the “Place Order” Page:
Once you select a shop or outlet, you will be taken to its Dashboard.
On the left-hand side of the page, you will see various options, including:
Dashboard
Place Orders
View Orders
Reports
Configuration
Click on Place Orders to proceed.
Understanding the “Place Order” Page:
On the Place Order page, you will find:
Tables Section: Displays all available, running, and printed tables.
Occupied Rooms Section: Displays all occupied or checked-in rooms.
Place an order from the Table:
Under the Tables Section, you will see a list of available tables.
Click on the table number or table ID for the table where you want to place an order.
Once selected, a list of food categories (e.g., Veg, Non-Veg) will appear, basically whatever you have configured under categories and menu items.
Select your desired category and add menu items to the order.
Save and Confirm the Order:
After adding the items, click Save Order to confirm the order.
Note: The KOT & Print button will only be clickable after saving the order.
Print KOT:
Once the order is saved, click the KOT & Print button next to the Save Order button.
The Kitchen Order Ticket (KOT) will be printed, and you’ll see the KOT ID above the ordered items.
If you need to add more items later, you can do so, save the order again, and print a new KOT. The newly added items will have a different KOT ID.
That’s how the KOT process works in the Shops/POS module!
Can I partially settle a POS bill? What steps are required to do so?
Yes, you can partially settle the POS bill.
Below are the step-by-step guidelines to partially settle POS bills from Shops/POS:
Log in to Your Stayflexi Dashboard:
Enter your username and password to log in.
Access Shops/POS:
After logging in, click the “More Apps” icon (represented by four boxes or blocks) in the top right corner.
From the dropdown menu, select Shops.
A page showing all available shops or outlets will appear.
Choose the shop or outlet where you want to place an order by clicking on its name.
Navigate to the “Place Order” Page:
Once you select a shop or outlet, you will be taken to its Dashboard.
On the left-hand side of the page, you will see various options, including:
Dashboard
Place Orders
View Orders
Reports
Configuration
Click on Place Orders to proceed.
Understanding the “Place Order” Page:
On the Place Order page, you will find:
Tables Section: Displays all available, running, and printed tables.
Occupied Rooms Section: Displays all occupied or checked-in rooms.
Place an order from the Table:
Under the Tables Section, you will see a list of available tables.
Click on the table number or table ID for the table where you want to place an order.
Once selected, a list of food categories (e.g., Veg, Non-Veg) will appear.
Select your desired category and add menu items to the order.
Save and Confirm the Order:
After adding the menu items and customer information, click on the Save Order button to save and confirm your order.
Enter Customer Information:
To add customer details, click on the customer information icon at the top. Enter the required information and save it.
Note: If you’re placing an order from the table, customer information is mandatory for partial bill payment.
Partial bill payment:
Click on the Settle order button.
A pop-up to settle and save the amount with all other details will appear, like:
Payment type:
Cash
Offline card
Wallet
Other
Calculate amount textbox
Remarks
Settlement amount textbox
Click on the Settlement amount textbox and edit the actual amount with the amount you want to settle the order.
Now, Settle and Save the amount.
Navigate to the View Orders page and check the status of the order.
The order status will be displayed as DUE as the order is partially settled.
If you want to settle the remaining bill in the future, click on the settle dues option under the view orders page and collect the remaining payment.
By following these steps, you can partially settle the POS bill for a particular order.
How do I mark an item as out of stock in the shop?
Below are the step-by-step guidelines to mark an item out of stock from Shops/POS:
Log in to Your Stayflexi Dashboard:
Enter your username and password to log in.
Access Shops/POS:
After logging in, click the “More Apps” icon (represented by four boxes or blocks) in the top right corner.
From the dropdown menu, select Shops.
A page showing all available shops or outlets will appear.
Choose the shop or outlet by clicking on the shop or outlet name.
Navigate to the “Configuration” Page:
Once you select a shop or outlet, you will be taken to its Dashboard.
On the left-hand side of the page, you will see various options, including:
Dashboard
Place Orders
View Orders
Reports
Configuration
Click on Configuration dropdown to proceed.
Go to Menu items:
On the Configuration dropdown, you will see a list of options including:
Outlet
Menu items
Categories
Discounts
Table/Area
Staff
Click on the Menu items option.
A list of all the menu items will appear along with the details.
Mark menu items out of stock:
To mark menu items out of stock, do the following:
There is a Yes or No dropdown under the In Stock column for each menu item.
Just click on the dropdown, select NO,and click it.
The item is now marked as out of stock.
You can verify this by selecting the In-stock items option in the top right of the page.
It takes you to the Out Of Stock items page.
This displays all the out-of-stock items.
By following these steps you can mark all the items as out of stock.
If an order is settled, where can I find the payment method used?
Below are the step-by-step guidelines to check the payment method used from Shops/POS:
Log in to Your Stayflexi Dashboard:
Enter your username and password to log in.
Access Shops/POS:
After logging in, click the “More Apps” icon (represented by four boxes or blocks) in the top right corner.
From the dropdown menu, select Shops.
A page showing all available shops or outlets will appear.
Choose the shop or outlet by clicking on the shop or outlet name.
Navigate to the “View Orders” Page:
Once you select a shop or outlet, you will be taken to its Dashboard.
On the left-hand side of the page, you will see various options, including:
Dashboard
Place Orders
View Orders
Reports
Configuration
Click on View Orders to proceed.
View payment method :
After selecting View Orders, a page with all the order details with table ID, room ID, order source, Settled amount, etc will be displayed.
Click on the row where the order is Settled.
After clicking, different options will appear.
Click on the Detailed Payment View option.
Payment type with the payment amount will be displayed.
By following these steps, you can view the payment method used to settle a particular order.
What types of reports are available in the shop?
Log in to Your Stayflexi Dashboard:
Enter your username and password to log in.
Access Shops/POS:
After logging in, click the “More Apps” icon (represented by four boxes or blocks) in the top right corner.
From the dropdown menu, select Shops.
A page showing all available shops or outlets will appear.
Choose the shop or outlet by clicking on the shop or outlet name.
Navigate to the “Reports” Page:
Once you select a shop or outlet, you will be taken to its Dashboard.
On the left-hand side of the page, you will see various options, including:
Dashboard
Place Orders
View Orders
Reports
Configuration
Click on Reports to proceed.
Below are the types of reports available in the Shops/POS:
Outlet Day-Wise Sales Summary
Purpose: Provides a consolidated sales summary of all transactions made at your outlet, broken down by date wise.
Usage: Useful for tracking daily revenue and performance over a period.
Outlet Day-Wise Balance Summary
Purpose: Displays a day-wise balance summary for your outlet, likely showing remaining financial balances.
Usage: Helps in reviewing financial consistency and ensuring no discrepancies.
Hourly Item Sales Summary Report
Purpose: Presents item sales data broken down by the hour.
Usage: Allows users to identify peak sales hours and optimize staffing and inventory.
Item-Wise Category Summary Report
Purpose: Provides a summary of sales based on individual items.
Usage: Assists in understanding the performance of different product categories and managing stock accordingly.
Order-Wise Sales Summary
Purpose: Summarizes sales based on individual orders, providing insights into order trends.
Usage: Useful for analyzing how many orders were placed, average order value, and item preferences.
KOT Modification
Purpose: Shows a summary of all modifications made to Kitchen Order Tickets (KOT).
Usage: Important for tracking any changes made to orders in the kitchen and ensuring order accuracy.
KOT Report
Purpose: Displays a summary of all Kitchen Order Tickets (KOT) punched for the shop.
Usage: Useful for tracking kitchen workload and ensuring all orders have been processed.
Day-Wise Item Sales Summary Report
Purpose: It provides a day-wise breakdown of items punched into the system for the shop.
Usage: Useful for tracking daily item-level sales performance and managing inventory.
What is pending departure and pending arrival?
Pending Arrival: This refers to reservations where the guest is expected to arrive but has not yet checked in. These are upcoming bookings that are awaiting the guest’s arrival.
Pending Departures: This refers to reservations where the guest is due to check out but has not yet completed the check-out process. These are active stays that are approaching their scheduled departure date.
Both sections help property managers track the status of reservations and manage arrivals and departures efficiently.
Below are the step-by-step guidelines on how to check pending departures in Stayflexi:
Login : Log into your Stayflexi dashboard with your credentials.
Front Page: On the dashboard’s front page, you will see a list of tiles displaying various metrics like New bookings, In-house, Arrivals, Departures, etc.
Click on the Departure: On the Stayflexi dashboard, locate and click on the “Departures” tile.
View the List of Guests: Below the tile, you will see a list of guests who are scheduled to depart. These are the pending departures.
Below are the step-by-step guidelines on how to check pending Arrivals in Stayflexi:
Login : Log into your Stayflexi dashboard with your credentials.
Front Page: On the dashboard’s front page, you will see a list of tiles displaying various metrics like New bookings, In-house, Arrivals, Departures, etc.
Click on the Arrivals: On the Stayflexi dashboard, locate and click on the “Arrivals” tile.
View the List of Guests: Below the tile, you will see a list of guests who are scheduled to arrive. These are the pending arrivals.
I want to raise a concern or contact my relationship manager via chat, phone, or email. Where can I find the helpline contact information?
Below are the step-by-step guidelines to find the helpline contact information to reach your relationship manager:
Log in: Log in with your credentials, and you’ll be taken to the first page, which is the dashboard.
Locate the “help?” option: On the dashboard, located at the top right, find the “help?” option on the right side of the screen. This icon represents the support option.
Click on the Support option: Click on the help? [support] icon.
Support Page Opens: A page will open to the right-hand side.
Choose Your Preferred Contact Option :
Live Chat: Start a conversation with the Stayflexi support team directly from the dashboard.
Phone Support: The helpline number for your region will be listed here.
Email Support: You can view the official support email address to send your query.
For Relationship Manager Contact
Under the same Help/Support section, you’ll also see the Contact Relationship Manager option with details like name, phone, or email.
Reports
Unlock powerful insights into your property’s operations with Stayflexi’s Reports feature. Access a variety of detailed, customizable reports, including occupancy, financials, guest demographics, and booking patterns. These reports are designed to help you monitor your property’s performance, spot trends, and make informed, strategic decisions. With real-time data at your fingertips, Stayflexi Reports allow you to evaluate key metrics and streamline your decision-making process, ensuring better control over your property performance.
Overview Of reports and what are important reports to refer in Stayflexi ?
What are Stayflexi Reports?
The Reports feature in Stayflexi provides property managers with essential insights into their property’s operations. It offers a range of detailed reports on revenue, tax filing, occupancy, booking sources, sales performance, and guest demographics. These reports allow users to monitor trends, optimize room pricing, adjust marketing strategies, and improve overall property performance. By analyzing these data points, property managers can make informed decisions that enhance profitability and guest experience, supporting both day-to-day management and long-term strategic planning.
Why Use Stayflexi Reports?
Reports are essential for understanding various aspects of your property’s operations, such as:
Tracking Revenue: Track financial performance, analyze income sources, and identify high-performing channels.
Optimize Occupancy: Adjust room availability based on occupancy trends and prevent under utilisation.
Manage Sales Performance: Monitor bookings, cancellations, and modifications to better understand guest behavior.
Enhance Marketing Strategies: Evaluate booking sources to focus on effective distribution channels.
Set Competitive Pricing: Utilize average daily rate[ADR] and revenue per available room [RevPar] insights to develop profitable pricing.
Using these reports enables data-driven decisions, leading to increased occupancy, revenue, and guest satisfaction.
How to Access and Use Stayflexi Reports?
Accessing Reports:
Log in to your Stayflexi dashboard using your credentials.
From the dashboard, click on the 4-dots square icon labeled “More Apps”, located on the right side of the screen.
From the listed apps, locate and click on the Reports.
In Stayflexi, when you access the Reports feature, a new page opens where you can view a comprehensive list of reports, each providing valuable insights into property performance.
The Key Reports to focus on include:
Flash Manager Report: This report provides a quick, high-level overview of essential metrics, offering insights that help in daily decision-making, which include:
Revenue Report: Details revenue generated from various sources, helping track income flow.
Tax Revenue Report: Shows total tax collected on revenues, aiding in tax management.
Taxes Report: Breaks down specific tax categories and amounts, useful for accounting.
Payments Summary Report: Summarizes all payments received, giving a quick snapshot of cash flow.
Payments Detailed Report: Offers a more granular view of each transaction, ideal for payment tracking.
Expense Report: Lists all expenses, helping manage property costs effectively.
Inventory Report: Tracks available room Inventory, ensuring room availability and allocation.
House Report: Summarizes room statuses, occupancy, and other essential house operations.
Room Revenue Report: Focused on revenue generated per room, this report is critical for understanding how room sales contribute to overall income.
Night Audit Report: Summarizes daily transactions, occupancy, and revenue, ensuring all records are accurate and balanced at the end of each day.
The Flash Manager Report, Room Revenue Report, and Night Audit Report in Stayflexi collectively offer a property’s performance. Together, they cover almost every crucial aspect of property management, including revenue tracking, occupancy levels, tax breakdowns, payments, expenses, inventory, and room status.
Is there a way to generate a report for POS transactions (restaurant, spa, etc.) within the property?
YES, here’s a step-by-step guide on how to generate reports for transactions across various property outlets like restaurants, spas, etc., in Stayflexi:
Log in to your Stayflexi dashboard using your credentials.
From the dashboard, click on the 4-dots square icon labeled “More Apps”, located on the right side of the screen.
From the listed apps, locate and click on the Reports.
On the left side of the dashboard, you will see a list of different reports.
From the list of available reports, click on All Outlets Itemwise Category Summary Report.
View the Report:
The report will open on your screen, displaying transaction details.
Data is organized with headers horizontally, such as:
Outlet Name
Item Category
Item Name
Quantity Sold
Total Sales
Below each column, you’ll find the corresponding data categorized by outlet.
Filter by Date Range:
Use the Date Range Selector to choose the desired time period:
For current date transactions, select today’s date.
For previous date transactions, adjust the date range accordingly.
Analyze and Export:
Review the report on-screen or export it for further analysis, depending on your needs.
This process ensures you can quickly access detailed sales and transaction data for each outlet within your property.
How can I generate an expense report to track operational costs?
To generate an expense report to track operational costs of your property in Stayflexi, follow the below-mentioned steps:
Log in to your Stayflexi dashboard using your credentials.
From the dashboard, click on the 4-dots square icon labeled “More Apps”, located on the right side of the screen.
From the listed apps, locate and click on the Reports.
On the left side of the dashboard, you will see a list of different reports.
From the list of displayed reports, locate and select the Expense Manager Report.
View the Report Details:
The report will open, showing your property’s expenses.
Data is structured as follows:
Horizontal Headers include:
Type of Expense (e.g., maintenance, utilities)
ID (unique identifier for each expense)
Reason/Entity Name (why or who the expense was for)
Description (details of the expense)
Vertical Columns list the corresponding data under each header.
Analyze the Data:
Scroll through the report to review detailed expense entries.
Use this report to track and manage your property’s expenditures.
This report provides a clear overview of your expenses, helping you monitor and control costs efficiently.
How can I generate a report of all the charged virtual cards from Expedia or Booking.com?
To generate a report of all the charged virtual cards from Expedia or Booking.com, Follow the below-mentioned guidelines.
Log in to your Stayflexi dashboard using your credentials.
From the dashboard, click on the 4-dots square icon labeled “More Apps”, located on the right side of the screen.
From the listed apps, locate and click on the Reports.
On the left side of the dashboard, you will see a list of different reports.
Click on Payment Reports: Go to the Reports section and select Payment Reports.
Click on the Payment Gateway Report option.
Select the desired date range in the open report to view the relevant data.
Review the columns provided in the report, such as the Gateway and Booking Source columns.
Use the filter option in the Booking Source column to display data specific to a selected OTA, like Expedia or Booking.com. [Refer to the provided image to clearly understand the filtering process.]
How can I generate a tax report to track the taxes collected from bookings?
To generate a tax report to track the taxes collected from bookings, follow the below-mentioned steps:
Log in to your Stayflexi dashboard using your credentials.
From the dashboard, click on the 4-dots square icon labeled “More Apps”, located on the right side of the screen.
From the listed apps, locate and click on the Reports.
On the left side of the dashboard, you will see a list of different reports.
Access Property Reports: At the top of the Reports section, you’ll see Property Reports. The reports under this section will already be displayed on the screen.
Click on Room Bookings Report :
Click on “Room Bookings Reports” from the displayed reports.
View the Report:
A report will open displaying the booking information.
View the Tax:
Scroll to the far right of the report to view the tax charged for each booking.
This report provides a clear breakdown of taxes associated with each booking.
How can I generate a booking source report to track where my reservations are coming from (e.g., OTA, direct bookings)?
To generate a booking source report to track where your reservations are coming from, follow the below-explained steps:
Log in to your Stayflexi dashboard using your credentials.
From the dashboard, click on the 4-dots square icon labeled “More Apps”, located on the right side of the screen.
From the listed apps, locate and click on the Reports.
On the left side of the dashboard, you will see a list of different reports.
Access Property Reports: At the top of the Reports section, you’ll see Property Reports. The reports under this section will already be displayed on the screen.
Click on the Room Bookings Report from the list of displayed reports on the screen.
A report will open, Locate the ‘Booking Source’ column heading, displayed horizontally. You can apply filter for a specific OTA booking source.
Below this heading, you’ll find the information on the source of each booking.
Can I view a report of all reservations made during a specific period?
To view a report of all reservations made during a specific period, follow the below mentioned steps:
Log in to your Stayflexi dashboard using your credentials.
From the dashboard, click on the 4-dots square icon labeled “More Apps”, located on the right side of the screen.
From the listed apps, locate and click on the Reports.
On the left side of the dashboard, you will see a list of different reports.
Access Property Reports: At the top of the Reports section, you’ll see Property Reports. The reports under this section will already be displayed on the screen.
Open the Master Report:
Click on Master Report to open the detailed booking report.
Select the Date Range:
In the reports section, locate the Date Range Selector to set the dates.
Choose Your Dates:
Click on any specific dates for which you want to view all reservations made during that period.
Apply the Date Range:
Once you’ve selected the desired dates, click the “Apply” button to confirm your date range.
This will display a report showing all reservations made within the specified period.
Is there a way to generate a report for discounts or promotions applied to bookings?
To generate a report for discounts or promotions applied to bookings, follow the below-mentioned guidelines:
Log in to your Stayflexi dashboard using your credentials.
From the dashboard, click on the 4-dots square icon labeled “More Apps”, located on the right side of the screen.
From the listed apps, locate and click on the Reports.
On the left side of the dashboard, you will see a list of different reports.
Access Property Reports: At the top of the Reports section, you’ll see Property Reports. The reports under this section will already be displayed on the screen.
Open the Master Report:
Click on Master Report to open the detailed booking report.
Add the Coupons/Discounts Column:
By default, the report does not show applied coupon codes or discounts.
To add this information, go to the columns list on the right side of the report.
Scroll through the options, find “Applied Coupons/Discounts,” and check the box next to it.
View the Updated Report:
The selected column will now appear in your report, displaying any coupon codes or discounts applied to each booking.
This way, you can easily see details about any promotional offers associated with each reservation.
How can I generate a report of room revenue by room type or category?
To generate a report of room revenue by room type or category, follow the below-mentioned steps:
Log in to your Stayflexi dashboard using your credentials.
From the dashboard, click on the 4-dots square icon labeled “More Apps”, located on the right side of the screen.
From the listed apps, locate and click on the Reports.
On the left side of the dashboard, you will see a list of different reports.
Access Property Reports: At the top of the Reports section, you’ll see Property Reports. The reports under this section will already be displayed on the screen.
Open Room Bookings Report:
Click on “Room Bookings Report” in your Stayflexi dashboard.
Customize Columns:
On the right side of the report, click on the column options listed vertically.
Find “Room Category” in the options and check the box next to it.
Adjust Column Placement:
The “Room Category” column will now appear in your report.
You can move it by dragging it to place it next to any other column of your choice.
This customization allows you to organize and view the report in a way that best suits your needs.
How can I download a guest history report?
To download a guest history report in Stayflexi, follow the below-mentioned guidelines:
Log in to your Stayflexi dashboard using your credentials.
From the dashboard, click on the 4-dots square icon labeled “More Apps”, located on the right side of the screen.
From the listed apps, locate and click on the Reports.
On the left side of the dashboard, you will see a list of different reports.
Access the Customer Report:
Go to the dashboard and click on the Customers Report section.
From the page that opens, click on Customers Report again from the two options presented.
View Guest Details:
A detailed report will open, displaying guest details in horizontal rows and vertical columns.
Set the Date Range:
At the top of the report, locate the Date Range Selector and click on it to open a calendar.
The calendar allows you to select date ranges by weekly, monthly, or yearly intervals, as well as options for days up to today and days starting today.
Choose the date range that suits your needs and click on the Apply button within the calendar.
Use Filters for Easy Navigation:
Next to the Date Range Selector, find the Filters option. Click on it to open a dropdown with filter choices.
Apply any necessary filters to refine the report and make it easier to navigate.
Export the Report:
To the right of the Filters column, click on the Export Report dropdown menu.
Select your preferred format (PDF, CSV, or Excel) to export the report.
By following these steps, you can download a guest history report.
How do I analyze my property's monthly or yearly room booking performance report compared to the previous year?
To analyze your property’s monthly or yearly performance report compared to the previous year, follow the below-mentioned guidelines:
Log in to your Stayflexi dashboard using your credentials.
From the dashboard, click on the 4-dots square icon labeled “More Apps”, located on the right side of the screen.
From the listed apps, locate and click on the Reports.
On the left side of the dashboard, you will see a list of different reports.
Go to Flash Manager Report:
In your dashboard, click on the Flash Manager Report section. This report gives you an overview of property performance metrics.
Set the Date Range:
At the top of the page, locate the Date Range Selector to choose the period [monthly or yearly] you want to analyze.
Enable Comparison Mode:
Next to the date range selector, the report will display comparative data, allowing you to see key metrics from the current period alongside those from the previous year [e.g., this month vs. the same month last year, or this year vs. last year].
Analyze the Report:
In comparison mode, all key performance indicators [KPIs] will show side-by-side comparisons, helping you analyze growth, trends, and any notable changes in performance over time.
This setup provides a clear view of your property’s performance against the previous, making it easier to assess improvements or areas that need attention.
Is there a report to track cancellations and no-shows?
To track cancellations in Stayflexi, follow the below-mentioned steps:
Log in to your Stayflexi dashboard using your credentials.
From the dashboard, click on the 4-dots square icon labeled “More Apps”, located on the right side of the screen.
From the listed apps, locate and click on the Reports.
On the left side of the dashboard, you will see a list of different reports.
Access Property Reports: At the top of the Reports section, you’ll see Property Reports. The reports under this section will already be displayed on the screen.
Open the Master Report:
Click on Master Report to open the detailed booking report.
Locate the Booking Status Column:
In the report, find the Booking Status column displayed horizontally. This column shows the status of each booking, such as confirmed, checked out, and cancelled.
Filter for Cancelled Bookings:
Click on the Filter option beneath the Booking Status column.
A popup will appear, allowing you to select specific statuses.
Choose Cancelled to display only the bookings with a cancelled status.
Following these steps will filter the report to show only cancelled bookings, making it easy to track cancellations.
To track no shows in Stayflexi, follow the below-mentioned steps:
Log in to your Stayflexi dashboard using your credentials.
From the dashboard, click on the 4-dots square icon labeled “More Apps”, located on the right side of the screen.
From the listed apps, locate and click on the Reports.
On the left side of the dashboard, you will see a list of different reports.
Open the Front Desk Report:
On the dashboard, click on Front Desk Report to access a range of front desk-related reports.
Select the No-Show Report:
From the reports displayed, locate and click on No-Show Report.
View No-Show Details:
The No-Show Report page will open, showing information about guests who did not show up at your property. This report includes guest details and reservation specifics.
This process allows you to easily view and trackall no-show bookings for better management and follow-up.
How do I view an overdue payments or pending balance report?
To view an overdue payments or pending balance report, follow the below-mentioned steps in Stayflexi:
Log in to your Stayflexi dashboard using your credentials.
From the dashboard, click on the 4-dots square icon labeled “More Apps”, located on the right side of the screen.
From the listed apps, locate and click on the Reports.
On the left side of the dashboard, you will see a list of different reports.
Access Property Reports: At the top of the Reports section, you’ll see Property Reports. The reports under this section will already be displayed on the screen.
Open the Room Revenue Reports:
Click on the Room Revenue Report section. This report provides detailed information about guest transactions and room revenue, both with and without taxes.
Navigate to the Pending Balance Column:
Once the report opens, scroll or use the arrow keys to move to the extreme right of the report sheet.
Check the Balance Amount:
Look for the Balance Amount column on the fair right. This column reflects any pending balances for guests, showing any overdue payments or remaining amounts.
This process allows you to quickly identify and review any outstanding payments directly within the report.
How can I view logs of any changes made to room pricing, inventory, or a specific reservation ID in the system?
Below are the step-by-step guidelines to view logs of any changes made to room pricing, inventory, or a specific reservation ID in the system in Stayflexi:
Accessing Reports:
Log in to your Stayflexi dashboard using your credentials.
From the dashboard, click on the 4-dots square icon labeled “More Apps”, located on the right side of the screen.
From the listed apps, locate and click on the Reports.
On the left side of the dashboard, you will see a list of different reports.
“Log Reports” section :
On the main dashboard, find and click on the log reports option. This section keeps a record of all changes in the system.
View User Log Report:
Once on the Log Reports page, you’ll see a detailed user log report appear on your screen.
Open the Report:
Click on the report to open it and view the information.
Explore the Columns:
The report displays various columns across the screen, such as change type, date, user name, and specific details of the modification. These columns allow you to filter and search for specific changes based on your requirements.
Filter Information:
To find the exact log details you need, filter by date, user, or other criteria based on the columns available.
This process will help you access logs on any modifications to room pricing, inventory, or reservations as needed.
How do I schedule a daily revenue report for my property?
To generate a daily revenue report for your property, Follow the below-mentioned steps:
Log in to your Stayflexi dashboard using your credentials.
From the dashboard, click on the 4-dots square icon labeled “More Apps”, located on the right side of the screen.
From the listed apps, locate and click on the Reports.
Once the reports page opens, look to the right side and click on Schedule Reports.
On Schedule Reports page, click on Add New Report Schedule to start configuring your report.
Configure the Report:
A report configuration page will appear on the right.
Fill in the details, including the Name of the Report Schedule [e.g.,”Daily Revenue Report”].
Select Report Type as Revenue Report.
Set Schedule Frequency by clicking on the dropdown. Choose Daily from the default options.
Click the Save button at the bottom to complete the setup.
You have successfully scheduled a Daily Revenue Report in Stayflexi. The system will automatically generate the report daily based on your configuration.
How can I view the occupancy report for a specific date?
To view the occupancy report for a specific date range, Follow the below-mentioned guidelines:
Log in to your Stayflexi dashboard using your credentials.
From the dashboard, click on the 4-dots square icon labeled “More Apps”, located on the right side of the screen.
From the listed apps, locate and click on the Reports.
On the left side of the dashboard, you will see a list of different reports.
From the list, locate and click on Channel Manager Reports.
Three reports will open. Click on Occupancy Report to proceed.
In the center of the page, find the date selection area. Click on the calendar icon to open the dropdown calendar.
From the dropdown calendar, select the specific date for which you want to view the occupancy report.
You will now receive the Occupancy Report for that particular date, providing insights into the room utilization and occupancy levels.
How do I generate a report to track the booking sources by OTA channel manager, such a Booking.com, Expedia, etc.?
To track where your reservations are coming from (e.g., OTA, direct bookings), follow the below-mentioned steps:
Log in to your Stayflexi dashboard using your credentials.
From the dashboard, click on the 4-dots square icon labeled “More Apps”, located on the right side of the screen.
From the listed apps, locate and click on the Reports.
On the left side of the dashboard, you will see a list of different reports.
From the list, locate and click on Channel Manager Reports.
Three reports appear on the screen, click on CM Bookings Report.
The report will open on the same page, displaying a list of bookings received from various channels.
Within the report, find the Booking Source column.
Here you’ll see the source of each booking, showing where each guest reservation originated.
How do I check a detailed room status report (occupied, available, out of service)?
To create a detailed room status report (occupied, available, out of service), follow the below-mentioned steps:
Log in to your Stayflexi dashboard using your credentials.
From the dashboard, click on the 4-dots square icon labeled “More Apps”, located on the right side of the screen.
From the listed apps, locate and click on the Reports.
On the left side of the dashboard, you will see a list of different reports.
Access Property Reports: At the top of the Reports section, you’ll see Property Reports. The reports under this section will already be displayed on the screen.
Select Room Inventory Report: Locate and click on Room Inventory Report.
View Report Details: A new page will open, displaying a table at the top with columns like Blocked Rooms, Net Rooms, Available Rooms, etc.
Explore More Columns: To see additional columns, click on the small arrow icon on the right side to scroll forward.
Review the Inventory Report: Below the columns, you’ll find detailed data for your room inventory, showing a breakdown of each room’s status.
How do I check a report of payments made through different methods (e.g., cash, card, bank transfer)?
To create a report for payments made via different methods (cash, card, online, etc.), follow the below-mentioned steps:
Log in to your Stayflexi dashboard using your credentials.
From the dashboard, click on the 4-dots square icon labeled “More Apps”, located on the right side of the screen.
From the listed apps, locate and click on the Reports.
On the left side of the dashboard, you will see a list of different reports.
Click on Payment Reports: Go to the Reports section and select Payment Reports.
Select Counter Report by Payment Type: From the list of available reports, locate and click on Counter Report by Payment Type.
View the Report: A new page will open, displaying the report. At the top, you’ll see columns with names indicating different payment categories.
Check Payment Type Data: Under each column, you’ll find data showing the amounts received by various payment types, such as credit card, cash, bank transfer, etc.
Direct Billing
Simplify your billing process with Stayflexi’s Direct Billing feature. This tool allows you to efficiently manage invoices and payments for corporate clients, travel agents, or any other partners requiring direct billing. Generate detailed invoices, track payment statuses, and manage credit limits all from one centralized platform. Stayflexi’s Direct Billing streamlines financial operations, reducing manual effort and ensuring accurate records. Provide your partners with a seamless billing experience while maintaining full control over your property’s financial workflows.
How do I create a ''Direct Billing'' account in Stayflexi?
Image 1:
Image 2:
Image 3:
Below is the step-by-step guide to creating a direct billing account in Stayflexi:
Log in to Your Stayflexi Dashboard:
Use your username and password to log in.
Go to Direct Billing:
After logging in, click the icon with four boxes (more apps) in the top right corner(as shown in Image 1).
A dropdown menu will appear.
Select “Direct Billing” from the list (as shown in Image 1).
Click on ‘Add New’:
In the Direct Billing section, click the ‘Add new’ button, which will open a form on the right-hand side of the screen(as shown in Image 2).
Fill in Basic Information (as shown in Image 2):
Account Name: Enter the name of the company or travel agent.
Account Number: Enter the corresponding account number.
Account Type: Select the appropriate account type from the dropdown.
The Account type dropdown includes the following types:
Corporate
Travel Agent
House Account
Select the type based on the account you are creating.
Tax ID: Enter the Tax ID.
Account Email: Provide a valid email address for the account so that travel agents should receive email.
Account Phone: Enter the contact phone number, starting with the country code (e.g., +1 for USA).
Enter Address Details(as shown in Image 2):
Address Line 1: Enter the main address for the account.
Address Line 2: Fill in additional address details (optional).
City: Provide the city where the business is located.
State: Enter the state or region.
Country: Select the country from the dropdown list.
Postal Code: Enter the postal code for the address.
Configure IGST Status (Optional only for Indian Property):
If applicable, toggle the IGST status switch for integrated tax setup(as shown in Image 2).
Save the Information(as shown in Image 2):
After filling in all required details, click the ‘Save’ button at the bottom of the form to create the Direct Billing account.
Once saved, the new Direct Billing account will appear in the list, where you can manage or edit the information as needed (as shown in Image 3).
This process allows you to create and manage accounts for direct billing in Stayflexi, making it easy to handle payments directly with travel agents or corporate companies.
How do I view all bookings for a specific Direct Billing account?
Log in to Your Stayflexi Dashboard:
Use your username and password to log in.
Go to Direct Billing:
After logging in, click the icon with four boxes (more apps) in the top right corner(as shown in Image 1).
A dropdown menu will appear.
Select “Direct Billing” from the list (as shown in Image 1).
View Bookings:
Click on the View booking option on the Direct billing account you want to view the bookings(as shown in Image 2).
A page with all the bookings made on this particular direct billing account will be displayed (as shown in Image 3).
You can settle the balance amount from here by clicking on the Settle Dues option (as shown in Image 3).
If you want to display only the Unsettled bookings, enable the Unsettled-only switch to display the Unsettled bookings list (as shown in Image 3).
By following the steps you will be easily able to view all bookings for a specific Direct billing account.
How can I see only unsettled folios or reservations for a given Direct Billing account?
Log in to Your Stayflexi Dashboard:
Use your username and password to log in.
Go to Direct Billing:
After logging in, click the icon with four boxes (more apps) in the top right corner.
A dropdown menu will appear.
Select “Direct Billing” from the list.
View Bookings:
Click on the View booking option on the Direct billing account you want to view the bookings(as shown in Image 2).
A page with all the bookings made on this particular direct billing account will be displayed (as shown in Image 3).
If you want to display only the Unsettled folios or bookings, enable the Unsettled-only switch to display the Unsettled bookings/reservations list.
By following these steps you can easily see the unsettled folio or reservations for a given Direct Billing account.
How do I settle a folio after receiving payment from a Direct Billing account?
Below is the step-by-step guide to settling a folio after receiving payment from a Direct billing account:
Log in to Your Stayflexi Dashboard:
Use your username and password to log in.
Go to Direct Billing:
After logging in, click the icon with four boxes (more apps) in the top right corner.
A dropdown menu will appear.
Select “Direct Billing” from the list.
View Bookings:
Click on the View booking option on the Direct billing account you want to view the bookings
A page with all the bookings made on this particular direct billing account will be displayed
If you want to display only the Unsettled folios or bookings, enable the Unsettled-only switch to display the Unsettled bookings/reservations list.
Setlle Dues:
Click on the checkbox next to the booking or reservation you want to settle the booking.
You can settle the balance amount by clicking on the Settle Dues option
A list of payment methods will be displayed select the payment method you want to make the payment.
A pop-up with the amount details and a Bulk settle button will appear.
Click on the Bulk settle option to settle the dues.
How can I edit or update a Direct Billing account?
Log in to Your Stayflexi Dashboard:
Use your username and password to log in.
Go to Direct Billing:
After logging in, click the icon with four boxes (more apps) in the top right corner
A dropdown menu will appear.
Select “Direct Billing” from the list
Edit/Update Direct Billing account:
Click on the edit icon beside the View Bookings button for the particular direct billing account you want to edit or update the details.
A page to edit or update the details of the particular direct billing account will be displayed
Save the details:
After editing or updating the direct billing account details, click on the Save button to save the updated information
How do I download a report of all bookings under a Direct Billing account?
Log in to Your Stayflexi Dashboard:
Use your username and password to log in.
Go to Direct Billing:
After logging in, click the icon with four boxes (more apps) in the top right corner.
A dropdown menu will appear.
Select “Direct Billing” from the list.
View Bookings:
Click on the View booking option on the Direct billing account you want to download the report.
A page with all the bookings made on this particular direct billing account will be displayed.
Click on the Export report drop down at the top next to the settle dues option.
The Export report drop down contains.
Export as CSV
Export as PDF
Export as Excel
You can download the report of the bookings in any of the formats you wish by clicking on the above-mentioned options.
How do I view the pending balance for a Direct Billing account?
Image 1:
Image 2:
Image 3:
Below is the step-by-step guide to viewing all the pending balances for a specific Direct billing account:
Log in to Your Stayflexi Dashboard:
Use your username and password to log in.
Go to Direct Billing:
After logging in, click the icon with four boxes (more apps) in the top right corner.
Select “Direct Billing” from the list.
View Bookings:
Click on the View Booking option on the Direct billing account you want to view the pending balance.
A page with all the bookings made on this particular direct billing account will be displayed.
By scrolling right, at the end of the table, you can see the Direct Billing Balance Due and Folio Balance Due columns where you can view all the pending balances for a Direct Billing account.
By following these steps you can easily view all the pending balances for a specific direct billing account.
How can I make a walk-in booking under a Direct Billing account?
Log in to Your Stayflexi Dashboard:
Use your username and password to log in.
Go to Reservation calendar:
After logging in, click the Reservation Calendar icon second icon from the left.
Create a Walk-in booking:
Select the Create drop down on the right.
Click on the Walk-in option.
Fill in the customer details.
Click on the Segment drop down on the right-hand side of the page.
Select the DIRECT_BILLING option.
Click on the Sub-segment drop down
Select the Direct billing account under which you want to create the walk-in booking.
Click on the Create Reservation button to successfully create a walk-in booking.
By following these steps you can make a walk-in booking under a Direct Billing account.
How can I view the number of available rooms in each category and the base price from the dashboard?
To view how many rooms are available in each category and what the base price is from the dashboard, follow the below-mentioned steps:
Log in to Stayflexi: Use the provided credentials to log into the Stayflexi dashboard.
View Availability: Once on the opened page, look to the right side of the screen.
Check Availability Today: In this column, you will see the availability for today. Here, you can view:
Room Category Inventory: The number of rooms available in each category.
Base Price: The base price for each room category for the current day.
How it can be useful?
For Example, It’s evening, and a walk-in guest asks for a room. Instead of checking reports, the front desk sees “Available Today: 2 Rooms” on the dashboard and instantly confirms the booking.
Handy because: it saves time, avoids overbooking, and helps staff make quick decisions.
Revenue Management
Optimize your property’s profitability with Stayflexi’s Revenue Management feature. Leverage advanced tools to adjust pricing dynamically, track demand patterns, and forecast future trends. Stayflexi enables you to implement data-driven pricing strategies that maximize revenue while maintaining optimal occupancy levels. With real-time analytics and automated rate adjustments, Stayflexi’s Revenue Management helps you stay competitive in a constantly changing market. Take the guesswork out of pricing and ensure your property reaches its full revenue potential.
How do all Revenue Management features work and how do I set them up?
Below is a complete guide explaining all key features inside Revenue Management along with step-by-step instructions to help you configure each tool easily. This includes: Competitor Setup, Demand-Based Pricing, Rule-Based Pricing, Time-Based Pricing, Promotions, Coupon Code Offers, and Rate Templates.
1. Competitor Setup
Competitor Setup allows you to add or edit competitor hotels so the system can compare your pricing with similar properties in your market. This helps improve your demand-based and rule-based pricing accuracy.
Steps to Set It Up:
Log in to Your Stayflexi Dashboard:
Use your username and password.
Open Revenue Management:
Click the four-boxes (More Apps) icon.
Select Revenue Management.
Open Competitor Setup:
Click Competitor Setup on the left sidebar.
Add a Competitor:
Click Add Competitor.
Search the competitor on Google.
Copy the competitor’s Google hotel profile link and paste it here.
Click Save.
Edit your google profile and Remove Competitors:
click on edit your google profile and do the changes
Select the competitor and click on Remove
2. Demand-Based Pricing
Demand-Based Pricing uses AI to adjust your room prices based on market demand and your property’s star category. It automatically increases or decreases your prices depending on whether demand is low, moderate, high, or occupancy-based.
1. Open Revenue Management Log in to your account → go to More Apps → select Revenue Management.
2. Open Dynamic Pricing In the left menu, click Dynamic Pricing, then choose Demand-Based Pricing.
3. Add a New Configuration Click Add New Configuration to begin.
Important Note:Before configuring demand-based pricing, make sure your room types and rate plans are properly set up. If they are not linked correctly, it may lead to rate mismatches. For example, the system may remind you to sync the base price of your Premium 1BHK with Balcony Garden View with the market demand before continuing.
4. Choose the Star Category and also enable the demand based configuration toggle Select the hotel’s star rating (e.g., 3-star, 4-star, etc.).
5. Select the Demand Type Pick the demand level you want to target:
Low Demand
Moderate Demand
High Demand
Occupancy-Based Demand
6. Set the Price Behavior Choose whether the price should Increase or Decrease when this demand condition is met.
7. Enter the Adjustment Value Add the amount or percentage you want to adjust (e.g., +₹200, -₹150, +10%, etc.).
8. Save Your Configuration Click Save to activate your demand-based pricing rule.
3. Rule-Based Pricing
Rule-Based Pricing lets you create your own custom pricing rules based on occupancy levels. You can increase or decrease the price depending on how full the hotel is and apply these rules to specific room categories.
Select any rule to modify it, switch it off, or delete it permanently.
4. Time-Based Pricing (Time Slot Configuration)
Time-Based Pricing allows you to schedule when dynamic pricing should run. Instead of applying rules continuously, Stayflexi will only update prices during specific times you choose (example: every morning at 9 AM).
Steps to Configure It:
Open Time Slot Configuration:
Revenue Management → Dynamic Pricing → Time Slot Configuration.
Enable Time-Based Pricing:
Toggle ON the Time Slot mode.
Add a Time Slot:
Click Add Time Slot.
Enter a time (example: 09:00 AM)
Save the Time Slot:
Click Save.
Edit or Remove Slots:
Click a slot to update or delete it.
5. Promotions
Promotions allow you to create special offers such as discounts or seasonal deals that automatically apply to selected dates and room types.
Steps to Create a Promotion:
Log in to Your Stayflexi Dashboard:
Use your username and password to log in.
Go to Revenue Management:
After logging in, click the four boxes icon (more apps) in the top right corner.
A dropdown menu will appear.
Select “Revenue Management” from the list.
Go to Promotions:
On the left sidebar, click on “Promotions” (the 4th option) to view the promotions page.
Add a New Promotion:
Click the “Add new promotion” button to start creating a new promotion.
Set Stay Duration Criteria
In the section “How long do guests need to stay to get this promotion?”, enter the following:
Minimum number of nights required for guests to stay to qualify for the promotion.
Maximum number of nights guests can stay to qualify.
Set Room Booking Criteria
In the section “How many rooms do guests need to book to get this promotion?”, input:
Minimum number of rooms guests need to book.
Maximum number of rooms guests can book.
Set the Discount Percentage
In the section “How much of a discount do you want to give?”, enter the desired discount percentage.
Choose the Rate Plan
From the dropdown in the “Which Rate?” section, select the rate plan that the discount applies to (e.g., EP).
Set the Date Range for Discounted Stays:
Specify the date range for when guests can use the promotion
Select Days of the Week for Discount Availability:
Choose the days of the week that the discounted rate will be available. You can select all days or specific days as needed.
Make Promotion Available Online
Decide whether to make the promotion available online
Turn On the Toggle: Promotion will be available on the Stayflexi direct booking engine.
Turn Off the Toggle: Promotion will not be available for the Stayflexi booking engine.
Enter Promotion Name
Provide a descriptive name for your promotion to help identify it easily
Save the Promotion
Once you have entered all the details, review them carefully.
Click the “Save” button to finalise and activate your promotion.
6. Coupon Code Offers
Coupon codes allow you to give guests special codes that apply a fixed or percentage discount during booking.
Log in to Your Stayflexi Dashboard:
Use your username and password to log in.
Go to Revenue Management:
After logging in, click the four boxes icon (more apps) in the top right corner
A dropdown menu will appear.
Select “Revenue Management” from the list
Go to Coupon/Offers:
On the left sidebar, click on “Coupon Code / Offers” (the 5th option) to view the Coupon Code/ Offers page.
Add a Coupon/Offers:
Click the “Add Coupon Code / Offers” button to start creating a new Coupon Code / Offers
Enter Coupon Code / Offer Name:
Provide a descriptive name for your coupon code/offer to help identify it easily
Describe Coupon Code / Offer:
Provide a brief description of your coupon code/ offer for better understanding
Choose the type
From the dropdown in the “Choose type of your coupon code/offer” section, either of the following types:
OFFER
COUPON CODE
Set Room Booking Criteria
In the section “How many rooms do guests need to book to get this coupon code or offer?”, input:
Minimum number of rooms guests need to book.
Maximum number of rooms guests can book.
Set Stay Duration Criteria
In the section “How long do guests need to stay to get this coupon code or offer?”, enter the following:
Minimum number of nights required for guests to stay to qualify for the coupon code/ offer.
Maximum number of nights guests can stay to qualify.
Set the Discount
In the section “How much of a discount do you want to give?”, enter the desired discount and select the type of discount (Percentage or Flat ) from the dropdown.
Set the Date Range for Discounted Stays
In the “When can guests check in using the discounted rate?” section, specify the date range for when guests can use the Coupon code/offer.
Select Days of the Week for Discount Availability:
Choose the days of the week that the discounted rate will be available. You can select all days or specific days as needed
Valid Booking Period:
In the section “When can bookings be shown?”, select the date range during which the coupon code/offer is valid for bookings
Coupon Code/Offer Usage Limit:
In the section “How many times can the coupon code/offer be used? (leave blank for no limit)”:
The coupon code or offer can be used as many times as you want unless a limit is set.
Save the Coupon code/ offer:
Once you have entered all the details, review them carefully.
Click the “Save” button to finalize and activate your Coupon code/ offer.
7. Rate Templates
Rate Templates let you store pre-set pricing for seasons like high season, low season, weekends, festivals, or events. You can apply these templates to any date range with one click, saving time and ensuring pricing consistency.
How to Set Them Up?
Set Up a Rate Template:
Log in to the Stayflexi Dashboard.
Click the four boxes icon (more apps) in the top right corner.
A dropdown will appear.
Select “Revenue Management” from the list.
Click on “Rate Template” (second option on the left sidebar).
Click “Add New Template.”
Fill in the required fields (template name, color, and description).
Define the start and end dates for the season by using the template calendar button in the top right corner of the Rate template page (refer to the above Images).
Steps to Create and Apply a Template:
How do I add or remove competitors in the Competitor Setup section?
Below are the step-by-step guidelines on adding and managing competitors from the Competitor Setup section in Revenue Management:
Log in to Your Stayflexi Dashboard:
Use your username and password to log in.
Go to Revenue Management:
Click the four-boxes (More Apps) icon at the top right corner.
A dropdown menu will appear.
Select “Revenue Management” from the list.
Open Competitor Setup:
On the left sidebar, click “Competitor Setup” or “Competitor List”.
Add a Competitor:
Click “Add Competitor”.
Open Google and search for the competitor property.
Copy the hotel’s Google profile link.
Paste the link into the input field.
Click Save to add the competitor.
Remove a Competitor:
Click Remove
Confirm the action.
Your competitor data is now updated:
These competitors will be used for market comparison inside the Revenue Dashboard and demand-based pricing logic.
How do I configure Demand-Based Pricing?
Below are the step-by-step guidelines on setting up Demand-Based Pricing.
Log in to Your Stayflexi Dashboard:
Enter your username and password.
Open Revenue Management:
Click the four-boxes (More Apps) icon.
Select “Revenue Management.”
Go to Dynamic Pricing:
Click the Dynamic Pricing dropdown on the left sidebar.
Select “Demand-Based Pricing.”
Start a New Configuration:
Click “Add New Configuration.”
Important Note:Before configuring demand-based pricing, make sure your room types and rate plans are properly set up. If they are not linked correctly, it may lead to rate mismatches. For example, the system may remind you to sync the base price of your Premium 1BHK with Balcony Garden View with the market demand before continuing.
Choose Your Property’s Star Category:
Select the appropriate star category (e.g., 3-star, 4-star).
This helps the system compare your property with similar market competitors.
Select the Demand Type:
Choose one of the following:
Low Demand
Moderate Demand
High Demand
Occupancy-Based Demand
Set the Pricing Action:
Choose whether the price should Increase or Decrease when this demand level is detected.
Enter the Price Adjustment Value:
Add the amount or percentage by which the price should change.
Example: Increase by ₹200 or decrease by 10%.
Save the Configuration:
Click Save to activate the demand-based pricing rule.
The system will now automatically adjust rates based on market demand.
How do I create Rule-Based Pricing rules?
Below are the step-by-step guidelines on creating Rule-Based Pricing rules in Dynamic Pricing:
Log in to the Stayflexi Dashboard:
Use your login credentials.
Open Revenue Management:
Click the four-boxes icon.
Select “Revenue Management.”
Go to Dynamic Pricing:
Click the Dynamic Pricing dropdown on the left.
Select “Rule-Based Pricing.”
Add a New Rule:
Click “Add Rule” or “Add Dynamic Pricing Rule.”
Define the Occupancy Range:
Enter the occupancy percentage range where this rule should apply.
Example:
0%–50% → Decrease price
51%–70% → Increase price
71%–100% → Increase price more
Choose the Price Adjustment Type:
Set whether the change is a percentage or a fixed amount.
Enter the value accordingly.
Select Room Categories:
Choose whether this rule should apply to all rooms or specific room categories.
Set the Active Date Range:
Choose the calendar dates during which this rule should remain active.
Save the Rule:
Click Save to finalize the rule.
You will now see it listed in the Rule-Based Pricing table.
What is Time-Based Pricing and how do I set Time Slots?
Below are the step-by-step guidelines on what Time-Based Pricing means and how to configure Time Slot Pricing in Revenue Management:
Time-Based Pricing allows you to schedule when your dynamic pricing rules should run. Instead of adjusting prices continuously in real-time, the system will only update prices during the specific time slots you choose. This gives you more control, prevents frequent price fluctuations, and helps you manage pricing updates at predictable times (e.g., every morning at 9 AM).
Open Revenue Management:
Log in to your Stayflexi dashboard.
Click the four-boxes (More Apps) icon and select Revenue Management.
Open Dynamic Pricing:
Click Dynamic Pricing in the left sidebar.
Select Time Slot Configuration.
Enable Time Slot Mode:
Turn ON the toggle for Time-Based Pricing.
This switches dynamic pricing from real-time updates to scheduled time-based updates.
Add a Time Slot:
Click “Add Time Slot.”
Enter the exact time you want the pricing rules to run (e.g., 09:00 AM or 2:00 PM).
Save the Time Slot:
Click Save to activate the time slot.
From now on, pricing rules will only be applied at these scheduled times.
Remove or Edit Time Slots:
Click an existing time slot to edit its time.
To delete, click the delete option.
Save changes to update your time-based pricing schedule.
How do I manage (edit, run the rule immediately, disable or delete) dynamic pricing rules?
Below are the step-by-step guidelines on managing existing rules:
Open Rule-Based Pricing Go to Revenue Management → Dynamic Pricing → Rule-Based Pricing.
Select the Rule Click on the rule you want to manage from the list.
Edit the Rule
On the right-hand side, click the pencil (edit) icon.
In the Edit Rule screen, you can update the rule definition, occupancy ranges, adjustment values, turn on/off room-type-based occupancy, select room types, or change the date range.
Save your changes.
Run the Rule Immediately If you want the updated rule to apply right away, click Run Rule Now.
Disable the Rule To stop the rule from applying temporarily, click Disable Rule. (The rule will remain saved and can be enabled later.)
Permanently Delete or Remove the Rule
Click the calendar icon on the right.
Select Permanently Disable Rule if you want to remove it from use completely.
(You will also see an option to Permanently Enable Rule if needed.)
How do Rate Templates work and how do I create one?
Rate Templates allow you to store predefined pricing structures for different seasons, events, or special periods. Instead of manually updating each date on the calendar, you can create templates (such as High Season, Low Season, Weekend Rates, Festival Rates) and apply them instantly to any date range with just one click. This ensures pricing is consistent, faster to update, and reduces errors across your property.
Below are the step-by-step guidelines on what Rate Templates are and how to create and apply them:
Go to Revenue Management:
Log in to your Stayflexi dashboard.
Click the four-boxes (More Apps) icon.
Select Revenue Management.
Open Rate Templates:
Click Rate Templates from the left menu.
Add a New Template:
Click “Add Template.”
Enter a template name (examples: Winter Rates, High Season Rates, Festival Rates).
Enter Room Pricing:
For each room type, enter the base rate or seasonal rate that should be saved in this template.
Add weekday/weekend variations if applicable.
Save the Template:
Click Save.
Your template will now appear in the Rate Templates list.
Apply the Template to Dates:
Click Apply Template or open the calendar tool.
Select the start date and end date you want to apply the template to.
Choose the template you created from the dropdown list.
Click Apply.
Rates Will Instantly Update:
All selected dates will automatically update to the pricing defined in the template.
Your property’s rate strategy becomes consistent and easier to manage.
Can dynamic pricing be set to run at a specific time, regardless of occupancy changes?
Yes, dynamic pricing can be set to run at a specific time regardless of occupancy changes in Stayflexi.
When you enable Time Slot Configuration, you can pick certain times during the day for your pricing rules to take effect. Once this mode is on, the system will only adjust prices based on occupancy at those chosen times, not continuously throughout the day. This makes it easier to manage pricing.
For example, if you set a time for 10:00 AM, the system will check the occupancy and apply the pricing rules at that exact time. This way, you have clear control over when your prices change.
Here’s a simpler guide to setting dynamic pricing at specific times using Time Slot Configuration in Stayflexi:
Log in to Your Stayflexi Dashboard:
Use your username and password to log in.
Go to Revenue Management:
After logging in, click the four boxes icon (more apps) in the top right corner.
A dropdown menu will appear.
Select “Revenue Management” from the list.
Go to Dynamic Pricing:
Click the “Dynamic Pricing” dropdown icon (3rd option on the left sidebar).
Open Time-based pricing
On the left side, under Dynamic Pricing, you will see options like:
Demand-based pricing
Rule-based pricing
Time-based pricing
Click on Time-based pricing.
Turn onTime Slot Mode:
You will see a switch asking, “Do you want to enable a time slot?”
Turn this switch on
Set a Time for Dynamic Pricing
Under the switch, you will see a field to choose a time (e.g., 10:00 AM).
Pick the time you want the dynamic pricing rules to apply.
Click Add to set the time for more time slots.
Save Your Settings
After adding the time, click Save.
The time will now be listed on the screen.
Confirm or Adjust:
Check if the time slot appears correctly.
If you need to change or remove it, click the Delete button next to the time
Once this is set up, dynamic pricing will run at the time you choose, based on occupancy at that moment, instead of adjusting in real-time. This helps you control when pricing changes happen.
Can the occupancy percentages in dynamic pricing overlap across different rules?
In Stayflexi, occupancy percentages for dynamic pricing rules cannot overlap.
Each rule must have its own unique occupancy percentage range. For example, if one rule covers 50% to 80% occupancy, you cannot create another rule that overlaps with any part of that range, such as 60% to 90%. The ranges need to be distinct so the system knows exactly which rule to apply.
If you attempt to create overlapping rules, Stayflexi will alert you and ask you to change the ranges to ensure they don’t overlap, avoiding any confusion when applying the correct rule.
Here’s a step-by-step guide to check if occupancy percentages overlap between different dynamic pricing rules in Stayflexi:
Log in to Your Stayflexi Dashboard:
Use your username and password to log in.
Go to Revenue Management:
After logging in, click the four boxes icon (more apps) in the top right corner.
A dropdown menu will appear.
Select “Revenue Management” from the list
Go to Dynamic Pricing
Click the “Dynamic Pricing” dropdown icon (3rd option on the left sidebar).
Select the “Rule-based pricing” option from the dropdown.
Create an Overlapping Rule:
Let’s say you already have a rule called “Rule 1” that applies to occupancy percentages between 50% and 80% (as shown in Image 2).
Now, try to create another rule “Rule 2” by clicking the Add new dynamic pricing rule button, with an occupancy range of 60% and 90%.
Receive the Error:
The system will prevent you from saving “Rule 2” because its occupancy range overlaps with “Rule 1”.
An error message will pop up, stating: “Invalid rule specified, occupancy range is overlapping. Please enable if the previous rule is disabled.”
By following these steps, you can ensure that your dynamic pricing rules do not have overlapping occupancy percentages.
Can dynamic pricing be applied to only one specific room category?
Yes, in Stayflexi, you can apply dynamic pricing to just one specific room category. This allows you to adjust prices for that room type based on occupancy, without affecting the prices of other room categories.
Below are the step-by-step guidelines on dynamic pricing being applied to only one specific room category from Revenue Management:
Log in to Your Stayflexi Dashboard:
Use your username and password to log in.
Go to Revenue Management:
After logging in, click the four boxes icon (more apps) in the top right corner.
A dropdown menu will appear.
Select “Revenue Management” from the list.
Go to Dynamic Pricing:
Click the “Dynamic Pricing” dropdown icon (3rd option on the left sidebar).
Select the “Rule-based pricing” option from the dropdown.
Create or Edit a Pricing Rule:
To apply a rule to a specific room category, you can:
Create a new rule by clicking the Add new dynamic pricing rule button.
Or edit an existing rule by selecting it from the list of rules on the rule-based pricing page.
Enable Room Type-Based Occupancy:
In the rule setup window, you will see an option to EnableRoom Type-Based Occupancy.
Turn this option ON. This will let you apply the pricing rule to specific room categories instead of the entire property.
Select the Room Category (as shown in Image 3):
After enabling room-type-based occupancy, you will see a dropdown menu “Room types” under the “Select room types?” section.
Click on the dropdown and select the room category you want (e.g., Deluxe Room, Suite, etc.).
You can choose one or more categories, but to apply the rule to a single room category, just select that one.
Define the Pricing Rule:
Now, set the conditions for your dynamic pricing:
Occupancy Percentage Range: Enter the range of occupancy for when the rule should apply (e.g. if occupancy is between 90% and 100%).
Price Adjustment: Choose how much you want to increase or decrease the price when occupancy falls within that range (you can set it as a percentage or a fixed amount).
Rule Name:
Name the Dynamic Pricing rule (e.g., Rule 2).
Save the Rule:
Once you have set everything up, click on the “Add Event” button to apply the rule.
The dynamic pricing rule will now apply only to the room category you selected.
Can dynamic pricing and rate templates function simultaneously?
Yes, you can use both rate templates and dynamic pricing at the same time in Stayflexi. Rate templates let you set seasonal prices, while dynamic pricing adjusts rates based on real-time occupancy levels. When you set up seasonal prices, dynamic pricing will still work, making sure your rates reflect market conditions. Here’s a simple guide on how to use them together:
What Are Rate Templates?
What They Do: Rate templates allow you to set specific prices for certain times of the year, like during busy seasons or holidays. You can schedule these rates in advance.
Why Use Them: They help you plan by setting fixed prices for high-demand periods like summer or festival seasons and it can be used multiple times.
What is Dynamic Pricing?
What It Does: Dynamic pricing automatically adjusts your room rates based on demand and how full your hotel is.
Why Use It: It helps you maximize revenue by adjusting rates in real time based on current demand.
Dynamic pricing adjusts the rates based on the overall occupancy of the entire property. However, if you want to set dynamic pricing for a specific room type, you can do that by enabling the ‘Enable room type-based occupancy’ option when creating the pricing rule.
How Do They Work Together?
Work Simultaneously: When you set a seasonal rate using a rate template (like for a holiday), dynamic pricing still works. The seasonal rate will be your base price.
Adjust Automatically: If demand changes during that season (for example, if your hotel starts filling up), dynamic pricing will increase or decrease the rate based on occupancy.
How to Set Them Up?
Set Up a Rate Template:
Log in to the Stayflexi Dashboard.
Click the four boxes icon (more apps) in the top right corner.
A dropdown will appear.
Select “Revenue Management” from the list.
Click on “Rate Template” (second option on the left sidebar).
Click “Add New Template.”
Fill in the required fields (template name, color, and description).
Define the start and end dates for the season by using the template calendar button in the top right corner of the Rate template page (refer to the above Images).
Configure Dynamic Pricing (refer to the above Images):
Go to “Dynamic Pricing” (third option on the left sidebar under Revenue Management).
Select “Rule-based Pricing.”
Set rules for price changes (for example, “If occupancy is above 80%, increase rates by 10%”) by clicking “Add New Dynamic Pricing Rule.”
Why Use Both?
Maximize Earnings: Rate templates give you a plan for high-demand times, while dynamic pricing helps you adjust based on real-time changes. This way, you can always charge the best rates.
Stay Competitive: Using both strategies ensures your prices stay competitive no matter the season or occupancy level.
By following these steps, you can easily set up rate templates and dynamic pricing in Stayflexi, ensuring your rates are always optimized to help you earn more while staying flexible with market changes.
How do I create predefined Coupon Code/ offers in the system?
Below are the step-by-step guidelines to create predefined Coupon Code/offers in the system from Revenue Management:
Log in to Your Stayflexi Dashboard:
Use your username and password to log in.
Go to Revenue Management:
After logging in, click the four boxes icon (more apps) in the top right corner
A dropdown menu will appear.
Select “Revenue Management” from the list
Go to Coupon/Offers:
On the left sidebar, click on “Coupon Code / Offers” (the 5th option) to view the Coupon Code/ Offers page.
Add a Coupon/Offers:
Click the “Add Coupon Code / Offers” button to start creating a new Coupon Code / Offers
Enter Coupon Code / Offer Name:
Provide a descriptive name for your coupon code/offer to help identify it easily
Describe Coupon Code / Offer:
Provide a brief description of your coupon code/ offer for better understanding
Choose the type
From the dropdown in the “Choose type of your coupon code/offer” section, either of the following types:
OFFER
COUPON CODE
Set Room Booking Criteria
In the section “How many rooms do guests need to book to get this coupon code or offer?”, input:
Minimum number of rooms guests need to book.
Maximum number of rooms guests can book.
Set Stay Duration Criteria
In the section “How long do guests need to stay to get this coupon code or offer?”, enter the following:
Minimum number of nights required for guests to stay to qualify for the coupon code/ offer.
Maximum number of nights guests can stay to qualify.
Set the Discount
In the section “How much of a discount do you want to give?”, enter the desired discount and select the type of discount (Percentage or Flat ) from the dropdown.
Set the Date Range for Discounted Stays
In the “When can guests check in using the discounted rate?” section, specify the date range for when guests can use the Coupon code/offer.
Select Days of the Week for Discount Availability:
Choose the days of the week that the discounted rate will be available. You can select all days or specific days as needed
Valid Booking Period:
In the section “When can bookings be shown?”, select the date range during which the coupon code/offer is valid for bookings
Coupon Code/Offer Usage Limit:
In the section “How many times can the coupon code/offer be used? (leave blank for no limit)”:
The coupon code or offer can be used as many times as you want unless a limit is set.
Save the Coupon code/ offer:
Once you have entered all the details, review them carefully.
Click the “Save” button to finalize and activate your Coupon code/ offer.
How do I create predefined promotions in the system?
Below are the step-by-step guidelines to create predefined promotions in the system from Revenue Management:
Log in to Your Stayflexi Dashboard:
Use your username and password to log in.
Go to Revenue Management:
After logging in, click the four boxes icon (more apps) in the top right corner.
A dropdown menu will appear.
Select “Revenue Management” from the list.
Go to Promotions:
On the left sidebar, click on “Promotions” (the 4th option) to view the promotions page.
Add a New Promotion:
Click the “Add new promotion” button to start creating a new promotion.
Set Stay Duration Criteria
In the section “How long do guests need to stay to get this promotion?”, enter the following:
Minimum number of nights required for guests to stay to qualify for the promotion.
Maximum number of nights guests can stay to qualify.
Set Room Booking Criteria
In the section “How many rooms do guests need to book to get this promotion?”, input:
Minimum number of rooms guests need to book.
Maximum number of rooms guests can book.
Set the Discount Percentage
In the section “How much of a discount do you want to give?”, enter the desired discount percentage.
Choose the Rate Plan
From the dropdown in the “Which Rate?” section, select the rate plan that the discount applies to (e.g., EP).
Set the Date Range for Discounted Stays:
Specify the date range for when guests can use the promotion
Select Days of the Week for Discount Availability:
Choose the days of the week that the discounted rate will be available. You can select all days or specific days as needed.
Make Promotion Available Online
Decide whether to make the promotion available online
Turn On the Toggle: Promotion will be available on the Stayflexi direct booking engine.
Turn Off the Toggle: Promotion will not be available for the Stayflexi booking engine.
Enter Promotion Name
Provide a descriptive name for your promotion to help identify it easily
Save the Promotion
Once you have entered all the details, review them carefully.
Click the “Save” button to finalise and activate your promotion.
Will the rates automatically revert to the base price if the dynamic pricing rule is disabled or deleted after it has been applied?
No, the rates will not automatically revert to the base price if the dynamic pricing rule is disabled or deleted after it has been applied.
Disabling the rule stops it from affecting future bookings, but any bookings made while the rule was active will keep the modified rates.
Deleting the rule permanently removes it, but again, it only affects future bookings. Existing bookings will retain the rates applied during the rule’s active period.
To return the rates to their original base price, you must change them manually.
Understanding Dynamic Pricing Rules:
Dynamic pricing rules in Stayflexi help you change room prices automatically based on things like demand, special promotions, or seasonal changes. When these rules are active, they change the prices for all relevant bookings automatically.
Applying a Dynamic Pricing Rule:
When you activate a dynamic pricing rule, it instantly applies to all bookings during the time the rule is active.
The system will show the modified prices for all reservations made while the rule is in place.
Disabling or Deleting a Dynamic Pricing Rule:
Disabling the Rule:
If you disable the dynamic pricing rule, it stops changing prices for future bookings.
However, any bookings made while the rule was active will still keep the modified rates. These rates will not automatically go back to the base price.
Deleting the Rule:
Deleting the rule removes it from your settings entirely.
This only impacts future bookings, meaning no new bookings will use the deleted rule.
Existing bookings will still have the prices that were set when the rule was active.
Impact on Existing Bookings:
Any bookings made while the dynamic pricing rule was active will keep the modified rates.
These rates will not go back to the original base price automatically, even after disabling or deleting the rule.
To reset these prices to the base rate, you need to manually adjust them.
How to Manually Update Prices:
To adjust the prices back to the base price (or set a new price), follow these steps:
Go to the Rates and Inventory Page
In the Stayflexi dashboard, click on the Rates and Inventory icon (it’s the 3rd icon from the left in the top menu).
Select Rates and Inventory:
In the Rates and Inventory page, select the checkbox for Rates and Inventory from the drop down menu in the top left corner
Use Bulk Update:
Click on the Bulk update button
Set Pricing Option:
From the dropdown options, select Set pricing
Choose Room Types:
Select the room types where you want to adjust the prices
Choose the Rate plans:
Select the rate plans where you want to adjust the prices
Manually Enter the Base Price:
Enter the base price (or a new price) for those room types in the provided field
Save Your Changes:
Click the Set Pricing button to save and apply your new pricing
By following these steps, you can ensure that prices for existing bookings are manually updated to the base price or any price you prefer, even if the dynamic pricing rule is disabled or deleted.
Stayflexi PMS password- How to reset your password
To reset your password in Stayflexi, follow the below steps:
Open the Stayflexi Welcome Page:
Go to the Stayflexi login page.
Enter your Email ID:
In the email field, enter the email ID you use for your Stayflexi login.
Click on Sign In:
This will take you to a page with the password field.
Click on Forgot your Password:
You’ll see a confirmation message saying, “We will send you a link to create a new password”.
Re-enter your Email Id:
Enter the same email id associated with your Stayflexi account.
Click on “Submit”.
This will send a reset link to your email.
Open the Email and Use the Reset Link:
Check your inbox for the reset email. [If you don’t see it, check your Spam or Junk folder.]
Click on the reset link provided in the email.
Create a New Password:
Follow the link to a secure page where you can enter a new password. Choose a new password and confirm the change.
You should be now be able to log in with your new password.
Click on “Submit”:
Expense manager
Keep your property’s finances in check with Stayflexi’s Expense Manager feature. This tool enables you to record, categorize, and monitor all operational expenses in real time. From utility bills to maintenance costs, Stayflexi provides a clear, organized view of your spending. With detailed reporting and analytics, you can track trends, manage budgets, and make informed financial decisions. Stayflexi’s Expense Manager simplifies expense tracking, helping you maintain profitability and control over your property’s financial health.
The Cash Tracker in Stayflexi is a built-in tool that helps properties monitor, record, and reconcile all cash transactions in real-time. It gives a clear snapshot of how much cash is currently on hand, where it came from, and how it’s being used — making daily cash flow management simple and transparent.
Key Functions of Cash Tracker:
Tracks All Cash Inflows :
Cash received from guest folios (payments during check-in, check-out, or in-stay purchases)
Cash top-ups added for operational needs
Any other incoming cash sources.
Monitors All Cash Outflows:
Expenses paid in cash (e.g., supplies, repairs, petty cash)
Cash withdrawals for various purposes
Employee payouts and vendor payments
Real-Time Cash Balance :
Instantly calculates and displays the current available cash on the property based on inflow and outflow records.
Shift & Day-Wise Tracking :
Allows tracking of cash collections and withdrawals per shift or day, making handovers and audits easier.
Why it’s Useful? :
Eliminates manual ledger entries for cash
Provides transparent cash movement history linked to employees and categories
Reduces errors and discrepancies during reconciliation
Ensures accountability by tracking who collected or spent the cash and for what reason
Example Use Case :
If the front desk collects ₹5,000 in cash from guests and the housekeeping team spends ₹1,000 for supplies, the Cash Tracker will show:
₹5,000 as inflow (guest payments)
₹1,000 as outflow (housekeeping expense)
₹4,000 as the remaining cash balance for the day
What types of transactions can be recorded in the Cash Tracker?
The Cash Tracker in Stayflexi is a centralized tool that allows properties to log, monitor, and reconcile all cash transactions in real-time. It helps ensure transparency, accountability, and accuracy in managing the property’s cash flow.
Types of Transactions in Cash Tracker:
Cash Top-Ups – Manual cash additions to the register :
These are cash amounts manually added to the cash register to ensure enough funds are available for operational needs.
Example: The property manager adds ₹10,000 to the register at the start of the month for housekeeping purchases and petty cash needs.
Flow:
Manager initiates a Cash Top-Up entry in Cash Tracker.
Selects “Monthly Operational Cash” as the reason (predefined in Top-Up categories).
Enters amount and date, then saves.
Cash balance increases immediately by ₹10,000 in the tracker.
2. Cash Collections – Automatically logged when guest dues are settled in cash
This transaction type is system-generated whenever a guest payment is made in cash via their folio.
Example: A guest settles their bill of ₹5,000 in cash at checkout.
Flow:
Front desk records payment in the Guest Folio.
Selects Cash as payment mode.
System automatically logs this transaction in the Cash Tracker as a Cash Collection.
Available cash balance increases by ₹5,000 without manual entry.
3. Cash Withdrawals – Expenses, cash payouts, or owner withdrawals
Cash removed from the register for operational expenses, staff payments, or withdrawals by the owner.
Example: The property needs ₹2,000 to pay a local plumber for urgent repairs.
Flow:
Staff member logs in to Cash Tracker.
Selects Cash Withdrawal and chooses the category “Maintenance & Repairs” (predefined in Withdrawal categories).
Enters amount, date, and purpose.
Cash balance decreases by ₹2,000 immediately.
How is Cash Collected from Guest Folios Tracked?
When a guest settles dues in cash (e.g., room payments, add-ons), the amount is automatically added to the Cash Tracker in the Expenses manager as an inflow entry, ensuring the cash register reflects real-time updates. If you wish not to track, you can uncheck the ‘transfer cash to cash top-up’ in settle dues.
Flow:
The front desk or cashier opens the Guest Folio in Stayflexi.
Selects Cash as the payment method while settling the balance.
By default, the system records the payment instantly as a Cash Collection in the Cash Tracker.
The available cash balance updates in real-time.
Optional: If you don’t want this cash to be added to the Cash Tracker, simply deselect the checkbox (which is automatically selected by default).
Example:
A guest has a pending bill of ₹6,863.
The front desk receives the amount in cash and updates the folio.
Stayflexi auto-logs the ₹6,863 under Cash Collections in the Cash Tracker with the guest’s folio reference and payment date.
If the checkbox is deselected before saving, the transaction will not appear in the Cash Tracker.
Benefits:
Eliminates manual logging errors.
Creates a transparent audit trail.
Keeps cash balance updated instantly.
Allows flexibility to exclude specific cash collections from the Cash Tracker when needed.
Can I Add Cash to the Tracker Manually?
Yes. You can manually add cash to the Cash Tracker using the Cash Top-Up feature. This is useful for recording manual additions such as morning cash floats, emergency funds, or any non-guest cash injections into the register.
Flow:
Go to the Cash Tracker section in Stayflexi.
Click Add Top-Up from the left-hand menu.
Pick the Date for the cash addition.
In the Reason/Entity column, select a predefined top-up category (e.g., Morning Cash Load, Emergency Top-Up).
Enter the Amount and any Description for future reference.
Click Save to update the cash balance instantly.
Example:
At the start of the day, the cashier adds ₹5,000 to the cash drawer as a morning float.
They log into the Cash Tracker → Add Top-Up → select “Morning Cash Load” → enter ₹5,000 → Save.
The system immediately reflects this addition in the available cash balance.
What if the owner or manager takes cash out for personal or business purposes?
If the property owner, manager, or any authorized person withdraws cash for personal use or business-related expenses, you can log this in the Cash Tracker under Cash Withdrawals. This ensures the transaction is properly documented and the cash balance stays accurate.
Flow:
Go to the Cash Tracker section in Stayflexi.
Click Add Withdrawal from the left-hand menu.
Pick the Date of the withdrawal.
In the Reason/Entity column, select a predefined withdrawal category (e.g., Owner Withdrawal, Vendor Payment, Staff Wages).
Enter the Amount withdrawn and add a Description if necessary.
Click Save to record the transaction and update the available cash balance.
Example:
The owner takes ₹10,000 from the property’s cash for urgent equipment repair.
The cashier logs into the Cash Tracker → Add Withdrawal → select “Owner Withdrawal” → enter ₹10,000 → Save.
The system reduces the cash balance immediately and keeps a record for auditing.
What is the Expense Manager feature in Stayflexi, and how does it benefit to a property?
The Expense Manager in Stayflexi is a built-in tool that allows hotel staff to record, track, and manage all property-level operational expenses in one place. It provides visibility into where money is being spent, helping owners and managers maintain better financial control.
Why is it useful for your property?
Managing expenses manually or across disconnected spreadsheets often leads to data gaps, miscommunication, or overspending. The Expense Manager solves this by:
Providing real-time visibility into all property-level expenses.
Helping owners and managers track where money is going — by category, department, or user.
Ensuring accountability, as each expense is logged with user details and time stamps.
Offering easy reporting for audits, internal reviews, or tax purposes.
Improving financial planning by enabling data-driven decisions based on actual expense trends.
What types of expenses can I record in the Expense Manager?
You can log any operational expense, such as:
Housekeeping supplies
Maintenance costs
Staff salaries or wages
Vendor payments
Utility bills
Marketing costs
Miscellaneous purchases (stationery, fuel, etc.
Where can I access the Expense Manager in the Stayflexi dashboard?
Follow the steps below to access the Expense Manager from your Stayflexi dashboard:
Log in to your Stayflexi dashboard using your property credentials.
On the top right corner of the dashboard, click on the “More Apps” icon.
From the dropdown menu, select “Expense Manager.”
You will now be redirected to the Expense Manager interface, where you can start adding or managing your property’s expenses.
Understanding the Expense Manager Dashboard
Once you access the Expense Manager, you’ll be welcomed with a summary dashboard that gives you a quick overview of your financial activity:
Info Box Section (Top Panel): This section displays key financial figures at a glance:
Total Expenses
Cash Withdrawals
Cash Top-ups
Overall Cash Balance
Top Expense Categories (Middle Panel): Right next to the info boxes, you’ll find a list of the top categories where most of your expenses are being recorded. This helps you quickly identify high-spending areas.
Day-wise Expense Trend Graph (Right Panel): A visual day-wise trend graph shows how your expenses fluctuate over time. This allows you to monitor daily spending patterns, spot unusual spikes, and track how different departments impact cash flow.
Configuration Section (Bottom Panel): Below the summary panels, you’ll find an option to configure your Expense Manager settings.
Summary
The Expense Manager in Stayflexi is an essential module for any property aiming to maintain financial discipline, improve expense accountability, and reduce manual errors. It’s more than just a tracker — it’s a smart financial tool built to support daily operations, internal audits, and long-term budgeting.
Where can I see report for Expense Manager?
You can see the reports for Expense Manager by navigating to the Expense Reports section in the Reports.
Below is the step-by-step guide to see the Expense Manager reports:
Logging into Your Stayflexi Dashboard:
Enter your username and password to log in.
Navigate to Reports:
Once logged in, click on the More Apps icon (represented by four blocks) in the top right corner.
From the dropdown menu, select Reports.
On the left-hand menu, select Expense Reports.
Go to Expense Manager Reports:
After selecting the Expense Reports option, the Expense Manager Reports option will be displayed.
Click on the Expense Manager reports block.
This will navigate you to the page where you can see all the Expense Manager reports, including:
The date the expense was created
Type of expense( Expense, withdrawal, or top-up)
Issued to details.
Reason – entity name
Description
Amount.
By following these steps you can see all the Expense Manager report details.
How do I set up the Expense Manager in Stayflexi?
The Expense Manager in Stayflexi is designed to help properties track and manage all financial transactions such as daily expenses, cash withdrawals, and top-ups — all in one place. This guide walks you through how to set it up, configure it, and use it effectively for complete financial control.
1. ACESSING THE EXPENSE MANAGER:
To get started:
Log in to your Stayflexi dashboard using your property credentials.
Click on the “More Apps” icon (grid with four blocks) at the top right corner.
From the dropdown, select “Expense Manager.”
You’ll be redirected to the Expense Manager dashboard.
2. UNDERSTANDING THE EXPENSE MANAGER DASHBOARD:
Upon entry, you’ll see a summarized financial overview:
Info Boxes (Top Panel):
Total Expenses
Cash Withdrawals
Cash Top-Ups
Overall Cash Balance
Top Expense Categories (Middle Panel):
Displays your most frequently used expense types.
Day-wise Trend Graph (Right Panel):
Visualizes daily spending trends to help monitor expense flow.
Configuration Panel (Bottom Section):
Here, you can set up categories, payment modes, and user access settings to customize the Expense Manager for your property’s needs.
3. SETTING UP THE EXPENSE MANAGER:
A. Configure Expense Categories:
From the left-hand column, select “Expenses.”
On the right-hand side, click the Configuration icon.
Under Expense Categories, click Add New and enter names like:
Toiletries
Housekeeping Essentials
Repairs & Maintenance
Marketing
Click Save after each entry.
Repeat as needed to cover all types of expenses.
B. Set Up Withdrawal Categories:
From the left-hand column, switch to “Withdrawals.”
Click on the Configuration icon.
Click “Create Withdrawal Category”, and enter types like:
Daily Wages
Vendor Payments
Staff Advances
Click Save to store the category.
C. Configure Top-Up Categories:
On the left-hand side, switch to “Top-Up.”
Go to the Configuration panel.
Click Add Top-Up Type, and define options like:
Morning Cash Load
Emergency Top-Up
Night Shift Float
Click Save.
D. Configure Employee Access:
To track who’s responsible for logging financial actions:
In the Configuration menu, select “Configure Employee.”
Click “Create Employee” and add team members involved in financial entries.
Assign roles and permissions for:
Logging expenses
Creating withdrawals or top-ups
Approving entries (if needed)
This ensures complete accountability and audit readiness.
4. RECORDING FINANCIAL TRANSACTIONS:
A. Add and Track Expenses:
Click “Add Expense” from the left-hand menu (+ icon).
Choose an Expense Category (e.g., Housekeeping, Repairs).
Enter the amount, date, description, and upload any receipt.
Click Save to log the expense.
B. Log Cash Withdrawals:
Select “Add Withdrawal” from the left menu.
Choose a Withdrawal Category (e.g., Vendor Payment).
Fill in the amount, date, and add a note if needed.
Click Save.
C. Log Cash Top-Ups:
Click “Add Top-Up” from the left-hand side.
Select a Top-Up Category (e.g., Morning Cash Load).
Enter the amount and add any notes.
Click Save to record the top-up.
EXAMPLE USE CASES :
Housekeeping Purchase:
₹1,250 spent on cleaning supplies via UPI.
Logged under Housekeeping with a receipt attached.
Overall Summary:
With the Expense Manager set up and in use:
Your team can log all financial activities in real-time.
Owners and managers get complete visibility into daily cash flow.
Each entry is attributed to the right staff member, ensuring accountability.
Reports and graphs help analyze trends and control spending.
How can I add daily expenses in Expense Manager?
Log in to Stayflexi
Start by logging into your Stayflexi account with your credentials.
Once logged in, click on the More Apps icon (represented by four blocks) in the top right corner.
From the dropdown menu, select Expense Manager.
Add Daily Expenses:
To record any daily expenses, follow these simple steps:
Choose an Expense Category:
Click “Add Expense” from the left-hand menu (+ icon).
Select the date of the expense. It will default to today’s date, but you can modify it if needed.
Click on the dropdown arrow in this column to view and select from your predefined expense categories (e.g., Housekeeping, Repairs, Supplies).
Choose the employee or vendor to whom the amount was issued.
This list is based on entries from the “Configure Employee” section.
Type the exact amount spent in this field.
Add a brief description of the expense for future reference (e.g., “Purchased cleaning liquid for Room 101”).
If this expense should also be recorded under Withdrawals, tick the checkbox to link it.
Click the “Save” button to record the daily expense entry.
The expense will now be logged in the system and reflected in your dashboard, reports, and day-wise trends.
What is the 'Top-up' feature in the Expense Manager, and how is it used?
The Top-up feature in Stayflexi’s Expense Manager allows property owners and managers to load cash into their cash drawer at the beginning of the day or at any other time when additional cash is required for daily operations, such as covering expenses or withdrawals. This feature ensures that there is always enough cash available to manage operations smoothly.
Why use the Top-Up Feature?
To track when and how much cash is being added to the property’s available funds.
To maintain an accurate cash balance in the system.
To ensure accountability when physical cash is handed over to specific employees or departments.
Here’s how to use it step by step:
Log in to Stayflexi:
Start by logging into your Stayflexi account with your credentials.
Once logged in, click on the More Apps icon (represented by four blocks) in the top right corner.
From the dropdown menu, select Expense Manager.
Fill-Out Top-Up Details:
Pick the Date: Choose the date on which the top-up is made. It defaults to today, but you can change it as needed.
Reason / Entity Column:This dropdown is used to select the predefined Top-Up categories (e.g., “Morning Cash Load”, “Emergency Fund”) that were configured earlier under the Top-Up Configuration section.
Issued To: Select the employee who received the top-up. This list is based on the employees added under Configure Employee.
Enter Amount: Add the total amount of cash added.
Add Description: Optionally, include a short note for reference (e.g., “Cash float provided for front desk”).
Save the Top-Up:Click Save to log the entry. The system will update your overall cash balance accordingly.
Where Does It Reflect?
The added amount will be reflected in the cash balance on your dashboard.
It will also appear in the Top-Up summary reports, helping you track how often and how much cash is loaded.
Tip: Regularly reconciling top-ups against expenses and withdrawals helps ensure accurate cash flow tracking and reduces discrepancies.
How to proceed if I can't find the email with reset link?
If you’re a user or sub-user in Stayflexi and can’t find the password reset link, here’s what to do:
Contact the Main Admin:
Only the main admin has access to reset links for users and subusers. Reach out to them, and they can initiate the reset process on your behalf.
Follow Up with Admin:
Once the admin initiate the reset, they’ll provide you with the necessary information to complete the process.
If you don’t see the reset email within a few minutes, check your Spam or Junk folders just in case.
Follow-Up for Additional Assistance:
If you still don’t receive the reset link, or if there’s any issue, ask the main admin to contact Stayflexi support. The support team can help ensure the email is delivered correctly or assist with any technical issues on the account.
The Stayflexi Reservation Calendar is designed for ease of use, with all key features conveniently located in one place.
At the top, you’ll find the Date Range Selector. By clicking on the calendar icon, you can quickly view past, present, and future booking data, making it simple to navigate through different periods and manage your reservations efficiently.
On the right, there’s a View Mode option, allowing you to switch between day, week, or month views for your convenience. By default, the calendar is set to the weekly view for optimal visibility of upcoming reservations.
On the left, there’s Room Listings where you’ll see a list of all your rooms, whether you have 5 or 50. Everything is displayed in one place for easy management.
At the top of your room list, you’ll find a toggle. Enabling it will show the Room Type next to each room number.
If a room is marked with a red dot in the room number column, it indicates that the room is dirty.
On the left side of the page, you’ll find the Filter option, which gives you multiple choices. For example, if you want to see available rooms under the Deluxe Room Category, you can easily filter and get the desired information with a just a few clicks.
Create Button [Right side of the page]:
On the right-hand of the calendar, you will find a create button. Clicking on it provides four options:
Walk-in: For creating immediate bookings.
Enquiry: For creating guest inquiries that have not yet been confirmed.
Block Room: For blocking rooms due to maintenance or other needs.
Group Booking: For handling multiple room reservations under a single booking id or group.
Reservation Blocks:
Each reservation is represented as a block [or grid] within the calendar.
The blocks are color-coded based on the status of the reservation, providing a quick visual reference:
Light Yellow: Indicates a Confirmed Reservation.
Green: Represents a reservation that has been Checked In.
Purple: Indicates a Checked-out reservation.
Grey: Represents an Enquiry, signifying that the reservation is not yet confirmed.
If you click on any reservation, a pop-up will appear on the right side of the screen displaying the Reservation Details.
Next to that, you will see multiple actions depending on the reservation you selected, offering quick access to options like Cancel booking, Lock booking, Hold booking, Modify, Check-in/out, and more.
Payments
Simplify your payment management with Stayflexi’s Payments feature. Effortlessly process payments from bookings, deposits, and additional services through a secure and integrated platform. Accept a wide range of payment methods, including credit cards, debit cards, and online wallets, giving your guests flexibility and ease. Stayflexi’s Payments feature ensures smooth transactions with automatic invoicing, payment tracking, and detailed reports. With everything in one place, you can streamline your financial processes and provide a hassle-free experience for both staff and guests.
What is Payment Automation and how does it work in Stayflexi?
Payment automation in Stayflexi helps hotels handle payments smoothly and automatically. This feature ensures that guests’ payments are collected on time, making the booking process more efficient for property owners.
Log in to Your Stayflexi Dashboard:
Enter your username and password to log in.
Go to Payments:
After logging in, click the “More Apps” icon (represented by four boxes or blocks) in the top right corner.
From the dropdown menu, select Payments
Click on the Payment Configuration option
Enable Payment Automation
What it does: When this feature is turned on, Stayflexi automates the payment collection process for all reservations. This is particularly useful for properties that allow guests to pay during check-in or via online platforms like Booking.com, Expedia, or other OTAs (Online Travel Agencies).
How it works:
The system automatically processes payments when guests make a reservation if payment automation is enabled.
If the payment fails, the system can notify the guest to update their card details.
This automation reduces cancellations and ensures that hotels receive payments promptly.
Why you should enable it: It saves you time and effort in manually managing payments and reduces the chances of cancellations due to payment failures.
How to enable: Simply toggle the switch to the “on” position to activate payment automation for your property.
Apply Payment Automation to These Channels
What it does: This setting allows you to apply payment automation to specific booking channels, such as Booking.com, Expedia, and other OTAs.
How it works:
When guests book through these channels, the system will automatically charge their card details if they have selected the “pay later” option.
If the guest’s card is invalid, the system will send an email requesting updated payment information. The room inventory will be held until the payment is successfully processed.
How to set it up: Use the dropdown menu to select the channels you want to apply payment automation.
Enable Cancellation Policy
What it does: This feature automatically applies your hotel’s cancellation policy to the booking. If enabled, it charges the guest based on the rules of your cancellation policy, such as charging upfront for non-refundable bookings or after the cancellation window for partially refundable bookings.
How it works:
For non-refundable policies, the full booking amount is charged immediately after the booking is made.
For partially refundable policies, the system will automatically handle the payment after the refundable time period for the booking is over.
Why you should enable it: Automating the cancellation policy helps avoid manual intervention and ensures guests are charged according to the booking rules.
How to enable: Toggle the switch to enable or disable the cancellation policy automation.
Convert Booking into an Enquiry when Payment Fails
What it does: This option allows you to convert a booking into an Enquiry booking if the guest’s payment fails. This holds the booking temporarily, without canceling it outright, giving the guest time to resolve their payment issues.
How it works:
If the payment doesn’t go through, the booking is changed to an Enquiry, and the room inventory is reserved for a set period.
During this time, the guest can update their payment details, and the booking will be confirmed once payment is successful.
If the guest fails to complete the payment within the expiry time, the Enquiry is canceled, and the room is released for other guests.
Why you should use it: This feature gives the guest a second chance to complete the payment and ensures that rooms aren’t lost too quickly due to temporary payment failures.
How to enable: Select “YES” to convert failed payment bookings into Enquiries, or “NO” if you want the booking to remain in confirmed status or be canceled right away.
Set Expiry for Enquiry Bookings:
What it does: This setting lets you decide how long a booking will remain in an Enquiry state before it expires. During this time, the room is held for the guest, and the payment can still be completed.
How it works:
You can set the Expiry Hours to specify how long the booking will stay as an Enquiry.
There are two Expiry Types:
From the time of booking creation: The expiry countdown starts as soon as the booking is made.
Before check-in: The expiry countdown is based on the check-in date and time.
Why you should use it: It gives flexibility on how long to hold a room for guests who haven’t completed their payments. Setting this appropriately ensures you can free up rooms for other bookings if the payment isn’t completed in time.
How to set it up: Enter the number of hours for the expiry and select whether the timer starts from the time of booking or before check-in.
Partial Payment Setting.
What it does: This feature allows you to charge a percentage of the booking amount upfront instead of the full amount.
How it works:
You can set a specific percentage (e.g., 50%, 100%) of the total booking amount to be collected at the time of booking.
For example, if you set the percentage to 50%, guests will be charged half the total amount when they book, and the remaining amount can be charged later (e.g., at check-in).
Why you should use it: This can help secure bookings with a smaller payment upfront, giving guests more flexibility while still confirming the reservation.
How to set it up: Use the slider to choose the percentage of the booking amount you wish to charge when the booking is made.
Payment automation in Stayflexi helps properties manage payments more efficiently by automating processes like payment collection, applying cancellation policies, and handling failed payments. Each of these settings provides flexibility in how payments are handled, ensuring that hotel owners can streamline operations while providing guests with a smooth booking experience.
What is the Payment Automation Dashboard and what can I monitor there?
The Payment Automation Dashboard in Stayflexi is designed to give hotel owners and managers a clear and detailed overview of their payment activities. This dashboard allows you to monitor various aspects of payments, including automated payments, manual payments, and payments by type (like cash, card, etc.). By using this dashboard, you can track how payments are processed daily, understand the volume by payment methods, and see important details related to failed or successful payments.
What Can You Monitor on the Dashboard?
Total Payments (Automated vs. Manual)
Top section: You can see the total volume of payments processed, divided between automated and manual payments. This helps you understand the extent to which payment automation is being used and how much manual intervention is needed.
Payments by Day
Top middle section: A graph shows the volume of payments for each day of the month, giving you insights into daily payment trends. This can help you spot patterns, such as when guests tend to make more payments (e.g., weekends vs. weekdays).
Payment by Type
Top right graph: This section breaks down payments by different methods—cash, card, bank transfers, and online payments. You can easily see which payment methods are most popular among guests.
Manual vs. Automated Payments
Middle section: This chart distinguishes between payments that are handled automatically (through booking engines or payment processors) and those handled manually. It shows the total revenue from each method.
Gateway Payments by Day
Bottom right graph: This shows payments that went through various gateways (such as Stripe, Razorpay, etc.) over specific days. It helps you track gateway performance and identify any issues related to specific payment providers.
Table for payments, refunds, transfers, and reversals (Detailed View)
Bottom section: This table shows a detailed list of individual transactions, including date, amount booking ID, guest name, payment type, gateway name, payment gateway ID, and source of payment.
Step-by-Step Explanation:
Log in to Your Stayflexi Dashboard:
Enter your username and password to log in.
Go to Dashboard:
After logging in, click the “More Apps” icon (represented by four boxes or blocks) in the top right corner.
From the dropdown menu, select Payments(as shown in Image 1).
You will see the Dashboard option with various graphs and data tables.
Review Total Payments (as shown in Image 2):
At the top of the dashboard, you’ll see the total payments processed today. This includes both automated and manual payments, so you can quickly gauge how much revenue has been collected.
Check Payments by Day(as shown in Image 3):
Look at the “Payments by Day” graph to understand payment trends over the month. The taller bars indicate days with higher payment volumes.
This helps you predict busier times or peak days for payments.
Analyze Payments by Type(as shown in Image 3):
The “Payments by Type” graph gives you a breakdown of the payment methods used (cash, card, etc.). This is useful for understanding guest preferences and ensuring your payment methods are adequately supported.
Compare Automated vs. Manual Payments(as shown in Image 4):
Check the graph that compares manual and automated payments. If you notice that manual payments are higher, you might want to adjust your settings to enable more automation.
View Gateway Payments by Day(as shown in Image 4):
The “Gateway Payments by Day” chart tracks the payments processed through payment gateways like Stripe and Razorpay. This shows which payment providers are being used most often and allows you to monitor gateway-specific trends.
Monitor Individual Transactions(as shown in Images 5 and 6):
At the bottom, you will see a table with details of each payment, refunds, transfers, and reversal. Use this table to:
Confirm amounts.
Check the booking IDs
Payment gateway IDs etc.
The Payment Automation Dashboard gives you a clear and comprehensive overview of how payments are being processed for your hotel. By monitoring this dashboard, you can ensure smooth operations, identify any issues quickly, and make informed decisions to improve your payment processes.
How do I configure Payment Automation in Stayflexi?
Below is the step-by-step guide to configuring payment automation in Staflexi:
Login to Stayflexi Dashboard:
Start by logging into your Stayflexi account using your credentials.
Go to Payment Configuration:
After logging in, click the “More Apps” icon (represented by four boxes or blocks) in the top right corner.
From the dropdown menu, select Payments
On the Payment page, click the Payment Configuration option
Enable Payment Automation
Toggle the switch next to the Enable Payment Automation section to activate this feature.
What it does: This enables automatic payment collection from guests at the time of booking or during check-in, depending on the OTA (Online Travel Agent) or the type of payment selected.
Benefit: Streamlines the payment process and reduces the chances of failed payments going unnoticed.
Choose Channels for Payment Automation
In the Apply Payment Automation to These Channels section, select the OTAs (e.g., Booking.com, Expedia) where you want payment automation enabled.
Use the dropdown menu to choose one or multiple channels.
What it does: Ensures that for the selected channels, the system automatically attempts to charge the guest’s credit card at the time of booking or check-in.
Benefit: You can control which channels are enabled for automated payment, providing flexibility in handling different OTA payment rules.
Enable or Disable the Cancellation Policy
Toggle the switch next to Enable Cancellation Policy.
What it does: When this feature is enabled, the system automatically charges the guest for non-refundable bookings right after the booking is confirmed. For partially refundable bookings, payments are processed after the refundable period expires.
Benefit: Automates cancellation charges, ensuring properties comply with their cancellation policies without manual involvement.
Configure Failed Payment Handling:
In the section labelled Convert Booking into an Enquiry When Payment Fails, you can decide what happens when a guest’s payment fails.
Select “YES”: If you want the booking to be converted into an enquiry, which will hold the room inventory for a certain period (defined by expiry hours) while waiting for the guest to make a successful payment.
Select “NO”: If you want the booking to remain confirmed even if the payment fails, keep the room inventory locked for the guest.
What it does: Helps you manage failed payments by either downgrading the booking to an enquiry (with time limits) or keeping it confirmed, giving flexibility to your booking management process.
Benefit: Avoids the risk of overbooking and allows you to retain control over room inventory in case of payment failures.
Set Expiry Time for Enquiry Bookings (Optional):
If you’ve opted to convert failed payments into enquiries, you’ll need to set the expiry time for the enquiry.
In the Expiry Hours field, specify how long (in hours) you want to hold the booking as an enquiry before releasing the inventory.
In the Expiry Type dropdown, choose the reference point (e.g., from the time of enquiry) for calculating expiry.
What it does: Ensures that room inventory isn’t held indefinitely, releasing it if the guest does not make the payment within the set time.
Benefit: Ensures rooms are available to other potential guests if payments aren’t completed within a reasonable time frame.
Save Your Settings(as shown in Image 4):
After configuring all the options, make sure to Save the settings to apply the changes to your property’s payment automation system.
Benefit: Your property will now automatically handle payments and cancellation policies based on the rules you’ve set, helping you manage bookings and payments more efficiently.
What happens if the payment fails due to an invalid guest card?
If a guest’s payment fails due to an invalid credit card, Stayflexi offers automated processes to handle the situation. Follow this step-by-step breakdown of what happens next and how the system manages the failed payment.
System Tries to Process Payment(refer the above given Image):
When a guest makes a booking, Stayflexi’s payment automation system attempts to charge the credit card provided by the guest during the booking process (either at the time of booking or during check-in depending on the channel and configuration).
Payment Failure:
If the guest’s credit card details are invalid or the payment is declined, the system automatically detects the failure.
Email Notification to Guest (refer the above given Image):
The system sends an automated email to the guest informing them that their payment could not be processed.
The email will contain a request for updated card information, urging the guest to provide new, valid payment details.
Benefit: This ensures that the guest is promptly informed and allowed to resolve the issue without delay.
Booking Converted to Enquiry (refer the above given Image):
If you have enabled the Convert Booking into an Enquiry When Payment Fails option, the booking will be converted into an enquiry status.
What does this mean?: An enquiry status means that the room is held in the system, but the booking is not confirmed until the payment is completed.
The room inventory will be reserved for a specific period (defined by expiry hours) to give the guest time to resolve their payment issue.
Example: If you have set the enquiry expiry to 24 hours, the guest has 24 hours to update their card information before the room is released for other bookings.
Expiry Hours for Enquiry Bookings(refer the above given Image):
You can configure the expiry hours for the enquiry under the Set Expiry for Enquiry Bookings section.
After the defined expiry time (e.g., 24 hours), if the guest does not provide updated payment information, the room will be automatically released back into inventory, making it available for other guests to book.
Benefit: This ensures that rooms aren’t blocked indefinitely by bookings with failed payments, allowing the property to maximize room availability.
Booking Remains Confirmed (refer the above given Image):
If the Convert Booking into Enquiry option is disabled, the booking will remain confirmed even if the payment fails.
The system will continue to hold the room for the guest, but the payment will still need to be resolved before check-in.
Benefit: This gives flexibility in managing bookings for important guests, and keeping their reservations confirmed while they work on resolving payment issues.
By the above options, if a guest’s payment fails due to an invalid credit card in Stayflexi, the system will:
Automatically send an email to the guest requesting updated card details.
Convert the booking into an enquiry (if configured), holding the room for a specific period.
Allow you to set an expiry time for enquiry bookings, releasing the room if no payment is made within the time frame.
Keep the booking confirmed (if you choose not to convert it to an enquiry), allowing the guest time to resolve the payment issue.
This automation ensures that failed payments are handled efficiently while protecting your property’s inventory from being blocked by unconfirmed bookings.
How is the guest’s card charged? Is it based on the cancellation policy set in Stayflexi?
Yes, the guest’s card is charged based on the cancellation policy that you have configured in Stayflexi. The system automates the payment process, taking into account the specific terms of your cancellation policy, which determines how and when the guest is charged. Below is a step-by-step explanation of how the guest’s card is charged and how the cancellation policy influences this process.
Set Up Cancellation Policy:
In Stayflexi, you can set up different cancellation policies (e.g., non-refundable, partially refundable) for your property through Property configuration.
Non-refundable policy: The entire booking amount will be charged upfront after the booking is confirmed.
Partially refundable policy: The system will process the payment based on the refundable time period you have set.
Example:
Non-refundable: Guests are charged immediately and cannot get a refund if they cancel.
Refundable up to 48 hours before check-in: Guests are charged after the refundable period expires (48 hours before check-in).
Guest Makes a Booking:
When the guest makes a booking through your property, Stayflexi’s system attempts to charge the guest’s card according to the payment automation settings and the specific cancellation policy applied to the booking.
Charging the Guest’s Card Based on Cancellation Policy
Depending on the cancellation policy configured:
For Non-Refundable Policies:
The system will automatically charge the full amount immediately after booking confirmation.
Since the booking is non-refundable, the guest won’t be able to cancel for a refund.
This helps ensure that you secure payment for the room regardless of any cancellation requests from the guest.
For Partially or Fully Refundable Policies:
If you have set a refundable window (e.g., cancel within 48 hours before check-in), the system does not charge the guest’s card immediately.
Instead, the card will be charged after the refundable window expires.
For example, if the guest cancels within the allowable window, they won’t be charged, but if they cancel after the window, the card will be charged as per the policy.
Example:
If the cancellation policy allows free cancellation up to 48 hours before check-in, the system will automatically charge the guest’s card 48 hours before the check-in time.
If the guest cancels before that time, no charge is made.
Handling Failed Charges:
In cases where the guest’s card is invalid or the payment fails, Stayflexi’s automated email system will notify the guest and request updated card information.
If the payment cannot be processed, the booking can be converted to an Enquiry booking (based on your configuration), and the room inventory will be held for a specific period until the issue is resolved.
After Cancellation Window Expires:
If the guest’s booking falls under a refundable policy and the cancellation window expires without cancellation, the system will automatically charge the guest’s card according to the policy.
If you enable Payment Automation, this entire process happens automatically without manual intervention.
Tracking Charges:
All charges (whether automated or manual) can be tracked and reviewed in Stayflexi’s dashboard, allowing property managers to monitor payments for each booking.
Does Stayflexi offer the option to charge a booking partially or in full?
Yes, Stayflexi allows properties to charge a booking either partially or in full, depending on how you configure the payment and cancellation policies. The system offers flexibility to property owners, enabling automated payment handling based on your preferences. Below is a step-by-step explanation of how you can configure partial or full charges for a booking in Stayflexi.
Log in to Your Stayflexi Dashboard:
Enter your username and password to log in.
Go to Payments
After logging in, click the “More Apps” icon (represented by four boxes or blocks) in the top right corner.
From the dropdown menu, select Payments
Click on the Payment Configuration option.
Navigate to Payment Automation Configuration:
In the Payment Configuration page, you should see the following options Enable Payment Automation, Apply Payment Automation to These Channels, and Enable Cancellation Policy.
Enable Payment Automation
Toggle the switch to Enable Payment Automation.
This ensures that the system will handle payments automatically without manual intervention.
Once enabled, the system will automatically charge guests based on the rules you define, whether partially or fully.
Choose the Payment Automation Channels:
In the Apply Payment Automation to These Channels section, you can select which online channels will apply these automation rules (e.g., Booking.com, Expedia).
If the channel supports partial payment, you can apply the settings to that channel, ensuring seamless payment processing for bookings coming from different platforms.
Configure Partial or Full Charges:
Full Charge Setup (For Non-Refundable Bookings)
If you want to charge the guest the full amount immediately:
Ensure that your Cancellation Policy is set to non-refundable (this usually indicates the booking is fully charged at the time of booking).
You can configure this under the Enable Cancellation Policy toggle. Turn it on, and set the full charge as the default for non-refundable bookings.
Once the booking is confirmed, the guest’s card will be charged for the entire amount, guaranteeing full payment upfront.
Partial Charge Setup (For Refundable Bookings):
If you want to charge only a portion of the booking amount upfront:
Set the Cancellation Policy to allow for refundable bookings.
In the Payment Settings, configure the system to charge a partial deposit. This could be a percentage of the total (e.g., 20% upfront).
Under the payment rules, set the remaining balance to be charged closer to the check-in date.
Set Triggers for Payments:
You can configure specific triggers for payments:
Full charge at the time of booking for non-refundable reservations.Partial charge (e.g., a deposit) when the booking is made, and set the system to collect the remaining amount before check-in or when the refundable window closes.
Monitor and Track Payments:
In the dashboard, you can track the status of payments, whether they were charged partially or in full.
If the guest’s card fails or if a partial payment is pending, Stayflexi will display this information, allowing you to follow up if necessary.
Handling Failed Payments:
If a payment fails (e.g., invalid card details), Stayflexi will automatically notify the guest and prompt them to update their card information.
Depending on your policy, the booking can be converted to an Enquiry, and the room will be held for a set number of hours until the guest resolves the payment issue.
Save Your Configuration:
After setting all payment policies (whether full or partial), make sure to save your settings.
The system will then automatically apply these rules to all future bookings that meet the criteria.
Property Configuration
Easily customize your property’s setup with Stayflexi’s Property Configuration feature. From room configurations to pricing and policies, this feature gives you full control over how your property operates. Adjust settings, manage amenities, and define special rules to match your specific needs, all from one centralized platform. Stayflexi’s Property Configuration simplifies the setup process, ensuring your property’s details are accurate and aligned with your operational goals, with complete control at your fingertips.
In Stayflexi, Property Configuration is a module that enables hotel administrators to set up and manage various operational and customizable aspects of their property within the Stayflexi system.
To access and manage your Property Configuration settings:
Log in to Stayflexi Start by logging into your Stayflexi dashboard with your admin credentials.
Go to More Apps On the right-hand side (RHS) of your dashboard, click on “More Apps.”
Open Property Configuration From the list of available modules that appears, select “Property Configuration.” This will take you to the section where you can manage key setup elements such as rooms, rates, channels, taxes, fees, policies, meal plans, and more.
On the LHS, you will see several categories. Each category contains multiple configuration options — simply click the dropdown arrow to expand and view all available settings.
1. Property Setup
Under Property Setup, you can manage all essential configurations related to your property. This includes:
Property Details – Update general information such as name, address, contact details, and branding.
Rate Plans – Create or edit rate plans, meal plans, and associated pricing.
Folio Setup – Configure how charges, payments, and folios are structured.
Shift Setup – Manage shift timings for your staff or front desk operations.
Hotel Add-ons – Add or modify extra services such as breakfast, pickup/drop, amenities, etc.
Hourly Price Configuration – Set pricing for hourly stays (if applicable).
Flexible Slot Settings – Configure flexible check-in/check-out slots used for day-use or short stays.
Other Settings – Manage additional property-level preferences and operational rules.
POS Device Configuration – Set up your POS devices for billing and room posting.
2. Policies
Under the Policies category, you can configure all rules related to cancellations, modifications, and overall hotel guidelines. This includes:
Cancellation Policies Define how cancellations are handled, including charges, deadlines, and refund rules.
Amendment Policies Set rules for booking modifications such as date changes, room changes, or guest information updates.
Hotel Policies (Terms & Conditions) Add or update the general hotel rules, guest guidelines, check-in/check-out terms, smoking policies, pet policies, and other terms & conditions.
3. Tax and Fee Categories
In this section, you can configure all tax- and fee-related settings applicable to your property or group of properties:
Tax Categories Set up standard tax configurations, including GST, service tax, occupancy tax, or any government-mandated tax.
Group Tax Categories Create and manage tax templates that can be applied across multiple properties within your group.
Custom Tax Categories Add any additional or property-specific taxes that do not fall under standard categories.
Fee Categories Configure various fee types such as service fees, cleaning fees, resort fees, or any other predefined charges.
Group Fee Categories Create fee structures that can be applied at the group level for consistent configuration across all properties.
4. Notifications
Under the Notifications category, you can configure automated communication settings for both guests and hotel staff:
Guest Notifications Set up emails, SMS, or WhatsApp messages sent to guests — including booking confirmations, pre-arrival messages, check-in/out notifications, invoices, and more.
Hotelier Notifications Configure alerts and updates for your internal team, such as new bookings, cancellations, modifications, payment alerts, or housekeeping updates.
Guest Review Manage and customize automated review requests sent to guests after their stay, helping you collect valuable feedback and improve service quality.
5. Channel Manager
The Channel Manager section allows you to connect and manage all your online distribution channels seamlessly:
Channel Mapping Map your room types, rates, and inventory with OTAs (such as Booking.com, Expedia, Airbnb, Agoda, etc.) to ensure real-time sync across all platforms.
Rentals United If you use Rentals United as your distribution hub, you can configure and manage the integration here for automated channel updates.
Custom Booking Sources Create and manage additional booking sources such as corporate accounts, travel agents, direct offline bookings, or any custom-defined channel.
6. Booking Engine
The Booking Engine section allows you to customize and manage how your property or group appears and functions on your direct booking website.
Hotel Configuration Set up property-specific booking engine settings, including room visibility, images, amenities, policies, booking restrictions, promotions, and payment options.
Group Configuration Manage booking engine settings at the group level — allowing you to configure branding, group-wide policies, promotions, and centralized setup for all properties under the group.
7. Magic Link & Kiosk
This section allows you to configure your contactless check-in experience and streamline guest arrival processes.
Configuration Manage overall Magic Link and Kiosk settings, including check-in flow, required guest details, ID upload settings, payment requirements, and customized guest instructions.
Common Area Lock Codes Add or manage lock codes for shared spaces such as entrances, lounges, gyms, or co-living areas. These can be automatically shared with guests through the Magic Link.
Room-Wise Check-In Instructions Set specific instructions for each room — such as door lock codes, access guidelines, special directions, or any room-specific arrival notes. These appear in the guest’s Magic Link at check-in time.
8. Users & Access Controls
This section helps you manage who can access the system and what level of permissions they have.
Roles and Access Create and configure different user roles (e.g., Front Desk, Housekeeping, Manager). Define permissions for each role to control what they can view, edit, or manage within the system.
Users Add new users such as staff, managers, or admins. Assign roles, set login credentials, and manage their access settings.
Active Users View all currently active users in the system. Monitor login activity, track user sessions, and manage access when needed.
9. Booking Import
The Booking Import section allows you to seamlessly upload and sync past or existing reservations into Stayflexi.
How can I show actual check-in and check-out times on invoices?
Below is the step-by-step guide to show actual check-in and check-out times on invoices:
Log in to Your Stayflexi Dashboard:
Enter your username and password to log in.
Go to Property configuration:
After logging in, click the “More Apps” icon (represented by four boxes or blocks) in the top right corner.
From the dropdown menu, select Property Configuration.
On the left-hand side of the Property Configuration page, you will see various options.
Click on the Property setup dropdown icon :
A list of different options will be displayed in the dropdown, including:
Property details
Folio setup
Shift setup
Hotel addons
Hourly price config
Flexible slot
Other settings
Click on the Folio setup option
The Folio configuration page will be displayed.
Setting up actual check-in and check-out times on invoices:
In the Folio setup page, scroll to the below option:
Show Actual Check-in and Checkout:
Enable the toggle.
Once enabled, the system will automatically include the guest’s real check-in and check-out times on all generated invoices and folios.
By this, you can show the actual check-in and check-out times on the invoices.
How do I configure room dependency pricing?
Below is the step-by-step guide to configuring room dependency pricing in Property Configuration:
Logging into Your Stayflexi Dashboard
Enter your username and password to access your Stayflexi dashboard.
Accessing Property Configuration
After logging in, click on the More Apps icon (shown as four blocks) located in the top-right corner.
From the dropdown, select Property Configuration.
Navigating to Property Setup
On the left side of the Property Configuration page, you’ll see a menu with various options.
Click on the Property Setup dropdown to reveal additional options, including:
Property Details
Folio Setup
Shift Setup
Hotel Addons
Hourly Price Config
Flexible Slot
Other Settings
Select Property Details
Setting Up Room Dependency Pricing
On the Property Details page, locate the Manage Room Types section, where all room types are listed.
For each room type, click the three-dot menu to view options such as:
Edit Amenities
Edit Room
Select Edit Room to access the room’s details.
A section to edit room details will appear. Scroll down to the Derived Pricing – Room Category section:
Choose a Parent Room from the dropdown to set the base room for dependency pricing.
In the Dependency dropdown, select Yes to enable pricing dependence on the selected parent room.
In the Direction dropdown, specify whether to increase (+) or decrease (-) the price based on the parent room.
Enter a Value for the price adjustment.
Choose the Type of adjustment [percentage (%) or INR].
Click Save to apply your changes.
By this, you can configure the room dependency pricing.
Where can I configure all notifications sent to guests?
Below are the step-by-step guidelines to configure notifications sent to guests from Property Configuration:
Logging into Your Stayflexi Dashboard:
Enter your username and password to log in.
Go to Property Configuration:
Once logged in, click on the More Apps icon (represented by four blocks) in the top right corner.
From the dropdown menu, select Property Configuration.
Got to Notifications:
You’ll see various options on the left side of the Property Configuration page.
Click on the Notifications dropdown to reveal more options, including:
Guest notifications
Hotelier notifications.
Guest review
Click on the Guest notifications option.
Guest notifications:
In the Guest notifications page, you can control email and WhatsApp notifications sent to guests.
Email notifications:
It includes the following options and the Enable disable switch next to each option:
Notification when a booking is made
Notification when a booking check-in happens
Notification when a booking checkout happens
Notification when a booking cancellation happens
Notification when a booking modification happens
Notification when an online payment for a booking happens
Notification when a payment for a booking happens via a generated payment link
Notification when a Flex Collect payment fails
Notification when a Self Service check-in happens
Notification when a Self Service checkout happens
Notification when a Self Service early check-in/late checkout happens
Notification when a POS order is finished
Notification when a self-service POS order is created
Notification when an OTA booking is made
Direct Notification to Customers on check-in/Checkout for OTA Booking.
You can enable or disable any options by clicking ON an OFF switch next to each option.
WhatsApp notifications:
It includes the following options and the Enable disable switch next to each option:
Booking Confirmation
Self Checkin Notification
Early Checkin Notification
Late Checkout Notification.
You can enable or disable any options by clicking ON an OFF switch next to each option.
Save the configuration:
By clicking on the Save option, you can save the changes you have configured.
How to Create Users ?
To Create Users, follow the below mentioned steps:
Log in to your Stayflexi account using your credentials.
Click on the Four Grid (Apps) icon on the top right-hand side.
Select Property Configuration from the menu.
On the left-hand side panel, click on Access & Control.
From the dropdown options, select Users (second option).
On the Users page, click Add New User.
Enter the required details of the new user (name, email, contact information, etc.).
Assign the appropriate Roles & Access permissions.
Click Save to confirm.
Can I bulk upload bookings from another PMS into Stayflexi? What are the requirements?
Yes, You can bulk upload bookings from another PMS into Stayflexi by following the below-given steps:
Log into Your Stayflexi Dashboard:
Enter your username and password to sign in.
Navigate to Property Configuration:
Once logged in, click on the “More Apps” icon (four small blocks) in the top-right corner.
Select “Property Configuration” from the dropdown menu.
Go to Booking Imports:
In the left-hand menu, click on “Booking imports.”
This will take you to the page for uploading bookings in bulk.
Download and Fill Out the Template:
Click on the “Download template” button to get the file needed for bulk uploading.
Open the template and add all booking details in the format provided.
Upload Your Booking Data:
Once you’ve filled out the template, go back to the booking imports page.
Click on “Bulk import bookings” and follow the instructions that appear in the pop-up window.
Set the date format as needed, then click “Bulk upload booking.”
Finally, upload your completed file.
Your bookings will now be imported into Stayflexi!
This functionality allows you to seamlessly migrate your bookings to Stayflexi in manageable batches. Here is how it works: Import in Batches: You can upload reservations in batches of 500 bookings at a time. This allows for easier management and processing of large datasets. please be aware that uploading the same booking data twice will result in the bookings being marked as unassigned. This can cause confusion and issues.
What are custom booking sources, how can I create them, and how are they useful?
Custom booking sources allow property managers to define and track specific booking channels that aren’t part of the standard, integrated sources. For example, instead of only capturing bookings from well-known Online Travel Agencies (OTAs) or direct website bookings, custom booking sources let you track referrals from unique sources like local agencies, social media campaigns, corporate partnerships, or other specific sources.
Logging into Your Stayflexi Dashboard:
Enter your username and password to log in.
Go to Property Configuration:
Once logged in, click on the More Apps icon (represented by four blocks) in the top right corner.
From the dropdown menu, select Property Configuration.
Go to the Custom Booking sources:
Navigate to the “Channel Manager” section in the left-hand menu.
Select “Custom booking sources”.
Add a New Source:
On the Custom Booking Sources page, click on Add New Source. This will open a pop-up form for adding a new source.
Enter Source Details:
Segment: Select the category or segment that best represents your source, such as OTA if it’s an Online Travel Agency.
Sub-source: Select or type the name of the specific source within the chosen segment. This could be the name of a referral agency, a corporate client, or another unique channel.
Save the New Booking Source :
Click Save to add this source to your list of custom booking sources.
If you change your mind, you can click Cancel to exit without saving.
How Custom Booking Sources Are Useful:
Track and analyze revenue more accurately by understanding where your bookings are coming from. Once custom booking sources are created, you can select them when creating a reservation in Stayflexi PMS.
By following these steps, you can define and organize new booking sources that will make your revenue analysis more detailed and meaningful.
Uploading Room/Hotel Images: How can a property upload images of rooms and hotel facilities for the website?
Below are the step-by-step guidelines to upload images of rooms and hotel facilities for the website from Property Configuration:
Log in to Your Stayflexi Dashboard:
Enter your username and password to log in.
Go to Property configuration:
After logging in, click the “More Apps” icon (represented by four boxes or blocks) in the top right corner.
From the dropdown menu, select Property Configuration.
On the left-hand side of the Property Configuration page, you will see various options.
Click on the Property setup dropdown icon:
A list of different options will be displayed in the dropdown, including:
Property details
Folio setup
Shift setup
Hotel addons
Hourly price config
Flexible slot
Other settings
Click on the Property details option.
A page with all the details of the property and the details of room categories will be displayed.
Upload Hotel Images:
Once the Property Details page is displayed, you can see the Images at the beginning of the page.
Click the Edit icon on the first Image.
A pop-up will appear to upload the hotel image.
Select the Click or Drop here option.
Select the Images from your system and add them here or you can just drag and drop the Images.
Click on the Save option to save the Hotel Images.
You can also remove the Images by clicking on the cross option on the Image.
Upload Room Images:
On the Property Details page, find the Manage Room Types section, where all room types are listed.
On room type, click the edit icon on the left-hand side of the room type.
A pop-up will appear to upload Room-type images.
Select the Click or Drop here option.
Select the Images from your system and add them here or you can just drag and drop the Images.
Click on the Save option to save the Room Images.
You can also remove the Images by clicking on the cross option on the Image.
How to change the Room Type name ?
Steps to change the room name:
Log in to your Stayflexi dashboard.
Click on More Apps (represented by the four-block icon) and select Property Configuration.
Navigate to Property setup.
Scroll down to the Manage room type section.
On the required room type, click on the three dots (⋮) to view more options.
Click on Edit room.
In the first column, update the Room Name as required.
Click Save to apply the changes.
How do I update hotel details like website URL, address, description, logo, or phone number?
Below are the step-by-step guidelines to update hotel details like website URL, address, description, logo, or phone number from Property Configuration:
Log in to Your Stayflexi Dashboard:
Enter your username and password to log in.
Go to Property configuration:
After logging in, click the “More Apps” icon (represented by four boxes or blocks) in the top right corner.
From the dropdown menu, select Property Configuration.
On the left-hand side of the Property Configuration page, you will see various options.
Click on the Property setup dropdown icon :
A list of different options will be displayed in the dropdown, including:
Property details
Folio setup
Shift setup
Hotel addons
Hourly price config
Flexible slot
Other settings
Click on the Property details option.
A page with all the details of the property and the details of room categories will be displayed.
Update or Edit Hotel Details:
In the Property details page, click on the Edit details option just above the property name.
All the Hotel details are displayed in the Edit Hotel Details section.
In this section, you can edit or update the details of the property/hotel, including:
Property Name
Property Official Website (for updating website URL)
Address
Property Description
Logo
Phone number
Total room count
By clicking on any of the textboxes, you can edit or update the Property details and click on the Save button to save the changes made.
Setting Room Occupancy: How do I define maximum occupancy, including adults, children, and infants, along with age limits for rooms?
Below are the step-by-step guidelines for setting room occupancy:
Logging into Your Stayflexi Dashboard:
Enter your username and password to log in.
Go to Property Configuration:
Once logged in, click on the More Apps icon (represented by four blocks) in the top right corner.
From the dropdown menu, select Property Configuration.
Navigating Property Setup:
On the left side of the Property Configuration page, you’ll see various options.
Click on the Property Setup dropdown to reveal more options, including:
Property Details
Folio Setup
Shift Setup
Hotel Addons
Hourly Price Config
Flexible Slot
Other Settings
Click on the Property Setup option.
Setting up room occupancy:
On the Property Details page, find the Manage Room Types section, where all room types are listed.
On room type, click the three-dot menu on the room type to display the following options:
Edit Amenities
Edit Room
Select Edit Room to see room details.
A section to edit room details appears, where you can see various options:
To set room occupancy for maximum occupancy, including adults, children, and infants, along with age limits, do the following:
To set max room occupancy: Click on the Room max occupancy field.
For adults: Click on the Max adults field.
For children: Click on Max children(7-12 years) field
For infant: Click on the Max infant (0-6 years) field
For minimum and maximum child age: Click on the Min child age and Max child age field
For minimum and maximum infant age: Click on the Min child age and Max infant age field
After setting up everything, click on the Save button to save all the defined occupancy.
By following these steps you can define room occupancy.
What is folio configuration, and what can I do with it?
Folio Configuration is the settings area in your PMS where you control how guest folios, invoices, registration cards, and related financial documents are displayed, formatted, and generated. It lets you customize the layout, content, numbering, and rules used across all billing documents in your property.
Folio Configuration is organized into the following sections: 1. Display & Content 2. PDF & Print Settings 3. Registration Card 4. Other Settings 5. Custom Folio Sequencing
To access and manage your Property Configuration settings:
Log in to Stayflexi Start by logging into your Stayflexi dashboard with your admin credentials.
Go to More Apps On the right-hand side (RHS) of your dashboard, click on “More Apps.”
Open Property Configuration From the list of available modules that appears, select “Property Configuration.” This will take you to the section where you can manage key setup elements such as rooms, rates, channels, taxes, fees, policies, meal plans, and more.
Display Content Settings (Folio Configuration)
Below are all the options available under Display Content and what each one does:
Show Cancellation Policy in Folio (Toggle) Enable this to display the property’s cancellation policy on guest invoices and folios.
Show Signature (Toggle) Enables a section on the folio for guest or staff signatures, useful for check-in confirmations or billing approval.
Folio Log (Toggle) Shows a chronological log of folio activities such as added charges, edits, payments, and adjustments.
Folio Terms and Conditions (Toggle) Displays your property’s terms & conditions on the folio for guest acknowledgment.
Folio Display Phone Number (Field) Enter the phone number you want displayed on the folio (property contact number).
Folio Display Email (Field) Enter the email address that should appear on the folio for guest communication or support.
Booking Folio Header (Field) Customize the header text displayed on top of the folio (e.g., “Tax Invoice,” “Guest Folio,” “Billing Summary”).
Hide Stayflexi Booking ID (Toggle) Enable this if you don’t want the Stayflexi-generated booking ID to appear on the folio.
Hide Room Booking Charges on Registration Card for OTA Bookings (Toggle) Hides nightly room rates on the registration card when the reservation comes from OTAs like Booking.com, Agoda, etc.
Show Terms on Guest Emails (Toggle) When enabled, the system includes your terms and conditions in all automated guest emails.
Show Actual Check-in and Checkout (Toggle) Displays the guest’s actual check-in and check-out timestamps on generated invoices and folios.
PDF & Print Settings (Folio Configuration)
Below are the available options under PDF & Print Settings and what each one controls:
Choose the Logo Size Select the size of the property logo that appears on the folio/invoice PDF.
Choose the Invoice PDF Font Size Set the default font size for text on all invoice PDFs. (Helps ensure the document is easy to read and fits properly on a page.)
Choose the Margin Top Adjust the top margin of the invoice PDF. (Useful when printing on pre-formatted paper or aligning content under the logo.)
Invoice Date Rule Choose how the invoice date should be generated—such as booking date, check-out date, or actual invoice creation date. (Ensures consistency with your accounting or audit processes.)
Folio PDF Layout Select the layout/template for the folio PDF.
Registration Card Settings
Show Room Tariff on Registration Card (Toggle) Displays the nightly room rate on the registration card.
Enable to show the tariff to guests at check-in.
Disable if you prefer not to reveal pricing (especially for OTA bookings).
Registration Card Preference (Dropdown / Setting) Choose the preferred format or template for registration cards.
Show Registration Card Number (Toggle) Displays a unique registration card number on the document. (Helpful for record keeping, audits, or internal tracking.)
Show Cancellation Policy on Registration Card (Toggle) Includes the property’s cancellation policy directly on the registration card. (Ensures guests acknowledge policy terms during check-in.)
Show Terms & Conditions on Registration Card (Toggle) Adds your terms & conditions section to the registration card. (Useful for legal compliance and guest consent.)
Choose the Registration Card PDF Font Size (Field / Selector) Set the preferred font size for the PDF version of the registration card. (Helps improve readability or fit more content on a single page.)
Other Settings
Show HSN Code (Toggle) When enabled, the HSN/SAC code will be displayed on the invoice/folio for applicable taxable items.
High Balance Alert Configuration Set the threshold amount at which the system should trigger a high-balance alert for a reservation. (Helps front-office staff monitor outstanding balances and avoid checkout delays.)
Folio Footer Configuration Add or customize the footer text that appears at the bottom of all folios and invoices. (Commonly used for disclaimers, bank details, thank-you notes, or legal statements.)
Custom Folio Sequencing Configure how folio numbers are generated — set custom prefixes, formats, or numbering rules. (Useful for aligning invoice numbering with accounting standards or property-specific workflows.)
Custom Folio Sequencing
Booking Folio Prefix Enter a custom prefix that will appear before every folio number.
Booking Folio Sequence Start Set the starting number for the folio sequence. (Example: starting from 1, 1000, or any preferred number.)
Booking Folio Suffix Add a suffix that will appear at the end of each folio number. (Example: -A, -STAY, -NY.)
Generate Custom ID for Cancelled and No-Show Bookings (Toggle) Enable this to assign a separate custom folio ID format for bookings that are cancelled or marked as no-show.
After making any changes in the Folio Configuration section, click the Save button on the right-hand side to ensure all updates are applied and stored.
How do I set up property tax, custom tax, and fee categories?
Tax categories: A Tax category can be used to calculate and apply tax in a variety of places. For example, defining tax for a room type, tax for an item being added to an invoice or tax for products in a shop.
Custom tax categories: A Custom tax property is used to define and configure specific tax rules for their property.
Fee categories: A Fee category can be used to calculate and apply fees in a variety of places. For example, defining fee for a room type, fee for an item being added to an invoice, or fee for products in a shop.
Below are the step-by-step guidelines for amenities both at the property and room level from Property configuration:
Logging into Your Stayflexi Dashboard:
Enter your username and password to log in.
Go to Property Configuration:
Once logged in, click on the More Apps icon (represented by four blocks) in the top right corner.
From the dropdown menu, select Property Configuration.
Navigating Tax and fee categories:
On the left side of the Property Configuration page, you’ll see various options.
Click on the Tax and fee categories dropdown to reveal more options, including:
Tax categories
Group tax categories
Custom tax categories
Fee categories
Group fee categories
Create Tax category:
Click on the Tax Categoriesoption from the Tax and Fee Categories dropdown.
Click on the Add New Tax Category button at the top of the Tax Categories page.
Tax category section will appear:
Enter the Tax name and Tax percentage.
Click on the Save button to save the Tax category.
Create Custom tax category:
Click on the Custom Tax Categories option from the Tax and Fee Categoriesdropdown.
Click on the Add New Custom tax button at the top of the Custom tax Categories page
Create custom taxes based on various factors such as:
Tax Name: The name of the custom tax (e.g., service tax).
Tax Value: The percentage or fixed amount for the tax.
Room Type: The types of rooms or accommodations the tax applies to.
Per Person/Per Night: Option to apply the tax on a per-person or per-night basis.
OTA, Booking Engine, Walk-in: The ability to specify whether the tax applies to bookings from Online Travel Agencies (OTAs), the booking engine, or walk-in customers.
Click on the Save button to save the Custom tax category.
Create Fee category :
Click on the Fee Categories option from the Tax and Fee Categories dropdown.
Click on the Add New Fee Category button at the top of the Fee Categories page.
The fee category section will appear:
Enter:
Fee category name
Fee value
Value type dropdown which consists of:
ABSOLUTE
PERCENT
Fee type dropdown which consists of:
Per Booking
Per Room
Per Room Night
You can select the checkbox next to Apply for walk-ins section if required.
Click the Save button to save the Fee category.
Managing Property and Room Amenities: How do I control amenities at both the property and room level?
Below are the step-by-step guidelines to amenities both at the property and room level from Property Configuration:
Logging into Your Stayflexi Dashboard:
Enter your username and password to log in.
Go to Property Configuration:
Once logged in, click on the More Apps icon (represented by four blocks) in the top right corner.
From the dropdown menu, select Property Configuration.
Navigating Property Setup:
On the left side of the Property Configuration page, you’ll see various options.
Click on the Property Setup dropdown to reveal more options, including:
Property Details
Folio Setup
Shift Setup
Hotel Addons
Hourly Price Config
Flexible Slot
Other Settings
Viewing and Editing Property Details:
Select Property Details (the first option on the left).
A page will open showing all your property information, including room categories.
Managing Property Amenities:
On the Property Details page, look to the right side for the Amenities section.
Click the icon next to Amenities.
A list of all available property-level amenities will appear.
You can:
Add or remove amenities.
Mark amenities as free or paid by using the buttons next to each amenity.
Managing Room Amenities:
On the Property Details page, find the Manage Room Types section, where all room types are listed.
On room type, click the three-dot menu on the room type to display the following options:
Edit Amenities
Edit Room
Select Edit Amenities to see all room-level amenities.
You can:
Add or remove amenities.
Make amenities free or paid by clicking the buttons next to each one.
This guide helps you quickly and easily manage both property-level and room-level amenities.
What is a fee category, and how can I use it?
A fee category in Stayflexi is used to define and apply various fees for room types and items being added to invoices. It allows you to set up different types of fees, such as room type, that will be automatically applied during the booking process.
Below is the Step-by-step guide on the Fee category in Property configuration:
Logging into Your Stayflexi Dashboard:
Enter your username and password to log in.
Go to Property Configuration:
Once logged in, click on the More Apps icon (represented by four blocks) in the top right corner.
From the dropdown menu, select Property Configuration.
Access the Fee Category Page:
Click on the “Tax and Fee Categories” section.
Click on “Fee Categories” to add the fee categories.
Add a New Fee Category:
Click on the “Add New Fee Category” button.
A new form will pop up on the right side.
Provide a Fee Category Name:
In the “Fee category name?” field, enter a descriptive name for the fee. For example, you might call it a “Room Booking Fee” or “Entertainment Fee”.
This will appear in invoices automatically when creating a room reservation.
Set the Fee Value :
Under “Fee value?“, enter the amount for the fee.
Choose the Value Type from the dropdown:
Absolute: A fixed fee, like Rs.150 per booking.
Percentage: A percentage of the total amount, like 10% of the total amount.
Choose the Fee Type from the dropdown:
Per Booking: Applied for each booking.
Per Room: Applied for each room in a booking.
Per Room night: The fee will be applied for each room night. This means if a guest stays in one room for three nights, the fee will be applied three times (once per room night).
Save the Fee Category:
Once you’ve filled in all the necessary details, click the “Save” button.
The fee category will now be available and can be applied across the property for various services.
Creating Hotel Add-on Services: Where do I add extra services offered by my hotel?
Below are the step-by-step guidelines to create hotel add-ons from Property Configuration:
Logging into Your Stayflexi Dashboard:
Enter your username and password to log in.
Go to Property Configuration:
Once logged in, click on the More Apps icon (represented by four blocks) in the top right corner.
From the dropdown menu, select Property Configuration.
Navigating Property Setup:
On the left side of the Property Configuration page, you’ll see various options.
Click on the Property Setup dropdown to reveal more options, including:
Property Details
Folio Setup
Shift Setup
Hotel Addons
Hourly Price Config
Flexible Slot
Other Settings
Click on the Hotel Addons option.
Add Hotel Addons:
To create Hotel addons, click on the Add new hotel addon button on the top of the Hotel Addons page.
A section to fill in the required details to create a Hotel addon will appear.
Fill in the following to create the hotel addon:
Addon name
Addon description
Addon applicable at room types:
Click on the dropdown to select room types
You can select multiple rooms from the dropdown(For example: Suite, Deluxe rooms)
Tax category:
Select tax categories from the dropdown(.eg., Food tax or Alcohol tax, etc)
Addon value:
In the Addon value field, enter the price for the extra service your property offers.
For example, if airport pick-up costs Rs.150, enter 150.
Date Range: Select the date range you want to apply the addon to.
Do you want to apply per night?
Click the Yes or No switch.
Do you want to apply at the booking level?
Click the Yes or No switch.
Save to create the Addon:
Click on the Save button to create the Hotel Addon.
By following these steps you can easily create the hotel add-ons.
What is User and Access Control, and what is its purpose?
User and Access Control is a feature within the Stayflexi platform designed to manage the permissions and roles of users. The goal is to regulate what actions each user can perform and what parts of the system they can access based on their assigned roles.
Below is a step-by-step explanation of how this system works for end users:
Accessing User and Access Control:
Log into your Stayflexi account with your credentials.
Once logged in, click on the More Apps icon (represented by four blocks) in the top right corner.
From the dropdown menu, select Property Configuration.
Under Property configuration, the are various options.
Click on Users and Access Controls to reveal the following key sections:
Roles and Access
User
Active Users
Roles and Access: This section lets you manage roles, which define specific permissions for users in the system. Here’s how it works:
Viewing Roles:
When you click on Roles and Access, you will see a list of predefined roles with a description and the access permissions granted to that role.
Creating a New Role:
You can add a new role by clicking Add a new role for general users or Add a new mobile role for mobile-specific roles.
In the role creation window, you can define the role name, and description, and specify which features or areas of the system the role should have access to (e.g., housekeeping reports, room management, etc.).
Editing Roles:
Existing roles can be modified by clicking the edit icon (pencil) next to the role name.
You can adjust permissions or make changes to reflect new responsibilities for that role.
Users :
This section allows you to manage users who have access to the Stayflexi platform. You can view, add, and edit user access details.
Add new user:
Click on the Add new user button.
A page will be displayed.
This page lets you create a new user in a system and assign multiple roles based on their responsibilities. You can adjust the user’s access level or revoke access at any time.
Enter the email ID and password of the user you want to create.
Enable the toggle net to the role which you want to assign to the user.
Click on the Save button to create the User.
You can also edit the user role, reset the password, and force logout the user respectively.
Active Users:
This section shows users who are currently active and logged into the software in real time.
It includes:
Search Bar: You can search for specific users who are actively logged in by entering their email ID.
Active Users List: Currently, the list of active users is empty, suggesting that no users are currently logged in.
Log Out All Users: This button allows you to log out all active users at once. This might be useful during maintenance or to ensure security by enforcing re-logins.
Purpose of User and Access Control:
Security: Limits access to sensitive information based on user roles, ensuring that only authorized personnel can view or modify critical data.
Operational Efficiency: By providing tailored access to different areas of the platform, employees can quickly and efficiently perform tasks relevant to their jobs.
Accountability: Role-based permissions help track which users are responsible for certain actions, providing a clear audit trail in case of errors or issues.
What are different type of policies I can configure in Stayflexi
In Stayflexi, you can configure various types of hotel policies, which include:
Cancellation Policies: Rules for handling booking cancellations and associated refunds.
Amendment Policies: Guidelines for making changes or amendments to existing bookings.
Hotel Policies (Terms and Conditions): General hotel rules like check-in/out times, usage of facilities, guest behavior, etc.
Below is the step-by-step guide to configure policies:
Logging into Your Stayflexi Dashboard:
Enter your username and password to log in.
Go to Property Configuration:
After logging in, click the “More Apps” icon in the top right corner (represented by four boxes or blocks).
From the dropdown menu, select Property Configuration.
On the left-hand side of the Property Configuration page, you’ll see various options.
Got to Policies:
Click on the Policies option.
Under Policies, you will see options like Cancellation Policies, Amendment Policies, and Hotel Policies (Terms and Conditions).
Cancellation policies:
Under the Cancellation policy, click on the Add new policy button.
You can create a cancellation/refund policy in this by filling in the below details:
Policy name: Give a name for the policy.
Policy description: Describe the policy.
Note: If the Add policy rule is created and the above checkbox beside the description section is not selected then this rule will reflect everywhere i.e. Booking Engine, Email, Room folio.
Enable toggle to apply the rule for all channels(optional).
Save the policy by clicking on the Save button.
You can also edit or disable the policies.
Amendment policies:
Select Amendment policies.
Here, you can create or edit amendment policies that govern how amendments to bookings will be charged.
Add a New Policy
Click on the Add New Policy button to create a new amendment policy.
Days Range
In this section, you set the days before the check-in date when amendments will not be allowed. You define the following:
Amendment not permitted within X and Y days prior to arrival date.
Enter the number of days (e.g., “10 and 5”) to specify the range within which amendments to bookings are not allowed.
Amendment Charges
You can set different charges for amendments, depending on how many times the booking is amended:
For first amendment: Specify the percentage (e.g., “0%”) of the booking amount that will be charged for the first amendment.
For the second amendment: Set a charge for the second amendment by entering a percentage (e.g., “5%”) of the booking amount.
For subsequent amendments: Set a percentage (e.g., “10%”) for any amendments beyond the second one.
Note: Modification can be allowed for the dates-This means users may modify the booking dates, and charges will be applied according to the set amendment policy.
Saving the Policy:
Once you’ve filled in all the necessary details (days range and amendment charges), click the Save button to save the policy.
This allows users to control how booking changes will be handled, including when they can be made and the cost for each amendment.
Hotel policies(terms and conditions):
Click on the Hotel policies(terms and conditions) option.
On this page, you can provide hotel rules like usage of facilities, guest behavior, etc.
Click on the Add new T&C button.
Here you can add the Hotel policy or Terms and conditions.
Click on the Save option.
Setting Minimum Room Price: How can I set a minimum price for a room category to avoid lower price updates?
Yes. You can set a minimum price for a room category by using Stayflexi’s Property configuration settings.
Below are the step-by-step guidelines for setting up minimum room price:
Logging into Your Stayflexi Dashboard:
Enter your username and password to log in.
Go to Property Configuration:
Once logged in, click on the More Apps icon (represented by four blocks) in the top right corner.
From the dropdown menu, select Property Configuration.
Navigating Property Setup:
On the left side of the Property Configuration page, you’ll see various options.
Click on the Property Setup dropdown to reveal more options, including:
Property Details
Folio Setup
Shift Setup
Hotel Addons
Hourly Price Config
Flexible Slot
Other Settings
Click on the Property Details option.
Setting up room occupancy:
On the Property Details page, find the Manage Room Types section, where all room types are listed.
On room type, click the three-dot menu on the room type to display the following options:
Edit Amenities
Edit Room
Select Edit Room to see room details.
A section to edit room details appears, where you can see various options.
To set minimum room price:
Click on the Minimum Room Price field.
After setting up the minimum room price, click on the Save button to save the minimum room price.
By following these steps you can set the Minimum room price.
How can I send automatic emails to guests after checkout to collect reviews?
Below are the steps to send automatic emails to guests after checkout to collect the reviews:
Logging into Your Stayflexi Dashboard:
Enter your username and password to log in.
Go to Property Configuration:
Once logged in, click on the More Apps icon (represented by four blocks) in the top right corner.
From the dropdown menu, select Property Configuration.
Got to Notification
On the left side of the Property Configuration page, you’ll see various options.
Click on the Notifications dropdown to reveal more options, including:
Guest notifications
Hotelier notifications.
Guest review
Click on the Guest review option.
This is where you can control review request emails.
Enable Guest Review Feedback:
On the “Guest Review” page, you will see an option for “Guest Review Feedback.”
Toggle the switch next to this option to enable it. Once enabled, the system will send an automated email to guests after they check out.
Set the Mode to Automatic :
There are two modes:
AUTOMATIC
MANUAL
Ensure that the Mode is set to “AUTOMATIC”. This ensures that the email will be sent automatically without any manual intervention after the guest checks out.
Enter Your Google Review/Feedback URL :
In the input field labeled “Paste your Google review/docs URL”, paste the URL for your property’s Google Review page.
You can obtain this URL by navigating to your property’s listing on Google, copying the review link, and pasting it into this field.
Alternatively, you can use a Google Docs form if you’d like to gather reviews through a custom form instead of Google Reviews.
Save and Confirm:
Once you’ve pasted the URL and enabled the review feedback toggle, ensure all changes are saved by clicking on the Update option.
The system will now send an email with the provided review link to guests after their checkout.
What are hotelier notifications, and how do they help?
Hotelier notifications are communication features of Stayflexi that allow hotel operators to receive important updates and reports related to their property. These notifications can be sent via email or messaging platforms like WhatsApp to keep the hotelier informed about key operations, such as daily reports, property updates, rate alerts, and more.
Below is a Step-by-Step Guide for End Users:
Logging into Your Stayflexi Dashboard:
Enter your username and password to log in.
Go to Property Configuration:
Once logged in, click on the More Apps icon (represented by four blocks) in the top right corner.
From the dropdown menu, select Property Configuration.
Go to the Notifications:
Navigate to the “Notifications” section in the left-hand menu.
Select “Hotelier notifications” to configure notifications sent to the hotel.
Configure Email Notifications:
Night Audit Report:
In the “Emails” section, locate the “Night audit report” field.
Enter one or more email addresses (separated by commas) to receive daily night audit reports. These reports provide a summary of property performance and operations for the day.
Make sure not to include any spaces before or after the commas when entering multiple email addresses.
Set Up WhatsApp Notifications:
WhatsApp Daily Report:
In the “Whatsapp” section, you can enable WhatsApp notifications to receive daily reports about the property.
Toggle the switch to activate WhatsApp notifications for reports and alerts.
Property Report via WhatsApp:
Enter your WhatsApp number(s) in the “Configure your WhatsApp numbers to receive the property report” field. Multiple numbers can be entered, separated by commas.
Rate Shopper Price Alerts via WhatsApp:
In the second WhatsApp configuration field, enter the numbers to receive price alerts for competitive properties or rate changes. This ensures that hoteliers can react quickly to market shifts.
After entering the required information, click “Save” to apply the changes.
Saving Changes:
Once you’ve set up your email and WhatsApp notifications, make sure to click the “Save” button at the bottom of the page. This will save your configuration and activate the notifications according to the inputted details.
Benefits for Hoteliers:
Timely Updates: Receive critical reports such as the night audit summary and property performance via email and WhatsApp.
Quick Response: Stay updated with rate shopper price alerts to react quickly to market conditions.
Customization: Control where and how notifications are sent by entering multiple recipients and contact numbers, ensuring key personnel are informed.
This guide will help you ensure that notifications are properly set up so you can stay on top of essential hotel operations.
What is shift setup, and how is it beneficial for my property?
Below is the step-by-step guide for Shift setup:
Logging into Your Stayflexi Dashboard:
Enter your username and password to log in.
Go to Property Configuration:
Once logged in, click on the More Apps icon (represented by four blocks) in the top right corner.
From the dropdown menu, select Property Configuration.
Go to Shift setup:
From the Property configuration, click on the Property setup option from the dropdown and navigate to Shift Setup.
Click on Shift Setup to open the shift setup page.
Add a New Shift:
At the top of the shift setup page, you’ll see a button labeled Add New Shift.
Click this button to create a new shift for your staff.
Enter Shift Name:
In the Shift Name? field, enter a name for the shift (e.g., Morning Shift, Evening Shift, etc.). This helps identify the shift later.
Set Start Time:
Under the Start Time? section set the shift’s start time.
Use the dropdown menus to select the start hour and start minute. For example, selecting 00 for both will set the shift to start at midnight.
Set End Time :
Similarly, under the End Time? section set the time when the shift ends.
Choose the end hour and end minute. For instance, selecting 23 for hours and 59 for minutes will set the shift to end at 11:59 PM.
Set Shift Status :
In the Status? dropdown, choose whether the shift is ENABLED or DISABLED.
If the shift is enabled, it will be active and available in the system.
Assign Staff Members :
In the Staff Names? field, enter the email addresses of staff members assigned to this shift.
You can list multiple staff members in the dropdown and can add multiple staff by clicking on the staff email ID.
Save the Shift Configuration :
After filling out the required fields (shift name, times, status, staff names), ensure all details are correct.
Click the Save to finalize and save the shift configuration.
Benefits of Shift setup for properties:
The Shift setup feature helps property managers easily manage staff shifts by defining working hours and assigning staff to those shifts. Staff outside his shift hour won’t be able to login into stayflexi PMS and access any information from PMS.
It ensures a clear schedule for operational efficiency and data privacy.
Single Slot vs. 3 Slots: What are single slot and 3 slots, and which option should I select for my property?
In the Stayflexi system, “Single Slot” and “3 Slots” refer to the way time blocks are allocated for bookings. The main difference lies in the flexibility and duration of the booking periods available.
Logging into Your Stayflexi Dashboard:
Enter your username and password to log in.
Go to Property Configuration:
Once logged in, click on the More Apps icon (represented by four blocks) in the top right corner.
From the dropdown menu, select Property Configuration.
Navigating Property Setup:
On the left side of the Property Configuration page, you’ll see various options.
Click on the Property Setup dropdown to reveal more options, including:
Property Details
Folio Setup
Shift Setup
Hotel Addons
Hourly Price Config
Flexible Slot
Other Settings
Click on the Flexible Slot option.
Go to the Edit slot mode option where you can set the slots to either Single slot or the Three slots.
Single Slot:
Definition: A “Single Slot” refers to fix check-in and check-out time a property can be booked. For example, if you select a single slot for a property, it might represent a booking window such as 12 PM check-in time to 11 AM check-out time (24 hours), which guests can book as one uninterrupted time block.
Usage: This option is commonly used for properties that want to offer straightforward, full-day, or fixed-period bookings without breaking the day into smaller chunks.
Best For:
Properties that offer standard check-in and check-out times (e.g., hotels, hostels).
Three Slots:
Definition: The “Three Slots” option divides the day into three distinct time slots, allowing the property to be booked multiple times throughout the day. For example, the day may be split into:
Morning slot: 8 AM to 4 PM
Evening slot: 4 PM to 12 AM
Night slot: 12 AM to 8 AM
Usage: This gives the property more flexibility to accommodate multiple guests during different parts of the day. It allows for more frequent bookings by splitting the availability into smaller blocks.
Best For:
Properties that offer short-stay or day-use options (e.g., hourly hotels, lounges, co-working spaces).
Maximizing revenue by booking the same property multiple times in a day.
Which Option to Select?
Single Slot: Choose this if your property typically handles longer stays or if you prefer simpler management with one guest per day.
Three Slots: Choose this if you want to maximize occupancy and revenue by accommodating multiple bookings per day. This is great for day use, hourly stays, or situations where flexibility is key.
Consider how often your property is booked and the type of guests you cater to when making the decision.
How can I set hourly rates for my property?
Below is the step-by-step guide to set hourly rates from Property configuration:
Logging into Your Stayflexi Dashboard:
Enter your username and password to log in.
Go to Property Configuration:
Once logged in, click on the More Apps icon (represented by four blocks) in the top right corner.
From the dropdown menu, select Property Configuration.
Navigate to Property setup:
On the left side of the Property Configuration page, you’ll see various options.
Click on the Property Setup dropdown to reveal more options, including:
Property Details
Folio Setup
Shift Setup
Hotel Addons
Hourly Price Config
Flexible Slot
Other Settings
Click on the Hourly Price Config option.
Configure Hourly Booking
Click on the Configure option on the right side of the page.
A new window will appear titled Configure hourly booking.
Enter the Date range during which the hourly rates will apply by selecting the start and end dates using the calendar picker.
In the example, the date range is from 17 Oct 2024 to 24 Oct 2024.
Set Room Types and Rate Plans.
Choose the Room types from the dropdown (you can select multiple Room types from the dropdown). This will apply hourly rates to the specific rooms.
Select a Rate plan from the dropdown (you can select multiple Rate plans from the dropdown). This will apply hourly rates to that specific rate plan.
Define Your Hourly Pricing.
In the Set your price section, specify the hourly Price.
Enter the rate value (for example, 30$) in the price input field.
Select whether this price is a Percent or a Flat value from the dropdown.
Define how long this rate is applicable by selecting the number of hours.
For example, this could be for “6 hours”.
Advanced Settings (Optional)
If you need advanced settings for managing multiple rates or different room types, click on the Click here button next to “If you need advanced settings for all your rates.”
This will open additional configurations, allowing you to fine-tune the pricing.
Save Your Settings
After setting up your hourly pricing, click on the Save button at the bottom.
The hourly rates will now be applied based on the configuration you’ve set.
Following these steps will ensure that your property’s hourly rates are properly configured and visible to customers booking for specific hours.
Understanding the filters in reservation calendar
The Stayflexi reservation calendar offers filtering options to help users quickly access the specific room and booking information they need.
Imagine your front desk team receives a call from a guest interested in booking a superior king room for the upcoming weekend. To quickly check the availability of this specific room type [OR] Let’s say it’s a busy day at your property, and the housekeeping team needs to clean rooms that have just been vacated. You want to quickly find which rooms are Dirty and need attention. Don’t worry, Stayflexi is going to make your job much easier with this filter option. Enjoy each step mentioned below!
Below are the step-by-step guidelines for using the filter options:
Login to Stayflexi: Start by logging into your Stayflexi dashboard using your credentials.
Navigate to the Reservations Tab: From the front page of the Stayflexi dashboard, locate the top navigation menu. The second icon is the Reservation Calendar.
Locate the Filter Option: On the top-left corner [as shown in the image], click the Filter dropdown to reveal a list of available filters.
Available Filters: The following options can be selected from the filter dropdown menu.
Available Rooms: Displays all rooms that are vacant and ready for booking.
Blocked Rooms: Shows the rooms that are temporarily blocked.
Dirty Rooms: Displays rooms that are marked for cleaning.
Clean Rooms: Rooms that are cleaned and ready for new guests.
Occupied Rooms: Shows all rooms currently occupied by guests.
Room Types: You can filter rooms based on their room type such as: Superior King, Super Deluxe, standard etc.
All: Shows all rooms regardless of status or type.
Unselect: Clears all active filters to display all rooms again.
How to view reservations by room type?
Login to Stayflexi: Log into your Stayflexi dashboard with your credentials.
Go to the Reservation Calendar: From the main dashboard, click on Reservation Calendar. Here you can see available rooms and dates.
Locate the Filter Dropdown: At the top-left corner of the calendar, you will see a Filter dropdown. Click on this to open the filter options.
Select a Room Type: From the list of filter options, scroll down to find room types like Superior King, Superior Twin, or any specific room categories that your property has. Click on the room type you wish to filter by.
View Filtered Results: The reservation calendar will automatically refresh to display only the reservations for the selected room type. You will now be able to see all reservations for the chosen room type.
Night Audit
Simplify your end-of-day processes with Stayflexi’s Night Audit feature. This powerful tool automates daily reconciliations, including revenue tracking, payment verification, and occupancy reports. It ensures your financial data is accurate and up to date, reducing manual effort and errors. Stayflexi’s Night Audit gives you a comprehensive overview of your property’s daily performance, helping you close the day efficiently and start the next one with confidence. Perfect for properties of all sizes, it’s the seamless solution for managing your nightly operations.
The Night Audit is a key daily process in property management that ensures all transactions are accurately recorded and the property is ready for the next day. In Stayflexi, this process is streamlined to help properties efficiently manage their financials and operations at the end of each day.
Purpose of the Night Audit:
Check Financial Records:
Verifies all payments, room charges, and services used during the day.
Update Guest Accounts:
Makes sure that all charges and payments for each guest are correct.
Prepare for the Next Day:
Adjusts room availability and other details to ensure smooth operations.
Key Tasks in Stayflexi:
Review Transactions:
Automatically reviews all daily transactions, like room bookings and service charges.
Guest Account Review:
Ensures all guest folios are accurate, showing the correct room rates, services used, and payments received.
Report Generation:
Generates key reports such as revenue summaries, occupancy rates, and transaction summaries for the day.
How the Process Works:
End-of-Day Closure:
The night audit begins when the front desk is closed, ensuring all daily activities are finalized in the system.
System Updates:
Stayflexi’s system automatically updates financial records and generates daily reports or you can manually do Night Audit.
Final Adjustments:
Any errors or discrepancies found are corrected to ensure accurate records.
Importance of the Night Audit:
Financial Accuracy:
The audit helps ensure financial records are correct, which is important for budgeting and forecasting.
Operational Readiness:
By updating room inventory and reconciling accounts, the audit prepares the property for the next day, ensuring a smooth operation.
Performance Insights:
The audit provides valuable reports that offer insights into trends, helping management make strategic decisions.
Can I access Night Audit reports of previous days using Stayflexi?
YES, you can access night audit reports of previous days in Stayflexi.
Below is the explanation of how to access night audit reports from previous days using Stayflexi:
Go to the Night Audit Section:
From the Stayflexi dashboard, select the Night Audit option.
Access the Date Range Selector :
On the Night Audit page, find the Data Range field at the top of the page. Click on this field to open a calendar view.
Select the Desired Date:
In the Calendar, navigate to the date range you’re interested in.
Select a Single date for a specific past day’s report, or choose a date range if you want to see reports over multiple days.
View the Night Audit Data:
Once you’ve selected the date, the system will automatically display the night audit data for that period.
By following these steps, you can efficiently retrieve and review night audit reports from any previous date.
Can Stayflexi automate the Night Audit for my property?
YES, Stayflexi can automate the Night Audit process for your property, making it easier to manage daily operations without manual intervention. Here how it works:
To automate the Night Audit for your property in Stayflexi, follow the below-mentioned steps:
Login to Stayflexi: Start by logging into your Stayflexi dashboard using your credentials.
Access More Apps: From the dashboard, click on the 4-dots square icon labeled “More Apps”, located on the right side of the screen.
Locate Night Audit: From the listed apps, locate and click on the “Night Audit” option.
Open Night Audit Page: A new page will open that displays the night audit settings.
Find Configuration Options: On the right side of the screen, you’ll see two options:
Night Audit History
Night Audit Configuration – “Click on it”.
Open Configuration Page: The configuration page will appear, where you can manage night audit settings.
Select Auto Mode: Look for the third setting from the top labeled “What mode you prefer”. Click the small arrow next to it to open the dropdown options.
Choose Auto: From the dropdown, select the “Auto” option.
Save Settings: Once you’ve selected “Auto”, the system will now automatically run the night audit.
With the above steps, you’ve successfully configured Stayflexi to automatically perform the night audit each day without manual intervention.
How does Stayflexi handle the Night Audit process?
To know how Stayflexi handle the Night Audit process, go through the below mentioned steps to understand better:
Login to Stayflexi: Start by logging into your Stayflexi dashboard using your credentials.
Access More Apps: From the dashboard, click on the 4-dots square icon labeled “More Apps”, located on the right side of the screen.
Locate Night Audit: From the listed apps, locate and click on the “Night Audit” option.
Open Night Audit Page: A new page will open that displays the night audit settings.
Find Configuration Options: On the right side of the screen, you’ll see two options:
Night Audit History
Night Audit Configuration – “Click on it”.
Open Configuration Page: The configuration page will appear, where you can manage night audit settings.
Understanding the Night Audit Process: On this page, you can review how the night audit works and the options available to ensure it runs smoothly . Before proceeding, you need to configure the settings properly.
Enable Night Audit: Start by enabling the night audit feature. Click on the toggle to activate it, as indicated in the visual guide.
Select Audit Mode: Choose your preferred mode for running the night audit- either Auto or Manual. This option determines whether the system will automatically conduct the audit or if you’ll initiate it manually.
Set the Audit Time: Specify the time you want the night audit to run. Click on the tiny arrow next to the time setting to view default time slots. Select any time that fits your property’s schedule, We advise you to select a time when property operation end for the given day ideally it can be 12 to 1 am at night.
Manage Cancellations, No Shows, and Pending Departures: Each of these sections has specific principles that guide how they are handled during the night audit.
Cancellations: You will see options to enable or disable toggles for cancellations. Read the descriptions below each option to understand their implications and choose accordingly.
No Shows: Similarly, manage no show settings by enabling or disabling the appropriate toggles based on your policy.
Pending Departures: Adjust the settings for pending departures in the same manner, ensuring you align with your operational procedures.
Set Up Notifications: Finally, in the notifications section, enter multiple email addresses to receive the night audit report. This ensures that relevant staff members stay informed about the audit outcomes.
By configuring these settings, you allow Stayflexi to handle the night audit process smoothly and efficiently.
What happens if a reservation or payment is missing during the Night Audit?
If a reservation or payment is missing during the night audit in Stayflexi, the system will identify the issue, prompting the property staff to take corrective actions. Here’s what happens:
Missing Data Alert: The system will flag any discrepancies, such as missing reservations or payments. This alert will show up in the night audit report, making it clear where the issue lies.
Manual Investigation: The property staff will need to investigate the missing reservation or payment. This may involve checking guest folios, payment records, or third-party OTA integrations to identify why the data is missing.
Corrective Actions: Once the issue is identified, the staff can take corrective measures, such as entering the missing reservation or processing the payment manually. If the payment is delayed from an OTA, they may need to wait for the funds to be transferred or confirmed.
Reconciliation: After resolving the issue, the night audit can be re-run to ensure that all financial and reservation data is accurately reconciled for the day.
In the Night Audit history of Stayflexi, if you see a “Pending” status, it means the audit process has not been completed successfully. By clicking on the “Pending” status, a page will appear, covering half of your screen. This page will list the specific reasons why the audit was unsuccessful, providing you with details to address the issues and successfully complete the audit.
What reports does Stayflexi generate during the Night Audit?
During the Night Audit in Stayflexi, various reports are generated based on your property’s configuration. These typically include:
Audit Reports
Room Revenue Reports
Payments Reports
Front Desk Reports
Daily Intelligence Reports, etc.
You can receive all the reports as a single attachment or access them individually, depending on how they are configured.
In the Audit email, you’ll mainly see:
Today’s Performance, including total payments
Monthly Performance, summarizing total payments for the month.
The picture beside is a reference to help you understand the report that is sent to your email. This is how the main context would look, followed by the attachments mentioned below.
Click on the “View Report”, as highlighted in the picture, to access all the reports in a single view.
The above picture shows the result of clicking on the “View Report” button in the email. If you click on it, you will be redirected to the Stayflexi platform, where you can view all the reports in a single snapshot.
The mail will include an attachment containing all the individual reports for detailed reference, just as shown in the picture below.
How to create a walk-in reservation?
Stayflexi provides two convenient ways to create Walk-in Reservation:
Drag-and-Drop [super friendly]
Walk-in Reservation
Below is the Drag-and-Drop method for checking in a reservation.
Login to your Stayflexi dashboard.
On the left panel, click on the Reservation Calendar [the second icon] to view all your reservations.
Select the desired date from the calendar.
Drag the booking from the Check-in date to the desired check-out date.
A pop-up window will appear covering the entire screen, where you can complete the guest’s details.
Guest Information Section:
Enter the guest’s Name, Email, and Phone Number.
You can also add any special requests from the guest.
ID Proof: Upload the guest’s ID Proof with Front and Back photos options
Address details: Enter the guest’s address, and select the number of adults and children for the reservation.
Price and Room Details:
On the right side, the system will automatically update the Room Prices, including Taxes, once the room type is selected.
After reviewing all the details, click the Create Reservation button at the bottom right of the window.
Your Walk-in reservation is now confirmed, and you’ll receive a confirmation message on the screen.
In addition to the drag-and-drop method, Stayflexi also offers the option to create Walk-in reservations for guests who book a room on the spot. Follow the steps below:
Method: 2 – To Create Walk-in Reservation:
Login to your Stayflexi dashboard.
On the left panel, click on the Reservation Calendar [the second icon] to view all your reservations.
On the top-right corner of the calendar, you will see a Create button. Click on it, and a list of 4 options will appear.
From the list, Select Walk-in.
A pop-up window will appear, covering the entire screen. Here, you’ll be prompted to enter all the necessary guest details.
Guest Information Section [Same as Drag and Drop Method]:
Enter the guest’s Name, Email, and Phone Number.
You can also add any special requests from the guest.
ID Proof: Upload the guest’s ID P roof with Front and Back photos options
Address details: Enter the guest’s address, and select the number of adults and children for the reservation.
Price and Room Details:
The system will automatically update room prices, including taxes, based on the selected room type.
After entering all the details, click on Create Reservation at the bottom of the window.
A confirmation message will appear, indicating that your Walk-in reservation has been completed.
Stock Management
Efficiently manage your property’s inventory with Stayflexi’s Stock Management feature. Track and control your stock levels in real time, whether it’s for housekeeping supplies, maintenance materials, or guest amenities. Stayflexi makes it easy to monitor stock usage, set reorder alerts, and ensure you never run out of essentials. With detailed reporting and automatic updates, Stayflexi’s Stock Management feature helps you stay organized, reduce waste, and optimize your supply chain, ensuring your property runs smoothly and efficiently at all times.
Stayflexi’s Stock Management system helps properties track and manage their inventory, orders, and suppliers. It offers tools to monitor stock levels in real time, create purchase orders, and receive alerts for low stock. This system helps reduce waste, improve efficiency, and keep operations running smoothly, particularly in the hospitality industry.
Stock management consists of the following option:
Dashboard:
The Dashboard consists of the following options:
Consumption Report: Shows real-time data on the usage of raw materials.
Current Stock Report: Provides an overview of stock levels for each item.
Purchase Order Report: Lists pending and recent purchase orders.
Wastage Report: Displays wastage data to help control costs and minimize losses.
Notifications Column: Centralized alerts for stock status.
Reports:
The Reports consist of the following reports:
Warehouse Cumulative Report: Provides an overall summary of warehouse stock and activities.
Purchase Order Received Report: Displays details of purchase orders received by the warehouse.
Closing Stock for Warehouse Report: Shows the closing stock levels for the warehouse at the end of a specified period.
Warehouse Consumption Report: Tracks the consumption of stock in the warehouse.
Food Costing Report: Analyzes the cost breakdown of food-related inventory.
Purchase:
This page displays your orders from a specific supplier, along with order dates and payment status.
You can track orders using a request number and view items yet to be received. Once received, orders are removed.
Consumption:
Closing stock:
The Closing Stock feature in Stayflexi enables properties to track and record end-of-day inventory levels for raw materials, ensuring accurate stock management across various categories and outlets. Users can select a date, outlet type, and raw material category, then input specific quantities and units for each item in stock.
Raw material wastage:
The Raw Material Wastage option in stock management is a feature that helps businesses track and manage the loss or spoilage of raw materials. In any inventory system, wastage can occur due to various reasons such as spoilage, expiration, handling errors, or production processes.
Overall, this feature aids in minimizing waste, optimizing stock levels, and ultimately lowering operational costs by providing clear insights into how raw materials are used and where losses occur.
Configuration:
The Configuration includes:
Vendors: Stores information about suppliers, making it easier to order materials from trusted vendors.
Raw materials – Centralised: This centralised warehouse serves as the central hub for all raw materials, from which they are distributed to the appropriate outlets.
Item recipes: By creating recipes with precise ingredient quantities, businesses can streamline operations, minimise wastage, and enhance overall efficiency.
Outlet configuration: To ensure easy configuration with a specific shop and effective tracking of raw material data, it is recommended that the outlet be named the same as the shop.
How do I configure an outlet in stock management and map it with a restaurant? Why is mapping stock management outlets important with restaurant outlets?
Below is the step-by-step guide to configure an outlet in stock management and map with a restaurant:
Log in to Your Stayflexi Dashboard:
Enter your username and password to log in.
Go to Stock management:
After logging in, click the “More Apps” icon (represented by four boxes or blocks) in the top right corner.
From the drop down menu, select Stock management
Go to Configuration:
Click on the three horizontal lines in the top right corner of the Stock management
Click on the Configuration drop down
Go to Outlet configuration:
In the Configuration dropdown, you can see the following options:
Vendors
Raw materials – Centralized
Item recipes
Outlet configuration
Click on the Outlet Configuration option
Add the Outlet:
On the Outlet configuration page, click on the Add outlet configuration button
A page to add the outlet configuration appears.
Type the name of the shop outlet you want to add in the Shop outlet name field[Note: It is recommended to use the same name for the outlet as that of the shop
Click on the Type drop down, which includes the following options
SINGLE
MULTIPLE
Select the particular type of outlet either Single or multiple.
Enter the closing stock time from the Closing stock time drop down
Now click on the Confirm button to add the Outlet configuration
Map the outlet with the restaurant/shop:
To map the outlet you created with the restaurant/shops of your property, click on the Item recipes option from the Configuration dropdown
The recipe management page appears.
Click on the Add new recipe button
All the shops or restaurants in your property will be displayed from the Shop name drop down
You can select the shop you want to map with the outlet you created in the Stock management configuration.
Click on the Outlet dropdown where all the outlets you added from the outlet configuration in the stock management will be displayed (as shown in Image 9).
You can select whichever outlet you want to map with the shop or restaurant.
Select the raw material and then click on the Confirm button to add the recipe and also to successfully map the restaurant or shop to the outlet in the Stock management
Mapping stock management outlets with restaurant outlets ensures smooth operations by accurately tracking inventory, reducing waste, and making sure the right stock is available at the right place. It helps manage resources efficiently, keeps recipes consistent, and provides clear reports for better decision-making. This process simplifies multi-outlet management and ensures everything runs seamlessly.
What kinds of reports are available in stock management?
The following reports are available in Stock Management:
Warehouse Cumulative Report
Purchase Order Received Report
Closing Stock for Warehouse Report
Warehouse Consumption Report
Food Costing Report
Follow the below-given steps to understand the reports that are available in Stayflexi’s stock management:
Log in to Stayflexi:
Access your Stayflexi account using your credentials.
Go to Stock management:
After logging in, click the “More Apps” icon (represented by four boxes or blocks) in the top right corner.
From the dropdown menu, select Stock Management (as shown in Image 1).
Navigate to the Reports Section
On the left-hand side menu, click on the Reports tab under Stock Management.
View Available Reports
Once you are in the Reports section, you will see a list of report cards. Each card represents a different type of report.
Understand Each Report’s Purpose
The available reports are:
Warehouse Cumulative Report: Provides an overall summary of warehouse stock and activities.
Purchase Order Received Report: Displays details of purchase orders received by the warehouse.
Closing Stock for Warehouse Report: Shows the closing stock levels for the warehouse at the end of a specified period.
Warehouse Consumption Report: Tracks the consumption of stock in the warehouse.
Food Costing Report: Analyzes the cost breakdown of food-related inventory.
Access a Report
Click the View button on the corresponding report card to open and view the detailed data for that report.
How do I place a purchase order to a vendor and receive it in Stayflexi once the vendor delivers it?
Below is the step-by-step guide to placing a purchase order with a vendor and receiving it in Stayflexi’s Stock management once the vendor delivers it:
Log in to Your Stayflexi Dashboard:
Enter your username and password to log in.
Go to Stock management:
After logging in, click the “More Apps” icon (represented by four boxes or blocks) in the top right corner.
From the dropdown menu, select Stock management
Go to Configurationto add the vendor details:
Click on the three horizontal lines in the top right corner of the Stock management
First, you need to configure the vendor details by clicking on the Add new vendor button in the Vendors option under Configuration to purchase an order with a vendor
Purchase an order from the Vendor:
Click on the Purchase option in the left-sidebar on the Stock Management page
Click the Add Purchase Order button on the right of the Purchase Order list page
Add items for purchase from your chosen vendor, then confirm your selection by following the below-given
Supplier Dropdown:
Purpose: Select the vendor or supplier from whom the materials are being purchased.
Action: Click the dropdown arrow, then choose the supplier’s name.
Delivery Charge Included in Invoice (FLAT):
Purpose: Enter the fixed delivery charge amount that will be included in the invoice.
Action: Input the flat amount (e.g., “0” if no delivery charges apply).
Payment Type:
Purpose: Select whether the order will be paid immediately (“PAID”) or later (“UNPAID”).
Action: Click the dropdown arrow and choose the appropriate option.
Item Details Section:
Raw Material Name
Purpose: Choose the raw material or item to be ordered.
Action: Use the dropdown to select an item.
Quantity
Purpose: Specify the number of units of the selected item.
Action: Input the desired quantity (e.g., “0” if no items are currently being ordered).
Unit
Purpose: The unit of measurement for the item (e.g., kilograms, liters, or pieces). This may be pre-defined.
Price Per Unit
Purpose: Enter the cost per unit of the item.
Action: Input the price (e.g., “0” for no cost yet).
Tax Percentage
Purpose: Enter the applicable tax percentage for the item.
Action: Input the percentage (e.g., “0”).
Tax Amount
Purpose: This field auto-calculates the tax amount based on the tax percentage and unit price.
Action: No manual input is required here.
Total
Purpose: Displays the total cost of the item, including quantity, unit price, and taxes.
Action: Automatically calculated.
Description
Purpose: Optionally provide additional notes or details about the item.
Action: Input a short description, if needed.
Add Purchase Order
Purpose: Add another item to the order if you are purchasing multiple goods.
Action: Click this button to open a new row for adding a new item.
Cancel
Purpose: Discard the current purchase order and return to the previous screen.
Action: Click the Cancel link.
Confirm
Purpose: Finalize the purchase order.
Action: Click the Confirm button to save and submit the purchase order.
This page displays your orders from a specific supplier, order dates and payment status. You can track orders using a request number and view items that have not been received. Once received, orders are removed.
To obtain raw materials, visit Configuration Raw Material Centralized and select Receive Raw Material Vendor.
Receive the Purchase order (as shown in Images 7 and 8):
Click on the Configuration dropdown and click on the Raw Material – Centralized option.
In the Centralized Raw Material List page, click on the Receive Raw Material – Vendor button on the right side of the page.
To receive the raw materials from the vendor, do the following:
Select Supplier:
Click on the dropdown under Supplier and choose the vendor.
Choose Date:
Confirm the delivery date range. This may already be pre-filled.
Select Raw Material:
Click on the dropdown under Raw Material and pick the item.
Check Unit:
Verify the unit.
Enter Quantity:
Type the quantity received.
Confirm or Cancel:
Click Confirm to save the details or Cancel to discard and exit.
By following the above steps you can purchase an order from the vendor and receive it in Stayflexi’s Stock management.
Can I track daily wastage due to any reason? How do I do that in Stayflexi?
Yes, you can track daily wastage in Stayflexi.
Below is the step-by-step guide to track the daily wastage:
Steps to Track Daily Wastage in Stayflexi:
Log in to Stayflexi:
Access your Stayflexi account using your credentials.
Go to Stock management:
After logging in, click the “More Apps” icon (represented by four boxes or blocks) in the top right corner.
From the dropdown menu, select Stock Management
Navigate to the ‘Raw Material Wastage’ Section
From the left-hand menu, go to Consumption.
Under the Consumption menu, click on Raw Material Wastage.
View the Wastage List:
The Wastage List screen will appear, as shown in the screenshot. Here, you can view details like:
Wastage Date
Raw Material Category
Raw Material
Quantity
Unit
Average Purchase Price
Total
Description
Filter by Date or Outlet Type:
Use the Date field to select the specific day you want to track.
Use the Outlet Type dropdown to filter by a specific outlet if applicable.
Add Wastage details:
Click the Add Wastage button on the top-right corner of the screen
Fill the following details
Select Outlet Type:
In the dropdown field labeled “Raw Material Wastage For”, select the outlet type where the wastage occurred (e.g., Centralised Outlet).
Enter Raw Material Details:
Use the fields to provide details about the wastage:
Raw Material Name: Choose the raw material from the dropdown.
Raw Material Category: Select the category of the raw material (e.g., Food, Beverages, etc.).
Quantity: Specify the amount of raw material wasted.
Raw Material Unit: Choose the unit of measurement (e.g., Kg, L, etc.).
Note: The In-hand stock is shown below the quantity field, helping you track available stock.
Add Cost Details:
Average Purchase Price: Enter the average cost of purchasing the raw material.
Total Amount: This field might auto-calculate based on quantity and purchase price. Otherwise, input the total cost manually.
Provide a Description:
In the Description field, specify the reason for the wastage (e.g., expired stock, spillage, or over-preparation). This helps in tracking patterns and minimizing future losses.
Add Additional Wastage (Optional):
If you have multiple items to report, click the Add Wastage button and fill in the details for the next item.
Save the Wastage Record:
Once all details are added, click Confirm to save the wastage record.
What is recipe management, and why is it important?
What is Recipe Management?
Recipe management is the process of defining, organising, and maintaining recipes for food or beverage preparation in a structured manner. It ensures the efficient use of raw materials, reduces wastage, and improves overall cost and operational management. This functionality is essential for properties to maintain consistency in product quality and optimise resources.
Why is Recipe Management Important?
Accuracy in Resource Planning: By specifying the required raw materials and quantities for each recipe, businesses can plan inventory effectively.
Minimized Wastage: Accurate recipes prevent over- or under-utilization of raw materials.
Cost Efficiency: Standardized recipes help in determining precise costs for preparation, enabling proper pricing and profitability.
Consistency: Recipes ensure that products are prepared with the same quality and taste across outlets or branches.
Improved Reporting and Tracking: Linking recipes to raw material usage provides insights into consumption trends and helps identify areas for improvement.
Step-by-Step Guide for Using Recipe Management:
Log in to Your Stayflexi Dashboard:
Enter your username and password to log in.
Go to Stock management:
After logging in, click the “More Apps” icon (represented by four boxes or blocks) in the top right corner.
From the dropdown menu, select Stock management
Go to Configuration:
Click on the three horizontal lines in the top right corner of the Stock management.
Click on the Configuration dropdown
Go to Item recipes:
In the Configuration dropdown, you can see the following options:
Vendors
Raw materials – Centralized
Item recipes
Outlet configuration
Click on the Item Recipes option to open the recipe management page
Add a New Recipe:
Click the “Add New Recipe” button to create a new recipe
All the shops or restaurants in your property will be displayed from the Shop name dropdown
You can select the shop you want to map with the outlet you created in the Stock management configuration.
Click on the Outlet dropdown where all the outlets you added from the outlet configuration in the stock management will be displayed
You can select whichever outlet you want to map with the shop or restaurant.
Select the raw material and then click on the Confirm button to add the recipe and also to successfully map the restaurant or shop to the outlet in the Stock management
Edit or Delete Recipes
The newly created recipe will appear in the list under the Recipe Management dashboard.
Click on the edit option to edit that particular recipe’s details, such as updating raw materials or quantities.
If you want to delete that particular recipe, you can click on the delete option beside the edit option to delete the recipe.
By following the above-given steps, you can understand the recipe management in Stayflexi’s Stock management.
Does Stayflexi provide a dashboard in stock management to view all important data?
Yes, Stayflexi provides a dashboard in the stock management module to view and monitor all important data. The dashboard displays various reports such as consumption, current stock, wastage, and purchase orders, giving a clear overview of inventory performance and usage.
Step-by-Step guide for Stock management Dashboard:
Log in to Your Stayflexi Dashboard:
Enter your username and password to log in.
Go to Stock management:
After logging in, click the “More Apps” icon (represented by four boxes or blocks) in the top right corner.
From the dropdown menu, select Stock Management
Navigate to the Dashboard
Consumption Report:
Located at the top of the dashboard, this section shows the consumption data of raw materials categorized by time periods: Today, Yesterday, Last 7 Days, and Last 30 Days.
Example: The consumption for items like Onion, Tomato, Rice, and Chicken is displayed in kilograms (KG).
Current Stock Report:
This section displays the current quantity of stock for each item available in the inventory.
Data includes Item Name, Category, Unit, and Quantity.
Example: The stock shows 81 KG of Onion, 1 KG of Tomato, 1000 KG of Rice, and 1000 KG of Chicken.
Wastage Report:
This report highlights wastage data over various time periods (e.g., Today, Yesterday, Last 7 Days, Last 30 Days).
The user can filter by Raw Material Wise or other available categories.
Purchase Order Report
Located on the right side, it lists purchase orders with a date range filter.
Displays information like Request Number, Total Amount, and Date.
Notifications Section
Provides notifications or important messages for low stock levels etc related to the selected date range.
Folio
Welcome to Stayflexi’s Folio management feature! In this video, we explore how our advanced folio system simplifies billing and improves the guest experience. Learn how to manage guest charges, payments, and invoices effortlessly, all in one place. Stayflexi’s Folio module ensures accurate and transparent billing, enhancing both operational efficiency and guest satisfaction. Watch now to discover how you can streamline your hotel’s financial operations and provide a seamless experience for your guests. Don’t forget to like, subscribe, and click the bell icon for more updates on innovative hospitality solutions!
Overview Part 2: In this video, we demonstrate how our Folio feature consolidates all charges, payments, and adjustments into a single, easy-to-manage document. Learn how to efficiently handle guest invoices, track expenses, and ensure accurate billing with Stayflexi’s intuitive platform. Perfect for enhancing transparency and reducing manual errors, our Folio module streamlines financial management for your hotel. Watch now to discover how you can simplify your billing processes and improve guest satisfaction! Don’t forget to like, subscribe, and hit the notification bell for more updates on innovative hospitality solutions!
At the top-left (LHS) of the folio page, you will see:
Booking ID – the unique identifier for the reservation
Guest status – indicates whether the booking is Confirmed or Checked-in
Booking segment and sub-segment – helps identify the booking type and source
Next to these details, you will find:
Refresh icon – refreshes folio data after any changes are made
Currency conversion icon – allows you to view folio amounts in a different currency
On the top-right (RHS) of the same line:
Configuration (settings) icon – used to configure folio-related settings and layout
Directly below the Booking ID, you will see a summary box that contains:
Booking ID
Stay details (check-in & check-out date/time and number of nights)
Room name and rate plan
Room number(s) assigned
Booking made date and time
Access code(s) (if applicable)
Within the same booking summary box, you can perform the following actions:
Check-in / Check-out the guest
Print Folio for billing or records
Print Registration Card for guest documentation
On the right-hand side (RHS) of this box, you’ll also find:
More Actions – for additional booking-level operations
Notes – to add internal notes related to the booking
Below the booking information box, there is a Guest Details section that displays:
Primary guest name
Number of guests
Breakdown of adults, children, and infants
In the Guest Details section:
Click the “+ Add Guests” option on the right-hand side to add additional guests to the booking.
Below the Guest Details section, you will find the Folio Summary box.
This section provides:
A summarized view of all charges applied to the booking
A quick overview of the total amount for the stay
It helps front-desk staff quickly understand the guest’s billing at a glance.
Next to the Folio Summary box, you will see the Payment Breakdown section.
This section displays:
Payments already received
Outstanding balance
A clear split of amounts paid vs. pending
This makes it easy to track financial status without scrolling through line items.
On the right-hand side (RHS) of the folio page, you will find the Settle Dues column.
Using this section, you can:
Settle outstanding balances
Choose the mode of payment (cash, card, UPI, etc., based on configuration)
Complete payment directly from the folio page
This allows quick and seamless payment settlement during check-out or mid-stay.
At the end of the folio page, Stayflexi provides four folio view options:
Summary Folio – a high-level view of charges and totals
Detailed Folio – includes detailed breakdowns of charges
Itemized Folio – displays individual line items
Payments – shows all payment-related transactions
You can click on any of these options to switch views instantly.
On the right-hand side of the folio view section, you’ll find the Room / Custom Folio selector.
This option allows you to:
Switch between room-level folios
View or manage custom folios created for the booking
This is especially useful for:
Multi-room bookings
Split billing scenarios
Customized guest invoices
Difference between Summary, Detailed, and itemized folio versions
Stayflexi provides three distinct folio types – Summary, Detailed, and Itemized to enhance the management of guest accounts. Each folio type is designed to meet specific needs, allowing property staff to navigate billing with ease.
Login to Stayflexi: Log into your Stayflexi dashboard using your credentials.
Navigate to the Reservations Tab: From the front page of the Stayflexi dashboard, locate the top navigation menu. The second icon is the Reservation Calendar. Click on the icon to see all your reservations.
Select the Reservation: Choose the reservation for which you want to see the folio by clicking on it
View Reservation Details: A pop-up window will appear on the right side of the screen, showing the reservation details.
Find the Folio Option: Scroll down to the section with multiple actions. Look for the option labeled View Folio and click on it.
Stayflexi offers three types of folios, each designed for different operational and guest communication needs. You can switch between these from the bottom of the Folio page.
Summary Folio
The Summary Folio shows a consolidated view of the guest’s total charges, without displaying individual transaction lines. It highlights only the key figures such as total room charges, additional charges, taxes, payments, and balance due.
This folio format is best suited for quick reviews and guest-facing billing.
Hoteliers typically use the Summary Folio in the following situations:
During check-out, when the guest wants to quickly know the final payable amount
While sharing or printing a simple bill for guests who do not need detailed charge breakdowns
At the front desk during peak hours, to save time and close billing faster
For corporate or short stays, where only the total amount matters
Detailed Folio
The Detailed Folio shows a clear breakdown of charges by category, such as room charges, add-ons, and taxes, without going into every individual transaction.
Hoteliers typically use the Detailed Folio in these situations:
When a guest asks for a clear explanation of charges but not line-by-line details
For corporate, long-stay, or GST-related bookings where charge clarity is required
While handling billing queries or disputes, to explain how the total amount is formed
For internal audits or management review of booking charges
The Detailed Folio balances clarity and simplicity by explaining charges without overwhelming detail.
Itemized Folio
The Itemized Folio displays a line-by-line record of every transaction posted to the booking, including dates, descriptions, taxes, and totals.
Hoteliers typically use the Itemized Folio in these situations:
When guests request a complete transaction-level bill
For accounting, reconciliation, or financial audits
To review or verify manual postings, adjustments, or add-on charges
While resolving detailed billing disputes or discrepancies
The Itemized Folio offers maximum transparency and is best suited for detailed financial review.
How to print folio to pdf
To print folio to pdf, follow the below-mentioned steps :
Log in to Stayflexi using your dashboard credentials.
From the top navigation menu, click on the Reservation Calendar (second icon) to view all reservations.
Select the required reservation from the calendar. The reservation details panel opens on the right-hand side.
Click on View Folio to open the folio page.
On the folio page, review the booking details shown in the first section and click on Print Folio.
The Print Invoice panel opens on the right-hand side:
Use the dropdown to select the required folio type (Summary, Detailed, or Itemized).
Choose whether to Bill to Guest or Bill to Company.
Click on Generate & Print.
You will be redirected to the print preview page. From the Destination dropdown, select Save as PDF.
Click Save to download the folio as a PDF file.
Done — the folio is now saved and ready to share or store.
How do I mark a booking as a no-show, and can I do this for all OTAs?
To mark a booking as a no-show, follow the below-mentioned steps:
Login to Stayflexi: Log into your Stayflexi dashboard using your credentials.
Navigate to the Reservations Tab: From the front page of the Stayflexi dashboard, locate the top navigation menu. The second icon is the Reservation Calendar. Click on the icon to see all your reservations.
Select the Reservation: Choose the reservation for which you wish to mark as a no-show.
View Reservation Details: A pop-up window will appear on the right side of the screen, showing the reservation details.
Locate and Click on ‘Modify’ on the RHS.
click on “Set to no show” from the displayed list of actions.
You will be redirected to a Set to No-Show page. Here, select the cancellation policy appropriate for your property.
Click on the Set button after selecting the policy to finalize the no-shows status.
Once these steps are completed, the booking will be marked as a no-show in Stayflexi.
Can I do this for all OTAs?
Stayflexi marks “No Show” only for Booking.com bookings because of a direct integration through the Booking.com API. This integration is crucial since Booking.com charges a commission based on completed bookings. If a “No Show” is not properly marked, Booking.com will still apply a commission charge, even if the guest didn’t actually check in.
All Booking.com bookings with Stayflexi are set up as “pay at hotel,” meaning guests pay directly upon arrival. By marking “No Show” in Stayflexi, the system can automatically update the status on Booking.com’s side, preventing unnecessary commission charges for guests who didn’t show up.
For other OTAs, Stayflexi doesn’t support a “No Show” update.
How to capture guest signature with my payment terminal
To Delete a card from a booking in Stayflexi, follow the below steps:
1) Go to folio
2) Click on 3 dots just beside the booking ID
3) Click on Capture guest signature
4) This will light up the payment terminal and the guest can signature. This signature will be digitally recorded into the folio
How to add GST number to folio
To add GST number to folio in Stayflexi, follow the below-mentioned steps:
Login to Stayflexi: Log into your Stayflexi dashboard using your credentials.
Navigate to the Reservations Tab: From the front page of the Stayflexi dashboard, locate the top navigation menu. The second icon is the Reservation Calendar. Click on the icon to see all your reservations.
Select the Reservation: Choose the reservation you want to add GST number to folio.
View Reservation Details: A pop-up window will appear on the right side of the screen.
Click on the “View Folio” option from the reservation calendar.
On the folio page, find the invoice related to the booking.
Click on the tiny drop-down arrow next to the invoice to expand it.
A list containing guest details will appear.
Add or Edit GST Number
Locate the GST Number field and click on it.
Enter a new GST number or edit the existing one.
Save Changes
Click Update to save the changes successfully.
The GST number will now be updated for the booking.
Can I change the payment mode after settlement?
Follow these steps to update the payment mode for a reservation after settlement.
Log in to your Stayflexi account.
Open the reservation for which you want to change the payment mode.
From the reservation details panel (on the right-hand side), click “View Folio.”
Scroll down to the bottom of the folio page.
Under Folio View Mode, select “Payments.”
In the Payments section, locate the payment entry you want to modify.
On the extreme right-hand side of that payment row, click “Actions.”
Choose the option to Change Payment Mode.
Select the desired payment method from the available options.
Click Confirm to save the changes. The payment mode will now be updated successfully.
Where can we get the invoice with per night breakup?
To get the invoice with per night breakup in Stayflexi, follow the below-mentioned steps:
Login to Stayflexi: Log into your Stayflexi dashboard using your credentials.
Navigate to the Reservations Tab: From the front page of the Stayflexi dashboard, locate the top navigation menu. The second icon is the Reservation Calendar. Click on the icon to see all your reservations.
Select the Reservation: Choose the reservation you want to see the view folio history or log.
View Reservation Details: A pop-up window will appear on the right side of the screen.
Click on the “View Folio” option from the reservation calendar.
By default, the folio opens in Summary Folio Mode, displaying the entire invoice summary.
Select Folio Type:
By default, the Summary Folio is selected. You’ll find options to choose from three types of folios:
Summary Folio
Detailed Folio
Itemized Folio
View Detailed Folio:
Click on Detailed Folio to switch views.
The invoice will now display a per-night breakdown, showing charges and details for each night of the reservation.
This view allows you to analyze the charges more granularly, helping with detailed billing.
I am unable to charge or authorize the guest credit card or the virtual card provided by the OTA. What can or should I do next?
If and when the card charge or authorization fails, you will see a clear error message on the same popup and the folio log. This happens because your payment gateway has declined the charge. You can use the displayed information to follow up with your payment gateway provider
How to edit booking source in the folio
To edit booking source in the folio in Stayflexi, follow the below steps:
Login to Stayflexi: Log into your Stayflexi dashboard using your credentials.
Navigate to the Reservations Tab: From the front page of the Stayflexi dashboard, locate the top navigation menu. The second icon is the Reservation Calendar. Click on the icon to see all your reservations.
Select the Reservation: Choose the reservation you want to edit booking source in the folio.
View Reservation Details: A pop-up window will appear on the right side of the screen.
Click on the “View Folio” option from the reservation calendar.
Open More Actions:
From the folio page, click onMore Actions.
Change Booking Source
Select Change Booking Source from the drop-down menu.
A side panel will appear on the right with two options.
Select New Source and Segment
Use the drop-down menu to click on the tiny arrows next to the options.
Choose the new Source and Segment.
Click Save Changes to finalize the changes.
Your booking source has now been updated.
How to settle dues in folio?
Login to Stayflexi: Log into your Stayflexi dashboard using your credentials.
Navigate to the Reservations Tab: From the front page of the Stayflexi dashboard, locate the top navigation menu. The second icon is the Reservation Calendar. Click on the icon to see all your reservations.
Select the Reservation: Choose the reservation for which you want to see the folio by clicking on it
View Reservation Details: A pop-up window will appear on the right side of the screen, showing the Reservation details.
Find the Folio Option: In the reservation section, Look for the option labeled View Folio and click on it.
How to Settle Dues in the Folio?
Open the required Folio from the reservation.
On the right-hand side (RHS) of the folio page, locate the Payment Breakdown section.
Click on Settle Dues.
A list of available payment modes will be displayed.
Select the preferred mode of payment.
Confirm the action to settle the outstanding dues.
How to modify check in or check out date and time for a given booking.
Click on More Actions in the folio page.
Under Booking Actions, select Check-in.
Note: If the reservation is already checked in, you will see the Check-out option instead.
Click on Check-in / Check-out.
The Modify Check-in / Check-out panel will open on the right-hand side.
Select the Room, New Check-in/out Date, and Check-in Slot.
The pricing will be automatically updated based on the selected dates.
Review the updated details and click Save Changes.
Your booking has now been successfully modified.
How to edit folio amount?
Below are the step-by-step guidelines on how to edit the Folio Amount in Stayflexi:
Login to Stayflexi: Log into your Stayflexi dashboard using your credentials.
Navigate to the Reservations Tab: From the front page of the Stayflexi dashboard, locate the top navigation menu. The second icon is the Reservation Calendar. Click on the icon to see all your reservations.
Select the Reservation: Choose the reservation you want to edit the amount in the folio.
View Reservation Details: A pop-up window will appear on the right side of the screen, showing the reservation details.
Find the Folio Option: Look for the option labeled View Folio and click on it.
How to Edit the Folio Amount in Stayflexi:
Click the Folio button to access the billing information.
Check Subtotal and Total:
The Subtotal displays the charges before taxes are applied.
The Total shows the charges with taxes included.
Modify Prices:
Identify the charge you want to change.
Click on the price, to modify the price.
Instant Update:
Any changes you make will automatically reflect in the folio.
The updated price will adjust both the subtotal and total accordingly.
Finalize and Save: After editing, review the changes and click Save to apply the updates to the folio.
How can we modify the Booking price after the reservation is created?
In Stayflexi, you can modify the booking price after the reservation is confirmed. It ensures that you can easily update the price after confirmation.
Through the Reservation Calendar:
Login to Stayflexi: Log into your Stayflexi dashboard using your credentials.
Navigate to the Reservations Tab: From the front page of the Stayflexi dashboard, locate the top navigation menu. The second icon is the Reservation Calendar. Click on the icon to see all your reservations.
Select the Reservation: Choose the reservation for which you want to modify the booking price.
View Reservation Details: A pop-up window will appear on the right side of the screen.
Locate the Modify option on the right-hand side, click on it to view a list of actions.
Locate and click on “Edit Reservation”.
On the next page, modify the desired price in the appropriate field.
Click on the “Edit Reservation” button below to complete the action.
A confirmation message will appear on the screen.
How to edit the rate plan on the folio
To Edit a Rate Plan in Stayflexi, Follow the below-mentioned steps:
Login to Stayflexi: Log into your Stayflexi dashboard using your credentials.
Navigate to the Reservations Tab: From the front page of the Stayflexi dashboard, locate the top navigation menu. The second icon is the Reservation Calendar. Click on the icon to see all your reservations.
Select the Reservation: Choose the reservation you want to edit the rate plan on the folio.
View Reservation Details: A pop-up window will appear on the right side of the screen.
Click on the “View Folio” option from the reservation calendar.
From the opened page, click on “More Actions”.
From the opened More Actions menu, go to the Administrative category.
Click on Edit Rate Plan.
This opens the Edit Rate Plan panel on the right-hand side.
From the Rate Plan dropdown, select the rate plan you want to change.
Below this, you will see the Amount field.
Note: Once a rate plan is selected, the system automatically generates and updates the corresponding price in the amount field.
Review the updated amount.
Click Save Changes to apply the updated rate plan.
How to provide discounts on a Flat / Percentage basis for the existing reservations?
To Provide discounts on a flat or percentage basis for existing reservations in Stayflexi:
Login to Stayflexi: Log into your Stayflexi dashboard using your credentials.
Navigate to the Reservations Tab: From the front page of the Stayflexi dashboard, locate the top navigation menu. The second icon is the Reservation Calendar. Click on the icon to see all your reservations.
Select the Reservation: Choose the reservation for which you want to modify the booking price.
View Reservation Details: A pop-up window will appear on the right side of the screen.
Click on the “View Folio” option from the reservation calendar.
In the“View Folio” page, click on “More Actions”.
From the More Folio Actions menu, scroll to the Financial category.
Click on Apply Promo / Discount.
This opens the discount panel on the right-hand side.
In the Action Type dropdown, choose Apply Manual Discount.
Other available options include Apply Coupon Code and Apply Offer.
Under Type, select either:
Flat (fixed amount), or Percent (percentage-based discount).
Enter the discount amount.
Click Validate to preview the applied discount amount in INR.
Once verified, click Apply to Folio at the bottom to add the discount to the folio.
How to release a booking from Hold Bookings in Stayflexi?
If a booking is placed on hold, releasing it and assigning it to a room is simple. Here’s how you can do it from the reservation calendar:
Below are the step-by-step guidelines on how to release a booking from Hold Bookings:
Access the Reservation Calendar: Log in to the dashboard and navigate to the Reservation Calendar.
Locate Unassigned and On-Hold Bookings: On the right-hand side of the screen, click on the UA [unassigned] section. This will display any Unassigned bookings, On-Hold bookings, and inquiries.
Select On-Hold Bookings: From the list, click on the On-Hold Bookings section to view details of guests with bookings on hold.
Assign the Booking: Select the booking you want to release from hold, then click on Assign.
Fill in Room Details: A pop-up window will appear where you can fill in the room details you’d like to assign. Complete all required fields and click Assign.
Confirm the Assignment: The guest’s name will now reflect on the reservation calendar grid in the selected room.
You will receive confirmation that the booking has been successfully released from hold and assigned to a room.
Where can we modify the Rate plan after the reservation is confirmed?
To Modify the Rate Plan after a reservation is confirmed in Stayflexi, follow the below mentioned steps:
Login to Stayflexi: Log into your Stayflexi dashboard using your credentials.
Navigate to the Reservations Tab: From the front page of the Stayflexi dashboard, locate the top navigation menu. The second icon is the Reservation Calendar. Click on the icon to see all your reservations.
Select the Reservation: Choose the reservation for which you want to modify the booking price.
View Reservation Details: A pop-up window will appear on the right side of the screen.
Click on the “View Folio” option from the reservation calendar.
In the “View Folio” page, click on “More Folio Actions”.
From the listed options, locate and click on “Edit Rate Plan”.
A page will open on the right-hand side of the screen.
In the Rate Plan column, click the tiny arrow to view all available rate plans for your property.
Choose the desired rate plan and edit it.
Click the “Confirm” button to complete the action.
You will receive a confirmation message.
How to unassign a booking from a room number from the reservation calendar or room folio ?
In Stayflexi, you can unassign a booking from a room number using two methods. Below is the explanation of two methods:
Through the Reservation Calendar:
Go to the Reservation Calendar: Navigate to the reservation calendar in Stayflexi.
Select the Reservation Calendar: Click on the reservation you want to unassign from a room.
Access Room Options: In the opened window on the right-hand side, you will see multiple options.
Unassign the Room: Locate and click on “Unassign Room”.
Confirm the Action: A confirmation page will appear to the right.
Complete the Action: Click “Yes, Unassign” to finalize the process
Through Folio:
Login to Stayflexi: Log into your Stayflexi dashboard using your credentials.
Navigate to the Reservations Tab: From the front page of the Stayflexi dashboard, locate the top navigation menu. The second icon is the Reservation Calendar. Click on the icon to see all your reservations.
Select the Reservation: Choose the reservation you want to Unassign from a room.
View Reservation Details: A pop-up window will appear on the right side of the screen.
Click on the “View Folio” option from the reservation calendar.
From the opened page, click on “More Folio Actions”.
Locate and click on Unassign room
A pop-up will appear on the Right Hand Side as a confirmation.
Complete the action by clicking Unassign Room below.
How to release a booking inventory by putting booking on hold from folio or reservation calendar
In Stayflexi, you can put a booking on hold using two methods: through the reservation calendar or the folio.
Below is a step-by-step explanation of both methods:
Through Reservation Calendar:
Step 1: Navigate to the Reservation Calendar.
Step 2: Click on the Reservation you want to put on hold.
Step 3: A page will open on the right-hand side.
Step 4: From the opened page, click on Modify and select “Hold Booking”.
Step 5: A confirmation page will open
Step 6: Click “Yes, hold booking.”
You will receive a confirmation message that the action has been successfully completed.
Through Folio:
Step 1: Click on the Reservation you want to put on hold.
Step 2: A page will open on the right-hand side.
Step 3: Locate and click on “View Folio” from the listed actions.
Step 4: On the folio page, click on “More Folio Actions”.
Step 5: Locate Hold Booking from the multiple listed actions.
Step 6: Click on “Hold Booking” to proceed further.
Step 7: A confirmation page will open on the right side of the screen.
Step 8: Click “Confirm” to complete the action.
You will receive a confirmation message that the booking has been successfully placed on hold.
Can I delete a particular reservation from system
YES, you can delete a particular reservation in Stayflexi by following the below steps:
Login to Stayflexi: Log into your Stayflexi dashboard using your credentials.
Navigate to the Reservations Tab: From the front page of the Stayflexi dashboard, locate the top navigation menu. The second icon is the Reservation Calendar. Click on the icon to see all your reservations.
Select the Reservation: Choose the reservation for which you want to see the folio by clicking on it
View Reservation Details: A pop-up window will appear on the right side of the screen.
Find the Folio Option: Scroll down to the section with multiple actions. Look for the option labeled View Folio and click on it.
Click on More Folio Actions.
The options are categorized — under the Administrative category, select Delete Folio.
Click Delete Folio to proceed.
Once deleted:
The reservation will be removed from the Reservation Calendar.
It will no longer appear in active booking views.
Note: Deleted reservations are not permanently erased. You can find the reservation and its details in the Folio Report under the Archived state. The booking can be reverted at any time if required — only if the user has been granted the necessary permission under Roles and Access.
How to move a booking to a different room number or room category
In Stayflexi, You can move a booking to a different room number or room category using two methods:
Below is the explanation of moving a booking to a different room or room category through the reservation calendar:
Login to Stayflexi: Log into your Stayflexi dashboard using your credentials.
Navigate to the Reservations Tab: From the front page of the Stayflexi dashboard, locate the top navigation menu. The second icon is the Reservation Calendar. Click on the icon to see all your reservations.
Select the Reservation: Choose the confirmed reservation you want to move a booking to a different room number or category.
Click on Move Room: From the list of available actions, locate and click the Move Room button next to the reservation.
Open the Move Reservation Page: A page will open to the Right Hand Side.
Select Room and Category: Choose the new room number and room category based on the guest’s requirement.
Automatic Amount Update: The amount will automatically update in the relevant columns based on the new room.
Add a Remark: In the remarks column, provide the reason for moving the booking to another room.
Complete the Action: Click on “Move Reservation” at the bottom to finalize the move.
Through View Folio:
Login to Stayflexi: Log into your Stayflexi dashboard using your credentials.
Navigate to the Reservations Tab: From the front page of the Stayflexi dashboard, locate the top navigation menu. The second icon is the Reservation Calendar. Click on the icon to see all your reservations.
Select the Reservation: Choose the confirmed reservation you want to move a booking to a different room number or category.
View Reservation Details: A pop-up window will appear on the right side of the screen, showing the booking and customer information.
Find the Folio Option: Scroll down to the section with multiple actions. Look for the option labeled View Folio and click on it.
Click on More Folio Actions: On the folio page, click the More Folio Actions button to view additional options.
Locate and click on Move Room: From the listed options, click on move room.
Open the Move Reservation Page: A page will open to the RHS.
Select Room and Category: Choose the new room number and room category based on the guest’s requirement.
Automatic Amount Update: The amount will automatically update in the relevant columns based on the new room.
Add a Remark: In the remarks column, provide the reason for moving the booking to another room.
Complete the Action: Click on “Upgrade room” at the bottom to finalize the move.
How to split a group booking ?
A split booking in Stayflexi allows you to break down a group reservation into individual bookings by separating a group room booking into individual rooms. This feature is especially useful when a group booking for multiple rooms needs to be split into separate reservations for each room. It offers flexibility by allowing each room to have its own folio, billing, and details after the split, while still retaining the original booking information. Once the booking is split, the group reservation ID will change to individual reservation IDs, and the room prices will be adjusted accordingly.
To Split a group booking in Stayflexi, follow the below steps:
Login to Stayflexi: Log into your Stayflexi dashboard using your credentials.
Navigate to the Reservations Tab: From the front page of the Stayflexi dashboard, locate the top navigation menu. The second icon is the Reservation Calendar. Click on the icon to see all your reservations.
Select the Group Booking: Click on the group booking that you want to split.
Navigate to the Folio: Open the folio of the selected booking.
Access More Folio Actions: Click on “More Folio Actions”.
Locate and Click on Split Bookings: From the list of actions, find and select “Split Bookings”.
Confirm the Action: A pop-up will appear asking for confirmation. Click “Yes, Split Booking”.
The group booking will now be split into individual bookings, and you will no longer see the group booking icon next to the reservations.
How to add company details to a folio in Stayflexi and apply them during billing?
Below are the step-by-step guidelines on how to find the Folio of a Reservation in Stayflexi:
Login to Stayflexi: Log into your Stayflexi dashboard using your credentials.
Navigate to the Reservations Tab: From the front page of the Stayflexi dashboard, locate the top navigation menu. The second icon is the Reservation Calendar. Click on the icon to see all your reservations.
Select the Reservation: Choose the reservation you want to add the company details.
View Reservation Details: A pop-up window will appear on the right side of the screen, showing the booking and customer information.
Find the Folio Option: Scroll down to the section with multiple actions. Look for the option labeled View Folio and click on it.
How to Add Company Details to a Folio:
Locate More Folio Actions: On the folio page, find the section called More Folio Actions.
Select Add Company: Click on the option to Add Company Details.
Fill in Company Details: A popup will appear where you need to fill in all the relevant company information.
Click Add Details: Once all the details are filled in, click the green Add Details button at the bottom to save the company information.
Confirmation Message: You will receive a confirmation message that the company details have been successfully added.
Billing with Company Details:
Booking Segment and Source:
During billing, go to the folio. Next to the guest name, click on the Booking Segment column.
Select Direct Billing to link the company to the folio.
In the Booking Source column, select the appropriate company details.
Proceed with Billing:
The bill will be processed with selected company details.
Sending Folio PDF: You can send the Folio PDF to:
The Guest
The Company.
Click on the print icon in black color at the top right-hand side to see the options for sending the folio.
How to set a booking to no show
In Stayflexi, you can set a booking no-show using two methods: through the reservation calendar or the folio.
Below are the explanations and guidelines for both methods:
Through the Reservation Calendar:
Step 1: Go to Reservation Calendar.
Step 2: Click on the reservation you want to set a no show.
Step 3: A page will open on the right side with multiple actions.
Step 4: Locate and click on “Set to no show”.
Step 5: A page will open on the right side for selecting the no-show option.
Step 6: Select your options, such as:
Apply Cancellation policy.
Don’t void.
Charge one night and void remaining.
Void all remaining charges.
Step 7: Click “Yes” to complete the action.
You will receive a confirmation message that the booking has been successfully Set to no show.
Through Folio:
Step 1: Click on the reservation you want to set to no-show.
Step 2: A page will open on the right side.
Step 3: Select “View Folio” from the available actions.
Step 4: On the Folio page, click on “More Folio Actions.”
Step 5: Locate and click on the” Set to no show option”.
Step 6: Select the void charge options according to your preference.
Step 7: Click on “Set to no show” to complete the action.
You will receive a confirmation message indicating that the booking has been successfully Set to no show.
How to view folio history or folio log ?
Below is the explanation of how to view folio history or log in Stayflexi:
Login to Stayflexi: Log into your Stayflexi dashboard using your credentials.
Navigate to the Reservations Tab: From the front page of the Stayflexi dashboard, locate the top navigation menu. The second icon is the Reservation Calendar. Click on the icon to see all your reservations.
Select the Reservation: Choose the reservation you want to see the view folio history or log.
View Reservation Details: A pop-up window will appear on the right side of the screen.
Click on the “View Folio” option from the reservation calendar.
From the opened page, click on “More Folio Actions”.
From the listed options, locate and click on “Folio Logs”.
A new page will open displaying the folio logs for the selected reservation.
You can see detailed information such as the log time, the user who made the action, and the logged action itself.
How to lock a booking a specific room so that system does not move it automatically
In Stayflexi, you can lock a booking to a specific room to prevent the system from moving it automatically. This can be done in two ways: through the reservation calendar or the folio. Below are the instructions for both methods.
Through Reservation Calendar:
Step 1: Log in to the Stayflexi dashboard using your credentials.
Step 2: Click on the Second icon on top to open the reservation calendar.
Step 3: Select the reservation you want to lock to a specific room.
Step 4: A page will appear on the right-hand side with multiple actions.
Step 5: Locate and click on “Lock Booking”.
Step 6: A confirmation page will open.
Step 7: Click “Yes, lock” to complete the action.
You will receive a confirmation message that the room has been successfully locked to the booking.
Through Folio:
Step 1: Log in to the Stayflexi dashboard using your credentials.
Step 2: Click on the Second icon on top to open the reservation calendar.
Step 3: Select the reservation you want to lock to a specific room.
Step 4: A page will appear on the right-hand side with multiple actions.
Step 5: Locate and click on “View Folio”.
Step 6: On the folio page, click on “More Folio Actions” in green.
Step 7: On the folio page, click on “Lock Booking”.
Step 8: A confirmation page will open on the right side.
Step 9: Click “Yes, lock room” to complete the action.
You will receive confirmation that the booking has been successfully locked to the specific room.
How to unlock a booking a specific room so that system can move it automatically
In Stayflexi, you can unlock a booking to a specific room to prevent the system from moving it automatically. This can be done in two ways: through the reservation calendar or the folio. Below are the instructions for both methods.
Through Reservation Calendar:
Step 1: Log in to the Stayflexi dashboard using your credentials.
Step 2: Click on the Second icon on top to open the reservation calendar.
Step 3: Select the reservation you want to unlock for a specific room.
Step 4: A page will appear on the right-hand side with multiple actions.
Step 5: Locate and click on “Unlock Booking”.
Step 6: A confirmation page will open.
Step 7: Click “Yes, unlock” to complete the action.
You will receive a confirmation message that the room has been successfully unlocked for the booking.
Through Folio:
Step 1: Log in to the Stayflexi dashboard using your credentials.
Step 2: Click on the Second icon on top to open the reservation calendar.
Step 3: Select the reservation you want to unlock for a specific room.
Step 4: A page will appear on the right-hand side with multiple actions.
Step 5: Locate and click on “View Folio”.
Step 6: On the folio page, click on “More Folio Actions” in green.
Step 7: On the folio page, click on “Unlock Booking”.
Step 8: A confirmation page will open on the right side.
Step 9: Click “Yes, unlock room” to complete the action.
You will receive confirmation that the booking has been successfully unlocked to the specific room.
How to add a new room to a group booking or remove a room from group booking
To add a new room to a group booking in Stayflexi, follow the below steps:
Login to Stayflexi: Log into your Stayflexi dashboard using your credentials.
Navigate to the Reservations Tab: From the front page of the Stayflexi dashboard, locate the top navigation menu. The second icon is the Reservation Calendar. Click on the icon to see all your reservations.
Select the Group Booking: Click on the group booking for which you want to add a new room.
Navigate to the Folio: Open the folio of the selected booking.
Access More Folio Actions: Click on “More Folio Actions”.
Locate and click on “Add New Room to Group Booking”.
A page will open on the right side. Fill in the guest details and room information you want to add.
The room price will automatically be generated based on the room’s rate.
Click on the “Add” button below to complete the action.
To delete a room from a group booking in Stayflexi, follow the below steps:
Login to Stayflexi: Log into your Stayflexi dashboard using your credentials.
Navigate to the Reservations Tab: From the front page of the Stayflexi dashboard, locate the top navigation menu. The second icon is the Reservation Calendar. Click on the icon to see all your reservations.
Select the Group Booking: Click on the group booking for which you want to add a new room.
Navigate to the Folio: Open the folio of the selected booking.
Access More Folio Actions: Click on “More Folio Actions”.
Locate and click on “Delete room from group booking”.
A page will open in the middle of the screen.
Click on the tiny arrow [as shown in the picture] to view the room ID list.
Select the room you want to delete.
Click on Cancel Booking to complete the action.
How to add Addons or any chargeable service in room folio ?
Login to Stayflexi: Log into your Stayflexi dashboard using your credentials.
Navigate to the Reservations Tab: From the front page of the Stayflexi dashboard, locate the top navigation menu. The second icon is the Reservation Calendar. Click on the icon to see all your reservations.
Select the Reservation: Choose the reservation for which you want to see the folio by clicking on it
View Reservation Details: A pop-up window will appear on the right side of the screen, showing the booking and customer information.
Find the Folio Option: Scroll down to the section with multiple actions. Look for the option labeled View Folio and click on it.
How to add Addons or any chargeable service in the room folio?
At the top of the page, locate the Add Hotel Addons button.
Click on it to proceed further.
On the right side, the add hotel addons page will open.
select the Room ID for which you want to add addons.
Click on Addons: When you click on Addons, you will see two options:
Predefined Addons: A list of preset services [e.g., breakfast, spa, parking] with fixed pricing.
Custom Addons: An option where the property can manually add any service or item not predefined, allowing you to input the description and price as needed.
Below that, you will see a list of details like date, payment mode, etc.
Fill in the mandatory column for the folio item name that you are adding.
Once completed, scroll down and click on the Add New Hotel Addon button below to finalize and save the addon.
How to add notes to a given booking ?
To Add Notes to a Booking in Stayflexi, follow the below-mentioned steps:
Login to Stayflexi: Log into your Stayflexi dashboard using your credentials.
Navigate to the Reservations Tab: From the front page of the Stayflexi dashboard, locate the top navigation menu. The second icon is the Reservation Calendar. Click on the icon to see all your reservations.
Select the Reservation: Choose the reservation you want to add the notes.
View Reservation Details: A pop-up window will appear on the right side of the screen.
Click on the “View Folio” option from the reservation calendar.
On the folio page, locate the Notes icon next to the guest alphabet and guest add icon [as shown in the image below].
Click on the Notes.
A panel will open on the right-hand side, displaying two sections:
Customer Notes
Booking Notes
Select the appropriate section where you want to add your notes.
After entering the notes, click the Add button to save.
Once you add notes to a reservation, the message icon in the reservation calendar will update and reflect that notes have been added to the particular reservation.
Refer to the first image above to view the notes icon, circled in the reservation, which indicates that notes have been added to that specific reservation.
How to take different type of payments for a given booking
To take different types of payments for a booking in Stayflexi, follow the below-mentioned steps:Through the Reservation Calendar
Login to Stayflexi: Log into your Stayflexi dashboard using your credentials.
Navigate to the Reservations Tab: From the front page of the Stayflexi dashboard, locate the top navigation menu. The second icon is the Reservation Calendar. Click on the icon to see all your reservations.
Select the Reservation: Choose the reservation you want to take different types of payments.
View Reservation Details: A pop-up window will appear on the right side of the screen.
From the available options, click on Settle Dues.
A list of payment methods will appear.
Choose the guest’s preferred payment method.
A pop-up will appear in the middle of the screen.
Fill in the required payment details and click the submit button to complete the action.
Through View Folio:
Login to Stayflexi: Log into your Stayflexi dashboard using your credentials.
Navigate to the Reservations Tab: From the front page of the Stayflexi dashboard, locate the top navigation menu. The second icon is the Reservation Calendar. Click on the icon to see all your reservations.
Select the Reservation: Choose the reservation for which you want to see the folio by clicking on it
View Reservation Details: A pop-up window will appear on the right side of the screen, showing the booking and customer information.
Find the Folio Option: Scroll down to the section with multiple actions. Look for the option labeled View Folio and click on it.
At the top of the page, locate the Settle Dues button.
Click on it to view the available options.
On the right side, select the Room ID for which you want to settle the dues.
Below that, you will see a list of payment methods available.
Choose the payment method the guest prefer to pay.
Fill in the required payment details.
Click the Record button to complete the action.
Through More Folio Actions:
Login to Stayflexi: Log into your Stayflexi dashboard using your credentials.
Navigate to the Reservations Tab: From the front page of the Stayflexi dashboard, locate the top navigation menu. The second icon is the Reservation Calendar. Click on the icon to see all your reservations.
Select the Reservation: Choose the reservation for which you want to see the folio by clicking on it
View Reservation Details: A pop-up window will appear on the right side of the screen, showing the booking and customer information.
Find the Folio Option: Scroll down to the section with multiple actions. Look for the option labeled View Folio and click on it.
Click on More Folio Actions: From the listed options, locate and click on settle dues.
Click the Record button to complete the action.
How to take cash deposit for a given booking
The Cash Deposit feature in Stayflexi allows you to accept and record cash payments made by guests as deposits during their stay. This feature is handy for tracking advance payments or security deposits that guests may need to provide at check-in or before using certain services.
Here’s how it works:
The property can add a cash deposit against a guest’s booking.
The amount is recorded in the system, ensuring both the guest and the property can track the deposit.
The deposit can later be used to settle any dues or refund if necessary.
To take a cash deposit for a given booking in Stayflexi, follow the below-mentioned steps:Through the Reservation Calendar
Login to Stayflexi: Log into your Stayflexi dashboard using your credentials.
Navigate to the Reservations Tab: From the front page of the Stayflexi dashboard, locate the top navigation menu. The second icon is the Reservation Calendar. Click on the icon to see all your reservations.
Select the Reservation: Choose the reservation you want to take a cash deposit.
View Reservation Details: A pop-up window will appear on the right side of the screen.
From the available options, click on Settle Dues.
A list of payment methods will appear.
Choose Cash deposit.
A pop-up will appear in the middle of the screen.
Fill in the required payment details and additionally, you have a description column, where you can input specific notes or details about the transaction.
Click the submit button to complete the action.
Through View Folio:
Login to Stayflexi: Log into your Stayflexi dashboard using your credentials.
Navigate to the Reservations Tab: From the front page of the Stayflexi dashboard, locate the top navigation menu. The second icon is the Reservation Calendar. Click on the icon to see all your reservations.
Select the Reservation: Choose the reservation for which you want to take a cash deposit.
View Reservation Details: A pop-up window will appear on the right side of the screen, showing the booking and customer information.
Find the Folio Option: Scroll down to the section with multiple actions. Look for the option labeled View Folio and click on it.
At the top of the page, locate the Settle Dues button.
Click on it to view the available options.
On the right side, select the Room ID for which you want to take cash deposit.
Below that, you will see a list of payment methods available.
Choose Cash deposit.
A pop-up will appear in the middle of the screen.
Fill in the required payment details and additionally, you have a description column, where you can input specific notes or details about the transaction.
Click the submit button to complete the action.
How to refund a payment to guest from Stayflexi PMS ?
hi
To Refund a Payment in Stayflexi, follow the below steps:
Log in to your Stayflexi account.
Open the reservation for which you want to process the refund.
From the reservation details panel (on the right-hand side), click “View Folio.”
Scroll down to the bottom of the folio page.
Under Folio View Mode, select “Payments.”
On the extreme right side of the relevant payment entry, click “Actions.”
From the available options, select “Refund.”
In the pop-up window, enter the reason for the refund.
Click Refund to complete the refund process.
How to send a payment link to the guest from Stayflexi PMS?
To Send a Payment link to the guest in Stayflexi, follow the below steps:
Login to Stayflexi: Log into your Stayflexi dashboard using your credentials.
Navigate to the Reservations Tab: From the front page of the Stayflexi dashboard, locate the top navigation menu. The second icon is the Reservation Calendar. Click on the icon to see all your reservations.
Select the Reservation: Choose the reservation for which you want to send the payment link to.
View Reservation Details: A pop-up window will appear on the right side of the screen.
Click on the “View Folio” option from the reservation calendar.
From the opened page, click on “More Folio Actions”.
Locate and click on “Send Payment Link.”
In the opened page, fill in the guest’s email, mobile number, and the amount.
By default, the guest details entered at the time of reservation will already be reflected in these columns.
Click on “Send Payment Link” to complete the action, Guest will receive the payment link.
A confirmed message will appear on the screen.
How to delete a saved card from given booking
To Delete a card from a booking in Stayflexi, follow the below steps:
Login to Stayflexi: Log into your Stayflexi dashboard using your credentials.
Navigate to the Reservations Tab: From the front page of the Stayflexi dashboard, locate the top navigation menu. The second icon is the Reservation Calendar. Click on the icon to see all your reservations.
Select the Reservation: Choose the reservation for which you want to add a card.
View Reservation Details: A pop-up window will appear on the right side of the screen.
Click on the Settle Dues to see the listed options.
Click on the card number to bring up the card with options.
A pop-up will appear, showing the card details with options.
Click on the “Delete Card” button to remove the card from the booking.
You have successfully deleted the card now.
How to add guest card details to a particular booking and charge it?
To add a card to a particular booking and charge it in Stayflexi, follow the below steps:
Login to Stayflexi: Log into your Stayflexi dashboard using your credentials.
Navigate to the Reservations Tab: From the front page of the Stayflexi dashboard, locate the top navigation menu. The second icon is the Reservation Calendar. Click on the icon to see all your reservations.
Select the Reservation: Choose the reservation for which you want to add a card.
View Reservation Details: A pop-up window will appear on the right side of the screen.
Click on the Settle Dues to see the listed options.
Locate and click on “Add Card”.
A pop-up will appear on the screen. Fill in the card details.
Click on “Add card” to complete the process.
Again, click on “Settle Dues” to see the added card.
Click on the card number to bring up the card with options.
Enter the amount you want to charge and click on “Charge” to complete the action
Once the card is charged amount will reflect under the payment made section in the room folio.
How to Change the booking segment or source ?
To change the Booking Segment or Source in Stayflexi, follow the below mentioned steps:
Login to Stayflexi: Log into your Stayflexi dashboard using your credentials.
Navigate to the Reservations Tab: From the front page of the Stayflexi dashboard, locate the top navigation menu. The second icon is the Reservation Calendar. Click on the icon to see all your reservations.
Select the Reservation: Choose the reservation for which you want to change the booking segment and source.
View Reservation Details: A pop-up window will appear on the right side of the screen.
Click on the “View Folio” option from the reservation calendar.
From the opened page, click on “More Folio Actions”.
Locate and click on “Change Booking Source”.
A page will open on the right-hand side.
Click on the tiny arrows in the two columns to view and change the booking segment and source.
Click on “Add Segment” below to complete the action.
How to edit the guest details in the folio
To edit the guest details in the folio, follow the below mentioned steps:
Login to Stayflexi: Log into your Stayflexi dashboard using your credentials.
Navigate to the Reservations Tab: From the front page of the Stayflexi dashboard, locate the top navigation menu. The second icon is the Reservation Calendar. Click on the icon to see all your reservations.
Select the Reservation: Choose the reservation for which you want to modify the booking price.
View Reservation Details: A pop-up window will appear on the right side of the screen.
Click on the “View Folio” option from the reservation calendar.
On the opened page, click on the alphabet icon with the guest’s name initial in the booking ID column.
A page will open on the right side.
Edit the guest details by filling the boxes one by one.
Click on “Save Guest” after making the changes to complete the action.
How to check-in a booking
In Stayflexi, you can check in a booking using three methods:
Through the Reservation Calendar:
Below are the step by step guidelines for check-in a booking in Stayflexi:
Login to Stayflexi: Log into your Stayflexi dashboard using your credentials.
Navigate to the Reservations Tab: From the front page of the Stayflexi dashboard, locate the top navigation menu. The second icon is the Reservation Calendar. Click on the icon to see all your reservations.
Select the Reservation: Choose the confirmed reservation you want to check-in.
Click on Check-In: From the list of available actions, locate and click the Check-In button next to the reservation.
Confirmation Page: A panel will open on the right-hand side, confirming that you are checking in the guest with the displayed reservation ID.
Complete Check-In: To finalize the process, scroll down and click on the Check-In button at the bottom of the confirmation panel. This will complete the action and check the guest in.
Once you check in the guest by clicking the Check-In button, the reservation color will change from orange to green. This color change serves as a visual indicator for easy understanding, signifying that the guest has successfully checked in.
A confirmation message will appear on the screen.
Through View Folio:
Login to Stayflexi: Log into your Stayflexi dashboard using your credentials.
Navigate to the Reservations Tab: From the front page of the Stayflexi dashboard, locate the top navigation menu. The second icon is the Reservation Calendar. Click on the icon to see all your reservations.
Select the Reservation: Choose the confirmed reservation you want to check-in.
View Reservation Details: A pop-up window will appear on the right side of the screen, showing the booking and customer information.
Find the Folio Option: Scroll down to the section with multiple actions. Look for the option labeled View Folio and click on it.
Locate the Check-In box: On the folio page, at the top, you’ll see the “Check-In” box [as shown in the above image].
Click on the Check-In Box: Click on the box to begin the check-in process.
Confirmation Page: A confirmation panel will open on the right-hand side, showing the booking ID.
Complete Check-In: Proceed by clicking the Check-In button on the panel to finalize and complete the action
Once you check in the guest by clicking the Check-In button, the reservation color will change from orange to green. This color change serves as a visual indicator for easy understanding, signifying that the guest has successfully checked in.
A confirmation message will appear on the screen.
Through More Folio Actions:
Login to Stayflexi: Log into your Stayflexi dashboard using your credentials.
Navigate to the Reservations Tab: From the front page of the Stayflexi dashboard, locate the top navigation menu. The second icon is the Reservation Calendar. Click on the icon to see all your reservations.
Select the Reservation: Choose the confirmed reservation you want to check-in.
View Reservation Details: A pop-up window will appear on the right side of the screen, showing the booking and customer information.
Find the Folio Option: Scroll down to the section with multiple actions. Look for the option labeled View Folio and click on it.
Click on More Folio Actions: On the folio page, click the More Folio Actions button to view additional options.
Locate the Check-In Option: From the listed options, locate and click on the Check-In option.
Confirmation Page: A confirmation panel will open on the right-hand side, showing the booking ID.
Complete Check-In: Proceed by clicking the Check-In button on the panel to finalize and complete the action
Once you check in the guest by clicking the Check-In button, the reservation color will change from orange to green. This color change serves as a visual indicator for easy understanding, signifying that the guest has successfully checked in.
A confirmation message will appear on the screen.
How to checkout a booking
In Stayflexi, you can check-out a booking using three methods:
Through the Reservation Calendar:
Below are the step by step guidelines for check-out a booking in Stayflexi:
Login to Stayflexi: Log into your Stayflexi dashboard using your credentials.
Navigate to the Reservations Tab: From the front page of the Stayflexi dashboard, locate the top navigation menu. The second icon is the Reservation Calendar. Click on the icon to see all your reservations.
Select the Reservation: Choose the confirmed reservation you want to check-out.
Click on Check-out: From the list of available actions, locate and click the check-out button next to the reservation.
Confirmation Page: A panel will open on the right-hand side, confirming that you are checking out the guest with the displayed reservation ID.
Complete Check-out: To finalize the process, scroll down and click on the Check-out button at the bottom of the confirmation panel. This will complete the action and check the guest out.
Once you check out the guest by clicking the Check-out button, the reservation color will change from green to violet. This color change serves as a visual indicator for easy understanding, signifying that the guest has successfully checked out.
A confirmation message will appear on the screen.
Through View Folio:
Login to Stayflexi: Log into your Stayflexi dashboard using your credentials.
Navigate to the Reservations Tab: From the front page of the Stayflexi dashboard, locate the top navigation menu. The second icon is the Reservation Calendar. Click on the icon to see all your reservations.
Select the Reservation: Choose the confirmed reservation you want to check-out.
View Reservation Details: A pop-up window will appear on the right side of the screen, showing the booking and customer information.
Find the Folio Option: Scroll down to the section with multiple actions. Look for the option labeled View Folio and click on it.
Locate the Check-out box: On the folio page, at the top, you’ll see the “Check-out” box [as shown in the above image].
Click on the Check-out Box: Click on the box to begin the check-out process.
Confirmation Page: A confirmation panel will open on the right-hand side, showing the booking ID.
Complete Check-out: Proceed by clicking the Check-Out button on the panel to finalize and complete the action
Once you check out the guest by clicking the Check-out button, the reservation color will change from green to violet. This color change serves as a visual indicator for easy understanding, signifying that the guest has successfully checked out.
A confirmation message will appear on the screen.
Through More Folio Actions:
Login to Stayflexi: Log into your Stayflexi dashboard using your credentials.
Navigate to the Reservations Tab: From the front page of the Stayflexi dashboard, locate the top navigation menu. The second icon is the Reservation Calendar. Click on the icon to see all your reservations.
Select the Reservation: Choose the confirmed reservation you want to check-in.
View Reservation Details: A pop-up window will appear on the right side of the screen, showing the booking and customer information.
Find the Folio Option: Scroll down to the section with multiple actions. Look for the option labeled View Folio and click on it.
Click on More Folio Actions: On the folio page, click the More Folio Actions button to view additional options.
Locate the Check-Out Option: From the listed options, locate and click on the Check-Out option.
Confirmation Page: A confirmation panel will open on the right-hand side, showing the booking ID.
Complete Check-Out: Proceed by clicking the Check-out button on the panel to finalize and complete the action
Once you check out the guest by clicking the Check-out button, the reservation color will change from green to violet. This color change serves as a visual indicator for easy understanding, signifying that the guest has successfully checked out.
A confirmation message will appear on the screen.
How to cancel a booking
In Stayflexi, you can cancel a booking using two methods: through the reservation calendar or via the folio.
Below are the explanations and guidelines for both methods:
Through the Reservation Calendar:
Step 1: Go to Reservation Calendar.
Step 2: Click on the reservation you want to cancel.
Step 3: A page will open on the right side with multiple actions.
Step 4: Locate and click on “Cancel Booking”.
Step 5: A page will open on the right side for cancellation options.
Step 6: Select your options, such as:
Apply Cancellation policy:- It will cancel the booking and apply the amount as per cancellation policy configured.
Don’t void.
Charge one night and void remaining:- It will charge one night prices only and void remaining night prices.
Void all remaining charges:- It will make the room amount zero for the given booking id.
Step 7: Click “Yes, Cancel booking”.
You will receive a confirmation message that the booking has been successfully canceled.
Through Folio:
Step 1: Click on the reservation you want to cancel.
Step 2: A page will open on the right side.
Step 3: Select “View Folio” from the available actions.
Step 4: On the Folio page, click on “More Folio Actions.”
Step 5: Locate and click on “Cancel Booking”.
Step 6: Select the void charge options according to your preference.
Step 7: Click “Confirm Cancel” to complete the action.
You will receive a confirmation message indicating that the booking has been successfully canceled.
Note: To cancel an online travel portal or channel booking, Kindly reach out to the respective online travel portal or channel.
How to email guest folio and confirmation voucher?
To email a guest folio in Stayflexi, you can quickly send a detailed breakdown of the guest’s charges, payments, and any adjustments directly to their email.
Below are the step-by-step guidelines for emailing a guest folio in Stayflexi:
Login to Stayflexi: Log into your Stayflexi dashboard using your credentials.
Navigate to the Reservations Tab: From the front page of the Stayflexi dashboard, locate the top navigation menu. The second icon is the Reservation Calendar. Click on the icon to see all your reservations.
Select the Reservation: Choose the reservation for which you want to send the folio by clicking on it
View Reservation Details: A pop-up window will appear on the right side of the screen, showing the booking and customer information.
Find the Folio Option: Scroll down to the section with multiple actions. Look for the option labeled View Folio and click on it.
Access More Folio Options: This will open the folio page. On this page, click on the More Folio Options button.
Select Email Folio: A pop-up will appear with various options. Find and click on Email Folio.
Review Guest Email: A new pop-up will appear on the right side of the screen, automatically filled with guest’s email address.
Send the Folio: Click on Send to email the folio to the guest.
Confirmation: You will now receive a confirmation message indicating the folio has been successfully sent.
how to send a Confirmation voucher?
To email a confirmation voucher in Stayflexi, you can send guests an official document confirming their reservation details, including dates, room type, and any associated charges.
Here are the step-by-step guidelines for sending a confirmation voucher:
Login to Stayflexi: Log into your Stayflexi dashboard using your credentials.
Navigate to the Reservations Tab: From the front page of the Stayflexi dashboard, locate the top navigation menu. The second icon is the Reservation Calendar. Click on the icon to see all your reservations.
Select the Reservation: Choose the reservation for which you want to send the folio by clicking on it
View Reservation Details: A pop-up window will appear on the right side of the screen, showing the booking and customer information.
Find the Folio Option: Scroll down to the section with multiple actions. Look for the option labeled View Folio and click on it.
Access More Folio Options: This will open the folio page. On this page, click on the More Folio Options button.
Email Confirmation: From the options that pop up, select Email Booking Confirmation.
Confirm Email: Another pop-up will appear to the right, where the guest’s email address will automatically be displayed, You can also edit it in case you want to send it to the different email id.
Send the Email: Click on the Send button below the email field to send the confirmation voucher.
Confirmation Message: You will receive a confirmation message indicating that the email has been successfully sent to the guest.
How to exempt taxes from a particular reservation?
Login to Stayflexi: Log into your Stayflexi dashboard using your credentials.
Navigate to the Reservations Tab: From the front page of the Stayflexi dashboard, locate the top navigation menu. The second icon is the Reservation Calendar. Click on the icon to see all your reservations.
Select the Reservation: Choose the reservation for which you want to see the folio by clicking on it
View Reservation Details: A pop-up window will appear on the right side of the screen, showing the booking and customer information.
Find the Folio Option: Scroll down to the section with multiple actions. Look for the option labeled View Folio and click on it.
How to Apply for Tax Exemption?
Click on More Folio Actions: At the top of the folio, click the green More Folio Actions button.
A popup window will appear with multiple actions listed.
Locate and click on Tax-Exempt Status: Select this option from the list.
Another popup will appear on the right side.
Enable the toggle to check for tax exemption , or uncheck it to revoke the exemption.
Enter the Tax Exemption ID and specify the types of taxes to exempt.
Click the Tax Exempt button to complete the action successfully.
What is Scanty Baggage Feature?
The Scanty Baggage feature in Stayflexi marks reservations where guests arrive with minimal or no luggage. This is typically an indicator for the hotel staff to be cautious, as it may signify a higher risk of the guest leaving without paying. When a guest is flagged as “Scanty Baggage”, it helps the hotel staff take necessary precautions, such as requesting advance payment or ensuring payment guarantees before allowing further services.
How to find Folio:
Login to Stayflexi: Log into your Stayflexi dashboard using your credentials.
Navigate to the Reservations Tab: From the front page of the Stayflexi dashboard, locate the top navigation menu. The second icon is the Reservation Calendar. Click on the icon to see all your reservations.
Select the Reservation: Choose the reservation for which you want to see the folio by clicking on it
View Reservation Details: A pop-up window will appear on the right side of the screen, showing the booking and customer information.
Find the Folio Option: Scroll down to the section with multiple actions. Look for the option labeled View Folio and click on it.
How to find and mark Scanty Baggage in Stayflexi:
Click on “More Folio Actions”.
Locate “Scanty Baggage” and click on it.
A pop-up window will appear on the right-hand side.
The default option will be “Yes/No”. Select “Yes” to mark the reservation as having Scanty Baggage.
Click the “Confirm” button below.
After confirming, you will see a red luggage icon in the middle of the folio page, next to the booking ID and status of the reservation, indicating that the reservation has been marked as having Scanty Baggage.
Adding or removing guests from a reservation
Login to Stayflexi: Log into your Stayflexi dashboard using your credentials.
Navigate to the Reservations Tab: From the front page of the Stayflexi dashboard, locate the top navigation menu. The second icon is the Reservation Calendar. Click on the icon to see all your reservations.
Select the Reservation: Choose the reservation for which you want to see the folio by clicking on it
View Reservation Details: A pop-up window will appear on the right side of the screen, showing the booking and customer information.
Find the Folio Option: Scroll down to the section with multiple actions. Look for the option labeled View Folio and click on it.
How to Add a Guestin Folio:
Click on the icon to the right side next to the alphabet icon.
A guest details form will appear. Fill in all the required details.
Click on the green “Add Guest” button.
Once added, you will see two initials representing the guest’s name
You have successfully added the guest.
How to Remove a Guest in Folio:
Click on the guest’s alphabet icon corresponding to the guest you want to remove.
You will be taken to the guest information page.
Click on “More” option.
Select “Delete customer” to remove them from the folio.
You have successfully removed the guest.
How to add / remove room on existing reservation?
Login to Stayflexi: Log into your Stayflexi dashboard using your credentials.
Navigate to the Reservations Tab: From the front page of the Stayflexi dashboard, locate the top navigation menu. The second icon is the Reservation Calendar. Click on the icon to see all your reservations.
Select the Reservation: Choose the reservation for which you want to see the folio by clicking on it
View Reservation Details: A pop-up window will appear on the right side of the screen, showing the booking and customer information.
Find the Folio Option: Scroll down to the section with multiple actions. Look for the option labeled View Folio and click on it.
How to Add a Room to an Existing Reservation:
Click on “Add New Room to Group Booking” in the “More Folio Actions” menu.
A new page will open on the right side of the screen displaying room and guest details.
Fill in the necessary details, then click the “Save” button to complete the action.
The added room number will reflect on the left-hand side, along with the existing room number.
You have successfully added a room to the existing reservation.
How to Remove a Room from an Existing Reservation:
Click on the room folio for the room you want to remove.
Select “More Folio Actions.”
Find Delete Room from Group Booking, or search for it using the search bar.
A confirmation page will appear on the right side. Click Remove Room from Booking to complete the action.
You have successfully removed the room from the booking.
How to create a group reservation?
Follow these steps to create a group reservation in Stayflexi:
Login to your Stayflexi dashboard.
On the left panel, click on the Reservation Calendar [the second icon] to view all your reservations.
On the top-right corner, click on the Create button. A list of 4 options will appear. Select Group Booking.
4. A pop-up window will appear. In this window:
Select the Check-in and Check-out dates and times for the group booking.
Specify the number of rooms needed and the occupancy details [number of adults and children for each room].
5. Once the room and occupancy details are filled, click the Add [+] button located at the bottom-right of the page.
After clicking the Add button, the Next button at the top of the window will be enabled. Click on it to proceed.
6. Another pop-up will appear for entering guest details, room-wise. The system will automatically pre-fill the check-in, check-out, occupancy, and price summary.
7. Scroll down to find the section for Accompanying Guest Details:
You can either fill in the guest information for each room or select the option to copy the details from the Group Owner. This will auto-fill the respective columns with the same information.
8. There is also an Additional Details section where you can add any special requests from the guest, and confirmation will go to the guest via email.
Example: The guest has requested to decorate the room for a birthday celebration or other special requirements.
9. At the bottom of the page, you will find a section for applying Coupon Codes, Offers, and Discounts. Apply or remove them as needed.
10. Once all details are reviewed and completed, click the Create Reservation button at the top-right corner.
11. You will receive a confirmation message indicating that the group booking has been successfully created.
Note: Once a group booking is created, you can easily identify it on the reservation calendar by the presence of three icons next to the guest’s name.
How do I create an enquiry booking and collect payment using a payment link?
Login to Stayflexi: Log into your Stayflexi dashboard with your credentials.
Go to the Reservation Calendar: From the main dashboard, click on Reservation Calendar. Here you can see available rooms and dates.
Locate the “Create” column: On the right side of the page, you will see the Create column. This column offers four booking options Walk-in, Enquiry, Block room, and Group booking.
Select Enquiry: click on Enquiry to open a pop-up form.
Fill in the Required Details: In the pop-up window, enter the necessary details for the enquiry, including Check-in and Check-out Dates, Guest Names, Room Type, Prices, and more.
Set Enquiry Expiry Time: You can set an expiry time for the enquiry. This can be in minutes, hours, or days, based on your preference.
Create the Enquiry: Once all details are entered, click Create enquiry at the bottom right corner of the page.
Confirmation Message: You will receive a confirmation message indicating that the enquiry was created successfully, and the guest will receive all the booking details along with a payment link. Once the guest makes the payment through the provided payment link, the enquiry’s booking status will automatically update in the PMS, and the booking will be confirmed.
Booking Engine
Boost your property’s direct bookings with Stayflexi’s Booking Engine feature. This powerful tool integrates seamlessly into your website, allowing guests to easily check availability, view rates, and make secure bookings in just a few clicks. With a user-friendly interface and mobile optimization, your guests can book anytime, anywhere.
Stayflexi’s Booking Engine also provides real-time updates on room availability and pricing, ensuring your property stays competitive. Reduce reliance on third-party platforms and increase your revenue by capturing more direct bookings, all while offering a smooth and hassle-free booking experience for your guests.
Stayflexi Booking Engine - Everything you need to know
Stayflexi’s Booking Engine makes it easy to reserve your stay online. Follow these simple steps to book your room smoothly:
Open the Booking Page
Go to the hotel website where Stayflexi is set up.
Click on the booking section on the main page to start.
Choose Your Dates
Pick your check-in and check-out dates on the calendar.
Flexible options let you choose convenient arrival and departure times.
Select Your Room
Browse the available rooms with photos and details.
The system shows rooms that match your selected dates.
Enter Guest Info
Fill in your name and contact details.
Double-check for accuracy to ensure a smooth check-in process.
Review Your Booking
Review your booking summary to confirm dates, room type, extras, and the total price.
If you have any promo codes, enter them now.
Make Payment
Choose a payment method (credit card, Apple Pay, etc.).
Enter your details safely. Stayflexi supports quick, secure payment.
Receive Confirmation
After payment, a confirmation email will be sent to you.
This includes a booking reference and check-in instructions.
Step-by-step guide for booking engine configuration
Logging into Your Stayflexi Dashboard:
Enter your username and password to log in.
Go to Property Configuration:
Once logged in, click on the More Apps icon (represented by four blocks) in the top right corner.
From the drop down menu, select Property Configuration
Go to Booking engine:
You’ll see various options on the left side of the Property Configuration page.
Click on the Booking engine option
This will navigate you to the booking engine settings or configuration page.
Booking Engine URL
This field holds the URL of the booking engine page that guests will be directed to when making a reservation. Ensure it has the correct hotel ID included in the URL.
Header Colour
This option allows you to choose the color for the header of the booking engine page. Select a color that matches your brand identity.
Main Body Colour
Sets the main background colour for the body section of the booking engine page. Pick a colour that complements the header and maintains readability.
Room Type and Summary Cart Colour
Controls the color for the sections displaying room types and the booking summary cart. This can help highlight these areas for better user navigation.
Lowest Price Colour
Sets the color for the lowest price displayed on the booking engine, making it more prominent to attract attention to special rates or discounts.
Font Colour
Specifies the text color used across the booking engine page. Ensure this color contrasts well with the background for readability.
Phone Number
Enter the contact number that guests can use for inquiries. This should be a direct line to the hotel’s reservations or customer support team.
Email
The email address provided here will be visible to guests, offering an alternative contact method for support or booking assistance.
Add Your Website Link to Booking Engine Logo
Toggle this option to add a clickable link to your website on the booking engine’s logo, providing guests a way to navigate back to your main site from the booking engine.
Run Booking Engine in Stayflexi’s Unique 3-Slot Mode
Stayflexi’s 3-slot mode organizes booking times into distinct slots (e.g., morning, afternoon, evening). Toggle this feature based on your property’s needs.
Rate Check Widget
Enables or disables the rate check widget, a tool that helps guests quickly view rates and availability across dates.
Can Users Make Booking Without Addons?
This option allows users to book a room without adding optional services or amenities (add-ons). If set to “No,” guests must select at least one add-on.
Do You Want to Allow Partial Payment?
Enables guests to make a partial payment at the time of booking instead of paying in full. The percentage slider lets you set the minimum partial payment amount.
Manually Approve Bookings for a Given Time Before Check-In?
This setting allows you to require manual approval for bookings made within a specific time frame before check-in. The hours field specifies how close to check-in this applies (set to 0 hrs here, meaning no time restriction).
Allow Booking Engine Widget to Add Rooms by Default?
When enabled, the booking engine widget automatically adds a default room for guests, simplifying the booking process for users.
Save Button
Click “Save” after configuring the settings to apply the changes to your booking engine.
These are the settings for the Booking engine.
Stayflexi Booking Engine configurations which you should know.
Logging into Your Stayflexi Dashboard:
Enter your username and password to log in.
Go to Property Configuration:
Once logged in, click on the More Apps icon (represented by four blocks) in the top right corner.
From the drop down menu, select Property Configuration
Got to Booking engine:
You’ll see various options on the left side of the Property Configuration page.
Click on the Booking engine option
This will navigate you to the booking engine settings or configuration page.
Booking Engine URL
This field holds the URL of the booking engine page that guests will be directed to when making a reservation. Ensure it has the correct hotel ID included in the URL.
Header Color
This option allows you to choose the color for the header of the booking engine page. Select a color that matches your brand identity.
Main Body Color
Sets the main background color for the body section of the booking engine page. Pick a color that complements the header and maintains readability.
Room Type and Summary Cart Color
Controls the color for the sections displaying room types and the booking summary cart. This can help highlight these areas for better user navigation.
Lowest Price Color
Sets the color for the lowest price displayed on the booking engine, making it more prominent to attract attention to special rates or discounts.
Font Color
Specifies the text color used across the booking engine page. Ensure this color contrasts well with the background for readability.
Phone Number
Enter the contact number that guests can use for inquiries. This should be a direct line to the hotel’s reservations or customer support team.
Email
The email address provided here will be visible to guests, offering an alternative contact method for support or booking assistance.
Add Your Website Link to Booking Engine Logo
Toggle this option to add a clickable link to your website on the booking engine’s logo, providing guests a way to navigate back to your main site from the booking engine.
Run Booking Engine in Stayflexi’s Unique 3-Slot Mode
Stayflexi’s 3-slot mode organizes booking times into distinct slots (e.g., morning, afternoon, evening). Toggle this feature based on your property’s needs.
Rate Check Widget
Enables or disables the rate check widget, a tool that helps guests quickly view rates and availability across dates.
Can Users Make Booking Without Addons?
This option allows users to book a room without adding optional services or amenities (add-ons). If set to “No,” guests must select at least one add-on.
Do You Want to Allow Partial Payment?
Enables guests to make a partial payment at the time of booking instead of paying in full. The percentage slider lets you set the minimum partial payment amount.
Manually Approve Bookings for a Given Time Before Check-In?
This setting allows you to require manual approval for bookings made within a specific time frame before check-in. The hours field specifies how close to check-in this applies (set to 0 hrs here, meaning no time restriction).
Allow Booking Engine Widget to Add Rooms by Default?
When enabled, the booking engine widget automatically adds a default room for guests, simplifying the booking process for users.
Save Button
Click “Save” after configuring the settings to apply the changes to your booking engine.
These are the settings for the Booking engine.
Stayflexi Booking Engine - How to Sell specific Rooms with Rate Plans on Booking Engine
To sell specific rooms with Rate Plans on the Booking Engine, you need to configure the rate plan in the PMS.
Below is the step-by-step guide to configure or create a Rate Plan in Stayflexi’s Revenue Management:
Log in to Your Stayflexi Dashboard:
Use your username and password to log in.
Go to Revenue Management:
After logging in, click the four boxes icon (more apps) in the top right corner.
A dropdown menu will appear.
Select “Revenue Management” from the list
Create a Rate plan
Go to the “Rate plans” section on the left menu.
Click “Add new rate plan” to open the rate plan creation form.
Filling in Rate Plan Details
What’s the name of your rate category?
This is where you enter the name of your rate plan.
This name will be used internally to identify the rate plan.
What’s the plan Display Name of your rate category?
This is the name that will be displayed to customers.
Make sure the name is clear and descriptive for customers.
Set your rates
Select Rate: Choose an existing base rate plan from the dropdown
Percentage or Amount Adjustment: Select whether the adjustment to the base rate should be in % (percentage) or $ (fixed amount).
Value: Enter the adjustment amount (e.g., “20” if you’re offering a 20% discount).
Dependency: Choose if this rate plan is dependent on another rate plan.
Hard Dependency Toggle: Set this to “Yes” if this rate plan should only be available when its base rate plan is available.
Dependency Dropdown: Select “YES” if you want this rate plan to be strictly tied to the base rate.
Selecting Additional Policies and Settings
Select a Policy: Choose a cancellation policy or other policy that applies to this rate plan (e.g., “Cancellation Policy”).
This ensures the selected policy rules apply to reservations made under this rate plan.
Configuring Visibility and Payment Options
Show this rate plan on front desk kiosk?
No/Yes Toggle: Choose whether this rate plan should appear on the front desk kiosk.
No: The rate plan will not be visible on the kiosk, meaning staff won’t see it for walk-in or front desk bookings.
Yes: The rate plan will be visible at the kiosk, allowing it to be used for on-the-spot bookings.
Allow pay at property?
No/Yes Toggle: Decide if customers are allowed to pay directly at the property or if only online payments are accepted.
No: Only online payments will be allowed; customers must pay in advance.
Yes: Guests can choose to pay when they arrive at the property.
Hide this rate plan on the booking engine?
No/Yes Toggle: Determine if this rate plan should be hidden from the online booking engine.
No: The rate plan will be shown and available on the booking engine.
Yes: The rate plan will be hidden, meaning it won’t appear to guests booking online.
Is this rate plan for OTA mapping only?
No/Yes Toggle: Specify if this rate plan is exclusively for OTA (Online Travel Agency) mapping and should not be visible elsewhere.
No: The rate plan will be available across different channels, including the booking engine and front desk kiosk.
Yes: The rate plan will only be used for OTA mapping. It won’t show up on the Stayflexi booking engine or for front desk reservations.
Assigning Room Types and Adding Description
Which room types?
Select the specific room types to which this rate plan applies. Only the selected rooms will offer this rate to guests.
Describe the rate category in a few words?
Enter a brief description of the rate plan to help staff and customers understand what this rate plan includes or why it might be beneficial (e.g., “20% discount for stays of 3 nights or more”).
Saving the Rate Plan(as shown in Image 2):
Once all details and settings have been configured, click “Save” at the bottom of the form to create the rate plan.
According to the above configuration, the Rate plan will either be visible on the Booking engine or will be hidden at the time of booking creation for the guests.
Below is the step-by-step guide on how to sell specific rooms with rate plans in the Stayflexi Booking Engine :
Access the Booking Engine
Go to the Stayflexi booking engine for the hotel or property you’re interested in.
You may find this link on the hotel’s website or by searching directly for the property on Stayflexi.
Select Dates and Room Preferences
Choose your Check-In and Check-Out dates.
Specify the number of rooms, adults, and children to filter the available rooms accordingly.
Browse Available Room Types
Scroll to the “Choose your room(s)” section. Each room type, such as “Suite” or “Deluxe Room,” is listed here.
Click on a room type to view additional details like maximum occupancy, bed configuration, and amenities (e.g., soundproofing, hardwood floors, private bathrooms).
Select a Rate Plan
Each room type has multiple rate plans, such as Standard Plan, AP (American Plan), MAP (Modified American Plan), and CP (Continental Plan).
Review the rate plan options and prices. Each rate plan may come with specific inclusions, like meals or cancellation policies.
Choose Quantity
Use the quantity selector next to the desired rate plan (the +/- buttons) to choose the number of rooms you want to book under that plan.
Click Add to confirm your selection. The selected room and rate plan will appear in your booking summary on the right.
Review Your Booking Summary
On the right side of the screen, you’ll see a summary of your booking. This includes:
Room type and rate plan (e.g., Suite – Standard Plan).
The number of adults and children.
Room price and any applicable taxes.
Proceed to Book
Once you’re satisfied with your selections, click on Continue to Book.
This will take you to the next steps, where you’ll enter guest information and payment details.
Complete the Payment
Enter your details and follow the prompts to complete the payment.
After payment, you’ll receive a booking confirmation with all the details of your reservation.
Coupon code option on stayflexi Booking Engine and how it is useful
The “Coupon code” option on the Stayflexi booking engine allows users to apply discount codes or promotional offers to reduce the booking cost. This option is useful for guests who have received a coupon from the hotel or as part of a promotional campaign. By entering the code and clicking “Apply,” guests can see the updated price with the discount reflected in the total.
Creating a Coupon Code in Stayflexi PMS
Before guests can use a coupon code on the booking engine, you must set it up in the Stayflexi Dashboard.
Log in to Your Stayflexi Dashboard:
Use your username and password to log in.
Go to Revenue Management:
After logging in, click the four boxes icon (more apps) in the top right corner
A dropdown menu will appear.
Select “Revenue Management” from the list
Go to Coupon/Offers:
On the left sidebar, click on “Coupon Code / Offers” (the 5th option) to view the Coupon Code/ Offers page. (as shown in Image 2).
Add a Coupon/Offers:
Click the “Add Coupon Code / Offers” button to start creating a new Coupon Code / Offers
Enter Coupon Code / Offer Name:
Provide a descriptive name for your coupon code/offer to help identify it easily
Describe Coupon Code / Offer:
Provide a brief description of your coupon code/ offer for better understanding
Choose the type
From the dropdown in the “Choose type of your coupon code/offer” section, either of the following types:
OFFER
COUPON CODE
Set Room Booking Criteria
In the section “How many rooms do guests need to book to get this coupon code or offer?”, input:
Minimum number of rooms guests need to book.
Maximum number of rooms guests can book.
Set Stay Duration Criteria
In the section “How long do guests need to stay to get this coupon code or offer?”, enter the following:
Minimum number of nights required for guests to stay to qualify for the coupon code/ offer.
Maximum number of nights guests can stay to qualify.
Set the Discount (as shown in Image 4):
In the section “How much of a discount do you want to give?”, enter the desired discount and select the type of discount (Percentage or Flat ) from the dropdown.
Set the Date Range for Discounted Stays
In the “When can guests check in using the discounted rate?” section, specify the date range for when guests can use the Coupon code/offer.
Select Days of the Week for Discount Availability:
Choose the days of the week that the discounted rate will be available. You can select all days or specific days as needed
Valid Booking Period:
In the section “When can bookings be shown?”, select the date range during which the coupon code/offer is valid for bookings
Coupon Code/Offer Usage Limit:
In the section “How many times can the coupon code/offer be used? (leave blank for no limit)”:
The coupon code or offer can be used as many times as you want unless a limit is set
Save the Coupon code/ offer:
Once you have entered all the details, review them carefully.
Click the “Save” button to finalize and activate your Coupon code/ offer
Using the Coupon Code on the Stayflexi Booking Engine
Now that the coupon code is set up, guests can apply it during the booking process.
Select Room and Start Booking
On the Stayflexi booking engine, guests should select a room and click Continue to Book.
Locate the Coupon Code Field
In the booking details section, they’ll see a field labeled Coupon Code with an Apply button.
Enter and Apply the Coupon Code
Guests can enter their coupon code carefully (avoiding extra spaces).
They then click Apply to activate the discount.
View the Discounted Total
If the coupon code is valid, the total booking amount will update to reflect the discount.
Complete the Booking
After reviewing the discounted price, guests can fill in their booking details, and click Pay Now to complete the reservation at the discounted rate.
Enjoy the Savings!
Guests save on their booking, enjoying a more affordable stay thanks to the coupon code.
Following these steps, you can efficiently set up and manage Coupon codes/offers, enhancing guest experience and boosting bookings.
Magic link
Simplify guest access with Stayflexi’s Magic Link feature. This innovative tool allows guests to quickly and securely log in to their reservations or accounts with just a single click. No passwords or complicated steps—guests receive a personalized link via email or SMS, making the process seamless and convenient. Whether for checking in, viewing bookings, or accessing special offers, Stayflexi’s Magic Link enhances the guest experience by providing quick, secure, and hassle-free access, all while reducing administrative workload for your staff.
What is the Magic Link feature in Stayflexi, and how can it benefit my property?
The Magic Link is a feature in Stayflexi which are used by hotels and properties to streamline the guest experience by providing a unique, secure URL that grants guests access to various self-service options along with all the booking details and a way to connect with properties directly. The link can be sent to guests via email, whatsapp and messaging allowing them to complete tasks like:
Self-check-in: Guests can check in using a self-service link without assistance from the front desk.
Early check-in/late check-out: Guests can request to check in early or check out late if the hotel offers these options.
Room upgrades: Guests can view available room upgrades and choose to upgrade before arrival.
Purchase add-ons: Guests can buy extra services like meals, spa treatments, tours or any add on services offered by properties.
Payment options: Guests can pay for services either in advance or upon arrival, depending on the hotel’s configuration.
The Magic Link eliminates the need for guests to interact with the front desk directly for these services, providing convenience and flexibility. It simplifies the process of managing bookings and enhancing guest experience through an easy-to-use, web-based interface. The property benefits from a more efficient check-in/check-out process, reduced staff workload, and opportunities to upsell services or rooms.
Here is a step-by-step guide for Magic link:
Log in to Your Stayflexi Dashboard:
Enter your username and password to log in.
Go to Property configuration:
After logging in, click the “More Apps” icon (represented by four boxes or blocks) in the top right corner.
From the dropdown menu, select Property Configuration.
On the left-hand side of the Property Configuration page, you will see various options.
Click on the Magic link and kiosk dropdown, you will see some more options.
Click on the Configuration option.
This takes you to the Self-service configuration page.
Front Desk Kiosk URL
Purpose: This URL is generated for the hotel’s self-service platform, allowing guests to access services such as check-in, check-out, and other options without needing to interact with hotel staff directly.
Action: Guests can visit this link to use self-service features when check-in in at the property.
Front desk QR codePurpose:
This QR code is generated for the hotel’s self-service platform, providing guests with quick and easy access to essential services such as check-in, check-out, and other available options directly from their mobile devices.
Action: Guests can scan this QR code upon arrival at the property to access self-service features instantly, enabling a smooth and contactless check-in or check-out experience without needing to interact with hotel staff.
Do you want to allow guests to self-check in?
Purpose: This option, when enabled, allows guests to check in using the self-service link without assistance from the front desk.
Action: Toggle this switch to “Yes” to let guests check themselves in before their arrival.
Do you want to allow guests to perform early check-in?
Purpose: This allows guests to check in earlier than the standard check-in time, providing more flexibility.
Action: Toggle this to “Yes” to offer early check-in as an option, subject to hotel availability.
Do you want to allow guests to perform late check-out?
Purpose: This option allows guests to check out later than the regular check-out time.
Action: Enable this option if you wish to offer late check-out services.
Do you want to allow guests to purchase add-ons?
Purpose: Enables guests to buy additional services or products, such as breakfast, spa services, or room upgrades, through the self-service platform.
Action: Switch this to “Yes” to allow guests to purchase available add-ons.
Do you want to allow guests to pay at the hotel for add-ons?
Purpose: If add-ons are enabled, this option determines whether guests must pay at the time of booking (PAY NOW) or the hotel (PAY AT HOTEL).
Action: Select either “PAY NOW” or “PAY AT HOTEL” depending on how you want guests to complete payments for the add-ons.
Do you want guests to auto-upgrade their rooms?
Purpose: This feature allows guests to automatically upgrade their room if a better room is available, usually at an additional charge. It helps properties in up selling rooms automatically and generate extra revenue.
Action: Enable this if you want to give guests the option to upgrade their rooms through the self-service platform.
Do you want to send the self-service link email to guests and the hotel?
Purpose: When this option is enabled, the system sends the self-service link via email to both the guest and the property.
This makes the check-in process easier for the guest and helps the hotel manage the guest’s arrival.
Action: Toggle this to “Yes” to enable the automatic sending of the self-service link via email.
Please specify check-in instructions for the guest
Purpose: In this field, the property can provide detailed instructions for the check-in process that will be visible on the front desk kiosk and sent to the guest. These instructions guide the guest through self-check-in, ensuring they understand how to proceed.
Action: Write specific check-in instructions, such as ID verification procedures or directions to the hotel, in the provided text box.
Final Step:
Save Configuration: Once you have set your desired options, click the “Save” button at the bottom right to apply these configurations.
This ensures that the self-service settings are updated for your guests.
How do I configure or control the settings for the Magic Link?
Below is the Step-by-step guide to control or configure settings for Magic Link:
Log in to Your Stayflexi Dashboard
Enter your username and password to log in.
Go to Property configuration:
After logging in, click the “More Apps” icon (represented by four boxes or blocks) in the top right corner.
From the drop down menu, select Property Configuration.
On the left-hand side of the Property Configuration page, you will see various options.
Got to Magic link and kiosk:
Click on the Magic link and kiosk drop down, you will see some more options.
Click on the Configuration option.
This takes you to the Self-service configuration page.
Front Desk Kiosk URL
Purpose: This URL is generated for the hotel’s self-service platform, allowing guests to access services such as check-in, check-out, and other options without needing to interact with hotel staff directly.
Action: Guests can visit this link to use self-service features when checking in at the property.
Do you want to allow guests to self-check in?
Purpose: This option, when enabled, allows guests to check in using the self-service link without assistance from the front desk.
Action: Toggle this switch to “Yes” to let guests check themselves in before their arrival.
Once you toggle this switch to “Yes”, you get an option below it asking “What percentage of the balance due should be charged as the self-check-in cost?”.
Configure the percentage amount of the booking’s balance due that is payable during self-check-ins. If set to 0, guests will be able to self-check in without payment.
Do you want to allow guests to perform early check-in?
Purpose: This allows guests to check in earlier than the standard check-in time, providing more flexibility.
Action: Toggle this to “Yes” to offer early check-in as an option, subject to hotel availability.
Once you toggle this switch to “Yes”, you get an option below it asking “How many hours before the check-in can the guest opt for early check-in?”.
Configure the availability window to allow the guest to perform early check-in within the hours set before the actual check-in(as shown in Image 3).
Do you want to allow guests to perform late check-out?
Purpose: This option allows guests to check out later than the regular check-out time.
Action: Enable this option if you wish to offer late check-out services.
Once you toggle this switch to “Yes”, you get an option below it asking “How many hours before the check-out can the guest opt for late check-out?”.
Configure the availability window to allow the guest to perform late checkout within the hours set before the actual checkout(as shown in Image 3).
Do you want to allow guests to purchase add-ons?
Purpose: Enables guests to buy additional services or products, such as breakfast, spa services, or room upgrades, through the self-service platform.
Action: Switch this to “Yes” to allow guests to purchase available add-ons.
Do you want to allow guests to pay at the hotel for add-ons?
Purpose: If add-ons are enabled, this option determines whether guests must pay the POS orders at the time of booking (PAY NOW) or the hotel (PAY AT HOTEL).
Action: Select either “PAY NOW” or “PAY AT HOTEL” depending on how you want guests to complete payments for the add-ons.
Do you want guests to auto-upgrade their rooms?
Purpose: This feature allows guests to automatically upgrade their room if a better room is available, usually at an additional charge.
Action: Enable this if you want to give guests the option to upgrade their rooms through the self-service platform.
Once you toggle this switch to “Yes”, you get an option below it asking “Do you want to allow guests to upgrade their room after check-in?”.
If enabled, it will allow the users to auto-upgrade their room from the self-service URL after check-in(as shown in Image 3).
Do you want to send the self-service link email to guests and the hotel?
Purpose: When this option is enabled, the system sends the self-service link via email to both the guest and the hotel.
This makes the check-in process easier for the guest and helps the hotel manage the guest’s arrival.
Action: Toggle this to “Yes” to enable the automatic sending of the self-service link via email.
Please specify check-in instructions for the guest
Purpose: In this field, the hotel can provide detailed instructions for the check-in process that will be visible on the front desk kiosk and sent to the guest. These instructions guide the guest through self-check-in, ensuring they understand how to proceed.
Action: Write specific check-in instructions, such as ID verification procedures or directions to the hotel, in the provided text box.
Save the configuration:
Save Configuration: Once you have set your desired options, click the “Save” button at the bottom right to apply these configurations.
This ensures that the self-service settings are updated for your guests.
If a guest selects a service through the Magic Link, where can I view it in Stayflexi?
If a guest selects a service through the Magic Link in Stayflexi, you can view it in Stayflexi’s Dashboard. Here’s a step-by-step guide on how you can view the Magic link bookings
Log in to Your Stayflexi Dashboard
Enter your username and password to log in.
Go to the Magic link in the Dashboard
In the Dashboard, click on the Reservations option.
You can see the following tiles/blocks:
New bookings
In-house
Arrivals
Departures
Cancellations
On hold
No shows
Magic link
Click on the Magic link tile.
All the bookings made through the Magic link will be displayed.
You view the folio, send a magic link and approve the booking by clicking on the options on the booking.
Following these steps, you can view the bookings or services the guest selects through the Magic link in Stayflexi.
How do I configure shop items or services to appear on the Magic Link?
Below is the step-by-step guide to configuring shop items or services to appear on the Magic Link:
Log in to Your Stayflexi Dashboard:
Enter your username and password to log in.
Go to Property configuration:
After logging in, click the “More Apps” icon (represented by four boxes or blocks) in the top right corner.
From the drop down menu, select Property Configuration
On the left-hand side of the Property Configuration page, you will see various options.
Got to Magic link and kiosk:
Click on the Magic link and kiosk drop down, you will see some more options.
Click on the Configuration option.
This takes you to the Self-service configuration page.
Configure shop items or services:
To set up shop items or services to appear on the Magic link, do the following:
Do you want to allow guests to purchase add-ons?
Purpose: Enables guests to buy additional services or products, such as breakfast, spa services, or room upgrades, through the self-service platform.
Action: Switch this to “Yes” to allow guests to purchase available add-ons.
Do you want to allow guests to pay at the hotel for add-ons?
Purpose: If add-ons are enabled, this option determines whether guests must pay the POS orders at the time of booking (PAY NOW) or the hotel (PAY AT HOTEL).
Action: Select either “PAY NOW” or “PAY AT HOTEL” depending on how you want guests to complete payments for the add-ons.
Click on the Save button to set up the shop items or service successfully.
Also, you can enable or disable particular POS/Shops menu items to be displayed on the magic link sent to guests by following the below-given steps:
Log in to Your Stayflexi Dashboard
Enter your username and password to log in.
Access Shops/POS:
After logging in, click the “More Apps” icon (represented by four boxes or blocks) in the top right corner.
From the drop down menu, select Shops
A page showing all available shops or outlets will appear.
Choose the shop or outlet by clicking on the shop or outlet name.
Navigate to the “Configuration” Page:
Once you select a shop or outlet, you will be taken to its Dashboard.
On the left-hand side of the page, you will see various options, including:
Dashboard
Place Orders
View Orders
Reports
Configuration
Click on Configuration drop down to proceed
Go to Menu items:
On the Configuration dropdown, you will see a list of options including:
Outlet
Menu items
Categories
Discounts
Table/Area
Staff
Click on the Menu items option
A list of all the menu items will appear along with the details.
Enable or disable the menu items:
To enable or disable the menu items to be displayed on magic link sent to guests, do the following
Click on the Edit item option under the Actions column for the menu item,you want to either enable or disable on the Magic link.
A page to edit the details for menu items will appear.
Scroll down to the Self-service section.
There are two options:
Enable
Click on Enable to enable the menu item on the Magic link and provide the self-service discount value in the Self-service discount field below.
Disable
Click on Disable to disable the menu item on the Magic link.
Click on the Save button to save the changes made.
By following these steps you can configure shop items or services to appear on the Magic Link.
Can I set up room-specific self-check-in instructions for guest using the Magic Link?
Yes, you can set up room-specific self-check-in instructions for guests using the magic link by following the steps given below
Log in to Your Stayflexi Dashboard:
Enter your username and password to log in.
Go to Property configuration:
After logging in, click the “More Apps” icon (represented by four boxes or blocks) in the top right corner.
From the drop down menu, select Property Configuration
On the left-hand side of the Property Configuration page, you will see various options.
Got to Magic link and kiosk:
Click on the Magic link and kiosk drop down, you will see some more options
Click on the Room wise check-in instructions option
This takes you to the Room check-in instructions page.
On the Room check-in instructions page, a list of room IDs will be displayed.
For each room ID, the check-in instructions column is available.
Click on the Add some instructions field next to the room ID where you want to specify the self-check-in instructions.
Enter the instructions and click, and the instructions will be successfully set up.
By following these steps room-specific self-check-in instructions for guests using the magic link.
How to block or unblock rooms from reservation calendar?
Below are the step-by-step guidelines to block a room from the reservation calendar:
Login to Stayflexi: Start by logging into your Stayflexi dashboard using your credentials.
Navigate to the Reservation Calendar Tab: From the front page of the Stayflexi dashboard, locate the top navigation menu. The second icon is the Reservation Calendar. Click on the icon to view all your reservations.
Click the Create Column: On the top right corner of the calendar, you will see the Create button. Click on it to view a dropdown menu.
Select “Block Room”: In the dropdown, you will see four options: Walk-in, Enquiry, Block Room, and Group Booking. Click on Block Room.
Fill in the Blocking Details: A pop-up window will appear on the right side of the screen. Enter the required details such as Room type, Room ID, and Date Range. There is also an optional field to provide the Reason for Blocking the room.
Confirm Blocking: After entering the details, click the Block Room button at the bottom of the pop-up.
Confirmation Message: You will see a confirmation message indicating that the room has been successfully blocked. To view the block reason, click on the blocked room, and it will display the reason you entered at the time of blocking the room.
Below are the step-by-step guidelines to Unblock a room from the reservation calendar:
Locate the Blocked Room: In the reservation calendar, the blocked room will be displayed in grey.
Click on the Blocked Rooms: Select the blocked room from the calendar. A pop-up window will appear on the right side of the screen.
Select the Date Range: In the pop-up window, you can adjust the Date Range for the room block if needed.
Unblock the Room: You will see an option to Unblock the room. Click on the Unblock button.
Confirmation Message: After unblocking, you will receive a confirmation message that the room has been successfully unblocked.
How to Modify Check in and Check out date of reservations ?
Below is the step-by-step explanation of the modification of check in and check out date for a reservation in Stayflexi:
Login to Stayflexi: Start by logging into your Stayflexi dashboard using your credentials.
Navigate to the Reservations Tab: From the front page of the Stayflexi dashboard, locate the top navigation menu. The second icon is the Reservation Calendar. Click on the icon to view all your reservations.
Select the Desired Reservation: Click on the desired reservation, that you wish to modify.
Reservation Information Pop-up: A pop-up will appear on the right side of the screen, providing the key details about the selected reservation. Click on the modify option to view the list of options.
Modification Option: You will see options to modify the check-in and check-out dates in the list, allowing you to adjust the reservation as needed with a calendar icon.
The Group Performance Dashboard in stayflexi provides a comprehensive and insightful overview of your multi-property portfolio’s performance, all in one place. It enables hoteliers to easily understand key performance metrics, identify top-performing properties, and analyze trends through visual, easy-to-read reports.
To access the Group Performance Dashboard:
Log in to your Stayflexi admin account.
On the left-hand menu, click on Dashboard.
At the top of the dashboard screen, switch to the “Group Performance” tab (visible only for group/chain accounts).
This will open the consolidated multi-property performance view with metrics, charts, and comparisons across all your properties.
Right-Hand Side Controls (RHS):
Compare with Last Year On the top-right corner, you will find a toggle that allows you to compare your current performance with the same period last year. Enable this toggle to instantly view YoY comparisons across all key metrics.
View by Today, MTD, or YTD You can switch the data view between Today, Month-to-Date (MTD), and Year-to-Date (YTD). This helps you quickly analyze performance for different time frames.
Filter by Properties (All Properties Dropdown) Click on the All Properties dropdown to view a full list of your properties. You can select one or multiple properties to filter the dashboard and see results for specific locations or clusters.
When you open the dashboard, you can instantly view performance data for a specific date, including:
Total Revenue
Average Occupancy
Average ADR (Average Daily Rate)
RevPAR (Revenue Per Available Room)
On the LHS, you’ll find sections that highlight your Top Performing and Low Performing properties. These insights help you quickly understand which properties are exceeding expectations and which ones may require attention or operational improvements.
On the right side, the Monthly Performance Graph helps visualize trends by filtering metrics such as Revenue, ADR, RevPAR, or Occupancy
When you scroll down, you’ll see a property-wise performance bar graph that gives you a clear visual comparison across all your properties.
Compare by Today, MTD, or YTD Use the time selector to switch the graph between Today, Month-to-Date, and Year-to-Date performance.
Select Metrics on the RHS On the right-hand side, you can choose which key metric to display:
Revenue
Occupancy
ADR (Average Daily Rate)
RevPAR (Revenue Per Available Room)
Graph Layout
Vertical Axis: Represents the value range (e.g., revenue amount, occupancy %, ADR, etc.)
Horizontal Axis: Shows all your properties side by side for easy comparison.
When you scroll further down, you will find the Booking Source Performance chart, which helps you understand which channels contribute the most to your business.
Switch Between Revenue and Rooms Sold On the top right-hand side, you can toggle between:
Revenue
Rooms Sold This lets you compare how each booking source performs based on the metric you want to analyze.
Chart Layout
Vertical Axis: Displays all your booking sources (e.g., Walk-in, OTA, Booking Engine etc..).
Horizontal Axis: Represents the value—either total revenue or number of rooms sold depending on the selected tab.
Scroll further down to access the Day-Wise Performance Report, which provides a detailed daily breakdown of your property or group performance.
The table includes key metrics such as: Date, Revenue, Occupancy, ADR, and RevPAR.
On the top right-hand side, you also have the option to download this report for offline use or sharing with your team.
The Group Performance Dashboard simplifies performance tracking and empowers your management team to make data-driven decisions that enhance overall profitability across all properties.
What can I view and analyse under the Group Performance Dashboard?
Under the Group Performance Dashboard in stayflexi, you can view and analyse the performance of your properties in detail:
Daily and Monthly Metrics: Instantly see key performance indicators like Revenue, Occupancy, ADR, and RevPAR for the current day or across a selected month.
Top and Low Performing Properties: Identify which properties are leading or lagging through the panel on the left.
Monthly Performance Trends: Use the interactive graph on the right to analyse trends over time, filtering by Revenue, ADR, RevPAR, or Occupancy.
Property-wise Performance: Compare properties with detailed bar graphs showing date-wise or monthly data for Revenue, ADR, RevPAR, and Occupancy.
Booking Source Performance: Review channel-wise performance using horizontal bar charts, filterable by Revenue or Rooms Sold.
Day-wise Performance Report: Access daily summaries of Revenue, ADR, Occupancy, and RevPAR, with the option to download reports for further analysis.
The dashboard provides a comprehensive view of your portfolio, enabling data-driven decisions to optimise performance and profitability.
How can I view performance for a specific property, multiple properties, or all my properties together?
Here are the steps :
Log in to your stayflexi account using your credentials.
From the left-hand menu, click on Group Performance Dashboard.
At the top of the dashboard, locate the property selection dropdown.
To view a specific property, select the property name from the dropdown.
To view multiple properties together, check the boxes next to the properties you want to include.
To view all properties in your group, select the “All Properties” option.
The dashboard will update to display performance metrics – including Revenue, Occupancy, ADR, and RevPAR, for your selected property or properties.
You can now analyse trends using the Monthly Performance Graph, Property-wise Performance, Booking Source Performance, and Day-wise Performance Report for your selected selection.
To save the data, click Download Report to export the performance summary for your chosen properties and date range.
How can I view and compare monthly performance in graph format?
To view monthly performance in the Group Performance Dashboard, follow these steps:
Log in to your stayflexi account.
From the left-hand menu, select Group Performance Dashboard.
Click on the Monthly Data tab to view performance across the month.
On the right-hand side, view the graph showing month-long trends.
Use the filter options above the graph to select the metric you want to analyse – Revenue, ADR, RevPAR, or Occupancy.
The graph will update to display the selected metric, allowing you to easily compare performance trends over the month.
How do I interpret the top performing and low performing properties?
Interpreting the Top Performing and Low Performing Properties Panel
Log in to your stayflexi account.
Navigate to the Group Performance Dashboard.
On the left side, locate the Top Performing and Low Performing Properties panel.
Review which properties are listed under each category, based on recent Revenue and Occupancy metrics.
Use this information to identify strong performers and properties that may require attention or promotional efforts.
Can I filter the booking source performance by number of rooms sold instead of revenue?
Filtering Booking Source Performance by Number of Rooms Sold
Log in to your stayflexi account and open the Group Performance Dashboard.
Scroll down to the Booking Source Performance section.
Find the filter or toggle option above the horizontal bar graph.
Select Number of Rooms Sold instead of the default Revenue.
The graph will update to display booking channel performance based on room sales rather than revenue.
What are unassigned reservations? how to assign room?
Unassigned reservations are bookings that haven’t been allocated to a specific room yet. They appear in the Unassigned Reservations column in the Stayflexi reservation calendar, waiting to be assigned to a room. They could be from guest enquiries, online bookings, or other sources that need manual room assignments.
Follow the steps mentioned below to assign unassigned reservations from the Stayflexi reservation calendar:
Login to Stayflexi: Log into your Stayflexi dashboard using your credentials.
Navigate to the Reservations Tab: From the front page of the Stayflexi dashboard, locate the top navigation menu. The second icon is the Reservation Calendar. Click on the icon to see all your reservations.
Find the Unassigned Tab: In the top middle of the calendar, next to the Date Range Selector, you’ll see the Unassigned tab. This tab automatically displays all reservations that have not been assigned to rooms.
Click to View Details: When you click on the Unassigned tab, a pop-up will appear on the right side of the screen.
The Pop-up is divided into three sections:
Unassigned Reservations: Shows reservations waiting to be assigned.
On Hold Bookings: Displays reservations that are temporarily on hold. These are not confirmed bookings system will not hold inventory.
Enquiries: Lists enquiries made by guests that need further action before becoming confirmed reservations.
Select a Reason: Click on any reservation under these categories to view details.
View Guest Information: Detailed information about the guest will be displayed after selecting a reservation.
Click the Assign Button: You’ll see an Assign button next to the guest details. Click the Assign button to allocate the reservation to a suitable room.
Confirmation Message: Once the reservation is assigned, a confirmation message will appear, confirming that the booking has been successfully assigned a room.
Helpline
For immediate assistance, you can contact our support team:
Can I create a booking enquiry with an automatic expiration if payment is not received, and auto-confirm it upon payment?
Yes, In Stayflexi, you can create a booking enquiry that is based on minutes, hours, or days, and it will automatically expire if the guest doesn’t make the payment within the specified time. Here’s how it works in more detail:
Create Time-Sensitive Booking enquiries:
When you create a booking enquiry, you have the flexibility to set an expiration window that fits your needs. This could be in minutes [for short-term bookings like hourly stays], hours, or even days [for longer enquiries].
The booking enquiry will hold the room or service for the guest during that period. However, it will not be confirmed until payment is received.
The system automatically tracks the time and, if the payment is not made within the set period, the inquiry will expire and the room will be released back into availability. This prevents rooms from being blocked indefinitely without any payment.
Automatic Expiry Without Payment:
If the guest does not complete the payment within the specified time, the enquiry expires automatically, and the booking request is canceled.
This ensures that rooms don’t remain held for too long, improving your occupancy management. You no longer need to manually track unpaid inquiries or release rooms, as the system handles this automatically.
Automatic Confirmation With Payment:
If the guest completes the payment within the expiration window, the system will automatically confirm the booking.
This means there’s no need for manual confirmation or additional follow-up. The enquiry is seamlessly converted into a confirmed reservation, streamlining your operations and saving time for both property staff and guests.
Can I capture and upload a guest’s photo directly from the device camera in the Stayflexi PMS?
YES, Stayflexi allows you to capture and upload a guest’s photo directly from your device’s camera through the software. This feature is especially useful during check-in or when updating guest profiles.
How It Works:
When check-in a guest, you can use the device’s camera [such as a tablet or computer with a webcam] to take their photo instantly.
The photo is then uploaded directly into the guest’s profile or booking record, eliminating the need for manual uploads or external devices.
Benefits:
seamless Process: No need to upload images from external devices, making the process faster and more efficient.
Better Guest Identification: Storing the guest’s photo ensures accurate identification, helping to avoid any mix-ups.
Improved Security: It adds an extra layer of security to your operations by visually verifying the guest’s identity during check-in.
Enhanced Record-Keeping: Photos are stored within the system along with the guest’s information, making them easily accessible for future reference or for the record purpose.
What is the difference between "Move" and "Swap" rooms in the reservation calendar?
In Stayflexi’s reservation calendar, both move and swap room actions allow flexibility in managing guest reservations, but they serve different purposes and operate in distinct ways. Below is the detailed breakdown:
MOVE ROOM:
What It Means: Moving a room involves relocating a reservation from one room to another. This action is typically done when a guest needs to be reassigned to a different room and involves only one reservation at a time.
When to Use It:
When there’s a maintenance issue in the current room, the guest must be placed in a different room.
When a guest requests an upgrade or downgrade to another room.
When you want to free up a particular room for operational reasons [e.g., preparing for a VIP guest or a specific room type request]
How It Works:
The reservation’s details stay the same [like the dates and guest information], but the room assignment changes.
The original room becomes available for new bookings or other uses.
Example:
A guest is booked in Room 105, but due to an upgrade request, you move the reservation to Room 201. The booking is now linked to Room 201, and Room 105 becomes available for another guest.
Benefits:
Efficient Room Management.
Quick Problem-Solving.
No need to Recreate Bookings.
SWAP ROOM:
What It Means: Swapping rooms refers to exchanging room assignments between two different reservations. Instead of just moving one reservation, this involves two reservations that trade places in terms of room assignment.
When to Use It:
When two guests need to exchange rooms for reasons such as preference for specific room types or locations.
To balance room allocations [e.g., if a guest booked a more expensive room but the current room is not available, and another guest’s room can be swapped].
How It Works:
In the reservation calendar, you select the two reservations you want to swap.
Both reservations retain all other details [like guest information, check-in and check-out dates], but their room assignments switch.
Example: Guest A is staying in room 202, and guest B is staying in Room 203. If you swap the rooms, Guest A will now stay in Room 203, and Guest B will move to Room 202.
Benefits:
Efficient Room Adjustments.
Guest Satisfaction.
Save Time and Effort.
Key Differences:
Move Room: Only affects one reservation and relocates it to a new room. It’s a one-way shift.
Swap Rooms: Affects two reservations and switches their room assignments, essentially making a direct trade between two rooms.
How to upgrade or downgrade a reservation?
Upgrade a Reservation in Stayflexi:
If a guest wants to upgrade their room, they are moving from their current room to a better one, which typically includes more amenities and a higher price.
Example: Upon arrival, a guest originally booked a standard room but decides they want more luxury and requests to move to a deluxe suite with a better view and added amenities. The hotel can easily process this request in Stayflexi by upgrading the reservation and adjusting the rate accordingly.
Downgrade a Reservation in Stayflexi:
If a guest wants to downgrade their room, they wish to move from their current room to one of a lower category, usually at a lower price.
Example: A guest initially booked a deluxe room but decides that the standard room will suffice for their stay, perhaps due to a change in budget or preference. The hotel can easily accommodate this request by downgrading the reservation, and Stayflexi will adjust the room rate to reflect the new booking.
How to Upgrade or Downgrade Reservation in Stayflexi:
Login to Stayflexi: Log into your Stayflexi dashboard using your credentials.
Navigate to the Reservations Tab: From the front page of the Stayflexi dashboard, locate the top navigation menu. The second icon is the Reservation Calendar. Click on the icon to see all your reservations.
Select the Reservation that you want to Upgrade or Downgrade.
A pop-up window will appear on the right side of the screen showing the Reservation details.
Look for the ‘Modify’ option in the right corner, and click on it to view the list of options.
Scroll down to see multiple actions you can perform, and find the Move Room option. Click on it.
Another pop-up will appear, displaying the room details:
On the left side, you will see the existing room type, room ID, and current price.
On the right side, you will find the new room options for Upgrading or Downgrading.
If you select opt for higher room category [Upgrade], the price will automatically adjust, and the system will show the price difference with a” + ” sign, indicating the additional amount the guest will need to pay.
If the guest opts for a lower room category [Downgrade], the system will show the price difference with a ” – ” sign, indicating the refund or reduced cost.
Once you fill in the required details according to the guest’s preference, click on the Move Reservation button located at the bottom-right corner of the screen.
You have successfully Upgraded or Downgraded the reservation, you will now receive a confirmation message.
When upgrading a reservation from a lower room category to a higher one, should I input the entire charge or only the additional amount?
When upgrading a reservation in Stayflexi, the system is designed to make the process easy and accurate. Once you select a new room type for an upgrade, the system automatically calculates the difference in price between the original room and the upgraded room.
Here’s how it works:
Original Booking: The guest has already booked a room at a specific rate, for example, a Standard Room at $100 per night for 3 nights, totaling $300.
Selecting the Upgrade: When you choose a new room type, such as upgrading to a Deluxe Room at $150 per night, you don’t need to manually calculate the additional cost.
Automatic Price Update: The system instantly calculates the difference between the original rate and the new rate. In this case, it will calculate the $50 difference per night ($150 – $100). For a 3-night stay, the system will automatically add $150 (3 nights x $50) to the original total, generating a new total of $450.
Final Charge: The system updates the reservation total, ensuring that the guest is charged only the additional amount for the upgraded room. This process avoids manual errors and makes sure the correct price is applied.
This automated feature ensures that the property can quickly and accurately process upgrades, while the guest is charged with the correct amount for their stay based on the new room selection.
How can I upload guest ID proof in the PMS while creating or editing a reservation?
Below are the guidelines on how to upload guest ID proof in the PMS while creating or editing a reservation.
Login to Stayflexi: Log into your Stayflexi dashboard using your credentials.
Navigate to the Reservations Tab: From the front page of the Stayflexi dashboard, locate the top navigation menu. The second icon is the Reservation Calendar. Click on the icon to see all your reservations.
Select and click on the Reservation that you want to upload guest ID proof in the PMS.
A pop-up window will appear on the right side of the screen showing the Reservation details.
Reservation details: This is the page where you can see the guest information, where their details will be displayed.
Upload Image Section: At the bottom of the customer information screen, you’ll find list of options. Click on others.
Select Camera or Device Upload: Click on this option, and you’ll see two choices- Camera Upload or Device Upload.
Camera Upload lets you capture an image directly from your camera.
Device Upload allows you to upload images from your device.
Select Device Upload: Choose Device Upload if you have the images saved on your computer or device.
ID Image Upload: You will see two fields: ID Front and ID Back.
Upload the front side of the guest’s ID in the ID front section.
Upload the back side of the ID in the ID Back section.
Use the file selection options to choose images from your device’s gallery or desktop.
Save the Customer Information: After uploading both images, click the Save Customer button to complete the process. This will store the images and update the customer’s information in Stayflexi.
Can I import booking data from another PMS, and what steps are required for that?
YES, you can import booking data from another PMS into Stayflexi. Here’s how you can do it:
To import booking data from another PMS to Stayflexi, follow the below-mentioned guidelines:
Login to Stayflexi: Start by logging into your Stayflexi dashboard using your credentials.
Access More Apps: From the dashboard, click on the 4-dots square icon labeled More Apps, located on the right side of the screen.
Open Property Configuration: Locate and click on Property Configuration from the list of available apps.
Navigate to Booking Import: A new page will open. On the left side, a list of options will appear, locate and click on Booking Import.
Understand Bulk Upload: A new page will appear titled Bulk Upload Bookings from Other PMS with a description of how to use the feature.
Read through the description carefully.
Download the Template: Click on Download Template File to get the format required for bulk uploads.
Import Bookings: After filling out the template, click on Bulk Import Bookings to migrate your bookings from another PMS.
NOTE: Uploading the same booking data twice will mark the bookings a Unassigned, which may cause confusion or issues. Be cautious to avoid duplicate uploads.
Where can I find the Guest details?
How to View Guest Details
Log in to your Stayflexi account.
From the left menu, click on the Reservation Calendar (second icon).
Click on any booking from the calendar.
The Reservation details will open on the right-hand side (RHS) of the screen.
In the opened panel:
The first section displays the Reservation Details.
The second section displays the Guest Details.
Click on the guest’s name in the Guest Details section.
This opens the complete guest profile, showing all saved guest information.
How can I edit guest details in the Stayflexi?
To edit the guest details in the system, follow the below-explained steps:
Login to Stayflexi: Log into your Stayflexi dashboard using your credentials.
Navigate to the Reservations Tab: From the front page of the Stayflexi dashboard, locate the top navigation menu. The second icon is the Reservation Calendar. Click on the icon to see all your reservations.
Select the Reservation: Find and click on the reservation for which you want to edit the details.
View the Reservation Details: A pop-up window displaying the reservation details will appear on the right side of the screen.
From the opened page, click on the guest name. This will open the Edit Reservation option.
Update the guest information with the correct details.
Click Save Customer to save the updated information.
How to check a guest out early ?
Early checkout means the guest is leaving before the original checkout date mentioned in the reservation. The stay duration is reduced, and the system recalculates room charges based on the new checkout date.
Log in to your Stayflexi dashboard.
Navigate to the Reservation Calendar.
Click on the guest’s reservation.
This opens the reservation panel on the right-hand side.
If the guest is already checked in, you will see the Checkout option.
To edit the checkout date, click Modify in the top-right corner of the reservation panel.
From the Modify options, select Modify Checkout.
The Modify Checkout screen opens.
Click on the calendar icon to select the new (earlier) checkout date.
The stay dates and charges will update accordingly.
Click Modify Checkout to confirm the changes.
The guest is now checked out early, and the reservation is updated successfully.
Can I edit guest details (name, phone number, ID proof) after check-in?
To edit guest details (name, phone number, ID proof) after check-in, follow the below mentioned steps:
Login to Stayflexi: Log into your Stayflexi dashboard using your credentials.
Navigate to the Reservations Tab: From the front page of the Stayflexi dashboard, locate the top navigation menu. The second icon is the Reservation Calendar. Click on the icon to see all your reservations.
Select the Reservation: Find and click on the reservation for which you want to edit the details.
View the Reservation Details: A pop-up window displaying the reservation details will appear on the right side of the screen.
From the opened page, click on the guest name. This will open the Edit Reservation option.
Update the guest information with the correct details.
Click Save Customer to save the updated information.
How to Modify Checkout time ?
Steps to modify checkout time in Stayflexi:
Log in to your Stayflexi dashboard.
Open the Reservation Calendar.
Click on the guest’s reservation you want to update.
The reservation details panel opens on the right-hand side.
Click on Modify.
From the modify options, select Modify Checkout.
In the Time field, update the checkout time as required.
Review the updated pricing (if applicable).
Click on Modify Checkout to save the changes.
How to add Sub Segment ?
How to move a reservation from one room to another?
Follow the steps mentioned below to Move a reservation from one room to another in Stayflexi:
Login to Stayflexi: Log into your Stayflexi dashboard using your credentials.
Navigate to the Reservations Tab: From the front page of the Stayflexi dashboard, locate the top navigation menu. The second icon is the Reservation Calendar. Click on the icon to see all your reservations.
Select the Reservation: Find and click on the reservation you wish to move by clicking on it.
View the Reservation Details: A pop-up window will appear on the right side of the screen, displaying the guest’s reservations details.
Access Action Options: From the opened page, you will find multiple options for managing the reservation. Locate and click on Move Room.
Fill in the New Room Details: A new page will appear showing two sections:
Previous Room ID [pre-filled with the current room]
Current Room ID [you need to fill this with the new room information].
Below this, you will need to fill in the Room Type, Price, and Tax details.
Note: Based on the room type you select, the system will automatically calculate the difference in amount. For example, if the guest is upgrading from a lower room category to a higher one, the system will prompt you to collect the additional amount.
Add Remarks: There is a column provided for adding remarks about the room change. This is optional but can be useful to understand why move room was done for a given reservation.
Move Reservation: Once all details are entered, click on Move Reservation at the bottom of the page.
Confirmation: A confirmation message will appear, notifying you that the reservation has been successfully moved to the new room.
How do I create a reservation for past dates?
To Create a reservation for past dates, follow the below-mentioned methods:
Navigate to Previous Weeks:
In the reservation Calendar, locate the arrow pointing left in the top-left corner.
Click on it to view the calendar for the previous week. This is useful when you want quick access to earlier dates within a week.
Select Specific Dates:
Alternatively, you can click on the calendar icon located in the middle at the top of the reservation calendar page.
From here, you can select any date across any month to easily make a booking for that specific date.
Follow the below mentioned steps to create a booking for past dates.
Navigate to the Desired Date:
Use the left arrow to access previous weeks or click on the calendar icon to select any specific date across different months.
Drag and Drop a Reservation:
Once on the desired date, click and drag on an available room slot.
A booking window will appear where you can enter guest details, room type, rate, and other relevant information.
Save the Reservation:
After filling in the necessary details, click Save to finalize the booking.
How do I cancel a reservation in the system?
To cancel a reservation in Stayflexi, follow the below-mentioned guidelines:
Login to Stayflexi: Start by logging into your Stayflexi dashboard using your credentials.
Navigate to the Reservations Tab: From the front page of the Stayflexi dashboard, locate the top navigation menu. The second icon is the Reservation Calendar. Click on the icon to view all your reservations.
Select the Desired Reservation: Click on the desired reservation, that you want to cancel.
Reservation Details Page: A page will appear on the right side of the screen displaying Reservation details.
Modify Option: Click on Modify option on top right corner.
Locate Cancel Booking Option: A list of actions will be displayed. Find and click on Cancel Booking.
Choose Cancellation Policy:
A new page will open on the right side.
In the Please Select column, click on the tiny arrow to open the dropdown menu.
Select the applicable Cancellation Policy based on your property’s rules.
Complete the Cancellation: After selecting the policy, click the Yes, Cancel Booking button at the bottom to finalize the action.
Can I mark a same-day booking as checked-in while creating the reservation?
YES, in Stayflexi, you can mark a same-day booking as checked-in while creating the reservation. When you create the booking, there will be an option to directly check in the guest during the reservation process. This allows you to streamline the process for walk-ins or last-minute bookings, ensuring that the reservation is both created and checked in at the same time.
To mark a same-day booking as checked-in while creating the reservation, follow the below-explained step guidelines:
Login to your Stayflexi dashboard.
On the left panel, click on the Reservation Calendar [the second icon] to view all your reservations.
Select the today’s date from the calendar.
Drag the booking from the Check-in date to the desired check-out date.
A pop-up window will appear covering the entire screen, where you can complete the guest’s details.
Enter the guest’s Name, Email, and Phone Number.
You can also add any special requests from the guest.
ID Proof: Upload the guest’s ID Proof with Front and Back photos options
Address details: Enter the guest’s address, and select the number of adults and children for the reservation.
Review Guest Details: After reviewing all the guest details, you will find the Create Reservation button. To the right of this button, there is a Check-in button, which allows you to check in the guest during the reservation process.
Select the Check-in Option: click on the tiny square checkbox next to the Check-in option. By selecting this, the guest will be automatically checked in once the reservation is created.
Click the Create Reservation button at the bottom right of the window.
Your reservation and check-in are completed and you’ll receive a confirmation message on the screen.
I have different rate plans with varying room prices. How do I select a specific rate plan while creating a booking?
To select a specific rate plan while creating a booking, follow the below-mentioned guidelines:
Start the Drag–and-Drop Booking:
In the Reservation Calendar, click and drag on the room and date you want to book.
A new booking page will appear on the screen.
Enter Guest and Price Details:
On the left side, fill in the guest details.
On the right side, you’ll be prompted to set the prices.
Select a Rate Plan:
At the top of the right side, you’ll see the Rate Plan option.
Click on the small arrow to open the dropdown menu.
All rate plans offered by your property will be listed.
Select the rate plan preferred by your guest.
Auto-fill Pricing:
Once a rate plan is selected, the prices for that specific plan will automatically populate the amount columns.
Complete the Booking:
After filling out all the necessary details, click the Create Reservation button at the bottom to finalize the booking.
How to check-in a reservation?
Follow these steps to check-in a confirmed reservation:
Login to your Stayflexi dashboard.
On the left panel, click on the Reservation Calendar [the second icon] to view all your reservations.
Identifying Confirmed Reservations: All confirmed reservations are marked in light yellow. These are confirmed reservations and on arrival dates you can mark check-in.
Click on the specific booking you wish to check-in. A pop-up window will appear on the right side of the screen, displaying reservation details.
Below the booking details, you will see multiple action options as mentioned in the screenshot. Locate the check-in option and click on it.
Another pop-up window will appear to confirm the check-in. Ensure you are checking in the correct guest by verifying the booking ID.
Once verified, click on Check-in to confirm.
You will receive a confirmation message, and the reservation status will change.
The Reservation that was previously colored in light yellow will now turn green, indicating the guest has successfully checked in.
How to print registration card?
Below is the Step to Step guide for printing a registration card in Stayflexi:
Log into Stayflexi: Start by logging into your Stayflexi dashboard using your credentials.
Navigate to the Reservations Tab: From the front page of the Stayflexi dashboard, locate the top navigation menu. The second icon is the Reservation Calendar. Click on the icon to view all your reservations.
Select the Desired Reservation: Click on the specific reservation for the guest whose registration card you want to print.
Open Guest Details: When you click on the desired reservation, a pop-up will appear on the right side of the screen. This pop-up displays the selected reservation details along with multiple options for further actions.
Locate the Print Registration Card: Among the options provided, one of them is a Print Registration Card.
Click the Print Registration Card: Click on this button to initiate the printing process. This action will open a new popup displaying the registration card.
Review the Registration Card: Ensure all the guest details are accurate, including name, date, and any special requests.
Choose your Print Option: From the preview screen, you can choose to print directly by clicking on the print button.
How do I navigate the reservation calendar to view bookings for specific dates?
Follow these steps to navigate through the reservation calendar in Stayflexi:
Login to your Stayflexi dashboard with your credentials.
Click on the Reservation Calendar icon [the second icon on the left panel] to access the calendar, where you will see all your reservations.
In the middle of the page, you will find the Date Range Selector, which allows you to view reservations within a specific time.
Right next to the date range selector, there is a small calendar icon.
By clicking on the calendar icon, a pop-up calendar will appear. You can then select any dates according to your requirements.
You can easily navigate between Past, Present, and Future dates to access the desired reservation details.
How to add booking notes?
Login to Stayflexi: Log into your Stayflexi dashboard using your credentials.
Navigate to the Reservations Tab: From the front page of the Stayflexi dashboard, locate the top navigation menu. The second icon is the Reservation Calendar. Click on the icon to see all your reservations.
Select a Reservation: Click on the Reservation where you want to add Booking Notes.
View the Reservation Details: A pop-up window will appear on the right side of the screen, displaying four sections.
Access the Notes Section: Click on the Notes in the list below to view Booking Notes.
Add a Note: Below the notes section, You’ll see a plus [+] symbol. Click on it to add a new note.
Type your Note: A pop-up window will appear on RHS, allowing you to type the note.
Save the Note: Once you’ve typed the note, click on Save at the bottom of the window.
Confirmation: Your note will be added and saved. You can easily identify that the reservation has a note by the Message Icon appearing next to the reservation in the calendar.
Understanding rates & inventory layout
Log in to Stayflexi Dashboard: Use you credentials to log into the Stayflexi dashboard.
Access Rates and Inventory: Click on the third icon, which represents “Rates and Inventory”.
Top Columns Overview: At the top, you’ll see a column labeled “Rates/Inventory/Restrictions”.
Click on this column to reveal the listed options.
Select view: Choose “Rates”, “Inventory”, or “Restrictions” depending on what you want to display.
You can set the page to view only rates, only inventories, only restrictions, or display all at once.
This flexible layout allows you to tailor the view to match your needs, making it easier to manage rates, inventory, and restrictions efficiently.
Next to the Rates/Inventory/Restrictions column, you will find the Date Range Selector.
Click on the Date Range Selector: This will open a calendar view.
Set the Date Range: Select the start and end dates according to your requirements to display the rates and inventory for the chosen period.
This feature allows you to customize the view based on the specific dates you want to manage or review.
Next to the Date Range selector, You’ll see the Source column.
Click on the Source Column: This will display a list of booking sources [Such as OTAs or direct bookings].
Select a Source: Click on any specific source to view the rates and inventory data associated with that particular booking source.
This helps you manage and analyze data for bookings from various sources effectively.
Next to the Source Column, you’ll find the Days Column.
Click on the Days Column: This allows you to set the view for the specified number of days.
Select the Desired Duration: Choose whether you want to display data for 8 days or 15 days in the displayed screen.
This feature enables you to customize the timeframe for which you want to review rates and inventory.
Next to the Days column, You’ll find the Room Categories column.
Click on the Room Categories Column: This allows you to filter the displayed data by room category.
Select the Room Categories: You can choose a specific room category or select all categories to view the data for multiple or all room types.
This feature helps you to focus on specific room categories or view the entire property’s room data at once.
Next to the Room Categories column, you’ll see the Rate Plan column.
Click on the Rate Plan Column: This will display a list of available rate plans for your property.
Select Rate Plans: You can click on any specific rate plan or select all of them according to your requirements.
This functionality allows you to filter and view data based on the selected rate plans, helping you manage pricing strategies effectively.
Next to the Rate Plan column, you’ll find the Bulk Update feature, which is one the most dynamic and versatile tools in Stayflexi.
Click on Bulk Update: This opens a menu with multiple action options, such as:
Set Pricing
Rate Multiplier
Inventory Capping
Block/Unblock Rooms and a lot more.
Select a Feature: Choose any of these features to perform your required actions, whether it’s updating rates, managing inventory, or adjusting room availability.
This feature offers comprehensive solution for bulk changes, making property management more efficient.
Next to the Bulk Update column, you’ll see View more option.
These options help you manage your property’s rates and inventory efficiently and ensure they are in sync across all platforms.
.
Click on the View more option: This will open a list of options, including:
Rates and Inventory: View and manage your property’s rates and inventory.
Base Price: Set and adjust the base price for your rooms.
OTA Price Compare: Compare your rates with those listed on OTAs.
View Latest Updates : Displays the list of modifications to rates and inventory allocations.
Channel Status Report: Provides an overview of the current operational status of all connected distribution channels.
Detailed log: Presents a comprehensive chronological record of all system activities and updates.
These options allow for easy navigation and management of your pricing strategy and market comparison from a single view.
Below all the key options mentioned above, You’ll see a Dates Row.
This Dates Row displays the selected date range, showing the specific days within your chosen timeframe.
It provides a clear overview of how rates, inventory, and other settings apply to each day within the selected range, making it easy to monitor and adjust details for particular dates.
This feature helps you ensure that all rate and inventory updates are aligned with your desired scheduling.
Under the Dates Row, on the left side vertically, you’ll find key occupancy metrics:
Occupancy in 1%: This shows the percentage of rooms occupied for each date in the selected range.
Total Available: Displays the total number of rooms available for booking.
Total Booked: Indicates the total number of rooms already booked.
These metrics give you a quick overview of your property’s occupancy status, helping you manage availability and maximize occupancy efficiently.
Under the Occupancy Metrics, you’ll find a list of Room Categories with their associated Rate Plans:
Room Categories and Rate Plans: This section displays the various room types available at your property, along with the corresponding rate plans for each.
Data for Respective Dates: Next to each room category and rate plan, you’ll see the specific rates, inventory levels, and other relevant data for the selected dates.
This layout provides a clear and organised way to view and manage pricing, room availability, and rate plans across different dates.
Where can I view the sync status of my OTA channels?
Log in to your Stayflexi account using your credentials.
Go to the Dashboard.
Click on Rates and Inventory.
Select the View More option.
Under View More, choose Channel Status Report.
You’ll see a list of all connected OTA channels with their current sync status.
Where can I view my OTA channels report and compare prices across all connected OTAs?
Log in to your Stayflexi account using your credentials.
Go to the Dashboard.
Click on Rates and Inventory.
Select the View More option.
Under View More, click on OTA Price Compare.
You can now view all your connected OTA channels and compare their live prices.
How do I reassign an existing room number to a different room category?
This feature allows you to reassign one or more existing room numbers from their current room category to another room category using the Bulk Update option in Rates & Inventory.
Steps to Reassign Room Type:
Log in to your Stayflexi dashboard.
Navigate to Rates & Inventory.
Click on Bulk Update.
In the Action Type dropdown, select Reassign Room Type.
In the Room Types column (next to Action Type), select the current room type from which the rooms need to be moved.
Select the Room IDs (room numbers) you want to reassign.
From the New Room Type column below, choose the room category you want to move the selected rooms into.
Click on Reassign Rooms to apply the changes.
Once completed, the selected room numbers will be successfully reassigned to the new room category.
How can I check the latest updates or history of changes made to my rates and inventory?
Follow these steps to check the latest updates or history changes made to rates and inventory
Log in to your Stayflexi account using your credentials.
Navigate to the Dashboard.
Click on Rates and Inventory.
Select the View More option.
Under View More, click on View Latest Updates.
Here, you can view all the recent changes, update history, and check the success status for each update.
How can I view detailed logs of rate and inventory changes across OTA channels?
There are two ways to view detailed rate and inventory logs in stayflexi.
Method 1
Log in to your stayflexi account using your credentials.
From the main menu, navigate to the Dashboard.
Click on Rates and Inventory.
Select the View More option.
Under the View More section, click on View Detailed Logs.
You can now:
View detailed reports of rate and inventory updates.
Filter the data by date or channel.
Export the data if required.
Method 2
Navigate to the View More section.
Click on Channel Status Report.
At the top left corner, locate and click on Detailed Logs.
This will take you to the Report Status Panel, where you can view detailed rate and inventory update reports, filter by date or channel, and export data if needed.
Can OTA bookings be canceled directly from Stayflexi?
OTA bookings CANNOT be cancelled directly from Stayflexi.
To cancel an OTA booking, you need to complete the process through the respective OTA’s extranet (like Booking.com, Expedia, or Airbnb), as direct cancellations from Stayflexi are not supported.
This ensures the cancellation is officially processed within the OTA system, maintaining accurate records and communication with the guest. Start by identifying the booking details in Stayflexi, then log in to the OTA extranet, locate the reservation, and cancel it there.
The cancellation status will then sync back to Stayflexi, keeping your records consistent and up-to-date across all platforms.
How can I change rates for a specific day?
To change rates for a specific day in Stayflexi, follow these steps:
Log in to the StayFlexi Dashboard.
From the left panel, click on the third icon from the top (Rates & Inventory).
On the right side of the screen, locate the black “Bulk Update” button and click on it.
From the listed options, select Set Pricing.
On the Set Pricing page, go to the right-hand side and locate the Date Range column.
A calendar will appear. Select the specific date you want to update (e.g., 25th)
Click Apply to confirm your date selection.
Next, select the Room Type and Rate Plan for which you want to update the price.
Enter the desired price for the selected date.
(Optional) If required, you can add another Room Type and set pricing for it.
Once done, click Set Pricing
The pricing for the selected date and room type will be successfully updated across your connected channels.
Can you manually sync rates and inventory from Stayflexi?
YES, you can manually sync rates and inventory from Stayflexi. The platform provides an option to manually update or sync this information with connected OTAs [Online Travel Agencies].
To sync rates and inventory from Stayflexi, follow the below mentioned steps:
Log in to the StayFlexi dashboard with your credentials.
Click on the “Rates and Inventory” icon at the top of the dashboard (third icon from the left).
On the right side of the screen, select Bulk Update.
Under Action Type, choose Bulk Sync.
Under Sync Type, select whether you want to sync Rates or Inventory as per your requirements
Next, configure your sync by:
Selecting the Room Type
Selecting the Rate Plan
Choosing the Channels you want to sync with
Selecting the Date Range
Once all selections are made, click on Save.
A confirmation message will show that the rates have been successfully synced across all selected OTAs.
Where can I view close rate plan restrictions applied to specific OTAs?
To view Closed Rate Plan Restrictions for Specific OTAs in Stayflexi, follow the below-mentioned steps:
Log in to the Stayflexi Dashboard with your credentials.
Click on the ” Rates & Inventory ” icon at the dashboard’s top [third icon from the left].
Enable Restrictions View:
On the opened page, locate the column options on the left side.
Tick the Restrictions box under Sort and View Rates, Inventory, and Restrictions.
This will display all the restrictions applied across OTAs, including Stayflexi.
Filter by Source:
Next to the Date Range Selector, click on the Source column. To know on which source or channel restriction is applied you need to select a specific source.
Use the filter to select the specific OTA or source you wish to view.
Review Restrictions:
Once you scroll down, you will see the rate plan restrictions that are applied. The following options are displayed:
Close/Open Rate Plan
Close/Open on Arrival
Close/Open on Departure
This allows you to easily identify close rate plan restrictions for individual OTAs or sources.
Can I update rates and inventory on OTAs once the channel manager is connected?
To update rates and inventory for connected OTAs in Stayflexi, follow the below-mentioned steps:
Log in to the Stayflexi Dashboard with your credentials.
Click on the ” Rates & Inventory ” icon at the dashboard’s top [third icon from the left].
Click on the Rates/Inventory/Restrictions column on the left side of the screen (the first column).
Select the Rates and Inventory checkboxes.
A list of your connected OTAs will appear on the screen, reflecting current rates and inventory details.
The data displayed is editable, simply update the prices or inventory levels as needed.
Once updated, Stayflexi will automatically sync these changes with your connected OTAs, ensuring that your latest rates and inventory are reflected across all platforms.
Is it possible to change the category of a specific room number or reassign it to a new room type?
YES, you can change the category of a specific room number or reassign it to a new room type in Stayflexi: Here’s how to it:
Below are the step-by-step guidelines for changing the category of a specific room number or reassign it to a new room type in Stayflexi:
Log into the Stayflexi Dashboard.
Click on the third icon from the top, which is Rates and Inventory.
Locate the green “Bulk Update” on the right side of the screen and click on it.
From the listed options, Locate and click onReassign Room Type.
A page will open on the right side of the screen. On this page, click on the Room Types column at the top to access a drop-down menu.
In the drop-down menu, choose the room type that corresponds to the room ID you want to change.
Choose the room number ID.
Below the selected room number, click on New Room Types. A drop-down menu will appear where you can select the new room type.
After selecting the room type and room number, click on theReassign Rooms button at the bottom to complete the process.
How to change prices or inventory for specific channel / OTA?
To change prices for a specific channel/OTA in Stayflexi, follow the below steps:
Log into the Stayflexi Dashboard.
Click on the third icon from the top, which is Rates and Inventory.
Locate the green “Bulk Update” on the right side of the screen and click on it.
Set Pricing: Locate and click on the “Set Pricing” option.
A page will open on the RHS.
Select the OTA/ Channel: To set the price for a specific channel, select the arrow at the top right corner of the page to choose the OTA or Channel.
You can select multiple channels or just one.
Select Days: In the “Days” column, choose the specific days you want to apply the price changes.
Set Date Range: Choose the date range for which you want the price changes to take effect.
Select Room Types: Under “Room Types”, click on “Add Room Type” to select the rooms for which you want to update the pricing.
You can add multiple room types one by one.
Click on Set Pricing: Once all the selections are made, click the green “Set Pricing” button at the bottom of the page.
Review and Confirm: A confirmation page will appear where you can recheck the data you have updated.
If everything is correct, click “Confirm” to apply the changes.
Receive Confirmation: You will get a confirmation message indicating that the pricing has been successfully updated.
To change inventory for a specific channel/OTA in Stayflexi, follow the below steps:
Log into the Stayflexi Dashboard.
Click on the third icon from the top, which is Rates and Inventory.
Locate the green “Bulk Update” on the right side of the screen and click on it.
Locate Inventory Capping and click on it.
Popup Window: A popup will appear on the right-hand side of the screen.
Select Room Types: Choose the Room Types you want to apply the cap on.
Specify days: select the days for which you want to apply the inventory cap.
Set Date Range: Select the date range during which the cap will be in effect.
Source of Booking: Select the source of Booking for which the inventory cap applies, and select the arrow at the top-right corner of the page to choose the OTA or channel.
Select Cap Value: Enter the Cap Value you want to set.
Choose Type: Specify whether the cap is in Count [number of rooms] or Percentage.
Applying Capping: Click on the Apply Capping button to complete the process.
Confirmation Message: A confirmation message will appear, indicating that the inventory capping has been successfully applied.
How do I restrict a specific rate plan on OTAs?
To restrict a specific rate plan on OTAs, follow the below-mentioned steps:
Log into the Stayflexi Dashboard.
Click on the third icon from the top, which is Rates and Inventory.
Navigate to Bulk Update: Click on the “Bulk Update” option in the dashboard.
Select Close/Open Rate Plan:
From the list of actions, locate and click on Close/Open Rate Plan.
A new page will appear on the right side of the screen.
Set the Restrictions:
Select the desired days and date range for the restriction.
Choose the Source [OTAs] where you want to apply the restriction.
Select the Direct Billing Accounts if applicable.
Toggle Room Type and Rate Plan Selection:
You’ll see a toggle option:
Enable the toggle to apply the restriction to all room types and rate plans.
Disable the toggle if you want to select individual room types and rate plans.
Select Room Type and Rate Plan:
Below the toggle, select the Room Type.
Once the room type is selected, the Rate Plan column will become editable.
Choose whether to Close or Open the rate plan for that room type.
Close [restricting the rate plan] or Open [making it available to all OTAs].
Save the Changes:
After filling in all necessary details, click the Save button at the bottom to complete the action.
How can I set a cut-off time for a specific OTA?
Follow the below steps to set a cut-off time for a specific OTA:
Log into the Stayflexi Dashboard.
Click on the third icon from the top, which is Rates and Inventory.
Locate the green “Bulk Update” on the right side of the screen and click on it.
Locate Min/Max Advanced Booking Offset: From the listed options, find and click on Min/Max Advanced Booking Offset.
A page will open on the right side of the screen.
Select Days: Choose the days for which you want to apply the booking offset.
Select Date Range: Specify the date range for the cut-off time.
Select the OTA/Source: From the source list, select the specific OTA for which you want to set the restrictions.
Enable/Disable Toggle: You’ll see a toggle option. If you enable it, the restrictions will apply to all room types and rate plans. If you disable it, you can set restrictions individually.
Select Room Types: Choose the room types for which you want to set the cut-off time.
Set Min/Max Hours: In the respective columns, input the minimum and maximum hours:
Min Hours: Set this when you want to prevent bookings within a certain number of hours before check-in.
Max Hours: Set this when you want to restrict bookings after a certain number of hours from the current time.
The Set cutoff Option is only accessible after all mandatory fields have been completed.
How do I restrict a particular room category on OTAs?
To restrict a particular room category on OTAs, follow the below-mentioned steps:
Log into the Stayflexi Dashboard.
Click on the third icon from the top, which is Rates and Inventory.
Navigate to Bulk Update: Click on the “Bulk Update” option in the dashboard.
Select Close/Open Rate Plan:
From the list of actions, locate and click on Close/Open Room Type.
A new page will appear on the right side of the screen.
Set the Restrictions:
Select the desired days and date range for the restriction.
Choose the Source [OTAs] where you want to apply the restriction.
Select the Direct Billing Accounts if applicable.
Toggle Room Type and Rate Plan Selection:
You’ll see a toggle option:
Enable the toggle to apply the restriction to all room types and rate plans.
Disable the toggle if you want to select individual room types and rate plans.
Select Room Type and Rate Plan:
Below the toggle, select the Room Type.
Once the room type is selected, the Rate Plan column will become editable.
Choose whether to Close or Open the room type.
Close [restricting the room type] or Open [making it available to all OTAs].
Save the Changes:
After filling in all necessary details, click the Save button at the bottom to complete the action.
What is bulk update?
Bulk Update in Stayflexi is a feature designed to simplify the management of multiple rooms, rates, and settings across all OTAs [Online Travel Agencies] and direct booking channels. Instead of manually adjusting rates, inventory, or room availability one by one, Bulk Update allows you to make these changes in a single action for multiple rooms or rate plans, ensuring consistency across all platforms.
What Makes Bulk Update Unique in Stayflexi:
All-in-one Management: Bulk Update covers a wide range of actions, such as setting rates, updating inventory, applying rate multipliers, etc, all from a single interface.
Instant Synchronization: Any changes you make using Bulk Update are automatically synced across all your OTAs and direct booking channels, ensuring consistent pricing and availability without the need for manual entry on each platform.
Easy to Use: Stayflexi’s Bulk Update lets users quickly perform complex actions with just a few clicks, simplifying the management process for even the largest properties with multiple room types and rate plans.
Error Reduction: By allowing bulk actions, Stayflexi reduces the chance of inconsistencies or mistakes when managing inventory and rates, as everything is updated uniformly across channels.
Here’s a simple and easy-to-understand example of using Bulk Update in Stayflexi:
Scenario: Your hotel has 10 rooms under maintenance, and you want to block these rooms from being booked across all OTAs for the next two weeks.
Without Bulk Update: You would need to go into each OTA or channel and manually block these rooms one by one for the specific dates, which could be time-consuming and prone to error.
With Bulk Update: Using the Bulk Update feature, you can quickly select the room types that are under maintenance, choose the Block Rooms option, and set the dates for the next two weeks. With just a few clicks, these rooms will be blocked from being on all OTAs or channels.
Similarly, Bulk Update allows you to perform various other actions easily, such as: Deleting rooms, Setting Inventory, setting rooms online or offline, etc.
Below are the step-by-step guidelines on how to operate Bulk Update:
Log into the Stayflexi Dashboard.
Click on the third icon from the top, which is Rates and Inventory.
Locate the green “Bulk Update” on the right side of the screen and click on it.
A menu will appear with the following actions:
Set Pricing: Allows you to update the room rates across various OTAs or channels for a specific date range. You can adjust pricing for individual room types or rate plans.
Set Inventory: This lets you adjust the number of available room types over a defined date range. This ensures that the correct room availability is synced across all cahnnels.
Rate Multiplier: This feature allows you to apply a percentage increase or decrease to the existing rates for specific room types or rate plans. For example, you could increase the rate by 10% for a peak season.
Inventory Capping: This enables you to set limits on the number of rooms that can be sold through OTAs or specific channels, ensuring you retain control over the direct sales on your website.
Set Online/ Set Offline: This allows you to make certain room types or rate plans available [set online] or Unavailable [Set offline] for booking across your connected OTAs or channels.
Block Rooms/ Unblock Rooms: Provides the option to temporarily block rooms, making them unavailable for booking, or unblock previously blocked rooms, making them available again.
Delete Rooms/ Restore Deleted Rooms: This lets you permanently remove rooms from your inventory, or restore rooms that have been deleted, bringing them back into your active inventory.
Close/ Open Rate Plan and Room Type: This action allows you to close [make unavailable] or open [make available] specific rate plans or room types for booking on OTAs or direct channels.
Min/Max Length of Stay: Sets the minimum or maximum number of nights a guest must book for a particular room type or rate plan. For Instance: You might require a minimum stay of 2 nights during weekends.
Set Sold Out: Marks certain room types as fully booked [sold out] across your channels, even if there are still rooms available, to control availability manually.
Min/Max Advanced Booking Offset: Allows you to specify how far in advance or how close to check-in a guest can book. For example, you may require bookings to be made at least 2 days in advance or set a maximum window of 6 months.
How to sync rates across all OTAs or Channels?
Below are the step-by-step guidelines on how to sync rates across all OTAs or Channels:
Log in to the Stayflexi Dashboard with your credentials.
Click on the ” Rates & Inventory ” icon at the dashboard’s top [third icon from the left].
On the right side of the screen, click on the Bulk Update to open more options.
Select “Bulk sync.”
In the Bulk Sync window, you will see the following fields:
Room Type
Rate Plan
Channels/ OTAs
Date Range
Fill in the required details for each field as per your needs.
Once completed, click the “Save” button.
A confirmation message will show that the rates have been successfully synced across all selected OTAs.
Close / open room type and rate plan.
In Stayflexi, Closing or Opening room types and rate plans refer to controlling the availability of specific rooms and pricing options for bookings.
Close Room Type: When a room type is closed, it becomes unavailable for booking. Even if rooms of that type exist, they won’t appear as options for guests to book.
Close Rate Plan: Closing a rate plan means that the pricing or promotional offer attached to that rate plan is no longer available for booking. Guests won’t see or be able to select that specific rate plan.
Open Room Type: When a room type is opened, it becomes available again for bookings. Guests will see the room types as an option when making reservations.
Open Rate Plan: means making a specific pricing structure or offer available for bookings again, allowing guests to see and book rooms at those rates.
Below are the guidelines on how to use the feature Close/Open Room Type and Rate Plan:
Log into the Stayflexi Dashboard.
Click on the third icon from the top, which is Rates and Inventory.
Locate the green “Bulk Update” on the right side of the screen and click on it.
Locate Close/Open Room Type and Rate Plan in the bulk update settings.
A popup window will open with various options.
Select Days and Date Range: Choose the specific days and date range for which you want to apply the action [close/open room types or rate plans].
Choose Booking Source: Select the source or channel of booking for which you want to apply the restriction [e.g., OTA, direct bookings].
Select Direct Billing Accounts [if applicable]: You can apply the restrictions to specific direct billing accounts.
Enable/Disable the Toggle: There will be a toggle option:
Enable it to apply the action to all room types and rate plans.
Disable it if you want to select individual room types or rate plans.
Click Save: Once you’ve selected, click the Save button to complete the action.
Confirmation Message: You will receive a confirmation message indicating that the action has been successfully applied.
How to check OTA specific rates?
Below are the step-by-step guidelines on how to check OTA specific rates:
Log in to the Stayflexi Dashboard with your credentials.
Click on the ” Rates & Inventory ” icon at the dashboard’s top [third icon from the left].
In the middle of the screen, you will see the Source column, which displays all the sources of bookings [OTAs and direct channels].
Click on any specific source [e.g., Booking.com, Expedia] to view the rates associated with that OTA or channel.
How do I increase or decrease prices for a specific OTA?
Below are the step by step guidelines on how to increase or decrease prices for a specific OTA in Stayflexi:
Log into the Stayflexi Dashboard.
Click on the third icon from the top, which is Rates and Inventory.
Locate the green “Bulk Update” on the right side of the screen and click on it.
Locate and click on “Set Pricing” from the listed options.
On the next page, go to the right-hand-side and select the source to adjust the prices for the specific OTA.
Choose the days and set the date range for which the price adjustments apply.
Select the appropriate room types from the list.
When you select a room type, the pricing details for each rate plan will appear. Adjust the prices per person as needed.
If needed, click on “Add Room Type” to include additional room types for price setting.
Click on “Set Pricing” at the bottom, that will be enabled after filling all the required information.
Review and Confirm: A confirmation page will appear where you can recheck the data you have updated.
Receive Confirmation: You will get a confirmation message indicating that the pricing has been successfully updated.
How do I apply minimum and maximum length of stay restrictions?
In Stayflexi, Minimum/Maximum Length of Stay refers to the restrictions you can set on a booking to control how long guests must or can stay at your property. For Example:
If you set a 2-night minimum, guests cannot book for just 1 night.
If you set a 7-night maximum, guests cannot book for more than 7 consecutive nights.
Below are the step-by-step guidelines for Applying Minimum/Maximum Length of Stay Restrictions:
Log in to the Stayflexi Dashboard with your credentials.
Click on the ” Rates & Inventory ” icon at the dashboard’s top [third icon from the left].
Access the Bulk Update: On the right-hand side of the screen, click the Bulk Update button.
Select Min/Max Length of Stay: A list of bulk actions will appear. Select either Minimum Length of Stay or Maximum Length of Stay depending on your requirement.
Configure the Restriction Details:
A popup will appear where you can configure the restriction
Select the specific days and date range for the restriction.
Choose the source [e.g., OTA channels or Direct Bookings].
Apply to All Room Types and Rate Plans [Optional]: If you want to apply the restriction across all room types and rate plans, toggle the Apply for all room types and rate plans option.
Select Specific Room Types: If you do not want to apply the restriction to all rooms, choose the specific room types that you want the restriction to apply to.
Enter the Minimum or Maximum Length of Stay: Set the Minimum or Maximum length of stay you want to apply.
Confirm the Action:
Click the Min/Max Length of Stay button at the bottom of the popup to apply the restriction.
A confirmation message will appear to confirm that the restrictions have been successfully applied.
How to find rate parities reported by OTAs?
Below are the step-by-step guidelines on how to find rate parities by OTAs in Stayflexi:
Log into the Stayflexi Dashboard.
Click on the third icon from the top, which is Rates and Inventory.
On the right-hand side, locate the View more options.
From the listed options, find and click on “OTA Price Compare”.
You will now see the rate parities reported by different OTAs.
Note: In some Scenarios, OTAs may show varying prices due to promotions or discounts. If the rates differ from Stayflexi, adjust them in the respective OTA extranet to ensure price parity across platforms.
What is inventory capping, and how does it work ?
Inventory Capping in Stayflexi refers to the practice of setting limits on the number of rooms available for booking within a specified timeframe. This feature allows property managers to control how many rooms can be sold at a given timeon given source, helping them manage demand, optimize pricing, and avoid overbooking.
Benefits:
Avoid Overbooking: Reduces the risk of having guests show up with no available rooms.
Manage Demand: Adjusts room availability based on expected occupancy.
Maximize Revenue: Helps in strategic pricing and availability management.
Flexibility: Easy to adjust limits in response to changes in demand or booking patterns.
Example of Use:
If a property wants to allocate a specific number of rooms to online channels, they can use inventory capping. For example, if a property has 20 rooms in a category and wants to make only 5 rooms available to online channels, they can set the cap value to 5, select the desired channels, and specify the date range.
How to use the feature Inventory Capping in Stayflexi:
Log into the Stayflexi Dashboard.
Click on the third icon from the top, which is Rates and Inventory.
Locate the green “Bulk Update” on the right side of the screen and click on it.
Locate Inventory Capping and click on it.
Popup Window: A popup will appear on the right-hand side of the screen.
Select Room Types: Choose the Room Types you want to apply the cap on.
Specify days: select the days for which you want to apply the inventory cap.
Set Date Range: Select the date range during which the cap will be in effect.
Source of Booking: Select the source of Booking for which the inventory cap applies.
Select Cap Value: Enter the Cap Value you want to set.
Choose Type: Specify whether the cap is in Count [number of rooms] or Percentage.
Applying Capping: Click on the Apply Capping button to complete the process.
Confirmation Message: A confirmation message will appear, indicating that the inventory capping has been successfully applied.
How can I adjust the inventory for a specific day?
Below are the step by step guidelines on how to adjust the inventory for a specific day:
Log into the Stayflexi Dashboard.
Click on the third icon from the top, which is Rates and Inventory.
Locate the green “Bulk Update” on the right side of the screen and click on it.
Locate and click on “Set Inventory” from the listed options.
On the next page, go to the Days column and select the specific day for which you want adjust the inventory.
Select the date range to apply the changes.
Choose the appropriate room type from the list.
Enter the desired room count for that day.
If needed, click on the “Add Room Type” button to add inventory for additional room types.
Finally, click on “Set Inventory” to complete the adjustment.
How do I set rooms to offline status?
The main purpose of setting rooms’ Offline Status in Stayflexi is to keep certain rooms unavailable for online bookings while still allowing them to be manually booked for offline purposes.
Here’s a step-by-step guide on how to find the feature Setting a Room Offline:
Log into the Stayflexi Dashboard.
Click on the third icon from the top, which is Rates and Inventory.
Locate the “Bulk Update” option on the top right side of the screen and click on it.
Locate Set Offline: In the list of actions that appears, find and select set Offline option.
Select Room Types: Choose the Room Types and then you can select room numbers you want to set offline from the options provided.
Toggle Selection:
There is a toggle option available:
Enable the toggle to select all rooms at once and make it offline.
Disable it to set rooms offline on a room-by-room basis.
Select the Date Range: Don’t forget to specify the “Date Range” during which the rooms will be offline.
Set Offline: After making your selections, click on the Set Offline button located below.
Confirmation Message: You will receive a confirmation message indicating that the selected rooms have been successfully Set Offline.
Can I copy rates from one online channel and apply them to another channel or travel portal?
To copy rates from one online channel and apply them to another channel or travel portal, follow the below-mentioned steps:
Log into the Stayflexi Dashboard.
Click on the third icon from the top, which is Rates and Inventory.
Locate the green “Bulk Update” on the right side of the screen and click on it.
From the listed options, Locate and click on “Update Rates from OTA”.
A page will open on the RHS of the screen.
In the respective column, select the Source [OTA] from which you want to update the rates.
Select the specific days for which you want to update the rates from OTA.
Choose the date range for which the rates should be updated.
Depending upon your need, select either Previous Year or Next Year to apply the rates accordingly.
The previous year or next year options allow you to apply rate updates based on historical or future data. Here’s a brief overview:
Previous Year: This option lets you copy and apply rates from the same period in the previous year. It’s useful for maintaining consistency in pricing strategies based on past performance.
Next Year: This option allows you to set or adjust rates for the upcoming year. It’s beneficial for planning ahead and ensuring your rates are competitive and aligned with your revenue management strategy.
Once all selections are made, proceed with updating the rates to complete the action.
How can I check if the rates updated in Stayflexi have synced with the OTAs?
There are two ways to verify the rates updated in Stayflexi after syncing with OTAs:
Using view latest updates
To check if the rates updated in Stayflexi have synced with the OTAs, follow these steps:
Log in to the Stayflexi Dashboard with your credentials.
Click on the ” Rates & Inventory ” icon at the dashboard’s top [third icon from the left].
On the right side of the screen, click on View more options to open more options.
Select Logs: From the list of options, click on View latest Updates.
Check the Sync Status: On the opened page, review the status. If it shows “Success”, the updated rates have been successfully synced with the OTAs.
If it does not show “Success” the rates have not been synced, and further action may be needed.
This process ensures that your rates are aligned across Stayflexi and the OTAs.
2. Using View Detailed Logs
In Rates & Inventory, select View Detail Logs
Review the on-screen notice: this log reports only OTA (channel) rate and inventory updates.
From the calendar control, choose the date for which you want the report.
Click Export Report to generate and download the log.
A list of reports for the selected date will be displayed. Review the update records and check their Status.
How to set sold out entire property ?
Below are the step-by-step guidelines on how to Set Sold Out:
Log in to the Stayflexi Dashboard with your credentials.
Click on the ” Rates & Inventory ” icon at the dashboard’s top [third icon from the left].
Click on the “Bulk Update” button located on the right side of the screen.
From the list of actions, select “Set Sold Out.”
A pop-up will appear on the right side of the screen. Select the Specific days you want to mark as sold out.
Choose the date range during which you want to set rooms as sold out.
Click the “Set Sold Out” button to complete the action.
You will receive a Confirmation message and the entire property will be marked as sold out.
How do I set rooms to online status?
The main purpose of setting a room to Online Status in Stayflexi is to make it available for bookings across online channels, such as OTAs [Online Travel Agencies] and the property’s website.
Here’s a step-by-step guide on how to find the feature Setting a Room Online status:
Log into the Stayflexi Dashboard.
Click on the third icon from the top, which is Rates and Inventory.
Locate the “Bulk Update” option on the top right side of the screen and click on it.
Locate Set Online: In the list of actions that appears, find and select set Online option.
Select Room Types: Choose the Room Types and then you can select room numbers you want to set online from the options provided.
Toggle Selection:
There is a toggle option available:
Enable the toggle to select all rooms at once and make it online.
Disable it to set rooms online on a room-by-room basis.
Select the Date Range: Don’t forget to specify the “Date Range” during which the rooms will be online.
Set Online: After making your selections, click on the Set Online button located below.
Confirmation Message: You will receive a confirmation message indicating that the selected rooms have been successfully Set Online.
Blocking and unblocking the rooms.
In Stayflexi, managing room availability is quick and effortless with the Block/Unblock feature. Whether you need to temporarily remove rooms from inventory for maintenance, or permanently block them due to long unavailability, Stayflexi allows you to do so in just a few clicks.
EXAMPLE: Consider a hotel undergoing renovations on one of its floors. The manager needs to keep the rooms on that floor unavailable for an extended period while the work is completed. Using Stayflexi’s block/unblock feature, the manager can permanently block those rooms, ensuring they don’t appear in the booking system.
Once the renovations are done, the manager can simply unblock the rooms with a few clicks, instantly making them available for reservations. This streamlined process helps the hotel avoid any booking mishaps while keeping inventory up to date.
Below are the step-by-step guidelines on blocking and unblocking the rooms:
Log in to the Stayflexi Dashboard with your credentials.
Click on the ” Rates & Inventory ” icon at the dashboard’s top [third icon from the left].
On the opened page, click on Bulk Update. A popup will appear displaying multiple actions you can perform.
Select Block/Unblock Rooms: From the list of actions, choose Block/Unblock Rooms based on your requirements.
Choose Room Types: You will see a page displaying rooms on the right side. Under Room Types, select the rooms you wish to block or unblock.
Select All or Individual Rooms: You will find a toggle below the room types
Enable the toggle to Select all rooms for the action.
Disable it to select rooms individually.
Set Date Range: Below the room selection, choose the date range during which you want the rooms to be blocked or unblocked.
Add a Reason [Optional]: There’s an optional field where you can type the reason for blocking the rooms, if necessary.
Complete the Action: Click on Block/Unblock Rooms to execute the action.
Confirmation: A confirmation message will appear, indicating the completed process.
Note: Once rooms are blocked, they will also appear in the “Out of Order” reports under the Housekeeping tab, ensuring the housekeeping team is aware of the status.
What happens when a room is set offline?
When a room is set to Offline Status in Stayflexi, it becomes unavailable for booking online platforms like OTAs and the property’s official website. However, the room remains available for offline bookings, such as walk-ins or direct reservations made by phone or at the front desk. The inventory is not blocked on online channels like OTAs, but the property purposefully keeps it offline for various reasons, such as maintenance or keeping a few rooms aside for VIP guests.
EXAMPLE: A property may set a room to offline status during a local festival. They anticipate that many guests will walk in without prior bookings, so they reserve some rooms exclusively for offline bookings, ensuring they can accommodate last-minute guests.
What happens when a room is set online?
When a room is Set Online in Stayflexi, it becomes available for booking across all connected channels, including the property’s own website and OTAs [Online Travel Agencies]. This is commonly done after the room has been offline due to maintenance, cleaning, or other operational reasons. The room’s availability is instantly updated across all platforms, making it open for new reservations.
EXAMPLE: Let’s say Kevin, a property manager, had previously set Room 301 offline for a week due to to plumbing repairs. After the repairs are completed and the room is ready for guests, Kevin logs into Stayflexi and sets Room 301 back Online. Immediately, the room becomes available for booking across all connected OTAs like Booking.com and Airbnb.
Later that day, a guest visiting the property’s official website sees Room 301 available for their desired dates and makes a booking. Since Stayflexi automatically syncs inventory across all platforms, the room is also available on all OTA platforms.
By setting the room online, Kevin ensures that the guests have access to the most up-to-date availability, all while avoiding any manual work to update each booking channel individually.
What is the difference between setting room offline and blocking a room?
Setting a Room Offline in Stayflexi: This action temporarily removes a room from online availability, making it unavailable for booking through any online channels. The room can only be booked for walk-in guests. The room will not be shown as available on the online booking platform, and no online reservations can be made for that room until inventory is set back online.
Blocking a Room: Blocking a room in Stayflexi allows a property manager to block a particular room number for a specific guest. This action prevents the room from being booked by other guests during the specified period.
Blocking a room can happen for property management needs also, If renovations, maintenance, or any other changes are needed, property managers can block the room to prevent bookings during that duration.
When a room is blocked, it remains visible on the reservation calendar but is labeled as a blocked room in grey color. This visual indication helps front desk staff quickly identify which rooms are unavailable for new bookings.
Here’s a step-by-step guide on how to find the feature Setting a Room Offline:
Log into the Stayflexi Dashboard.
Click on the third icon from the top, which is Rates and Inventory.
Locate the “Bulk Update” option on the top right side of the screen and click on it.
Locate Set Offline: In the list of actions that appears, find and select set Offline option.
Select Room Types: Choose the Room Types and then you can select room numbers you want to set offline from the options provided.
Toggle Selection:
There is a toggle option available:
Enable the toggle to select all rooms at once and make it offline.
Disable it to set rooms offline on a room-by-room basis.
Select the Date Range: Don’t forget to specify the “Date Range” during which the rooms will be offline.
Set Offline: After making your selections, click on the Set Offline button located below.
Confirmation Message: You will receive a confirmation message indicating that the selected rooms have been successfully Set Offline.
Here’s a step-by-step guide on how to find the feature Block Room:
Log into the Stayflexi Dashboard.
Click on the third icon from the top, which is Rates and Inventory.
Locate the “Bulk Update” option on the top right side of the screen and click on it.
Locate Block Room: In the list of actions, find and select Block Rooms.
Popup Window: A popup will appear on the right-hand side of the screen.
Select Room Types: Choose the Room Types you want to block.
Select Room ID Grids: You can individually select the room ID grids for the rooms you wish to block.
Toggle Selection:
Enable the toggle to block all rooms at once.
Disable the toggle to block rooms individually.
Select Date Range: Don’t forget to specify the “Date Range” during which the rooms will be blocked.
Provide a Reason: There is an optional Reason box where you can type the reason for blocking the room.
Block Room: After making your selections, click on the Block Room button located below.
Confirmation Message: A confirmation message will appear, indicating that the selected rooms have been successfully blocked.
How can I update prices for all or multiple room categories at once for both offline and online travel portals using the software?
Below are the step-by-step guidelines on how to set pricing in Stayflexi:
Log into the Stayflexi Dashboard.
Click on the third icon from the top, which is Rates and Inventory.
Locate the green “Bulk Update” on the right side of the screen and click on it.
From the list of actions, Locate and click on Set Pricing to adjust rates.
A pop-up will appear on the right-hand with options:
Select the Source of booking e.g., OTA, Direct, etc.. for which you want to set the rates. You can choose one, multiple, or all sources at once.
Choose the Days for which you want to adjust the rates, similar to the source selection.
Select the Date Range during which the price changes will apply.
Choose the Room Type and rate Plan you wish to adjust.
Set the Price per Person under the room type and rate plan.
Add the Child and Infant prices, if applicable.
Click on ‘Add Room Type’ on the left side of the pop-up page and repeat the process for each new room type.
After setting all prices, click on ‘Set Pricing’.
You will see a summary of the changes:
Review the updated data and pricing details.
Click on ‘Confirm’ to complete the action.
A confirmation message will appear, indicating that the rates have been successfully updated.
How can I change a room number or room ID within the software?
Below are the step-by-step guidelines on how to change room numbers in Stayflexi:
Log into the Stayflexi Dashboard.
Click on the third icon from the top, which is Rates and Inventory.
Locate the “Bulk Update” option on the right side of the screen and click on it.
Locate Edit Room IDs: In the list of actions, find and select Edit Room IDs.
Popup Window: A page will appear on the right-hand side of the screen.
Select Room Types: Choose the Room Types you want to edit.
Edit Room IDs: Below the room type selection, you will see the current room IDs. Enter your desired new room IDs in the corresponding fields.
Confirm Edit: After entering the new room IDs, click on the Edit Room IDs button below to complete the action.
Confirmation Message: You will receive a confirmation message indicating that the room numbers have been successfully changed.
How to change prices for multiple date ranges and across multiple room types?
To change prices for Multiple Date Ranges and across Multiple Room Types, follow the below steps:
Log into the Stayflexi Dashboard.
Click on the third icon from the top, which is Rates and Inventory.
Locate the green “Bulk Update” on the right side of the screen and click on it.
Set Pricing: Locate and click on the “Set Pricing” option.
A page will open on the RHS.
Select the OTA/ Channel: To set the price for a specific channel, select the arrow at the top right corner of the page to choose the OTA or Channel.
You can select multiple channels or just one.
Select Days: In the “Days” column, choose the specific days you want to apply the price changes.
Set Date Range: Choose the date range for which you want the price changes to take effect.
Click on the date range field to open the calendar.
Choose the start and end dates for the specified range.
Select Room Types: select the arrow at the top right corner of the page in the Select Room Types column. Under “Room Types”, click on “Add Room Type” to select the rooms for which you want to update the pricing.
Note:- You can add multiple room types one by one and accordingly you can update prices in 1 go.
Click on Set Pricing: Once all the selections are made, click the green “Set Pricing” button at the bottom of the page.
Review and Confirm: A confirmation page will appear where you can recheck the data you have updated.
If everything is correct, click “Confirm” to apply the changes.
Receive Confirmation: You will get a confirmation message indicating that the pricing has been successfully updated.
How to check what room types and rate plans connected to what channels/OTAs?
Below are the step-by-step guidelines on how to check what Room Types and Rate plans are connected to what channels:
Log in to the Stayflexi Dashboard with your credentials.
Click on the ” Rates & Inventory ” icon at the dashboard’s top [third icon from the left].
You will see Room Types and Rate Plans listed individually on the page.
Next to each Room Type, there is an option labeled “View Connected Channels”. Click on this option.
A pop-up will appear, displaying the OTAs and channels connected to that specific Room Type and Rate Plan.
How to delete rooms ?
Below are the guidelines on how to Delete rooms:
Log into the Stayflexi Dashboard.
Click on the third icon from the top, which is Rates and Inventory.
Locate the “Bulk Update” option on the right side of the screen and click on it.
Locate Delete Rooms: In the list of actions, find and select Delete Rooms option.
Popup Window: A popup will appear on the right-hand side of the screen.
Select Room Type: Choose the Room Types from which you want to delete.
Select Room IDs: Select the specific Room IDs, which are displayed in grid form.
Delete Rooms: After making your selections, click on the Delete Rooms button below.
Confirmation Message: You will receive a confirmation message indicating that the selected rooms have been successfully deleted.
Follow the same steps as mentioned above for deleting rooms. Choose the Room IDs you want to Restore. After making your selections, click on the Restore Rooms button located below. You will receive a confirmation message indicating that the selected rooms have been successfully restored.
Understanding the housekeeping layout.
Overview:
The layout is designed to provide a comprehensive view of the housekeeping status of the rooms on the property. It shows a grid of rooms, and their current status, and allows for various actions related to cleaning and staff assignment. The main dashboard displays key housekeeping statistics, while the bottom section lists the individual rooms with detailed information.
On the top menu, click the Housekeeping icon (4th icon from the left) to open the Housekeeping dashboard. This page displays all rooms along with their current housekeeping and booking statuses.
Housekeeping Status Tiles (Top Section)
At the top of the page, you’ll find status summary tiles, giving a quick overview of the property’s room conditions:
Clean: Number of rooms that are clean and ready for new guests.
Clean Occupied: Clean rooms that currently have checked-in guests.
Dirty: Rooms marked as dirty and need cleaning.
Dirty Stayover: Occupied rooms that require cleaning during the guest’s stay.
Dirty Checkout: Rooms where guests have checked out and the room needs to be serviced.
Out of Order: Rooms unavailable due to repairs or maintenance.
Total Clean: Sum of all rooms marked clean (occupied or vacant).
Total Dirty: Sum of all dirty rooms (stayover + checkout).
All Rooms: Displays the total number of rooms in the property.
Filters and Controls (Below the Tiles)
Search Bar: Quickly search for a specific Room No., Guest Name, or Room Type.
Dropdown (Room Count): Lets you adjust how many room records are displayed per page.
Pick Your Date: Use the calendar icon to view the housekeeping data for a specific date.
Actions Dropdown: Provides key housekeeping operations such as:
Mark Clean – Update selected room(s) to clean status.
Mark Dirty – Mark selected room(s) as dirty.
Assign Staff – Allocate rooms to housekeeping staff for cleaning.
Mark Out of Order – Mark selected rooms as unavailable for maintenance.
Mark Available – Bring out-of-order rooms back to available status.
Add Staff Remark – Add specific notes or updates related to room or staff activity.
Export Report Dropdown: Download detailed housekeeping activity reports in PDF, CSV, or Excel formats for easy tracking and management.
Room List (Main Table Section)
Each row in the table represents an individual room with details such as:
Room No.: The room number assigned within the property.
Status: Shows the current housekeeping condition (e.g., Dirty – Stayover, Dirty – Checkout, Clean).
Guest Name: Displays the guest currently staying or who recently checked out.
Booking Status: Indicates whether the room is Checked-In or Checked-Out.
Check-In / Check-Out: Displays the respective check-in and check-out dates and times.
Staff Name: Shows the staff member responsible for cleaning or maintaining the room.
You can select multiple rooms using the checkboxes for performing batch actions like marking them clean or assigning staff.
Additional Features
Column Settings (Right Side): You can customize visible columns in the table for a personalized view.
Total Rows Count (Bottom): Displays the total number of rooms currently visible in the list.
Accessing Configuration Options
On the right-hand side of the Housekeeping page, click on the ⚙️ Configuration icon to open additional housekeeping settings.
This section provides two important options:
Room Assignment
Out-of-Order Report
The overall Housekeeping Layout provides a clear and structured way for hotel management and staff to:
Monitor daily cleaning progress,
Assign and track staff duties,
Quickly take bulk actions on rooms, and
Generate instant reports for recordkeeping and analysis.
Is there a simple and efficient way to mark all dirty room as clean with just one click from the housekeeping interface? How user-friendly is this process?
Yes, there is a simple and efficient way to mark all dirty rooms as clean directly from the Housekeeping interface, and it’s designed to be very user-friendly.
Here’s how it works:
By following these steps, you can easily mark rooms as clean from the housekeeping interface.
Go to the Housekeeping Page: Click on the Housekeeping icon (4th icon from the left on the top menu).
Select All Dirty Rooms:
Select the dirty tile from the housekeeping dashboard.
Use the checkbox beside the column header to Select All rooms at once.
This automatically highlights every room listed on the page (including all dirty rooms).
Click on the “Actions” Dropdown: From the dropdown options, choose “Mark Clean.”
Instant Update:
All selected dirty rooms will instantly change their status to Clean.
The dashboard counters (Clean, Dirty, Total Clean, etc.) refresh automatically.
Where can I find a comprehensive view of all rooms and their current statuses (dirty, clean, out of order, dirty occupied)?
You can view a comprehensive list of all rooms and their current housekeeping statuses right from the Housekeeping Dashboard itself.
Here’s how it works:
Comprehensive View of All Room Statuses :
Go to the Housekeeping Page: Click on the Housekeeping icon (4th icon from the left on the top menu).
Dashboard Overview:
The top section of the page displays status summary cards showing:
Clean – Rooms ready for occupancy.
Clean Occupied – Clean but currently occupied rooms.
Dirty – Rooms that need cleaning.
Dirty Stayover – Occupied rooms that require daily cleaning.
Dirty Checkout – Rooms vacated by guests and pending cleaning.
Out of Order – Rooms blocked due to maintenance.
Total Clean / Total Dirty / All Rooms – Overall counts for quick tracking.
Room List (Detailed Table View): Below the summary cards, the main table gives a detailed breakdown of each room, including:
Room Number
Current Status (Clean, Dirty, Out of Order, etc.)
Guest Name
Booking Status (Checked-In / Checked-Out)
Check-In & Check-Out Dates
Assigned Staff Name
How do I assign housekeeping staff to specific rooms for cleaning?
Below are the step-by-step guidelines to assign Housekeeping staff to rooms from the Stayflexi Housekeeping:
Method 1: From the Housekeeping Dashboard
Open the Housekeeping Page: Click on the Housekeeping icon (4th icon from the left on the top menu).
Select Room(s):
Use the checkbox beside the room(s) you want to assign.
You can select one or multiple rooms at a time.
Click on the “Actions” Dropdown:
From the dropdown options, choose “Assign Staff for Cleaning.”
Assign Staff:
A small pop-up will appear showing the list of available housekeeping staff.
Select the staff member you want to assign and click Save.
Confirmation:
The Staff Name and Email will now appear beside each assigned room in the table.
The room status and staff remark (if added) will be visible instantly.
Method 2: From the Configurationto Room Assignment Page :
If you want to set permanent staff assignments so that a particular staff is automatically assigned every time that room becomes dirty:
Click on the Configuration icon on the right-hand side of the Housekeeping page.
Select “Room Assignment.”
Choose a Room Number and Assign Staff permanently.
Click Save.
From now on, whenever that room becomes dirty, it will auto-assign to the same staff member.
NOTE: To add a staff member’s name or email in the Room Assignment section, you must first add them under Property Configuration → Users & Access Control. Once the user is created there, their details will automatically reflect in the staff list for Room Assignment.
How to bulk mark rooms dirty / clean?
You can update the housekeeping status of multiple rooms at once using the bulk action feature available on the Housekeeping dashboard. This helps save time and ensures all room statuses are updated instantly.
Below are the step-by-step guidelines to bulk mark rooms as dirty/clean from the Stayflexi Housekeeping:
Open the Housekeeping Page:
Click on the Housekeeping icon (4th icon from the top menu) to access the housekeeping dashboard.
Select Rooms:
Use the checkbox beside each room to select multiple rooms.
To select all rooms at once, click the Select All checkbox at the top of the list.
Click on the “Actions” Dropdown:
At the top of the page, you’ll find the Actions dropdown menu.
Choose “Mark Clean” to mark all selected rooms as clean.
Choose “Mark Dirty” to mark all selected rooms as dirty.
Instant Update:
The selected rooms will immediately update their status.
The status cards (Clean, Dirty, Total Clean, etc.) will automatically refresh to reflect the changes.
Is there a system to add specific remarks or instructions for staff on individual rooms, ensuring they have all the necessary information?
Yes, the Housekeeping module includes a remarks feature that allows you to add specific notes or instructions for staff on individual rooms — ensuring they have all the details they need before cleaning or inspection.
Below are the step-by-step guidelines to add remarks or instructions for staff on individual rooms from the Stayflexi Housekeeping:
Log in to Your Stayflexi Dashboard:
Use your username and password to log in.
Go to Housekeeping:
On the top menu, click the Housekeeping icon (4th icon from the left) to view a list of rooms and their current status.
Select the Rooms:
To select individual rooms, click the checkbox next to each room .
To select all rooms at once, click the checkbox in the header row.
Open the Actions Menu:
Once rooms are selected, click on the Actions dropdown menu at the top of the Housekeeping Dashboard.
A list of bulk action options will appear.
Choose the Action:
Choose the option “Assign a room to supervisor and add a remark.”
Assign Staff:
In the pop-up window that appears, select the staff member from the dropdown by entering their email address. This will assign the selected rooms to that specific staff member.
Add Remarks:
Supervisor Remark:
Enter any important notes or instructions that the supervisor needs to be aware of for the selected rooms in the Supervisor Remark text box.
Staff Remark:
Add specific instructions or comments for the housekeeping staff, such as tasks to be completed or special requirements for the room in the Staff Remark text box.
Save the Remark:
After reviewing the details, click the “Save” button.
This will ensure that the assigned staff members receive the rooms and the remarks you added.
How can I quickly identify and access information about all out-of-order rooms?
You can easily view and manage all Out-of-Order rooms directly from the Housekeeping module. The system provides both a quick visual overview and a detailed report for better tracking and maintenance management.
Below is the Step-by-step guide to identifying and accessing information about all out-of-order rooms in Stayflexi Housekeeping:
Method 1: From the Housekeeping Dashboard:
Open the Housekeeping Page:
Click on the Housekeeping icon (4th icon from the top menu).
Check the Status Summary Cards:
At the top of the page, you’ll see a status card labeled “Out of Order.”
This card instantly shows the total number of rooms currently marked as Out of Order.
View Out-of-Order Rooms in the Table:
Scroll down to the room list (main table).
Under the Status column, look for rooms marked as “Out of Order.”
You can also use the search bar and type “Out of Order” to filter and view only those rooms.
Method 2: From the Configuration → Out-of-Order Report:
On the right-hand side of the Housekeeping page, click on the Configuration icon.
Select “Out-of-Order Report.”
This opens a detailed log of all rooms that are currently out of order, including:
Room Number
Reason for being Out of Order (e.g., AC repair, renovation, maintenance)
Status (Active / Resolved)
Action Log (who marked it and when)
Remarks or Notes (if added during blocking)
You can also export this report in PDF, Excel, or CSV format for tracking and record-keeping.
What is the difference between dirty stayover and dirty?
Both Dirty Stayover and Dirty indicate rooms that require cleaning — but they differ based on whether the room is occupied or vacant.
Dirty Stayover:
Refers to a room that is currently occupied by a guest, but still needs cleaning or servicing.
This usually happens when a guest is staying for multiple nights and requests or is scheduled for daily housekeeping service.
The guest’s belongings remain in the room while cleaning is done.
Example: A guest is staying for 3 nights. After the first night, the room is cleaned while the guest continues the stay — that day, the room status is Dirty Stayover until cleaned.
Dirty (or Dirty Checkout):
Refers to a room that has been vacated by the guest and now needs full cleaning and resetting before the next check-in.
The room is unoccupied and ready for deep cleaning, linen change, and inspection.
Example: A guest checks out at 11 AM, and the room now needs cleaning before the next arrival — that room shows as Dirty (Checkout) or simply Dirty.
How can I export housekeeping data?
Below are the step-by-step guidelines to export the housekeeping charter from Stayflexi Housekeeping:
Log in to Your Stayflexi Dashboard:
Use your username and password to log in.
Go to Housekeeping:
On the top menu, click the Housekeeping icon (4th icon from the left) to view a list of rooms and their current status.
Open the Export Options:
Click on the Export Reportdropdown menu at the top of the Housekeeping Dashboard.
Choose the Export Format:
You will see three options to export the housekeeping data.
Export as CSV
Export as PDF
Export as Excel
For Example:
Select Export asPDF to export the report in PDF format.
Download and View the Report:
Once you select Export asPDF, the file will automatically download to your system.
Open the PDF to view the housekeeping charter in a document format with all the details.
what is the conversation feature in Stayflexi and how can it help a property
The Conversations feature in Stayflexi is specifically designed to streamline communication with guests by linking chats from multiple channels Expedia, Booking.com, and Airbnb directly into theStayflexi platform. This centralization simplifies guest communication management by allowing staff to handle all queries from these major OTAs without the need to access each OTA’s extranet.
Benefits of the Conversations Feature in Stayflexi:
Single Platform for OTA chats:
With Expedia, Booking.com, and Airbnb chats integrated into Stayflexi, the property staff can manage all guest communication in one place. This reduces the time and effort needed to log into each OTA extranet to respond to guests.
Efficient Guest Communication:
Since all messages from these platforms are collected in Stayflexi, staff can respond to guest inquiries in real-time, helping to resolve issues faster and providing a better guest experience.
Consistent and Seamless Replies:
Responses sent through Stayflexi are automatically synced with the OTA platform, ensuring smooth and timely communication without switching between systems.
Improved Productivity:
By centralizing OTA chats, staff can focus on providing better service without worrying about missed messages or delayed responses due to logging in multiple extranets.
How It works:
Staff can access the Conversations tab from the Stayflexi Dashboard .
Here, they will see all messages from guests who booked through Expedia, Booking.com, or Airbnb.
They can reply to guests directly from Stayflexi, and the messages will be automatically sent to the correct platform.
Can I reply online travel portal / channel guest messages from Stayflexi and what are the steps to do so ?
YES, you can reply to guest messages or query through Stayflexi, and managing responses is streamlined through the platform’s Conversations feature. Here’s how it works and how responses are managed:
Direct Guest Replies:
When you send messages to guests via Stayflexi, whether it’s through integrated OTAs like Booking.com, Expedia, or Airbnb, guests can respond to these messages directly from their OTA account.
Their replies appear instantly in the Stayflexi under the Conversations section, where staff can view and respond to them without logging into individual OTA platforms extranet.
Managing Guest Responses:
Centralized Dashboard: All incoming guest messages, whether pre-arrival during the stay or post-checkout, are displayed in a single, centralized dashboard within Stayflexi. This allows property staff to manage all communication from one place.
Real-Time Notifications: When a guest replies, the system sends real-time notifications, ensuring that staff are alerted promptly and can respond to enquiries or issues as soon as they arise.
Responding to Multiple Guests: For properties managing multiple guests, the Conversations feature organizes messages by guest or booking, helping staff handle responses efficiently and without confusion.
Enhancing Guest Experience:
Timely Responses: Since all messages are centralized and tracked, property staff can respond quickly, providing guests with prompt answers to their questions or requests. This enhances guest satisfaction and reduces response times.
Improved Staff Efficiency: By managing all guest communication in one place, property staff save time and avoid the hassle of logging into different OTA platforms to respond to messages. This boosts operational efficiency while maintaining consistent communication with guests.
Can a property communicate on real time basis with OTA guest with the help of conversations
YES, with Stayflexi’s Conversations feature, a property can communicate with OTA [Online Travel Agency] guests in real time. This feature integrates directly with major OTAs like Booking.com, Expedia, and Airbnb, allowing property staff to respond to guest enquiries, messages, and requests without logging into each OTA extranet.
How It Helps:
Real-Time Communication:
Messages sent by guests through the OTA are instantly received in Stayflexi’s Conversations feature, enabling staff to reply in real-time. This ensures quick responses, improving guest satisfaction.
Staff can respond directly from within Stayflexi, and the message is immediately sent to the guest via the corresponding OTA. This real-time messaging ensures that guests get prompt replies, whether they have questions about their booking, special requests, or other concerns.
Automated Updates and Notifications:
With real-time notifications, staff are alerted as soon as a new message arrives, ensuring timely responses. They can see all the necessary information in one interface, such as the guest’s name, booking details, and the source of the message.
Operational Efficiency:
Since all communication channels are integrated into Stayflexi, staff can focus on responding promptly without logging into multiple OTA systems.
It also helps with consistency and accuracy in communication, ensuring that all guest interactions are documented in one place for better tracking and follow-up.
Can I track the history of messages sent to guests through Stayflexi?
YES, Stayflexi enables you to track the entire history of messages sent to guests using its Conversations feature: Here is how it works:
Comprehensive Message Logging:
Every message you send to guests, whether it’s through OTA platforms like Booking.com, Expedia, or Airbnb or directly from Stayflexi, is automatically This creates a detailed log of all communications for each guest.
The communication log includes all types of messages, such as booking confirmations, payment requests, pre-arrival details, and in-stay or post-stay conversations.
Accessing the Message History:
You can easily access the entire message history by navigating to the guest’s reservation within Stayflexi. Each conversation is saved and organized, allowing you to view previous messages and responses in one continuous thread.
This gives you a clear view of all interactions with the guest, including when the messages were sent and what content was shared.
Why Message History Tracking is Helpful:
Consistency: Having a complete communication record ensures you can continue conversations with guests without losing context. You can refer back to earlier messages if there are questions or follow-ups.
Problem Solving: If any issues or disputes arise, the message history provides clear evidence of past communications, helping resolve situations quickly.
Better Team Coordination: Since all staff members can see the conversation history, it’s easier for multiple team members to manage guest communication without duplication or missed details.
Improved Guest Experience: Guests receive timely and informed responses because the staff can quickly refer back to previous communications, making interactions smoother and more efficient.
How does Stayflexi enable communication with guests before, during, and after their stay?
Stayflexi offers a comprehensive communication solution that allows properties to engage with guests before, during, and after their stay. This ensures guests have a seamless experience at every touchpoint, improving service and satisfaction. Here’s how Stayflexi enables communication throughout the guest journey:
Before the Stay:
Pre-Arrival Communication:
Stayflexi allows properties to send automated pre-arrival emails or messages to guests, providing them with important details about their booking, check-in times, and property policies. If a guest sends any inquiry message on Airbnb to property that messages also come to Stayflexi and from Stayflexi you can reply to the guest.
Real-Time Messaging via OTAs:
For guests who book through OTAs such as Booking.com, Expedia, or Airbnb, the Stayflexi Conversations feature connects directly to these platforms. This integration lets property staff Conversations feature connect directly to these platforms. This integration lets property staff respond to any pre-stay questions, such as requests for airport transfers, early check-in, any enquiry or clarification of booking details, all from one central platform.
During the Stay:
Instant Messaging and Real-Time Support:
During a guest’s stay, Stayflexi enables properties to communicate directly with guests for requests or enquiries. Guests can reach out for extra amenities, housekeeping, or room service, and property staff can reply in real time.
Special Requests Management:
Whether it’s a request for a room change, extended stay, or any other specific needs, Stayflexi allows staff to handle and communicate these changes seamlessly. All communication is logged in the platform for easy tracking.
On-Demand Services:
Guests can use the Stayflexi platform to request additional services or upgrades during their stay, such as spa bookings, and late check-outs, enhancing their overall experience.
After the Stay:
Post-Checkout Messages:
After the guest checks out, Stayflexi can automatically send a thank you email, ensuring the guest feels appreciated. This post-stay communication can include helpful details like an invitation to review the property or a summary of their charges.
Feedback Collection:
Properties can send requests for feedback or encourage guests to leave reviews, helping the property gather insights to improve services and boost online visibility. Stayflexi’s platform helps manage guest feedback efficiently.
Overview of Review Management
Review Management is the process of monitoring, analyzing, and responding to guest feedback left on various online booking platforms, such as Booking.com, Airbnb, and Expedia. For property managers, it’s an essential way to gain insights into guest experiences, address feedback, and enhance the property’s reputation. Stayflexi’s AI-powered review management simplifies this process by consolidating reviews from multiple channels into a single interface. This centralization allows you to view and respond to feedback more efficiently, ultimately helping improve guest satisfaction and increase bookings.
Step-by-Step Guide to Using Stayflexi’s Review Management:
Image 1:
Image 2:
Image 3:
Image 4:
Accessing the Review Management:
Log in to the Stayflexi dashboard and navigate to the Review Management section. This is where you can access and manage guest reviews from different booking platforms, all in one place.
Viewing Reviews Across Multiple Channels
In the left sidebar, you’ll see a list of integrated booking platforms (such as Booking.com, Airbnb, and Expedia).
Select a specific platform to view all guest reviews from that channel.
This consolidation saves you time by providing a single location to manage reviews, rather than logging into each platform separately.
Detailed Rating Breakdown
Each review provides a rating breakdown across different categories, such as Location, Comfort, Cleanliness, Facilities, Value for Money, and Staff.
For instance, if a guest rates their experience, you’ll see individual scores for each aspect (e.g., Location rated at 8, Cleanliness at 7.5).
This breakdown helps you quickly pinpoint specific areas for improvement or highlight positive aspects to maintain, offering actionable insights to enhance the guest experience.
Generating AI-Powered Responses to Reviews
To respond to a guest review, click the Reply button. A popup will appear, allowing you to type your reply directly or use the AI-generated response option, Generate reply with FlexiAI.
FlexiGPT’s AI will draft a professional, relevant response based on the review content. For example, if the review mentions cleanliness concerns, the AI can generate a response acknowledging the feedback and assuring the guest of improvements.
This feature helps ensure that your responses are prompt, thoughtful, and address guest concerns effectively.
Customizing and Sending Your Response
Once the AI has generated a response, you have the option to edit the reply before posting, allowing you to add personal touches or specific details.
After finalizing your response, click the Send button to publish it directly to the guest review on the respective platform.
Benefits of Using Stayflexi’s Review Management:
Centralized Management: Access reviews from multiple channels in one place, saving time and effort.
Actionable Insights: The rating breakdown provides clear visibility into areas of success and improvement.
Prompt, Professional Responses: AI-generated replies help you respond quickly and effectively to guest feedback.
Enhanced Guest Satisfaction: By addressing reviews promptly and thoughtfully, you can improve guest satisfaction and build a positive property reputation.
Stayflexi’s Review management makes managing reviews simple and efficient. It helps property managers respond quickly to guest feedback, use insights to improve the property, and enhance the guest experience overall.
What is Stayflexi’s AI-powered review management, and how can it help my property?
Stayflexi’s AI-powered review management tool is designed to help property managers monitor, analyze, and respond to guest reviews efficiently. Here’s how it works and the benefits it can bring to your property:
Image 1:
Image 2:
Review Management Across Multiple Channels (as shown in Image 1):
The tool gathers guest reviews from multiple booking channels, such as Booking.com, Airbnb, and Expedia, into a single interface.
You can switch between these channels easily, where each platform (Booking.com, Airbnb, Expedia) is accessible on the left sidebar.
This feature saves time by allowing you to view all reviews in one place instead of logging into each platform separately.
Detailed Rating Breakdown (as shown in Images 1 and 2):
Stayflexi’s review management displays a breakdown of guest ratings for different aspects of their stay, including Location, Comfort, Cleanliness, Facilities, Value for Money, and Staff.
Each aspect is rated on a scale (e.g., out of 10), with sliders visually representing guest satisfaction levels. For instance, in the screenshot, the guest rated Staff at 7.5 and other categories at 5.
This breakdown helps you quickly understand which areas are performing well and which may need improvement, allowing you to make data-driven decisions to enhance guest experience.
AI-Generated Responses for Reviews(as shown in Image 2 and 3):
With the Reply button provided within each review, the AI can generate an appropriate response based on the content of the guest’s review.
The AI takes into account the feedback, positive or negative, and crafts a suitable response to address the guest’s comments. For instance, if a guest mentions a negative experience with cleanliness, the AI might respond with an apology and a reassurance that the property will work to resolve the issue.
For example, refer to Image 3: So after clicking on the Reply button, a popup will appear where you can type a reply to the review yourself or can click on the Generate reply with FlexiGPT button, where the FlexiGPT will automatically generate the response or reply for that particular guest’s review.
Then, you can click on the Send button to send the reply to the guest.
This automated response feature saves time and ensures that responses are prompt, professional, and appropriately address the guest’s feedback, which helps improve guest satisfaction and reputation management.
Improving Property Reputation and Guest Satisfaction:
By addressing feedback proactively and using AI to ensure prompt responses, your property can enhance its online reputation. Better ratings and responsive communication can lead to more bookings, as potential guests are influenced by recent reviews.
Identifying and acting on common issues, like the “bad smell” example, allows you to make necessary improvements, enhancing the overall guest experience.
How It Benefits Your Property:
Centralized Review Management: View and manage reviews from multiple channels in one place.
Actionable Insights: Get clear visibility into ratings and guest feedback for targeted improvements.
AI-Generated Responses: Respond to reviews automatically, ensuring a prompt, professional reply.
Enhanced Guest Experience: Use feedback to continuously improve and provide a better guest experience, boosting your reputation and bookings.
Stayflexi’s AI-powered review management tool is an invaluable resource for properties looking to stay on top of guest feedback, resolve issues proactively, and build a positive reputation across booking platforms with the help of automated, AI-generated responses.
Can I respond directly to guest reviews posted on online travel portals through Stayflexi?
Yes, you can respond directly to guest reviews posted on online travel portals through Stayflexi’s AI powered review management.
Stayflexi’s review management centralizes reviews from multiple booking platforms (like Booking.com, Airbnb, and Expedia), allowing you to manage and respond to reviews all from one interface. Here’s how it works:
Image 1:
Image 2:
Image 3:
Log in to Your Stayflexi Dashboard:
Use your username and password to log in.
Go to Review management (as shown in Image 1):
Click on the Review Management section to see guest reviews from multiple channels in one place(6th from the left on the top menu).
Choose the Platform
In the sidebar, select a specific booking platform (like Booking.com, Airbnb, and Expedia) to view its reviews without needing to log in separately to this OTA extranet.
Check the Rating Breakdown:
Each review includes a breakdown of ratings for different aspects of the stay, helping you understand guest feedback.
Reply to the Review
Click the Reply button on any review.
You can type a response yourself or use the “Generate reply with Flexi AI” option to have AI draft a response for you.
Customize and Send
You can modify the AI-generated reply or send it as it is, posting your response directly to the original booking platform.
This setup helps you save time, manage feedback efficiently, and ensures timely, professional responses, enhancing your property’s online reputation and guest satisfaction.
How do I set up the shop to start taking orders?
Image 1:
Image 2:
Image 3:
Image 4:
Image 5:
Image 6:
Image 7:
Image 8:
Image 9:
Image 10:
Image 11:
Image 12:
Image 13:
Image 14:
Image 15:
Image 16:
Below is the step-by-step guide to setting up the shop to start taking orders:
Log in to Your Stayflexi Dashboard:
Enter your username and password to log in.
Access Shops/POS:
After logging in, click the “More Apps” icon (represented by four boxes or blocks) in the top right corner.
From the dropdown menu, select Shops(as shown in Image 1).
Shops or outlets page will appear.
Set up the shop:
On the shops page, at the top of the page, you will be able to see the Add Shop option (as shown in Image 2).
Once clicked, it will navigate you to the page where you can create or set up the shop for your property.
Fill in the below details (as shown in Image 3):
Outlet name: Name of your shop or outlet
Outlet address: Fill in the address details where your shop is located.
Outlet Phone: Provide the shop phone number
Outlet email: Provide the shop email ID
Outlet Description: Provide a brief description of your shop
Click on the Next button at the bottom of the page (as shown in Image 3).
Some more details related to creating a shop will appear.
Fill in the below details (as shown in Image 4):
Shop Tax Section:
There is a dropdown labeled “Shop tax” where you can select the applicable tax rate. This is likely required for the shop’s transactions.
If no tax rate is selected, it will display as “Select tax [0%].” You need to select the appropriate tax percentage for your shop.
Service Charge:
Below the tax field, there is an option to choose the type of service charge. The dropdown allows selecting the type, such as “Percentage” or “Fixed”.
In the next field, labeled “Service charge,” you can input the actual service charge value. This determines how much service charge will be applied on top of the base price.
Self-Service Section:
You can enable or disable the “Self-service” option through a dropdown, which includes the following option:
Enable self-service
Disable self-service
Tax Identificationnumber:
Here the Tax identification number is required. This likely indicates that you need to provide additional tax details or a tax ID before proceeding.
Outlet Type:
Users can select the type of outlet (such as F&B, Food & Beverage) from the “Outlet type” dropdown. This helps categorize the type of business or service offered at the shop.
Add Images and Back Buttons:
There are two buttons at the bottom: one to go Back to the previous page and another to Add Images, which allows you to upload images for the shop or menu.
Click on the Add Images option after filling in all the details on this page to go to the next page (as shown in Image 4).
In the Add Images page, you can click on the Click here to upload the images option. (Note: Adding Images is not mandatory, but to enhance your experience at least add one image).
Create Shop:
Create the shop by clicking on the Create Shop option at the bottom of the page (as shown in Image 5).
Your shop or outlet is successfully created and will be visible on the Shops page (as shown in Image 6).
Shop configuration:
To start taking the order, you need to configure the following :
Firstly, click on the shop to navigate to the Dashboard of the shop (as shown in Image 7).
On the left-hand side of the page, you can see the following options:
Dashboard
Place orders
View orders
Reports
Configuration
Click on the Configuration dropdown option (as shown in Image 8).
The configuration option is where you can configure the following for your shop or outlet:
Outlet: Configure and edit your outlet information, like description, default shop tax, order details, tax identification number, etc (as shown in Image 8).
Menu items: Add or Bulk upload menu items you need to configure for your shop (as shown in Image 9).
Categories: Add food categories to configure for your shop (as shown in Image 10).
Discounts: Add discounts based on food categories or menu items (as shown in Image 11).
Table/Area: Configure tables by clicking on the Add new table option (as shown in Image 12).
Table name: Give names for the tables.
Note: You can enter multiple table no. , as well as the table range
Table range – A10:A20 (by this you can add many tables at once by using “:”.
Multiple tables – 1,2,3
Avoid whitespaces to get the desired result.
Table description: Give table description in the table description section
Seating Area
No. of persons: Add how many people can sit at that particular table.
Click on the Save button to add tables.
Staff: To add staff details like staff email ID, staff name, and description (as shown in Image 13).
After setting up all the details you can easily start placing orders by going to the place orders option.
Understanding the “Place Order” Page (as shown in Image 14):
On the Place Order page, you will find:
Tables Section: Displays all available, running, and printed tables.
Occupied Rooms Section: Displays all occupied or checked-in rooms.
Placing an Order for a Specific Table:
Under the Tables Section, you will see a list of available tables.
Click on the table number or table ID for the table where you want to place an order (as shown in Image 14).
Once selected, a list of food categories (e.g., Veg, Non-Veg) whatever you have created from the configuration.
Select your desired category and add menu items to the order (as shown in Image 15).
Save and Confirm the Order:
After adding the menu items, click on the Save Order button to save and confirm your order (as shown in Image 16).
If you want to print KOT then configure KOT with the Stayflexi system and click on KOT & Print (as shown in Image 16).
Settling the Payment: If you’re ready to settle the bill for the order, click on the Settle Order button to complete the payment (as shown in Image 16).
By following these steps you can easily set up the shop and start taking orders.
How do I bulk upload POS menu items? What should I check before uploading?
Log in to Your Stayflexi Dashboard:
Enter your username and password to log in.
Access Shops/POS:
After logging in, click the “More Apps” icon (represented by four boxes or blocks) in the top right corner.
From the dropdown menu, select Shops.
A page showing all available shops or outlets will appear.
Choose the shop or outlet by clicking on the shop or outlet name.
Navigate to the “Configuration” Page:
Once you select a shop or outlet, you will be taken to its Dashboard.
On the left-hand side of the page, you will see various options, including:
Dashboard
Place Orders
View Orders
Reports
Configuration
Click on Configuration dropdown to proceed.
Go to Menu items:
On the Configuration dropdown, you will see a list of options including:
Outlet
Menu items
Categories
Discounts
Table/Area
Staff
Click on the Menu items option.
A list of all the menu items will appear along with the details.
Bulk upload POS menu items:
At the top of the Menu items page, an option called Bulk upload items will be visible.
You can click on this option and upload the Excel sheet from your system to the POS menu items.
But before uploading the menu items, you need to check the format in which you need to upload the menu items.
Just below the Bulk upload items option, the Download bulk upload template file option will be visible.
Click on this option to download the template to bulk upload the items and upload the items according to the bulk upload template.
When you click on the Download bulk upload template file option, a pop-up with a warning message will be displayed.
Read the instructions carefully and click on the Download template file button.
The template file will be downloaded to your system.
Open the template file and check on which format you need to upload the menu items.
If the template instructions are not followed you will not be able to bulk upload the menu items to POS.
After following the template, you can click on the Bulk upload items button to upload the menu items.
By following these steps you can easily bulk-upload menu items.
When settling a POS bill, if remarks (like “payment collected via net banking”) are added, where can I view these remarks in the reports?
Below are the step-by-step guidelines for placing an order for a specific table from Shops/POS:
Log in to Your Stayflexi Dashboard:
Enter your username and password to log in.
Access Shops/POS:
After logging in, click the “More Apps” icon (represented by four boxes or blocks) in the top right corner.
From the dropdown menu, select Shops.
A page showing all available shops or outlets will appear.
Choose the shop or outlet where you want to place an order by clicking on its name.
Navigate to the “Place Order” Page:
Once you select a shop or outlet, you will be taken to its Dashboard.
On the left-hand side of the page, you will see various options, including:
Dashboard
Place Orders
View Orders
Reports
Configuration
Click on Place Orders to proceed.
Understanding the “Place Order” Page:
On the Place Order page, you will find:
Tables Section: Displays all available, running, and printed tables.
Occupied Rooms Section: Displays all occupied or checked-in rooms.
Placing an Order for a Specific Table:
Under the Tables Section, you will see a list of available tables.
Click on the table number or table ID for the table where you want to place an order.
Once selected, a list of food categories (e.g., Veg, Non-Veg) whatever you have created from the configuration.
Select your desired category and add menu items to the order.
Save and Confirm the Order:
After adding the menu items, click on the Save Order button to save and confirm your order.
If you want to print KOT then configure KOT with the Stayflexi system and click on KOT & Print.
Settling the Payment: If you’re ready to settle the bill for the order, click on the Settle Order button to complete the payment.
Settle and Save:
Click on the Settle order button.
A pop-up to settle and save the amount with all other details will appear, like:
Payment type:
Cash
Offline card
Wallet
Other
Click on Other.
Write the remark like “payment collected via net banking” in the remark section.
Now, Click on Settle and Save.
Go to the Reports page in POS:
Click on the Reports option.
You will see various options on the reports page.
Click on the order-wise sales summary report.
Scroll right to the last column of the order-wise sales summary report.
You will find the Remarks column, this is where you can view the remarks if you have added any after settling the order.
How can I configure a service charge, and can it be automatically added to each order?
Image 1:
Image 2:
Image 3:
Image 4:
Image 5:
Image 6:
Image 7:
The service charge can be manually applied to each order. After placing an order in the Place Orders section, you will need to manually select the Apply Service Charge option under the Taxes section for each order.
Below are the step-by-step guidelines on how to configure service charges from Shops/POS:
Log in to Your Stayflexi Dashboard:
Enter your username and password to log in.
Access Shops/POS:
After logging in, click the “More Apps” icon (represented by four boxes or blocks) in the top right corner.
From the dropdown menu, select Shops.
A page showing all available shops or outlets will appear (as shown in Image 1).
Choose the shop or outlet by clicking on the shop or outlet name (as shown in Image 2).
Navigate to the “Configuration” Page:
Once you select a shop or outlet, you will be taken to its Dashboard.
On the left-hand side of the page, you will see various options, including:
Dashboard
Place Orders
View Orders
Reports
Configuration
Click on Configuration dropdown to proceed (as shown in Image 3).
Go to Outlet:
On the Configuration dropdown, you will see a list of options including:
Outlet
Menu items
Categories
Discounts
Table/Area
Staff
Click on the Outlet option (as shown in Image 3).
On the Outlet details block, click Edit to manage your outlet’s information, such as name, address, and email (as shown in Image 3).
Configure a service charge (as shown in Image 4):
Add service charge:
In the Outlet edit page, find the Service Charge option just below the Tax Identification Number textbox.
Select the service charge type from the dropdown:
Percentage
Fixed
Enter the service charge value in the textbox next to the dropdown.
Click Save to store the changes.
Go to the Place Orders page (as shown in Image 5):
Click on the Place Orders option.
On the Place Order page, you will find:
Tables Section: Displays all available, running, and printed tables.
Occupied Rooms Section: Displays all occupied or checked-in rooms.
Create an order:
Under the Tables Section, you will see a list of available tables.
Click on the table number or table ID for the table where you want to place an order (as shown in Image 5).
Once selected, a list of food categories (e.g., Veg, Non-Veg) whatever you have created from the configuration.
Select your desired category and add menu items to the order.
Apply service charge:
Below the Taxes section, you’ll find the Apply Service Charge option (as shown in Image 6).
Manually apply the service charge by clicking on it.
After applying the service charge if you wish to remove the service charge, do the following:
To remove the service charge, select the Remove option below the Service Charge section (as shown in Image 7).
Save and Confirm the Order:
After adding the menu items and applying the service charge, click on the Save Order button to save and confirm your order.
If you want to print KOT then configure KOT with the Stayflexi system and click on KOT & Print.
Settling the Payment: If you’re ready to settle the bill for the order, click on the Settle Order button to complete the payment.
By following these organized steps, you can easily apply service charges to the particular order through the Shops/POS!!
How do I place an order for a specific table?
Below are the step-by-step guidelines for placing an order for a specific table from Shops/POS:
Log in to Your Stayflexi Dashboard:
Enter your username and password to log in.
Access Shops/POS:
After logging in, click the “More Apps” icon (represented by four boxes or blocks) in the top right corner.
From the dropdown menu, select Shops.
A page showing all available shops or outlets will appear.
Choose the shop or outlet where you want to place an order by clicking on its name.
Navigate to the “Place Order” Page:
Once you select a shop or outlet, you will be taken to its Dashboard.
On the left-hand side of the page, you will see various options, including:
Dashboard
Place Orders
View Orders
Reports
Configuration
Click on Place Orders to proceed.
Understanding the “Place Order” Page:
On the Place Order page, you will find:
Tables Section: Displays all available, running, and printed tables.
Occupied Rooms Section: Displays all occupied or checked-in rooms.
Placing an Order for a Specific Table:
Under the Tables Section, you will see a list of available tables.
Click on the table number or table ID for the table where you want to place an order.
Once selected, a list of food categories (e.g., Veg, Non-Veg) whatever you have created from the configuration.
Select your desired category and add menu items to the order.
Save and Confirm the Order:
After adding the menu items, click on the Save Order button to save and confirm your order.
If you want to print KOT then configure KOT with the Stayflexi system and click on KOT & Print.
Settling the Payment: If you’re ready to settle the bill for the order, click on the Settle Order button to complete the payment .
By following these organized steps, you can easily place an order for a specific table through the Shops/POS!!
How do I place an order for a guest staying in a specific room?
Below are the step-by-step guidelines to place an order for guest staying in a specific room from Shops/POS:
Step-by-Step Guide to Place an Order for a Specific Room in Stayflexi:
Log in to Your Stayflexi Dashboard:
Enter your username and password to log in.
Access Shops/POS:
After logging in, click the “More Apps” icon (represented by four boxes or blocks) in the top right corner.
From the dropdown menu, select Shops.
A page showing all available shops or outlets will appear.
Choose the shop or outlet where you want to place an order by clicking on its name.
Navigate to the “Place Order” Page:
Once you select a shop or outlet, you will be taken to its Dashboard.
On the left-hand side of the page, you will see various options, including:
Dashboard
Place Orders
View Orders
Reports
Configuration
Click on Place Orders to proceed.
Understanding the “Place Order” Page:
On the Place Order page, you will find:
Tables Section: Displays all available, running, and printed tables.
Occupied Rooms Section: Displays all occupied or checked-in rooms.
Placing an Order for a Specific Room:
Under the Occupied Rooms section, you will see a list of available rooms (occupied or checked-in rooms).
Click on the room number or roomID for the room where you want to place an order.
A pop-up displaying the guest or customer details for the room will appear, giving you the option to either Proceed or Cancel.
Once you click on Proceed, a list of food categories (e.g., Veg, Non-Veg) will appear.
Select your desired category and add menu items to the order.
Save and Confirm the Order:
After adding the menu items, click on the Save Order button to save and confirm your order.
By following these steps, you can easily place an order for a specific room through the Shops/POS!!
How can I track orders coming from QR code in shops?
Below are the step-by-step guidelines to track orders coming from QR code from Shops/POS:
Log in to Your Stayflexi Dashboard:
Enter your username and password to log in.
Access Shops/POS:
After logging in, click the “More Apps” icon (represented by four boxes or blocks) in the top right corner.
From the dropdown menu, select Shops.
A page showing all available shops or outlets will appear.
Choose the shop or outlet by clicking on the shop or outlet name.
Navigate to the “View Orders” Page:
Once you select a shop or outlet, you will be taken to its Dashboard.
On the left-hand side of the page, you will see various options, including:
Dashboard
Place Orders
View Orders
Reports
Configuration
Click on View Orders to proceed.
Identifying QR Code Orders:
On the View Orders page, you will see a table listing all the orders.
There will be a column labeled QR Code.
If the status in the QR Code column is NO, it means the order was not placed using a QR code.
If the status is YES, the order was placed through a QR code.
These steps help you quickly log in, navigate through the shops, and identify whether an order was placed via a QR code.
How can I transfer a bill from one table to another in shop / POS?
Below are the step-by-step guidelines to transfer bills from one table to another from Shops/POS:
Log in to Your Stayflexi Dashboard:
Enter your username and password to log in.
Access Shops/POS:
After logging in, click the “More Apps” icon (represented by four boxes or blocks) in the top right corner.
From the dropdown menu, select Shops.
A page showing all available shops or outlets will appear.
Choose the shop or outlet where you want to place an order by clicking on its name.
Navigate to the “Place Order” Page:
Once you select a shop or outlet, you will be taken to its Dashboard.
On the left-hand side of the page, you will see various options, including:
Dashboard
Place Orders
View Orders
Reports
Configuration
Click on Place Orders to proceed.
Understanding the “Place Order” Page:
On the Place Order page, you will find:
Tables Section: Displays all available, running, and printed tables.
Occupied Rooms Section: Displays all occupied or checked-in rooms.
Place an order from the Table:
Under the Tables Section, you will see a list of available tables.
Click on the table number or table ID for the table where you want to place an order.
Once selected, a list of food categories (e.g., Veg, Non-Veg) will appear.
Select your desired category and add menu items to the order.
Save and Confirm the Order:
After adding the menu items and customer information, click on the Save Order button to save and confirm your order.
Navigating to the View Order Page:
After confirming your order, click on the shop name located at the top left corner of the screen.
This will take you back to the page where you can place orders.
To view your orders, click on the “View Orders” option on the left side just below the Place Orders option.
Moving a Bill to Another Table:
On the “View Orders” page, select the order whose bill you wish to move.
Find and click on the “Move Bill” button.
A pop-up will appear, displaying all available tables.
Select the table number or ID to which you want to move the bill.
Finally, click the “Confirm Move Table” button.
The guest bill will now be successfully moved to the selected table.
How do I apply a discount to an entire food category or a specific item?
Below are the step-by-step guidelines to apply the discount to an entire food category or a specific item from Shops/POS:
Log in to Your Stayflexi Dashboard:
Enter your username and password to log in.
Access Shops/POS:
After logging in, click the “More Apps” icon (represented by four boxes or blocks) in the top right corner.
From the dropdown menu, select Shops.
A page showing all available shops or outlets will appear.
Choose the shop or outlet by clicking on the shop or outlet name.
Navigate to the “Configuration” Page:
Once you select a shop or outlet, you will be taken to its Dashboard.
On the left-hand side of the page, you will see various options, including:
Dashboard
Place Orders
View Orders
Reports
Configuration
Click on the Configuration dropdown to proceed.
Go to Discount:
On the Configuration dropdown, you will see a list of options including:
Outlet
Menu items
Categories
Discounts
Table/Area
Staff
Click on the Discounts option.
Create a Discount:
To create a new discount, click the Add Discount button.
Fill in the following details:
Discount Name: Enter a name for the discount.
Discount Type: Choose between:
Percentage: Discount will be applied as a percentage of the item or category price.
Fixed: A fixed amount will be discounted.
Discount Value: Enter the value or percentage of the discount.
Discount Applied On: Select where the discount should apply:
Category: Choose categories (e.g., Veg, Non-Veg) from the dropdown to apply the discount to all items in these categories.
Item: Choose specific items (e.g., Veg Biryani, Chicken Biryani) from the dropdown to apply the discount to those items only.
Once all the details are filled in, save your discount settings. The discount option will then be available for the specific item, allowing you to select the desired discount when placing an order if needed.
Can I print a KOT or an A4-sized bill for the guest?
Yes, you can print a KOT or an A4-sized bill for the guest.
Below are the step-by-step guidelines to print KOT or an A4-sized bill for the guest from Shops/POS:
Log in to Your Stayflexi Dashboard:
Enter your username and password to log in.
Access Shops/POS:
After logging in, click the “More Apps” icon (represented by four boxes or blocks) in the top right corner.
From the dropdown menu, select Shops.
A page showing all available shops or outlets will appear.
Choose the shop or outlet where you want to place an order by clicking on its name.
Navigate to the “Place Order” Page:
Once you select a shop or outlet, you will be taken to its Dashboard.
On the left-hand side of the page, you will see various options, including:
Dashboard
Place Orders
View Orders
Reports
Configuration
Click on Place Orders to proceed.
Understanding the “Place Order” Page:
On the Place Order page, you will find:
Tables Section: Displays all available, running, and printed tables.
Occupied Rooms Section: Displays all occupied or checked-in rooms.
Place an order from the Table:
Under the Tables Section, you will see a list of available tables.
Click on the table number or table ID for the table where you want to place an order.
Once selected, a list of food categories (e.g., Veg, Non-Veg) will appear.
Select your desired category and add menu items to the order.
Save and Confirm the Order:
After adding the menu items and customer information, click on the Save Order button to save and confirm your order.
Enter Customer Information:
To add customer details, click on the customer information icon at the top. Enter the required information and save it.
Note: If you’re placing an order from a table, customer information is mandatory to print the A4 bill.
Print KOT:
After saving the order, click the KOT & Print button next to the Save Order button. This will print the Kitchen Order Ticket (KOT), and you’ll see the KOT ID displayed above the ordered or menu items.
If you need to add more items later, save the order again and print a new KOT. The newly added items will have a different KOT ID.
Print Bill (A4 or KOT Bill):
To print the bill, click on the Print Bill button located next to the KOT & Print button. A pop-up will appear with two options:
A4 Bill
KOT Bill View
Choose the type of bill you’d like to print, and it will include all the order details.
Does the shop support KOT (Kitchen Order Tickets), and how does it work?
Yes, shops/POS support KOT(Kitchen Order Tickets).
Below are the step-by-step guidelines to show how KOT works from Shops/POS:
Log in to Your Stayflexi Dashboard:
Enter your username and password to log in.
Access Shops/POS:
After logging in, click the “More Apps” icon (represented by four boxes or blocks) in the top right corner.
From the dropdown menu, select Shops.
A page showing all available shops or outlets will appear.
Choose the shop or outlet where you want to place an order by clicking on its name.
Navigate to the “Place Order” Page:
Once you select a shop or outlet, you will be taken to its Dashboard.
On the left-hand side of the page, you will see various options, including:
Dashboard
Place Orders
View Orders
Reports
Configuration
Click on Place Orders to proceed.
Understanding the “Place Order” Page:
On the Place Order page, you will find:
Tables Section: Displays all available, running, and printed tables.
Occupied Rooms Section: Displays all occupied or checked-in rooms.
Place an order from the Table:
Under the Tables Section, you will see a list of available tables.
Click on the table number or table ID for the table where you want to place an order.
Once selected, a list of food categories (e.g., Veg, Non-Veg) will appear, basically whatever you have configured under categories and menu items.
Select your desired category and add menu items to the order.
Save and Confirm the Order:
After adding the items, click Save Order to confirm the order.
Note: The KOT & Print button will only be clickable after saving the order.
Print KOT:
Once the order is saved, click the KOT & Print button next to the Save Order button.
The Kitchen Order Ticket (KOT) will be printed, and you’ll see the KOT ID above the ordered items.
If you need to add more items later, you can do so, save the order again, and print a new KOT. The newly added items will have a different KOT ID.
That’s how the KOT process works in the Shops/POS module!
Can I partially settle a POS bill? What steps are required to do so?
Yes, you can partially settle the POS bill.
Below are the step-by-step guidelines to partially settle POS bills from Shops/POS:
Log in to Your Stayflexi Dashboard:
Enter your username and password to log in.
Access Shops/POS:
After logging in, click the “More Apps” icon (represented by four boxes or blocks) in the top right corner.
From the dropdown menu, select Shops.
A page showing all available shops or outlets will appear.
Choose the shop or outlet where you want to place an order by clicking on its name.
Navigate to the “Place Order” Page:
Once you select a shop or outlet, you will be taken to its Dashboard.
On the left-hand side of the page, you will see various options, including:
Dashboard
Place Orders
View Orders
Reports
Configuration
Click on Place Orders to proceed.
Understanding the “Place Order” Page:
On the Place Order page, you will find:
Tables Section: Displays all available, running, and printed tables.
Occupied Rooms Section: Displays all occupied or checked-in rooms.
Place an order from the Table:
Under the Tables Section, you will see a list of available tables.
Click on the table number or table ID for the table where you want to place an order.
Once selected, a list of food categories (e.g., Veg, Non-Veg) will appear.
Select your desired category and add menu items to the order.
Save and Confirm the Order:
After adding the menu items and customer information, click on the Save Order button to save and confirm your order.
Enter Customer Information:
To add customer details, click on the customer information icon at the top. Enter the required information and save it.
Note: If you’re placing an order from the table, customer information is mandatory for partial bill payment.
Partial bill payment:
Click on the Settle order button.
A pop-up to settle and save the amount with all other details will appear, like:
Payment type:
Cash
Offline card
Wallet
Other
Calculate amount textbox
Remarks
Settlement amount textbox
Click on the Settlement amount textbox and edit the actual amount with the amount you want to settle the order.
Now, Settle and Save the amount.
Navigate to the View Orders page and check the status of the order.
The order status will be displayed as DUE as the order is partially settled.
If you want to settle the remaining bill in the future, click on the settle dues option under the view orders page and collect the remaining payment.
By following these steps, you can partially settle the POS bill for a particular order.
How do I mark an item as out of stock in the shop?
Below are the step-by-step guidelines to mark an item out of stock from Shops/POS:
Log in to Your Stayflexi Dashboard:
Enter your username and password to log in.
Access Shops/POS:
After logging in, click the “More Apps” icon (represented by four boxes or blocks) in the top right corner.
From the dropdown menu, select Shops.
A page showing all available shops or outlets will appear.
Choose the shop or outlet by clicking on the shop or outlet name.
Navigate to the “Configuration” Page:
Once you select a shop or outlet, you will be taken to its Dashboard.
On the left-hand side of the page, you will see various options, including:
Dashboard
Place Orders
View Orders
Reports
Configuration
Click on Configuration dropdown to proceed.
Go to Menu items:
On the Configuration dropdown, you will see a list of options including:
Outlet
Menu items
Categories
Discounts
Table/Area
Staff
Click on the Menu items option.
A list of all the menu items will appear along with the details.
Mark menu items out of stock:
To mark menu items out of stock, do the following:
There is a Yes or No dropdown under the In Stock column for each menu item.
Just click on the dropdown, select NO,and click it.
The item is now marked as out of stock.
You can verify this by selecting the In-stock items option in the top right of the page.
It takes you to the Out Of Stock items page.
This displays all the out-of-stock items.
By following these steps you can mark all the items as out of stock.
If an order is settled, where can I find the payment method used?
Below are the step-by-step guidelines to check the payment method used from Shops/POS:
Log in to Your Stayflexi Dashboard:
Enter your username and password to log in.
Access Shops/POS:
After logging in, click the “More Apps” icon (represented by four boxes or blocks) in the top right corner.
From the dropdown menu, select Shops.
A page showing all available shops or outlets will appear.
Choose the shop or outlet by clicking on the shop or outlet name.
Navigate to the “View Orders” Page:
Once you select a shop or outlet, you will be taken to its Dashboard.
On the left-hand side of the page, you will see various options, including:
Dashboard
Place Orders
View Orders
Reports
Configuration
Click on View Orders to proceed.
View payment method :
After selecting View Orders, a page with all the order details with table ID, room ID, order source, Settled amount, etc will be displayed.
Click on the row where the order is Settled.
After clicking, different options will appear.
Click on the Detailed Payment View option.
Payment type with the payment amount will be displayed.
By following these steps, you can view the payment method used to settle a particular order.
What types of reports are available in the shop?
Log in to Your Stayflexi Dashboard:
Enter your username and password to log in.
Access Shops/POS:
After logging in, click the “More Apps” icon (represented by four boxes or blocks) in the top right corner.
From the dropdown menu, select Shops.
A page showing all available shops or outlets will appear.
Choose the shop or outlet by clicking on the shop or outlet name.
Navigate to the “Reports” Page:
Once you select a shop or outlet, you will be taken to its Dashboard.
On the left-hand side of the page, you will see various options, including:
Dashboard
Place Orders
View Orders
Reports
Configuration
Click on Reports to proceed.
Below are the types of reports available in the Shops/POS:
Outlet Day-Wise Sales Summary
Purpose: Provides a consolidated sales summary of all transactions made at your outlet, broken down by date wise.
Usage: Useful for tracking daily revenue and performance over a period.
Outlet Day-Wise Balance Summary
Purpose: Displays a day-wise balance summary for your outlet, likely showing remaining financial balances.
Usage: Helps in reviewing financial consistency and ensuring no discrepancies.
Hourly Item Sales Summary Report
Purpose: Presents item sales data broken down by the hour.
Usage: Allows users to identify peak sales hours and optimize staffing and inventory.
Item-Wise Category Summary Report
Purpose: Provides a summary of sales based on individual items.
Usage: Assists in understanding the performance of different product categories and managing stock accordingly.
Order-Wise Sales Summary
Purpose: Summarizes sales based on individual orders, providing insights into order trends.
Usage: Useful for analyzing how many orders were placed, average order value, and item preferences.
KOT Modification
Purpose: Shows a summary of all modifications made to Kitchen Order Tickets (KOT).
Usage: Important for tracking any changes made to orders in the kitchen and ensuring order accuracy.
KOT Report
Purpose: Displays a summary of all Kitchen Order Tickets (KOT) punched for the shop.
Usage: Useful for tracking kitchen workload and ensuring all orders have been processed.
Day-Wise Item Sales Summary Report
Purpose: It provides a day-wise breakdown of items punched into the system for the shop.
Usage: Useful for tracking daily item-level sales performance and managing inventory.
Overview Of reports and what are important reports to refer in Stayflexi ?
What are Stayflexi Reports?
The Reports feature in Stayflexi provides property managers with essential insights into their property’s operations. It offers a range of detailed reports on revenue, tax filing, occupancy, booking sources, sales performance, and guest demographics. These reports allow users to monitor trends, optimize room pricing, adjust marketing strategies, and improve overall property performance. By analyzing these data points, property managers can make informed decisions that enhance profitability and guest experience, supporting both day-to-day management and long-term strategic planning.
Why Use Stayflexi Reports?
Reports are essential for understanding various aspects of your property’s operations, such as:
Tracking Revenue: Track financial performance, analyze income sources, and identify high-performing channels.
Optimize Occupancy: Adjust room availability based on occupancy trends and prevent under utilisation.
Manage Sales Performance: Monitor bookings, cancellations, and modifications to better understand guest behavior.
Enhance Marketing Strategies: Evaluate booking sources to focus on effective distribution channels.
Set Competitive Pricing: Utilize average daily rate[ADR] and revenue per available room [RevPar] insights to develop profitable pricing.
Using these reports enables data-driven decisions, leading to increased occupancy, revenue, and guest satisfaction.
How to Access and Use Stayflexi Reports?
Accessing Reports:
Log in to your Stayflexi dashboard using your credentials.
From the dashboard, click on the 4-dots square icon labeled “More Apps”, located on the right side of the screen.
From the listed apps, locate and click on the Reports.
In Stayflexi, when you access the Reports feature, a new page opens where you can view a comprehensive list of reports, each providing valuable insights into property performance.
The Key Reports to focus on include:
Flash Manager Report: This report provides a quick, high-level overview of essential metrics, offering insights that help in daily decision-making, which include:
Revenue Report: Details revenue generated from various sources, helping track income flow.
Tax Revenue Report: Shows total tax collected on revenues, aiding in tax management.
Taxes Report: Breaks down specific tax categories and amounts, useful for accounting.
Payments Summary Report: Summarizes all payments received, giving a quick snapshot of cash flow.
Payments Detailed Report: Offers a more granular view of each transaction, ideal for payment tracking.
Expense Report: Lists all expenses, helping manage property costs effectively.
Inventory Report: Tracks available room Inventory, ensuring room availability and allocation.
House Report: Summarizes room statuses, occupancy, and other essential house operations.
Room Revenue Report: Focused on revenue generated per room, this report is critical for understanding how room sales contribute to overall income.
Night Audit Report: Summarizes daily transactions, occupancy, and revenue, ensuring all records are accurate and balanced at the end of each day.
The Flash Manager Report, Room Revenue Report, and Night Audit Report in Stayflexi collectively offer a property’s performance. Together, they cover almost every crucial aspect of property management, including revenue tracking, occupancy levels, tax breakdowns, payments, expenses, inventory, and room status.
Is there a way to generate a report for POS transactions (restaurant, spa, etc.) within the property?
YES, here’s a step-by-step guide on how to generate reports for transactions across various property outlets like restaurants, spas, etc., in Stayflexi:
Log in to your Stayflexi dashboard using your credentials.
From the dashboard, click on the 4-dots square icon labeled “More Apps”, located on the right side of the screen.
From the listed apps, locate and click on the Reports.
On the left side of the dashboard, you will see a list of different reports.
From the list of available reports, click on All Outlets Itemwise Category Summary Report.
View the Report:
The report will open on your screen, displaying transaction details.
Data is organized with headers horizontally, such as:
Outlet Name
Item Category
Item Name
Quantity Sold
Total Sales
Below each column, you’ll find the corresponding data categorized by outlet.
Filter by Date Range:
Use the Date Range Selector to choose the desired time period:
For current date transactions, select today’s date.
For previous date transactions, adjust the date range accordingly.
Analyze and Export:
Review the report on-screen or export it for further analysis, depending on your needs.
This process ensures you can quickly access detailed sales and transaction data for each outlet within your property.
How can I generate an expense report to track operational costs?
To generate an expense report to track operational costs of your property in Stayflexi, follow the below-mentioned steps:
Log in to your Stayflexi dashboard using your credentials.
From the dashboard, click on the 4-dots square icon labeled “More Apps”, located on the right side of the screen.
From the listed apps, locate and click on the Reports.
On the left side of the dashboard, you will see a list of different reports.
From the list of displayed reports, locate and select the Expense Manager Report.
View the Report Details:
The report will open, showing your property’s expenses.
Data is structured as follows:
Horizontal Headers include:
Type of Expense (e.g., maintenance, utilities)
ID (unique identifier for each expense)
Reason/Entity Name (why or who the expense was for)
Description (details of the expense)
Vertical Columns list the corresponding data under each header.
Analyze the Data:
Scroll through the report to review detailed expense entries.
Use this report to track and manage your property’s expenditures.
This report provides a clear overview of your expenses, helping you monitor and control costs efficiently.
How can I generate a report of all the charged virtual cards from Expedia or Booking.com?
To generate a report of all the charged virtual cards from Expedia or Booking.com, Follow the below-mentioned guidelines.
Log in to your Stayflexi dashboard using your credentials.
From the dashboard, click on the 4-dots square icon labeled “More Apps”, located on the right side of the screen.
From the listed apps, locate and click on the Reports.
On the left side of the dashboard, you will see a list of different reports.
Click on Payment Reports: Go to the Reports section and select Payment Reports.
Click on the Payment Gateway Report option.
Select the desired date range in the open report to view the relevant data.
Review the columns provided in the report, such as the Gateway and Booking Source columns.
Use the filter option in the Booking Source column to display data specific to a selected OTA, like Expedia or Booking.com. [Refer to the provided image to clearly understand the filtering process.]
How can I generate a tax report to track the taxes collected from bookings?
To generate a tax report to track the taxes collected from bookings, follow the below-mentioned steps:
Log in to your Stayflexi dashboard using your credentials.
From the dashboard, click on the 4-dots square icon labeled “More Apps”, located on the right side of the screen.
From the listed apps, locate and click on the Reports.
On the left side of the dashboard, you will see a list of different reports.
Access Property Reports: At the top of the Reports section, you’ll see Property Reports. The reports under this section will already be displayed on the screen.
Click on Room Bookings Report :
Click on “Room Bookings Reports” from the displayed reports.
View the Report:
A report will open displaying the booking information.
View the Tax:
Scroll to the far right of the report to view the tax charged for each booking.
This report provides a clear breakdown of taxes associated with each booking.
How can I generate a booking source report to track where my reservations are coming from (e.g., OTA, direct bookings)?
To generate a booking source report to track where your reservations are coming from, follow the below-explained steps:
Log in to your Stayflexi dashboard using your credentials.
From the dashboard, click on the 4-dots square icon labeled “More Apps”, located on the right side of the screen.
From the listed apps, locate and click on the Reports.
On the left side of the dashboard, you will see a list of different reports.
Access Property Reports: At the top of the Reports section, you’ll see Property Reports. The reports under this section will already be displayed on the screen.
Click on the Room Bookings Report from the list of displayed reports on the screen.
A report will open, Locate the ‘Booking Source’ column heading, displayed horizontally. You can apply filter for a specific OTA booking source.
Below this heading, you’ll find the information on the source of each booking.
Can I view a report of all reservations made during a specific period?
To view a report of all reservations made during a specific period, follow the below mentioned steps:
Log in to your Stayflexi dashboard using your credentials.
From the dashboard, click on the 4-dots square icon labeled “More Apps”, located on the right side of the screen.
From the listed apps, locate and click on the Reports.
On the left side of the dashboard, you will see a list of different reports.
Access Property Reports: At the top of the Reports section, you’ll see Property Reports. The reports under this section will already be displayed on the screen.
Open the Master Report:
Click on Master Report to open the detailed booking report.
Select the Date Range:
In the reports section, locate the Date Range Selector to set the dates.
Choose Your Dates:
Click on any specific dates for which you want to view all reservations made during that period.
Apply the Date Range:
Once you’ve selected the desired dates, click the “Apply” button to confirm your date range.
This will display a report showing all reservations made within the specified period.
Is there a way to generate a report for discounts or promotions applied to bookings?
To generate a report for discounts or promotions applied to bookings, follow the below-mentioned guidelines:
Log in to your Stayflexi dashboard using your credentials.
From the dashboard, click on the 4-dots square icon labeled “More Apps”, located on the right side of the screen.
From the listed apps, locate and click on the Reports.
On the left side of the dashboard, you will see a list of different reports.
Access Property Reports: At the top of the Reports section, you’ll see Property Reports. The reports under this section will already be displayed on the screen.
Open the Master Report:
Click on Master Report to open the detailed booking report.
Add the Coupons/Discounts Column:
By default, the report does not show applied coupon codes or discounts.
To add this information, go to the columns list on the right side of the report.
Scroll through the options, find “Applied Coupons/Discounts,” and check the box next to it.
View the Updated Report:
The selected column will now appear in your report, displaying any coupon codes or discounts applied to each booking.
This way, you can easily see details about any promotional offers associated with each reservation.
How can I generate a report of room revenue by room type or category?
To generate a report of room revenue by room type or category, follow the below-mentioned steps:
Log in to your Stayflexi dashboard using your credentials.
From the dashboard, click on the 4-dots square icon labeled “More Apps”, located on the right side of the screen.
From the listed apps, locate and click on the Reports.
On the left side of the dashboard, you will see a list of different reports.
Access Property Reports: At the top of the Reports section, you’ll see Property Reports. The reports under this section will already be displayed on the screen.
Open Room Bookings Report:
Click on “Room Bookings Report” in your Stayflexi dashboard.
Customize Columns:
On the right side of the report, click on the column options listed vertically.
Find “Room Category” in the options and check the box next to it.
Adjust Column Placement:
The “Room Category” column will now appear in your report.
You can move it by dragging it to place it next to any other column of your choice.
This customization allows you to organize and view the report in a way that best suits your needs.
How can I download a guest history report?
To download a guest history report in Stayflexi, follow the below-mentioned guidelines:
Log in to your Stayflexi dashboard using your credentials.
From the dashboard, click on the 4-dots square icon labeled “More Apps”, located on the right side of the screen.
From the listed apps, locate and click on the Reports.
On the left side of the dashboard, you will see a list of different reports.
Access the Customer Report:
Go to the dashboard and click on the Customers Report section.
From the page that opens, click on Customers Report again from the two options presented.
View Guest Details:
A detailed report will open, displaying guest details in horizontal rows and vertical columns.
Set the Date Range:
At the top of the report, locate the Date Range Selector and click on it to open a calendar.
The calendar allows you to select date ranges by weekly, monthly, or yearly intervals, as well as options for days up to today and days starting today.
Choose the date range that suits your needs and click on the Apply button within the calendar.
Use Filters for Easy Navigation:
Next to the Date Range Selector, find the Filters option. Click on it to open a dropdown with filter choices.
Apply any necessary filters to refine the report and make it easier to navigate.
Export the Report:
To the right of the Filters column, click on the Export Report dropdown menu.
Select your preferred format (PDF, CSV, or Excel) to export the report.
By following these steps, you can download a guest history report.
How do I analyze my property's monthly or yearly room booking performance report compared to the previous year?
To analyze your property’s monthly or yearly performance report compared to the previous year, follow the below-mentioned guidelines:
Log in to your Stayflexi dashboard using your credentials.
From the dashboard, click on the 4-dots square icon labeled “More Apps”, located on the right side of the screen.
From the listed apps, locate and click on the Reports.
On the left side of the dashboard, you will see a list of different reports.
Go to Flash Manager Report:
In your dashboard, click on the Flash Manager Report section. This report gives you an overview of property performance metrics.
Set the Date Range:
At the top of the page, locate the Date Range Selector to choose the period [monthly or yearly] you want to analyze.
Enable Comparison Mode:
Next to the date range selector, the report will display comparative data, allowing you to see key metrics from the current period alongside those from the previous year [e.g., this month vs. the same month last year, or this year vs. last year].
Analyze the Report:
In comparison mode, all key performance indicators [KPIs] will show side-by-side comparisons, helping you analyze growth, trends, and any notable changes in performance over time.
This setup provides a clear view of your property’s performance against the previous, making it easier to assess improvements or areas that need attention.
Is there a report to track cancellations and no-shows?
To track cancellations in Stayflexi, follow the below-mentioned steps:
Log in to your Stayflexi dashboard using your credentials.
From the dashboard, click on the 4-dots square icon labeled “More Apps”, located on the right side of the screen.
From the listed apps, locate and click on the Reports.
On the left side of the dashboard, you will see a list of different reports.
Access Property Reports: At the top of the Reports section, you’ll see Property Reports. The reports under this section will already be displayed on the screen.
Open the Master Report:
Click on Master Report to open the detailed booking report.
Locate the Booking Status Column:
In the report, find the Booking Status column displayed horizontally. This column shows the status of each booking, such as confirmed, checked out, and cancelled.
Filter for Cancelled Bookings:
Click on the Filter option beneath the Booking Status column.
A popup will appear, allowing you to select specific statuses.
Choose Cancelled to display only the bookings with a cancelled status.
Following these steps will filter the report to show only cancelled bookings, making it easy to track cancellations.
To track no shows in Stayflexi, follow the below-mentioned steps:
Log in to your Stayflexi dashboard using your credentials.
From the dashboard, click on the 4-dots square icon labeled “More Apps”, located on the right side of the screen.
From the listed apps, locate and click on the Reports.
On the left side of the dashboard, you will see a list of different reports.
Open the Front Desk Report:
On the dashboard, click on Front Desk Report to access a range of front desk-related reports.
Select the No-Show Report:
From the reports displayed, locate and click on No-Show Report.
View No-Show Details:
The No-Show Report page will open, showing information about guests who did not show up at your property. This report includes guest details and reservation specifics.
This process allows you to easily view and trackall no-show bookings for better management and follow-up.
How do I view an overdue payments or pending balance report?
To view an overdue payments or pending balance report, follow the below-mentioned steps in Stayflexi:
Log in to your Stayflexi dashboard using your credentials.
From the dashboard, click on the 4-dots square icon labeled “More Apps”, located on the right side of the screen.
From the listed apps, locate and click on the Reports.
On the left side of the dashboard, you will see a list of different reports.
Access Property Reports: At the top of the Reports section, you’ll see Property Reports. The reports under this section will already be displayed on the screen.
Open the Room Revenue Reports:
Click on the Room Revenue Report section. This report provides detailed information about guest transactions and room revenue, both with and without taxes.
Navigate to the Pending Balance Column:
Once the report opens, scroll or use the arrow keys to move to the extreme right of the report sheet.
Check the Balance Amount:
Look for the Balance Amount column on the fair right. This column reflects any pending balances for guests, showing any overdue payments or remaining amounts.
This process allows you to quickly identify and review any outstanding payments directly within the report.
How can I view logs of any changes made to room pricing, inventory, or a specific reservation ID in the system?
Below are the step-by-step guidelines to view logs of any changes made to room pricing, inventory, or a specific reservation ID in the system in Stayflexi:
Accessing Reports:
Log in to your Stayflexi dashboard using your credentials.
From the dashboard, click on the 4-dots square icon labeled “More Apps”, located on the right side of the screen.
From the listed apps, locate and click on the Reports.
On the left side of the dashboard, you will see a list of different reports.
“Log Reports” section :
On the main dashboard, find and click on the log reports option. This section keeps a record of all changes in the system.
View User Log Report:
Once on the Log Reports page, you’ll see a detailed user log report appear on your screen.
Open the Report:
Click on the report to open it and view the information.
Explore the Columns:
The report displays various columns across the screen, such as change type, date, user name, and specific details of the modification. These columns allow you to filter and search for specific changes based on your requirements.
Filter Information:
To find the exact log details you need, filter by date, user, or other criteria based on the columns available.
This process will help you access logs on any modifications to room pricing, inventory, or reservations as needed.
How do I schedule a daily revenue report for my property?
To generate a daily revenue report for your property, Follow the below-mentioned steps:
Log in to your Stayflexi dashboard using your credentials.
From the dashboard, click on the 4-dots square icon labeled “More Apps”, located on the right side of the screen.
From the listed apps, locate and click on the Reports.
Once the reports page opens, look to the right side and click on Schedule Reports.
On Schedule Reports page, click on Add New Report Schedule to start configuring your report.
Configure the Report:
A report configuration page will appear on the right.
Fill in the details, including the Name of the Report Schedule [e.g.,”Daily Revenue Report”].
Select Report Type as Revenue Report.
Set Schedule Frequency by clicking on the dropdown. Choose Daily from the default options.
Click the Save button at the bottom to complete the setup.
You have successfully scheduled a Daily Revenue Report in Stayflexi. The system will automatically generate the report daily based on your configuration.
How can I view the occupancy report for a specific date?
To view the occupancy report for a specific date range, Follow the below-mentioned guidelines:
Log in to your Stayflexi dashboard using your credentials.
From the dashboard, click on the 4-dots square icon labeled “More Apps”, located on the right side of the screen.
From the listed apps, locate and click on the Reports.
On the left side of the dashboard, you will see a list of different reports.
From the list, locate and click on Channel Manager Reports.
Three reports will open. Click on Occupancy Report to proceed.
In the center of the page, find the date selection area. Click on the calendar icon to open the dropdown calendar.
From the dropdown calendar, select the specific date for which you want to view the occupancy report.
You will now receive the Occupancy Report for that particular date, providing insights into the room utilization and occupancy levels.
How do I generate a report to track the booking sources by OTA channel manager, such a Booking.com, Expedia, etc.?
To track where your reservations are coming from (e.g., OTA, direct bookings), follow the below-mentioned steps:
Log in to your Stayflexi dashboard using your credentials.
From the dashboard, click on the 4-dots square icon labeled “More Apps”, located on the right side of the screen.
From the listed apps, locate and click on the Reports.
On the left side of the dashboard, you will see a list of different reports.
From the list, locate and click on Channel Manager Reports.
Three reports appear on the screen, click on CM Bookings Report.
The report will open on the same page, displaying a list of bookings received from various channels.
Within the report, find the Booking Source column.
Here you’ll see the source of each booking, showing where each guest reservation originated.
How do I check a detailed room status report (occupied, available, out of service)?
To create a detailed room status report (occupied, available, out of service), follow the below-mentioned steps:
Log in to your Stayflexi dashboard using your credentials.
From the dashboard, click on the 4-dots square icon labeled “More Apps”, located on the right side of the screen.
From the listed apps, locate and click on the Reports.
On the left side of the dashboard, you will see a list of different reports.
Access Property Reports: At the top of the Reports section, you’ll see Property Reports. The reports under this section will already be displayed on the screen.
Select Room Inventory Report: Locate and click on Room Inventory Report.
View Report Details: A new page will open, displaying a table at the top with columns like Blocked Rooms, Net Rooms, Available Rooms, etc.
Explore More Columns: To see additional columns, click on the small arrow icon on the right side to scroll forward.
Review the Inventory Report: Below the columns, you’ll find detailed data for your room inventory, showing a breakdown of each room’s status.
How do I check a report of payments made through different methods (e.g., cash, card, bank transfer)?
To create a report for payments made via different methods (cash, card, online, etc.), follow the below-mentioned steps:
Log in to your Stayflexi dashboard using your credentials.
From the dashboard, click on the 4-dots square icon labeled “More Apps”, located on the right side of the screen.
From the listed apps, locate and click on the Reports.
On the left side of the dashboard, you will see a list of different reports.
Click on Payment Reports: Go to the Reports section and select Payment Reports.
Select Counter Report by Payment Type: From the list of available reports, locate and click on Counter Report by Payment Type.
View the Report: A new page will open, displaying the report. At the top, you’ll see columns with names indicating different payment categories.
Check Payment Type Data: Under each column, you’ll find data showing the amounts received by various payment types, such as credit card, cash, bank transfer, etc.
How do I create a ''Direct Billing'' account in Stayflexi?
Image 1:
Image 2:
Image 3:
Below is the step-by-step guide to creating a direct billing account in Stayflexi:
Log in to Your Stayflexi Dashboard:
Use your username and password to log in.
Go to Direct Billing:
After logging in, click the icon with four boxes (more apps) in the top right corner(as shown in Image 1).
A dropdown menu will appear.
Select “Direct Billing” from the list (as shown in Image 1).
Click on ‘Add New’:
In the Direct Billing section, click the ‘Add new’ button, which will open a form on the right-hand side of the screen(as shown in Image 2).
Fill in Basic Information (as shown in Image 2):
Account Name: Enter the name of the company or travel agent.
Account Number: Enter the corresponding account number.
Account Type: Select the appropriate account type from the dropdown.
The Account type dropdown includes the following types:
Corporate
Travel Agent
House Account
Select the type based on the account you are creating.
Tax ID: Enter the Tax ID.
Account Email: Provide a valid email address for the account so that travel agents should receive email.
Account Phone: Enter the contact phone number, starting with the country code (e.g., +1 for USA).
Enter Address Details(as shown in Image 2):
Address Line 1: Enter the main address for the account.
Address Line 2: Fill in additional address details (optional).
City: Provide the city where the business is located.
State: Enter the state or region.
Country: Select the country from the dropdown list.
Postal Code: Enter the postal code for the address.
Configure IGST Status (Optional only for Indian Property):
If applicable, toggle the IGST status switch for integrated tax setup(as shown in Image 2).
Save the Information(as shown in Image 2):
After filling in all required details, click the ‘Save’ button at the bottom of the form to create the Direct Billing account.
Once saved, the new Direct Billing account will appear in the list, where you can manage or edit the information as needed (as shown in Image 3).
This process allows you to create and manage accounts for direct billing in Stayflexi, making it easy to handle payments directly with travel agents or corporate companies.
How do I view all bookings for a specific Direct Billing account?
Log in to Your Stayflexi Dashboard:
Use your username and password to log in.
Go to Direct Billing:
After logging in, click the icon with four boxes (more apps) in the top right corner(as shown in Image 1).
A dropdown menu will appear.
Select “Direct Billing” from the list (as shown in Image 1).
View Bookings:
Click on the View booking option on the Direct billing account you want to view the bookings(as shown in Image 2).
A page with all the bookings made on this particular direct billing account will be displayed (as shown in Image 3).
You can settle the balance amount from here by clicking on the Settle Dues option (as shown in Image 3).
If you want to display only the Unsettled bookings, enable the Unsettled-only switch to display the Unsettled bookings list (as shown in Image 3).
By following the steps you will be easily able to view all bookings for a specific Direct billing account.
How can I see only unsettled folios or reservations for a given Direct Billing account?
Log in to Your Stayflexi Dashboard:
Use your username and password to log in.
Go to Direct Billing:
After logging in, click the icon with four boxes (more apps) in the top right corner.
A dropdown menu will appear.
Select “Direct Billing” from the list.
View Bookings:
Click on the View booking option on the Direct billing account you want to view the bookings(as shown in Image 2).
A page with all the bookings made on this particular direct billing account will be displayed (as shown in Image 3).
If you want to display only the Unsettled folios or bookings, enable the Unsettled-only switch to display the Unsettled bookings/reservations list.
By following these steps you can easily see the unsettled folio or reservations for a given Direct Billing account.
How do I settle a folio after receiving payment from a Direct Billing account?
Below is the step-by-step guide to settling a folio after receiving payment from a Direct billing account:
Log in to Your Stayflexi Dashboard:
Use your username and password to log in.
Go to Direct Billing:
After logging in, click the icon with four boxes (more apps) in the top right corner.
A dropdown menu will appear.
Select “Direct Billing” from the list.
View Bookings:
Click on the View booking option on the Direct billing account you want to view the bookings
A page with all the bookings made on this particular direct billing account will be displayed
If you want to display only the Unsettled folios or bookings, enable the Unsettled-only switch to display the Unsettled bookings/reservations list.
Setlle Dues:
Click on the checkbox next to the booking or reservation you want to settle the booking.
You can settle the balance amount by clicking on the Settle Dues option
A list of payment methods will be displayed select the payment method you want to make the payment.
A pop-up with the amount details and a Bulk settle button will appear.
Click on the Bulk settle option to settle the dues.
How can I edit or update a Direct Billing account?
Log in to Your Stayflexi Dashboard:
Use your username and password to log in.
Go to Direct Billing:
After logging in, click the icon with four boxes (more apps) in the top right corner
A dropdown menu will appear.
Select “Direct Billing” from the list
Edit/Update Direct Billing account:
Click on the edit icon beside the View Bookings button for the particular direct billing account you want to edit or update the details.
A page to edit or update the details of the particular direct billing account will be displayed
Save the details:
After editing or updating the direct billing account details, click on the Save button to save the updated information
How do I download a report of all bookings under a Direct Billing account?
Log in to Your Stayflexi Dashboard:
Use your username and password to log in.
Go to Direct Billing:
After logging in, click the icon with four boxes (more apps) in the top right corner.
A dropdown menu will appear.
Select “Direct Billing” from the list.
View Bookings:
Click on the View booking option on the Direct billing account you want to download the report.
A page with all the bookings made on this particular direct billing account will be displayed.
Click on the Export report drop down at the top next to the settle dues option.
The Export report drop down contains.
Export as CSV
Export as PDF
Export as Excel
You can download the report of the bookings in any of the formats you wish by clicking on the above-mentioned options.
How do I view the pending balance for a Direct Billing account?
Image 1:
Image 2:
Image 3:
Below is the step-by-step guide to viewing all the pending balances for a specific Direct billing account:
Log in to Your Stayflexi Dashboard:
Use your username and password to log in.
Go to Direct Billing:
After logging in, click the icon with four boxes (more apps) in the top right corner.
Select “Direct Billing” from the list.
View Bookings:
Click on the View Booking option on the Direct billing account you want to view the pending balance.
A page with all the bookings made on this particular direct billing account will be displayed.
By scrolling right, at the end of the table, you can see the Direct Billing Balance Due and Folio Balance Due columns where you can view all the pending balances for a Direct Billing account.
By following these steps you can easily view all the pending balances for a specific direct billing account.
How can I make a walk-in booking under a Direct Billing account?
Log in to Your Stayflexi Dashboard:
Use your username and password to log in.
Go to Reservation calendar:
After logging in, click the Reservation Calendar icon second icon from the left.
Create a Walk-in booking:
Select the Create drop down on the right.
Click on the Walk-in option.
Fill in the customer details.
Click on the Segment drop down on the right-hand side of the page.
Select the DIRECT_BILLING option.
Click on the Sub-segment drop down
Select the Direct billing account under which you want to create the walk-in booking.
Click on the Create Reservation button to successfully create a walk-in booking.
By following these steps you can make a walk-in booking under a Direct Billing account.
How do all Revenue Management features work and how do I set them up?
Below is a complete guide explaining all key features inside Revenue Management along with step-by-step instructions to help you configure each tool easily. This includes: Competitor Setup, Demand-Based Pricing, Rule-Based Pricing, Time-Based Pricing, Promotions, Coupon Code Offers, and Rate Templates.
1. Competitor Setup
Competitor Setup allows you to add or edit competitor hotels so the system can compare your pricing with similar properties in your market. This helps improve your demand-based and rule-based pricing accuracy.
Steps to Set It Up:
Log in to Your Stayflexi Dashboard:
Use your username and password.
Open Revenue Management:
Click the four-boxes (More Apps) icon.
Select Revenue Management.
Open Competitor Setup:
Click Competitor Setup on the left sidebar.
Add a Competitor:
Click Add Competitor.
Search the competitor on Google.
Copy the competitor’s Google hotel profile link and paste it here.
Click Save.
Edit your google profile and Remove Competitors:
click on edit your google profile and do the changes
Select the competitor and click on Remove
2. Demand-Based Pricing
Demand-Based Pricing uses AI to adjust your room prices based on market demand and your property’s star category. It automatically increases or decreases your prices depending on whether demand is low, moderate, high, or occupancy-based.
1. Open Revenue Management Log in to your account → go to More Apps → select Revenue Management.
2. Open Dynamic Pricing In the left menu, click Dynamic Pricing, then choose Demand-Based Pricing.
3. Add a New Configuration Click Add New Configuration to begin.
Important Note:Before configuring demand-based pricing, make sure your room types and rate plans are properly set up. If they are not linked correctly, it may lead to rate mismatches. For example, the system may remind you to sync the base price of your Premium 1BHK with Balcony Garden View with the market demand before continuing.
4. Choose the Star Category and also enable the demand based configuration toggle Select the hotel’s star rating (e.g., 3-star, 4-star, etc.).
5. Select the Demand Type Pick the demand level you want to target:
Low Demand
Moderate Demand
High Demand
Occupancy-Based Demand
6. Set the Price Behavior Choose whether the price should Increase or Decrease when this demand condition is met.
7. Enter the Adjustment Value Add the amount or percentage you want to adjust (e.g., +₹200, -₹150, +10%, etc.).
8. Save Your Configuration Click Save to activate your demand-based pricing rule.
3. Rule-Based Pricing
Rule-Based Pricing lets you create your own custom pricing rules based on occupancy levels. You can increase or decrease the price depending on how full the hotel is and apply these rules to specific room categories.
Select any rule to modify it, switch it off, or delete it permanently.
4. Time-Based Pricing (Time Slot Configuration)
Time-Based Pricing allows you to schedule when dynamic pricing should run. Instead of applying rules continuously, Stayflexi will only update prices during specific times you choose (example: every morning at 9 AM).
Steps to Configure It:
Open Time Slot Configuration:
Revenue Management → Dynamic Pricing → Time Slot Configuration.
Enable Time-Based Pricing:
Toggle ON the Time Slot mode.
Add a Time Slot:
Click Add Time Slot.
Enter a time (example: 09:00 AM)
Save the Time Slot:
Click Save.
Edit or Remove Slots:
Click a slot to update or delete it.
5. Promotions
Promotions allow you to create special offers such as discounts or seasonal deals that automatically apply to selected dates and room types.
Steps to Create a Promotion:
Log in to Your Stayflexi Dashboard:
Use your username and password to log in.
Go to Revenue Management:
After logging in, click the four boxes icon (more apps) in the top right corner.
A dropdown menu will appear.
Select “Revenue Management” from the list.
Go to Promotions:
On the left sidebar, click on “Promotions” (the 4th option) to view the promotions page.
Add a New Promotion:
Click the “Add new promotion” button to start creating a new promotion.
Set Stay Duration Criteria
In the section “How long do guests need to stay to get this promotion?”, enter the following:
Minimum number of nights required for guests to stay to qualify for the promotion.
Maximum number of nights guests can stay to qualify.
Set Room Booking Criteria
In the section “How many rooms do guests need to book to get this promotion?”, input:
Minimum number of rooms guests need to book.
Maximum number of rooms guests can book.
Set the Discount Percentage
In the section “How much of a discount do you want to give?”, enter the desired discount percentage.
Choose the Rate Plan
From the dropdown in the “Which Rate?” section, select the rate plan that the discount applies to (e.g., EP).
Set the Date Range for Discounted Stays:
Specify the date range for when guests can use the promotion
Select Days of the Week for Discount Availability:
Choose the days of the week that the discounted rate will be available. You can select all days or specific days as needed.
Make Promotion Available Online
Decide whether to make the promotion available online
Turn On the Toggle: Promotion will be available on the Stayflexi direct booking engine.
Turn Off the Toggle: Promotion will not be available for the Stayflexi booking engine.
Enter Promotion Name
Provide a descriptive name for your promotion to help identify it easily
Save the Promotion
Once you have entered all the details, review them carefully.
Click the “Save” button to finalise and activate your promotion.
6. Coupon Code Offers
Coupon codes allow you to give guests special codes that apply a fixed or percentage discount during booking.
Log in to Your Stayflexi Dashboard:
Use your username and password to log in.
Go to Revenue Management:
After logging in, click the four boxes icon (more apps) in the top right corner
A dropdown menu will appear.
Select “Revenue Management” from the list
Go to Coupon/Offers:
On the left sidebar, click on “Coupon Code / Offers” (the 5th option) to view the Coupon Code/ Offers page.
Add a Coupon/Offers:
Click the “Add Coupon Code / Offers” button to start creating a new Coupon Code / Offers
Enter Coupon Code / Offer Name:
Provide a descriptive name for your coupon code/offer to help identify it easily
Describe Coupon Code / Offer:
Provide a brief description of your coupon code/ offer for better understanding
Choose the type
From the dropdown in the “Choose type of your coupon code/offer” section, either of the following types:
OFFER
COUPON CODE
Set Room Booking Criteria
In the section “How many rooms do guests need to book to get this coupon code or offer?”, input:
Minimum number of rooms guests need to book.
Maximum number of rooms guests can book.
Set Stay Duration Criteria
In the section “How long do guests need to stay to get this coupon code or offer?”, enter the following:
Minimum number of nights required for guests to stay to qualify for the coupon code/ offer.
Maximum number of nights guests can stay to qualify.
Set the Discount
In the section “How much of a discount do you want to give?”, enter the desired discount and select the type of discount (Percentage or Flat ) from the dropdown.
Set the Date Range for Discounted Stays
In the “When can guests check in using the discounted rate?” section, specify the date range for when guests can use the Coupon code/offer.
Select Days of the Week for Discount Availability:
Choose the days of the week that the discounted rate will be available. You can select all days or specific days as needed
Valid Booking Period:
In the section “When can bookings be shown?”, select the date range during which the coupon code/offer is valid for bookings
Coupon Code/Offer Usage Limit:
In the section “How many times can the coupon code/offer be used? (leave blank for no limit)”:
The coupon code or offer can be used as many times as you want unless a limit is set.
Save the Coupon code/ offer:
Once you have entered all the details, review them carefully.
Click the “Save” button to finalize and activate your Coupon code/ offer.
7. Rate Templates
Rate Templates let you store pre-set pricing for seasons like high season, low season, weekends, festivals, or events. You can apply these templates to any date range with one click, saving time and ensuring pricing consistency.
How to Set Them Up?
Set Up a Rate Template:
Log in to the Stayflexi Dashboard.
Click the four boxes icon (more apps) in the top right corner.
A dropdown will appear.
Select “Revenue Management” from the list.
Click on “Rate Template” (second option on the left sidebar).
Click “Add New Template.”
Fill in the required fields (template name, color, and description).
Define the start and end dates for the season by using the template calendar button in the top right corner of the Rate template page (refer to the above Images).
Steps to Create and Apply a Template:
How do I add or remove competitors in the Competitor Setup section?
Below are the step-by-step guidelines on adding and managing competitors from the Competitor Setup section in Revenue Management:
Log in to Your Stayflexi Dashboard:
Use your username and password to log in.
Go to Revenue Management:
Click the four-boxes (More Apps) icon at the top right corner.
A dropdown menu will appear.
Select “Revenue Management” from the list.
Open Competitor Setup:
On the left sidebar, click “Competitor Setup” or “Competitor List”.
Add a Competitor:
Click “Add Competitor”.
Open Google and search for the competitor property.
Copy the hotel’s Google profile link.
Paste the link into the input field.
Click Save to add the competitor.
Remove a Competitor:
Click Remove
Confirm the action.
Your competitor data is now updated:
These competitors will be used for market comparison inside the Revenue Dashboard and demand-based pricing logic.
How do I configure Demand-Based Pricing?
Below are the step-by-step guidelines on setting up Demand-Based Pricing.
Log in to Your Stayflexi Dashboard:
Enter your username and password.
Open Revenue Management:
Click the four-boxes (More Apps) icon.
Select “Revenue Management.”
Go to Dynamic Pricing:
Click the Dynamic Pricing dropdown on the left sidebar.
Select “Demand-Based Pricing.”
Start a New Configuration:
Click “Add New Configuration.”
Important Note:Before configuring demand-based pricing, make sure your room types and rate plans are properly set up. If they are not linked correctly, it may lead to rate mismatches. For example, the system may remind you to sync the base price of your Premium 1BHK with Balcony Garden View with the market demand before continuing.
Choose Your Property’s Star Category:
Select the appropriate star category (e.g., 3-star, 4-star).
This helps the system compare your property with similar market competitors.
Select the Demand Type:
Choose one of the following:
Low Demand
Moderate Demand
High Demand
Occupancy-Based Demand
Set the Pricing Action:
Choose whether the price should Increase or Decrease when this demand level is detected.
Enter the Price Adjustment Value:
Add the amount or percentage by which the price should change.
Example: Increase by ₹200 or decrease by 10%.
Save the Configuration:
Click Save to activate the demand-based pricing rule.
The system will now automatically adjust rates based on market demand.
How do I create Rule-Based Pricing rules?
Below are the step-by-step guidelines on creating Rule-Based Pricing rules in Dynamic Pricing:
Log in to the Stayflexi Dashboard:
Use your login credentials.
Open Revenue Management:
Click the four-boxes icon.
Select “Revenue Management.”
Go to Dynamic Pricing:
Click the Dynamic Pricing dropdown on the left.
Select “Rule-Based Pricing.”
Add a New Rule:
Click “Add Rule” or “Add Dynamic Pricing Rule.”
Define the Occupancy Range:
Enter the occupancy percentage range where this rule should apply.
Example:
0%–50% → Decrease price
51%–70% → Increase price
71%–100% → Increase price more
Choose the Price Adjustment Type:
Set whether the change is a percentage or a fixed amount.
Enter the value accordingly.
Select Room Categories:
Choose whether this rule should apply to all rooms or specific room categories.
Set the Active Date Range:
Choose the calendar dates during which this rule should remain active.
Save the Rule:
Click Save to finalize the rule.
You will now see it listed in the Rule-Based Pricing table.
What is Time-Based Pricing and how do I set Time Slots?
Below are the step-by-step guidelines on what Time-Based Pricing means and how to configure Time Slot Pricing in Revenue Management:
Time-Based Pricing allows you to schedule when your dynamic pricing rules should run. Instead of adjusting prices continuously in real-time, the system will only update prices during the specific time slots you choose. This gives you more control, prevents frequent price fluctuations, and helps you manage pricing updates at predictable times (e.g., every morning at 9 AM).
Open Revenue Management:
Log in to your Stayflexi dashboard.
Click the four-boxes (More Apps) icon and select Revenue Management.
Open Dynamic Pricing:
Click Dynamic Pricing in the left sidebar.
Select Time Slot Configuration.
Enable Time Slot Mode:
Turn ON the toggle for Time-Based Pricing.
This switches dynamic pricing from real-time updates to scheduled time-based updates.
Add a Time Slot:
Click “Add Time Slot.”
Enter the exact time you want the pricing rules to run (e.g., 09:00 AM or 2:00 PM).
Save the Time Slot:
Click Save to activate the time slot.
From now on, pricing rules will only be applied at these scheduled times.
Remove or Edit Time Slots:
Click an existing time slot to edit its time.
To delete, click the delete option.
Save changes to update your time-based pricing schedule.
How do I manage (edit, run the rule immediately, disable or delete) dynamic pricing rules?
Below are the step-by-step guidelines on managing existing rules:
Open Rule-Based Pricing Go to Revenue Management → Dynamic Pricing → Rule-Based Pricing.
Select the Rule Click on the rule you want to manage from the list.
Edit the Rule
On the right-hand side, click the pencil (edit) icon.
In the Edit Rule screen, you can update the rule definition, occupancy ranges, adjustment values, turn on/off room-type-based occupancy, select room types, or change the date range.
Save your changes.
Run the Rule Immediately If you want the updated rule to apply right away, click Run Rule Now.
Disable the Rule To stop the rule from applying temporarily, click Disable Rule. (The rule will remain saved and can be enabled later.)
Permanently Delete or Remove the Rule
Click the calendar icon on the right.
Select Permanently Disable Rule if you want to remove it from use completely.
(You will also see an option to Permanently Enable Rule if needed.)
How do Rate Templates work and how do I create one?
Rate Templates allow you to store predefined pricing structures for different seasons, events, or special periods. Instead of manually updating each date on the calendar, you can create templates (such as High Season, Low Season, Weekend Rates, Festival Rates) and apply them instantly to any date range with just one click. This ensures pricing is consistent, faster to update, and reduces errors across your property.
Below are the step-by-step guidelines on what Rate Templates are and how to create and apply them:
Go to Revenue Management:
Log in to your Stayflexi dashboard.
Click the four-boxes (More Apps) icon.
Select Revenue Management.
Open Rate Templates:
Click Rate Templates from the left menu.
Add a New Template:
Click “Add Template.”
Enter a template name (examples: Winter Rates, High Season Rates, Festival Rates).
Enter Room Pricing:
For each room type, enter the base rate or seasonal rate that should be saved in this template.
Add weekday/weekend variations if applicable.
Save the Template:
Click Save.
Your template will now appear in the Rate Templates list.
Apply the Template to Dates:
Click Apply Template or open the calendar tool.
Select the start date and end date you want to apply the template to.
Choose the template you created from the dropdown list.
Click Apply.
Rates Will Instantly Update:
All selected dates will automatically update to the pricing defined in the template.
Your property’s rate strategy becomes consistent and easier to manage.
Can dynamic pricing be set to run at a specific time, regardless of occupancy changes?
Yes, dynamic pricing can be set to run at a specific time regardless of occupancy changes in Stayflexi.
When you enable Time Slot Configuration, you can pick certain times during the day for your pricing rules to take effect. Once this mode is on, the system will only adjust prices based on occupancy at those chosen times, not continuously throughout the day. This makes it easier to manage pricing.
For example, if you set a time for 10:00 AM, the system will check the occupancy and apply the pricing rules at that exact time. This way, you have clear control over when your prices change.
Here’s a simpler guide to setting dynamic pricing at specific times using Time Slot Configuration in Stayflexi:
Log in to Your Stayflexi Dashboard:
Use your username and password to log in.
Go to Revenue Management:
After logging in, click the four boxes icon (more apps) in the top right corner.
A dropdown menu will appear.
Select “Revenue Management” from the list.
Go to Dynamic Pricing:
Click the “Dynamic Pricing” dropdown icon (3rd option on the left sidebar).
Open Time-based pricing
On the left side, under Dynamic Pricing, you will see options like:
Demand-based pricing
Rule-based pricing
Time-based pricing
Click on Time-based pricing.
Turn onTime Slot Mode:
You will see a switch asking, “Do you want to enable a time slot?”
Turn this switch on
Set a Time for Dynamic Pricing
Under the switch, you will see a field to choose a time (e.g., 10:00 AM).
Pick the time you want the dynamic pricing rules to apply.
Click Add to set the time for more time slots.
Save Your Settings
After adding the time, click Save.
The time will now be listed on the screen.
Confirm or Adjust:
Check if the time slot appears correctly.
If you need to change or remove it, click the Delete button next to the time
Once this is set up, dynamic pricing will run at the time you choose, based on occupancy at that moment, instead of adjusting in real-time. This helps you control when pricing changes happen.
Can the occupancy percentages in dynamic pricing overlap across different rules?
In Stayflexi, occupancy percentages for dynamic pricing rules cannot overlap.
Each rule must have its own unique occupancy percentage range. For example, if one rule covers 50% to 80% occupancy, you cannot create another rule that overlaps with any part of that range, such as 60% to 90%. The ranges need to be distinct so the system knows exactly which rule to apply.
If you attempt to create overlapping rules, Stayflexi will alert you and ask you to change the ranges to ensure they don’t overlap, avoiding any confusion when applying the correct rule.
Here’s a step-by-step guide to check if occupancy percentages overlap between different dynamic pricing rules in Stayflexi:
Log in to Your Stayflexi Dashboard:
Use your username and password to log in.
Go to Revenue Management:
After logging in, click the four boxes icon (more apps) in the top right corner.
A dropdown menu will appear.
Select “Revenue Management” from the list
Go to Dynamic Pricing
Click the “Dynamic Pricing” dropdown icon (3rd option on the left sidebar).
Select the “Rule-based pricing” option from the dropdown.
Create an Overlapping Rule:
Let’s say you already have a rule called “Rule 1” that applies to occupancy percentages between 50% and 80% (as shown in Image 2).
Now, try to create another rule “Rule 2” by clicking the Add new dynamic pricing rule button, with an occupancy range of 60% and 90%.
Receive the Error:
The system will prevent you from saving “Rule 2” because its occupancy range overlaps with “Rule 1”.
An error message will pop up, stating: “Invalid rule specified, occupancy range is overlapping. Please enable if the previous rule is disabled.”
By following these steps, you can ensure that your dynamic pricing rules do not have overlapping occupancy percentages.
Can dynamic pricing be applied to only one specific room category?
Yes, in Stayflexi, you can apply dynamic pricing to just one specific room category. This allows you to adjust prices for that room type based on occupancy, without affecting the prices of other room categories.
Below are the step-by-step guidelines on dynamic pricing being applied to only one specific room category from Revenue Management:
Log in to Your Stayflexi Dashboard:
Use your username and password to log in.
Go to Revenue Management:
After logging in, click the four boxes icon (more apps) in the top right corner.
A dropdown menu will appear.
Select “Revenue Management” from the list.
Go to Dynamic Pricing:
Click the “Dynamic Pricing” dropdown icon (3rd option on the left sidebar).
Select the “Rule-based pricing” option from the dropdown.
Create or Edit a Pricing Rule:
To apply a rule to a specific room category, you can:
Create a new rule by clicking the Add new dynamic pricing rule button.
Or edit an existing rule by selecting it from the list of rules on the rule-based pricing page.
Enable Room Type-Based Occupancy:
In the rule setup window, you will see an option to EnableRoom Type-Based Occupancy.
Turn this option ON. This will let you apply the pricing rule to specific room categories instead of the entire property.
Select the Room Category (as shown in Image 3):
After enabling room-type-based occupancy, you will see a dropdown menu “Room types” under the “Select room types?” section.
Click on the dropdown and select the room category you want (e.g., Deluxe Room, Suite, etc.).
You can choose one or more categories, but to apply the rule to a single room category, just select that one.
Define the Pricing Rule:
Now, set the conditions for your dynamic pricing:
Occupancy Percentage Range: Enter the range of occupancy for when the rule should apply (e.g. if occupancy is between 90% and 100%).
Price Adjustment: Choose how much you want to increase or decrease the price when occupancy falls within that range (you can set it as a percentage or a fixed amount).
Rule Name:
Name the Dynamic Pricing rule (e.g., Rule 2).
Save the Rule:
Once you have set everything up, click on the “Add Event” button to apply the rule.
The dynamic pricing rule will now apply only to the room category you selected.
Can dynamic pricing and rate templates function simultaneously?
Yes, you can use both rate templates and dynamic pricing at the same time in Stayflexi. Rate templates let you set seasonal prices, while dynamic pricing adjusts rates based on real-time occupancy levels. When you set up seasonal prices, dynamic pricing will still work, making sure your rates reflect market conditions. Here’s a simple guide on how to use them together:
What Are Rate Templates?
What They Do: Rate templates allow you to set specific prices for certain times of the year, like during busy seasons or holidays. You can schedule these rates in advance.
Why Use Them: They help you plan by setting fixed prices for high-demand periods like summer or festival seasons and it can be used multiple times.
What is Dynamic Pricing?
What It Does: Dynamic pricing automatically adjusts your room rates based on demand and how full your hotel is.
Why Use It: It helps you maximize revenue by adjusting rates in real time based on current demand.
Dynamic pricing adjusts the rates based on the overall occupancy of the entire property. However, if you want to set dynamic pricing for a specific room type, you can do that by enabling the ‘Enable room type-based occupancy’ option when creating the pricing rule.
How Do They Work Together?
Work Simultaneously: When you set a seasonal rate using a rate template (like for a holiday), dynamic pricing still works. The seasonal rate will be your base price.
Adjust Automatically: If demand changes during that season (for example, if your hotel starts filling up), dynamic pricing will increase or decrease the rate based on occupancy.
How to Set Them Up?
Set Up a Rate Template:
Log in to the Stayflexi Dashboard.
Click the four boxes icon (more apps) in the top right corner.
A dropdown will appear.
Select “Revenue Management” from the list.
Click on “Rate Template” (second option on the left sidebar).
Click “Add New Template.”
Fill in the required fields (template name, color, and description).
Define the start and end dates for the season by using the template calendar button in the top right corner of the Rate template page (refer to the above Images).
Configure Dynamic Pricing (refer to the above Images):
Go to “Dynamic Pricing” (third option on the left sidebar under Revenue Management).
Select “Rule-based Pricing.”
Set rules for price changes (for example, “If occupancy is above 80%, increase rates by 10%”) by clicking “Add New Dynamic Pricing Rule.”
Why Use Both?
Maximize Earnings: Rate templates give you a plan for high-demand times, while dynamic pricing helps you adjust based on real-time changes. This way, you can always charge the best rates.
Stay Competitive: Using both strategies ensures your prices stay competitive no matter the season or occupancy level.
By following these steps, you can easily set up rate templates and dynamic pricing in Stayflexi, ensuring your rates are always optimized to help you earn more while staying flexible with market changes.
How do I create predefined Coupon Code/ offers in the system?
Below are the step-by-step guidelines to create predefined Coupon Code/offers in the system from Revenue Management:
Log in to Your Stayflexi Dashboard:
Use your username and password to log in.
Go to Revenue Management:
After logging in, click the four boxes icon (more apps) in the top right corner
A dropdown menu will appear.
Select “Revenue Management” from the list
Go to Coupon/Offers:
On the left sidebar, click on “Coupon Code / Offers” (the 5th option) to view the Coupon Code/ Offers page.
Add a Coupon/Offers:
Click the “Add Coupon Code / Offers” button to start creating a new Coupon Code / Offers
Enter Coupon Code / Offer Name:
Provide a descriptive name for your coupon code/offer to help identify it easily
Describe Coupon Code / Offer:
Provide a brief description of your coupon code/ offer for better understanding
Choose the type
From the dropdown in the “Choose type of your coupon code/offer” section, either of the following types:
OFFER
COUPON CODE
Set Room Booking Criteria
In the section “How many rooms do guests need to book to get this coupon code or offer?”, input:
Minimum number of rooms guests need to book.
Maximum number of rooms guests can book.
Set Stay Duration Criteria
In the section “How long do guests need to stay to get this coupon code or offer?”, enter the following:
Minimum number of nights required for guests to stay to qualify for the coupon code/ offer.
Maximum number of nights guests can stay to qualify.
Set the Discount
In the section “How much of a discount do you want to give?”, enter the desired discount and select the type of discount (Percentage or Flat ) from the dropdown.
Set the Date Range for Discounted Stays
In the “When can guests check in using the discounted rate?” section, specify the date range for when guests can use the Coupon code/offer.
Select Days of the Week for Discount Availability:
Choose the days of the week that the discounted rate will be available. You can select all days or specific days as needed
Valid Booking Period:
In the section “When can bookings be shown?”, select the date range during which the coupon code/offer is valid for bookings
Coupon Code/Offer Usage Limit:
In the section “How many times can the coupon code/offer be used? (leave blank for no limit)”:
The coupon code or offer can be used as many times as you want unless a limit is set.
Save the Coupon code/ offer:
Once you have entered all the details, review them carefully.
Click the “Save” button to finalize and activate your Coupon code/ offer.
How do I create predefined promotions in the system?
Below are the step-by-step guidelines to create predefined promotions in the system from Revenue Management:
Log in to Your Stayflexi Dashboard:
Use your username and password to log in.
Go to Revenue Management:
After logging in, click the four boxes icon (more apps) in the top right corner.
A dropdown menu will appear.
Select “Revenue Management” from the list.
Go to Promotions:
On the left sidebar, click on “Promotions” (the 4th option) to view the promotions page.
Add a New Promotion:
Click the “Add new promotion” button to start creating a new promotion.
Set Stay Duration Criteria
In the section “How long do guests need to stay to get this promotion?”, enter the following:
Minimum number of nights required for guests to stay to qualify for the promotion.
Maximum number of nights guests can stay to qualify.
Set Room Booking Criteria
In the section “How many rooms do guests need to book to get this promotion?”, input:
Minimum number of rooms guests need to book.
Maximum number of rooms guests can book.
Set the Discount Percentage
In the section “How much of a discount do you want to give?”, enter the desired discount percentage.
Choose the Rate Plan
From the dropdown in the “Which Rate?” section, select the rate plan that the discount applies to (e.g., EP).
Set the Date Range for Discounted Stays:
Specify the date range for when guests can use the promotion
Select Days of the Week for Discount Availability:
Choose the days of the week that the discounted rate will be available. You can select all days or specific days as needed.
Make Promotion Available Online
Decide whether to make the promotion available online
Turn On the Toggle: Promotion will be available on the Stayflexi direct booking engine.
Turn Off the Toggle: Promotion will not be available for the Stayflexi booking engine.
Enter Promotion Name
Provide a descriptive name for your promotion to help identify it easily
Save the Promotion
Once you have entered all the details, review them carefully.
Click the “Save” button to finalise and activate your promotion.
Will the rates automatically revert to the base price if the dynamic pricing rule is disabled or deleted after it has been applied?
No, the rates will not automatically revert to the base price if the dynamic pricing rule is disabled or deleted after it has been applied.
Disabling the rule stops it from affecting future bookings, but any bookings made while the rule was active will keep the modified rates.
Deleting the rule permanently removes it, but again, it only affects future bookings. Existing bookings will retain the rates applied during the rule’s active period.
To return the rates to their original base price, you must change them manually.
Understanding Dynamic Pricing Rules:
Dynamic pricing rules in Stayflexi help you change room prices automatically based on things like demand, special promotions, or seasonal changes. When these rules are active, they change the prices for all relevant bookings automatically.
Applying a Dynamic Pricing Rule:
When you activate a dynamic pricing rule, it instantly applies to all bookings during the time the rule is active.
The system will show the modified prices for all reservations made while the rule is in place.
Disabling or Deleting a Dynamic Pricing Rule:
Disabling the Rule:
If you disable the dynamic pricing rule, it stops changing prices for future bookings.
However, any bookings made while the rule was active will still keep the modified rates. These rates will not automatically go back to the base price.
Deleting the Rule:
Deleting the rule removes it from your settings entirely.
This only impacts future bookings, meaning no new bookings will use the deleted rule.
Existing bookings will still have the prices that were set when the rule was active.
Impact on Existing Bookings:
Any bookings made while the dynamic pricing rule was active will keep the modified rates.
These rates will not go back to the original base price automatically, even after disabling or deleting the rule.
To reset these prices to the base rate, you need to manually adjust them.
How to Manually Update Prices:
To adjust the prices back to the base price (or set a new price), follow these steps:
Go to the Rates and Inventory Page
In the Stayflexi dashboard, click on the Rates and Inventory icon (it’s the 3rd icon from the left in the top menu).
Select Rates and Inventory:
In the Rates and Inventory page, select the checkbox for Rates and Inventory from the drop down menu in the top left corner
Use Bulk Update:
Click on the Bulk update button
Set Pricing Option:
From the dropdown options, select Set pricing
Choose Room Types:
Select the room types where you want to adjust the prices
Choose the Rate plans:
Select the rate plans where you want to adjust the prices
Manually Enter the Base Price:
Enter the base price (or a new price) for those room types in the provided field
Save Your Changes:
Click the Set Pricing button to save and apply your new pricing
By following these steps, you can ensure that prices for existing bookings are manually updated to the base price or any price you prefer, even if the dynamic pricing rule is disabled or deleted.
What is the Cash Tracker in Stayflexi?
The Cash Tracker in Stayflexi is a built-in tool that helps properties monitor, record, and reconcile all cash transactions in real-time. It gives a clear snapshot of how much cash is currently on hand, where it came from, and how it’s being used — making daily cash flow management simple and transparent.
Key Functions of Cash Tracker:
Tracks All Cash Inflows :
Cash received from guest folios (payments during check-in, check-out, or in-stay purchases)
Cash top-ups added for operational needs
Any other incoming cash sources.
Monitors All Cash Outflows:
Expenses paid in cash (e.g., supplies, repairs, petty cash)
Cash withdrawals for various purposes
Employee payouts and vendor payments
Real-Time Cash Balance :
Instantly calculates and displays the current available cash on the property based on inflow and outflow records.
Shift & Day-Wise Tracking :
Allows tracking of cash collections and withdrawals per shift or day, making handovers and audits easier.
Why it’s Useful? :
Eliminates manual ledger entries for cash
Provides transparent cash movement history linked to employees and categories
Reduces errors and discrepancies during reconciliation
Ensures accountability by tracking who collected or spent the cash and for what reason
Example Use Case :
If the front desk collects ₹5,000 in cash from guests and the housekeeping team spends ₹1,000 for supplies, the Cash Tracker will show:
₹5,000 as inflow (guest payments)
₹1,000 as outflow (housekeeping expense)
₹4,000 as the remaining cash balance for the day
What types of transactions can be recorded in the Cash Tracker?
The Cash Tracker in Stayflexi is a centralized tool that allows properties to log, monitor, and reconcile all cash transactions in real-time. It helps ensure transparency, accountability, and accuracy in managing the property’s cash flow.
Types of Transactions in Cash Tracker:
Cash Top-Ups – Manual cash additions to the register :
These are cash amounts manually added to the cash register to ensure enough funds are available for operational needs.
Example: The property manager adds ₹10,000 to the register at the start of the month for housekeeping purchases and petty cash needs.
Flow:
Manager initiates a Cash Top-Up entry in Cash Tracker.
Selects “Monthly Operational Cash” as the reason (predefined in Top-Up categories).
Enters amount and date, then saves.
Cash balance increases immediately by ₹10,000 in the tracker.
2. Cash Collections – Automatically logged when guest dues are settled in cash
This transaction type is system-generated whenever a guest payment is made in cash via their folio.
Example: A guest settles their bill of ₹5,000 in cash at checkout.
Flow:
Front desk records payment in the Guest Folio.
Selects Cash as payment mode.
System automatically logs this transaction in the Cash Tracker as a Cash Collection.
Available cash balance increases by ₹5,000 without manual entry.
3. Cash Withdrawals – Expenses, cash payouts, or owner withdrawals
Cash removed from the register for operational expenses, staff payments, or withdrawals by the owner.
Example: The property needs ₹2,000 to pay a local plumber for urgent repairs.
Flow:
Staff member logs in to Cash Tracker.
Selects Cash Withdrawal and chooses the category “Maintenance & Repairs” (predefined in Withdrawal categories).
Enters amount, date, and purpose.
Cash balance decreases by ₹2,000 immediately.
How is Cash Collected from Guest Folios Tracked?
When a guest settles dues in cash (e.g., room payments, add-ons), the amount is automatically added to the Cash Tracker in the Expenses manager as an inflow entry, ensuring the cash register reflects real-time updates. If you wish not to track, you can uncheck the ‘transfer cash to cash top-up’ in settle dues.
Flow:
The front desk or cashier opens the Guest Folio in Stayflexi.
Selects Cash as the payment method while settling the balance.
By default, the system records the payment instantly as a Cash Collection in the Cash Tracker.
The available cash balance updates in real-time.
Optional: If you don’t want this cash to be added to the Cash Tracker, simply deselect the checkbox (which is automatically selected by default).
Example:
A guest has a pending bill of ₹6,863.
The front desk receives the amount in cash and updates the folio.
Stayflexi auto-logs the ₹6,863 under Cash Collections in the Cash Tracker with the guest’s folio reference and payment date.
If the checkbox is deselected before saving, the transaction will not appear in the Cash Tracker.
Benefits:
Eliminates manual logging errors.
Creates a transparent audit trail.
Keeps cash balance updated instantly.
Allows flexibility to exclude specific cash collections from the Cash Tracker when needed.
Can I Add Cash to the Tracker Manually?
Yes. You can manually add cash to the Cash Tracker using the Cash Top-Up feature. This is useful for recording manual additions such as morning cash floats, emergency funds, or any non-guest cash injections into the register.
Flow:
Go to the Cash Tracker section in Stayflexi.
Click Add Top-Up from the left-hand menu.
Pick the Date for the cash addition.
In the Reason/Entity column, select a predefined top-up category (e.g., Morning Cash Load, Emergency Top-Up).
Enter the Amount and any Description for future reference.
Click Save to update the cash balance instantly.
Example:
At the start of the day, the cashier adds ₹5,000 to the cash drawer as a morning float.
They log into the Cash Tracker → Add Top-Up → select “Morning Cash Load” → enter ₹5,000 → Save.
The system immediately reflects this addition in the available cash balance.
What if the owner or manager takes cash out for personal or business purposes?
If the property owner, manager, or any authorized person withdraws cash for personal use or business-related expenses, you can log this in the Cash Tracker under Cash Withdrawals. This ensures the transaction is properly documented and the cash balance stays accurate.
Flow:
Go to the Cash Tracker section in Stayflexi.
Click Add Withdrawal from the left-hand menu.
Pick the Date of the withdrawal.
In the Reason/Entity column, select a predefined withdrawal category (e.g., Owner Withdrawal, Vendor Payment, Staff Wages).
Enter the Amount withdrawn and add a Description if necessary.
Click Save to record the transaction and update the available cash balance.
Example:
The owner takes ₹10,000 from the property’s cash for urgent equipment repair.
The cashier logs into the Cash Tracker → Add Withdrawal → select “Owner Withdrawal” → enter ₹10,000 → Save.
The system reduces the cash balance immediately and keeps a record for auditing.
What is the Expense Manager feature in Stayflexi, and how does it benefit to a property?
The Expense Manager in Stayflexi is a built-in tool that allows hotel staff to record, track, and manage all property-level operational expenses in one place. It provides visibility into where money is being spent, helping owners and managers maintain better financial control.
Why is it useful for your property?
Managing expenses manually or across disconnected spreadsheets often leads to data gaps, miscommunication, or overspending. The Expense Manager solves this by:
Providing real-time visibility into all property-level expenses.
Helping owners and managers track where money is going — by category, department, or user.
Ensuring accountability, as each expense is logged with user details and time stamps.
Offering easy reporting for audits, internal reviews, or tax purposes.
Improving financial planning by enabling data-driven decisions based on actual expense trends.
What types of expenses can I record in the Expense Manager?
You can log any operational expense, such as:
Housekeeping supplies
Maintenance costs
Staff salaries or wages
Vendor payments
Utility bills
Marketing costs
Miscellaneous purchases (stationery, fuel, etc.
Where can I access the Expense Manager in the Stayflexi dashboard?
Follow the steps below to access the Expense Manager from your Stayflexi dashboard:
Log in to your Stayflexi dashboard using your property credentials.
On the top right corner of the dashboard, click on the “More Apps” icon.
From the dropdown menu, select “Expense Manager.”
You will now be redirected to the Expense Manager interface, where you can start adding or managing your property’s expenses.
Understanding the Expense Manager Dashboard
Once you access the Expense Manager, you’ll be welcomed with a summary dashboard that gives you a quick overview of your financial activity:
Info Box Section (Top Panel): This section displays key financial figures at a glance:
Total Expenses
Cash Withdrawals
Cash Top-ups
Overall Cash Balance
Top Expense Categories (Middle Panel): Right next to the info boxes, you’ll find a list of the top categories where most of your expenses are being recorded. This helps you quickly identify high-spending areas.
Day-wise Expense Trend Graph (Right Panel): A visual day-wise trend graph shows how your expenses fluctuate over time. This allows you to monitor daily spending patterns, spot unusual spikes, and track how different departments impact cash flow.
Configuration Section (Bottom Panel): Below the summary panels, you’ll find an option to configure your Expense Manager settings.
Summary
The Expense Manager in Stayflexi is an essential module for any property aiming to maintain financial discipline, improve expense accountability, and reduce manual errors. It’s more than just a tracker — it’s a smart financial tool built to support daily operations, internal audits, and long-term budgeting.
Where can I see report for Expense Manager?
You can see the reports for Expense Manager by navigating to the Expense Reports section in the Reports.
Below is the step-by-step guide to see the Expense Manager reports:
Logging into Your Stayflexi Dashboard:
Enter your username and password to log in.
Navigate to Reports:
Once logged in, click on the More Apps icon (represented by four blocks) in the top right corner.
From the dropdown menu, select Reports.
On the left-hand menu, select Expense Reports.
Go to Expense Manager Reports:
After selecting the Expense Reports option, the Expense Manager Reports option will be displayed.
Click on the Expense Manager reports block.
This will navigate you to the page where you can see all the Expense Manager reports, including:
The date the expense was created
Type of expense( Expense, withdrawal, or top-up)
Issued to details.
Reason – entity name
Description
Amount.
By following these steps you can see all the Expense Manager report details.
How do I set up the Expense Manager in Stayflexi?
The Expense Manager in Stayflexi is designed to help properties track and manage all financial transactions such as daily expenses, cash withdrawals, and top-ups — all in one place. This guide walks you through how to set it up, configure it, and use it effectively for complete financial control.
1. ACESSING THE EXPENSE MANAGER:
To get started:
Log in to your Stayflexi dashboard using your property credentials.
Click on the “More Apps” icon (grid with four blocks) at the top right corner.
From the dropdown, select “Expense Manager.”
You’ll be redirected to the Expense Manager dashboard.
2. UNDERSTANDING THE EXPENSE MANAGER DASHBOARD:
Upon entry, you’ll see a summarized financial overview:
Info Boxes (Top Panel):
Total Expenses
Cash Withdrawals
Cash Top-Ups
Overall Cash Balance
Top Expense Categories (Middle Panel):
Displays your most frequently used expense types.
Day-wise Trend Graph (Right Panel):
Visualizes daily spending trends to help monitor expense flow.
Configuration Panel (Bottom Section):
Here, you can set up categories, payment modes, and user access settings to customize the Expense Manager for your property’s needs.
3. SETTING UP THE EXPENSE MANAGER:
A. Configure Expense Categories:
From the left-hand column, select “Expenses.”
On the right-hand side, click the Configuration icon.
Under Expense Categories, click Add New and enter names like:
Toiletries
Housekeeping Essentials
Repairs & Maintenance
Marketing
Click Save after each entry.
Repeat as needed to cover all types of expenses.
B. Set Up Withdrawal Categories:
From the left-hand column, switch to “Withdrawals.”
Click on the Configuration icon.
Click “Create Withdrawal Category”, and enter types like:
Daily Wages
Vendor Payments
Staff Advances
Click Save to store the category.
C. Configure Top-Up Categories:
On the left-hand side, switch to “Top-Up.”
Go to the Configuration panel.
Click Add Top-Up Type, and define options like:
Morning Cash Load
Emergency Top-Up
Night Shift Float
Click Save.
D. Configure Employee Access:
To track who’s responsible for logging financial actions:
In the Configuration menu, select “Configure Employee.”
Click “Create Employee” and add team members involved in financial entries.
Assign roles and permissions for:
Logging expenses
Creating withdrawals or top-ups
Approving entries (if needed)
This ensures complete accountability and audit readiness.
4. RECORDING FINANCIAL TRANSACTIONS:
A. Add and Track Expenses:
Click “Add Expense” from the left-hand menu (+ icon).
Choose an Expense Category (e.g., Housekeeping, Repairs).
Enter the amount, date, description, and upload any receipt.
Click Save to log the expense.
B. Log Cash Withdrawals:
Select “Add Withdrawal” from the left menu.
Choose a Withdrawal Category (e.g., Vendor Payment).
Fill in the amount, date, and add a note if needed.
Click Save.
C. Log Cash Top-Ups:
Click “Add Top-Up” from the left-hand side.
Select a Top-Up Category (e.g., Morning Cash Load).
Enter the amount and add any notes.
Click Save to record the top-up.
EXAMPLE USE CASES :
Housekeeping Purchase:
₹1,250 spent on cleaning supplies via UPI.
Logged under Housekeeping with a receipt attached.
Overall Summary:
With the Expense Manager set up and in use:
Your team can log all financial activities in real-time.
Owners and managers get complete visibility into daily cash flow.
Each entry is attributed to the right staff member, ensuring accountability.
Reports and graphs help analyze trends and control spending.
How can I add daily expenses in Expense Manager?
Log in to Stayflexi
Start by logging into your Stayflexi account with your credentials.
Once logged in, click on the More Apps icon (represented by four blocks) in the top right corner.
From the dropdown menu, select Expense Manager.
Add Daily Expenses:
To record any daily expenses, follow these simple steps:
Choose an Expense Category:
Click “Add Expense” from the left-hand menu (+ icon).
Select the date of the expense. It will default to today’s date, but you can modify it if needed.
Click on the dropdown arrow in this column to view and select from your predefined expense categories (e.g., Housekeeping, Repairs, Supplies).
Choose the employee or vendor to whom the amount was issued.
This list is based on entries from the “Configure Employee” section.
Type the exact amount spent in this field.
Add a brief description of the expense for future reference (e.g., “Purchased cleaning liquid for Room 101”).
If this expense should also be recorded under Withdrawals, tick the checkbox to link it.
Click the “Save” button to record the daily expense entry.
The expense will now be logged in the system and reflected in your dashboard, reports, and day-wise trends.
What is the 'Top-up' feature in the Expense Manager, and how is it used?
The Top-up feature in Stayflexi’s Expense Manager allows property owners and managers to load cash into their cash drawer at the beginning of the day or at any other time when additional cash is required for daily operations, such as covering expenses or withdrawals. This feature ensures that there is always enough cash available to manage operations smoothly.
Why use the Top-Up Feature?
To track when and how much cash is being added to the property’s available funds.
To maintain an accurate cash balance in the system.
To ensure accountability when physical cash is handed over to specific employees or departments.
Here’s how to use it step by step:
Log in to Stayflexi:
Start by logging into your Stayflexi account with your credentials.
Once logged in, click on the More Apps icon (represented by four blocks) in the top right corner.
From the dropdown menu, select Expense Manager.
Fill-Out Top-Up Details:
Pick the Date: Choose the date on which the top-up is made. It defaults to today, but you can change it as needed.
Reason / Entity Column:This dropdown is used to select the predefined Top-Up categories (e.g., “Morning Cash Load”, “Emergency Fund”) that were configured earlier under the Top-Up Configuration section.
Issued To: Select the employee who received the top-up. This list is based on the employees added under Configure Employee.
Enter Amount: Add the total amount of cash added.
Add Description: Optionally, include a short note for reference (e.g., “Cash float provided for front desk”).
Save the Top-Up:Click Save to log the entry. The system will update your overall cash balance accordingly.
Where Does It Reflect?
The added amount will be reflected in the cash balance on your dashboard.
It will also appear in the Top-Up summary reports, helping you track how often and how much cash is loaded.
Tip: Regularly reconciling top-ups against expenses and withdrawals helps ensure accurate cash flow tracking and reduces discrepancies.
What is Payment Automation and how does it work in Stayflexi?
Payment automation in Stayflexi helps hotels handle payments smoothly and automatically. This feature ensures that guests’ payments are collected on time, making the booking process more efficient for property owners.
Log in to Your Stayflexi Dashboard:
Enter your username and password to log in.
Go to Payments:
After logging in, click the “More Apps” icon (represented by four boxes or blocks) in the top right corner.
From the dropdown menu, select Payments
Click on the Payment Configuration option
Enable Payment Automation
What it does: When this feature is turned on, Stayflexi automates the payment collection process for all reservations. This is particularly useful for properties that allow guests to pay during check-in or via online platforms like Booking.com, Expedia, or other OTAs (Online Travel Agencies).
How it works:
The system automatically processes payments when guests make a reservation if payment automation is enabled.
If the payment fails, the system can notify the guest to update their card details.
This automation reduces cancellations and ensures that hotels receive payments promptly.
Why you should enable it: It saves you time and effort in manually managing payments and reduces the chances of cancellations due to payment failures.
How to enable: Simply toggle the switch to the “on” position to activate payment automation for your property.
Apply Payment Automation to These Channels
What it does: This setting allows you to apply payment automation to specific booking channels, such as Booking.com, Expedia, and other OTAs.
How it works:
When guests book through these channels, the system will automatically charge their card details if they have selected the “pay later” option.
If the guest’s card is invalid, the system will send an email requesting updated payment information. The room inventory will be held until the payment is successfully processed.
How to set it up: Use the dropdown menu to select the channels you want to apply payment automation.
Enable Cancellation Policy
What it does: This feature automatically applies your hotel’s cancellation policy to the booking. If enabled, it charges the guest based on the rules of your cancellation policy, such as charging upfront for non-refundable bookings or after the cancellation window for partially refundable bookings.
How it works:
For non-refundable policies, the full booking amount is charged immediately after the booking is made.
For partially refundable policies, the system will automatically handle the payment after the refundable time period for the booking is over.
Why you should enable it: Automating the cancellation policy helps avoid manual intervention and ensures guests are charged according to the booking rules.
How to enable: Toggle the switch to enable or disable the cancellation policy automation.
Convert Booking into an Enquiry when Payment Fails
What it does: This option allows you to convert a booking into an Enquiry booking if the guest’s payment fails. This holds the booking temporarily, without canceling it outright, giving the guest time to resolve their payment issues.
How it works:
If the payment doesn’t go through, the booking is changed to an Enquiry, and the room inventory is reserved for a set period.
During this time, the guest can update their payment details, and the booking will be confirmed once payment is successful.
If the guest fails to complete the payment within the expiry time, the Enquiry is canceled, and the room is released for other guests.
Why you should use it: This feature gives the guest a second chance to complete the payment and ensures that rooms aren’t lost too quickly due to temporary payment failures.
How to enable: Select “YES” to convert failed payment bookings into Enquiries, or “NO” if you want the booking to remain in confirmed status or be canceled right away.
Set Expiry for Enquiry Bookings:
What it does: This setting lets you decide how long a booking will remain in an Enquiry state before it expires. During this time, the room is held for the guest, and the payment can still be completed.
How it works:
You can set the Expiry Hours to specify how long the booking will stay as an Enquiry.
There are two Expiry Types:
From the time of booking creation: The expiry countdown starts as soon as the booking is made.
Before check-in: The expiry countdown is based on the check-in date and time.
Why you should use it: It gives flexibility on how long to hold a room for guests who haven’t completed their payments. Setting this appropriately ensures you can free up rooms for other bookings if the payment isn’t completed in time.
How to set it up: Enter the number of hours for the expiry and select whether the timer starts from the time of booking or before check-in.
Partial Payment Setting.
What it does: This feature allows you to charge a percentage of the booking amount upfront instead of the full amount.
How it works:
You can set a specific percentage (e.g., 50%, 100%) of the total booking amount to be collected at the time of booking.
For example, if you set the percentage to 50%, guests will be charged half the total amount when they book, and the remaining amount can be charged later (e.g., at check-in).
Why you should use it: This can help secure bookings with a smaller payment upfront, giving guests more flexibility while still confirming the reservation.
How to set it up: Use the slider to choose the percentage of the booking amount you wish to charge when the booking is made.
Payment automation in Stayflexi helps properties manage payments more efficiently by automating processes like payment collection, applying cancellation policies, and handling failed payments. Each of these settings provides flexibility in how payments are handled, ensuring that hotel owners can streamline operations while providing guests with a smooth booking experience.
What is the Payment Automation Dashboard and what can I monitor there?
The Payment Automation Dashboard in Stayflexi is designed to give hotel owners and managers a clear and detailed overview of their payment activities. This dashboard allows you to monitor various aspects of payments, including automated payments, manual payments, and payments by type (like cash, card, etc.). By using this dashboard, you can track how payments are processed daily, understand the volume by payment methods, and see important details related to failed or successful payments.
What Can You Monitor on the Dashboard?
Total Payments (Automated vs. Manual)
Top section: You can see the total volume of payments processed, divided between automated and manual payments. This helps you understand the extent to which payment automation is being used and how much manual intervention is needed.
Payments by Day
Top middle section: A graph shows the volume of payments for each day of the month, giving you insights into daily payment trends. This can help you spot patterns, such as when guests tend to make more payments (e.g., weekends vs. weekdays).
Payment by Type
Top right graph: This section breaks down payments by different methods—cash, card, bank transfers, and online payments. You can easily see which payment methods are most popular among guests.
Manual vs. Automated Payments
Middle section: This chart distinguishes between payments that are handled automatically (through booking engines or payment processors) and those handled manually. It shows the total revenue from each method.
Gateway Payments by Day
Bottom right graph: This shows payments that went through various gateways (such as Stripe, Razorpay, etc.) over specific days. It helps you track gateway performance and identify any issues related to specific payment providers.
Table for payments, refunds, transfers, and reversals (Detailed View)
Bottom section: This table shows a detailed list of individual transactions, including date, amount booking ID, guest name, payment type, gateway name, payment gateway ID, and source of payment.
Step-by-Step Explanation:
Log in to Your Stayflexi Dashboard:
Enter your username and password to log in.
Go to Dashboard:
After logging in, click the “More Apps” icon (represented by four boxes or blocks) in the top right corner.
From the dropdown menu, select Payments(as shown in Image 1).
You will see the Dashboard option with various graphs and data tables.
Review Total Payments (as shown in Image 2):
At the top of the dashboard, you’ll see the total payments processed today. This includes both automated and manual payments, so you can quickly gauge how much revenue has been collected.
Check Payments by Day(as shown in Image 3):
Look at the “Payments by Day” graph to understand payment trends over the month. The taller bars indicate days with higher payment volumes.
This helps you predict busier times or peak days for payments.
Analyze Payments by Type(as shown in Image 3):
The “Payments by Type” graph gives you a breakdown of the payment methods used (cash, card, etc.). This is useful for understanding guest preferences and ensuring your payment methods are adequately supported.
Compare Automated vs. Manual Payments(as shown in Image 4):
Check the graph that compares manual and automated payments. If you notice that manual payments are higher, you might want to adjust your settings to enable more automation.
View Gateway Payments by Day(as shown in Image 4):
The “Gateway Payments by Day” chart tracks the payments processed through payment gateways like Stripe and Razorpay. This shows which payment providers are being used most often and allows you to monitor gateway-specific trends.
Monitor Individual Transactions(as shown in Images 5 and 6):
At the bottom, you will see a table with details of each payment, refunds, transfers, and reversal. Use this table to:
Confirm amounts.
Check the booking IDs
Payment gateway IDs etc.
The Payment Automation Dashboard gives you a clear and comprehensive overview of how payments are being processed for your hotel. By monitoring this dashboard, you can ensure smooth operations, identify any issues quickly, and make informed decisions to improve your payment processes.
How do I configure Payment Automation in Stayflexi?
Below is the step-by-step guide to configuring payment automation in Staflexi:
Login to Stayflexi Dashboard:
Start by logging into your Stayflexi account using your credentials.
Go to Payment Configuration:
After logging in, click the “More Apps” icon (represented by four boxes or blocks) in the top right corner.
From the dropdown menu, select Payments
On the Payment page, click the Payment Configuration option
Enable Payment Automation
Toggle the switch next to the Enable Payment Automation section to activate this feature.
What it does: This enables automatic payment collection from guests at the time of booking or during check-in, depending on the OTA (Online Travel Agent) or the type of payment selected.
Benefit: Streamlines the payment process and reduces the chances of failed payments going unnoticed.
Choose Channels for Payment Automation
In the Apply Payment Automation to These Channels section, select the OTAs (e.g., Booking.com, Expedia) where you want payment automation enabled.
Use the dropdown menu to choose one or multiple channels.
What it does: Ensures that for the selected channels, the system automatically attempts to charge the guest’s credit card at the time of booking or check-in.
Benefit: You can control which channels are enabled for automated payment, providing flexibility in handling different OTA payment rules.
Enable or Disable the Cancellation Policy
Toggle the switch next to Enable Cancellation Policy.
What it does: When this feature is enabled, the system automatically charges the guest for non-refundable bookings right after the booking is confirmed. For partially refundable bookings, payments are processed after the refundable period expires.
Benefit: Automates cancellation charges, ensuring properties comply with their cancellation policies without manual involvement.
Configure Failed Payment Handling:
In the section labelled Convert Booking into an Enquiry When Payment Fails, you can decide what happens when a guest’s payment fails.
Select “YES”: If you want the booking to be converted into an enquiry, which will hold the room inventory for a certain period (defined by expiry hours) while waiting for the guest to make a successful payment.
Select “NO”: If you want the booking to remain confirmed even if the payment fails, keep the room inventory locked for the guest.
What it does: Helps you manage failed payments by either downgrading the booking to an enquiry (with time limits) or keeping it confirmed, giving flexibility to your booking management process.
Benefit: Avoids the risk of overbooking and allows you to retain control over room inventory in case of payment failures.
Set Expiry Time for Enquiry Bookings (Optional):
If you’ve opted to convert failed payments into enquiries, you’ll need to set the expiry time for the enquiry.
In the Expiry Hours field, specify how long (in hours) you want to hold the booking as an enquiry before releasing the inventory.
In the Expiry Type dropdown, choose the reference point (e.g., from the time of enquiry) for calculating expiry.
What it does: Ensures that room inventory isn’t held indefinitely, releasing it if the guest does not make the payment within the set time.
Benefit: Ensures rooms are available to other potential guests if payments aren’t completed within a reasonable time frame.
Save Your Settings(as shown in Image 4):
After configuring all the options, make sure to Save the settings to apply the changes to your property’s payment automation system.
Benefit: Your property will now automatically handle payments and cancellation policies based on the rules you’ve set, helping you manage bookings and payments more efficiently.
What happens if the payment fails due to an invalid guest card?
If a guest’s payment fails due to an invalid credit card, Stayflexi offers automated processes to handle the situation. Follow this step-by-step breakdown of what happens next and how the system manages the failed payment.
System Tries to Process Payment(refer the above given Image):
When a guest makes a booking, Stayflexi’s payment automation system attempts to charge the credit card provided by the guest during the booking process (either at the time of booking or during check-in depending on the channel and configuration).
Payment Failure:
If the guest’s credit card details are invalid or the payment is declined, the system automatically detects the failure.
Email Notification to Guest (refer the above given Image):
The system sends an automated email to the guest informing them that their payment could not be processed.
The email will contain a request for updated card information, urging the guest to provide new, valid payment details.
Benefit: This ensures that the guest is promptly informed and allowed to resolve the issue without delay.
Booking Converted to Enquiry (refer the above given Image):
If you have enabled the Convert Booking into an Enquiry When Payment Fails option, the booking will be converted into an enquiry status.
What does this mean?: An enquiry status means that the room is held in the system, but the booking is not confirmed until the payment is completed.
The room inventory will be reserved for a specific period (defined by expiry hours) to give the guest time to resolve their payment issue.
Example: If you have set the enquiry expiry to 24 hours, the guest has 24 hours to update their card information before the room is released for other bookings.
Expiry Hours for Enquiry Bookings(refer the above given Image):
You can configure the expiry hours for the enquiry under the Set Expiry for Enquiry Bookings section.
After the defined expiry time (e.g., 24 hours), if the guest does not provide updated payment information, the room will be automatically released back into inventory, making it available for other guests to book.
Benefit: This ensures that rooms aren’t blocked indefinitely by bookings with failed payments, allowing the property to maximize room availability.
Booking Remains Confirmed (refer the above given Image):
If the Convert Booking into Enquiry option is disabled, the booking will remain confirmed even if the payment fails.
The system will continue to hold the room for the guest, but the payment will still need to be resolved before check-in.
Benefit: This gives flexibility in managing bookings for important guests, and keeping their reservations confirmed while they work on resolving payment issues.
By the above options, if a guest’s payment fails due to an invalid credit card in Stayflexi, the system will:
Automatically send an email to the guest requesting updated card details.
Convert the booking into an enquiry (if configured), holding the room for a specific period.
Allow you to set an expiry time for enquiry bookings, releasing the room if no payment is made within the time frame.
Keep the booking confirmed (if you choose not to convert it to an enquiry), allowing the guest time to resolve the payment issue.
This automation ensures that failed payments are handled efficiently while protecting your property’s inventory from being blocked by unconfirmed bookings.
How is the guest’s card charged? Is it based on the cancellation policy set in Stayflexi?
Yes, the guest’s card is charged based on the cancellation policy that you have configured in Stayflexi. The system automates the payment process, taking into account the specific terms of your cancellation policy, which determines how and when the guest is charged. Below is a step-by-step explanation of how the guest’s card is charged and how the cancellation policy influences this process.
Set Up Cancellation Policy:
In Stayflexi, you can set up different cancellation policies (e.g., non-refundable, partially refundable) for your property through Property configuration.
Non-refundable policy: The entire booking amount will be charged upfront after the booking is confirmed.
Partially refundable policy: The system will process the payment based on the refundable time period you have set.
Example:
Non-refundable: Guests are charged immediately and cannot get a refund if they cancel.
Refundable up to 48 hours before check-in: Guests are charged after the refundable period expires (48 hours before check-in).
Guest Makes a Booking:
When the guest makes a booking through your property, Stayflexi’s system attempts to charge the guest’s card according to the payment automation settings and the specific cancellation policy applied to the booking.
Charging the Guest’s Card Based on Cancellation Policy
Depending on the cancellation policy configured:
For Non-Refundable Policies:
The system will automatically charge the full amount immediately after booking confirmation.
Since the booking is non-refundable, the guest won’t be able to cancel for a refund.
This helps ensure that you secure payment for the room regardless of any cancellation requests from the guest.
For Partially or Fully Refundable Policies:
If you have set a refundable window (e.g., cancel within 48 hours before check-in), the system does not charge the guest’s card immediately.
Instead, the card will be charged after the refundable window expires.
For example, if the guest cancels within the allowable window, they won’t be charged, but if they cancel after the window, the card will be charged as per the policy.
Example:
If the cancellation policy allows free cancellation up to 48 hours before check-in, the system will automatically charge the guest’s card 48 hours before the check-in time.
If the guest cancels before that time, no charge is made.
Handling Failed Charges:
In cases where the guest’s card is invalid or the payment fails, Stayflexi’s automated email system will notify the guest and request updated card information.
If the payment cannot be processed, the booking can be converted to an Enquiry booking (based on your configuration), and the room inventory will be held for a specific period until the issue is resolved.
After Cancellation Window Expires:
If the guest’s booking falls under a refundable policy and the cancellation window expires without cancellation, the system will automatically charge the guest’s card according to the policy.
If you enable Payment Automation, this entire process happens automatically without manual intervention.
Tracking Charges:
All charges (whether automated or manual) can be tracked and reviewed in Stayflexi’s dashboard, allowing property managers to monitor payments for each booking.
Does Stayflexi offer the option to charge a booking partially or in full?
Yes, Stayflexi allows properties to charge a booking either partially or in full, depending on how you configure the payment and cancellation policies. The system offers flexibility to property owners, enabling automated payment handling based on your preferences. Below is a step-by-step explanation of how you can configure partial or full charges for a booking in Stayflexi.
Log in to Your Stayflexi Dashboard:
Enter your username and password to log in.
Go to Payments
After logging in, click the “More Apps” icon (represented by four boxes or blocks) in the top right corner.
From the dropdown menu, select Payments
Click on the Payment Configuration option.
Navigate to Payment Automation Configuration:
In the Payment Configuration page, you should see the following options Enable Payment Automation, Apply Payment Automation to These Channels, and Enable Cancellation Policy.
Enable Payment Automation
Toggle the switch to Enable Payment Automation.
This ensures that the system will handle payments automatically without manual intervention.
Once enabled, the system will automatically charge guests based on the rules you define, whether partially or fully.
Choose the Payment Automation Channels:
In the Apply Payment Automation to These Channels section, you can select which online channels will apply these automation rules (e.g., Booking.com, Expedia).
If the channel supports partial payment, you can apply the settings to that channel, ensuring seamless payment processing for bookings coming from different platforms.
Configure Partial or Full Charges:
Full Charge Setup (For Non-Refundable Bookings)
If you want to charge the guest the full amount immediately:
Ensure that your Cancellation Policy is set to non-refundable (this usually indicates the booking is fully charged at the time of booking).
You can configure this under the Enable Cancellation Policy toggle. Turn it on, and set the full charge as the default for non-refundable bookings.
Once the booking is confirmed, the guest’s card will be charged for the entire amount, guaranteeing full payment upfront.
Partial Charge Setup (For Refundable Bookings):
If you want to charge only a portion of the booking amount upfront:
Set the Cancellation Policy to allow for refundable bookings.
In the Payment Settings, configure the system to charge a partial deposit. This could be a percentage of the total (e.g., 20% upfront).
Under the payment rules, set the remaining balance to be charged closer to the check-in date.
Set Triggers for Payments:
You can configure specific triggers for payments:
Full charge at the time of booking for non-refundable reservations.Partial charge (e.g., a deposit) when the booking is made, and set the system to collect the remaining amount before check-in or when the refundable window closes.
Monitor and Track Payments:
In the dashboard, you can track the status of payments, whether they were charged partially or in full.
If the guest’s card fails or if a partial payment is pending, Stayflexi will display this information, allowing you to follow up if necessary.
Handling Failed Payments:
If a payment fails (e.g., invalid card details), Stayflexi will automatically notify the guest and prompt them to update their card information.
Depending on your policy, the booking can be converted to an Enquiry, and the room will be held for a set number of hours until the guest resolves the payment issue.
Save Your Configuration:
After setting all payment policies (whether full or partial), make sure to save your settings.
The system will then automatically apply these rules to all future bookings that meet the criteria.
Overview of Property Configuration
In Stayflexi, Property Configuration is a module that enables hotel administrators to set up and manage various operational and customizable aspects of their property within the Stayflexi system.
To access and manage your Property Configuration settings:
Log in to Stayflexi Start by logging into your Stayflexi dashboard with your admin credentials.
Go to More Apps On the right-hand side (RHS) of your dashboard, click on “More Apps.”
Open Property Configuration From the list of available modules that appears, select “Property Configuration.” This will take you to the section where you can manage key setup elements such as rooms, rates, channels, taxes, fees, policies, meal plans, and more.
On the LHS, you will see several categories. Each category contains multiple configuration options — simply click the dropdown arrow to expand and view all available settings.
1. Property Setup
Under Property Setup, you can manage all essential configurations related to your property. This includes:
Property Details – Update general information such as name, address, contact details, and branding.
Rate Plans – Create or edit rate plans, meal plans, and associated pricing.
Folio Setup – Configure how charges, payments, and folios are structured.
Shift Setup – Manage shift timings for your staff or front desk operations.
Hotel Add-ons – Add or modify extra services such as breakfast, pickup/drop, amenities, etc.
Hourly Price Configuration – Set pricing for hourly stays (if applicable).
Flexible Slot Settings – Configure flexible check-in/check-out slots used for day-use or short stays.
Other Settings – Manage additional property-level preferences and operational rules.
POS Device Configuration – Set up your POS devices for billing and room posting.
2. Policies
Under the Policies category, you can configure all rules related to cancellations, modifications, and overall hotel guidelines. This includes:
Cancellation Policies Define how cancellations are handled, including charges, deadlines, and refund rules.
Amendment Policies Set rules for booking modifications such as date changes, room changes, or guest information updates.
Hotel Policies (Terms & Conditions) Add or update the general hotel rules, guest guidelines, check-in/check-out terms, smoking policies, pet policies, and other terms & conditions.
3. Tax and Fee Categories
In this section, you can configure all tax- and fee-related settings applicable to your property or group of properties:
Tax Categories Set up standard tax configurations, including GST, service tax, occupancy tax, or any government-mandated tax.
Group Tax Categories Create and manage tax templates that can be applied across multiple properties within your group.
Custom Tax Categories Add any additional or property-specific taxes that do not fall under standard categories.
Fee Categories Configure various fee types such as service fees, cleaning fees, resort fees, or any other predefined charges.
Group Fee Categories Create fee structures that can be applied at the group level for consistent configuration across all properties.
4. Notifications
Under the Notifications category, you can configure automated communication settings for both guests and hotel staff:
Guest Notifications Set up emails, SMS, or WhatsApp messages sent to guests — including booking confirmations, pre-arrival messages, check-in/out notifications, invoices, and more.
Hotelier Notifications Configure alerts and updates for your internal team, such as new bookings, cancellations, modifications, payment alerts, or housekeeping updates.
Guest Review Manage and customize automated review requests sent to guests after their stay, helping you collect valuable feedback and improve service quality.
5. Channel Manager
The Channel Manager section allows you to connect and manage all your online distribution channels seamlessly:
Channel Mapping Map your room types, rates, and inventory with OTAs (such as Booking.com, Expedia, Airbnb, Agoda, etc.) to ensure real-time sync across all platforms.
Rentals United If you use Rentals United as your distribution hub, you can configure and manage the integration here for automated channel updates.
Custom Booking Sources Create and manage additional booking sources such as corporate accounts, travel agents, direct offline bookings, or any custom-defined channel.
6. Booking Engine
The Booking Engine section allows you to customize and manage how your property or group appears and functions on your direct booking website.
Hotel Configuration Set up property-specific booking engine settings, including room visibility, images, amenities, policies, booking restrictions, promotions, and payment options.
Group Configuration Manage booking engine settings at the group level — allowing you to configure branding, group-wide policies, promotions, and centralized setup for all properties under the group.
7. Magic Link & Kiosk
This section allows you to configure your contactless check-in experience and streamline guest arrival processes.
Configuration Manage overall Magic Link and Kiosk settings, including check-in flow, required guest details, ID upload settings, payment requirements, and customized guest instructions.
Common Area Lock Codes Add or manage lock codes for shared spaces such as entrances, lounges, gyms, or co-living areas. These can be automatically shared with guests through the Magic Link.
Room-Wise Check-In Instructions Set specific instructions for each room — such as door lock codes, access guidelines, special directions, or any room-specific arrival notes. These appear in the guest’s Magic Link at check-in time.
8. Users & Access Controls
This section helps you manage who can access the system and what level of permissions they have.
Roles and Access Create and configure different user roles (e.g., Front Desk, Housekeeping, Manager). Define permissions for each role to control what they can view, edit, or manage within the system.
Users Add new users such as staff, managers, or admins. Assign roles, set login credentials, and manage their access settings.
Active Users View all currently active users in the system. Monitor login activity, track user sessions, and manage access when needed.
9. Booking Import
The Booking Import section allows you to seamlessly upload and sync past or existing reservations into Stayflexi.
How can I show actual check-in and check-out times on invoices?
Below is the step-by-step guide to show actual check-in and check-out times on invoices:
Log in to Your Stayflexi Dashboard:
Enter your username and password to log in.
Go to Property configuration:
After logging in, click the “More Apps” icon (represented by four boxes or blocks) in the top right corner.
From the dropdown menu, select Property Configuration.
On the left-hand side of the Property Configuration page, you will see various options.
Click on the Property setup dropdown icon :
A list of different options will be displayed in the dropdown, including:
Property details
Folio setup
Shift setup
Hotel addons
Hourly price config
Flexible slot
Other settings
Click on the Folio setup option
The Folio configuration page will be displayed.
Setting up actual check-in and check-out times on invoices:
In the Folio setup page, scroll to the below option:
Show Actual Check-in and Checkout:
Enable the toggle.
Once enabled, the system will automatically include the guest’s real check-in and check-out times on all generated invoices and folios.
By this, you can show the actual check-in and check-out times on the invoices.
How do I configure room dependency pricing?
Below is the step-by-step guide to configuring room dependency pricing in Property Configuration:
Logging into Your Stayflexi Dashboard
Enter your username and password to access your Stayflexi dashboard.
Accessing Property Configuration
After logging in, click on the More Apps icon (shown as four blocks) located in the top-right corner.
From the dropdown, select Property Configuration.
Navigating to Property Setup
On the left side of the Property Configuration page, you’ll see a menu with various options.
Click on the Property Setup dropdown to reveal additional options, including:
Property Details
Folio Setup
Shift Setup
Hotel Addons
Hourly Price Config
Flexible Slot
Other Settings
Select Property Details
Setting Up Room Dependency Pricing
On the Property Details page, locate the Manage Room Types section, where all room types are listed.
For each room type, click the three-dot menu to view options such as:
Edit Amenities
Edit Room
Select Edit Room to access the room’s details.
A section to edit room details will appear. Scroll down to the Derived Pricing – Room Category section:
Choose a Parent Room from the dropdown to set the base room for dependency pricing.
In the Dependency dropdown, select Yes to enable pricing dependence on the selected parent room.
In the Direction dropdown, specify whether to increase (+) or decrease (-) the price based on the parent room.
Enter a Value for the price adjustment.
Choose the Type of adjustment [percentage (%) or INR].
Click Save to apply your changes.
By this, you can configure the room dependency pricing.
Where can I configure all notifications sent to guests?
Below are the step-by-step guidelines to configure notifications sent to guests from Property Configuration:
Logging into Your Stayflexi Dashboard:
Enter your username and password to log in.
Go to Property Configuration:
Once logged in, click on the More Apps icon (represented by four blocks) in the top right corner.
From the dropdown menu, select Property Configuration.
Got to Notifications:
You’ll see various options on the left side of the Property Configuration page.
Click on the Notifications dropdown to reveal more options, including:
Guest notifications
Hotelier notifications.
Guest review
Click on the Guest notifications option.
Guest notifications:
In the Guest notifications page, you can control email and WhatsApp notifications sent to guests.
Email notifications:
It includes the following options and the Enable disable switch next to each option:
Notification when a booking is made
Notification when a booking check-in happens
Notification when a booking checkout happens
Notification when a booking cancellation happens
Notification when a booking modification happens
Notification when an online payment for a booking happens
Notification when a payment for a booking happens via a generated payment link
Notification when a Flex Collect payment fails
Notification when a Self Service check-in happens
Notification when a Self Service checkout happens
Notification when a Self Service early check-in/late checkout happens
Notification when a POS order is finished
Notification when a self-service POS order is created
Notification when an OTA booking is made
Direct Notification to Customers on check-in/Checkout for OTA Booking.
You can enable or disable any options by clicking ON an OFF switch next to each option.
WhatsApp notifications:
It includes the following options and the Enable disable switch next to each option:
Booking Confirmation
Self Checkin Notification
Early Checkin Notification
Late Checkout Notification.
You can enable or disable any options by clicking ON an OFF switch next to each option.
Save the configuration:
By clicking on the Save option, you can save the changes you have configured.
How to Create Users ?
To Create Users, follow the below mentioned steps:
Log in to your Stayflexi account using your credentials.
Click on the Four Grid (Apps) icon on the top right-hand side.
Select Property Configuration from the menu.
On the left-hand side panel, click on Access & Control.
From the dropdown options, select Users (second option).
On the Users page, click Add New User.
Enter the required details of the new user (name, email, contact information, etc.).
Assign the appropriate Roles & Access permissions.
Click Save to confirm.
Can I bulk upload bookings from another PMS into Stayflexi? What are the requirements?
Yes, You can bulk upload bookings from another PMS into Stayflexi by following the below-given steps:
Log into Your Stayflexi Dashboard:
Enter your username and password to sign in.
Navigate to Property Configuration:
Once logged in, click on the “More Apps” icon (four small blocks) in the top-right corner.
Select “Property Configuration” from the dropdown menu.
Go to Booking Imports:
In the left-hand menu, click on “Booking imports.”
This will take you to the page for uploading bookings in bulk.
Download and Fill Out the Template:
Click on the “Download template” button to get the file needed for bulk uploading.
Open the template and add all booking details in the format provided.
Upload Your Booking Data:
Once you’ve filled out the template, go back to the booking imports page.
Click on “Bulk import bookings” and follow the instructions that appear in the pop-up window.
Set the date format as needed, then click “Bulk upload booking.”
Finally, upload your completed file.
Your bookings will now be imported into Stayflexi!
This functionality allows you to seamlessly migrate your bookings to Stayflexi in manageable batches. Here is how it works: Import in Batches: You can upload reservations in batches of 500 bookings at a time. This allows for easier management and processing of large datasets. please be aware that uploading the same booking data twice will result in the bookings being marked as unassigned. This can cause confusion and issues.
What are custom booking sources, how can I create them, and how are they useful?
Custom booking sources allow property managers to define and track specific booking channels that aren’t part of the standard, integrated sources. For example, instead of only capturing bookings from well-known Online Travel Agencies (OTAs) or direct website bookings, custom booking sources let you track referrals from unique sources like local agencies, social media campaigns, corporate partnerships, or other specific sources.
Logging into Your Stayflexi Dashboard:
Enter your username and password to log in.
Go to Property Configuration:
Once logged in, click on the More Apps icon (represented by four blocks) in the top right corner.
From the dropdown menu, select Property Configuration.
Go to the Custom Booking sources:
Navigate to the “Channel Manager” section in the left-hand menu.
Select “Custom booking sources”.
Add a New Source:
On the Custom Booking Sources page, click on Add New Source. This will open a pop-up form for adding a new source.
Enter Source Details:
Segment: Select the category or segment that best represents your source, such as OTA if it’s an Online Travel Agency.
Sub-source: Select or type the name of the specific source within the chosen segment. This could be the name of a referral agency, a corporate client, or another unique channel.
Save the New Booking Source :
Click Save to add this source to your list of custom booking sources.
If you change your mind, you can click Cancel to exit without saving.
How Custom Booking Sources Are Useful:
Track and analyze revenue more accurately by understanding where your bookings are coming from. Once custom booking sources are created, you can select them when creating a reservation in Stayflexi PMS.
By following these steps, you can define and organize new booking sources that will make your revenue analysis more detailed and meaningful.
Uploading Room/Hotel Images: How can a property upload images of rooms and hotel facilities for the website?
Below are the step-by-step guidelines to upload images of rooms and hotel facilities for the website from Property Configuration:
Log in to Your Stayflexi Dashboard:
Enter your username and password to log in.
Go to Property configuration:
After logging in, click the “More Apps” icon (represented by four boxes or blocks) in the top right corner.
From the dropdown menu, select Property Configuration.
On the left-hand side of the Property Configuration page, you will see various options.
Click on the Property setup dropdown icon:
A list of different options will be displayed in the dropdown, including:
Property details
Folio setup
Shift setup
Hotel addons
Hourly price config
Flexible slot
Other settings
Click on the Property details option.
A page with all the details of the property and the details of room categories will be displayed.
Upload Hotel Images:
Once the Property Details page is displayed, you can see the Images at the beginning of the page.
Click the Edit icon on the first Image.
A pop-up will appear to upload the hotel image.
Select the Click or Drop here option.
Select the Images from your system and add them here or you can just drag and drop the Images.
Click on the Save option to save the Hotel Images.
You can also remove the Images by clicking on the cross option on the Image.
Upload Room Images:
On the Property Details page, find the Manage Room Types section, where all room types are listed.
On room type, click the edit icon on the left-hand side of the room type.
A pop-up will appear to upload Room-type images.
Select the Click or Drop here option.
Select the Images from your system and add them here or you can just drag and drop the Images.
Click on the Save option to save the Room Images.
You can also remove the Images by clicking on the cross option on the Image.
How to change the Room Type name ?
Steps to change the room name:
Log in to your Stayflexi dashboard.
Click on More Apps (represented by the four-block icon) and select Property Configuration.
Navigate to Property setup.
Scroll down to the Manage room type section.
On the required room type, click on the three dots (⋮) to view more options.
Click on Edit room.
In the first column, update the Room Name as required.
Click Save to apply the changes.
How do I update hotel details like website URL, address, description, logo, or phone number?
Below are the step-by-step guidelines to update hotel details like website URL, address, description, logo, or phone number from Property Configuration:
Log in to Your Stayflexi Dashboard:
Enter your username and password to log in.
Go to Property configuration:
After logging in, click the “More Apps” icon (represented by four boxes or blocks) in the top right corner.
From the dropdown menu, select Property Configuration.
On the left-hand side of the Property Configuration page, you will see various options.
Click on the Property setup dropdown icon :
A list of different options will be displayed in the dropdown, including:
Property details
Folio setup
Shift setup
Hotel addons
Hourly price config
Flexible slot
Other settings
Click on the Property details option.
A page with all the details of the property and the details of room categories will be displayed.
Update or Edit Hotel Details:
In the Property details page, click on the Edit details option just above the property name.
All the Hotel details are displayed in the Edit Hotel Details section.
In this section, you can edit or update the details of the property/hotel, including:
Property Name
Property Official Website (for updating website URL)
Address
Property Description
Logo
Phone number
Total room count
By clicking on any of the textboxes, you can edit or update the Property details and click on the Save button to save the changes made.
Setting Room Occupancy: How do I define maximum occupancy, including adults, children, and infants, along with age limits for rooms?
Below are the step-by-step guidelines for setting room occupancy:
Logging into Your Stayflexi Dashboard:
Enter your username and password to log in.
Go to Property Configuration:
Once logged in, click on the More Apps icon (represented by four blocks) in the top right corner.
From the dropdown menu, select Property Configuration.
Navigating Property Setup:
On the left side of the Property Configuration page, you’ll see various options.
Click on the Property Setup dropdown to reveal more options, including:
Property Details
Folio Setup
Shift Setup
Hotel Addons
Hourly Price Config
Flexible Slot
Other Settings
Click on the Property Setup option.
Setting up room occupancy:
On the Property Details page, find the Manage Room Types section, where all room types are listed.
On room type, click the three-dot menu on the room type to display the following options:
Edit Amenities
Edit Room
Select Edit Room to see room details.
A section to edit room details appears, where you can see various options:
To set room occupancy for maximum occupancy, including adults, children, and infants, along with age limits, do the following:
To set max room occupancy: Click on the Room max occupancy field.
For adults: Click on the Max adults field.
For children: Click on Max children(7-12 years) field
For infant: Click on the Max infant (0-6 years) field
For minimum and maximum child age: Click on the Min child age and Max child age field
For minimum and maximum infant age: Click on the Min child age and Max infant age field
After setting up everything, click on the Save button to save all the defined occupancy.
By following these steps you can define room occupancy.
What is folio configuration, and what can I do with it?
Folio Configuration is the settings area in your PMS where you control how guest folios, invoices, registration cards, and related financial documents are displayed, formatted, and generated. It lets you customize the layout, content, numbering, and rules used across all billing documents in your property.
Folio Configuration is organized into the following sections: 1. Display & Content 2. PDF & Print Settings 3. Registration Card 4. Other Settings 5. Custom Folio Sequencing
To access and manage your Property Configuration settings:
Log in to Stayflexi Start by logging into your Stayflexi dashboard with your admin credentials.
Go to More Apps On the right-hand side (RHS) of your dashboard, click on “More Apps.”
Open Property Configuration From the list of available modules that appears, select “Property Configuration.” This will take you to the section where you can manage key setup elements such as rooms, rates, channels, taxes, fees, policies, meal plans, and more.
Display Content Settings (Folio Configuration)
Below are all the options available under Display Content and what each one does:
Show Cancellation Policy in Folio (Toggle) Enable this to display the property’s cancellation policy on guest invoices and folios.
Show Signature (Toggle) Enables a section on the folio for guest or staff signatures, useful for check-in confirmations or billing approval.
Folio Log (Toggle) Shows a chronological log of folio activities such as added charges, edits, payments, and adjustments.
Folio Terms and Conditions (Toggle) Displays your property’s terms & conditions on the folio for guest acknowledgment.
Folio Display Phone Number (Field) Enter the phone number you want displayed on the folio (property contact number).
Folio Display Email (Field) Enter the email address that should appear on the folio for guest communication or support.
Booking Folio Header (Field) Customize the header text displayed on top of the folio (e.g., “Tax Invoice,” “Guest Folio,” “Billing Summary”).
Hide Stayflexi Booking ID (Toggle) Enable this if you don’t want the Stayflexi-generated booking ID to appear on the folio.
Hide Room Booking Charges on Registration Card for OTA Bookings (Toggle) Hides nightly room rates on the registration card when the reservation comes from OTAs like Booking.com, Agoda, etc.
Show Terms on Guest Emails (Toggle) When enabled, the system includes your terms and conditions in all automated guest emails.
Show Actual Check-in and Checkout (Toggle) Displays the guest’s actual check-in and check-out timestamps on generated invoices and folios.
PDF & Print Settings (Folio Configuration)
Below are the available options under PDF & Print Settings and what each one controls:
Choose the Logo Size Select the size of the property logo that appears on the folio/invoice PDF.
Choose the Invoice PDF Font Size Set the default font size for text on all invoice PDFs. (Helps ensure the document is easy to read and fits properly on a page.)
Choose the Margin Top Adjust the top margin of the invoice PDF. (Useful when printing on pre-formatted paper or aligning content under the logo.)
Invoice Date Rule Choose how the invoice date should be generated—such as booking date, check-out date, or actual invoice creation date. (Ensures consistency with your accounting or audit processes.)
Folio PDF Layout Select the layout/template for the folio PDF.
Registration Card Settings
Show Room Tariff on Registration Card (Toggle) Displays the nightly room rate on the registration card.
Enable to show the tariff to guests at check-in.
Disable if you prefer not to reveal pricing (especially for OTA bookings).
Registration Card Preference (Dropdown / Setting) Choose the preferred format or template for registration cards.
Show Registration Card Number (Toggle) Displays a unique registration card number on the document. (Helpful for record keeping, audits, or internal tracking.)
Show Cancellation Policy on Registration Card (Toggle) Includes the property’s cancellation policy directly on the registration card. (Ensures guests acknowledge policy terms during check-in.)
Show Terms & Conditions on Registration Card (Toggle) Adds your terms & conditions section to the registration card. (Useful for legal compliance and guest consent.)
Choose the Registration Card PDF Font Size (Field / Selector) Set the preferred font size for the PDF version of the registration card. (Helps improve readability or fit more content on a single page.)
Other Settings
Show HSN Code (Toggle) When enabled, the HSN/SAC code will be displayed on the invoice/folio for applicable taxable items.
High Balance Alert Configuration Set the threshold amount at which the system should trigger a high-balance alert for a reservation. (Helps front-office staff monitor outstanding balances and avoid checkout delays.)
Folio Footer Configuration Add or customize the footer text that appears at the bottom of all folios and invoices. (Commonly used for disclaimers, bank details, thank-you notes, or legal statements.)
Custom Folio Sequencing Configure how folio numbers are generated — set custom prefixes, formats, or numbering rules. (Useful for aligning invoice numbering with accounting standards or property-specific workflows.)
Custom Folio Sequencing
Booking Folio Prefix Enter a custom prefix that will appear before every folio number.
Booking Folio Sequence Start Set the starting number for the folio sequence. (Example: starting from 1, 1000, or any preferred number.)
Booking Folio Suffix Add a suffix that will appear at the end of each folio number. (Example: -A, -STAY, -NY.)
Generate Custom ID for Cancelled and No-Show Bookings (Toggle) Enable this to assign a separate custom folio ID format for bookings that are cancelled or marked as no-show.
After making any changes in the Folio Configuration section, click the Save button on the right-hand side to ensure all updates are applied and stored.
How do I set up property tax, custom tax, and fee categories?
Tax categories: A Tax category can be used to calculate and apply tax in a variety of places. For example, defining tax for a room type, tax for an item being added to an invoice or tax for products in a shop.
Custom tax categories: A Custom tax property is used to define and configure specific tax rules for their property.
Fee categories: A Fee category can be used to calculate and apply fees in a variety of places. For example, defining fee for a room type, fee for an item being added to an invoice, or fee for products in a shop.
Below are the step-by-step guidelines for amenities both at the property and room level from Property configuration:
Logging into Your Stayflexi Dashboard:
Enter your username and password to log in.
Go to Property Configuration:
Once logged in, click on the More Apps icon (represented by four blocks) in the top right corner.
From the dropdown menu, select Property Configuration.
Navigating Tax and fee categories:
On the left side of the Property Configuration page, you’ll see various options.
Click on the Tax and fee categories dropdown to reveal more options, including:
Tax categories
Group tax categories
Custom tax categories
Fee categories
Group fee categories
Create Tax category:
Click on the Tax Categoriesoption from the Tax and Fee Categories dropdown.
Click on the Add New Tax Category button at the top of the Tax Categories page.
Tax category section will appear:
Enter the Tax name and Tax percentage.
Click on the Save button to save the Tax category.
Create Custom tax category:
Click on the Custom Tax Categories option from the Tax and Fee Categoriesdropdown.
Click on the Add New Custom tax button at the top of the Custom tax Categories page
Create custom taxes based on various factors such as:
Tax Name: The name of the custom tax (e.g., service tax).
Tax Value: The percentage or fixed amount for the tax.
Room Type: The types of rooms or accommodations the tax applies to.
Per Person/Per Night: Option to apply the tax on a per-person or per-night basis.
OTA, Booking Engine, Walk-in: The ability to specify whether the tax applies to bookings from Online Travel Agencies (OTAs), the booking engine, or walk-in customers.
Click on the Save button to save the Custom tax category.
Create Fee category :
Click on the Fee Categories option from the Tax and Fee Categories dropdown.
Click on the Add New Fee Category button at the top of the Fee Categories page.
The fee category section will appear:
Enter:
Fee category name
Fee value
Value type dropdown which consists of:
ABSOLUTE
PERCENT
Fee type dropdown which consists of:
Per Booking
Per Room
Per Room Night
You can select the checkbox next to Apply for walk-ins section if required.
Click the Save button to save the Fee category.
Managing Property and Room Amenities: How do I control amenities at both the property and room level?
Below are the step-by-step guidelines to amenities both at the property and room level from Property Configuration:
Logging into Your Stayflexi Dashboard:
Enter your username and password to log in.
Go to Property Configuration:
Once logged in, click on the More Apps icon (represented by four blocks) in the top right corner.
From the dropdown menu, select Property Configuration.
Navigating Property Setup:
On the left side of the Property Configuration page, you’ll see various options.
Click on the Property Setup dropdown to reveal more options, including:
Property Details
Folio Setup
Shift Setup
Hotel Addons
Hourly Price Config
Flexible Slot
Other Settings
Viewing and Editing Property Details:
Select Property Details (the first option on the left).
A page will open showing all your property information, including room categories.
Managing Property Amenities:
On the Property Details page, look to the right side for the Amenities section.
Click the icon next to Amenities.
A list of all available property-level amenities will appear.
You can:
Add or remove amenities.
Mark amenities as free or paid by using the buttons next to each amenity.
Managing Room Amenities:
On the Property Details page, find the Manage Room Types section, where all room types are listed.
On room type, click the three-dot menu on the room type to display the following options:
Edit Amenities
Edit Room
Select Edit Amenities to see all room-level amenities.
You can:
Add or remove amenities.
Make amenities free or paid by clicking the buttons next to each one.
This guide helps you quickly and easily manage both property-level and room-level amenities.
What is a fee category, and how can I use it?
A fee category in Stayflexi is used to define and apply various fees for room types and items being added to invoices. It allows you to set up different types of fees, such as room type, that will be automatically applied during the booking process.
Below is the Step-by-step guide on the Fee category in Property configuration:
Logging into Your Stayflexi Dashboard:
Enter your username and password to log in.
Go to Property Configuration:
Once logged in, click on the More Apps icon (represented by four blocks) in the top right corner.
From the dropdown menu, select Property Configuration.
Access the Fee Category Page:
Click on the “Tax and Fee Categories” section.
Click on “Fee Categories” to add the fee categories.
Add a New Fee Category:
Click on the “Add New Fee Category” button.
A new form will pop up on the right side.
Provide a Fee Category Name:
In the “Fee category name?” field, enter a descriptive name for the fee. For example, you might call it a “Room Booking Fee” or “Entertainment Fee”.
This will appear in invoices automatically when creating a room reservation.
Set the Fee Value :
Under “Fee value?“, enter the amount for the fee.
Choose the Value Type from the dropdown:
Absolute: A fixed fee, like Rs.150 per booking.
Percentage: A percentage of the total amount, like 10% of the total amount.
Choose the Fee Type from the dropdown:
Per Booking: Applied for each booking.
Per Room: Applied for each room in a booking.
Per Room night: The fee will be applied for each room night. This means if a guest stays in one room for three nights, the fee will be applied three times (once per room night).
Save the Fee Category:
Once you’ve filled in all the necessary details, click the “Save” button.
The fee category will now be available and can be applied across the property for various services.
Creating Hotel Add-on Services: Where do I add extra services offered by my hotel?
Below are the step-by-step guidelines to create hotel add-ons from Property Configuration:
Logging into Your Stayflexi Dashboard:
Enter your username and password to log in.
Go to Property Configuration:
Once logged in, click on the More Apps icon (represented by four blocks) in the top right corner.
From the dropdown menu, select Property Configuration.
Navigating Property Setup:
On the left side of the Property Configuration page, you’ll see various options.
Click on the Property Setup dropdown to reveal more options, including:
Property Details
Folio Setup
Shift Setup
Hotel Addons
Hourly Price Config
Flexible Slot
Other Settings
Click on the Hotel Addons option.
Add Hotel Addons:
To create Hotel addons, click on the Add new hotel addon button on the top of the Hotel Addons page.
A section to fill in the required details to create a Hotel addon will appear.
Fill in the following to create the hotel addon:
Addon name
Addon description
Addon applicable at room types:
Click on the dropdown to select room types
You can select multiple rooms from the dropdown(For example: Suite, Deluxe rooms)
Tax category:
Select tax categories from the dropdown(.eg., Food tax or Alcohol tax, etc)
Addon value:
In the Addon value field, enter the price for the extra service your property offers.
For example, if airport pick-up costs Rs.150, enter 150.
Date Range: Select the date range you want to apply the addon to.
Do you want to apply per night?
Click the Yes or No switch.
Do you want to apply at the booking level?
Click the Yes or No switch.
Save to create the Addon:
Click on the Save button to create the Hotel Addon.
By following these steps you can easily create the hotel add-ons.
What is User and Access Control, and what is its purpose?
User and Access Control is a feature within the Stayflexi platform designed to manage the permissions and roles of users. The goal is to regulate what actions each user can perform and what parts of the system they can access based on their assigned roles.
Below is a step-by-step explanation of how this system works for end users:
Accessing User and Access Control:
Log into your Stayflexi account with your credentials.
Once logged in, click on the More Apps icon (represented by four blocks) in the top right corner.
From the dropdown menu, select Property Configuration.
Under Property configuration, the are various options.
Click on Users and Access Controls to reveal the following key sections:
Roles and Access
User
Active Users
Roles and Access: This section lets you manage roles, which define specific permissions for users in the system. Here’s how it works:
Viewing Roles:
When you click on Roles and Access, you will see a list of predefined roles with a description and the access permissions granted to that role.
Creating a New Role:
You can add a new role by clicking Add a new role for general users or Add a new mobile role for mobile-specific roles.
In the role creation window, you can define the role name, and description, and specify which features or areas of the system the role should have access to (e.g., housekeeping reports, room management, etc.).
Editing Roles:
Existing roles can be modified by clicking the edit icon (pencil) next to the role name.
You can adjust permissions or make changes to reflect new responsibilities for that role.
Users :
This section allows you to manage users who have access to the Stayflexi platform. You can view, add, and edit user access details.
Add new user:
Click on the Add new user button.
A page will be displayed.
This page lets you create a new user in a system and assign multiple roles based on their responsibilities. You can adjust the user’s access level or revoke access at any time.
Enter the email ID and password of the user you want to create.
Enable the toggle net to the role which you want to assign to the user.
Click on the Save button to create the User.
You can also edit the user role, reset the password, and force logout the user respectively.
Active Users:
This section shows users who are currently active and logged into the software in real time.
It includes:
Search Bar: You can search for specific users who are actively logged in by entering their email ID.
Active Users List: Currently, the list of active users is empty, suggesting that no users are currently logged in.
Log Out All Users: This button allows you to log out all active users at once. This might be useful during maintenance or to ensure security by enforcing re-logins.
Purpose of User and Access Control:
Security: Limits access to sensitive information based on user roles, ensuring that only authorized personnel can view or modify critical data.
Operational Efficiency: By providing tailored access to different areas of the platform, employees can quickly and efficiently perform tasks relevant to their jobs.
Accountability: Role-based permissions help track which users are responsible for certain actions, providing a clear audit trail in case of errors or issues.
What are different type of policies I can configure in Stayflexi
In Stayflexi, you can configure various types of hotel policies, which include:
Cancellation Policies: Rules for handling booking cancellations and associated refunds.
Amendment Policies: Guidelines for making changes or amendments to existing bookings.
Hotel Policies (Terms and Conditions): General hotel rules like check-in/out times, usage of facilities, guest behavior, etc.
Below is the step-by-step guide to configure policies:
Logging into Your Stayflexi Dashboard:
Enter your username and password to log in.
Go to Property Configuration:
After logging in, click the “More Apps” icon in the top right corner (represented by four boxes or blocks).
From the dropdown menu, select Property Configuration.
On the left-hand side of the Property Configuration page, you’ll see various options.
Got to Policies:
Click on the Policies option.
Under Policies, you will see options like Cancellation Policies, Amendment Policies, and Hotel Policies (Terms and Conditions).
Cancellation policies:
Under the Cancellation policy, click on the Add new policy button.
You can create a cancellation/refund policy in this by filling in the below details:
Policy name: Give a name for the policy.
Policy description: Describe the policy.
Note: If the Add policy rule is created and the above checkbox beside the description section is not selected then this rule will reflect everywhere i.e. Booking Engine, Email, Room folio.
Enable toggle to apply the rule for all channels(optional).
Save the policy by clicking on the Save button.
You can also edit or disable the policies.
Amendment policies:
Select Amendment policies.
Here, you can create or edit amendment policies that govern how amendments to bookings will be charged.
Add a New Policy
Click on the Add New Policy button to create a new amendment policy.
Days Range
In this section, you set the days before the check-in date when amendments will not be allowed. You define the following:
Amendment not permitted within X and Y days prior to arrival date.
Enter the number of days (e.g., “10 and 5”) to specify the range within which amendments to bookings are not allowed.
Amendment Charges
You can set different charges for amendments, depending on how many times the booking is amended:
For first amendment: Specify the percentage (e.g., “0%”) of the booking amount that will be charged for the first amendment.
For the second amendment: Set a charge for the second amendment by entering a percentage (e.g., “5%”) of the booking amount.
For subsequent amendments: Set a percentage (e.g., “10%”) for any amendments beyond the second one.
Note: Modification can be allowed for the dates-This means users may modify the booking dates, and charges will be applied according to the set amendment policy.
Saving the Policy:
Once you’ve filled in all the necessary details (days range and amendment charges), click the Save button to save the policy.
This allows users to control how booking changes will be handled, including when they can be made and the cost for each amendment.
Hotel policies(terms and conditions):
Click on the Hotel policies(terms and conditions) option.
On this page, you can provide hotel rules like usage of facilities, guest behavior, etc.
Click on the Add new T&C button.
Here you can add the Hotel policy or Terms and conditions.
Click on the Save option.
Setting Minimum Room Price: How can I set a minimum price for a room category to avoid lower price updates?
Yes. You can set a minimum price for a room category by using Stayflexi’s Property configuration settings.
Below are the step-by-step guidelines for setting up minimum room price:
Logging into Your Stayflexi Dashboard:
Enter your username and password to log in.
Go to Property Configuration:
Once logged in, click on the More Apps icon (represented by four blocks) in the top right corner.
From the dropdown menu, select Property Configuration.
Navigating Property Setup:
On the left side of the Property Configuration page, you’ll see various options.
Click on the Property Setup dropdown to reveal more options, including:
Property Details
Folio Setup
Shift Setup
Hotel Addons
Hourly Price Config
Flexible Slot
Other Settings
Click on the Property Details option.
Setting up room occupancy:
On the Property Details page, find the Manage Room Types section, where all room types are listed.
On room type, click the three-dot menu on the room type to display the following options:
Edit Amenities
Edit Room
Select Edit Room to see room details.
A section to edit room details appears, where you can see various options.
To set minimum room price:
Click on the Minimum Room Price field.
After setting up the minimum room price, click on the Save button to save the minimum room price.
By following these steps you can set the Minimum room price.
How can I send automatic emails to guests after checkout to collect reviews?
Below are the steps to send automatic emails to guests after checkout to collect the reviews:
Logging into Your Stayflexi Dashboard:
Enter your username and password to log in.
Go to Property Configuration:
Once logged in, click on the More Apps icon (represented by four blocks) in the top right corner.
From the dropdown menu, select Property Configuration.
Got to Notification
On the left side of the Property Configuration page, you’ll see various options.
Click on the Notifications dropdown to reveal more options, including:
Guest notifications
Hotelier notifications.
Guest review
Click on the Guest review option.
This is where you can control review request emails.
Enable Guest Review Feedback:
On the “Guest Review” page, you will see an option for “Guest Review Feedback.”
Toggle the switch next to this option to enable it. Once enabled, the system will send an automated email to guests after they check out.
Set the Mode to Automatic :
There are two modes:
AUTOMATIC
MANUAL
Ensure that the Mode is set to “AUTOMATIC”. This ensures that the email will be sent automatically without any manual intervention after the guest checks out.
Enter Your Google Review/Feedback URL :
In the input field labeled “Paste your Google review/docs URL”, paste the URL for your property’s Google Review page.
You can obtain this URL by navigating to your property’s listing on Google, copying the review link, and pasting it into this field.
Alternatively, you can use a Google Docs form if you’d like to gather reviews through a custom form instead of Google Reviews.
Save and Confirm:
Once you’ve pasted the URL and enabled the review feedback toggle, ensure all changes are saved by clicking on the Update option.
The system will now send an email with the provided review link to guests after their checkout.
What are hotelier notifications, and how do they help?
Hotelier notifications are communication features of Stayflexi that allow hotel operators to receive important updates and reports related to their property. These notifications can be sent via email or messaging platforms like WhatsApp to keep the hotelier informed about key operations, such as daily reports, property updates, rate alerts, and more.
Below is a Step-by-Step Guide for End Users:
Logging into Your Stayflexi Dashboard:
Enter your username and password to log in.
Go to Property Configuration:
Once logged in, click on the More Apps icon (represented by four blocks) in the top right corner.
From the dropdown menu, select Property Configuration.
Go to the Notifications:
Navigate to the “Notifications” section in the left-hand menu.
Select “Hotelier notifications” to configure notifications sent to the hotel.
Configure Email Notifications:
Night Audit Report:
In the “Emails” section, locate the “Night audit report” field.
Enter one or more email addresses (separated by commas) to receive daily night audit reports. These reports provide a summary of property performance and operations for the day.
Make sure not to include any spaces before or after the commas when entering multiple email addresses.
Set Up WhatsApp Notifications:
WhatsApp Daily Report:
In the “Whatsapp” section, you can enable WhatsApp notifications to receive daily reports about the property.
Toggle the switch to activate WhatsApp notifications for reports and alerts.
Property Report via WhatsApp:
Enter your WhatsApp number(s) in the “Configure your WhatsApp numbers to receive the property report” field. Multiple numbers can be entered, separated by commas.
Rate Shopper Price Alerts via WhatsApp:
In the second WhatsApp configuration field, enter the numbers to receive price alerts for competitive properties or rate changes. This ensures that hoteliers can react quickly to market shifts.
After entering the required information, click “Save” to apply the changes.
Saving Changes:
Once you’ve set up your email and WhatsApp notifications, make sure to click the “Save” button at the bottom of the page. This will save your configuration and activate the notifications according to the inputted details.
Benefits for Hoteliers:
Timely Updates: Receive critical reports such as the night audit summary and property performance via email and WhatsApp.
Quick Response: Stay updated with rate shopper price alerts to react quickly to market conditions.
Customization: Control where and how notifications are sent by entering multiple recipients and contact numbers, ensuring key personnel are informed.
This guide will help you ensure that notifications are properly set up so you can stay on top of essential hotel operations.
What is shift setup, and how is it beneficial for my property?
Below is the step-by-step guide for Shift setup:
Logging into Your Stayflexi Dashboard:
Enter your username and password to log in.
Go to Property Configuration:
Once logged in, click on the More Apps icon (represented by four blocks) in the top right corner.
From the dropdown menu, select Property Configuration.
Go to Shift setup:
From the Property configuration, click on the Property setup option from the dropdown and navigate to Shift Setup.
Click on Shift Setup to open the shift setup page.
Add a New Shift:
At the top of the shift setup page, you’ll see a button labeled Add New Shift.
Click this button to create a new shift for your staff.
Enter Shift Name:
In the Shift Name? field, enter a name for the shift (e.g., Morning Shift, Evening Shift, etc.). This helps identify the shift later.
Set Start Time:
Under the Start Time? section set the shift’s start time.
Use the dropdown menus to select the start hour and start minute. For example, selecting 00 for both will set the shift to start at midnight.
Set End Time :
Similarly, under the End Time? section set the time when the shift ends.
Choose the end hour and end minute. For instance, selecting 23 for hours and 59 for minutes will set the shift to end at 11:59 PM.
Set Shift Status :
In the Status? dropdown, choose whether the shift is ENABLED or DISABLED.
If the shift is enabled, it will be active and available in the system.
Assign Staff Members :
In the Staff Names? field, enter the email addresses of staff members assigned to this shift.
You can list multiple staff members in the dropdown and can add multiple staff by clicking on the staff email ID.
Save the Shift Configuration :
After filling out the required fields (shift name, times, status, staff names), ensure all details are correct.
Click the Save to finalize and save the shift configuration.
Benefits of Shift setup for properties:
The Shift setup feature helps property managers easily manage staff shifts by defining working hours and assigning staff to those shifts. Staff outside his shift hour won’t be able to login into stayflexi PMS and access any information from PMS.
It ensures a clear schedule for operational efficiency and data privacy.
Single Slot vs. 3 Slots: What are single slot and 3 slots, and which option should I select for my property?
In the Stayflexi system, “Single Slot” and “3 Slots” refer to the way time blocks are allocated for bookings. The main difference lies in the flexibility and duration of the booking periods available.
Logging into Your Stayflexi Dashboard:
Enter your username and password to log in.
Go to Property Configuration:
Once logged in, click on the More Apps icon (represented by four blocks) in the top right corner.
From the dropdown menu, select Property Configuration.
Navigating Property Setup:
On the left side of the Property Configuration page, you’ll see various options.
Click on the Property Setup dropdown to reveal more options, including:
Property Details
Folio Setup
Shift Setup
Hotel Addons
Hourly Price Config
Flexible Slot
Other Settings
Click on the Flexible Slot option.
Go to the Edit slot mode option where you can set the slots to either Single slot or the Three slots.
Single Slot:
Definition: A “Single Slot” refers to fix check-in and check-out time a property can be booked. For example, if you select a single slot for a property, it might represent a booking window such as 12 PM check-in time to 11 AM check-out time (24 hours), which guests can book as one uninterrupted time block.
Usage: This option is commonly used for properties that want to offer straightforward, full-day, or fixed-period bookings without breaking the day into smaller chunks.
Best For:
Properties that offer standard check-in and check-out times (e.g., hotels, hostels).
Three Slots:
Definition: The “Three Slots” option divides the day into three distinct time slots, allowing the property to be booked multiple times throughout the day. For example, the day may be split into:
Morning slot: 8 AM to 4 PM
Evening slot: 4 PM to 12 AM
Night slot: 12 AM to 8 AM
Usage: This gives the property more flexibility to accommodate multiple guests during different parts of the day. It allows for more frequent bookings by splitting the availability into smaller blocks.
Best For:
Properties that offer short-stay or day-use options (e.g., hourly hotels, lounges, co-working spaces).
Maximizing revenue by booking the same property multiple times in a day.
Which Option to Select?
Single Slot: Choose this if your property typically handles longer stays or if you prefer simpler management with one guest per day.
Three Slots: Choose this if you want to maximize occupancy and revenue by accommodating multiple bookings per day. This is great for day use, hourly stays, or situations where flexibility is key.
Consider how often your property is booked and the type of guests you cater to when making the decision.
How can I set hourly rates for my property?
Below is the step-by-step guide to set hourly rates from Property configuration:
Logging into Your Stayflexi Dashboard:
Enter your username and password to log in.
Go to Property Configuration:
Once logged in, click on the More Apps icon (represented by four blocks) in the top right corner.
From the dropdown menu, select Property Configuration.
Navigate to Property setup:
On the left side of the Property Configuration page, you’ll see various options.
Click on the Property Setup dropdown to reveal more options, including:
Property Details
Folio Setup
Shift Setup
Hotel Addons
Hourly Price Config
Flexible Slot
Other Settings
Click on the Hourly Price Config option.
Configure Hourly Booking
Click on the Configure option on the right side of the page.
A new window will appear titled Configure hourly booking.
Enter the Date range during which the hourly rates will apply by selecting the start and end dates using the calendar picker.
In the example, the date range is from 17 Oct 2024 to 24 Oct 2024.
Set Room Types and Rate Plans.
Choose the Room types from the dropdown (you can select multiple Room types from the dropdown). This will apply hourly rates to the specific rooms.
Select a Rate plan from the dropdown (you can select multiple Rate plans from the dropdown). This will apply hourly rates to that specific rate plan.
Define Your Hourly Pricing.
In the Set your price section, specify the hourly Price.
Enter the rate value (for example, 30$) in the price input field.
Select whether this price is a Percent or a Flat value from the dropdown.
Define how long this rate is applicable by selecting the number of hours.
For example, this could be for “6 hours”.
Advanced Settings (Optional)
If you need advanced settings for managing multiple rates or different room types, click on the Click here button next to “If you need advanced settings for all your rates.”
This will open additional configurations, allowing you to fine-tune the pricing.
Save Your Settings
After setting up your hourly pricing, click on the Save button at the bottom.
The hourly rates will now be applied based on the configuration you’ve set.
Following these steps will ensure that your property’s hourly rates are properly configured and visible to customers booking for specific hours.
Overview of Night Audit
The Night Audit is a key daily process in property management that ensures all transactions are accurately recorded and the property is ready for the next day. In Stayflexi, this process is streamlined to help properties efficiently manage their financials and operations at the end of each day.
Purpose of the Night Audit:
Check Financial Records:
Verifies all payments, room charges, and services used during the day.
Update Guest Accounts:
Makes sure that all charges and payments for each guest are correct.
Prepare for the Next Day:
Adjusts room availability and other details to ensure smooth operations.
Key Tasks in Stayflexi:
Review Transactions:
Automatically reviews all daily transactions, like room bookings and service charges.
Guest Account Review:
Ensures all guest folios are accurate, showing the correct room rates, services used, and payments received.
Report Generation:
Generates key reports such as revenue summaries, occupancy rates, and transaction summaries for the day.
How the Process Works:
End-of-Day Closure:
The night audit begins when the front desk is closed, ensuring all daily activities are finalized in the system.
System Updates:
Stayflexi’s system automatically updates financial records and generates daily reports or you can manually do Night Audit.
Final Adjustments:
Any errors or discrepancies found are corrected to ensure accurate records.
Importance of the Night Audit:
Financial Accuracy:
The audit helps ensure financial records are correct, which is important for budgeting and forecasting.
Operational Readiness:
By updating room inventory and reconciling accounts, the audit prepares the property for the next day, ensuring a smooth operation.
Performance Insights:
The audit provides valuable reports that offer insights into trends, helping management make strategic decisions.
Can I access Night Audit reports of previous days using Stayflexi?
YES, you can access night audit reports of previous days in Stayflexi.
Below is the explanation of how to access night audit reports from previous days using Stayflexi:
Go to the Night Audit Section:
From the Stayflexi dashboard, select the Night Audit option.
Access the Date Range Selector :
On the Night Audit page, find the Data Range field at the top of the page. Click on this field to open a calendar view.
Select the Desired Date:
In the Calendar, navigate to the date range you’re interested in.
Select a Single date for a specific past day’s report, or choose a date range if you want to see reports over multiple days.
View the Night Audit Data:
Once you’ve selected the date, the system will automatically display the night audit data for that period.
By following these steps, you can efficiently retrieve and review night audit reports from any previous date.
Can Stayflexi automate the Night Audit for my property?
YES, Stayflexi can automate the Night Audit process for your property, making it easier to manage daily operations without manual intervention. Here how it works:
To automate the Night Audit for your property in Stayflexi, follow the below-mentioned steps:
Login to Stayflexi: Start by logging into your Stayflexi dashboard using your credentials.
Access More Apps: From the dashboard, click on the 4-dots square icon labeled “More Apps”, located on the right side of the screen.
Locate Night Audit: From the listed apps, locate and click on the “Night Audit” option.
Open Night Audit Page: A new page will open that displays the night audit settings.
Find Configuration Options: On the right side of the screen, you’ll see two options:
Night Audit History
Night Audit Configuration – “Click on it”.
Open Configuration Page: The configuration page will appear, where you can manage night audit settings.
Select Auto Mode: Look for the third setting from the top labeled “What mode you prefer”. Click the small arrow next to it to open the dropdown options.
Choose Auto: From the dropdown, select the “Auto” option.
Save Settings: Once you’ve selected “Auto”, the system will now automatically run the night audit.
With the above steps, you’ve successfully configured Stayflexi to automatically perform the night audit each day without manual intervention.
How does Stayflexi handle the Night Audit process?
To know how Stayflexi handle the Night Audit process, go through the below mentioned steps to understand better:
Login to Stayflexi: Start by logging into your Stayflexi dashboard using your credentials.
Access More Apps: From the dashboard, click on the 4-dots square icon labeled “More Apps”, located on the right side of the screen.
Locate Night Audit: From the listed apps, locate and click on the “Night Audit” option.
Open Night Audit Page: A new page will open that displays the night audit settings.
Find Configuration Options: On the right side of the screen, you’ll see two options:
Night Audit History
Night Audit Configuration – “Click on it”.
Open Configuration Page: The configuration page will appear, where you can manage night audit settings.
Understanding the Night Audit Process: On this page, you can review how the night audit works and the options available to ensure it runs smoothly . Before proceeding, you need to configure the settings properly.
Enable Night Audit: Start by enabling the night audit feature. Click on the toggle to activate it, as indicated in the visual guide.
Select Audit Mode: Choose your preferred mode for running the night audit- either Auto or Manual. This option determines whether the system will automatically conduct the audit or if you’ll initiate it manually.
Set the Audit Time: Specify the time you want the night audit to run. Click on the tiny arrow next to the time setting to view default time slots. Select any time that fits your property’s schedule, We advise you to select a time when property operation end for the given day ideally it can be 12 to 1 am at night.
Manage Cancellations, No Shows, and Pending Departures: Each of these sections has specific principles that guide how they are handled during the night audit.
Cancellations: You will see options to enable or disable toggles for cancellations. Read the descriptions below each option to understand their implications and choose accordingly.
No Shows: Similarly, manage no show settings by enabling or disabling the appropriate toggles based on your policy.
Pending Departures: Adjust the settings for pending departures in the same manner, ensuring you align with your operational procedures.
Set Up Notifications: Finally, in the notifications section, enter multiple email addresses to receive the night audit report. This ensures that relevant staff members stay informed about the audit outcomes.
By configuring these settings, you allow Stayflexi to handle the night audit process smoothly and efficiently.
What happens if a reservation or payment is missing during the Night Audit?
If a reservation or payment is missing during the night audit in Stayflexi, the system will identify the issue, prompting the property staff to take corrective actions. Here’s what happens:
Missing Data Alert: The system will flag any discrepancies, such as missing reservations or payments. This alert will show up in the night audit report, making it clear where the issue lies.
Manual Investigation: The property staff will need to investigate the missing reservation or payment. This may involve checking guest folios, payment records, or third-party OTA integrations to identify why the data is missing.
Corrective Actions: Once the issue is identified, the staff can take corrective measures, such as entering the missing reservation or processing the payment manually. If the payment is delayed from an OTA, they may need to wait for the funds to be transferred or confirmed.
Reconciliation: After resolving the issue, the night audit can be re-run to ensure that all financial and reservation data is accurately reconciled for the day.
In the Night Audit history of Stayflexi, if you see a “Pending” status, it means the audit process has not been completed successfully. By clicking on the “Pending” status, a page will appear, covering half of your screen. This page will list the specific reasons why the audit was unsuccessful, providing you with details to address the issues and successfully complete the audit.
What reports does Stayflexi generate during the Night Audit?
During the Night Audit in Stayflexi, various reports are generated based on your property’s configuration. These typically include:
Audit Reports
Room Revenue Reports
Payments Reports
Front Desk Reports
Daily Intelligence Reports, etc.
You can receive all the reports as a single attachment or access them individually, depending on how they are configured.
In the Audit email, you’ll mainly see:
Today’s Performance, including total payments
Monthly Performance, summarizing total payments for the month.
The picture beside is a reference to help you understand the report that is sent to your email. This is how the main context would look, followed by the attachments mentioned below.
Click on the “View Report”, as highlighted in the picture, to access all the reports in a single view.
The above picture shows the result of clicking on the “View Report” button in the email. If you click on it, you will be redirected to the Stayflexi platform, where you can view all the reports in a single snapshot.
The mail will include an attachment containing all the individual reports for detailed reference, just as shown in the picture below.
Overview of Stock Management
Stayflexi’s Stock Management system helps properties track and manage their inventory, orders, and suppliers. It offers tools to monitor stock levels in real time, create purchase orders, and receive alerts for low stock. This system helps reduce waste, improve efficiency, and keep operations running smoothly, particularly in the hospitality industry.
Stock management consists of the following option:
Dashboard:
The Dashboard consists of the following options:
Consumption Report: Shows real-time data on the usage of raw materials.
Current Stock Report: Provides an overview of stock levels for each item.
Purchase Order Report: Lists pending and recent purchase orders.
Wastage Report: Displays wastage data to help control costs and minimize losses.
Notifications Column: Centralized alerts for stock status.
Reports:
The Reports consist of the following reports:
Warehouse Cumulative Report: Provides an overall summary of warehouse stock and activities.
Purchase Order Received Report: Displays details of purchase orders received by the warehouse.
Closing Stock for Warehouse Report: Shows the closing stock levels for the warehouse at the end of a specified period.
Warehouse Consumption Report: Tracks the consumption of stock in the warehouse.
Food Costing Report: Analyzes the cost breakdown of food-related inventory.
Purchase:
This page displays your orders from a specific supplier, along with order dates and payment status.
You can track orders using a request number and view items yet to be received. Once received, orders are removed.
Consumption:
Closing stock:
The Closing Stock feature in Stayflexi enables properties to track and record end-of-day inventory levels for raw materials, ensuring accurate stock management across various categories and outlets. Users can select a date, outlet type, and raw material category, then input specific quantities and units for each item in stock.
Raw material wastage:
The Raw Material Wastage option in stock management is a feature that helps businesses track and manage the loss or spoilage of raw materials. In any inventory system, wastage can occur due to various reasons such as spoilage, expiration, handling errors, or production processes.
Overall, this feature aids in minimizing waste, optimizing stock levels, and ultimately lowering operational costs by providing clear insights into how raw materials are used and where losses occur.
Configuration:
The Configuration includes:
Vendors: Stores information about suppliers, making it easier to order materials from trusted vendors.
Raw materials – Centralised: This centralised warehouse serves as the central hub for all raw materials, from which they are distributed to the appropriate outlets.
Item recipes: By creating recipes with precise ingredient quantities, businesses can streamline operations, minimise wastage, and enhance overall efficiency.
Outlet configuration: To ensure easy configuration with a specific shop and effective tracking of raw material data, it is recommended that the outlet be named the same as the shop.
How do I configure an outlet in stock management and map it with a restaurant? Why is mapping stock management outlets important with restaurant outlets?
Below is the step-by-step guide to configure an outlet in stock management and map with a restaurant:
Log in to Your Stayflexi Dashboard:
Enter your username and password to log in.
Go to Stock management:
After logging in, click the “More Apps” icon (represented by four boxes or blocks) in the top right corner.
From the drop down menu, select Stock management
Go to Configuration:
Click on the three horizontal lines in the top right corner of the Stock management
Click on the Configuration drop down
Go to Outlet configuration:
In the Configuration dropdown, you can see the following options:
Vendors
Raw materials – Centralized
Item recipes
Outlet configuration
Click on the Outlet Configuration option
Add the Outlet:
On the Outlet configuration page, click on the Add outlet configuration button
A page to add the outlet configuration appears.
Type the name of the shop outlet you want to add in the Shop outlet name field[Note: It is recommended to use the same name for the outlet as that of the shop
Click on the Type drop down, which includes the following options
SINGLE
MULTIPLE
Select the particular type of outlet either Single or multiple.
Enter the closing stock time from the Closing stock time drop down
Now click on the Confirm button to add the Outlet configuration
Map the outlet with the restaurant/shop:
To map the outlet you created with the restaurant/shops of your property, click on the Item recipes option from the Configuration dropdown
The recipe management page appears.
Click on the Add new recipe button
All the shops or restaurants in your property will be displayed from the Shop name drop down
You can select the shop you want to map with the outlet you created in the Stock management configuration.
Click on the Outlet dropdown where all the outlets you added from the outlet configuration in the stock management will be displayed (as shown in Image 9).
You can select whichever outlet you want to map with the shop or restaurant.
Select the raw material and then click on the Confirm button to add the recipe and also to successfully map the restaurant or shop to the outlet in the Stock management
Mapping stock management outlets with restaurant outlets ensures smooth operations by accurately tracking inventory, reducing waste, and making sure the right stock is available at the right place. It helps manage resources efficiently, keeps recipes consistent, and provides clear reports for better decision-making. This process simplifies multi-outlet management and ensures everything runs seamlessly.
What kinds of reports are available in stock management?
The following reports are available in Stock Management:
Warehouse Cumulative Report
Purchase Order Received Report
Closing Stock for Warehouse Report
Warehouse Consumption Report
Food Costing Report
Follow the below-given steps to understand the reports that are available in Stayflexi’s stock management:
Log in to Stayflexi:
Access your Stayflexi account using your credentials.
Go to Stock management:
After logging in, click the “More Apps” icon (represented by four boxes or blocks) in the top right corner.
From the dropdown menu, select Stock Management (as shown in Image 1).
Navigate to the Reports Section
On the left-hand side menu, click on the Reports tab under Stock Management.
View Available Reports
Once you are in the Reports section, you will see a list of report cards. Each card represents a different type of report.
Understand Each Report’s Purpose
The available reports are:
Warehouse Cumulative Report: Provides an overall summary of warehouse stock and activities.
Purchase Order Received Report: Displays details of purchase orders received by the warehouse.
Closing Stock for Warehouse Report: Shows the closing stock levels for the warehouse at the end of a specified period.
Warehouse Consumption Report: Tracks the consumption of stock in the warehouse.
Food Costing Report: Analyzes the cost breakdown of food-related inventory.
Access a Report
Click the View button on the corresponding report card to open and view the detailed data for that report.
How do I place a purchase order to a vendor and receive it in Stayflexi once the vendor delivers it?
Below is the step-by-step guide to placing a purchase order with a vendor and receiving it in Stayflexi’s Stock management once the vendor delivers it:
Log in to Your Stayflexi Dashboard:
Enter your username and password to log in.
Go to Stock management:
After logging in, click the “More Apps” icon (represented by four boxes or blocks) in the top right corner.
From the dropdown menu, select Stock management
Go to Configurationto add the vendor details:
Click on the three horizontal lines in the top right corner of the Stock management
First, you need to configure the vendor details by clicking on the Add new vendor button in the Vendors option under Configuration to purchase an order with a vendor
Purchase an order from the Vendor:
Click on the Purchase option in the left-sidebar on the Stock Management page
Click the Add Purchase Order button on the right of the Purchase Order list page
Add items for purchase from your chosen vendor, then confirm your selection by following the below-given
Supplier Dropdown:
Purpose: Select the vendor or supplier from whom the materials are being purchased.
Action: Click the dropdown arrow, then choose the supplier’s name.
Delivery Charge Included in Invoice (FLAT):
Purpose: Enter the fixed delivery charge amount that will be included in the invoice.
Action: Input the flat amount (e.g., “0” if no delivery charges apply).
Payment Type:
Purpose: Select whether the order will be paid immediately (“PAID”) or later (“UNPAID”).
Action: Click the dropdown arrow and choose the appropriate option.
Item Details Section:
Raw Material Name
Purpose: Choose the raw material or item to be ordered.
Action: Use the dropdown to select an item.
Quantity
Purpose: Specify the number of units of the selected item.
Action: Input the desired quantity (e.g., “0” if no items are currently being ordered).
Unit
Purpose: The unit of measurement for the item (e.g., kilograms, liters, or pieces). This may be pre-defined.
Price Per Unit
Purpose: Enter the cost per unit of the item.
Action: Input the price (e.g., “0” for no cost yet).
Tax Percentage
Purpose: Enter the applicable tax percentage for the item.
Action: Input the percentage (e.g., “0”).
Tax Amount
Purpose: This field auto-calculates the tax amount based on the tax percentage and unit price.
Action: No manual input is required here.
Total
Purpose: Displays the total cost of the item, including quantity, unit price, and taxes.
Action: Automatically calculated.
Description
Purpose: Optionally provide additional notes or details about the item.
Action: Input a short description, if needed.
Add Purchase Order
Purpose: Add another item to the order if you are purchasing multiple goods.
Action: Click this button to open a new row for adding a new item.
Cancel
Purpose: Discard the current purchase order and return to the previous screen.
Action: Click the Cancel link.
Confirm
Purpose: Finalize the purchase order.
Action: Click the Confirm button to save and submit the purchase order.
This page displays your orders from a specific supplier, order dates and payment status. You can track orders using a request number and view items that have not been received. Once received, orders are removed.
To obtain raw materials, visit Configuration Raw Material Centralized and select Receive Raw Material Vendor.
Receive the Purchase order (as shown in Images 7 and 8):
Click on the Configuration dropdown and click on the Raw Material – Centralized option.
In the Centralized Raw Material List page, click on the Receive Raw Material – Vendor button on the right side of the page.
To receive the raw materials from the vendor, do the following:
Select Supplier:
Click on the dropdown under Supplier and choose the vendor.
Choose Date:
Confirm the delivery date range. This may already be pre-filled.
Select Raw Material:
Click on the dropdown under Raw Material and pick the item.
Check Unit:
Verify the unit.
Enter Quantity:
Type the quantity received.
Confirm or Cancel:
Click Confirm to save the details or Cancel to discard and exit.
By following the above steps you can purchase an order from the vendor and receive it in Stayflexi’s Stock management.
Can I track daily wastage due to any reason? How do I do that in Stayflexi?
Yes, you can track daily wastage in Stayflexi.
Below is the step-by-step guide to track the daily wastage:
Steps to Track Daily Wastage in Stayflexi:
Log in to Stayflexi:
Access your Stayflexi account using your credentials.
Go to Stock management:
After logging in, click the “More Apps” icon (represented by four boxes or blocks) in the top right corner.
From the dropdown menu, select Stock Management
Navigate to the ‘Raw Material Wastage’ Section
From the left-hand menu, go to Consumption.
Under the Consumption menu, click on Raw Material Wastage.
View the Wastage List:
The Wastage List screen will appear, as shown in the screenshot. Here, you can view details like:
Wastage Date
Raw Material Category
Raw Material
Quantity
Unit
Average Purchase Price
Total
Description
Filter by Date or Outlet Type:
Use the Date field to select the specific day you want to track.
Use the Outlet Type dropdown to filter by a specific outlet if applicable.
Add Wastage details:
Click the Add Wastage button on the top-right corner of the screen
Fill the following details
Select Outlet Type:
In the dropdown field labeled “Raw Material Wastage For”, select the outlet type where the wastage occurred (e.g., Centralised Outlet).
Enter Raw Material Details:
Use the fields to provide details about the wastage:
Raw Material Name: Choose the raw material from the dropdown.
Raw Material Category: Select the category of the raw material (e.g., Food, Beverages, etc.).
Quantity: Specify the amount of raw material wasted.
Raw Material Unit: Choose the unit of measurement (e.g., Kg, L, etc.).
Note: The In-hand stock is shown below the quantity field, helping you track available stock.
Add Cost Details:
Average Purchase Price: Enter the average cost of purchasing the raw material.
Total Amount: This field might auto-calculate based on quantity and purchase price. Otherwise, input the total cost manually.
Provide a Description:
In the Description field, specify the reason for the wastage (e.g., expired stock, spillage, or over-preparation). This helps in tracking patterns and minimizing future losses.
Add Additional Wastage (Optional):
If you have multiple items to report, click the Add Wastage button and fill in the details for the next item.
Save the Wastage Record:
Once all details are added, click Confirm to save the wastage record.
What is recipe management, and why is it important?
What is Recipe Management?
Recipe management is the process of defining, organising, and maintaining recipes for food or beverage preparation in a structured manner. It ensures the efficient use of raw materials, reduces wastage, and improves overall cost and operational management. This functionality is essential for properties to maintain consistency in product quality and optimise resources.
Why is Recipe Management Important?
Accuracy in Resource Planning: By specifying the required raw materials and quantities for each recipe, businesses can plan inventory effectively.
Minimized Wastage: Accurate recipes prevent over- or under-utilization of raw materials.
Cost Efficiency: Standardized recipes help in determining precise costs for preparation, enabling proper pricing and profitability.
Consistency: Recipes ensure that products are prepared with the same quality and taste across outlets or branches.
Improved Reporting and Tracking: Linking recipes to raw material usage provides insights into consumption trends and helps identify areas for improvement.
Step-by-Step Guide for Using Recipe Management:
Log in to Your Stayflexi Dashboard:
Enter your username and password to log in.
Go to Stock management:
After logging in, click the “More Apps” icon (represented by four boxes or blocks) in the top right corner.
From the dropdown menu, select Stock management
Go to Configuration:
Click on the three horizontal lines in the top right corner of the Stock management.
Click on the Configuration dropdown
Go to Item recipes:
In the Configuration dropdown, you can see the following options:
Vendors
Raw materials – Centralized
Item recipes
Outlet configuration
Click on the Item Recipes option to open the recipe management page
Add a New Recipe:
Click the “Add New Recipe” button to create a new recipe
All the shops or restaurants in your property will be displayed from the Shop name dropdown
You can select the shop you want to map with the outlet you created in the Stock management configuration.
Click on the Outlet dropdown where all the outlets you added from the outlet configuration in the stock management will be displayed
You can select whichever outlet you want to map with the shop or restaurant.
Select the raw material and then click on the Confirm button to add the recipe and also to successfully map the restaurant or shop to the outlet in the Stock management
Edit or Delete Recipes
The newly created recipe will appear in the list under the Recipe Management dashboard.
Click on the edit option to edit that particular recipe’s details, such as updating raw materials or quantities.
If you want to delete that particular recipe, you can click on the delete option beside the edit option to delete the recipe.
By following the above-given steps, you can understand the recipe management in Stayflexi’s Stock management.
Does Stayflexi provide a dashboard in stock management to view all important data?
Yes, Stayflexi provides a dashboard in the stock management module to view and monitor all important data. The dashboard displays various reports such as consumption, current stock, wastage, and purchase orders, giving a clear overview of inventory performance and usage.
Step-by-Step guide for Stock management Dashboard:
Log in to Your Stayflexi Dashboard:
Enter your username and password to log in.
Go to Stock management:
After logging in, click the “More Apps” icon (represented by four boxes or blocks) in the top right corner.
From the dropdown menu, select Stock Management
Navigate to the Dashboard
Consumption Report:
Located at the top of the dashboard, this section shows the consumption data of raw materials categorized by time periods: Today, Yesterday, Last 7 Days, and Last 30 Days.
Example: The consumption for items like Onion, Tomato, Rice, and Chicken is displayed in kilograms (KG).
Current Stock Report:
This section displays the current quantity of stock for each item available in the inventory.
Data includes Item Name, Category, Unit, and Quantity.
Example: The stock shows 81 KG of Onion, 1 KG of Tomato, 1000 KG of Rice, and 1000 KG of Chicken.
Wastage Report:
This report highlights wastage data over various time periods (e.g., Today, Yesterday, Last 7 Days, Last 30 Days).
The user can filter by Raw Material Wise or other available categories.
Purchase Order Report
Located on the right side, it lists purchase orders with a date range filter.
Displays information like Request Number, Total Amount, and Date.
Notifications Section
Provides notifications or important messages for low stock levels etc related to the selected date range.
Understanding folio layout in Stayflexi
At the top-left (LHS) of the folio page, you will see:
Booking ID – the unique identifier for the reservation
Guest status – indicates whether the booking is Confirmed or Checked-in
Booking segment and sub-segment – helps identify the booking type and source
Next to these details, you will find:
Refresh icon – refreshes folio data after any changes are made
Currency conversion icon – allows you to view folio amounts in a different currency
On the top-right (RHS) of the same line:
Configuration (settings) icon – used to configure folio-related settings and layout
Directly below the Booking ID, you will see a summary box that contains:
Booking ID
Stay details (check-in & check-out date/time and number of nights)
Room name and rate plan
Room number(s) assigned
Booking made date and time
Access code(s) (if applicable)
Within the same booking summary box, you can perform the following actions:
Check-in / Check-out the guest
Print Folio for billing or records
Print Registration Card for guest documentation
On the right-hand side (RHS) of this box, you’ll also find:
More Actions – for additional booking-level operations
Notes – to add internal notes related to the booking
Below the booking information box, there is a Guest Details section that displays:
Primary guest name
Number of guests
Breakdown of adults, children, and infants
In the Guest Details section:
Click the “+ Add Guests” option on the right-hand side to add additional guests to the booking.
Below the Guest Details section, you will find the Folio Summary box.
This section provides:
A summarized view of all charges applied to the booking
A quick overview of the total amount for the stay
It helps front-desk staff quickly understand the guest’s billing at a glance.
Next to the Folio Summary box, you will see the Payment Breakdown section.
This section displays:
Payments already received
Outstanding balance
A clear split of amounts paid vs. pending
This makes it easy to track financial status without scrolling through line items.
On the right-hand side (RHS) of the folio page, you will find the Settle Dues column.
Using this section, you can:
Settle outstanding balances
Choose the mode of payment (cash, card, UPI, etc., based on configuration)
Complete payment directly from the folio page
This allows quick and seamless payment settlement during check-out or mid-stay.
At the end of the folio page, Stayflexi provides four folio view options:
Summary Folio – a high-level view of charges and totals
Detailed Folio – includes detailed breakdowns of charges
Itemized Folio – displays individual line items
Payments – shows all payment-related transactions
You can click on any of these options to switch views instantly.
On the right-hand side of the folio view section, you’ll find the Room / Custom Folio selector.
This option allows you to:
Switch between room-level folios
View or manage custom folios created for the booking
This is especially useful for:
Multi-room bookings
Split billing scenarios
Customized guest invoices
Difference between Summary, Detailed, and itemized folio versions
Stayflexi provides three distinct folio types – Summary, Detailed, and Itemized to enhance the management of guest accounts. Each folio type is designed to meet specific needs, allowing property staff to navigate billing with ease.
Login to Stayflexi: Log into your Stayflexi dashboard using your credentials.
Navigate to the Reservations Tab: From the front page of the Stayflexi dashboard, locate the top navigation menu. The second icon is the Reservation Calendar. Click on the icon to see all your reservations.
Select the Reservation: Choose the reservation for which you want to see the folio by clicking on it
View Reservation Details: A pop-up window will appear on the right side of the screen, showing the reservation details.
Find the Folio Option: Scroll down to the section with multiple actions. Look for the option labeled View Folio and click on it.
Stayflexi offers three types of folios, each designed for different operational and guest communication needs. You can switch between these from the bottom of the Folio page.
Summary Folio
The Summary Folio shows a consolidated view of the guest’s total charges, without displaying individual transaction lines. It highlights only the key figures such as total room charges, additional charges, taxes, payments, and balance due.
This folio format is best suited for quick reviews and guest-facing billing.
Hoteliers typically use the Summary Folio in the following situations:
During check-out, when the guest wants to quickly know the final payable amount
While sharing or printing a simple bill for guests who do not need detailed charge breakdowns
At the front desk during peak hours, to save time and close billing faster
For corporate or short stays, where only the total amount matters
Detailed Folio
The Detailed Folio shows a clear breakdown of charges by category, such as room charges, add-ons, and taxes, without going into every individual transaction.
Hoteliers typically use the Detailed Folio in these situations:
When a guest asks for a clear explanation of charges but not line-by-line details
For corporate, long-stay, or GST-related bookings where charge clarity is required
While handling billing queries or disputes, to explain how the total amount is formed
For internal audits or management review of booking charges
The Detailed Folio balances clarity and simplicity by explaining charges without overwhelming detail.
Itemized Folio
The Itemized Folio displays a line-by-line record of every transaction posted to the booking, including dates, descriptions, taxes, and totals.
Hoteliers typically use the Itemized Folio in these situations:
When guests request a complete transaction-level bill
For accounting, reconciliation, or financial audits
To review or verify manual postings, adjustments, or add-on charges
While resolving detailed billing disputes or discrepancies
The Itemized Folio offers maximum transparency and is best suited for detailed financial review.
How to print folio to pdf
To print folio to pdf, follow the below-mentioned steps :
Log in to Stayflexi using your dashboard credentials.
From the top navigation menu, click on the Reservation Calendar (second icon) to view all reservations.
Select the required reservation from the calendar. The reservation details panel opens on the right-hand side.
Click on View Folio to open the folio page.
On the folio page, review the booking details shown in the first section and click on Print Folio.
The Print Invoice panel opens on the right-hand side:
Use the dropdown to select the required folio type (Summary, Detailed, or Itemized).
Choose whether to Bill to Guest or Bill to Company.
Click on Generate & Print.
You will be redirected to the print preview page. From the Destination dropdown, select Save as PDF.
Click Save to download the folio as a PDF file.
Done — the folio is now saved and ready to share or store.
How do I mark a booking as a no-show, and can I do this for all OTAs?
To mark a booking as a no-show, follow the below-mentioned steps:
Login to Stayflexi: Log into your Stayflexi dashboard using your credentials.
Navigate to the Reservations Tab: From the front page of the Stayflexi dashboard, locate the top navigation menu. The second icon is the Reservation Calendar. Click on the icon to see all your reservations.
Select the Reservation: Choose the reservation for which you wish to mark as a no-show.
View Reservation Details: A pop-up window will appear on the right side of the screen, showing the reservation details.
Locate and Click on ‘Modify’ on the RHS.
click on “Set to no show” from the displayed list of actions.
You will be redirected to a Set to No-Show page. Here, select the cancellation policy appropriate for your property.
Click on the Set button after selecting the policy to finalize the no-shows status.
Once these steps are completed, the booking will be marked as a no-show in Stayflexi.
Can I do this for all OTAs?
Stayflexi marks “No Show” only for Booking.com bookings because of a direct integration through the Booking.com API. This integration is crucial since Booking.com charges a commission based on completed bookings. If a “No Show” is not properly marked, Booking.com will still apply a commission charge, even if the guest didn’t actually check in.
All Booking.com bookings with Stayflexi are set up as “pay at hotel,” meaning guests pay directly upon arrival. By marking “No Show” in Stayflexi, the system can automatically update the status on Booking.com’s side, preventing unnecessary commission charges for guests who didn’t show up.
For other OTAs, Stayflexi doesn’t support a “No Show” update.
How to capture guest signature with my payment terminal
To Delete a card from a booking in Stayflexi, follow the below steps:
1) Go to folio
2) Click on 3 dots just beside the booking ID
3) Click on Capture guest signature
4) This will light up the payment terminal and the guest can signature. This signature will be digitally recorded into the folio
How to add GST number to folio
To add GST number to folio in Stayflexi, follow the below-mentioned steps:
Login to Stayflexi: Log into your Stayflexi dashboard using your credentials.
Navigate to the Reservations Tab: From the front page of the Stayflexi dashboard, locate the top navigation menu. The second icon is the Reservation Calendar. Click on the icon to see all your reservations.
Select the Reservation: Choose the reservation you want to add GST number to folio.
View Reservation Details: A pop-up window will appear on the right side of the screen.
Click on the “View Folio” option from the reservation calendar.
On the folio page, find the invoice related to the booking.
Click on the tiny drop-down arrow next to the invoice to expand it.
A list containing guest details will appear.
Add or Edit GST Number
Locate the GST Number field and click on it.
Enter a new GST number or edit the existing one.
Save Changes
Click Update to save the changes successfully.
The GST number will now be updated for the booking.
Can I change the payment mode after settlement?
Follow these steps to update the payment mode for a reservation after settlement.
Log in to your Stayflexi account.
Open the reservation for which you want to change the payment mode.
From the reservation details panel (on the right-hand side), click “View Folio.”
Scroll down to the bottom of the folio page.
Under Folio View Mode, select “Payments.”
In the Payments section, locate the payment entry you want to modify.
On the extreme right-hand side of that payment row, click “Actions.”
Choose the option to Change Payment Mode.
Select the desired payment method from the available options.
Click Confirm to save the changes. The payment mode will now be updated successfully.
Where can we get the invoice with per night breakup?
To get the invoice with per night breakup in Stayflexi, follow the below-mentioned steps:
Login to Stayflexi: Log into your Stayflexi dashboard using your credentials.
Navigate to the Reservations Tab: From the front page of the Stayflexi dashboard, locate the top navigation menu. The second icon is the Reservation Calendar. Click on the icon to see all your reservations.
Select the Reservation: Choose the reservation you want to see the view folio history or log.
View Reservation Details: A pop-up window will appear on the right side of the screen.
Click on the “View Folio” option from the reservation calendar.
By default, the folio opens in Summary Folio Mode, displaying the entire invoice summary.
Select Folio Type:
By default, the Summary Folio is selected. You’ll find options to choose from three types of folios:
Summary Folio
Detailed Folio
Itemized Folio
View Detailed Folio:
Click on Detailed Folio to switch views.
The invoice will now display a per-night breakdown, showing charges and details for each night of the reservation.
This view allows you to analyze the charges more granularly, helping with detailed billing.
I am unable to charge or authorize the guest credit card or the virtual card provided by the OTA. What can or should I do next?
If and when the card charge or authorization fails, you will see a clear error message on the same popup and the folio log. This happens because your payment gateway has declined the charge. You can use the displayed information to follow up with your payment gateway provider
How to edit booking source in the folio
To edit booking source in the folio in Stayflexi, follow the below steps:
Login to Stayflexi: Log into your Stayflexi dashboard using your credentials.
Navigate to the Reservations Tab: From the front page of the Stayflexi dashboard, locate the top navigation menu. The second icon is the Reservation Calendar. Click on the icon to see all your reservations.
Select the Reservation: Choose the reservation you want to edit booking source in the folio.
View Reservation Details: A pop-up window will appear on the right side of the screen.
Click on the “View Folio” option from the reservation calendar.
Open More Actions:
From the folio page, click onMore Actions.
Change Booking Source
Select Change Booking Source from the drop-down menu.
A side panel will appear on the right with two options.
Select New Source and Segment
Use the drop-down menu to click on the tiny arrows next to the options.
Choose the new Source and Segment.
Click Save Changes to finalize the changes.
Your booking source has now been updated.
How to settle dues in folio?
Login to Stayflexi: Log into your Stayflexi dashboard using your credentials.
Navigate to the Reservations Tab: From the front page of the Stayflexi dashboard, locate the top navigation menu. The second icon is the Reservation Calendar. Click on the icon to see all your reservations.
Select the Reservation: Choose the reservation for which you want to see the folio by clicking on it
View Reservation Details: A pop-up window will appear on the right side of the screen, showing the Reservation details.
Find the Folio Option: In the reservation section, Look for the option labeled View Folio and click on it.
How to Settle Dues in the Folio?
Open the required Folio from the reservation.
On the right-hand side (RHS) of the folio page, locate the Payment Breakdown section.
Click on Settle Dues.
A list of available payment modes will be displayed.
Select the preferred mode of payment.
Confirm the action to settle the outstanding dues.
How to modify check in or check out date and time for a given booking.
Click on More Actions in the folio page.
Under Booking Actions, select Check-in.
Note: If the reservation is already checked in, you will see the Check-out option instead.
Click on Check-in / Check-out.
The Modify Check-in / Check-out panel will open on the right-hand side.
Select the Room, New Check-in/out Date, and Check-in Slot.
The pricing will be automatically updated based on the selected dates.
Review the updated details and click Save Changes.
Your booking has now been successfully modified.
How to edit folio amount?
Below are the step-by-step guidelines on how to edit the Folio Amount in Stayflexi:
Login to Stayflexi: Log into your Stayflexi dashboard using your credentials.
Navigate to the Reservations Tab: From the front page of the Stayflexi dashboard, locate the top navigation menu. The second icon is the Reservation Calendar. Click on the icon to see all your reservations.
Select the Reservation: Choose the reservation you want to edit the amount in the folio.
View Reservation Details: A pop-up window will appear on the right side of the screen, showing the reservation details.
Find the Folio Option: Look for the option labeled View Folio and click on it.
How to Edit the Folio Amount in Stayflexi:
Click the Folio button to access the billing information.
Check Subtotal and Total:
The Subtotal displays the charges before taxes are applied.
The Total shows the charges with taxes included.
Modify Prices:
Identify the charge you want to change.
Click on the price, to modify the price.
Instant Update:
Any changes you make will automatically reflect in the folio.
The updated price will adjust both the subtotal and total accordingly.
Finalize and Save: After editing, review the changes and click Save to apply the updates to the folio.
How can we modify the Booking price after the reservation is created?
In Stayflexi, you can modify the booking price after the reservation is confirmed. It ensures that you can easily update the price after confirmation.
Through the Reservation Calendar:
Login to Stayflexi: Log into your Stayflexi dashboard using your credentials.
Navigate to the Reservations Tab: From the front page of the Stayflexi dashboard, locate the top navigation menu. The second icon is the Reservation Calendar. Click on the icon to see all your reservations.
Select the Reservation: Choose the reservation for which you want to modify the booking price.
View Reservation Details: A pop-up window will appear on the right side of the screen.
Locate the Modify option on the right-hand side, click on it to view a list of actions.
Locate and click on “Edit Reservation”.
On the next page, modify the desired price in the appropriate field.
Click on the “Edit Reservation” button below to complete the action.
A confirmation message will appear on the screen.
How to edit the rate plan on the folio
To Edit a Rate Plan in Stayflexi, Follow the below-mentioned steps:
Login to Stayflexi: Log into your Stayflexi dashboard using your credentials.
Navigate to the Reservations Tab: From the front page of the Stayflexi dashboard, locate the top navigation menu. The second icon is the Reservation Calendar. Click on the icon to see all your reservations.
Select the Reservation: Choose the reservation you want to edit the rate plan on the folio.
View Reservation Details: A pop-up window will appear on the right side of the screen.
Click on the “View Folio” option from the reservation calendar.
From the opened page, click on “More Actions”.
From the opened More Actions menu, go to the Administrative category.
Click on Edit Rate Plan.
This opens the Edit Rate Plan panel on the right-hand side.
From the Rate Plan dropdown, select the rate plan you want to change.
Below this, you will see the Amount field.
Note: Once a rate plan is selected, the system automatically generates and updates the corresponding price in the amount field.
Review the updated amount.
Click Save Changes to apply the updated rate plan.
How to provide discounts on a Flat / Percentage basis for the existing reservations?
To Provide discounts on a flat or percentage basis for existing reservations in Stayflexi:
Login to Stayflexi: Log into your Stayflexi dashboard using your credentials.
Navigate to the Reservations Tab: From the front page of the Stayflexi dashboard, locate the top navigation menu. The second icon is the Reservation Calendar. Click on the icon to see all your reservations.
Select the Reservation: Choose the reservation for which you want to modify the booking price.
View Reservation Details: A pop-up window will appear on the right side of the screen.
Click on the “View Folio” option from the reservation calendar.
In the“View Folio” page, click on “More Actions”.
From the More Folio Actions menu, scroll to the Financial category.
Click on Apply Promo / Discount.
This opens the discount panel on the right-hand side.
In the Action Type dropdown, choose Apply Manual Discount.
Other available options include Apply Coupon Code and Apply Offer.
Under Type, select either:
Flat (fixed amount), or Percent (percentage-based discount).
Enter the discount amount.
Click Validate to preview the applied discount amount in INR.
Once verified, click Apply to Folio at the bottom to add the discount to the folio.
How to release a booking from Hold Bookings in Stayflexi?
If a booking is placed on hold, releasing it and assigning it to a room is simple. Here’s how you can do it from the reservation calendar:
Below are the step-by-step guidelines on how to release a booking from Hold Bookings:
Access the Reservation Calendar: Log in to the dashboard and navigate to the Reservation Calendar.
Locate Unassigned and On-Hold Bookings: On the right-hand side of the screen, click on the UA [unassigned] section. This will display any Unassigned bookings, On-Hold bookings, and inquiries.
Select On-Hold Bookings: From the list, click on the On-Hold Bookings section to view details of guests with bookings on hold.
Assign the Booking: Select the booking you want to release from hold, then click on Assign.
Fill in Room Details: A pop-up window will appear where you can fill in the room details you’d like to assign. Complete all required fields and click Assign.
Confirm the Assignment: The guest’s name will now reflect on the reservation calendar grid in the selected room.
You will receive confirmation that the booking has been successfully released from hold and assigned to a room.
Where can we modify the Rate plan after the reservation is confirmed?
To Modify the Rate Plan after a reservation is confirmed in Stayflexi, follow the below mentioned steps:
Login to Stayflexi: Log into your Stayflexi dashboard using your credentials.
Navigate to the Reservations Tab: From the front page of the Stayflexi dashboard, locate the top navigation menu. The second icon is the Reservation Calendar. Click on the icon to see all your reservations.
Select the Reservation: Choose the reservation for which you want to modify the booking price.
View Reservation Details: A pop-up window will appear on the right side of the screen.
Click on the “View Folio” option from the reservation calendar.
In the “View Folio” page, click on “More Folio Actions”.
From the listed options, locate and click on “Edit Rate Plan”.
A page will open on the right-hand side of the screen.
In the Rate Plan column, click the tiny arrow to view all available rate plans for your property.
Choose the desired rate plan and edit it.
Click the “Confirm” button to complete the action.
You will receive a confirmation message.
How to unassign a booking from a room number from the reservation calendar or room folio ?
In Stayflexi, you can unassign a booking from a room number using two methods. Below is the explanation of two methods:
Through the Reservation Calendar:
Go to the Reservation Calendar: Navigate to the reservation calendar in Stayflexi.
Select the Reservation Calendar: Click on the reservation you want to unassign from a room.
Access Room Options: In the opened window on the right-hand side, you will see multiple options.
Unassign the Room: Locate and click on “Unassign Room”.
Confirm the Action: A confirmation page will appear to the right.
Complete the Action: Click “Yes, Unassign” to finalize the process
Through Folio:
Login to Stayflexi: Log into your Stayflexi dashboard using your credentials.
Navigate to the Reservations Tab: From the front page of the Stayflexi dashboard, locate the top navigation menu. The second icon is the Reservation Calendar. Click on the icon to see all your reservations.
Select the Reservation: Choose the reservation you want to Unassign from a room.
View Reservation Details: A pop-up window will appear on the right side of the screen.
Click on the “View Folio” option from the reservation calendar.
From the opened page, click on “More Folio Actions”.
Locate and click on Unassign room
A pop-up will appear on the Right Hand Side as a confirmation.
Complete the action by clicking Unassign Room below.
How to release a booking inventory by putting booking on hold from folio or reservation calendar
In Stayflexi, you can put a booking on hold using two methods: through the reservation calendar or the folio.
Below is a step-by-step explanation of both methods:
Through Reservation Calendar:
Step 1: Navigate to the Reservation Calendar.
Step 2: Click on the Reservation you want to put on hold.
Step 3: A page will open on the right-hand side.
Step 4: From the opened page, click on Modify and select “Hold Booking”.
Step 5: A confirmation page will open
Step 6: Click “Yes, hold booking.”
You will receive a confirmation message that the action has been successfully completed.
Through Folio:
Step 1: Click on the Reservation you want to put on hold.
Step 2: A page will open on the right-hand side.
Step 3: Locate and click on “View Folio” from the listed actions.
Step 4: On the folio page, click on “More Folio Actions”.
Step 5: Locate Hold Booking from the multiple listed actions.
Step 6: Click on “Hold Booking” to proceed further.
Step 7: A confirmation page will open on the right side of the screen.
Step 8: Click “Confirm” to complete the action.
You will receive a confirmation message that the booking has been successfully placed on hold.
Can I delete a particular reservation from system
YES, you can delete a particular reservation in Stayflexi by following the below steps:
Login to Stayflexi: Log into your Stayflexi dashboard using your credentials.
Navigate to the Reservations Tab: From the front page of the Stayflexi dashboard, locate the top navigation menu. The second icon is the Reservation Calendar. Click on the icon to see all your reservations.
Select the Reservation: Choose the reservation for which you want to see the folio by clicking on it
View Reservation Details: A pop-up window will appear on the right side of the screen.
Find the Folio Option: Scroll down to the section with multiple actions. Look for the option labeled View Folio and click on it.
Click on More Folio Actions.
The options are categorized — under the Administrative category, select Delete Folio.
Click Delete Folio to proceed.
Once deleted:
The reservation will be removed from the Reservation Calendar.
It will no longer appear in active booking views.
Note: Deleted reservations are not permanently erased. You can find the reservation and its details in the Folio Report under the Archived state. The booking can be reverted at any time if required — only if the user has been granted the necessary permission under Roles and Access.
How to move a booking to a different room number or room category
In Stayflexi, You can move a booking to a different room number or room category using two methods:
Below is the explanation of moving a booking to a different room or room category through the reservation calendar:
Login to Stayflexi: Log into your Stayflexi dashboard using your credentials.
Navigate to the Reservations Tab: From the front page of the Stayflexi dashboard, locate the top navigation menu. The second icon is the Reservation Calendar. Click on the icon to see all your reservations.
Select the Reservation: Choose the confirmed reservation you want to move a booking to a different room number or category.
Click on Move Room: From the list of available actions, locate and click the Move Room button next to the reservation.
Open the Move Reservation Page: A page will open to the Right Hand Side.
Select Room and Category: Choose the new room number and room category based on the guest’s requirement.
Automatic Amount Update: The amount will automatically update in the relevant columns based on the new room.
Add a Remark: In the remarks column, provide the reason for moving the booking to another room.
Complete the Action: Click on “Move Reservation” at the bottom to finalize the move.
Through View Folio:
Login to Stayflexi: Log into your Stayflexi dashboard using your credentials.
Navigate to the Reservations Tab: From the front page of the Stayflexi dashboard, locate the top navigation menu. The second icon is the Reservation Calendar. Click on the icon to see all your reservations.
Select the Reservation: Choose the confirmed reservation you want to move a booking to a different room number or category.
View Reservation Details: A pop-up window will appear on the right side of the screen, showing the booking and customer information.
Find the Folio Option: Scroll down to the section with multiple actions. Look for the option labeled View Folio and click on it.
Click on More Folio Actions: On the folio page, click the More Folio Actions button to view additional options.
Locate and click on Move Room: From the listed options, click on move room.
Open the Move Reservation Page: A page will open to the RHS.
Select Room and Category: Choose the new room number and room category based on the guest’s requirement.
Automatic Amount Update: The amount will automatically update in the relevant columns based on the new room.
Add a Remark: In the remarks column, provide the reason for moving the booking to another room.
Complete the Action: Click on “Upgrade room” at the bottom to finalize the move.
How to split a group booking ?
A split booking in Stayflexi allows you to break down a group reservation into individual bookings by separating a group room booking into individual rooms. This feature is especially useful when a group booking for multiple rooms needs to be split into separate reservations for each room. It offers flexibility by allowing each room to have its own folio, billing, and details after the split, while still retaining the original booking information. Once the booking is split, the group reservation ID will change to individual reservation IDs, and the room prices will be adjusted accordingly.
To Split a group booking in Stayflexi, follow the below steps:
Login to Stayflexi: Log into your Stayflexi dashboard using your credentials.
Navigate to the Reservations Tab: From the front page of the Stayflexi dashboard, locate the top navigation menu. The second icon is the Reservation Calendar. Click on the icon to see all your reservations.
Select the Group Booking: Click on the group booking that you want to split.
Navigate to the Folio: Open the folio of the selected booking.
Access More Folio Actions: Click on “More Folio Actions”.
Locate and Click on Split Bookings: From the list of actions, find and select “Split Bookings”.
Confirm the Action: A pop-up will appear asking for confirmation. Click “Yes, Split Booking”.
The group booking will now be split into individual bookings, and you will no longer see the group booking icon next to the reservations.
How to add company details to a folio in Stayflexi and apply them during billing?
Below are the step-by-step guidelines on how to find the Folio of a Reservation in Stayflexi:
Login to Stayflexi: Log into your Stayflexi dashboard using your credentials.
Navigate to the Reservations Tab: From the front page of the Stayflexi dashboard, locate the top navigation menu. The second icon is the Reservation Calendar. Click on the icon to see all your reservations.
Select the Reservation: Choose the reservation you want to add the company details.
View Reservation Details: A pop-up window will appear on the right side of the screen, showing the booking and customer information.
Find the Folio Option: Scroll down to the section with multiple actions. Look for the option labeled View Folio and click on it.
How to Add Company Details to a Folio:
Locate More Folio Actions: On the folio page, find the section called More Folio Actions.
Select Add Company: Click on the option to Add Company Details.
Fill in Company Details: A popup will appear where you need to fill in all the relevant company information.
Click Add Details: Once all the details are filled in, click the green Add Details button at the bottom to save the company information.
Confirmation Message: You will receive a confirmation message that the company details have been successfully added.
Billing with Company Details:
Booking Segment and Source:
During billing, go to the folio. Next to the guest name, click on the Booking Segment column.
Select Direct Billing to link the company to the folio.
In the Booking Source column, select the appropriate company details.
Proceed with Billing:
The bill will be processed with selected company details.
Sending Folio PDF: You can send the Folio PDF to:
The Guest
The Company.
Click on the print icon in black color at the top right-hand side to see the options for sending the folio.
How to set a booking to no show
In Stayflexi, you can set a booking no-show using two methods: through the reservation calendar or the folio.
Below are the explanations and guidelines for both methods:
Through the Reservation Calendar:
Step 1: Go to Reservation Calendar.
Step 2: Click on the reservation you want to set a no show.
Step 3: A page will open on the right side with multiple actions.
Step 4: Locate and click on “Set to no show”.
Step 5: A page will open on the right side for selecting the no-show option.
Step 6: Select your options, such as:
Apply Cancellation policy.
Don’t void.
Charge one night and void remaining.
Void all remaining charges.
Step 7: Click “Yes” to complete the action.
You will receive a confirmation message that the booking has been successfully Set to no show.
Through Folio:
Step 1: Click on the reservation you want to set to no-show.
Step 2: A page will open on the right side.
Step 3: Select “View Folio” from the available actions.
Step 4: On the Folio page, click on “More Folio Actions.”
Step 5: Locate and click on the” Set to no show option”.
Step 6: Select the void charge options according to your preference.
Step 7: Click on “Set to no show” to complete the action.
You will receive a confirmation message indicating that the booking has been successfully Set to no show.
How to view folio history or folio log ?
Below is the explanation of how to view folio history or log in Stayflexi:
Login to Stayflexi: Log into your Stayflexi dashboard using your credentials.
Navigate to the Reservations Tab: From the front page of the Stayflexi dashboard, locate the top navigation menu. The second icon is the Reservation Calendar. Click on the icon to see all your reservations.
Select the Reservation: Choose the reservation you want to see the view folio history or log.
View Reservation Details: A pop-up window will appear on the right side of the screen.
Click on the “View Folio” option from the reservation calendar.
From the opened page, click on “More Folio Actions”.
From the listed options, locate and click on “Folio Logs”.
A new page will open displaying the folio logs for the selected reservation.
You can see detailed information such as the log time, the user who made the action, and the logged action itself.
How to lock a booking a specific room so that system does not move it automatically
In Stayflexi, you can lock a booking to a specific room to prevent the system from moving it automatically. This can be done in two ways: through the reservation calendar or the folio. Below are the instructions for both methods.
Through Reservation Calendar:
Step 1: Log in to the Stayflexi dashboard using your credentials.
Step 2: Click on the Second icon on top to open the reservation calendar.
Step 3: Select the reservation you want to lock to a specific room.
Step 4: A page will appear on the right-hand side with multiple actions.
Step 5: Locate and click on “Lock Booking”.
Step 6: A confirmation page will open.
Step 7: Click “Yes, lock” to complete the action.
You will receive a confirmation message that the room has been successfully locked to the booking.
Through Folio:
Step 1: Log in to the Stayflexi dashboard using your credentials.
Step 2: Click on the Second icon on top to open the reservation calendar.
Step 3: Select the reservation you want to lock to a specific room.
Step 4: A page will appear on the right-hand side with multiple actions.
Step 5: Locate and click on “View Folio”.
Step 6: On the folio page, click on “More Folio Actions” in green.
Step 7: On the folio page, click on “Lock Booking”.
Step 8: A confirmation page will open on the right side.
Step 9: Click “Yes, lock room” to complete the action.
You will receive confirmation that the booking has been successfully locked to the specific room.
How to unlock a booking a specific room so that system can move it automatically
In Stayflexi, you can unlock a booking to a specific room to prevent the system from moving it automatically. This can be done in two ways: through the reservation calendar or the folio. Below are the instructions for both methods.
Through Reservation Calendar:
Step 1: Log in to the Stayflexi dashboard using your credentials.
Step 2: Click on the Second icon on top to open the reservation calendar.
Step 3: Select the reservation you want to unlock for a specific room.
Step 4: A page will appear on the right-hand side with multiple actions.
Step 5: Locate and click on “Unlock Booking”.
Step 6: A confirmation page will open.
Step 7: Click “Yes, unlock” to complete the action.
You will receive a confirmation message that the room has been successfully unlocked for the booking.
Through Folio:
Step 1: Log in to the Stayflexi dashboard using your credentials.
Step 2: Click on the Second icon on top to open the reservation calendar.
Step 3: Select the reservation you want to unlock for a specific room.
Step 4: A page will appear on the right-hand side with multiple actions.
Step 5: Locate and click on “View Folio”.
Step 6: On the folio page, click on “More Folio Actions” in green.
Step 7: On the folio page, click on “Unlock Booking”.
Step 8: A confirmation page will open on the right side.
Step 9: Click “Yes, unlock room” to complete the action.
You will receive confirmation that the booking has been successfully unlocked to the specific room.
How to add a new room to a group booking or remove a room from group booking
To add a new room to a group booking in Stayflexi, follow the below steps:
Login to Stayflexi: Log into your Stayflexi dashboard using your credentials.
Navigate to the Reservations Tab: From the front page of the Stayflexi dashboard, locate the top navigation menu. The second icon is the Reservation Calendar. Click on the icon to see all your reservations.
Select the Group Booking: Click on the group booking for which you want to add a new room.
Navigate to the Folio: Open the folio of the selected booking.
Access More Folio Actions: Click on “More Folio Actions”.
Locate and click on “Add New Room to Group Booking”.
A page will open on the right side. Fill in the guest details and room information you want to add.
The room price will automatically be generated based on the room’s rate.
Click on the “Add” button below to complete the action.
To delete a room from a group booking in Stayflexi, follow the below steps:
Login to Stayflexi: Log into your Stayflexi dashboard using your credentials.
Navigate to the Reservations Tab: From the front page of the Stayflexi dashboard, locate the top navigation menu. The second icon is the Reservation Calendar. Click on the icon to see all your reservations.
Select the Group Booking: Click on the group booking for which you want to add a new room.
Navigate to the Folio: Open the folio of the selected booking.
Access More Folio Actions: Click on “More Folio Actions”.
Locate and click on “Delete room from group booking”.
A page will open in the middle of the screen.
Click on the tiny arrow [as shown in the picture] to view the room ID list.
Select the room you want to delete.
Click on Cancel Booking to complete the action.
How to add Addons or any chargeable service in room folio ?
Login to Stayflexi: Log into your Stayflexi dashboard using your credentials.
Navigate to the Reservations Tab: From the front page of the Stayflexi dashboard, locate the top navigation menu. The second icon is the Reservation Calendar. Click on the icon to see all your reservations.
Select the Reservation: Choose the reservation for which you want to see the folio by clicking on it
View Reservation Details: A pop-up window will appear on the right side of the screen, showing the booking and customer information.
Find the Folio Option: Scroll down to the section with multiple actions. Look for the option labeled View Folio and click on it.
How to add Addons or any chargeable service in the room folio?
At the top of the page, locate the Add Hotel Addons button.
Click on it to proceed further.
On the right side, the add hotel addons page will open.
select the Room ID for which you want to add addons.
Click on Addons: When you click on Addons, you will see two options:
Predefined Addons: A list of preset services [e.g., breakfast, spa, parking] with fixed pricing.
Custom Addons: An option where the property can manually add any service or item not predefined, allowing you to input the description and price as needed.
Below that, you will see a list of details like date, payment mode, etc.
Fill in the mandatory column for the folio item name that you are adding.
Once completed, scroll down and click on the Add New Hotel Addon button below to finalize and save the addon.
How to add notes to a given booking ?
To Add Notes to a Booking in Stayflexi, follow the below-mentioned steps:
Login to Stayflexi: Log into your Stayflexi dashboard using your credentials.
Navigate to the Reservations Tab: From the front page of the Stayflexi dashboard, locate the top navigation menu. The second icon is the Reservation Calendar. Click on the icon to see all your reservations.
Select the Reservation: Choose the reservation you want to add the notes.
View Reservation Details: A pop-up window will appear on the right side of the screen.
Click on the “View Folio” option from the reservation calendar.
On the folio page, locate the Notes icon next to the guest alphabet and guest add icon [as shown in the image below].
Click on the Notes.
A panel will open on the right-hand side, displaying two sections:
Customer Notes
Booking Notes
Select the appropriate section where you want to add your notes.
After entering the notes, click the Add button to save.
Once you add notes to a reservation, the message icon in the reservation calendar will update and reflect that notes have been added to the particular reservation.
Refer to the first image above to view the notes icon, circled in the reservation, which indicates that notes have been added to that specific reservation.
How to take different type of payments for a given booking
To take different types of payments for a booking in Stayflexi, follow the below-mentioned steps:Through the Reservation Calendar
Login to Stayflexi: Log into your Stayflexi dashboard using your credentials.
Navigate to the Reservations Tab: From the front page of the Stayflexi dashboard, locate the top navigation menu. The second icon is the Reservation Calendar. Click on the icon to see all your reservations.
Select the Reservation: Choose the reservation you want to take different types of payments.
View Reservation Details: A pop-up window will appear on the right side of the screen.
From the available options, click on Settle Dues.
A list of payment methods will appear.
Choose the guest’s preferred payment method.
A pop-up will appear in the middle of the screen.
Fill in the required payment details and click the submit button to complete the action.
Through View Folio:
Login to Stayflexi: Log into your Stayflexi dashboard using your credentials.
Navigate to the Reservations Tab: From the front page of the Stayflexi dashboard, locate the top navigation menu. The second icon is the Reservation Calendar. Click on the icon to see all your reservations.
Select the Reservation: Choose the reservation for which you want to see the folio by clicking on it
View Reservation Details: A pop-up window will appear on the right side of the screen, showing the booking and customer information.
Find the Folio Option: Scroll down to the section with multiple actions. Look for the option labeled View Folio and click on it.
At the top of the page, locate the Settle Dues button.
Click on it to view the available options.
On the right side, select the Room ID for which you want to settle the dues.
Below that, you will see a list of payment methods available.
Choose the payment method the guest prefer to pay.
Fill in the required payment details.
Click the Record button to complete the action.
Through More Folio Actions:
Login to Stayflexi: Log into your Stayflexi dashboard using your credentials.
Navigate to the Reservations Tab: From the front page of the Stayflexi dashboard, locate the top navigation menu. The second icon is the Reservation Calendar. Click on the icon to see all your reservations.
Select the Reservation: Choose the reservation for which you want to see the folio by clicking on it
View Reservation Details: A pop-up window will appear on the right side of the screen, showing the booking and customer information.
Find the Folio Option: Scroll down to the section with multiple actions. Look for the option labeled View Folio and click on it.
Click on More Folio Actions: From the listed options, locate and click on settle dues.
Click the Record button to complete the action.
How to take cash deposit for a given booking
The Cash Deposit feature in Stayflexi allows you to accept and record cash payments made by guests as deposits during their stay. This feature is handy for tracking advance payments or security deposits that guests may need to provide at check-in or before using certain services.
Here’s how it works:
The property can add a cash deposit against a guest’s booking.
The amount is recorded in the system, ensuring both the guest and the property can track the deposit.
The deposit can later be used to settle any dues or refund if necessary.
To take a cash deposit for a given booking in Stayflexi, follow the below-mentioned steps:Through the Reservation Calendar
Login to Stayflexi: Log into your Stayflexi dashboard using your credentials.
Navigate to the Reservations Tab: From the front page of the Stayflexi dashboard, locate the top navigation menu. The second icon is the Reservation Calendar. Click on the icon to see all your reservations.
Select the Reservation: Choose the reservation you want to take a cash deposit.
View Reservation Details: A pop-up window will appear on the right side of the screen.
From the available options, click on Settle Dues.
A list of payment methods will appear.
Choose Cash deposit.
A pop-up will appear in the middle of the screen.
Fill in the required payment details and additionally, you have a description column, where you can input specific notes or details about the transaction.
Click the submit button to complete the action.
Through View Folio:
Login to Stayflexi: Log into your Stayflexi dashboard using your credentials.
Navigate to the Reservations Tab: From the front page of the Stayflexi dashboard, locate the top navigation menu. The second icon is the Reservation Calendar. Click on the icon to see all your reservations.
Select the Reservation: Choose the reservation for which you want to take a cash deposit.
View Reservation Details: A pop-up window will appear on the right side of the screen, showing the booking and customer information.
Find the Folio Option: Scroll down to the section with multiple actions. Look for the option labeled View Folio and click on it.
At the top of the page, locate the Settle Dues button.
Click on it to view the available options.
On the right side, select the Room ID for which you want to take cash deposit.
Below that, you will see a list of payment methods available.
Choose Cash deposit.
A pop-up will appear in the middle of the screen.
Fill in the required payment details and additionally, you have a description column, where you can input specific notes or details about the transaction.
Click the submit button to complete the action.
How to refund a payment to guest from Stayflexi PMS ?
hi
To Refund a Payment in Stayflexi, follow the below steps:
Log in to your Stayflexi account.
Open the reservation for which you want to process the refund.
From the reservation details panel (on the right-hand side), click “View Folio.”
Scroll down to the bottom of the folio page.
Under Folio View Mode, select “Payments.”
On the extreme right side of the relevant payment entry, click “Actions.”
From the available options, select “Refund.”
In the pop-up window, enter the reason for the refund.
Click Refund to complete the refund process.
How to send a payment link to the guest from Stayflexi PMS?
To Send a Payment link to the guest in Stayflexi, follow the below steps:
Login to Stayflexi: Log into your Stayflexi dashboard using your credentials.
Navigate to the Reservations Tab: From the front page of the Stayflexi dashboard, locate the top navigation menu. The second icon is the Reservation Calendar. Click on the icon to see all your reservations.
Select the Reservation: Choose the reservation for which you want to send the payment link to.
View Reservation Details: A pop-up window will appear on the right side of the screen.
Click on the “View Folio” option from the reservation calendar.
From the opened page, click on “More Folio Actions”.
Locate and click on “Send Payment Link.”
In the opened page, fill in the guest’s email, mobile number, and the amount.
By default, the guest details entered at the time of reservation will already be reflected in these columns.
Click on “Send Payment Link” to complete the action, Guest will receive the payment link.
A confirmed message will appear on the screen.
How to delete a saved card from given booking
To Delete a card from a booking in Stayflexi, follow the below steps:
Login to Stayflexi: Log into your Stayflexi dashboard using your credentials.
Navigate to the Reservations Tab: From the front page of the Stayflexi dashboard, locate the top navigation menu. The second icon is the Reservation Calendar. Click on the icon to see all your reservations.
Select the Reservation: Choose the reservation for which you want to add a card.
View Reservation Details: A pop-up window will appear on the right side of the screen.
Click on the Settle Dues to see the listed options.
Click on the card number to bring up the card with options.
A pop-up will appear, showing the card details with options.
Click on the “Delete Card” button to remove the card from the booking.
You have successfully deleted the card now.
How to add guest card details to a particular booking and charge it?
To add a card to a particular booking and charge it in Stayflexi, follow the below steps:
Login to Stayflexi: Log into your Stayflexi dashboard using your credentials.
Navigate to the Reservations Tab: From the front page of the Stayflexi dashboard, locate the top navigation menu. The second icon is the Reservation Calendar. Click on the icon to see all your reservations.
Select the Reservation: Choose the reservation for which you want to add a card.
View Reservation Details: A pop-up window will appear on the right side of the screen.
Click on the Settle Dues to see the listed options.
Locate and click on “Add Card”.
A pop-up will appear on the screen. Fill in the card details.
Click on “Add card” to complete the process.
Again, click on “Settle Dues” to see the added card.
Click on the card number to bring up the card with options.
Enter the amount you want to charge and click on “Charge” to complete the action
Once the card is charged amount will reflect under the payment made section in the room folio.
How to Change the booking segment or source ?
To change the Booking Segment or Source in Stayflexi, follow the below mentioned steps:
Login to Stayflexi: Log into your Stayflexi dashboard using your credentials.
Navigate to the Reservations Tab: From the front page of the Stayflexi dashboard, locate the top navigation menu. The second icon is the Reservation Calendar. Click on the icon to see all your reservations.
Select the Reservation: Choose the reservation for which you want to change the booking segment and source.
View Reservation Details: A pop-up window will appear on the right side of the screen.
Click on the “View Folio” option from the reservation calendar.
From the opened page, click on “More Folio Actions”.
Locate and click on “Change Booking Source”.
A page will open on the right-hand side.
Click on the tiny arrows in the two columns to view and change the booking segment and source.
Click on “Add Segment” below to complete the action.
How to edit the guest details in the folio
To edit the guest details in the folio, follow the below mentioned steps:
Login to Stayflexi: Log into your Stayflexi dashboard using your credentials.
Navigate to the Reservations Tab: From the front page of the Stayflexi dashboard, locate the top navigation menu. The second icon is the Reservation Calendar. Click on the icon to see all your reservations.
Select the Reservation: Choose the reservation for which you want to modify the booking price.
View Reservation Details: A pop-up window will appear on the right side of the screen.
Click on the “View Folio” option from the reservation calendar.
On the opened page, click on the alphabet icon with the guest’s name initial in the booking ID column.
A page will open on the right side.
Edit the guest details by filling the boxes one by one.
Click on “Save Guest” after making the changes to complete the action.
How to check-in a booking
In Stayflexi, you can check in a booking using three methods:
Through the Reservation Calendar:
Below are the step by step guidelines for check-in a booking in Stayflexi:
Login to Stayflexi: Log into your Stayflexi dashboard using your credentials.
Navigate to the Reservations Tab: From the front page of the Stayflexi dashboard, locate the top navigation menu. The second icon is the Reservation Calendar. Click on the icon to see all your reservations.
Select the Reservation: Choose the confirmed reservation you want to check-in.
Click on Check-In: From the list of available actions, locate and click the Check-In button next to the reservation.
Confirmation Page: A panel will open on the right-hand side, confirming that you are checking in the guest with the displayed reservation ID.
Complete Check-In: To finalize the process, scroll down and click on the Check-In button at the bottom of the confirmation panel. This will complete the action and check the guest in.
Once you check in the guest by clicking the Check-In button, the reservation color will change from orange to green. This color change serves as a visual indicator for easy understanding, signifying that the guest has successfully checked in.
A confirmation message will appear on the screen.
Through View Folio:
Login to Stayflexi: Log into your Stayflexi dashboard using your credentials.
Navigate to the Reservations Tab: From the front page of the Stayflexi dashboard, locate the top navigation menu. The second icon is the Reservation Calendar. Click on the icon to see all your reservations.
Select the Reservation: Choose the confirmed reservation you want to check-in.
View Reservation Details: A pop-up window will appear on the right side of the screen, showing the booking and customer information.
Find the Folio Option: Scroll down to the section with multiple actions. Look for the option labeled View Folio and click on it.
Locate the Check-In box: On the folio page, at the top, you’ll see the “Check-In” box [as shown in the above image].
Click on the Check-In Box: Click on the box to begin the check-in process.
Confirmation Page: A confirmation panel will open on the right-hand side, showing the booking ID.
Complete Check-In: Proceed by clicking the Check-In button on the panel to finalize and complete the action
Once you check in the guest by clicking the Check-In button, the reservation color will change from orange to green. This color change serves as a visual indicator for easy understanding, signifying that the guest has successfully checked in.
A confirmation message will appear on the screen.
Through More Folio Actions:
Login to Stayflexi: Log into your Stayflexi dashboard using your credentials.
Navigate to the Reservations Tab: From the front page of the Stayflexi dashboard, locate the top navigation menu. The second icon is the Reservation Calendar. Click on the icon to see all your reservations.
Select the Reservation: Choose the confirmed reservation you want to check-in.
View Reservation Details: A pop-up window will appear on the right side of the screen, showing the booking and customer information.
Find the Folio Option: Scroll down to the section with multiple actions. Look for the option labeled View Folio and click on it.
Click on More Folio Actions: On the folio page, click the More Folio Actions button to view additional options.
Locate the Check-In Option: From the listed options, locate and click on the Check-In option.
Confirmation Page: A confirmation panel will open on the right-hand side, showing the booking ID.
Complete Check-In: Proceed by clicking the Check-In button on the panel to finalize and complete the action
Once you check in the guest by clicking the Check-In button, the reservation color will change from orange to green. This color change serves as a visual indicator for easy understanding, signifying that the guest has successfully checked in.
A confirmation message will appear on the screen.
How to checkout a booking
In Stayflexi, you can check-out a booking using three methods:
Through the Reservation Calendar:
Below are the step by step guidelines for check-out a booking in Stayflexi:
Login to Stayflexi: Log into your Stayflexi dashboard using your credentials.
Navigate to the Reservations Tab: From the front page of the Stayflexi dashboard, locate the top navigation menu. The second icon is the Reservation Calendar. Click on the icon to see all your reservations.
Select the Reservation: Choose the confirmed reservation you want to check-out.
Click on Check-out: From the list of available actions, locate and click the check-out button next to the reservation.
Confirmation Page: A panel will open on the right-hand side, confirming that you are checking out the guest with the displayed reservation ID.
Complete Check-out: To finalize the process, scroll down and click on the Check-out button at the bottom of the confirmation panel. This will complete the action and check the guest out.
Once you check out the guest by clicking the Check-out button, the reservation color will change from green to violet. This color change serves as a visual indicator for easy understanding, signifying that the guest has successfully checked out.
A confirmation message will appear on the screen.
Through View Folio:
Login to Stayflexi: Log into your Stayflexi dashboard using your credentials.
Navigate to the Reservations Tab: From the front page of the Stayflexi dashboard, locate the top navigation menu. The second icon is the Reservation Calendar. Click on the icon to see all your reservations.
Select the Reservation: Choose the confirmed reservation you want to check-out.
View Reservation Details: A pop-up window will appear on the right side of the screen, showing the booking and customer information.
Find the Folio Option: Scroll down to the section with multiple actions. Look for the option labeled View Folio and click on it.
Locate the Check-out box: On the folio page, at the top, you’ll see the “Check-out” box [as shown in the above image].
Click on the Check-out Box: Click on the box to begin the check-out process.
Confirmation Page: A confirmation panel will open on the right-hand side, showing the booking ID.
Complete Check-out: Proceed by clicking the Check-Out button on the panel to finalize and complete the action
Once you check out the guest by clicking the Check-out button, the reservation color will change from green to violet. This color change serves as a visual indicator for easy understanding, signifying that the guest has successfully checked out.
A confirmation message will appear on the screen.
Through More Folio Actions:
Login to Stayflexi: Log into your Stayflexi dashboard using your credentials.
Navigate to the Reservations Tab: From the front page of the Stayflexi dashboard, locate the top navigation menu. The second icon is the Reservation Calendar. Click on the icon to see all your reservations.
Select the Reservation: Choose the confirmed reservation you want to check-in.
View Reservation Details: A pop-up window will appear on the right side of the screen, showing the booking and customer information.
Find the Folio Option: Scroll down to the section with multiple actions. Look for the option labeled View Folio and click on it.
Click on More Folio Actions: On the folio page, click the More Folio Actions button to view additional options.
Locate the Check-Out Option: From the listed options, locate and click on the Check-Out option.
Confirmation Page: A confirmation panel will open on the right-hand side, showing the booking ID.
Complete Check-Out: Proceed by clicking the Check-out button on the panel to finalize and complete the action
Once you check out the guest by clicking the Check-out button, the reservation color will change from green to violet. This color change serves as a visual indicator for easy understanding, signifying that the guest has successfully checked out.
A confirmation message will appear on the screen.
How to cancel a booking
In Stayflexi, you can cancel a booking using two methods: through the reservation calendar or via the folio.
Below are the explanations and guidelines for both methods:
Through the Reservation Calendar:
Step 1: Go to Reservation Calendar.
Step 2: Click on the reservation you want to cancel.
Step 3: A page will open on the right side with multiple actions.
Step 4: Locate and click on “Cancel Booking”.
Step 5: A page will open on the right side for cancellation options.
Step 6: Select your options, such as:
Apply Cancellation policy:- It will cancel the booking and apply the amount as per cancellation policy configured.
Don’t void.
Charge one night and void remaining:- It will charge one night prices only and void remaining night prices.
Void all remaining charges:- It will make the room amount zero for the given booking id.
Step 7: Click “Yes, Cancel booking”.
You will receive a confirmation message that the booking has been successfully canceled.
Through Folio:
Step 1: Click on the reservation you want to cancel.
Step 2: A page will open on the right side.
Step 3: Select “View Folio” from the available actions.
Step 4: On the Folio page, click on “More Folio Actions.”
Step 5: Locate and click on “Cancel Booking”.
Step 6: Select the void charge options according to your preference.
Step 7: Click “Confirm Cancel” to complete the action.
You will receive a confirmation message indicating that the booking has been successfully canceled.
Note: To cancel an online travel portal or channel booking, Kindly reach out to the respective online travel portal or channel.
How to email guest folio and confirmation voucher?
To email a guest folio in Stayflexi, you can quickly send a detailed breakdown of the guest’s charges, payments, and any adjustments directly to their email.
Below are the step-by-step guidelines for emailing a guest folio in Stayflexi:
Login to Stayflexi: Log into your Stayflexi dashboard using your credentials.
Navigate to the Reservations Tab: From the front page of the Stayflexi dashboard, locate the top navigation menu. The second icon is the Reservation Calendar. Click on the icon to see all your reservations.
Select the Reservation: Choose the reservation for which you want to send the folio by clicking on it
View Reservation Details: A pop-up window will appear on the right side of the screen, showing the booking and customer information.
Find the Folio Option: Scroll down to the section with multiple actions. Look for the option labeled View Folio and click on it.
Access More Folio Options: This will open the folio page. On this page, click on the More Folio Options button.
Select Email Folio: A pop-up will appear with various options. Find and click on Email Folio.
Review Guest Email: A new pop-up will appear on the right side of the screen, automatically filled with guest’s email address.
Send the Folio: Click on Send to email the folio to the guest.
Confirmation: You will now receive a confirmation message indicating the folio has been successfully sent.
how to send a Confirmation voucher?
To email a confirmation voucher in Stayflexi, you can send guests an official document confirming their reservation details, including dates, room type, and any associated charges.
Here are the step-by-step guidelines for sending a confirmation voucher:
Login to Stayflexi: Log into your Stayflexi dashboard using your credentials.
Navigate to the Reservations Tab: From the front page of the Stayflexi dashboard, locate the top navigation menu. The second icon is the Reservation Calendar. Click on the icon to see all your reservations.
Select the Reservation: Choose the reservation for which you want to send the folio by clicking on it
View Reservation Details: A pop-up window will appear on the right side of the screen, showing the booking and customer information.
Find the Folio Option: Scroll down to the section with multiple actions. Look for the option labeled View Folio and click on it.
Access More Folio Options: This will open the folio page. On this page, click on the More Folio Options button.
Email Confirmation: From the options that pop up, select Email Booking Confirmation.
Confirm Email: Another pop-up will appear to the right, where the guest’s email address will automatically be displayed, You can also edit it in case you want to send it to the different email id.
Send the Email: Click on the Send button below the email field to send the confirmation voucher.
Confirmation Message: You will receive a confirmation message indicating that the email has been successfully sent to the guest.
How to exempt taxes from a particular reservation?
Login to Stayflexi: Log into your Stayflexi dashboard using your credentials.
Navigate to the Reservations Tab: From the front page of the Stayflexi dashboard, locate the top navigation menu. The second icon is the Reservation Calendar. Click on the icon to see all your reservations.
Select the Reservation: Choose the reservation for which you want to see the folio by clicking on it
View Reservation Details: A pop-up window will appear on the right side of the screen, showing the booking and customer information.
Find the Folio Option: Scroll down to the section with multiple actions. Look for the option labeled View Folio and click on it.
How to Apply for Tax Exemption?
Click on More Folio Actions: At the top of the folio, click the green More Folio Actions button.
A popup window will appear with multiple actions listed.
Locate and click on Tax-Exempt Status: Select this option from the list.
Another popup will appear on the right side.
Enable the toggle to check for tax exemption , or uncheck it to revoke the exemption.
Enter the Tax Exemption ID and specify the types of taxes to exempt.
Click the Tax Exempt button to complete the action successfully.
What is Scanty Baggage Feature?
The Scanty Baggage feature in Stayflexi marks reservations where guests arrive with minimal or no luggage. This is typically an indicator for the hotel staff to be cautious, as it may signify a higher risk of the guest leaving without paying. When a guest is flagged as “Scanty Baggage”, it helps the hotel staff take necessary precautions, such as requesting advance payment or ensuring payment guarantees before allowing further services.
How to find Folio:
Login to Stayflexi: Log into your Stayflexi dashboard using your credentials.
Navigate to the Reservations Tab: From the front page of the Stayflexi dashboard, locate the top navigation menu. The second icon is the Reservation Calendar. Click on the icon to see all your reservations.
Select the Reservation: Choose the reservation for which you want to see the folio by clicking on it
View Reservation Details: A pop-up window will appear on the right side of the screen, showing the booking and customer information.
Find the Folio Option: Scroll down to the section with multiple actions. Look for the option labeled View Folio and click on it.
How to find and mark Scanty Baggage in Stayflexi:
Click on “More Folio Actions”.
Locate “Scanty Baggage” and click on it.
A pop-up window will appear on the right-hand side.
The default option will be “Yes/No”. Select “Yes” to mark the reservation as having Scanty Baggage.
Click the “Confirm” button below.
After confirming, you will see a red luggage icon in the middle of the folio page, next to the booking ID and status of the reservation, indicating that the reservation has been marked as having Scanty Baggage.
Adding or removing guests from a reservation
Login to Stayflexi: Log into your Stayflexi dashboard using your credentials.
Navigate to the Reservations Tab: From the front page of the Stayflexi dashboard, locate the top navigation menu. The second icon is the Reservation Calendar. Click on the icon to see all your reservations.
Select the Reservation: Choose the reservation for which you want to see the folio by clicking on it
View Reservation Details: A pop-up window will appear on the right side of the screen, showing the booking and customer information.
Find the Folio Option: Scroll down to the section with multiple actions. Look for the option labeled View Folio and click on it.
How to Add a Guestin Folio:
Click on the icon to the right side next to the alphabet icon.
A guest details form will appear. Fill in all the required details.
Click on the green “Add Guest” button.
Once added, you will see two initials representing the guest’s name
You have successfully added the guest.
How to Remove a Guest in Folio:
Click on the guest’s alphabet icon corresponding to the guest you want to remove.
You will be taken to the guest information page.
Click on “More” option.
Select “Delete customer” to remove them from the folio.
You have successfully removed the guest.
How to add / remove room on existing reservation?
Login to Stayflexi: Log into your Stayflexi dashboard using your credentials.
Navigate to the Reservations Tab: From the front page of the Stayflexi dashboard, locate the top navigation menu. The second icon is the Reservation Calendar. Click on the icon to see all your reservations.
Select the Reservation: Choose the reservation for which you want to see the folio by clicking on it
View Reservation Details: A pop-up window will appear on the right side of the screen, showing the booking and customer information.
Find the Folio Option: Scroll down to the section with multiple actions. Look for the option labeled View Folio and click on it.
How to Add a Room to an Existing Reservation:
Click on “Add New Room to Group Booking” in the “More Folio Actions” menu.
A new page will open on the right side of the screen displaying room and guest details.
Fill in the necessary details, then click the “Save” button to complete the action.
The added room number will reflect on the left-hand side, along with the existing room number.
You have successfully added a room to the existing reservation.
How to Remove a Room from an Existing Reservation:
Click on the room folio for the room you want to remove.
Select “More Folio Actions.”
Find Delete Room from Group Booking, or search for it using the search bar.
A confirmation page will appear on the right side. Click Remove Room from Booking to complete the action.
You have successfully removed the room from the booking.
Stayflexi Booking Engine - Everything you need to know
Stayflexi’s Booking Engine makes it easy to reserve your stay online. Follow these simple steps to book your room smoothly:
Open the Booking Page
Go to the hotel website where Stayflexi is set up.
Click on the booking section on the main page to start.
Choose Your Dates
Pick your check-in and check-out dates on the calendar.
Flexible options let you choose convenient arrival and departure times.
Select Your Room
Browse the available rooms with photos and details.
The system shows rooms that match your selected dates.
Enter Guest Info
Fill in your name and contact details.
Double-check for accuracy to ensure a smooth check-in process.
Review Your Booking
Review your booking summary to confirm dates, room type, extras, and the total price.
If you have any promo codes, enter them now.
Make Payment
Choose a payment method (credit card, Apple Pay, etc.).
Enter your details safely. Stayflexi supports quick, secure payment.
Receive Confirmation
After payment, a confirmation email will be sent to you.
This includes a booking reference and check-in instructions.
Step-by-step guide for booking engine configuration
Logging into Your Stayflexi Dashboard:
Enter your username and password to log in.
Go to Property Configuration:
Once logged in, click on the More Apps icon (represented by four blocks) in the top right corner.
From the drop down menu, select Property Configuration
Go to Booking engine:
You’ll see various options on the left side of the Property Configuration page.
Click on the Booking engine option
This will navigate you to the booking engine settings or configuration page.
Booking Engine URL
This field holds the URL of the booking engine page that guests will be directed to when making a reservation. Ensure it has the correct hotel ID included in the URL.
Header Colour
This option allows you to choose the color for the header of the booking engine page. Select a color that matches your brand identity.
Main Body Colour
Sets the main background colour for the body section of the booking engine page. Pick a colour that complements the header and maintains readability.
Room Type and Summary Cart Colour
Controls the color for the sections displaying room types and the booking summary cart. This can help highlight these areas for better user navigation.
Lowest Price Colour
Sets the color for the lowest price displayed on the booking engine, making it more prominent to attract attention to special rates or discounts.
Font Colour
Specifies the text color used across the booking engine page. Ensure this color contrasts well with the background for readability.
Phone Number
Enter the contact number that guests can use for inquiries. This should be a direct line to the hotel’s reservations or customer support team.
Email
The email address provided here will be visible to guests, offering an alternative contact method for support or booking assistance.
Add Your Website Link to Booking Engine Logo
Toggle this option to add a clickable link to your website on the booking engine’s logo, providing guests a way to navigate back to your main site from the booking engine.
Run Booking Engine in Stayflexi’s Unique 3-Slot Mode
Stayflexi’s 3-slot mode organizes booking times into distinct slots (e.g., morning, afternoon, evening). Toggle this feature based on your property’s needs.
Rate Check Widget
Enables or disables the rate check widget, a tool that helps guests quickly view rates and availability across dates.
Can Users Make Booking Without Addons?
This option allows users to book a room without adding optional services or amenities (add-ons). If set to “No,” guests must select at least one add-on.
Do You Want to Allow Partial Payment?
Enables guests to make a partial payment at the time of booking instead of paying in full. The percentage slider lets you set the minimum partial payment amount.
Manually Approve Bookings for a Given Time Before Check-In?
This setting allows you to require manual approval for bookings made within a specific time frame before check-in. The hours field specifies how close to check-in this applies (set to 0 hrs here, meaning no time restriction).
Allow Booking Engine Widget to Add Rooms by Default?
When enabled, the booking engine widget automatically adds a default room for guests, simplifying the booking process for users.
Save Button
Click “Save” after configuring the settings to apply the changes to your booking engine.
These are the settings for the Booking engine.
Stayflexi Booking Engine configurations which you should know.
Logging into Your Stayflexi Dashboard:
Enter your username and password to log in.
Go to Property Configuration:
Once logged in, click on the More Apps icon (represented by four blocks) in the top right corner.
From the drop down menu, select Property Configuration
Got to Booking engine:
You’ll see various options on the left side of the Property Configuration page.
Click on the Booking engine option
This will navigate you to the booking engine settings or configuration page.
Booking Engine URL
This field holds the URL of the booking engine page that guests will be directed to when making a reservation. Ensure it has the correct hotel ID included in the URL.
Header Color
This option allows you to choose the color for the header of the booking engine page. Select a color that matches your brand identity.
Main Body Color
Sets the main background color for the body section of the booking engine page. Pick a color that complements the header and maintains readability.
Room Type and Summary Cart Color
Controls the color for the sections displaying room types and the booking summary cart. This can help highlight these areas for better user navigation.
Lowest Price Color
Sets the color for the lowest price displayed on the booking engine, making it more prominent to attract attention to special rates or discounts.
Font Color
Specifies the text color used across the booking engine page. Ensure this color contrasts well with the background for readability.
Phone Number
Enter the contact number that guests can use for inquiries. This should be a direct line to the hotel’s reservations or customer support team.
Email
The email address provided here will be visible to guests, offering an alternative contact method for support or booking assistance.
Add Your Website Link to Booking Engine Logo
Toggle this option to add a clickable link to your website on the booking engine’s logo, providing guests a way to navigate back to your main site from the booking engine.
Run Booking Engine in Stayflexi’s Unique 3-Slot Mode
Stayflexi’s 3-slot mode organizes booking times into distinct slots (e.g., morning, afternoon, evening). Toggle this feature based on your property’s needs.
Rate Check Widget
Enables or disables the rate check widget, a tool that helps guests quickly view rates and availability across dates.
Can Users Make Booking Without Addons?
This option allows users to book a room without adding optional services or amenities (add-ons). If set to “No,” guests must select at least one add-on.
Do You Want to Allow Partial Payment?
Enables guests to make a partial payment at the time of booking instead of paying in full. The percentage slider lets you set the minimum partial payment amount.
Manually Approve Bookings for a Given Time Before Check-In?
This setting allows you to require manual approval for bookings made within a specific time frame before check-in. The hours field specifies how close to check-in this applies (set to 0 hrs here, meaning no time restriction).
Allow Booking Engine Widget to Add Rooms by Default?
When enabled, the booking engine widget automatically adds a default room for guests, simplifying the booking process for users.
Save Button
Click “Save” after configuring the settings to apply the changes to your booking engine.
These are the settings for the Booking engine.
Stayflexi Booking Engine - How to Sell specific Rooms with Rate Plans on Booking Engine
To sell specific rooms with Rate Plans on the Booking Engine, you need to configure the rate plan in the PMS.
Below is the step-by-step guide to configure or create a Rate Plan in Stayflexi’s Revenue Management:
Log in to Your Stayflexi Dashboard:
Use your username and password to log in.
Go to Revenue Management:
After logging in, click the four boxes icon (more apps) in the top right corner.
A dropdown menu will appear.
Select “Revenue Management” from the list
Create a Rate plan
Go to the “Rate plans” section on the left menu.
Click “Add new rate plan” to open the rate plan creation form.
Filling in Rate Plan Details
What’s the name of your rate category?
This is where you enter the name of your rate plan.
This name will be used internally to identify the rate plan.
What’s the plan Display Name of your rate category?
This is the name that will be displayed to customers.
Make sure the name is clear and descriptive for customers.
Set your rates
Select Rate: Choose an existing base rate plan from the dropdown
Percentage or Amount Adjustment: Select whether the adjustment to the base rate should be in % (percentage) or $ (fixed amount).
Value: Enter the adjustment amount (e.g., “20” if you’re offering a 20% discount).
Dependency: Choose if this rate plan is dependent on another rate plan.
Hard Dependency Toggle: Set this to “Yes” if this rate plan should only be available when its base rate plan is available.
Dependency Dropdown: Select “YES” if you want this rate plan to be strictly tied to the base rate.
Selecting Additional Policies and Settings
Select a Policy: Choose a cancellation policy or other policy that applies to this rate plan (e.g., “Cancellation Policy”).
This ensures the selected policy rules apply to reservations made under this rate plan.
Configuring Visibility and Payment Options
Show this rate plan on front desk kiosk?
No/Yes Toggle: Choose whether this rate plan should appear on the front desk kiosk.
No: The rate plan will not be visible on the kiosk, meaning staff won’t see it for walk-in or front desk bookings.
Yes: The rate plan will be visible at the kiosk, allowing it to be used for on-the-spot bookings.
Allow pay at property?
No/Yes Toggle: Decide if customers are allowed to pay directly at the property or if only online payments are accepted.
No: Only online payments will be allowed; customers must pay in advance.
Yes: Guests can choose to pay when they arrive at the property.
Hide this rate plan on the booking engine?
No/Yes Toggle: Determine if this rate plan should be hidden from the online booking engine.
No: The rate plan will be shown and available on the booking engine.
Yes: The rate plan will be hidden, meaning it won’t appear to guests booking online.
Is this rate plan for OTA mapping only?
No/Yes Toggle: Specify if this rate plan is exclusively for OTA (Online Travel Agency) mapping and should not be visible elsewhere.
No: The rate plan will be available across different channels, including the booking engine and front desk kiosk.
Yes: The rate plan will only be used for OTA mapping. It won’t show up on the Stayflexi booking engine or for front desk reservations.
Assigning Room Types and Adding Description
Which room types?
Select the specific room types to which this rate plan applies. Only the selected rooms will offer this rate to guests.
Describe the rate category in a few words?
Enter a brief description of the rate plan to help staff and customers understand what this rate plan includes or why it might be beneficial (e.g., “20% discount for stays of 3 nights or more”).
Saving the Rate Plan(as shown in Image 2):
Once all details and settings have been configured, click “Save” at the bottom of the form to create the rate plan.
According to the above configuration, the Rate plan will either be visible on the Booking engine or will be hidden at the time of booking creation for the guests.
Below is the step-by-step guide on how to sell specific rooms with rate plans in the Stayflexi Booking Engine :
Access the Booking Engine
Go to the Stayflexi booking engine for the hotel or property you’re interested in.
You may find this link on the hotel’s website or by searching directly for the property on Stayflexi.
Select Dates and Room Preferences
Choose your Check-In and Check-Out dates.
Specify the number of rooms, adults, and children to filter the available rooms accordingly.
Browse Available Room Types
Scroll to the “Choose your room(s)” section. Each room type, such as “Suite” or “Deluxe Room,” is listed here.
Click on a room type to view additional details like maximum occupancy, bed configuration, and amenities (e.g., soundproofing, hardwood floors, private bathrooms).
Select a Rate Plan
Each room type has multiple rate plans, such as Standard Plan, AP (American Plan), MAP (Modified American Plan), and CP (Continental Plan).
Review the rate plan options and prices. Each rate plan may come with specific inclusions, like meals or cancellation policies.
Choose Quantity
Use the quantity selector next to the desired rate plan (the +/- buttons) to choose the number of rooms you want to book under that plan.
Click Add to confirm your selection. The selected room and rate plan will appear in your booking summary on the right.
Review Your Booking Summary
On the right side of the screen, you’ll see a summary of your booking. This includes:
Room type and rate plan (e.g., Suite – Standard Plan).
The number of adults and children.
Room price and any applicable taxes.
Proceed to Book
Once you’re satisfied with your selections, click on Continue to Book.
This will take you to the next steps, where you’ll enter guest information and payment details.
Complete the Payment
Enter your details and follow the prompts to complete the payment.
After payment, you’ll receive a booking confirmation with all the details of your reservation.
Coupon code option on stayflexi Booking Engine and how it is useful
The “Coupon code” option on the Stayflexi booking engine allows users to apply discount codes or promotional offers to reduce the booking cost. This option is useful for guests who have received a coupon from the hotel or as part of a promotional campaign. By entering the code and clicking “Apply,” guests can see the updated price with the discount reflected in the total.
Creating a Coupon Code in Stayflexi PMS
Before guests can use a coupon code on the booking engine, you must set it up in the Stayflexi Dashboard.
Log in to Your Stayflexi Dashboard:
Use your username and password to log in.
Go to Revenue Management:
After logging in, click the four boxes icon (more apps) in the top right corner
A dropdown menu will appear.
Select “Revenue Management” from the list
Go to Coupon/Offers:
On the left sidebar, click on “Coupon Code / Offers” (the 5th option) to view the Coupon Code/ Offers page. (as shown in Image 2).
Add a Coupon/Offers:
Click the “Add Coupon Code / Offers” button to start creating a new Coupon Code / Offers
Enter Coupon Code / Offer Name:
Provide a descriptive name for your coupon code/offer to help identify it easily
Describe Coupon Code / Offer:
Provide a brief description of your coupon code/ offer for better understanding
Choose the type
From the dropdown in the “Choose type of your coupon code/offer” section, either of the following types:
OFFER
COUPON CODE
Set Room Booking Criteria
In the section “How many rooms do guests need to book to get this coupon code or offer?”, input:
Minimum number of rooms guests need to book.
Maximum number of rooms guests can book.
Set Stay Duration Criteria
In the section “How long do guests need to stay to get this coupon code or offer?”, enter the following:
Minimum number of nights required for guests to stay to qualify for the coupon code/ offer.
Maximum number of nights guests can stay to qualify.
Set the Discount (as shown in Image 4):
In the section “How much of a discount do you want to give?”, enter the desired discount and select the type of discount (Percentage or Flat ) from the dropdown.
Set the Date Range for Discounted Stays
In the “When can guests check in using the discounted rate?” section, specify the date range for when guests can use the Coupon code/offer.
Select Days of the Week for Discount Availability:
Choose the days of the week that the discounted rate will be available. You can select all days or specific days as needed
Valid Booking Period:
In the section “When can bookings be shown?”, select the date range during which the coupon code/offer is valid for bookings
Coupon Code/Offer Usage Limit:
In the section “How many times can the coupon code/offer be used? (leave blank for no limit)”:
The coupon code or offer can be used as many times as you want unless a limit is set
Save the Coupon code/ offer:
Once you have entered all the details, review them carefully.
Click the “Save” button to finalize and activate your Coupon code/ offer
Using the Coupon Code on the Stayflexi Booking Engine
Now that the coupon code is set up, guests can apply it during the booking process.
Select Room and Start Booking
On the Stayflexi booking engine, guests should select a room and click Continue to Book.
Locate the Coupon Code Field
In the booking details section, they’ll see a field labeled Coupon Code with an Apply button.
Enter and Apply the Coupon Code
Guests can enter their coupon code carefully (avoiding extra spaces).
They then click Apply to activate the discount.
View the Discounted Total
If the coupon code is valid, the total booking amount will update to reflect the discount.
Complete the Booking
After reviewing the discounted price, guests can fill in their booking details, and click Pay Now to complete the reservation at the discounted rate.
Enjoy the Savings!
Guests save on their booking, enjoying a more affordable stay thanks to the coupon code.
Following these steps, you can efficiently set up and manage Coupon codes/offers, enhancing guest experience and boosting bookings.
What is the Magic Link feature in Stayflexi, and how can it benefit my property?
The Magic Link is a feature in Stayflexi which are used by hotels and properties to streamline the guest experience by providing a unique, secure URL that grants guests access to various self-service options along with all the booking details and a way to connect with properties directly. The link can be sent to guests via email, whatsapp and messaging allowing them to complete tasks like:
Self-check-in: Guests can check in using a self-service link without assistance from the front desk.
Early check-in/late check-out: Guests can request to check in early or check out late if the hotel offers these options.
Room upgrades: Guests can view available room upgrades and choose to upgrade before arrival.
Purchase add-ons: Guests can buy extra services like meals, spa treatments, tours or any add on services offered by properties.
Payment options: Guests can pay for services either in advance or upon arrival, depending on the hotel’s configuration.
The Magic Link eliminates the need for guests to interact with the front desk directly for these services, providing convenience and flexibility. It simplifies the process of managing bookings and enhancing guest experience through an easy-to-use, web-based interface. The property benefits from a more efficient check-in/check-out process, reduced staff workload, and opportunities to upsell services or rooms.
Here is a step-by-step guide for Magic link:
Log in to Your Stayflexi Dashboard:
Enter your username and password to log in.
Go to Property configuration:
After logging in, click the “More Apps” icon (represented by four boxes or blocks) in the top right corner.
From the dropdown menu, select Property Configuration.
On the left-hand side of the Property Configuration page, you will see various options.
Click on the Magic link and kiosk dropdown, you will see some more options.
Click on the Configuration option.
This takes you to the Self-service configuration page.
Front Desk Kiosk URL
Purpose: This URL is generated for the hotel’s self-service platform, allowing guests to access services such as check-in, check-out, and other options without needing to interact with hotel staff directly.
Action: Guests can visit this link to use self-service features when check-in in at the property.
Front desk QR codePurpose:
This QR code is generated for the hotel’s self-service platform, providing guests with quick and easy access to essential services such as check-in, check-out, and other available options directly from their mobile devices.
Action: Guests can scan this QR code upon arrival at the property to access self-service features instantly, enabling a smooth and contactless check-in or check-out experience without needing to interact with hotel staff.
Do you want to allow guests to self-check in?
Purpose: This option, when enabled, allows guests to check in using the self-service link without assistance from the front desk.
Action: Toggle this switch to “Yes” to let guests check themselves in before their arrival.
Do you want to allow guests to perform early check-in?
Purpose: This allows guests to check in earlier than the standard check-in time, providing more flexibility.
Action: Toggle this to “Yes” to offer early check-in as an option, subject to hotel availability.
Do you want to allow guests to perform late check-out?
Purpose: This option allows guests to check out later than the regular check-out time.
Action: Enable this option if you wish to offer late check-out services.
Do you want to allow guests to purchase add-ons?
Purpose: Enables guests to buy additional services or products, such as breakfast, spa services, or room upgrades, through the self-service platform.
Action: Switch this to “Yes” to allow guests to purchase available add-ons.
Do you want to allow guests to pay at the hotel for add-ons?
Purpose: If add-ons are enabled, this option determines whether guests must pay at the time of booking (PAY NOW) or the hotel (PAY AT HOTEL).
Action: Select either “PAY NOW” or “PAY AT HOTEL” depending on how you want guests to complete payments for the add-ons.
Do you want guests to auto-upgrade their rooms?
Purpose: This feature allows guests to automatically upgrade their room if a better room is available, usually at an additional charge. It helps properties in up selling rooms automatically and generate extra revenue.
Action: Enable this if you want to give guests the option to upgrade their rooms through the self-service platform.
Do you want to send the self-service link email to guests and the hotel?
Purpose: When this option is enabled, the system sends the self-service link via email to both the guest and the property.
This makes the check-in process easier for the guest and helps the hotel manage the guest’s arrival.
Action: Toggle this to “Yes” to enable the automatic sending of the self-service link via email.
Please specify check-in instructions for the guest
Purpose: In this field, the property can provide detailed instructions for the check-in process that will be visible on the front desk kiosk and sent to the guest. These instructions guide the guest through self-check-in, ensuring they understand how to proceed.
Action: Write specific check-in instructions, such as ID verification procedures or directions to the hotel, in the provided text box.
Final Step:
Save Configuration: Once you have set your desired options, click the “Save” button at the bottom right to apply these configurations.
This ensures that the self-service settings are updated for your guests.
How do I configure or control the settings for the Magic Link?
Below is the Step-by-step guide to control or configure settings for Magic Link:
Log in to Your Stayflexi Dashboard
Enter your username and password to log in.
Go to Property configuration:
After logging in, click the “More Apps” icon (represented by four boxes or blocks) in the top right corner.
From the drop down menu, select Property Configuration.
On the left-hand side of the Property Configuration page, you will see various options.
Got to Magic link and kiosk:
Click on the Magic link and kiosk drop down, you will see some more options.
Click on the Configuration option.
This takes you to the Self-service configuration page.
Front Desk Kiosk URL
Purpose: This URL is generated for the hotel’s self-service platform, allowing guests to access services such as check-in, check-out, and other options without needing to interact with hotel staff directly.
Action: Guests can visit this link to use self-service features when checking in at the property.
Do you want to allow guests to self-check in?
Purpose: This option, when enabled, allows guests to check in using the self-service link without assistance from the front desk.
Action: Toggle this switch to “Yes” to let guests check themselves in before their arrival.
Once you toggle this switch to “Yes”, you get an option below it asking “What percentage of the balance due should be charged as the self-check-in cost?”.
Configure the percentage amount of the booking’s balance due that is payable during self-check-ins. If set to 0, guests will be able to self-check in without payment.
Do you want to allow guests to perform early check-in?
Purpose: This allows guests to check in earlier than the standard check-in time, providing more flexibility.
Action: Toggle this to “Yes” to offer early check-in as an option, subject to hotel availability.
Once you toggle this switch to “Yes”, you get an option below it asking “How many hours before the check-in can the guest opt for early check-in?”.
Configure the availability window to allow the guest to perform early check-in within the hours set before the actual check-in(as shown in Image 3).
Do you want to allow guests to perform late check-out?
Purpose: This option allows guests to check out later than the regular check-out time.
Action: Enable this option if you wish to offer late check-out services.
Once you toggle this switch to “Yes”, you get an option below it asking “How many hours before the check-out can the guest opt for late check-out?”.
Configure the availability window to allow the guest to perform late checkout within the hours set before the actual checkout(as shown in Image 3).
Do you want to allow guests to purchase add-ons?
Purpose: Enables guests to buy additional services or products, such as breakfast, spa services, or room upgrades, through the self-service platform.
Action: Switch this to “Yes” to allow guests to purchase available add-ons.
Do you want to allow guests to pay at the hotel for add-ons?
Purpose: If add-ons are enabled, this option determines whether guests must pay the POS orders at the time of booking (PAY NOW) or the hotel (PAY AT HOTEL).
Action: Select either “PAY NOW” or “PAY AT HOTEL” depending on how you want guests to complete payments for the add-ons.
Do you want guests to auto-upgrade their rooms?
Purpose: This feature allows guests to automatically upgrade their room if a better room is available, usually at an additional charge.
Action: Enable this if you want to give guests the option to upgrade their rooms through the self-service platform.
Once you toggle this switch to “Yes”, you get an option below it asking “Do you want to allow guests to upgrade their room after check-in?”.
If enabled, it will allow the users to auto-upgrade their room from the self-service URL after check-in(as shown in Image 3).
Do you want to send the self-service link email to guests and the hotel?
Purpose: When this option is enabled, the system sends the self-service link via email to both the guest and the hotel.
This makes the check-in process easier for the guest and helps the hotel manage the guest’s arrival.
Action: Toggle this to “Yes” to enable the automatic sending of the self-service link via email.
Please specify check-in instructions for the guest
Purpose: In this field, the hotel can provide detailed instructions for the check-in process that will be visible on the front desk kiosk and sent to the guest. These instructions guide the guest through self-check-in, ensuring they understand how to proceed.
Action: Write specific check-in instructions, such as ID verification procedures or directions to the hotel, in the provided text box.
Save the configuration:
Save Configuration: Once you have set your desired options, click the “Save” button at the bottom right to apply these configurations.
This ensures that the self-service settings are updated for your guests.
If a guest selects a service through the Magic Link, where can I view it in Stayflexi?
If a guest selects a service through the Magic Link in Stayflexi, you can view it in Stayflexi’s Dashboard. Here’s a step-by-step guide on how you can view the Magic link bookings
Log in to Your Stayflexi Dashboard
Enter your username and password to log in.
Go to the Magic link in the Dashboard
In the Dashboard, click on the Reservations option.
You can see the following tiles/blocks:
New bookings
In-house
Arrivals
Departures
Cancellations
On hold
No shows
Magic link
Click on the Magic link tile.
All the bookings made through the Magic link will be displayed.
You view the folio, send a magic link and approve the booking by clicking on the options on the booking.
Following these steps, you can view the bookings or services the guest selects through the Magic link in Stayflexi.
How do I configure shop items or services to appear on the Magic Link?
Below is the step-by-step guide to configuring shop items or services to appear on the Magic Link:
Log in to Your Stayflexi Dashboard:
Enter your username and password to log in.
Go to Property configuration:
After logging in, click the “More Apps” icon (represented by four boxes or blocks) in the top right corner.
From the drop down menu, select Property Configuration
On the left-hand side of the Property Configuration page, you will see various options.
Got to Magic link and kiosk:
Click on the Magic link and kiosk drop down, you will see some more options.
Click on the Configuration option.
This takes you to the Self-service configuration page.
Configure shop items or services:
To set up shop items or services to appear on the Magic link, do the following:
Do you want to allow guests to purchase add-ons?
Purpose: Enables guests to buy additional services or products, such as breakfast, spa services, or room upgrades, through the self-service platform.
Action: Switch this to “Yes” to allow guests to purchase available add-ons.
Do you want to allow guests to pay at the hotel for add-ons?
Purpose: If add-ons are enabled, this option determines whether guests must pay the POS orders at the time of booking (PAY NOW) or the hotel (PAY AT HOTEL).
Action: Select either “PAY NOW” or “PAY AT HOTEL” depending on how you want guests to complete payments for the add-ons.
Click on the Save button to set up the shop items or service successfully.
Also, you can enable or disable particular POS/Shops menu items to be displayed on the magic link sent to guests by following the below-given steps:
Log in to Your Stayflexi Dashboard
Enter your username and password to log in.
Access Shops/POS:
After logging in, click the “More Apps” icon (represented by four boxes or blocks) in the top right corner.
From the drop down menu, select Shops
A page showing all available shops or outlets will appear.
Choose the shop or outlet by clicking on the shop or outlet name.
Navigate to the “Configuration” Page:
Once you select a shop or outlet, you will be taken to its Dashboard.
On the left-hand side of the page, you will see various options, including:
Dashboard
Place Orders
View Orders
Reports
Configuration
Click on Configuration drop down to proceed
Go to Menu items:
On the Configuration dropdown, you will see a list of options including:
Outlet
Menu items
Categories
Discounts
Table/Area
Staff
Click on the Menu items option
A list of all the menu items will appear along with the details.
Enable or disable the menu items:
To enable or disable the menu items to be displayed on magic link sent to guests, do the following
Click on the Edit item option under the Actions column for the menu item,you want to either enable or disable on the Magic link.
A page to edit the details for menu items will appear.
Scroll down to the Self-service section.
There are two options:
Enable
Click on Enable to enable the menu item on the Magic link and provide the self-service discount value in the Self-service discount field below.
Disable
Click on Disable to disable the menu item on the Magic link.
Click on the Save button to save the changes made.
By following these steps you can configure shop items or services to appear on the Magic Link.
Can I set up room-specific self-check-in instructions for guest using the Magic Link?
Yes, you can set up room-specific self-check-in instructions for guests using the magic link by following the steps given below
Log in to Your Stayflexi Dashboard:
Enter your username and password to log in.
Go to Property configuration:
After logging in, click the “More Apps” icon (represented by four boxes or blocks) in the top right corner.
From the drop down menu, select Property Configuration
On the left-hand side of the Property Configuration page, you will see various options.
Got to Magic link and kiosk:
Click on the Magic link and kiosk drop down, you will see some more options
Click on the Room wise check-in instructions option
This takes you to the Room check-in instructions page.
On the Room check-in instructions page, a list of room IDs will be displayed.
For each room ID, the check-in instructions column is available.
Click on the Add some instructions field next to the room ID where you want to specify the self-check-in instructions.
Enter the instructions and click, and the instructions will be successfully set up.
By following these steps room-specific self-check-in instructions for guests using the magic link.
Group Performance Dashboard Overview
The Group Performance Dashboard in stayflexi provides a comprehensive and insightful overview of your multi-property portfolio’s performance, all in one place. It enables hoteliers to easily understand key performance metrics, identify top-performing properties, and analyze trends through visual, easy-to-read reports.
To access the Group Performance Dashboard:
Log in to your Stayflexi admin account.
On the left-hand menu, click on Dashboard.
At the top of the dashboard screen, switch to the “Group Performance” tab (visible only for group/chain accounts).
This will open the consolidated multi-property performance view with metrics, charts, and comparisons across all your properties.
Right-Hand Side Controls (RHS):
Compare with Last Year On the top-right corner, you will find a toggle that allows you to compare your current performance with the same period last year. Enable this toggle to instantly view YoY comparisons across all key metrics.
View by Today, MTD, or YTD You can switch the data view between Today, Month-to-Date (MTD), and Year-to-Date (YTD). This helps you quickly analyze performance for different time frames.
Filter by Properties (All Properties Dropdown) Click on the All Properties dropdown to view a full list of your properties. You can select one or multiple properties to filter the dashboard and see results for specific locations or clusters.
When you open the dashboard, you can instantly view performance data for a specific date, including:
Total Revenue
Average Occupancy
Average ADR (Average Daily Rate)
RevPAR (Revenue Per Available Room)
On the LHS, you’ll find sections that highlight your Top Performing and Low Performing properties. These insights help you quickly understand which properties are exceeding expectations and which ones may require attention or operational improvements.
On the right side, the Monthly Performance Graph helps visualize trends by filtering metrics such as Revenue, ADR, RevPAR, or Occupancy
When you scroll down, you’ll see a property-wise performance bar graph that gives you a clear visual comparison across all your properties.
Compare by Today, MTD, or YTD Use the time selector to switch the graph between Today, Month-to-Date, and Year-to-Date performance.
Select Metrics on the RHS On the right-hand side, you can choose which key metric to display:
Revenue
Occupancy
ADR (Average Daily Rate)
RevPAR (Revenue Per Available Room)
Graph Layout
Vertical Axis: Represents the value range (e.g., revenue amount, occupancy %, ADR, etc.)
Horizontal Axis: Shows all your properties side by side for easy comparison.
When you scroll further down, you will find the Booking Source Performance chart, which helps you understand which channels contribute the most to your business.
Switch Between Revenue and Rooms Sold On the top right-hand side, you can toggle between:
Revenue
Rooms Sold This lets you compare how each booking source performs based on the metric you want to analyze.
Chart Layout
Vertical Axis: Displays all your booking sources (e.g., Walk-in, OTA, Booking Engine etc..).
Horizontal Axis: Represents the value—either total revenue or number of rooms sold depending on the selected tab.
Scroll further down to access the Day-Wise Performance Report, which provides a detailed daily breakdown of your property or group performance.
The table includes key metrics such as: Date, Revenue, Occupancy, ADR, and RevPAR.
On the top right-hand side, you also have the option to download this report for offline use or sharing with your team.
The Group Performance Dashboard simplifies performance tracking and empowers your management team to make data-driven decisions that enhance overall profitability across all properties.
What can I view and analyse under the Group Performance Dashboard?
Under the Group Performance Dashboard in stayflexi, you can view and analyse the performance of your properties in detail:
Daily and Monthly Metrics: Instantly see key performance indicators like Revenue, Occupancy, ADR, and RevPAR for the current day or across a selected month.
Top and Low Performing Properties: Identify which properties are leading or lagging through the panel on the left.
Monthly Performance Trends: Use the interactive graph on the right to analyse trends over time, filtering by Revenue, ADR, RevPAR, or Occupancy.
Property-wise Performance: Compare properties with detailed bar graphs showing date-wise or monthly data for Revenue, ADR, RevPAR, and Occupancy.
Booking Source Performance: Review channel-wise performance using horizontal bar charts, filterable by Revenue or Rooms Sold.
Day-wise Performance Report: Access daily summaries of Revenue, ADR, Occupancy, and RevPAR, with the option to download reports for further analysis.
The dashboard provides a comprehensive view of your portfolio, enabling data-driven decisions to optimise performance and profitability.
How can I view performance for a specific property, multiple properties, or all my properties together?
Here are the steps :
Log in to your stayflexi account using your credentials.
From the left-hand menu, click on Group Performance Dashboard.
At the top of the dashboard, locate the property selection dropdown.
To view a specific property, select the property name from the dropdown.
To view multiple properties together, check the boxes next to the properties you want to include.
To view all properties in your group, select the “All Properties” option.
The dashboard will update to display performance metrics – including Revenue, Occupancy, ADR, and RevPAR, for your selected property or properties.
You can now analyse trends using the Monthly Performance Graph, Property-wise Performance, Booking Source Performance, and Day-wise Performance Report for your selected selection.
To save the data, click Download Report to export the performance summary for your chosen properties and date range.
How can I view and compare monthly performance in graph format?
To view monthly performance in the Group Performance Dashboard, follow these steps:
Log in to your stayflexi account.
From the left-hand menu, select Group Performance Dashboard.
Click on the Monthly Data tab to view performance across the month.
On the right-hand side, view the graph showing month-long trends.
Use the filter options above the graph to select the metric you want to analyse – Revenue, ADR, RevPAR, or Occupancy.
The graph will update to display the selected metric, allowing you to easily compare performance trends over the month.
How do I interpret the top performing and low performing properties?
Interpreting the Top Performing and Low Performing Properties Panel
Log in to your stayflexi account.
Navigate to the Group Performance Dashboard.
On the left side, locate the Top Performing and Low Performing Properties panel.
Review which properties are listed under each category, based on recent Revenue and Occupancy metrics.
Use this information to identify strong performers and properties that may require attention or promotional efforts.
Can I filter the booking source performance by number of rooms sold instead of revenue?
Filtering Booking Source Performance by Number of Rooms Sold
Log in to your stayflexi account and open the Group Performance Dashboard.
Scroll down to the Booking Source Performance section.
Find the filter or toggle option above the horizontal bar graph.
Select Number of Rooms Sold instead of the default Revenue.
The graph will update to display booking channel performance based on room sales rather than revenue.